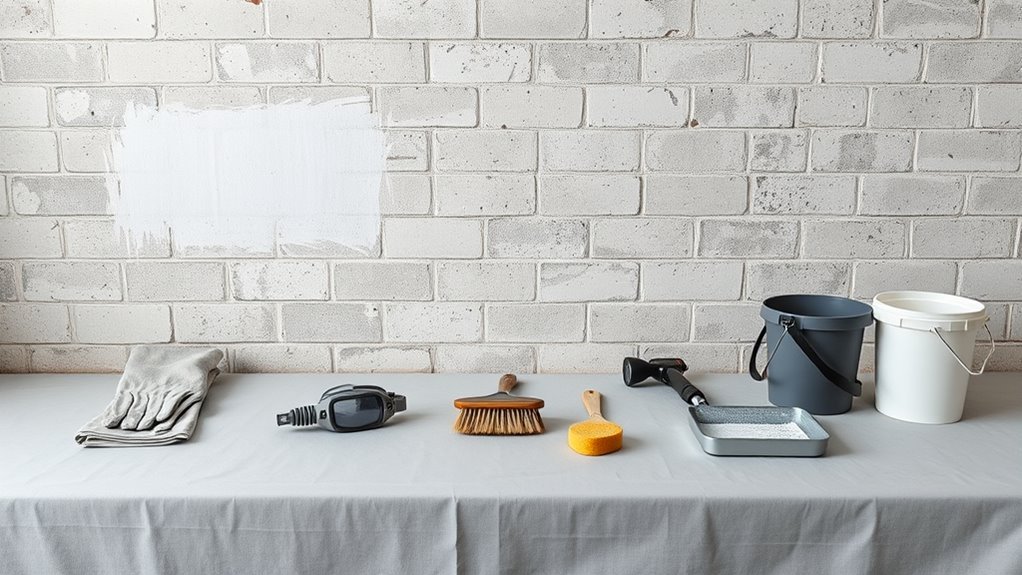
How to Remove Paint From Cement Block Wall
You’ll start by testing a small patch to check adhesion, porosity, and for lead; wear gloves, eye protection, and a respirator. For sound paint you can clean and repaint; for flaking or multiple layers use chemical strippers designed for masonry, then scrub with stiff nylon brushes and rinse until neutral. Mechanical wire brushes or low-pressure washing help on stubborn areas. Neutralize and dispose of residues properly, repair mortar or spalls, and if you keep going you’ll find detailed steps and safety tips.
How to Remove Paint From a Cement Block Wall : Quick Plan
Before you start, assess the wall’s condition and pick the right method—pressure washing, chemical stripper, or grinding—based on paint type and mortar joints. You’ll map the surface, test adhesion, and note fragile areas for historical preservation.
Assess the wall first, choose gentle removal methods, test adhesion, and protect fragile historic areas.
Choose eco friendly solvents when chemical removal’s needed, and wear protection.
Start with low-pressure washing or soft scraping on porous blocks, then escalate to grinders only where necessary.
Contain debris and capture runoff to protect landscaping.
Plan disposal of lead-containing paint per local rules.
Work in sections, rinse thoroughly, and allow the wall to dry before any repairs or repainting.
Which Paint Types Stick to Cement Block Most
When you’re choosing paint for cement block, know that masonry-specific formulations and high-solids acrylics grip the porous, rough surface best—acrylic latex masonry paint soaks into pores and flexes with temperature changes.
While epoxy and elastomeric coatings create tougher, more waterproof bonds on smoother or sealed blocks. You’ll pick acrylic latex for breathable exterior walls, elastomeric for large cracks and waterproofing, and two-part epoxy for high-impact interior areas.
Match color carefully to existing blocks for subtle repairs, and choose products that aid texture restoration so patched or primed areas blend. Test small areas to confirm adhesion and finish before committing.
Should You Strip Paint or Repaint Over It?
If the existing paint is flaking, bubbling, or built up in many layers, you’ll usually get better, longer-lasting results by stripping down to bare block rather than painting over it. You should strip when adhesion is poor, previous layers hide masonry detail, or you’re preparing for authentic decorative finishes or historical preservation work. Repainting can work if adhesion is sound and surface is clean.
| Situation | Recommended Action |
|---|---|
| Flaking paint | Strip to block |
| Multiple layers | Strip to block |
| Good adhesion | Repaint |
| Decorative finish planned | Strip |
| Preservation needs | Strip |
Safety Gear You Need Before Removing Paint
Before you start stripping paint, make sure you’ve got the right personal protective equipment on hand. You’ll need respiratory protection for dust and fumes, plus gloves and long sleeves to protect your skin.
Goggles or a face shield are also essential for protecting your eyes.
Getting these basics right will keep the job safe and let you work more efficiently.
Personal Protective Equipment
Because paint removal stirs up dust, chips, and potentially toxic fumes, you’ll want to suit up properly before you start work. You’ll protect skin, eyes, and clothing so you can finish and return to indoor plants without tracking contaminants, and get back to a digital detox afterward.
- Wear chemical-resistant gloves and long sleeves to keep acidic or alkaline strippers off skin.
- Use eye protection—tight-seal goggles—to stop chips and splashes.
- Put on coveralls and sturdy boots to protect clothing and feet; disposable suits make cleanup easier.
Avoid jewelry and loose clothing that can catch tools or debris.
Respiratory Protection Needed
How will you keep dust, fumes, and microscopic lead or mold particles out of your lungs while you work? Choose appropriate respiratory protection before starting: a NIOSH-rated N95 or P100 disposable mask for dust and paint chips. If solvents or heavy fumes are present, use a half- or full-face respirator with P95/organic vapor cartridges.
Guarantee a proper fit by doing seal checks and replacing filters per manufacturer guidelines. Maintain breathing safety by working in ventilated areas, using local exhaust when possible, and avoiding DIY sanding of suspected lead paint without professional containment.
Replace gear if damaged or contaminated.
Skin And Eye Protection
Wear durable gloves and eye protection to keep paint chips, solvents, and dust off your skin and out of your eyes. You’ll prevent skin irritation and splashes that can cause lasting harm.
Choose chemical-resistant gloves and wraparound safety goggles for full eye safety.
Add a long-sleeve coverall to shield forearms and reduce cleanup.
- Nitrile gloves — chemical and puncture resistance.
- Sealed goggles — splash and dust protection.
- Disposable coveralls — keep contaminants off clothing.
Inspect gear before use, replace damaged items, and avoid touching your face. Proper protection keeps you safe and makes the job cleaner and faster.
How to Test a Small Patch: Adhesion, Porosity & Finish
Before you commit to stripping or repainting the whole wall, test a small patch to check adhesion, porosity, and finish so you know what treatment will work best. Choose an inconspicuous area and remove paint with your desired method—scrape, chemical, or pressure—then let it dry.
Press tape to assess adhesion; porous areas will absorb sealer fast. Compare surface texture and color to adjacent blocks for texture restoration and color matching needs.
Try a primer and small paint sample to confirm finish and coverage. Document results and adjust method, sealer, or paint before tackling the entire wall.
Preparing the Area and Protecting Surroundings
Since you’ll be doing dusty, messy work, clear the area and protect everything you want to keep clean—furniture, plants, walkways, and nearby surfaces—with drop cloths, plastic sheeting, and painter’s tape. Seal vents and cover nearby vehicles; tape plastic to edges to prevent dust migration. Wear eye protection, gloves, and a respirator. Keep a wet-dry vacuum and cleanup rags handy.
Clear the area, cover everything with drop cloths and plastic, seal vents, and wear eye protection and a respirator.
- Remove loose items and wall hangings.
- Lay weighted drop cloths and secure edges.
- Protect landscaping with plywood or tarps.
Plan for paint disposal and note existing color matching or decorative effects you’ll want to preserve or replicate later.
Chemical vs Mechanical: Which to Use?
When deciding between chemical and mechanical paint removal, weigh how much paint you need to strip, how porous the block is, and how much dust or runoff you can tolerate. You’ll choose chemicals for deep, crevice-filled blocks or when you want to preserve underlying texture for color matching and decorative finishes. Mechanical methods suit thick, peeling layers and faster jobs but raise dust. Consider ventilation, cleanup, and nearby landscaping. Use the table to compare at a glance:
| Chemical | Mechanical |
|---|---|
| Less dust | Faster |
| Good for porous blocks | Aggressive on surface |
| Better for texture | More cleanup |
| Easier color matching prep | May damage finish |
Best Chemical Strippers for Cement Block Walls
If you’ve decided chemical removal fits your wall’s texture and nearby landscaping, the next step is picking a stripper that’s effective on porous, uneven surfaces without harming masonry. Choose products formulated for masonry and labeled biodegradable if runoff concerns you.
Consider color mixing effects if you’ll repaint or aim for mural preservation—test a small area first.
- Sodium hydroxide gel: penetrates porous block, good for thick coatings.
- Paint stripper with methylene chloride alternatives: strong but less toxic.
- Soy- or citrus-based gels: gentler, slower, better for sensitive landscaping.
Always test compatibility and plan waste containment.
How to Apply Chemical Strippers Safely
Pick a stripper formulated for masonry and the type of paint you’re removing so you get effective results without damaging the block.
You’ll also need proper PPE—chemical-resistant gloves, eye protection, a respirator rated for solvents, and protective clothing.
Work in a well-ventilated area, follow the product label exactly, and keep water or a neutralizer on hand in case of spills.
Choose Appropriate Stripper
Because chemical strippers vary in strength and formulation, you should match the product to the paint type and the condition of the cement block. Choose a stripper that supports color matching goals and won’t harm texture restoration efforts. Consider penetration for multiple coats and whether it’s gel or liquid for vertical blocks.
- Test a small area to confirm paint lift and substrate reaction.
- Use milder, biodegradable formulas for thin or delicate coatings.
- Pick heavy-duty solvents for thick, oil-based layers, but avoid acids on porous blocks.
Follow manufacturer directions closely and dispose of residues responsibly.
Protect Yourself Properly
When you’re ready to apply chemical stripper, gear up to protect your skin, lungs, and eyes—don’t skimp on PPE. You’ll wear chemical-resistant gloves, a long-sleeve impermeable suit, splash goggles, and a full-face respirator with organic vapor cartridges.
Ventilate the area; use fans and fresh air breaks.
Test a small patch, noting how the stripper interacts with mortar during historical cement analysis to avoid damage.
Follow manufacturer dwell times and neutralization steps precisely.
Dispose of residues per local hazardous-waste rules.
Even if you plan creative painting techniques later, prioritize safety now to preserve your health and the substrate.
How to Neutralize & Rinse After Chemical Stripping
After the chemical stripper has done its job, you’ll need to neutralize the surface to stop the reaction and prevent damage to the block. This usually means applying the appropriate neutralizer (acid or alkaline, depending on the stripper used), agitating gently with a stiff brush, then thoroughly rinsing with clean water until the runoff tests neutral.
Test a small area first, especially on walls with artistic techniques or requiring historical preservation. Then follow these steps:
- Apply neutralizer per label instructions and scrub gently.
- Let dwell briefly, then agitate stubborn spots.
- Rinse repeatedly until pH paper shows neutral runoff.
Dry fully before further work.
Using a Pressure Washer on Cement Block Walls
When you use a pressure washer on a cement block wall, set the nozzle and PSI low enough to avoid etching the mortar but high enough to remove loose paint.
Keep the wand at a safe distance and angle, moving steadily to prevent gouging and to rinse evenly.
Consider a mild detergent or masonry cleaner for stubborn spots, testing a small area first.
Pressure Washer Settings
Because cement block is porous and uneven, you’ll need to adjust your pressure washer carefully to avoid etching the mortar or driving water into the blocks. Start low and increase only as needed to remove paint without harming surface texture; aim to preserve opportunities for color matching and texture restoration later.
Follow these settings guidelines:
- 800–1200 PSI with a 25° nozzle for light paint removal.
- 1200–2000 PSI with a 15° nozzle for stubborn areas; test first.
- Use low-pressure rinse or detergent setting to finish and avoid saturation.
Always test a small, discreet area before full-scale cleaning.
Safe Distance Techniques
You’ve already set your pressure and nozzle—now focus on how far to hold the wand to protect the block. Keep the tip 12–24 inches away for most jobs; move closer only for stubborn paint, never under 6–8 inches.
Angle the stream 45 degrees to peel paint without gouging mortar. Work in overlapping passes, watching for surface erosion.
Rinse a small test area, then step back if pitting appears. After stripping, inspect for uneven texture that could affect color matching or later decorative finishes.
Adjust distance and speed rather than pressure to preserve the block’s integrity.
Cleaning Solution Options
If paint residue or mildew won’t come off with water alone, pick a cleaner that matches the job. You’ll use a pressure washer with the right solution: a mild detergent for dirt, a biocide for mildew, or a stripping agent for stubborn paint.
Match strength to surface so you don’t damage mortar or ruin nearby color mixing for a mural design. Test a small area, rinse thoroughly, and work from bottom up to prevent streaks.
Follow manufacturer dilution rates, wear protection, and avoid over-saturating masonry. After cleaning, let blocks fully dry before any repainting or mural design touch-ups.
Pressure Washer Settings That Won’t Damage Blocks
When using a pressure washer on cement block, pick a PSI and nozzle combination that strips paint without eroding the mortar or pitting the block: start around 1,200–1,500 PSI with a 25° or 40° nozzle and test a small, inconspicuous area.
Then increase pressure in 100–200 PSI increments only if paint isn’t loosening. You’ll keep the wand moving to avoid concentrated blasting.
Raise pressure only in 100–200 PSI steps if paint resists, keeping the wand moving to prevent concentrated damage
Hold the lance at a 45° angle about 12–18 inches away, then adjust distance before raising PSI.
Watch for surface roughening that can complicate color matching or harm decorative finishes, and stop if you see damage.
Low-Pressure Nozzle Techniques for Paint Removal
When using low-pressure nozzles, you’ll want the right spray angle to strip paint without etching the block. Keep the pressure moderate and hold the wand at a steady distance—usually 12–24 inches—while testing a small area first.
Adjust nozzle type, pressure, and distance together until you get paint removal without surface damage.
Correct Nozzle Selection
Choosing the right low-pressure nozzle makes paint removal from cement block efficient and prevents surface damage, so you’ll want to match nozzle size and spray pattern to the paint type and wall texture.
You’ll assess paint adhesion and substrate roughness, then pick a nozzle that strips without etching. Consider:
- Fan nozzles (wide pattern) for loose paint and uniform coverage.
- Narrow-angle nozzles for stubborn spots and deeper pores.
- Rotary or adjustable nozzles to vary flow for patchy adhesion.
Test on a small area first, record the best setting, and avoid aggressive tips that gouge mortar or widen pores.
Pressure And Distance
How hard you spray and how far you hold the nozzle largely determine whether paint peels cleanly or the block gets damaged. Start with low pressure and increase gradually until paint lifts without etching the mortar.
You’ll keep the nozzle 12–24 inches away for low-pressure passes, then move closer in small increments only if paint resists. Sweep evenly, overlap strokes, and test an inconspicuous area first to preserve texture.
For projects involving color matching or historical preservation, document original surfaces and remove paint incrementally to avoid overcleaning. Stop at the substrate; don’t chase perfection that damages block or mortar.
Hand Tools for Removing Paint From Cement Block
Although power tools speed the job, you’ll often rely on a handful of hand tools to safely and precisely remove paint from cement block—scrapers, wire brushes, chisels, and sanding blocks. You’ll choose tools that help with color matching later and protect texture preservation so the block’s surface stays authentic.
Wear gloves, eye protection, and a dust mask. Work in short passes, testing a small area first.
- Use a rigid scraper for peeling paint.
- Use brass or nylon wire brushes for stubborn spots.
- Use sanding blocks or chisels to refine edges and smooth progressions.
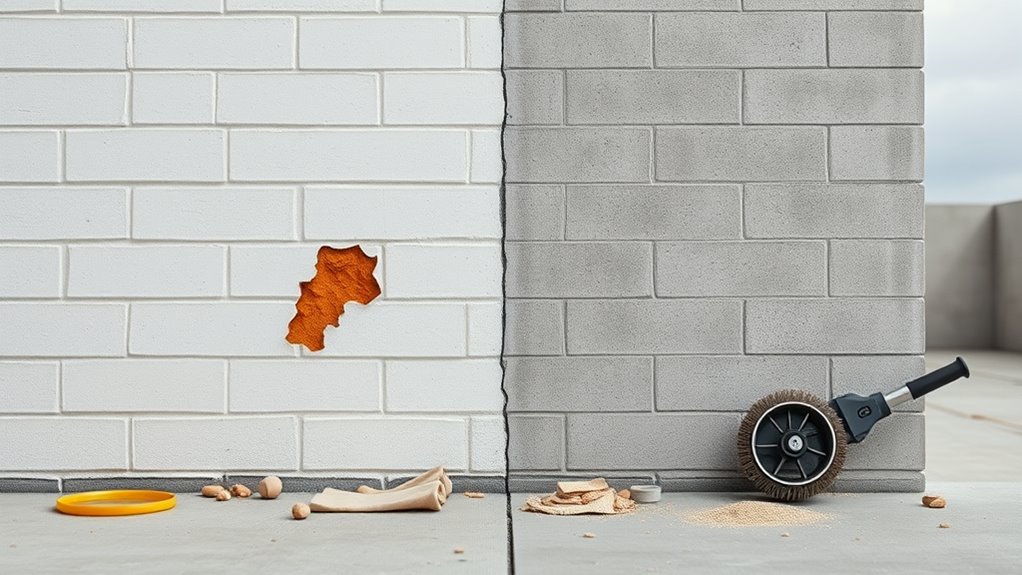
Power Tools: Angle Grinders & Rotary Wire Brushes
A powerful option for speeding paint removal is an angle grinder fitted with a rotary wire brush, which can strip layers quickly on large, rough cement block surfaces. You should wear eye, ear, and respiratory protection, clamp work where possible, and test a small area to gauge aggressiveness.
Move consistently to avoid gouging mortar joints; rotary brushes remove paint faster than sanding but create sparks and dust. Keep nearby moisture barriers covered to prevent contamination.
Avoid delicate finishes that might suggest laser engraving techniques instead. Clean debris frequently and inspect the block for structural damage before repainting or applying sealant.
Heat Guns on Cement Block: Pros & Cons
If you choose a heat gun for paint removal on cement block, know it speeds softening old coatings but works best on thinner, non-lead paints and on relatively flat mortar faces. You’ll want to manage temperature, avoid overheating, and spot-test for hidden hazards.
Heat gun myths about instant stripping ignore substrate damage and fumes. Consider:
- Efficiency — good for small areas, raises paint adhesion temporarily, aiding scraping.
- Risk — can scorch block, release toxic vapors, or blister deeper layers.
- Control — requires steady movement, appropriate nozzle, and PPE to avoid burns and poor results.
Combine Methods: When to Strip Chemically Then Wash
When you need the extra lift that chemicals provide but still want a clean, breathable surface, strip paint first with a suitable remover and follow up by washing to clear residues and loosened particles.
When chemical lift is needed, strip paint with a suitable remover, then wash to clear residues and loose particles
You’ll apply a gel or paste remover to targeted areas, scrape gently, then rinse with a low-pressure washer or stiff brush and water to avoid surface damage.
That sequence helps reveal original block color for accurate color matching and exposes pitting or flaking that needs repair.
After washing, let the wall dry thoroughly before evaluating texture restoration or repainting.
Always wear PPE and dispose of waste per local rules.
Removing Paint From Mortar Joints Without Damage
When you need to remove paint from mortar joints, choose gentle chemical strippers made for masonry to avoid softening the mortar.
You can follow with careful mechanical cleaning—like soft-bristled brushes or low-pressure water—to lift residue without chipping.
Test a small area first so you can adjust product strength and technique before treating the whole wall.
Gentle Chemical Strippers
Because mortar joints are softer than the blocks themselves, you’ll want a gentle chemical stripper that lifts paint without eroding the grout. Choose a low-VOC, gel formula designed for masonry; it clings to vertical mortar and limits runoff, helping you preserve color blending and texture matching for any touch-ups.
- Test: apply a small amount, wait, then rinse to confirm paint release and grout integrity.
- Apply: follow manufacturer dwell time; work with a nylon brush to coax softened paint.
- Rinse: neutralize per instructions, then blot dry; inspect for residue before repainting or sealing.
Mechanical Cleaning Methods
If you prefer a hands-on approach, mechanical cleaning uses tools and careful technique to remove paint from mortar joints without weakening the grout. You’ll work with wire brushes, stiff nylon bristles, dental picks, and low-speed rotary brushes to lift paint while preserving joint edges.
Start testing in an inconspicuous area to monitor color fading and avoid overbrushing. Work along the joint lines, not across, keeping pressure light and consistent.
Use a vacuum to collect dust and rinse with mild detergent afterward. Proper technique restores original texture, offers texture enhancement, and prevents mortar damage for a clean, durable finish.
Tackling Stubborn or Multiple Paint Layers
Although one coat of paint can often come off with a scraper and a pressure washer, stubborn or multiple layers need a more methodical approach.
You’ll inspect the surface, test small areas, and choose a combination of chemical strippers, heat, and wire brushing to lift heavy buildup without damaging block texture.
Consider how artistic techniques or historical preservation might affect your choices when working on murals or older finishes.
Follow this plan:
- Apply a masonry-compatible stripper, wait, then scrape.
- Use low-heat tools and stiff brushes for remaining residue.
- Rinse thoroughly and repeat targeted spots until clean.
Removing Lead Paint From Cement Block Walls: Safety Steps
If your cement block wall was painted before 1978 or shows cracked, chalky layers, treat it as potential lead paint and get a test kit or professional inspection.
If lead is confirmed, you’ll need strict containment, HEPA filtration, and PPE like respirators and disposable coveralls before any removal.
For safety and legal reasons, consider hiring certified lead-abatement pros for full-scale work you can’t manage safely yourself.
Identify Lead Paint Signs
Before you touch any old paint, look for signs that it might contain lead so you can protect yourself and others. Older homes (pre-1978) often used lead paint; peeling, chalking, or multiple layers increase risk.
Treat suspected surfaces as environmental hazards until testing confirms otherwise. Use a certified lead test kit or hire a professional to sample and analyze paint chips.
Note areas of damage from moisture or abrasion where dust forms. Record locations and avoid sanding or scraping.
Notify household members, especially children and pregnant people, and restrict access until a safe plan is in place.
Follow Safety Removal Steps
When you’re ready to remove suspected lead paint from cement block walls, put safety first by sealing the work area, wearing proper PPE (respirator with P100 filters, disposable coveralls, gloves, and eye protection), and using methods that minimize dust and chips—wet scraping, HEPA-equipped tools, or chemical strippers rated for lead—while keeping children and pets away and following local disposal rules.
Work systematically from top to bottom, contain debris in labeled, sealed bags, and clean with HEPA vacuums and wet wipes.
After removal, inspect for surface damage, plan color matching and texture restoration, and test for residual lead before repainting.
Prepping Block Surface for New Finishes After Stripping
Although the paint’s gone, you’ll still need to inspect and clean the block so new finishes will adhere properly. Walk the surface, noting efflorescence, residual paint flecks, and mortar gaps; document areas needing special care if historical preservation or artistic techniques will be applied.
Clean with a stiff brush, pressure rinse at low PSI, and let it dry fully.
- Remove dust and loose particles with a brush and vacuum.
- Neutralize salts and rinse; allow 48–72 hours to dry.
- Apply a breathable masonry primer compatible with your finish.
Seal joints and mask adjacent areas before painting or glazing.
Repairing Damage Caused by Paint Removal
After stripping paint, check the blocks and mortar for cracks, spalling, or loose material so you know what needs fixing.
You’ll patch holes, replace deteriorated mortar joints, and repoint where necessary to restore structural integrity.
Once repairs cure, sand or brush the surface and apply a suitable primer so it’s ready for repainting.
Assess Surface Integrity
Because paint removal can strip more than color, you should inspect the block for weakened mortar, spalled faces, or deep etching before you proceed with refinishing.
You’ll evaluate surface texture and check remaining paint adhesion to decide if cleaning, profiling, or consolidation is needed. Focus on sound substrate; probe hollow spots and note efflorescence or cracking.
Prioritize safety and document areas needing work.
- Tap test hollow areas.
- Scrape small sections to test adhesion.
- Use a wire brush to reveal true texture.
Plan repairs based on stability, not appearance, before refinishing.
Patch And Repoint
When paint removal leaves chipped mortar, flaking block faces, or widened joints, you’ll need to patch spalls and repoint joints before any refinishing so new coatings bond to a sound surface.
Inspect for loose debris, then chip away unsound material. Mix mortar or patching compound to match existing. Color matching and texture blending — adjust aggregate and tooling to mimic the block face.
Fill spalls, press mortar into joints, and strike to match profile. Cure per product instructions and keep repairs slightly recessed if you’ll later apply sealers.
Once cured, clean lightly; repaired masonry should be stable and ready for the next step.
Prepare For Repainting
Once you’ve repaired spalls and repointed joints, prep the wall for repainting by removing dust, laitance, and any remaining loose particles so new paint will adhere properly.
Next, wash with a mild detergent solution, rinse thoroughly, and let the masonry dry completely. Sand any rough patches and vacuum residue. Prime with a masonry primer suited to your environment.
- Test adhesion with a small patch.
- Choose primer and paint considering Color mixing needs.
- Decide if you want smooth coverage or Vintage finishes and select sheen accordingly.
Address moisture issues prior to painting to guarantee lasting results.
Treating Efflorescence and Stains After Stripping
After you’ve stripped paint from a cement block wall, you’ll often see white, powdery efflorescence and lingering stains that need attention before any repainting or sealing. Treating these promptly prevents moisture issues and improves adhesion.
Start by dry-brushing efflorescence, then apply a diluted muriatic or vinegar solution to dissolve salts—rinse thoroughly and let dry.
For oil, rust, or graffiti removal, use targeted cleaners or eco-friendly solvents to avoid surface damage; test a small area first.
For stubborn stains, gentle scrubbing with a nylon brush and repeating treatments works.
Finish by correcting drainage or leaks causing recurring deposits.
Choose Primer & Paint After Stripping (Best Options)
Now that the block’s clean, you’ll want to pick a primer that seals porous concrete and bonds to remaining residue—look for a masonry or high-adhesion acrylic primer.
For topcoat, choose a breathable, exterior-grade masonry paint or an elastomeric coating if you need extra crack resistance and weatherproofing.
Match primer and paint chemistries (both acrylic or both elastomeric-compatible) to guarantee proper adhesion and long life.
Primer Selection Tips
When you’ve stripped the paint back to clean, dry block, choosing the right primer makes the difference between a durable finish and one that flakes or soaks in unevenly. You’ll want a masonry or block-specific primer that seals pores and adheres well.
Consider pigmentation for color mixing if you’ll tint the primer, and evaluate products that help with texture matching to minimize visible repairs.
Check moisture ratings for basements or exterior exposure. Prioritize high-adhesion, breathable primers.
Finally, compare VOC levels and dry times so you can work efficiently without compromising longevity.
- Sealant strength
- Tintability
- Breathability
Paint Type Recommendations
If you want a long-lasting, easy-to-maintain finish on stripped cement block, pick products formulated for masonry: a high-adhesion, breathable masonry primer followed by a 100% acrylic elastomeric or masonry paint will give the best balance of adhesion, flexibility, and moisture resistance.
After priming, choose acrylic elastomeric for exterior walls exposed to freeze/thaw and moisture; interior block can use masonry latex paint.
Match paint sheen and base when doing color matching, and test samples on cleaned block.
For decorative finishes, use breathable stains or textured coatings designed for masonry.
Always follow manufacturer instructions for coverage and curing.
Alternatives to Full Stripping: Spot Repairs & Touch-Ups
Although full stripping can be necessary for widespread peeling or multiple layers, you can often save time and effort by focusing on spot repairs and touch-ups for isolated chips, stains, or small flaking areas. You’ll inspect, clean, and prep only damaged sections, then use appropriate primers and masonry paint. Aim for color matching and texture blending to make repairs invisible.
For isolated chips or flaking, spot-repair and touch-up—clean, prime, patch, and blend for invisible results.
Basic steps:
- Clean and remove loose paint, then apply masonry primer.
- Patch with cement-based filler, sand to match surface texture.
- Feather paint outward, blend edges, and cure per product instructions.
This keeps costs down and preserves sound paint.
Typical Time and Cost to Expect for a Wall
Wondering how long and how much it’ll cost to strip or refresh a cement block wall? You can expect 1–3 days for a medium wall: prep, stripping, and light sanding. Costs vary: DIY chemical or pressure approaches are cheaper but factor in sealers and new paint for color mixing and improved paint durability. Below is a quick estimate matrix.
| Task | Time | Typical Cost |
|---|---|---|
| Strip (DIY) | 1–2 days | $50–$200 |
| Strip (tools/chem) | 1–3 days | $100–$400 |
| Repaint/seal | 0.5–1 day | $75–$300 |
Hiring a Pro vs. DIY: Decision Checklist
When deciding whether to hire a pro or tackle the job yourself, weigh your skill level, available time, and tolerance for messy, physical work. pros bring speed, warranty, and specialized equipment, while DIY saves money but demands careful prep and learning.
- Assess complexity: if the wall has historical preservation concerns or delicate artistic murals, hire a conservator or specialist.
- Time and tools: pros handle heavy blasting, chemical strippers, and cleanup. DIY suits small, simple areas you can finish over weekends.
- Risk tolerance: consider damage potential, safety, and whether you want a guaranteed finish or are willing to experiment.
Permits, Waste Disposal & Local Regulation Tips
Before you start stripping paint from a cement block wall, check local permits and disposal rules so you don’t face fines or expensive cleanup requirements. You’ll follow permitting procedures, confirm whether the paint is hazardous, and plan waste disposal routes. Contact municipal offices, document approvals, and keep receipts.
| Task | Contact | Timeline |
|---|---|---|
| Permit needed? | City permit office | 1–14 days |
| Hazard check | Recycling center | 1–3 days |
| Disposal method | Licensed hauler | As scheduled |
| Records | Keep copies | Permanent |
Follow rules, avoid penalties, and respect neighborhood ordinances.
Eco-Friendly Paint Removal Options
Once you’ve confirmed permits and disposal routes, choose paint-removal methods that minimize health risks and environmental impact. You can protect yourself and nearby plants by selecting eco friendly solvents and non toxic alternatives or mechanical options. Consider these approaches:
- Biodegradable chemical strippers: apply per instructions, rinse responsibly, and collect residues for disposal.
- Steam or hot water pressure (low PSI): soften paint without harsh chemicals, working in controlled sections.
- Manual abrasion with wire brushes or scrapers: combine with vacuum capture to avoid airborne particles.
Always use PPE, work in ventilated areas, and test a small patch before full application.
Common Mistakes That Ruin Cement Block Surfaces
Although you want the paint gone, aggressive techniques can scar or weaken cement block surfaces, so pick methods that protect the masonry.
Don’t sandblast without testing: high-pressure abrasion removes surface aggregate and ruins plans for decorative finishes.
Avoid acidic strippers on older mortar — they’ll eat joints and complicate historical preservation.
Don’t ignore moisture: pressure washing saturated blocks can drive water deep, causing spalling later.
Skipping proper containment risks staining nearby materials and legal trouble.
Never use metal brushes aggressively; they gouge pores and alter texture.
Work slowly, choose compatible products, and consult pros when dealing with heritage or fragile blocks.
How to Test Cleanliness & Porosity After Stripping
Start by doing a careful visual surface inspection to spot any remaining paint, stains, or mortar haze.
Then use a water bead test—sprinkle a little water and watch whether it beads or soaks in—to quickly gauge surface cleanliness and sealant residues.
Finally, perform a porosity absorption check by applying a measured amount of water to see how fast the block absorbs it, which tells you if the surface will accept primer or needs further preparation.
Visual Surface Inspection
How clean is the block after stripping, and how porous is the surface? Visually inspect for color contrast and texture change across the block and mortar. Look for residue, streaks, or darker patches that indicate embedded paint.
- Scan evenly: note lighter or darker areas and altered texture change.
- Touch-test: run fingers for roughness, loose particles, and tactile contrast.
- Use angled light: shadows reveal pits, film, or missed spots showing color contrast.
Document problem areas with photos and mark them. If you see consistent clean appearance and uniform texture, the surface is likely ready for priming or further testing.
Water Bead Test
Want a quick, reliable check of how clean and porous the block is after stripping? Put a small water bead on several cleaned areas and watch immediately.
If water beads and sits, surface porosity is low and the strip worked well; if it soaks in quickly, you’ve exposed higher porosity or left residue.
Test multiple spots—high, low, shaded—to map variability. Wipe away excess after each test and note where absorption differs.
This water absorption check helps you decide if additional cleaning or a primer is needed before sealing or repainting, without complex tools.
Porosity Absorption Check
The water bead test gives a quick snapshot, but a more precise porosity absorption check will tell you where the block will hold moisture or primer. After stripping, you’ll inspect for residue from graffiti removal and uneven surface that affects color matching. Do this quick sequence:
- Dab 1 cup of water on several areas; time absorption.
- Apply a thin primer patch to test coverage and note bleed-through.
- Use a flashlight at low angle to spot residues or efflorescence.
Record results and map problem zones. Sandblast or re-clean areas that absorb too fast or resist primer before finishing.
Best Weather & Seasonal Timing for This Work
If you can pick the day, aim for mild, dry weather—ideally between 50°F and 75°F with low humidity—because paint removers, power washers, and new sealants work best and cure predictably under those conditions.
You’ll avoid runoff and slow drying that compromise paint durability or interfere with color mixing for any touch-ups.
Spring and fall offer stable temperatures; avoid freezing nights or hot, humid afternoons.
Windy days scatter debris and chemical sprays, so choose calm conditions.
Plan projects after several dry days to ensure surfaces are dry inside pores.
Schedule sealant and repainting windows when forecasts stay steady.
Long-Term Maintenance After Removing Paint
Once you’ve stripped paint from your cement block wall, plan a simple routine to keep the surface sound and looking good.
Inspect yearly for cracks, efflorescence, and moisture; address small issues fast to prevent bigger repairs and protect any historical preservation concerns.
Clean gently with a soft brush and mild detergent after storms.
Reseal porous areas and touch up exposed mortar with compatible products.
Consider protective breathable sealers if you’ll add decorative finishes later.
Keep records of treatments and materials used for future work.
Follow this checklist:
- Annual inspection and cleaning
- Reseal and touch up mortar
- Document treatments and finishes
Troubleshooting: What to Do If Paint Won’t Come Off?
When paint won’t come off despite your best efforts, start by identifying what’s bonding it to the block—old oil-based paints, multiple layers, or a cured primer will need different approaches. Test small areas, try stronger strippers, or use a rotary brush; for delicate surfaces think about artistic techniques to blend or score stubborn spots. If the wall has historical value, consult a conservation expert for historical preservation guidance rather than aggressive removal.
| Problem | Action |
|---|---|
| Oil-based | Use solvent stripper |
| Multiple layers | Repeat stripping |
| Primer residue | Mechanical abrasion |
| Historic finish | Consult conservator |
Quick Safety & Cleanup Checklist for Paint Removal
Because paint removal stirs up dust, chemicals, and debris, you should gear up with the right PPE, ventilation, and containment before you start.
Because paint removal kicks up dust and chemicals, gear up with proper PPE, ventilation, and containment.
Wear respirator, gloves, eye protection, and coveralls; keep windows open and use fans to exhaust fumes.
Contain the area with plastic sheeting and ground tarps to protect surroundings and respect historical preservation guidelines when working on older masonry.
Follow local disposal rules for chemical waste and used media.
Consider how artistic techniques may affect substrate and cleanup.
Quick checklist:
- PPE: respirator, gloves, goggles
- Ventilation & containment
- Waste labeling and disposal
Frequently Asked Questions
Can Removing Paint Reveal Structural Issues in the Blocks?
Yes — you may uncover cracks, spalling, or efflorescence when removing paint; during surface preparation you should inspect thoroughly, and consider chemical alternatives cautiously, since they can expose issues or worsen fragile masonry if misused.
How Does Interior Humidity Affect Re-Painted Cement Block Longevity?
High indoor moisture weakens paint adhesion, so you’ll see peeling, blistering, and faster failure on re-painted cement block; you’ll need vapor barriers, dehumidifiers, and breathable masonry paints to extend coating longevity and prevent damage.
Can You Paint Over Residual Stripper Residue if Rinsing Is Incomplete?
No—you shouldn’t paint over paint stripper residue if incomplete rinsing occurred; studies show coatings fail up to 60% faster on contaminated surfaces, so fully remove residue and dry the block before repainting to guarantee adhesion.
Will Removing Paint From Exterior Blocks Affect Insulation or Thermal Performance?
No, removing paint from exterior blocks won’t substantially change insulation or thermal performance; you’ll preserve paint adhesion by doing proper surface preparation, but you should reseal or repaint to maintain weatherproofing and prevent moisture-related degradation.
How to Handle Historical or Decorative Painted Patterns on Block Walls?
You should assess significance, document patterns, and consult experts; use preservation techniques like gentle cleaning, reversible consolidants, and spot retouching. You’ll prioritize decorative patterns’ integrity and avoid abrasive or irreversible removal methods.
Conclusion
You’re standing back, brush in hand, watching the wall shed its colorful coat like autumn leaves drifting away, revealing the cool gray bones beneath. Keep testing patches, suit up, and pick the method that peels cleanly without scarring the surface. Work on dry, calm days, rinse and seal once it’s stripped, and imagine rain beading off a restored face. With patience and safety, the wall will breathe again and stay sound for years.