How to Paint Exterior Cement Foundation Properly
You’ll get a durable, attractive result by fixing leaks, drainage, and cracks first, then pressure‑washing and letting the foundation fully dry. Patch spalls and hairline cracks with appropriate masonry fillers, prime with a breathable masonry primer, and apply two coats of high‑quality exterior acrylic or elastomeric paint in mild, dry weather. Keep vegetation and mulch away, maintain gutters, and inspect annually for moisture or efflorescence — continue for step‑by‑step prep, materials, and timing.
Why Paint an Exterior Cement Foundation?
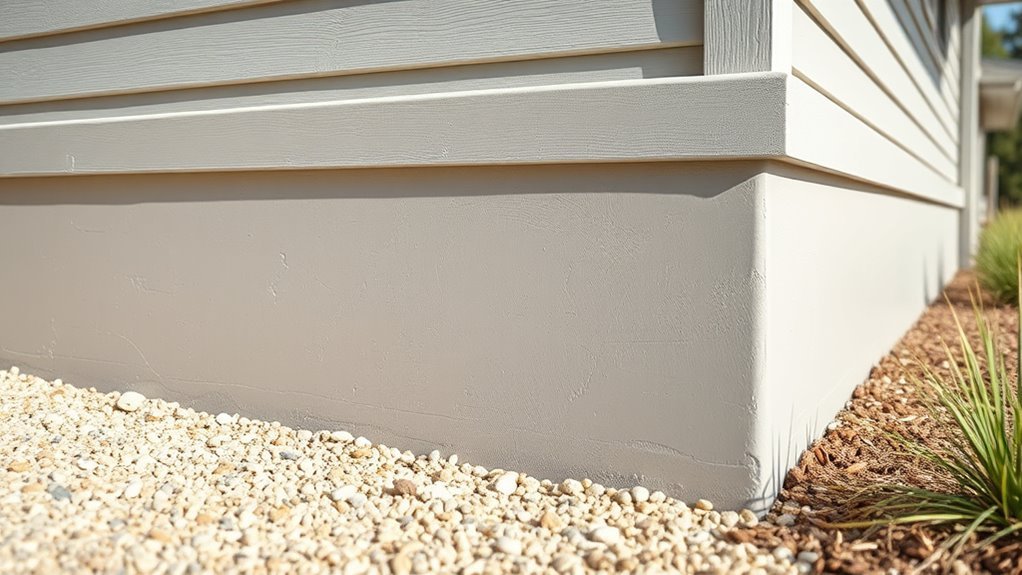
Although you might think a bare concrete foundation is fine, painting it protects and improves your home’s exterior. You’ll prevent moisture penetration, reduce efflorescence, and slow deterioration while boosting curb appeal.
A fresh coat makes maintenance easier and hides uneven patches, so your house looks cared for. You’ll also increase resale value by presenting a clean, cohesive facade.
Beyond function, paint carries historical significance and cultural symbolism—choices reflect neighborhood traditions and architectural periods, tying your home to local identity. When you choose color and finish, you’re protecting the structure and expressing context with intentionality.
Quick 8‑Step Checklist to Paint a Foundation
Ready to get the job done? Gather permits for historical preservation if required.
Inspect for cracks, efflorescence, and moisture.
Clean thoroughly with a pressure washer and allow to dry.
Repair and patch defects with masonry filler.
Sand and remove loose paint, then prime with a masonry primer.
Choose breathable, eco friendly coatings suited for cement and climate.
Apply two even coats, working top to bottom and following manufacturer dry times.
Seal joints and trim with compatible caulk.
Clean tools, dispose materials responsibly, and schedule a final inspection to guarantee durability and proper adhesion.
When You Should Not Paint a Foundation
If your foundation shows active moisture issues, don’t paint it—sealing paint will trap water, worsen damage, and hide underlying problems you need to fix first.
You shouldn’t paint when:
- You see efflorescence or active leaks indicating water entry.
- Cracks are shifting or wider than hairline; repair structurally first.
- New concrete hasn’t cured fully; wait the recommended cure time.
- Surrounding grading or drainage directs water toward the wall.
Painting in these cases can accelerate deterioration, trap salts, and mask issues that affect garden furniture stability or future interior decoration plans.
Fix moisture, structural, and site problems before painting.
How to Do a Fast Foundation Condition Check
Before you grab paint, do a quick exterior check to spot obvious issues.
Walk the perimeter looking for moisture stains or damp areas, then scan for cracks—note size and location.
If you see active leaks or hairline-to-wider cracks, don’t paint until those problems are fixed.
Visual Exterior Inspection
When you walk the perimeter of your home, focus on spotting cracks, gaps, and uneven settling that signal foundation trouble; these quick visual checks let you decide if a DIY paint touch-up is enough or if you need a pro inspection.
Check for hairline and wider cracks, note displaced mortar or flaking concrete, and inspect joints where the foundation meets siding or trim.
Also consider how any planned color matching or artistic accents will draw attention to flaws. Use this quick list to guide you:
- Scan for vertical, horizontal, or stair-step cracks.
- Look for shifting or bowed sections.
- Inspect seams and edges.
- Photograph findings for reference.
Look For Moisture
Wondering whether damp spots are surface stains or signs of a bigger problem? You’ll want to do a quick moisture check before painting. Run your hand over foundations after rainfall, look for efflorescence, and smell for mildew. Test suspect areas with a dampness meter or taped plastic square for 24 hours. Make sure exterior grading and moisture barriers are intact to prevent water seepage. If dampness persists, don’t paint until resolved.
| What to do | What it indicates |
|---|---|
| Touch/visual | Recent wetness |
| Plastic test | Ongoing moisture |
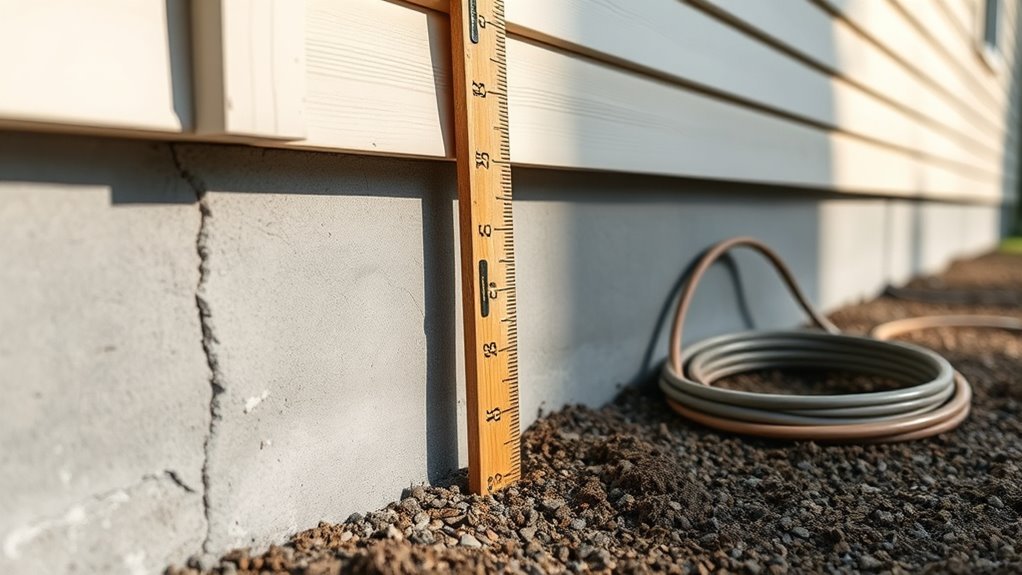
Check For Cracks
If your moisture check shows dry conditions, move on to a quick crack inspection to catch problems that could let water in later. You’ll want to spot hairline fissures and wider gaps, because addressing them early aids crack prevention and reduces repair scope. Use a flashlight and probe, note depth and length, and photograph suspect areas for records. Small cracks can be sealed; larger ones may need foundation reinforcement before painting.
- Scan visually from ground to sill for linear or stair-step cracks.
- Probe for loose material and map locations.
- Measure widths; document anything over 1/8″.
- Decide seal, patch, or consult.
Detecting Active Moisture and Water Intrusion
How can you tell if your foundation is actively letting water in? Look for damp patches, dark staining, peeling paint, or mold near the base. Inside, check for musty odors, rising damp on basement walls, or water stains.
Outside, inspect grading, downspouts, and foundation drainage—water should flow away from the wall. Probe soil moisture after rain; persistent wetness signals intrusion.
Verify intact moisture barriers at the sill and along exposed footing; missing or damaged barriers let hydrostatic pressure force water through pores and cracks.
If you spot ongoing wetness, stop and address drainage and barriers before painting.
Testing for Efflorescence and Salt Damage
Once you’ve ruled out active water intrusion, check for efflorescence and salt damage that can undermine paint adhesion. You’ll perform simple Efflorescence testing and a Salt damage assessment so coatings last.
After ruling out active leaks, test for efflorescence and salt damage to ensure coatings will adhere and last
Look for powdery white deposits, crumbling mortar, or blistering paint. Test small areas and document results.
- Scrape surface to reveal embedded salts.
- Wipe with damp cloth; persistent residue signals salts.
- Use vinegar spot test for stubborn deposits.
- Record locations and severity to plan remediation.
If salts persist after cleaning, you’ll need deeper treatment before priming and painting.
Tools and Materials You’ll Need
Now you’ll gather the right tools and materials to get the job done efficiently. You’ll need prep equipment like wire brushes, a pressure washer or scrub brushes, patching tools, drop cloths, and safety gear.
For coatings, choose a masonry primer, breathable exterior masonry paint, appropriate rollers/brushes, and consumables such as caulk, patch compound, tape, and rags.
Prep Tools And Equipment
Before you start painting, gather the right tools and materials so the job goes smoothly and lasts longer. You’ll prep the surface, protect nearby areas, and pick tools that match your color selection and preferred brush techniques. Organize everything before you begin to save time and avoid mistakes.
- Pressure washer or stiff broom, scraper, and wire brush for cleaning.
- Drop cloths, painter’s tape, and plastic sheeting for protection.
- Extension pole, angled sash brush, and roller with a masonry nap for application.
- Safety gear: gloves, goggles, respirator, and knee pads for comfort and protection.
Paints And Consumables
Pick paints and consumables that match your foundation’s material and the local climate, because the right products determine durability and long-term appearance.
Choose a high-quality masonry primer and breathable elastomeric or acrylic exterior paint rated for cement.
Buy concrete patch, masonry cleaner, muriatic if needed, and alkali-resistant primer.
Get brushes, rollers with nap suited for rough surfaces, extension poles, masking tape, drop cloths, and a pressure washer or scrub brushes.
Include sealant for cracks to protect foundation drainage, and exterior lighting-safe ladders or stands for night work.
Keep rags, buckets, stir sticks, and safety gear: gloves, goggles, respirator.
Best Primer Types for Cement Foundations
Which primer will give your cement foundation the best base for paint? You want a primer that seals, bonds, and supports foundation reinforcement while respecting historical preservation on older structures. Choose based on substrate condition and exposure.
Choose a primer that seals, bonds, and protects your cement foundation—match the type to substrate condition and exposure.
- Acrylic masonry primer: breathable, bonds well, ideal for mild-to-moderate conditions.
- Silicate (mineral) primer: chemically bonds to masonry, excellent for lime-based or historic walls.
- Epoxy-blocking primer: for severe moisture or efflorescence, provides strong adhesion and sealing.
- Elastomeric primer: bridges hairline cracks, adds flexible protection on fluctuating exteriors.
Choosing the Right Exterior Masonry/Foundation Paint
When you’re choosing exterior masonry paint, focus on durability, breathability, and compatibility with the primer and masonry type so the finish both looks good and protects the foundation.
Pick a high-quality acrylic or elastomeric formula suited to concrete; they’ll flex with temperature changes and resist moisture.
Match the paint to your primer’s chemistry to avoid peeling.
Consider color stability near garden landscaping and how shades interact with outdoor lighting at night.
Test a small area and inspect after a rain.
Buy enough for full coverage and recoat if needed.
Proper selection saves maintenance and preserves foundation integrity.
Recommended Paint Finishes and Sheens
You’ll want to pick a finish that balances appearance with performance, like matte for hiding imperfections or satin for easier cleaning.
For exterior cement foundations, breathable masonry paint is essential so moisture can escape and won’t get trapped behind the coating.
Next, we’ll compare matte vs. satin and explain why breathability matters for longevity.
Matte Vs. Satin
Although both matte and satin finishes can protect and refresh a foundation, they perform differently. You’ll pick matte for a low-sheen, forgiving look that hides surface imperfections, or satin for easier cleaning and slight sheen. Consider color coordination with siding and trim; satin reflects more, so hues appear brighter.
- Matte: masks flaws, needs careful surface prep, works with varied brush types for texture.
- Satin: durable, wipes clean, highlights color nuances.
- Application: use quality brushes or rollers suited to finish for even coverage.
- Choice: balance aesthetics, maintenance, and surrounding materials.
Breathable Masonry Paint
Because exterior foundations need to shed moisture from the inside out, choose a breathable masonry paint that lets vapor escape while sealing out rain and dirt. You’ll want a mineral or lime-based product that’s compatible with porous cement; these finishes reduce trapped moisture and peeling.
For historical preservation, pick formulations matching original vapor permeability and appearance. Look for coatings labeled vapor-permeable, water-repellent, and breathable.
Prefer eco-friendly pigments and low-VOC binders to limit environmental impact.
Apply per manufacturer instructions: clean, repair, prime if specified, then two thin coats. Test a small area first to confirm adhesion and color.
How Weather and Season Affect Painting
When should you plan to paint your exterior cement foundation? You’ll choose timing based on weather patterns and seasonal considerations to guarantee adhesion and curing. Pick a stretch of dry days with mild temperatures and low humidity.
- Aim for temperatures between 50–85°F (10–29°C) and stable forecasts.
- Avoid painting right before rain; wait 24–48 hours of dry weather.
- In spring or fall, mornings warm and afternoons dry are best; extreme sun or cold hampers curing.
- High humidity or freeze-thaw cycles will ruin finish—schedule around those risks.
Prepare Ground, Grading, and Landscaping First
Before you paint, make sure the soil slopes away from the foundation so water won’t pool against the wall.
Clear all vegetation and debris from the base to expose the surface and prevent mold or staining.
Add proper drainage and a layer of mulch or gravel to control runoff and protect your new paint job.
Grade Away From Foundation
If water doesn’t drain away from the foundation, paint and masonry will fail faster, so grade the ground to slope away at least 6 inches over the first 10 feet, compacting soil and extending downspouts to carry runoff well past the house.
You’ll check existing grade, adjust soil, and protect paint from constant moisture. Coordinate grading with garden irrigation and position landscape lighting so it doesn’t trap water. Follow these practical steps:
- Measure slope with a level and stakes.
- Add and compact fill soil in shallow lifts.
- Redirect downspouts with extensions or underground drains.
- Verify drainage after heavy rain and adjust.
Clear Vegetation And Debris
Because you’ll want paint and masonry to last, clear all vegetation and debris from the foundation area so soil and moisture don’t stay against the wall. Pull vines, trim roots, and remove mulch that touches cement; you’ll reduce rot, garden pests, and hidden moisture. Keep a tidy buffer so air circulates and paint adheres. Regular lawn maintenance prevents regrowth and cuts inspection time. Don’t let compost or piles sit near the wall.
| Task | Why it matters |
|---|---|
| Remove vines | Prevents paint lifting |
| Trim roots | Stops cracking |
| Clear debris | Eliminates moisture traps |
| Routine checks | Controls garden pests |
Install Drainage And Mulch
Once you’ve cleared vegetation and confirmed proper grading, focus on routing water away from the foundation by installing drainage and a mulch buffer so moisture won’t linger against the cement. You’ll trench for a French drain or install surface drains, slope soil away, and lay landscape fabric before mulch.
Proper garden landscaping reduces splashback and soil contact. Mulch should stop several inches below siding to aid air circulation and pest prevention. Inspect annually and refresh materials.
- Excavate trench and add perforated pipe with gravel.
- Install fabric to block soil migration.
- Apply 2–3 inches of inorganic or cedar mulch.
- Check grade and clear debris.
How to Mask and Protect Adjacent Surfaces
Before you start painting, protect anything near the foundation—siding, windows, plants, and walkways—so paint stays only where you want it. Use high-quality masking tape along trim and window edges, pressing firmly to seal gaps.
Cover large areas with breathable drop cloths or plastic sheeting, securing edges with tape to prevent wind lift. Protect plants with lightweight fabric that lets light through, and shield walkways with sturdy cardboard or rosin paper to avoid slips.
Remove fixtures or cover them. Check tapes after a few hours to confirm adhesion. Work methodically so cleanup is quick and surfaces remain pristine.
Cleaning a Cement Foundation: Product Choices
Wondering which cleaners will give you a clean, paint-ready surface without damaging the cement? You’ll choose products that respect foundation aesthetics and, if relevant, historical preservation standards.
Pick non-acidic, masonry-safe cleaners for general grime and mildew to avoid etching. For tougher oil or grease, use a biodegradable degreaser formulated for concrete.
Test any product on an inconspicuous patch first. Rinse thoroughly and follow manufacturer dwell times.
Consider renting a pressure washer with adjustable PSI for rinsing only.
Recommended product types:
- pH-neutral masonry cleaner
- Oxygen bleach mildew remover
- Biodegradable degreaser
- Low-PSI power-wash rinse
Removing Efflorescence and Mineral Stains
You’ll first learn what causes efflorescence so you can tell salt deposits from other stains. Then we’ll cover safe cleaning methods that remove minerals without damaging the concrete.
Finally, you’ll get practical steps to prevent those salts from coming back.
Identify Efflorescence Causes
When white, powdery stains appear on your foundation, they’re usually efflorescence—salts left behind when water evaporates from the concrete—and identifying why it’s forming is the first step to removing it for good. Check sources that drive salts to the surface so you can stop recurrence.
- Poor drainage: surface runoff or clogged gutters increase foundation moisture, pushing salts outward.
- High groundwater: rising damp brings dissolved minerals into the wall.
- Cracks and penetrations: allow water to enter and migrate through the concrete.
- Improper concrete mix or curing: excess salts or trapped moisture promote efflorescence.
Clean Stains Safely
Before repainting, you’ll need to remove efflorescence and mineral stains so the finish will adhere and look consistent. Start by dry-brushing loose salt with a stiff nylon brush, then rinse with a garden hose.
For stubborn deposits, apply a mild acidic cleaner (follow label directions), scrub gently, and rinse thoroughly.
Protect nearby plants—use tarps and rinse runoff away from garden integration beds to avoid damage. Wear gloves and eye protection, and avoid power-washing that can erode mortar.
Inspect for insect nests; coordinating with pest control prevents surprises while you work.
Let the surface fully dry before priming and painting.
Prevent Recurrence Techniques
How can you keep efflorescence and mineral stains from coming back? You’ll prevent recurrence by addressing moisture sources, choosing compatible sealers, and applying careful repairs that respect historical preservation and artistic techniques. Follow these steps:
- Fix drainage and gutters to stop water contact at the foundation.
- Use breathable, masonry-specific sealers so salts can escape without staining.
- Replace damaged mortar with compatible mixes; match textures using artistic techniques when visible.
- Monitor and re-treat annually; document changes for future conservation and historical preservation records.
Act proactively and you’ll reduce stains while preserving appearance and structural integrity.
Repairing Cracks, Holes, and Spalled Concrete
If you’ve noticed cracks, holes, or spalled areas in your foundation, tackle them now to prevent water intrusion and further deterioration. First, clean debris and loose concrete, then inspect depth and length to choose proper repair mortar or epoxy.
For hairline cracks, use flexible sealant; for larger damage, chisel to sound edges and apply patching compound in layers.
Address underlying causes like poor grading or downspouts; tie repairs into landscaping ideas so runoff diverts away.
When working on older homes, respect historical preservation by matching textures and materials.
Allow full cure before priming and painting.
Patching and Skim‑Coating for a Smooth Surface
Once you’ve repaired major damage, skim-coating evens out texture and fills minor imperfections so paint goes on smoothly and lasts longer. You’ll mix a cementitious or polymer-based skim coat, apply thin layers with a trowel or float, and sand between coats until the surface is uniform.
After repairing major damage, skim-coat with thin polymer or cementitious layers, sanding between passes for a smooth, paint-ready finish.
For historic houses, match texture gently to respect historical preservation while preparing for modern coatings. If you plan decorative finishes, guarantee the skim coat is compatible and fully cured. Follow manufacturers’ instructions and work in suitable temperatures and humidity to avoid failure.
- Clean and dampen substrate
- Mix per directions
- Apply thin passes
- Sand and inspect
Treating Porous or Chalky Concrete Before Painting
Check the surface by spraying water or rubbing a fingertip to see how quickly it soaks in, since high porosity will suck up paint.
Scrub away any chalky residue with a stiff brush and a trisodium phosphate cleaner, then rinse and let the wall dry completely.
If the concrete still looks powdery or absorbs unevenly, roll on a quality bonding primer to seal and unify the surface before painting.
Assess Surface Porosity
How porous is your foundation surface, and does it feel chalky when you rub it with your hand? You’ll inspect porosity to decide primers and prep, and to verify foundation insulation or exterior lighting mounts won’t trap moisture against painted concrete.
Test small areas: wet spot to see absorption speed, and scrape for powder.
- Tap surface for hollow sounds that suggest voids.
- Pour a teaspoon of water; note how fast it soaks in.
- Press a fingertip; check for powdery residue without rubbing it off.
- Record variations around vents, corners, and lighting fixtures.
Remove Chalky Residue
If your foundation feels chalky, you’ll need to strip that powdery residue before priming so paint can bond properly; start by brushing and rinsing, then move to more aggressive cleaning for stubborn areas. Use a stiff brush and pressure washer on low to remove loose chalky residue. For persistent salt deposits or foundation efflorescence, apply a diluted vinegar or masonry cleaner, scrub, then rinse thoroughly. Allow to dry fully and recheck for powder. Repair cracks before painting.
| Method | Solution | Notes |
|---|---|---|
| Brush | Stiff brush | Dry removal |
| Rinse | Pressure washer | Low setting |
| Clean | Vinegar mix | Targets efflorescence |
| Repeat | As needed | Guarantee dry |
| Inspect | Visual | No powder remaining |
Apply Bonding Primer
Once the surface is clean and dry, prime it with a masonry bonding primer to guarantee paint will adhere to porous or slightly chalky concrete. You’ll improve durability and lock loose particles so topcoat performance matches your foundation aesthetics and color coordination goals. Apply evenly with a brush or roller, following manufacturer’s spread rate. Allow full cure before painting.
- Stir primer; avoid thinning unless specified.
- Use a masonry brush for rough textures.
- Check temperature and humidity limits.
- Patch any remaining voids, then re-prime.
Proper priming prevents peeling and assures a uniform finish.
Priming Step‑by‑Step for Best Adhesion
Before you lay down primer, make sure the foundation is clean, dry, and free of loose material so the primer can bond properly. You’ll tape edges, patch cracks, and sand rough spots. Apply primer in even coats, letting each dry fully for maximum adhesion. This preps surfaces for paint, ensures color coordination with siding, and supports future decorative accents. Check manufacturer’s recoat times and temperature limits. Keep a moisture meter handy and avoid priming in direct rain or extreme heat. Trust the process: thorough prep prevents peeling and extends finish life.
| Calm | Confident | Proud |
|---|---|---|
| Secure | Ready | Clean |
| Lasting | Beautiful | Protected |
Painting Techniques and Tools: Rollers, Sprayers, Brushes
With the primer dry and the surface prepped, you’ll choose the right tools to get an even, durable finish—rollers for broad, textured areas, sprayers for speed and uniform coverage, and brushes for edges and detail work.
Match roller nap to masonry texture, use extension poles, and keep a wet edge to avoid lap marks.
Adjust sprayer pressure and overlap passes for uniformity, and use brushes for cut-ins, corners, and touchups where landscape design meets foundation lines.
Consider how color ties into interior décor when selecting sheen and tone.
- Rollers: nap, poles
- Sprayers: pressure, passes
- Brushes: cut-ins
- Cleanup: tips, storage
How Many Coats You Need and Drying Times
You’ll typically need two coats of masonry paint for full coverage and durability, though patchy or porous areas may require a third.
Let each coat dry to the touch before re-coating—usually 2–4 hours for latex and longer for alkyds—and follow the manufacturer’s directions.
Full cure can take several days to weeks, so avoid heavy contact or sealing until the paint’s fully set.
Coats Required Overview
When painting an exterior cement foundation, plan on at least two coats for proper coverage and durability: a quality masonry primer followed by one or two finish coats, depending on color and porosity.
You’ll choose finishes mindful of historical architecture if relevant, and you can opt for eco-friendly paints to reduce VOCs.
Apply evenly, avoid thinning unless the manufacturer allows, and inspect for absorption after the primer.
- Primer: seals and evens porosity.
- First finish: establishes color and adhesion.
- Second finish: deepens color and durability.
- Touch-up coat: for repairs and isolated wear.
Drying And Cure Times
Drying and curing times determine how many coats you can apply and how long the foundation needs to stay undisturbed: most masonry primers dry to the touch in 1–4 hours but need 24 hours to cure before a finish coat, and latex exterior paints usually dry to the touch in 1–2 hours with recoat windows of 4–6 hours and full cure in 7–30 days depending on temperature and humidity.
| Coat | Dry to Touch | Full Cure |
|---|---|---|
| Primer | 1–4 hrs | 24 hrs |
| First Coat | 1–2 hrs | 7–14 days |
| Second Coat | 4–6 hrs | 14–30 days |
Plan coats around weather, foundation waterproofing, and landscaping drainage.
Painting Safely Near Grade, Vents, and Utilities
Although the foundation looks straightforward, painting close to grade, vents, and utilities demands extra care to protect systems and guarantee a lasting finish. You’ll watch foundation drainage paths and avoid blocking vents while respecting concrete curing timelines. Keep tools, coatings, and ladders clear of utility lines and cover fixtures to prevent paint intrusion.
- Locate and mark utilities before scraping or sanding.
- Use breathable coatings near grade to preserve foundation drainage.
- Protect vent openings with tape and mesh, removing covers after paint tack dries.
- Maintain recommended concrete curing interval before priming to assure adhesion.
Sealing Joints, Sill Plates, and Transitions
Before you paint, pick a compatible exterior-grade sealant that stays flexible and bonds to concrete and wood.
Prepare joints and sill plates by cleaning, removing old sealant, and backing with foam backer rod where needed for proper depth.
Add or repair changeover flashing so water sheds away from seams and the sealant can do its job.
Sealant Selection Basics
When you’re sealing foundation joints, sill plates, and material shifts, choose a durable, flexible sealant that sticks to both concrete and wood without shrinking or pulling away. You’ll want a paintable, mildew-resistant product compatible with masonry and lumber so your finish matches nearby garden landscaping and interior wall textures where visible connections meet.
Consider UV resistance and movement capability for seasonal shifts. Match sealant color to primer or paint when possible.
- Polyurethane — strong adhesion, high movement tolerance.
- Hybrid MS polymer — paintable, good for mixed substrates.
- Silicone (paintable variety) — excellent flexibility.
- Acrylic-latex — easiest to paint over.
Proper Joint Preparation
If you want a long-lasting finish, prepare every joint, sill plate, and connection so sealant and paint can bond without gaps or trapped moisture. Clean joints of dust, old caulk, and efflorescence; dry thoroughly.
Backer rod fills wide gaps, controlling sealant depth and movement. Run a continuous bead along sill plates, tooling it smooth for full adhesion to wood and concrete.
Check junctions for voids and slope toward grade to support foundation drainage and avoid water pooling.
Compact soil to maintain soil stability around the foundation so seals aren’t stressed by settling.
Allow proper cure before painting.
Transition Flashing Details
Having finished sealing joints and bedding sill plates, now focus on flashing details that keep water out where materials meet. You’ll install metal or flexible flashing at junctions, guarantee continuous overlap, and integrate with your foundation insulation and siding. Pay attention to exterior lighting mounts and penetrations.
- Cut flashing to extend over foundation and up wall sheathing.
- Lapse overlaps by at least 2 inches, seal with compatible sealant.
- Bed sill plates on flashing, fasten through into framing, seal fasteners.
- Wrap flashing around exterior lighting boxes, seal gaps with gaskets and counterflashing.
Inspect and test for leaks before finishing paint.
Avoiding Common Mistakes That Cause Peeling
Why did your last paint job peel so fast? You likely skipped prep, ignored foundation drainage, or used wrong primer, harming paint durability. Fix substrate moisture, clean efflorescence, and choose breathable masonry paint. Avoid painting in direct sun or on damp concrete. Use correct primer and follow dry-time instructions.
| Problem | Cause | Solution |
|---|---|---|
| Blisters | Trapped moisture | Wait, dry, use breathable paint |
| Flaking | Poor adhesion | Etch, prime, use proper product |
| Chalky finish | Alkali bleed | Neutralize, rinse, prime |
Inspect prep steps and weather; patience prevents peeling.
Spotting and Fixing Early Paint Failure
When you spot bubbling, flaking, or white powdery residue on your foundation paint, act fast to diagnose and stop further damage. Check adhesion, moisture sources, and salt efflorescence before repainting. Remove loose paint, clean surfaces, and let the wall dry fully. Use breathable masonry primer and paint to prevent recurrence.
- Scrape and sand to sound substrate.
- Test for damp with a moisture meter or tap for hollow sounds.
- Clean efflorescence with a stiff brush; neutralize salts if needed.
- Repaint using masonry products that complement garden décor and interior accents.
Handling Mold, Mildew, and Biological Stains
If mold, mildew, or algae appear on your foundation, don’t ignore them—these organisms can stain paint, hold moisture against the wall, and eventually damage the surface. You should treat affected areas before painting. For mold removal, scrub with a bleach solution or a commercial biocide, rinse thoroughly, and let dry. For mildew prevention, improve drainage, trim vegetation, and use breathable, mildewcide-containing primer. Test a small patch first.
| Task | Solution | Frequency |
|---|---|---|
| Clean | Bleach or biocide | As needed |
| Protect | Mildewcide primer | Before painting |
| Prevent | Improve drainage/ventilation | Ongoing |
Maintenance Schedule for Painted Foundations
Treating mold and preventing moisture damage sets you up to keep painted foundations looking and performing well over time. Create a simple maintenance schedule: inspect annually after wet seasons, wash stains promptly, and touch up failed spots. Keep garden furniture away from the wall to allow airflow and avoid trapped moisture. Coordinate inspections with routine pest control to catch insect-related damage early.
- Spring: wash surface, check for cracking, touch up paint.
- Summer: move garden furniture, spot-clean, monitor drainage.
- Fall: clear debris, inspect sealant, repair minor damage.
- Winter: verify downspouts and grading work properly.
Estimating DIY vs Pro Cost and Timeline
Because you can control labor and timing, DIY often costs less upfront but takes longer, while hiring a pro speeds the job and adds guarantees. You’ll save on labor but spend time prepping, masking, and fixing minor cracks; factor paint, primer, brushes, masks, and rental equipment.
Pros charge for inspection, surface prep, and skilled application, but finish faster and often include warranty.
Account for tasks beyond painting: checking foundation ventilation, sealing joints, and adjusting landscaping drainage to prevent water damage.
Estimate DIY weekends versus a pro’s one- to three-day crew, and weigh your time, skill, and risk tolerance.
Hiring a Contractor: Questions to Ask
When you hire a contractor for painting your exterior cement foundation, ask clear, specific questions so you know exactly what you’ll get, how they’ll protect the structure, and who’ll be responsible if issues arise.
You should verify licensing, insurance, and experience with waterproofing and coatings near landscaping design features. Ask how they’ll prep surfaces, control moisture, and coordinate with pest control needs.
Request a written scope, timeline, cleanup plan, and warranty. Get references and photos of similar jobs.
- Licenses, insurance, and references
- Surface prep and moisture control
- Landscaping protection and cleanup
- Warranty, timeline, and costs
Picking Foundation Colors and Documenting Warranties
If you want your foundation to blend with the house and landscape, pick colors that coordinate with siding, trim, and hardscaping while keeping maintenance and warranty limits in mind.
Choose foundation hues that harmonize with siding, trim, and hardscaping while considering maintenance and warranty limits.
You should test swatches on different walls and view them at various times to confirm undertones.
For durable results, choose masonry-specific paints and note prep requirements that affect longevity.
Keep thorough warranty documentation: record product names, batch numbers, application dates, contractor details, and photos before and after.
Store receipts and labels digitally and physically.
That paperwork speeds claims and helps future touch-ups, ensuring your color selection lasts and any issues get resolved quickly.
Frequently Asked Questions
Can I Paint Over Exposed Aggregate or Decorative Concrete?
Yes—you can paint exposed aggregate or decorative concrete. You’ll need thorough surface preparation to clean and profile the surface, then use proper paint selection (masonry or epoxy coatings) that’s breathable, UV-resistant, and compatible.
Will Painting Affect My Home’s Breathable Vapor Barrier System?
Yes — it can if you choose the wrong coating. You’ll want breathable paints with high moisture permeability and controlled vapor transmission so moisture can escape; otherwise trapped vapor can cause deterioration, mold, and reduced wall performance.
Can I Paint a Foundation With Old Lead-Based Paint Present?
An ounce of prevention: you can paint over old lead-based paint only if you hire certified abatement or follow strict containment and removal procedures. Lead paint hazards demand testing, proper surface prep, and professional handling to protect your household.
How Do Painted Foundations Impact Termite or Pest Inspections?
Painted foundations can hide damage and moisture issues, so you’ll need to reveal Foundation moisture during inspections; properly applied paint aids Pest prevention by sealing gaps, but inspectors may still require probing or patch removal to confirm integrity.
Is Graffiti-Proof or Anti-Graffiti Coating Recommended for Foundations?
About 60% of property owners see vandalism within five years, so yes — you should consider graffiti resistance coatings. You’ll boost coating durability, make cleanup easy, and protect your foundation’s appearance and resale value.
Conclusion
Painting your exterior cement foundation protects it and boosts curb appeal—plus it’s something you can often tackle yourself. Did you know painted foundations can reduce water penetration by up to 30% when you use the right breathable masonry paint? Keep up simple inspections, address active moisture before painting, and weigh DIY time vs. pro guarantees. With a clear plan and documented warranties, you’ll extend your foundation’s life and enjoy a cleaner, more durable exterior finish.