How to Paint Over a Red Wall (Complete Guide)
You can cover a red wall by cleaning, repairing, and sanding the surface, then sealing tannin or stains with a high-hide, stain-blocking (often tinted) primer; cut in edges, roll with the right nap, and apply one to three topcoats until even. Use feathering, proper dry times, and test patches under natural light to check for bleed-through. Pick compatible paint and tools, save time with tinted primer, and keep following for detailed tips on technique, coating counts, and tricky spots.
Quick Plan: How to Cover a Red Wall Fast
If you need to cover a red wall fast, start by choosing high-coverage products and planning a short sequence. You’ll prep the surface quickly: clean, sand rough spots, and prime with a stain-blocking primer.
Pick a neutral topcoat that counters red undertones; consider paint color psychology to predict final mood. Use a tinted primer or two coats of high-hide primer if red wall psychology suggests strong bleed-through.
Work in sections, cut in edges first, then roll with a dense nap roller for uniform coverage. Allow proper dry times, inspect under natural light, and touch spots as needed.
When to Repaint vs. Touch Up Red Walls
When deciding whether to repaint or just touch up a red wall, weigh the extent of damage, color fading, and how noticeable repairs will be against the time and cost involved.
If scratches or small chips are localized and the hue still pops, touch-ups save time; match finish and feather edges for seamless repair.
For localized scratches or chips, touch up—match the finish and feather edges for an invisible repair.
Repaint when large areas show fading, patchy coverage, or when you’re changing decor that clashes with red’s color psychology.
Also consider historical trends in your home—if original red is prized, preserve with careful touch-ups; otherwise a full repaint modernizes and ensures uniform coverage.
Why Red Paint Is Harder to Hide
Because red sits at the edge of the visible spectrum and contains strong pigment concentration, it reveals imperfections and color mismatches more readily than muted tones. You’ll notice uneven coverage, bleeding edges, and undertones peeking through because red pigments are intense and often transparent.
Color psychology and historical significance mean reds were formulated for impact, so they’re loaded with dyes that resist blanketing. You must plan for extra coats, primer choices, and drying time to avoid shadowing.
Accept that surface flaws stand out until properly sealed; treating the substrate and using correct layering prevents the red from showing through your new color.
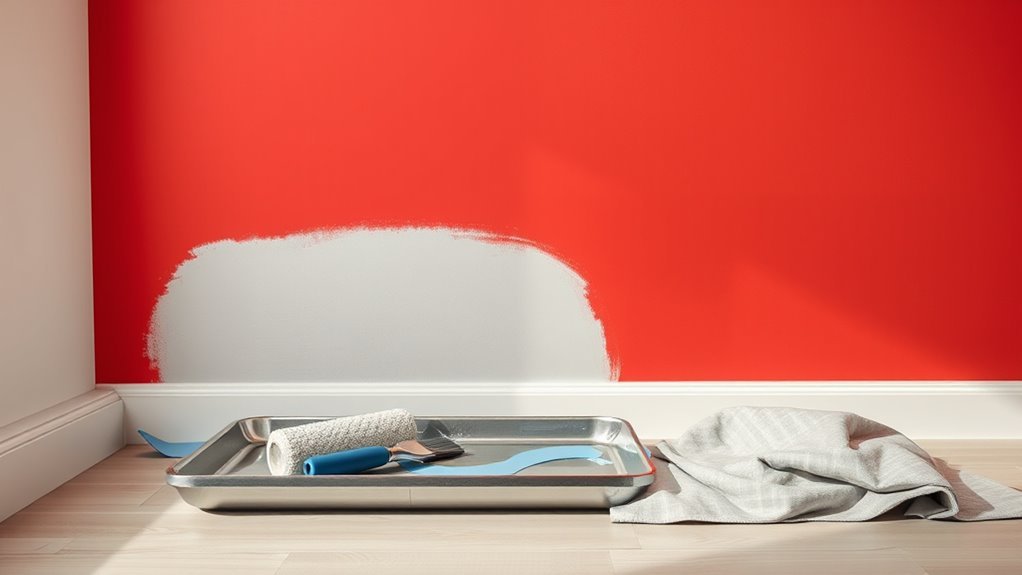
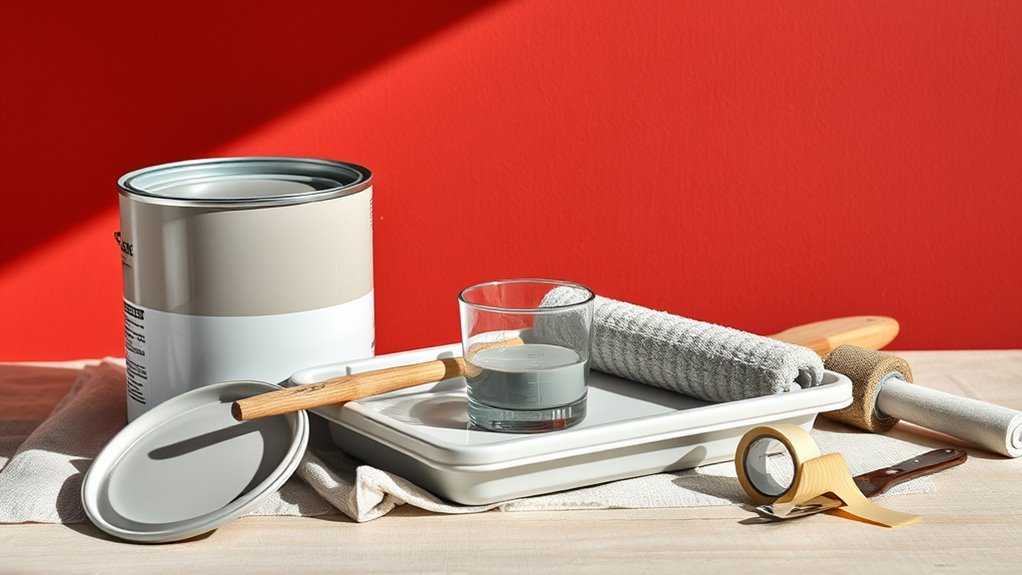
Tools and Materials You’ll Need
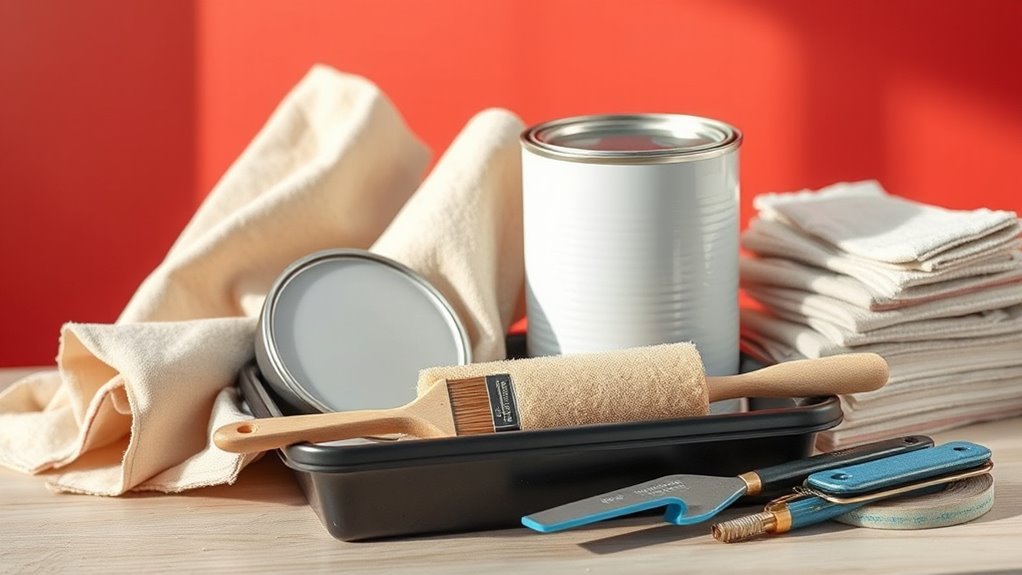
You’ll need the right tools to get good coverage and a smooth finish, from rollers and brushes to drop cloths and painter’s tape.
Prep materials like sandpaper, spackle, and a degreaser will help the new paint stick and hide the red underneath.
Choose a high-quality primer and the proper paint type—usually a tint-blocking primer and a medium- to high-hide latex—for best results.
Essential Painting Tools
Before you start painting, gather the right tools so the job goes smoothly and your new color covers the red underneath. You’ll need quality brushes, rollers, a tray, painter’s tape, and a primer suited to block red bleed-through. Think about color psychology and historical significance when selecting finishes—matte hides flaws; satin reflects more light. Don’t forget drop cloths and a ladder for reach.
| Tool | Purpose | Tip |
|---|---|---|
| Brushes | Cut in edges | Angled for control |
| Roller | Cover large areas | Use nap for texture |
| Primer | Seal red | Stain-blocking formula |
| Tape | Protect trim | Remove while wet |
| Tray | Hold paint | Clean after use |
Surface Prep Materials
Now that your tools are ready, get the surface materials lined up so prep goes quickly and the new paint adheres properly. Gather drop cloths, painter’s tape, sanding blocks (medium and fine grit), a vacuum or tack cloth, spackling compound and putty knife, and a sturdy scraper.
Keep a mild detergent, sponge, and bucket for degreasing; rinse and let dry. Use a mask and gloves for safety.
Priming choices affect color psychology and paint durability, so have appropriate primer specified later ready.
Inspect for loose paint or mold and repair before moving to the painting stage.
Paint Types And Primers
When choosing paint and primer for covering red, pick a high-hide primer and a medium- to high-coverage topcoat so you need fewer coats and get true color payoff.
Use a stain-blocking, shellac- or latex-based primer labeled “high-hide” to neutralize red undertones.
For topcoats, choose eggshell or satin for living areas and semi-gloss for trim; consider how color psychology affects mood when selecting neutrals or cooler hues.
Favor acrylic latex for easy cleanup and good paint durability.
Buy tinted primer if switching to very light shades, and get enough primer and paint to avoid mid-job color mismatch.
How Primers Block Red and Stains
You’ll want to understand how stain-blocking primers work chemically so you can prevent red pigments from bleeding through.
Apply the primer at the manufacturer’s recommended thickness—too thin and the red will show, too thick and you risk drips or poor drying.
Finally, pick a primer that’s compatible with your finish paint to guarantee good adhesion and long-lasting coverage.
Primer Stain-Blocking Chemistry
Because red pigments and tannin stains penetrate porous surfaces, primers use chemistry to trap and isolate them so your topcoat stays true, rather than seeping through and discoloring the finish. You’ll choose primers with blocking resins and special pigments that neutralize red dye and tannin chromophores.
Alkyd or shellac-based binders create a tight, impermeable film; shellac often wins for severe bleed-through. Modern waterborne paint formulas add enhanced stain inhibitors for milder cases.
Apply primer that’s compatible with your topcoat; it shouldn’t soften or repel the finish. Let it dry fully so the chemistry stabilizes before repainting.
Application Thickness Matters
Although primer chemistry is essential, the thickness of the coat you lay down often determines whether red pigments and tannins stay sealed or bleed through. You’ll control bleed-through by applying even, adequate film build; thin coats can allow color migration during paint drying.
Consider these practical steps:
- Apply a full, even coat; don’t try to stretch coverage.
- Wait recommended dry times between coats to assess hiding.
- Add a second heavier coat if red shows through after drying.
- Use tools that deliver consistent film—roller nap or quality brush.
Remember color psychology: stubborn red can affect mood unless fully blocked.
Paint Adhesion Compatibility
Getting the right film build helps, but adhesion compatibility between primer, new paint, and the red undercoat will determine whether stains stay sealed or reappear.
You’ll choose a primer formulated to block tannins and pigments; oil-based or shellac primers often outperform basic latex for stubborn reds. Match primer chemistry to your finish—waterborne primers work with many modern topcoats, but check compatibility charts.
Test a small patch to confirm no bleed-through.
Consider how paint color psychology affects perception—deep reds need heavier blocking to avoid haloing.
If you prefer eco-friendly paint options, look for low-VOC primers rated for stain blocking.
Oil, Shellac, or Latex Primer: Which to Use?
When you’re covering a red wall, choosing the right primer—oil, shellac, or latex—makes the job easier and prevents bleed-through. Each type has strengths depending on how stubborn the red is, the topcoat you’ll use, and your cleanup preferences.
When covering red walls, pick oil, shellac, or latex primer to prevent bleed-through and simplify painting
Think about Red wall psychology and Red paint history: deep pigments often need stronger sealing.
- Oil: excellent stain blocking, bonds well to glossy finishes, longer dry time.
- Shellac: best for severe bleed-through, fast drying, odor and solvent cleanup.
- Latex: easy cleanup, flexible, good for mild reds and interior use.
- Match primer to topcoat for adhesion and durability.
When to Use a Tinted Primer
After you pick the type of primer—oil, shellac, or latex—think about tinting it to cut down on coats and improve coverage over red. Use a tinted primer when the red shows through or when your new color is pale; tinting reduces bleed-through and speeds coverage.
Consider color psychology: a warm undertint can neutralize red’s intensity, while a cool undertint counters warmth. Match tint strength to how saturated the red is.
Also factor paint texture—rough or porous surfaces soak primer differently, so you might need a stronger tint or an extra coat for even hide before applying topcoat.
Picking a Topcoat Sheen to Hide Red
Because sheen affects how much light bounces off the wall, choosing the right topcoat can make hiding red much easier. You’ll balance appearance and function: flatter sheens hide imperfections and mute red’s intensity, while glossier sheens reflect more light and may reveal undertones.
Consider color psychology—matte feels calmer, satin feels livelier. Also factor paint durability for high-traffic areas.
- Flat: hides red best, low reflection.
- Eggshell: slight sheen, good compromise.
- Satin: more durable, shows subtle red hints.
- Semi-gloss: highest reflectivity, avoids if masking is priority.
Estimating Primer and Paint Quantities
Before you buy anything, measure the wall area and check the primer’s coverage rating so you can calculate how much primer you’ll need to block the red.
Then estimate paint needs based on the number of topcoats required and the paint’s coverage per gallon.
This quick math helps you avoid runs to the store and make certain of full, even coverage.
Calculating Primer Coverage
While a good primer can cut down how many topcoats you’ll need, you should still calculate coverage so you buy the right amount. Primer chemistry and color mixing affect hide and spread rate, so check the can for coverage (sq ft per gallon). Measure wall area, subtract windows/doors, then apply the manufacturer’s spread rate; textured walls need more.
Use this quick checklist:
- Measure height × width for each wall.
- Subtract non-painted areas.
- Divide net square footage by primer coverage.
- Round up for touch-ups and waste.
Buy slightly more than calculated to ensure full, even sealing.
Determining Paint Needs
Now that you’ve figured primer coverage, you’ll want to estimate how much primer and topcoat paint you’ll actually need for the whole job. Measure wall area, subtract windows and doors, and factor coats: usually two primer coats for red, plus one or two topcoats.
Check manufacturer coverage (sq ft per gallon) and divide total area by that number, rounding up. Account for texture, porosity, and waste—add 10–15% extra.
Consider color psychology when choosing tinting strength and how many coats are needed to neutralize red. Note any historical significance that demands specific pigments or conservation approaches.
Inspecting for Stains, Tannin Bleed, and Marks
When you inspect the red wall, look closely for dark spots, yellowish streaks, or uneven patches—these can be stains or tannin bleed that will show through lighter paint. You’ll want to identify sources (water, smoke, wood tannins) because stain-blocking primer choice affects color psychology of the final room and long-term paint durability.
Note areas needing special treatment before priming.
- Mark visible stains and measure extent.
- Check corners and trim junctions for seepage.
- Tap for soft spots indicating damage.
- Photograph problem areas for reference and material estimates.
Cleaning Walls for Primer Adhesion
After you’ve identified stains and damage, clean the wall so primer can grip and block what’s underneath. Wipe dust, cobwebs, and grease with a mild detergent solution, rinse, and let dry fully.
Use a sponge for flat areas and a soft brush for pronounced wall texture; avoid overly wetting textured surfaces to prevent softening. For nicotine or heavy stains, use a trisodium phosphate substitute per directions.
Cleaning guarantees primer adheres uniformly and prevents color bleed-through that undermines color psychology decisions for your new scheme. Finish by lightly scuff-sanding glossy spots, then remove residue before priming.
Repairing Holes, Dents, and Texture
Before you paint, you’ll assess the wall for holes, dents, and any uneven texture so you know what needs fixing.
Use spackling or patching compound for small gaps and a proper patch kit for larger holes, then sand smooth once dry.
If the wall’s texture matters, match or recreate it with texture spray or a trowel before priming.
Assess Surface Damage
How damaged is the wall, really? You’ll inspect for holes, dents, cracks, and uneven surface texture before deciding fixes. Consider how repairs affect final color and color psychology; rough patches can shift light and hue perception.
- Measure hole size and depth to gauge repair time.
- Tap and listen for hollow spots indicating delamination.
- Run your hand to feel subtle dents and waviness.
- Note existing finishes (gloss, flat) that influence primer choice.
Document damage, take photos, and prioritize repairs by visibility. This assessment guides materials and prevents surprises when you repaint over red.
Patch And Texture
Now that you’ve mapped out the damage, it’s time to repair holes, dents, and mismatched texture so the new paint lays down smoothly and evenly.
Clean dust, remove loose plaster, and widen tiny holes into a V for better adhesion. Use spackle for small dings, joint compound for larger areas, and sand between layers until flush.
Match texture with a sponge, brush, or spray texture before it dries. Prime patched spots to prevent red bleed-through and preserve paint durability.
Consider how final color influences mood—color psychology—so texture and finish support the room’s desired feel.
Sanding Glossy Red Finishes Effectively
When you’re tackling a glossy red finish, scuff-sanding and degreasing are the most important steps to get reliable adhesion and prevent the new paint from peeling. You’ll respect red psychology and color symbolism by preparing rather than hiding the finish. Follow this concise process:
When refinishing glossy red, scuff-sand and degrease thoroughly—prepare the surface for lasting adhesion and true color impact.
- Clean surface with degreaser; remove oils and wax.
- Scuff-sand with 220–320 grit; focus on gloss reduction, not deep scratches.
- Wipe with tack cloth, then solvent if needed; let dry fully.
- Prime with a bonding primer suited for glossy surfaces.
Work methodically, wear a mask, and test adhesion before topcoating.
Masking Trim, Floors, and Fixtures Fast
After you’ve scuff-sanded and primed glossy red areas, protect surrounding trim, floors, and fixtures so fresh paint lands only where you want it. Tape trim with low-tack painter’s tape, pressing edges firmly to prevent bleed; use a putty knife for crisp lines.
Cover floors with rosin paper or drop cloths, taping seams. Remove switch plates and mask fixtures, labeling hardware for reinstallation.
Work in sections and smooth tape as you go to accommodate wall texture without gaps. Consider color psychology when choosing adjacent trim finishes to guarantee transitions feel intentional.
Inspect edges after drying and touch up as needed.
Sealing Marker and Stubborn Red Stains
Start by prepping the surface: clean off dirt, sand glossy spots, and make sure the wall is dry.
If you’ve got marker or other stubborn red stains, treat them with a solvent or stain remover designed for painted walls and blot until the mark fades.
Finish by priming with a quality stain-blocking primer to lock in any residual color before you paint.
Prep The Surface
Because marker and deep red stains can bleed through new paint, you’ll need to seal them before priming; otherwise your fresh finish won’t look clean or even.
Prep the surface by cleaning, sanding, and inspecting so your primer bonds and paint durability improves. Remember color psychology—neutralizing red prevents undertone shifts.
- Wipe surface with a mild detergent, rinse, dry.
- Lightly sand glossy spots and feather edges.
- Apply a stain-blocking shellac or oil-based primer to sealed areas.
- Recheck for bleed-through after drying; touch up primer where needed.
Now you’re ready to prime the whole wall.
Treat Marker Stains
When marker or deeply saturated red stains show through primer, you’ll need to spot-seal them before you prime the entire wall; otherwise the pigments can bleed back and ruin your topcoat.
Start by cleaning the area with mild detergent and rubbing alcohol to remove surface oils and loosen marker stains. Lightly sand flaky spots to prevent paint peeling, then wipe dust away.
Use a small brush to apply a shellac-based or specialty sealer over stubborn marks, following manufacturer directions and drying times. Test a discrete area, then proceed to seal each blemish so the final finish stays flawless.
Prime With Stain-Blocker
After you’ve spot-sealed stubborn marker and red stains, apply a quality stain-blocking primer to lock any remaining pigments in place before you topcoat. You’ll prevent bleed-through and guarantee true coverage, especially when moving from bold red—whose color psychology and historical significance can influence room mood—to a neutral finish.
Follow these steps:
- Clean surface, dry completely.
- Sand glossy spots lightly for adhesion.
- Roll or brush a high-hide, oil- or shellac-based primer.
- Let primer cure fully, inspect for any tint showing through.
You’ll achieve a uniform base that saves paint and avoids rework.
Apply Primer: Brush, Roller, and Spray
If you want a smooth, long-lasting finish over red, start by choosing the right priming method for the surface and your timeline.
For trim and corners, use a brush to cut in precisely; a sash brush controls edges and preserves paint texture.
Rollers cover flat walls quickly—use a ½-inch nap for smooth drywall or ¾-inch for slight texture.
For large areas or uneven surfaces, a sprayer gives even coverage fast but needs masking.
Work wet edges, maintain consistent strokes, and sand between coats if needed.
Consider color psychology when selecting primer tint—neutral grays block red better than pure white.
How Many Primer Coats for Red Walls?
Start by evaluating how intense the red pigment is, since deep reds will need more coverage.
Next, match that to your primer’s opacity—high-hide primers may cut the coats you need in half.
Finally, factor in surface condition: stained or uneven walls often require an extra coat for a smooth, uniform base.
Assess Red Pigment Strength
Because red pigments vary so widely in depth and staining power, you’ll want to evaluate the wall before choosing primer coats. Inspect light exposure, previous sheen, and whether the red pigment bleeds through test patches.
Remember color psychology: strong reds can feel aggressive under thin coverage, so aim for control.
- Test a small area with your chosen primer.
- Wipe the test after drying to check staining.
- Note undertones that might shift with light.
- Mark problem spots needing extra sealing.
Based on these findings, you’ll decide if one coat suffices or if multiple sealing layers are necessary.
Determine Primer Opacity
How many primer coats you will need depends on the red’s intensity, the primer’s tint and hiding power, and how light or dark your final color is.
If the red’s saturated, plan at least two coats of a high-hiding primer or a tinted primer toward your new hue.
For muted reds, you may get by with one strong primer coat.
Consider color psychology—warmer reds bleed through more noticeably under pale, cool finishes.
When paint mixing, match tint strength so the primer neutralizes undertones.
Test a small area, let it dry, and add another coat only if red shows through.
Consider Surface Condition
Beyond primer choice and tint, you’ll also need to assess the wall’s condition before deciding how many primer coats to apply. You’ll inspect for stains, peeling, and uneven surface texture—each affects adhesion and paint durability. Consider these steps:
- Smooth, clean wall: one coat usually suffices.
- Minor stains or texture variations: one tinted coat, possibly a second.
- Significant stains or patching: two coats, plus spot priming.
- Porous or heavily textured surfaces: two coats and allow full cure.
Adjust based on test patches and the topcoat’s coverage recommendations.
Tinting Primer to Reduce Topcoats
When you’re covering a red wall, tinting the primer toward the target paint color can dramatically cut the number of topcoats you need, saving time and paint.
You’ll choose a primer tint that neutralizes red’s intensity while respecting color psychology—cooler primers counter warm reds; warmer tints counter cool reds. Match tint strength to how bold the red is and consider paint temperature: cooler room light can make colors read differently.
Apply one tinted coat, sand lightly if needed, then evaluate. This approach reduces bleeding and coats, offers truer final color, and keeps project time and material costs down.
Choosing Base Colors to Minimize Coats
Picking the right base color cuts down on the number of finish coats you’ll need and makes coverage more reliable. You want a base that neutralizes red undertones, supports color psychology goals, and boosts paint durability.
Choose warm tans under warm reds and cool grays under cooler crimson. Consider mid-tone bases rather than stark white to mask bleeding. Test swatches before committing.
- Match undertone to neutralize red.
- Use a mid-tone for better coverage.
- Pick a base aligned with color psychology for room mood.
- Prioritize bases with proven paint durability to reduce recoats.
First Topcoat: Roller Patterns and Overlap
Start your first topcoat by rolling in a consistent direction to lay down an even nap and reduce visible seams.
Overlap each pass by about 50% so wet edges blend and you get full coverage over the red undercoat.
Keep a steady pace and reload the roller before it skims dry to avoid lap marks.
Roller Stroke Direction
Although you’ve prepped the wall and mixed the paint, your roller strokes will determine how even the topcoat looks, so work in deliberate, overlapping passes. You’ll guide direction to control texture and edge definition, using short W or N strokes then flattening with long vertical pulls. Combine with careful brush techniques at corners for crisp progression and subtle color blending where red shows through.
- Start vertical, cover a 3×3 foot area.
- Flatten with light horizontal pulls.
- Re-load before dry edges form.
- Finish with single-direction strokes for uniform nap.
Keep pace steady and pressure consistent.
Overlap And Coverage
When you lay down the first topcoat, work in overlapping passes so each new section blends wet into wet and hides any streaks from the red base; aim for about a 50–75% overlap on each roller pass to guarantee full coverage without lap marks. Keep a consistent rhythm and lightly feather edges to avoid ridges.
If red’s intensity still shows, add a tinted primer or a second topcoat. Remember paint choices influence emotion—color psychology matters—so test swatches under room light.
Also consider red’s historical significance in the space; cultural context can guide your final hue and finish.
Cutting In Around Trim and Ceilings
Before you roll the new color onto the main wall, cut in around trim and ceilings so you get a crisp, professional edge without smudging paint onto moldings or plaster. Use a high-quality angled brush and steady strokes; this helps your color psychology choices shine and preserves paint durability. Mask trim if needed. Follow these steps:
- Load brush lightly and tap off excess.
- Paint a 2–3 inch band along ceilings and trim.
- Feather the inner edge for seamless rolling overlap.
- Inspect and touch up before rolling the main field.
Work patiently; clean lines make the room feel intentional.
How Many Topcoats to Fully Hide Red?
Start with a good primer coat so you’re not fighting bleed-through from the red. Usually one primer plus one or two topcoats will do the trick, but the exact number depends on your paint’s opacity and whether your topcoat is tinted for coverage.
If you want fewer coats, choose a high-quality, heavily tinted topcoat designed to hide strong colors.
Primer Coat Importance
Although a quality primer doesn’t do all the work, it dramatically cuts the number of topcoats you’ll need to fully hide red paint. You should pick a high-opacity, stain-blocking primer that neutralizes red’s intensity rooted in color psychology and historical significance.
Apply according to instructions, let it cure, then inspect for bleed-through. Consider these steps:
- Clean and sand the surface.
- Use a tinted primer if red is vivid.
- Apply one even coat, more if needed.
- Sand light and spot-prime before topcoating.
A proper primer saves time, reduces waste, and guarantees your finish covers evenly.
Number Of Topcoats
How many topcoats you’ll need depends on the primer you used, the shade and saturation of the red, and the finish you want. With a high-coverage, stain-blocking primer you can often get full hide in one or two topcoats, but vivid or deep reds may still need three.
You’ll assess after each coat: stop when you see consistent, even color. Matte finishes hide imperfections differently than gloss, so count coats accordingly.
Keep in mind color psychology—strong reds can subtly influence perceived depth unless fully covered. Also consider paint durability; follow manufacturer drying and recoating times for best long-term results.
Tinting And Coverage
If you want reliable coverage over red, consider both the tint of your topcoat and how many layers you’ll apply. Cooler or darker neutrals need fewer coats than pale, warm shades because they counter red’s warm undertone.
Choose tinted primer or a deep base coat to reduce bleeding; that boosts paint durability and saves topcoats.
Also think about color psychology—darker neutrals feel restful, pale warms can betray red beneath.
- Use tinted primer matched toward the final shade.
- Apply two coats for medium tones.
- Expect three+ coats for very light warms.
- Sand lightly between coats for adhesion.
Fast-Dry vs. Regular Paint for Coverage
When you need to cover red quickly, fast-dry paints can save time but sometimes cost you coverage—these formulas dry sooner so you can recoat faster, yet they may require extra coats to fully block vivid reds compared with regular paints designed for higher hide.
You’ll weigh speed against coverage: fast-dry helps meet deadlines, while regular paints often deliver better opacity in fewer coats.
Consider color psychology—deep reds can bleed through and affect perceived tone if undercoated poorly.
Also factor paint durability: regular, higher-hide paints often offer longer-lasting finish.
Test a swatch to confirm coat count before tackling the whole wall.
Painting Textured and Orange-Peel Walls
After choosing the right paint type for coverage, you’ll need a different approach for textured or orange-peel walls to avoid thin spots and clogged texture. You’ll prep by dusting and spot-priming, since texture can hide old color that affects new tones and their color psychology.
Use thicker nap rollers and adjust technique to maintain texture. Remember the historical significance of finishes in older homes when choosing sheen.
- Clean and repair
- Use high-build primer
- Roll with a thick nap, “floating” strokes
- Back-roll for even coverage
Finish with light inspection and touch-ups to preserve texture.
Painting High-Gloss Trim After Color Change
Because trim shows color changes more than walls, you’ll want to approach high-gloss repainting with care to make sure crisp edges and a smooth, reflective finish. Sand lightly, clean dust, and apply a high-quality deglosser or primer designed for gloss surfaces so the new paint adheres without brush marks.
Use a sash brush for edges, keep steady, and maintain wet edges to avoid lap marks. Consider how finish and color psychology affect perception—gloss reflects light and can make rooms feel larger or more formal, echoing the historical significance of trim in traditional interiors.
Finish with two thin coats.
Ceiling Touch-Ups When Switching to Light Colors
If you’re switching to a lighter ceiling color, touch-ups will make a big visual difference since ceilings reflect light and reveal inconsistencies more readily; focus for crisp, even results. Start by cleaning dust and marking spots needing paint. Use ceiling-grade paint and a short-nap roller for texture match.
For Ceiling touch ups during Light color transitions, work fast to blend wet edges.
- Assess stains and discoloration.
- Spot-prime any red bleed-through.
- Feather new paint into existing area.
- Inspect under natural and artificial light.
Let each coat dry fully before judging coverage.
Fixing Problems: Streaks, Flashing, Bleed
Ceilings can hide dust and small flaws, but walls reveal problems like streaks, flashing, and red bleed much more readily, so you’ll want a systematic approach to fix them.
Start by sanding glossy patches and feathering edges, then wash with trisodium phosphate to remove oils.
Prime with a high-hide, stain-blocking primer; multiple thin coats beat one thick coat.
For stubborn bleed, use an oil-based or shellac primer spot-treated before full priming.
Match final sheen to avoid flashing.
Remember red carries color psychology and historical significance, so test swatches under varied light before finishing.
Time-Saving Hacks for Large Red Rooms
When you’re covering a large red room, plan to work in zones and use tools that multiply your output—think wide rollers with extension poles, a 9– or 12–inch angled brush for cutting in, and an airless sprayer or hybrid roller-sprayer if the surface and budget allow.
Prioritize setup, ventilation, and tester patches to check how new hues interact with color psychology and how primers block bleed. Use efficient sequencing to avoid rework.
Prioritize setup, ventilation, and tester patches to see how colors behave and primers prevent bleed—plan sequencing to avoid rework.
- Tape and protect once, then paint continuously.
- Use a pole-mounted roller for ceilings first.
- Keep hydrated buckets for quick reloads.
- Choose eco friendly paints to reduce odor.
Cost-Saving Strategies Without Losing Coverage
Although saving money matters, you shouldn’t sacrifice coverage—smart choices let you cut costs without multiple coats.
Prime with a high-coverage stain-blocking primer to neutralize red; it saves paint and time. Pick a high-hide topcoat or a tinted primer close to your final shade so you need fewer layers.
Buy quality rollers and brushes to apply paint evenly and avoid touch-ups.
Consider color psychology and historical significance when choosing lighter neutrals that cover red well.
Test small samples to confirm coverage before committing.
Reuse leftover paint for trim and touch-ups to stretch your budget.
When to Call a Pro for Stubborn Red
If your red walls resist coverage despite primer and quality paint, call a pro—especially when stains bleed through, the surface has water or smoke damage, or multiple coats still show undertones. You’ll save time and avoid wasted paint when issues go beyond technique.
Consider hiring a pro if:
- Structural or moisture problems cause recurring discoloration.
- Smoke or nicotine has deeply stained the substrate.
- Multiple primers and coats still reveal red undertones affecting mood and Red wall psychology.
- You want expert color neutralization respecting Red color symbolism and final aesthetic.
A pro diagnoses root causes and applies correct blocking primers or repairs.
Post-Paint Care: Curing and Rehanging Hardware
Wondering how long to wait before you touch up and rehang hardware? Wait at least 24–48 hours for touch-ups and 72 hours for full curing, depending on paint type and humidity.
Wait 24–48 hours for touch-ups and about 72 hours for full curing, depending on paint and humidity.
Keep windows open or use fans for post paint ventilation to speed drying.
Remove painter’s tape carefully after tack-free time to avoid peeling.
When rehanging knobs, switch plates, and hinges, tighten screws gently to avoid stressing new paint.
Store leftover paint sealed and upright; label cans with date and room — basic paint storage tips help future touch-ups match.
Handle cured surfaces gently for seven days for best adhesion.
Test the Color in Different Light and Maintain
Before you commit to the whole room, test paint samples on several walls and check them at different times of day and under the lighting you actually use. You’ll see hue shifts, undertones and how color psychology affects mood. Note results, then maintain finish and consistency.
- Observe samples morning, noon, evening, and under lamps.
- Photograph squares so you compare light conditions later.
- Consider paint color trends but prioritize lasting comfort over fads.
- Record brand, sheen, and batch numbers for touch-ups.
Regular cleaning, prompt spot repairs, and storing extra paint will keep your walls true to the tested shade.
Frequently Asked Questions
Can I Paint Red Walls Without Moving Heavy Furniture Out First?
You can, but you’ll need furniture protection and careful paint color matching; cover, move smaller pieces, and tape edges, work in sections, and use long-handled tools to avoid scuffs while painting around heavy items in place.
Will Red Paint Odor Affect Sensitive Occupants or Pets During Repainting?
Like a faint campfire, yes — paint odor can bother sensitive occupants and pets. You should ventilate, use low‑VOC or no‑VOC paints, limit exposure, and monitor pet safety by keeping animals out until fumes dissipate.
How Long Before I Can Hang Artwork After Painting Over Red?
You can hang artwork after 24–48 hours for light pieces, but wait 7 days for heavy items to guarantee full color adhesion; choose primer selection wisely (high-hide, stain-blocking) to speed curing and improve bond.
Can I Repaint Red Walls Over Wallpaper Instead of Removing It?
Like patching a boat, you can paint over wallpaper, but you’ll risk bubbling and peeling. You should consider wallpaper removal and thorough surface preparation first; prime sealed seams, repair flaws, then paint for a lasting finish.
Do Colored Primers Expire or Lose Effectiveness Over Time?
Yes — colored primers can lose effectiveness over time; you should check primer longevity and paint shelf life, because separation, thickening, or odor changes mean it’s degraded, so you shouldn’t risk uneven coverage or adhesion.
Conclusion
You’ve seen why red resists coverage and how primers, multiple coats, and proper prep visually tame it. Test small swatches in varied light to watch undertones shift and confirm coverage—this visual experiment proves primer plus tinted sealer beats brute force recoating. If stains or deep pigment persist, a stain-blocking primer or pro intervention will flip the results. Follow curing times, rehung hardware, and your new color will read true and steady across the room.