How to Prep a Plastered Wall for Painting Easily
You can prep plastered walls quickly by checking for damp, loose or crumbling areas, scraping and sanding flaking paint, and filling holes or cracks with lightweight filler. Clean grease or dust, treat any mold, then vacuum and wipe surface. Apply the right primer for your plaster type (lime, gypsum, or painted surfaces) and let it dry before painting. Follow the simple step-by-step tips ahead to handle tricky spots and pick the best products.
Quick Steps to Prep Plaster Walls
Wondering where to start? You’ll clear the room, dust surfaces, and inspect plaster for cracks or loose bits.
Start by clearing the room, dusting surfaces, and checking plaster for cracks or loose areas.
Use gentle tools to scrape flaking areas, then fill gaps with compatible repair compound—especially important for historical preservation so you don’t harm original fabric.
Sand lightly once repairs set, wiping residue with a damp cloth.
Choose eco-friendly materials: low-VOC primers and paints, natural spackles, and breathable sealers that suit lime plaster.
Apply primer evenly, let it cure, then sand for a smooth base.
These quick steps make painting safer, cleaner, and respectful of the wall’s heritage.
Who Should Prep Plaster Before Painting
If your home has old plaster showing cracks or loose patches, you should prep it before painting to avoid problems later.
Even if you’re a DIYer aiming for an even finish, taking time to clean, repair, and sand will pay off.
And if you’re a professional, thorough prep guarantees a durable, high-quality result.
Homeowners With Old Plaster
Because old plaster often hides cracks, loose spots, and hairline shrinkage, you should prep it before painting to guarantee a smooth, long-lasting finish.
If you own an older home or handle historical restoration, inspect walls for loose keys, lath gaps, and failing skim coats. Remove loose material, secure any hollow sections with adhesive or screws, and fill cracks with appropriate compound.
Match existing textured finishes when patching, or feather repairs thinly for paint to blend. You’ll prolong paint life, prevent future peeling, and preserve character—so don’t skip thorough prep on aged plaster surfaces.
DIYers Seeking Even Finish
When you want a glass-smooth, professional-looking finish, prep your plaster before painting so paint adheres evenly and imperfections don’t telegraph through the topcoat. If you’re a DIYer, you should tackle surface prep when walls show cracks, uneven texture, old paint, or leftover wallpaper.
Start with careful wallpaper removal, then repair gouges, fill hairline cracks, and sand high spots. Address stains and any mold with appropriate mold treatment before sealing.
Prime repaired areas and use a leveling primer if needed. Doing this work yourself saves money and guarantees your paint lays down uniformly for a lasting, even finish.
Professionals Preparing Surfaces
Although DIYers can handle many jobs, professionals should prep plaster when the project demands speed, guaranteed durability, or structural repairs you can’t safely do yourself. You’ll want a pro if walls have major cracks, loose key coats, or uneven wall texture that needs skimcoating.
They’ll assess substrate stability, remove contaminants, and match compound mixes so finishes adhere. Hire them when you need consistent paint sheen across progressions, or when high-end coatings are planned.
A pro’s tools and experience cut rework, control dust, and guarantee correct drying. That saves time and prevents costly repainting or hidden failures later.
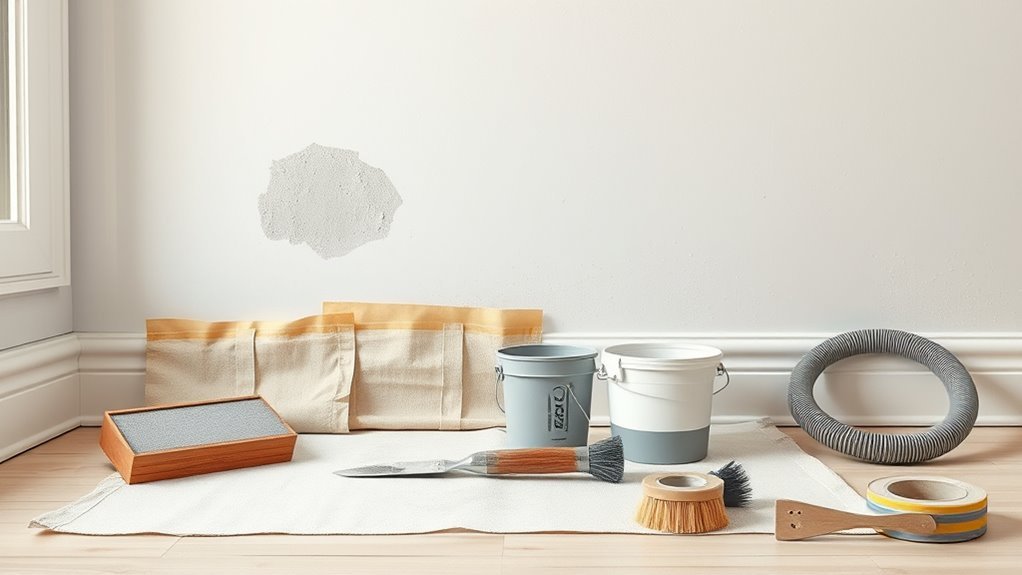
Tools and Materials Checklist
Before you start, gather the right tools, prep materials, and safety gear so the job goes smoothly. You’ll need items like sandpaper, plaster patching compound, primer, drop cloths, and a sturdy ladder.
Don’t forget gloves, a dust mask, and eye protection to keep yourself safe while you work.
Tools You’ll Need
If you want the job to go smoothly, gather the right tools and materials up front so you won’t stop mid-project to hunt for supplies. You’ll need hand and power tools suitable for historical plaster, plus safety gear and primers compatible with eco friendly paints. Choose items that won’t damage delicate surfaces.
| Task | Tool |
|---|---|
| Cleaning | Soft brush, vacuum attachment |
| Repair | Filler knife, plaster trowel |
| Sanding & smoothing | Sanding block, medium-grit paper |
Also have drop cloths, painter’s tape, and a sturdy ladder. Keep tools organized so you can work steadily and protect the plaster’s integrity.
Prep Materials List
Now that you’ve gathered the basic tools, it’s time to assemble a focused materials checklist so you have everything on hand when you start prepping the plaster. Gather patching plaster, bonding agent, fine sandpaper, joint compound, a mixing bucket, clean cloths, primer suited to plaster, and paintable caulk.
If you’re doing historical restoration, include lime-based fillers and breathable primers to match original materials. Choose eco-friendly materials where possible—low-VOC primer, natural plaster, and responsibly sourced fillers.
Keep labeled containers, replacement sanding pads, and a sponge for feathering edges. Having these items ready speeds work and improves final results.
Safety Gear Essentials
Because plaster dust and solvents can harm your skin, eyes, and lungs, you’ll want the right safety gear on hand before you start prepping. Wear a NIOSH-rated respirator, safety goggles, gloves, and coveralls to protect skin and keep decorative finishes free from contamination. Use knee pads for low work and a cap to catch falling dust. Keep a first-aid kit handy for minor cuts.
| Item | Purpose | Tip |
|---|---|---|
| Respirator | Dust/solvent protection | Fit-test before use |
| Goggles | Eye safety | Anti-fog lenses |
| Gloves | Skin barrier | Nitrile for solvents |
| Coveralls | Clothing protection | Disposable for messy jobs |
Also, have color matching samples nearby.
Identify the Type of Plaster You Have

Before you start any repairs or painting, figure out which plaster you’re dealing with so you choose the right prep and materials. Check for lime, gypsum, or Portland-based plaster by age and texture: older homes often use lime plaster tied to lath.
Mid-century homes typically use gypsum plaster. Newer builds may use gypsum or cement mixes.
Look for decorative finishes like molded or textured layers that signal specialty coatings. Note any fabric or paper facing, which is common in renovations.
If you’re working on a historic property, consider historical preservation guidelines before altering surfaces. Label the type so you pick compatible primers and fillers.
Check If Plaster Is Sound or Delaminating
How can you tell if plaster is holding tight or starting to fail? Tap lightly across the wall with a coin or small hammer. A solid, consistent sound means plaster soundness; hollow or rattling spots indicate plaster delamination.
Look for fine hairline cracks that don’t widen under pressure — those are usually cosmetic.
Press gently at edges and seams; any give, crumbling, or dusty residue shows detachment. Use a screwdriver to probe suspect areas; loose plaster will flake away.
Mark compromised sections for repair. Document overall soundness before painting so you address delamination zones first and avoid wasted effort.
Spot Damp, Mold, and Salt in Plaster
Notice musty smells, staining, or powdery white deposits on plaster — those are clear signs of damp, mold, or salt (efflorescence). You should first dry the area and improve ventilation; use a dehumidifier or fan and stop the moisture source if possible.
For mold, scrub with a mild detergent or diluted bleach, rinse, and let fully dry.
For salt, brush off crystals gently and neutralize with a vinegar solution, then rinse.
After treatment, sand lightly to blend vintage textures or decorative finishes before priming.
Monitor the spot; if stains return, moisture persists and you’ll need further assessment.
When to Call a Pro for Plaster Repairs
If you spot cracks that affect the wall’s structure or plaster that’s sagging or crumbling, you should call a pro rather than try to patch it yourself.
The same goes for widespread damp, recurring mold, or salt that suggests ongoing moisture issues.
A professional can diagnose underlying causes and make repairs that keep your new paint job from failing.
Visible Structural Damage
What should make you pick up the phone and call a professional is any sign that the plaster’s integrity is compromised—large cracks, bulging sections, or areas where plaster has separated from its lath or backing.
You’ll notice structural deterioration when walls bow, ceilings sag, or you find chunks missing. Visible cracks that widen over time, diagonal fissures near openings, or gaps at trim indicate underlying movement or failing supports.
Don’t try cosmetic fixes; a pro will assess load-bearing issues, secure loose plaster, and replace damaged lath if needed. Prompt intervention prevents bigger repairs and guarantees a safe, paint-ready surface.
Extensive Moisture Problems
When persistent damp spots, peeling paint, or mold keep returning despite your fixes, call a professional—these are signs of extensive moisture problems that can undermine plaster and the structure behind it. You’ll want an expert to diagnose source issues like roof leaks, rising damp, or plumbing failures and recommend repairs beyond surface patching.
Pros assess whether moisture barriers need replacement, address compromised lath or studs, and guarantee proper drying before new finishes. They’ll also advise on ventilation strategies to prevent recurrence and may install mechanical ventilation or dehumidification.
Don’t delay: untreated moisture leads to bigger structural and health risks.
Protect Floors, Furniture, and Trim Efficiently
Before you start painting, cover floors, furniture, and trim so paint and dust don’t create extra work later. Lay down heavy-duty drop cloths, tape seams, and use plastic sheeting for furniture; weigh edges to prevent slipping. Remove small items and hardware, or bag them securely.
Protect trim with low-tack painter’s tape, pressing edges firmly for crisp lines—this helps when you apply color theory to choose accent trims. Position portable lamps to test lighting techniques after prep, ensuring covers won’t cast shadows that hide flaws.
Keep a broom, vacuum, and tack cloth handy to clear dust before you begin.
Masks, Ventilation, and Safety Basics
While you’ve protected floors and furniture, don’t forget personal safety—paint dust and fumes can harm your lungs and eyes. Wear appropriate personal protective equipment: a NIOSH-rated respirator or mask, safety goggles, and gloves.
Keep windows open and use box or oscillating fans to create cross-ventilation. Run an air filtration unit with a HEPA filter to capture dust and solvent particles during sanding and painting.
Take breaks outside to clear your head and hydrate. If you feel dizzy or nauseous, stop work, get fresh air, and seek medical advice.
Store solvents in closed containers away from ignition sources.
Remove Loose or Flaking Paint From Plaster
Start by scanning the wall to spot any flaking or bubbling paint so you know where to focus.
Use a putty knife or wire brush to gently remove loose paint until you reach solid plaster.
Wipe away dust and debris before moving on to repairs or priming.
Identify Flaking Areas
If you run your hand over painted plaster and feel rough patches or loose flakes, mark those spots and get ready to remove the failing paint so the new coat will adhere properly.
Walk the room in good light, tapping and visually scanning for bubbling, cracking, or gaps. Use a pencil or small piece of painter’s tape to map problem areas on a diagram so you don’t miss anything.
Note edges where flaking meets sound paint — those shifting lines affect color matching and texture blending later. Prioritize large or widespread failures, and record any underlying dampness or previous repairs for attention.
Remove Loose Paint
Now that you’ve mapped the flaky spots, remove all loose paint so the new finish will stick and look smooth. Use a putty knife or scraper at a shallow angle, working gently to avoid gouging plaster.
Scrape loose flakes with a flexible putty knife.
Sand remaining edges feathering into solid paint, matching surface textures to prevent visible seams. For decorative finishes, proceed cautiously to preserve desired effects; strip only where adhesion fails.
Sand feathered edges for smooth progressions.
Clean dust with a damp cloth and let dry.
Wipe clean and prime exposed areas.
Prime bare plaster before painting.
Clean Greasy or Stained Plaster
Because grease and stains can prevent paint from adhering and leave visible marks, you’ll need to remove them thoroughly before priming. Use trisodium phosphate or mild detergent, test a hidden spot, then rinse with clean water. For delicate decorative finishes or historical restoration, work gently: blot, don’t scrub. Oil stains may need a poultice; food splatters often come off with warm soapy water.
| Surface | Action |
|---|---|
| Light dust | Wipe |
| Grease | TSP |
| Oil | Poultice |
| Nicotine | Degreaser |
| Old wax | Solvent |
Dry fully, then inspect for lingering discoloration before priming.
Treat Mold and Mildew on Plaster
After you’ve removed grease and stains, check for mold or mildew—these need special handling before you prime.
After removing grease and stains, inspect for mold or mildew and treat gently before priming.
You’ll protect plaster and historical preservation details by removing growth gently. Wear gloves, eye protection, and a mask, and test a small area.
Use an eco friendly materials approach: a diluted vinegar solution or a borax mix removes mildew without harsh solvents. Scrub with a soft brush, rinse lightly, and let the surface air.
If mold returns or covers large areas, call a professional for safe remediation.
- Test small areas first
- Use gentle scrubbing methods
- Prefer eco friendly materials
Dry Damp Plaster Safely and Effectively
Before you start drying plaster, identify and fix the moisture source so the problem doesn’t come back.
Compare drying methods—natural ventilation, dehumidifiers, and heat—based on time, safety, and potential damage to the plaster.
Choose the gentlest effective method and monitor moisture with a meter until readings are stable.
Assess Moisture Source
When you find damp plaster, don’t just paint over it—identify and stop the moisture source first so drying will be effective and lasting. You’ll inspect for leaks, rising damp, or condensation paths and prioritize repairs to prevent recurring moisture intrusion and support mold prevention.
Check plumbing, rooflines, guttering, and external walls; document wet areas and stain patterns to confirm sources. After fixing causes, monitor humidity and ventilation to keep conditions unfriendly to mold.
Use this quick checklist to guide your assessment:
- Look for active leaks and plumbing faults
- Examine exterior drainage and roof integrity
- Note ventilation problems and condensation spots
Drying Methods Comparison
Although different drying methods suit different causes and timelines, choosing the right approach prevents damage fast and prevents mold regrowth. You’ll weigh passive airing, dehumidifiers, heat, and fans.
Airing is gentle for light dampness; open windows and keep airflow to protect wall texture.
Dehumidifiers remove moisture steadily without overheating; they’re best when humidity’s high.
Low-heat dryers or heaters speed drying after leaks but watch plaster for cracking.
Fans help evaporation but need combined ventilation.
For severe or hidden moisture, call a pro.
Once dry, check color matching and texture before repainting to guarantee a seamless finish.
Repair Small Hairline Plaster Cracks
If your plaster has tiny hairline cracks, you can fix them quickly with minimal tools and a little patience. Gently widen cracks with a utility knife or fine sandpaper, remove dust, then apply a thin coat of ready-mixed filler or spackling compound.
Smooth with a damp sponge, let dry, then sand feathered edges. Match any surrounding vintage textures or decorative finishes by stippling lightly or using a small trowel for pattern consistency. Prime repaired spots before painting to guarantee adhesion.
- clean and prep surface
- apply thin filler, smooth carefully
- texture-match and prime
Fill Medium Cracks and Shrinkage Gaps
Since medium cracks and shrinkage gaps are wider than hairlines, you’ll need a sturdier approach: clear loose plaster and dust. Underline the crack slightly with a utility knife to give the filler something to bite. Then backfill with a setting-type plaster repair compound or epoxy filler in layers.
Let each layer harden, then sand lightly to blend with the surrounding surface. Feather edges to aid texture matching and avoid obvious repairs.
Prime patched areas to prevent paint blotches, using a stain-blocking primer if needed. Finish by lightly sanding the primer, then repaint, checking that the repaired texture reads consistent under the finished coat.
Patch Nail and Screw Holes Quickly
When you’ve removed trim and prepped the wall, patching nail and screw holes is a quick, low-mess step that prevents tiny imperfections from showing through your new paint. You’ll scrape loose paint, dust the area, then press lightweight spackling into nail holes or use small screw patches for deeper gaps.
Smooth with a putty knife, let dry, and sand flush. Prime any bare plaster spots before painting.
- Use a small tube of spackling for nail holes
- Apply screw patches for larger fastener holes
- Sand lightly and wipe dust before priming
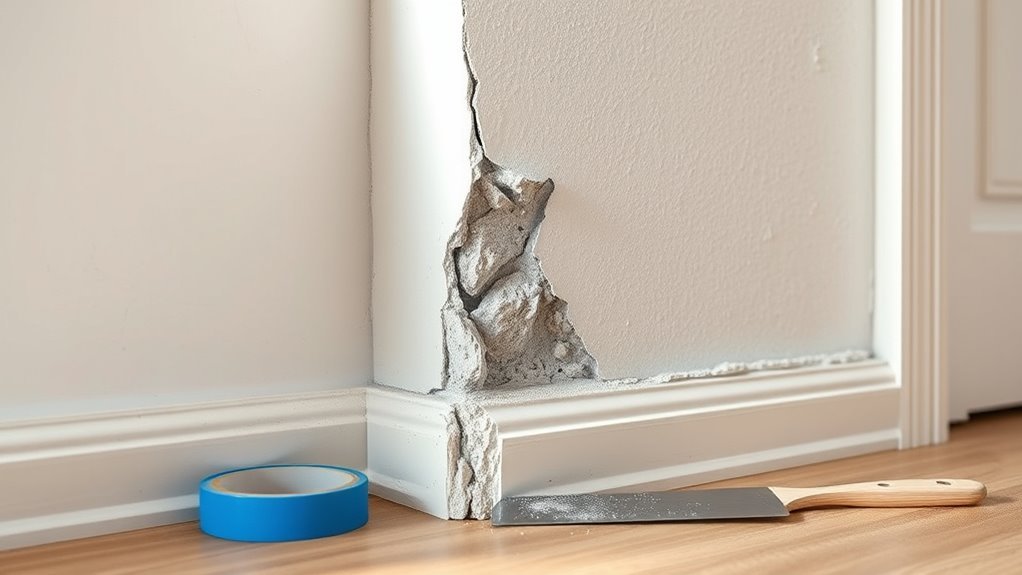
Repair Large Damaged or Missing Plaster Areas
How do you tackle large areas where plaster’s missing or crumbling? First, remove loose debris, cut back to solid edges, and assess lath or backing. You’ll install backing or mesh if needed, then apply multi-layer plaster, matching original profile for historical preservation and textured finishes. Sand between coats, feather edges, and replicate texture before final curing. Finish with a primer suited to plaster.
| Step | Action |
|---|---|
| Prep | Remove loose material, expose sound edges |
| Backing | Install mesh or wood support |
| Fill & Texture | Apply coats, match texture, sand between coats |
When and How to Use a Bonding Agent
After you’ve rebuilt any missing or crumbling plaster and smoothed the surface, decide if a bonding agent is necessary: use it whenever the new plaster or skim coat is going over dusty, porous, painted, or otherwise weak substrates that might prevent a good mechanical or chemical bond.
You’ll improve surface adhesion and reduce delamination by choosing a compatible bonding agent—cement-based for masonry, acrylic for painted or chalky surfaces. Clean, dampen, and apply per manufacturer directions; allow tacky but not wet before plastering. Test a small area first.
- Choose type by substrate
- Follow prep and drying times
- Patch-test for adhesion
Level Uneven Plaster for a Smooth Finish
If your plaster’s surface dips or ridges catch the light, you’ll need to level it before priming so paint lays down smoothly and hides imperfections. Start by evaluating the extent of unevenness with a straightedge or long level to mark high and low spots.
You’ll fill low areas with a setting compound or plaster skim, feathering edges to avoid ridges. For larger hollows, apply multiple thin layers, letting each cure.
Match the existing finish by practicing texture blending with a damp brush or sponge. When cured, spot-prime patched areas and consider color matching for any visible repairs before full priming.
Sand Plaster Without Overdoing It
While you want the surface smooth, resist the urge to sand aggressively—light, controlled sanding removes high spots and dust without thinning plaster or creating grooves. You’ll focus on evenness and texture removal rather than heavy abrasion.
Work with gentle passes, check progress often, and stop when bumps are gone. That preserves the plaster integrity and boosts paint adhesion. Clean dust thoroughly before priming to guarantee a strong bond.
- Sand lightly in small areas, then inspect.
- Use a soft touch near edges and corners.
- Wipe or vacuum dust to confirm smooth, receptive surface.
Which Sandpaper Grits to Use and When
Now that you’ve smoothed high spots with light sanding and removed the dust, pick grits that match the job: start with a coarser 80–100 grit only for any stubborn bumps or old paint edges, move to 120–150 grit for general shaping and blending, and finish with 180–220 grit to create a fine, receptive surface for primer. Match grit to texture patterns or to preserve subtle historical finishes. Use gentle pressure, test in an inconspicuous spot, and switch grits progressively.
| Grit | Use | Tip |
|---|---|---|
| 80–100 | Heavy removal | Short passes |
| 120–150 | Blending | Even strokes |
| 180–220 | Final finish | Light touch |
| 320 | Ultra-smooth | Rarely needed |
Remove Dust After Sanding
Because plaster dust can ruin paint adhesion and show through thin coats, you should remove it thoroughly before priming. Start by vacuuming with a brush attachment, working top to bottom to protect decorative finishes and preserve delicate wall textures.
Next, wipe with a slightly damp microfiber cloth or sponge, rinsing often and avoiding over-wetting plaster. Allow the wall to dry completely before proceeding.
- Vacuum corners and ledges with a soft-brush tool.
- Wipe smooth and textured areas gently to avoid marring textures.
- Inspect under good light for remaining dust and repeat cleaning if needed.
Prime Plaster for Latex and Oil Paints
After the wall is fully dry and dust-free, you’ll want to seal the plaster with the right primer so paint adheres evenly and finish coats look consistent. Choose a primer formulated for both latex and oil to bridge substrates and reduce flashing.
Apply thin, even coats with a roller and brush into corners; textured finishes may need an extra coat to fill micro-porosity. Let each coat dry per manufacturer directions.
Proper priming is a key step in wall preparation that promotes uniform sheen and prevents uneven absorption when you switch between paint types.
Clean tools promptly after use.
Choose Primer for Fresh, Sealed, or Repaired Plaster
When you’re choosing a primer for fresh, sealed, or repaired plaster, match the product to the surface condition. You’ll pick a high-alkalinity primer for fresh lime plaster, a sealing primer for patched gypsum, and a stain-blocking primer where repairs show through.
Consider surface porosity, drying time, and final paint type. Also think about color psychology when planning toned primers to influence room mood.
Respect historical plaster techniques on period walls—use compatible, breathable primers to avoid damage.
- Fresh lime: breathable, alkali-resistant primer
- Sealed gypsum: standard acrylic sealer
- Repaired areas: stain-blocking, flexible primer
Apply Primer for Best Adhesion and Coverage
Before you roll or brush, make sure the plaster is clean, dry, and free of loose dust so the primer can bond properly.
Choose a high-quality primer suited to your plaster type and pour into a tray.
Work in sections, cutting in edges with a brush, then roll with consistent strokes to avoid lap marks.
Use a nap length that matches existing texture patterns so the finish reads uniformly.
For repaired spots, feather primer outward to blend.
If you plan strong topcoat colors, use a tintable primer for better color matching and to reduce the number of finish coats needed.
How Long to Wait Between Primer and Paint
Let the primer fully cure so your topcoat adheres and looks uniform. Most water-based primers need about 1–4 hours before you can paint, while oil-based primers typically require 24 hours. You’ll check label instructions and room conditions—temperature and humidity affect cure time.
For plaster, wait longer if it’s cool or damp. If you’re planning decorative finishes or working on surfaces for historical preservation, be extra patient and test a small area. Follow manufacturer recoat windows to avoid adhesion problems.
- Confirm tack-free surface before painting
- Extend wait in high humidity or low temp
- Test a discreet patch first
Choose the Right Paint Finish for Plaster
Pick a finish that matches how much wear your plaster will see—higher durability finishes stand up better in hallways and kids’ rooms.
Keep in mind that glossier sheens show imperfections but clean easier, while flatter finishes hide flaws but need gentler maintenance.
Decide based on traffic, cleaning needs, and how much surface texture you want visible.
Finish Durability
Because plaster soaks up and shows wear differently than drywall, choosing the right paint finish makes a big practical difference in how long your walls look good. You’ll want finishes that resist scuffs, clean without stripping, and respect historical preservation when working on older homes.
For eco-friendly paints, check durability ratings; low-VOC options can still perform well. Match finish to room use and traffic patterns so you avoid frequent recoats. Consider test patches and consult preservation guidelines for heritage plaster.
- Satin or eggshell for balanced durability and touch-upability
- Flat for authenticity in period rooms
- Semi-gloss for high-traffic areas
Sheen And Maintenance
Which sheen will make your plaster look its best and stay manageable over time? You’ll usually choose eggshell or satin: they hide minor imperfections, resist scuffs, and clean easily without highlighting vintage textures or decorative finishes.
Use flat or matte on very smooth historic plaster where you want a subtle, period-appropriate look, but expect harder cleaning.
High-gloss draws attention to flaws and suits trim, not large plaster expanses.
For high-traffic areas pick a tougher satin; for low-traffic rooms select eggshell.
Test swatches, clean them after drying, and pick the sheen that balances appearance with maintenance needs.
Avoid Common Painting Issues on Plaster
When you prep plaster correctly, you’ll avoid problems like blistering, flaking, and uneven sheen that can ruin a fresh paint job. Start by checking for loose or powdery areas, repairing cracks, and removing old gloss before you paint.
Proper plaster prep prevents blistering, flaking, and uneven sheen—check for loose areas, repair cracks, and remove old gloss.
You’ll also respect vintage techniques and adapt for decorative finishes: test small areas, use compatible primers, and match textures to avoid patchy results.
Clean, sand, and prime repaired spots. Seal any porous patches and allow full cure times. Follow manufacturer instructions for primers and paints to prevent adhesion failures.
- Test small sections first
- Use appropriate primer
- Match texture and finish
How Temperature and Humidity Affect Painting
You’ll want to paint when the temperature is in the ideal range (usually 50–85°F) so the finish adheres and levels properly.
Pay attention to humidity because high moisture can cause blushing, slow drying, or poor bonding, while very low humidity can make paint cure too fast and crack.
Plan your timing and drying intervals accordingly to guarantee each coat dries fully before the next one.
Ideal Temperature Range
Wondering how temperature and humidity change the outcome of your paint job? You should aim for a steady ideal temperature range—typically 50–85°F (10–29°C)—so paint cures evenly and adheres well.
Good temperature control reduces drying defects and supports mold prevention by avoiding prolonged dampness on plaster. If it’s cooler, paint stays tacky; if hotter, it may skin over too fast.
Monitor conditions and postpone painting when temperatures fall outside the range.
- Paint best between 50–85°F (10–29°C)
- Keep temperatures stable during drying
- Use heaters or fans cautiously to prevent moisture buildup
Humidity’s Paint Effects
How much does humidity change your paint job? You’ll notice humidity effects immediately: high humidity can cause tacky finishes, blistering, and poor adhesion, while very low humidity may lead to cracking or uneven sheen.
You should monitor relative humidity and keep it within the paint manufacturer’s recommended range to guarantee proper bonding. Use dehumidifiers, fans, or HVAC to maintain moisture control, and avoid painting during damp weather or right after showering or cooking.
Also seal any damp plaster before painting, since trapped moisture undermines adhesion. Controlling humidity gives you a smoother, more durable finish and fewer touch-ups.
Drying Time Considerations
Although temperature and humidity often work together, they each play a distinct role in how fast paint dries and cures. You should monitor both so you don’t trap moisture in new plaster or force paint to skin over before solvents evaporate.
Higher humidity slows drying; low temps thicken paint and extend cure times. Consider weather impact when scheduling, and adjust ventilation or heating.
Surface texture also matters: rough plaster soaks more and may need longer between coats. Plan longer waits for cooler, damper days, and shorten them when conditions are warm and dry.
- Allow longer drying for damp, cool conditions
- Increase ventilation or heat to speed cure
- Test adhesion on textured areas
Time-Saving Tricks for Prepping Multiple Rooms
When you’re prepping multiple rooms, the smartest move is to work in parallel instead of finishing one room at a time. You’ll stage tools centrally, tackle patching across rooms in one session, and batch sanding by grit to save setup time. Protect floors and trim once per zone, and label drop cloths. Be mindful of decorative finishes and historical preservation—group rooms needing gentle methods together. Use teams or time blocks so tasks overlap efficiently.
| Task | Batch Size | Time Saved |
|---|---|---|
| Patching | 3 rooms | 30% |
| Sanding | 4 rooms | 40% |
| Masking | 5 rooms | 50% |
Low-Dust, Low-Mess Techniques for Small Spaces
Because you’re working in tight quarters, pick techniques that keep dust and debris contained without slowing you down: use a tack cloth or microfiber wipe-down instead of heavy sanding, attach a HEPA-filter vacuum to sanders or sand by hand with abrasive sponges, hang a temporary zipper-door plastic barrier for the room’s doorway, and lay down small, tacky drop cloths that grip floors.
You’ll protect nearby furniture and limit cleanup while prepping for paint or decorative finishes. For textured surfaces, focus on targeted smoothing and spot priming rather than broad abrasion. Keep tools compact and cleanup immediate.
- Microfiber wipes and tack cloths
- HEPA vacuum attachment
- Zipper-door plastic barrier
Prep Older Plaster Safely (Lead Paint & Lath Tips)
If your home was built before 1978, assume old plaster might’ve lead paint and take steps to protect yourself and your space. Test for lead paint with a kit or hire a pro; don’t sand or scrape without containment.
Use HEPA-filtered vacuums, wet methods, and disposable drop cloths to limit dust. When lath is exposed, secure loose strips and wear respiratory protection.
Fragile lath may need a restoration-minded contractor to avoid damage. Balance safety with historic preservation—repair gently, document work, and follow local disposal rules for contaminated debris to keep occupants and heritage safe.
Maintain Plastered Walls After Painting
After the paint fully cures, keep your plaster looking its best with simple, regular care that prevents damage and preserves finish. You’ll dust gently with a soft cloth or brush, avoid harsh cleaners, and address stains promptly with mild detergent.
For decorative finishes, spot-test any cleaner first so you don’t alter texture or sheen. Monitor for hairline cracks or dampness and repair small issues before they spread.
If your walls are part of historical preservation, consult pros for restoration methods that respect original materials. Follow consistent routines to extend life and maintain appearance without unnecessary interventions.
- Dust monthly with soft tools
- Tackle stains promptly, spot-test cleaners
- Inspect and repair small cracks regularly
Cost: DIY Prep vs. Contractor
You’ll usually pay less up front by prepping a plastered wall yourself, but save on labor only if you have the right tools, time, and skill. Weigh materials, rental tools, and complexity—historical restoration needs care and may force you to hire pros. DIY saves money with eco friendly materials you can source, but contractors bring speed, warranty, and experience for tricky repairs. Use this quick cost comparison:
| Item | DIY | Contractor |
|---|---|---|
| Labor | Low (your time) | Higher (paid) |
| Tools | Rental/purchase | Provided |
| Skill risk | Higher | Lower |
| Warranty | None | Usually included |
Troubleshooting: Peeling, Recurring Cracks, Blotches
Spending less by doing your own prep is great, but it won’t help if paint keeps peeling, cracks reappear, or blotches show through—those problems can erase your savings fast. You’ll diagnose causes: poor adhesion, moisture, or movement.
Doing your own prep saves money—until peeling paint, recurring cracks, or stains undo those savings.
Address peeling paint by scraping, sanding, and priming with a bonding primer.
For recurring cracks, widen hairline splits, fill with flexible joint compound, embed fiberglass tape, and feather smooth.
Blotches usually mean uneven primer or stains; spot-prime with stain-blocking primer.
After repairs, check for moisture sources and repaint only when surfaces are fully dry.
- Scrape and prime
- Tape and fill cracks
- Use stain-blocking primer
Step-by-Step Recap: Ready-to-Paint Checklist
Before you pick up a brush, give the wall a final surface inspection to spot any missed imperfections or leftover filler.
Make sure your prep area is completely dust-free by wiping, vacuuming, and using a tack cloth where needed.
Once the surface is clean and smooth, you’ll be ready to start painting with confidence.
Final Surface Inspection
Ready for a final check? You’ll inspect the plaster visually and by touch, confirming repairs are flush, paintable, and aligned with historical preservation standards if the wall’s period matters.
Check for soft spots or staining that suggest unresolved moisture; moisture mitigation must be verified before painting.
Make sure surfaces are smooth, keyed for primer, and free of loose particles.
- Run your hand and a bright light over seams and repairs.
- Use a moisture meter on suspect areas and document readings.
- Verify repaired textures match surrounding plaster and historical profiles before priming.
Dust-Free Prep Steps
A clear, dust-free surface makes painting easier and prevents adhesion problems, so you’ll want to follow a tight, step-by-step prep checklist that removes loose particles, seals dust sources, and protects finishes.
First, vacuum with a brush attachment, then wipe with a damp microfiber cloth to catch fine grit.
Mask trim and cover floors to protect decorative finishes and nearby surfaces.
Fill cracks, sand lightly, and vacuum again.
Use tack cloth for final dust pickup.
For historic rooms, balance cleaning with historical preservation—avoid aggressive scraping that damages original plaster or ornamental work.
Proceed only when the surface is spotless.
Further Resources and Top Product Recommendations
If you want reliable advice and the right tools, start with a few trusted resources and products that pros use. Seek guides on historical preservation if your plaster has heritage value, and favor eco friendly materials to reduce VOCs and waste.
Use manufacturer datasheets and how-to videos for technique and drying times. For tools and supplies, pick reputable brands that list composition and safety info.
Consult manufacturer datasheets and tutorial videos for proper techniques, drying times, and safety information before starting.
- Microfiber dusters, HEPA vacuum, and soft-bristle brushes
- Low-VOC primers, breathable lime-based plasters, and eco friendly sealers
- Flexible fillers, sanding blocks, and manufacturer-recommended brushes
Frequently Asked Questions
Can I Paint Plaster Over Wallpaper Without Removing It First?
You can, but you shouldn’t usually: wallpaper removal is recommended. If you don’t, guarantee thorough surface cleaning, troubleshoot loose seams, prime with a proper sealer, and expect extra prep to avoid bubbling or peeling later.
How Do I Handle Plaster Dust in HVAC Systems During Sanding?
You’ll seal vents and use dust containment barriers, run a HEPA air filtration unit near the work area, change filters frequently, and vacuum with a HEPA-equipped shop vac so plaster dust won’t circulate through your HVAC.
Will Textured Plaster Require Special Rollers or Brushes?
Yes — textured finishes need special rollers or brushes; you’ll use thicker-nap rollers and stiff-bristle brushes, adjusting roller techniques for even coverage, and you’ll dab, roll crosswise, and back-roll to fill crevices effectively.
Can I Use Caulk Instead of Plaster Filler for Thin Gaps?
No — you shouldn’t use caulk instead of plaster filler for thin gaps; use caulk alternatives only for flexible joints. For plaster, choose proper fillers; combine gap filling techniques like skim, flexible filler, or setting compound for best results.
How Long Should Newly Installed Plaster Cures Before Priming?
You should wait 2–4 weeks for plaster curing before priming; you’ll check dryness and hardness as part of priming preparation, and cure longer in damp conditions or thick coats to avoid trapping moisture under primer.
Conclusion
You’ve got this—prep’s the secret to a lasting finish, so follow the checklist, fix loose plaster, sand smooth, prime, and paint with confidence. Think like a careful clockmaker: small adjustments now save big headaches later. Whether you DIY or hire pros, inspect for delamination, patch cracks, and use the right primer. Take your time, keep materials handy, and you’ll turn a tired wall into something that feels timeless and newly made.