Is Satin Good for Exterior Paint? Durability Guide
Yes — satin is a very good choice for exterior paint when you want balanced performance and appearance. You’ll get a moderate sheen that hides minor flaws, resists dirt, sheds moisture better than flat paints, and stands up to everyday wear with proper prep and UV-stable pigments. It’s easier to clean and touch up, suits varied surfaces, and often saves on long-term maintenance. Keep going and you’ll find tips on testing, prep, and longevity.
Quick Verdict: Is Satin Good for Exterior Paint?
If you want a durable, attractive finish that hides minor imperfections without showing every streak, satin is a great choice for exterior paint. You’ll get moderate sheen, good washability, and enough toughness for weather exposure while avoiding high-gloss glare.
Satin resists dirt and can be spot-cleaned more easily than flat finishes. When selecting a shade, insist on precise color matching and professional paint mixing to guarantee consistency across batches and touch-ups.
Use primer on bare surfaces, apply even coats, and allow proper cure time. Overall, satin balances longevity and appearance for many exterior applications.
Who Should Consider Satin Exterior Paint?
When you want a durable, low-maintenance finish that still hides minor surface flaws, satin is a smart choice for many homeowners and pros alike. You’ll pick satin if you need weather resistance and easy cleaning without high gloss. It suits trim, siding, and porches, and works well where foot traffic or grime appear. Consider existing substrate, Color options you prefer, and the right Application tools for smooth coverage. Match sheen to architectural style and maintenance willingness. Use rollers for large areas, brushes for detail, and a sprayer for speed to get consistent results.
| Ideal Use | Benefit |
|---|---|
| Trim | Highlights details |
| Siding | Durable, cleanable |
| Porches | Hides scuffs |
| Rental homes | Low upkeep |
| Renovations | Forgiving finish |
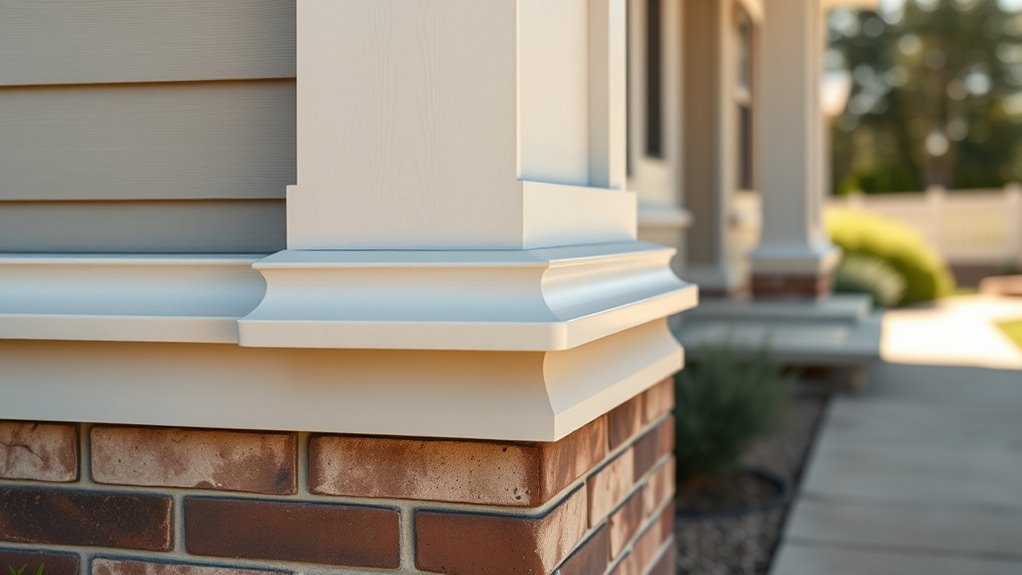
What “Satin” Finish Means for Exteriors
Satin offers a soft, low-luster sheen that balances appearance and practicality for exterior surfaces. You’ll notice it subtly reflects light, softening imperfections without creating glare.
That sheen complements varied surface texture—from smooth siding to modestly rough trim—helping details read cleanly at a distance. Satin’s finish also accepts dirt washing without demanding constant touch-ups, so maintenance stays manageable.
When choosing paint, you’ll find satin available in many color options, letting you pair durability with the palette you want.
Satin vs Flat, Eggshell, Semi-Gloss, and Gloss (Quick Compare)
Because sheen affects both look and performance, it’s useful to compare satin directly with flat, eggshell, semi-gloss, and gloss so you can pick the right balance of hide, durability, and cleanability for each exterior surface.
Because sheen shapes both appearance and performance, compare satin with other finishes to choose the right balance of hide, durability, and cleanability.
Satin offers moderate sheen and cleanability, hiding minor imperfections while resisting dirt better than flat or eggshell. Flat hides most flaws but needs gentle cleaning.
Eggshell balances hide and wipeability for siding. Semi-gloss and gloss deliver top durability and easy washing but highlight surface flaws and reflect more light.
Consider paint color and application tools—rollers for flat/eggshell, brushes or sprayers for satin to gloss.
Key Durability Metrics for Satin: Chalking, Adhesion, Fade
If you want a satin finish to stay looking fresh, focus on three measurable durability traits: chalking, adhesion, and fade. You’ll check chalking by rubbing a white cloth—excess powder means more maintenance. Test adhesion with a cross-hatch peel test; poor adhesion signals prep or substrate issues. Monitor fade against a color-matched sample; uniform fading hints at pigment limits. Good color matching during paint mixing reduces visible drift. Below is a quick reference:
| Metric | What to look for |
|---|---|
| Chalking | Minimal powder on cloth |
| Adhesion | No flaking after cross-hatch |
| Fade | Match to sample, consistent tone |
How Satin Resists Weathering and UV Fading
You’ll see how satin’s formulation offers better UV light resistance than flat sheens, helping pigments hold their color longer.
Its slightly glossy surface also sheds moisture more effectively, reducing water-related breakdown.
Together those traits extend the finish longevity on exterior surfaces.
UV Light Resistance
Wondering how satin finishes hold up under relentless sun exposure? You’ll find satin balances reflectivity and pigment protection, so color matching stays truer longer and subtle texture options don’t amplify fading. UV stabilizers in quality satin slow pigment breakdown and binder degradation, preserving gloss and hue.
- Pigment protection: UV additives absorb/deflect rays, reducing fade.
- Binder resilience: Flexible resins resist chalking and maintain adhesion.
- Maintenance ease: Faded spots blend better with matching and light touch-ups.
You should still choose high-grade satin with UV inhibitors and test samples in sun-exposed areas.
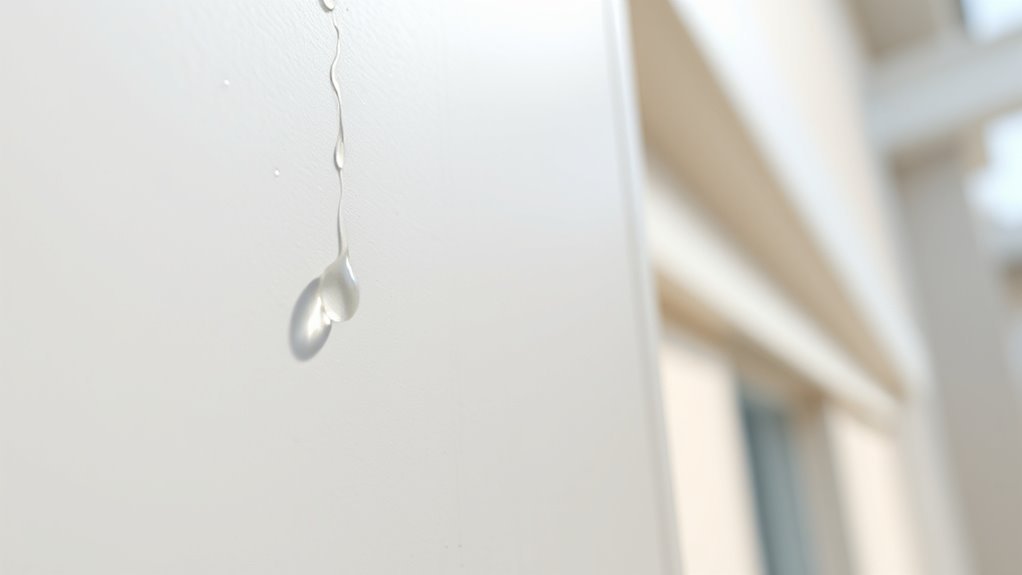
Moisture Shedding
Because satin finishes form a tighter film than flat paints, they shed water more effectively and keep moisture from seeping into siding and trim, which helps prevent swelling, mildew, and premature paint failure.
You’ll notice less staining and easier cleaning after storms, since satin’s slight sheen repels moisture and speeds drying. When choosing satin, consider texture variations on different substrates—smooth boards shed water differently than rough stucco—so pick application methods accordingly.
Also plan color matching carefully: darker shades can hide damp streaks less well, while proper match and maintenance keep exteriors looking uniform and resilient over seasons.
Finish Longevity
How does a satin finish hold up to sun, wind, and seasonal wear? You’ll find satin balances durability and appearance: its low-sheen surface reflects some UV, slowing color fading while supporting color blending across panels. Satin resists grime, so you’ll clean surfaces less often, and its slight sheen aids texture enhancement without highlighting imperfections. Expect gradual wear, not sudden failure.
- UV resistance — satin disperses light, reducing rapid fading.
- Abrasion resistance — it tolerates wind-driven particles better than flat.
- Maintenance — easy washing restores look, extending service life.
Choose quality satin and proper prep for best longevity.
Satin and Moisture: Water Penetration, Breathability, Mildew
Curious how satin finishes handle moisture compared with flat or gloss paints? You’ll find satin sheds water better than flat, reducing water penetration, yet it’s not as impermeable as gloss.
Its moderate sheen balances breathability so trapped moisture can slowly escape through surface porosity, cutting the risk of blistering. That breathability helps limit mildew growth on exterior walls, provided you control spores and clean surfaces.
Still, proper preparation—sealing gaps, using quality primers, and ensuring good drainage—is essential. Satin won’t fix chronic moisture problems; it manages them more effectively than flat but less aggressively than high-gloss coatings.
Abrasion and Scuff Resistance of Satin on Siding and Trim
Satin finishes resist scratches and scuffs better than flat paints, but they can still show wear on high-traffic siding and trim. You’ll want to inspect vulnerable areas regularly and keep a small supply of touch-up paint for quick repairs.
Proper prep and gentle cleaning will extend the finish and make touch-ups blend more seamlessly.
Scratch And Scuff Resistance
Want your siding and trim to keep a clean, finished look despite daily wear? You’ll find satin balances subtle sheen with moderate toughness. Its paint texture hides minor imperfections better than flat, and careful color matching reduces visibility of small marks.
For scratches and scuffs, consider these practical points:
- Satin resists light abrasion; shallow scuffs often blend into the finish.
- Deeper scratches may reveal primer or substrate, so prompt assessment helps.
- High-traffic areas benefit from tougher formulations and proper application to maximize durability.
You’ll get good everyday resistance, but satin isn’t invulnerable to heavy impacts.
Maintenance And Touch-Ups
After you’ve assessed scratches and scuffs, regular maintenance and timely touch-ups will keep the siding and trim looking sharp and prolong the finish. You’ll clean affected areas, sand lightly, and prime exposed substrate before applying satin touch-up paint.
Match color precisely by bringing a swatch or using a digital sample for color matching at the store. When they mix paint, request a small batch labeled with formula details so future touch-ups match.
Keep a touch-up kit with stirred paint, brushes, and clear instructions. Inspect annually, address nibs and scuffs quickly, and avoid heavy abrasion to preserve sheen.
How Well Satin Hides Surface Imperfections
When you’re choosing a finish, remember that satin strikes a middle ground: it softens minor flaws without masking deeper gouges or heavy texture. You’ll find satin forgiving for small imperfections, especially with careful paint application and sensible color choices. It reflects light gently, reducing the visibility of hairline cracks and brush strokes, but it won’t hide structural damage.
Prep matters: fill, sand, and prime where needed so satin can do its best. Use satin when you want a balance between hiding and highlighting detail.
- Minor scratches and small bumps
- Subtle surface irregularities
- Deep gouges and rough texture
Cleaning Satin: Washing, Stain Removal, and Frequency
You should start by regularly wiping dust and washing satin finishes with a mild soap-and-water solution to prevent buildup.
For tougher marks, use a soft brush and a gentle, non-abrasive cleaner, testing in an inconspicuous spot first.
Aim to wash high-exposure areas every 6–12 months and spot-clean stains as they appear.
Wiping And Washing
Although satin finishes hide imperfections better than flat paint, they still need regular wiping and occasional washing to stay looking their best. You should wipe dust and pollen weekly, rinse mud and bird droppings promptly, and wash gently twice yearly to minimize color fading and prevent edge staining.
Use a soft cloth, mild detergent, and low-pressure water. Test a small area first. Focus on trim and high-touch zones. Avoid harsh abrasives that dull sheen.
- Weekly: dry wipe for dust and pollen.
- As-needed: spot rinse after contamination.
- Biannual: full gentle wash to maintain finish.
Stain Removal Techniques
If stains appear on satin-painted surfaces, act quickly and use the mildest method that will remove the mark; quicker action reduces the chance you’ll need stronger cleaners that can dull the sheen.
Start with warm water and a soft cloth, moving gently across decorative accents and flat areas.
For grease, use diluted dish soap; for mildew, a bleach solution (test first). Rinse thoroughly and dry to prevent water spots.
For stubborn marks, try a magic eraser lightly.
Touch up chips using proper color matching to maintain a uniform finish.
Clean routinely—every 6–12 months—and spot-clean as needed.
Touch-Ups, Spot Repairs, and Repaint Cycles for Satin
When small chips or scuffs appear on satin finishes, act quickly to blend touch-ups so the sheen stays consistent across the surface. You’ll need accurate color matching and careful primer selection to avoid visible patches.
Clean and sand the spot, apply compatible primer if bare substrate shows, then feather the new satin paint into surrounding areas.
Clean and sand the area, prime exposed substrate as needed, then feather new satin paint into surrounding surfaces.
For larger sections, consider spot repairs before they worsen.
- Match color and sheen precisely.
- Use primer on exposed wood or metal.
- Blend edges and cure fully before evaluating.
Plan repaint cycles every 7–12 years based on exposure and maintenance.
Best Siding for Satin: Wood and Engineered Wood
When you pick wood or engineered wood for a satin finish, consider how the grain will show through and whether you want to highlight or hide texture.
You’ll also need to account for moisture resistance—choose species or engineered products with good water-shedding properties and proper sealing.
Finally, plan for regular maintenance and periodic recoating to keep the satin sheen even and durable.
Wood Grain Compatibility
Curious how satin finishes play with natural wood grain? You’ll notice satin highlights texture without masking it, so wood grain remains visible and attractive while paint adhesion stays strong when surfaces are prepped.
For engineered wood, satin smooths inconsistencies and provides a uniform sheen that still shows grain patterns.
- Sand and clean: open the grain for better paint adhesion.
- Primer choice: seals engineered layers and promotes bonding on natural wood.
- Brush vs. roller: brush work follows grain, improving finish and longevity.
Follow these steps and satin will complement wood’s character while adhering reliably.
Moisture Resistance Needs
Satin finishes that show wood grain still need protection from moisture, so pick siding that balances appearance with water-shedding performance. You’ll want wood or engineered wood that’s kiln-dried, sealed, and profiled to shed water; these reduce trapped moisture that accelerates color fading and surface cracking.
Engineered wood offers added dimensional stability and factory-applied primers that help resist swelling in wet climates. When you install, guarantee proper flashing, gaps for drainage, and breathable house wrap so moisture exits rather than sits against the satin finish.
Choose species and treatments rated for exterior exposure to preserve appearance and structural integrity.
Maintenance And Recoating
How often should you plan for touch-ups and full recoats on wood or engineered-wood siding? You’ll inspect annually, touch up minor wear every 2–3 years, and recoat fully every 5–8 years depending on exposure.
Keep accurate notes on color mixing to match fades, and label stored cans for paint storage so you avoid mismatches.
Clean surfaces, sand glossy spots, and prime bare wood before recoating. Follow this simple routine:
- Annual inspection and immediate small touch-ups.
- Partial refreshes at 2–3 years; address chalking and mildew.
- Full recoating at 5–8 years; prep and use matched color mixes.
Satin on Vinyl: Adhesion and Color Retention
When you choose a satin finish for vinyl siding, you’re balancing a soft sheen with practical demands like adhesion and long-term color retention. You’ll find satin generally bonds well if the vinyl is clean, chalk-free, and compatible with acrylic latex paints. Proper preparation improves vinyl adhesion and reduces peeling.
Satin’s slight gloss helps hide imperfections and resists dirt, aiding color retention by slowing fade from UV exposure. Still, darker satins absorb heat and can accelerate fading or warping if the product isn’t rated for vinyl.
Test a small area, use UV-resistant topcoats, and follow manufacturer guidelines to maintain appearance.
Satin on Stucco and Masonry: What to Expect
Because stucco and masonry are porous and textured, you’ll want to choose a satin finish that balances mild sheen with breathability and durability. You’ll appreciate that satin highlights textures without glossy glare, but you must prep properly to guarantee adhesion on rough surfaces.
Expect slightly less washability than on smooth siding; touch-ups blend differently because textured finishes scatter light. Prioritize primers designed for masonry and test small areas for color matching under real light.
Consider these quick tips:
- Use breathable masonry primer and flexible satin exterior paint.
- Match pigments on textured finishes, testing samples.
- Back-roll for even coverage.
Satin on Metal and Aluminum Trim: Prep and Performance
When you paint metal or aluminum trim with a satin finish, start by stripping loose paint, sanding lightly, and cleaning off oils and debris so primer bonds well.
Treat and seal any rust with a converter and use a corrosion-resistant primer to stop future blistering.
Keep the finish looking good with a simple maintenance routine: wash annually, touch up scratches promptly, and inspect for new rust.
Surface Preparation Steps
If you want a satin finish on metal or aluminum trim to last, start with meticulous surface prep: clean away dirt, oils, and oxidation, sand to a keyed profile, and remove all loose coatings before priming. You’ll choose a primer suited to metal, match topcoat color coordination with surrounding siding, and plan decorative accents so edges and highlights are consistent.
Follow these steps:
- Degrease and wash, then rinse thoroughly and let dry.
- Sand, feather edges, and remove powdery oxidation for adhesion.
- Apply a metal-etch primer, spot-prime bare areas, then finish with satin topcoat.
Rust Prevention Tips
After prepping and priming metal or aluminum trim for a lasting satin finish, you’ll want to stop rust before it starts by addressing moisture, bare metal, and edge exposure head-on.
For rust prevention, remove mill scale and old corrosion with a wire brush or abrasive pad during surface preparation, then wipe clean and dry.
Apply a corrosion-inhibiting primer and seal joints and fasteners with silicone or polyurethane caulk to keep water out.
Use stainless or galvanized fasteners and avoid direct soil contact.
Finally, choose a satin exterior topcoat rated for metal; it’ll shed water and resist abrasion.
Finish Maintenance Routine
A simple, regular maintenance routine will keep your satin metal and aluminum trim looking fresh and protect the underlying substrate; you’ll preserve finish, prevent corrosion, and maintain color combinations that enhance curb appeal.
Inspect quarterly for chips or dulling, clean with mild detergent, and touch up promptly to retain aesthetic appeal. Keep records of repairs and products used.
- Clean: gentle soap, soft brush, rinse.
- Inspect: chips, sealant failure, corrosion.
- Repair: sand, prime, match satin touch-up.
Follow manufacturer guidance, avoid abrasive cleaners, and retouch with compatible satin products for lasting performance.
Why Substrate Prep Matters More With Satin
Because satin finishes sit between flat and gloss, they highlight any surface irregularities more than flatter sheens do, so you need to prepare substrates thoroughly to get the smooth, even look you want. You’ll remove loose material, mildew, and chalking, then sand to a consistent surface texture so the paint sheen reads uniformly.
Fill cracks and feather edges of old coatings to avoid visible ridges. Cleaning and allowing proper dry time prevents adhesion failures that satin would reveal.
When you prep carefully, the satin finish reflects light evenly, resists premature wear, and makes touchups far less noticeable.
Best Primers for Satin Exteriors
Start with a quality primer formulated for exterior use—it’s the single most important step to getting a durable, even satin finish. You’ll choose primers that seal, promote adhesion, and resist moisture so your satin topcoat performs longer and keeps its aesthetic appeal.
Consider stain-blocking, high-build, or bonding types depending on substrate. Also think about color matching to reduce the number of topcoats.
- Stain-blocking primer — for knots, tannins, or water marks.
- High-build primer — for minor surface imperfections and uniformity.
- Bonding primer — for slick or previously painted surfaces.
Latex vs Oil-Based Satin: Which Topcoat to Pick?
With the right primer in place, you’ll face the next key choice: latex or oil-based satin for your exterior topcoat.
With the right primer, choose latex for durability and ease, or oil-based satin for a smoother, stain-resistant finish.
You’ll pick latex for faster drying, easier cleanup, better UV resistance, and flexibility against cracking—ideal if you need reliable color matching and frequent repainting.
Choose oil-based satin when you want superior leveling, smoother finish, and exceptional stain resistance on trim or high-traffic areas, though it yellows slightly with age.
Consider climate, substrate, and maintenance.
Test samples in daylight to judge aesthetic appeal, feel the finish, and confirm long-term performance before committing to your whole project.
High-Quality Satin Brands and Features to Look For
When choosing a satin exterior, you’ll want brands with a proven manufacturer reputation so product performance and support are reliable.
Look for advanced weather resistance—UV blockers, mildewcides, and flexible films that shed water and resist chalking.
Pay attention to resin and pigment quality, because high-grade binders and opaque, lightfast pigments determine adhesion and long-term color retention.
Trusted Manufacturer Reputation
Because the brand behind your satin exterior paint determines how consistently it performs, you should prioritize manufacturers with proven track records for durability, color retention, and customer support.
You want brands that offer reliable color matching and enhance your home’s aesthetic appeal, plus clear warranties and responsive tech assistance.
Look for third-party reviews, professional endorsements, and transparent testing data.
- Reputation: long-standing brands with consistent performance records.
- Support: accessible customer service, clear warranties, and color matching tools.
- Transparency: published test results, ingredient lists, and demonstrable cases of long-term color stability.
Advanced Weather Resistance
If you want a satin exterior that actually stands up to sun, rain, and rapid temperature swings, choose brands that build advanced weather resistance into their formulas. You’ll look for UV inhibitors, elastomeric stretch, and mildew blockers. Prioritize Color matching systems and varied Texture options so repairs and design choices stay consistent. Check warranties and real-world reviews. Compare finish durability, ease of cleaning, and environmental certifications before buying.
| Brand | Weather Feature | Design Aid |
|---|---|---|
| Brand A | UV inhibitors | Color matching |
| Brand B | Elastomeric | Texture options |
| Brand C | Mildew resistant | Digital swatches |
Resin And Pigment Quality
Although you’ll judge a satin exterior by its sheen, the hidden story is in the resin and pigments—the resin binds and flexes with temperature changes while high-quality pigments resist fading and washout.
You should pick brands that specify acrylic or elastomeric resin blends for flexibility and UV stability.
Look for lightfast, inorganic or durable organic pigments that aid color matching over time and reduce repaint frequency.
Proper surface sanding improves adhesion, so prep matters as much as formula.
Prioritize manufacturers with clear resin/pigment specs, long warranties, and lab-backed fade data.
- Resin flexibility
- Pigment lightfastness
- Prep & surface sanding
Cost Comparison: Satin vs Other Exterior Sheens
When you compare satin to other exterior sheens, you’ll find its price usually sits between flat/eggshell and semi-gloss/high-gloss, making it a middle-ground choice for cost-conscious projects. You’ll pay more than basic flat finishes because satin uses higher-quality resins and pigments that handle cleaning and mild wear better.
Compared to semi-gloss, satin often costs less while still offering attractive color variation and moderate durability. Texture options influence cost—smooth, low-VOC formulations can raise price.
For budgeting, factor in longevity and maintenance: satin may reduce repaint frequency versus flat, offsetting its slightly higher upfront cost.
How Climate Affects Satin Performance Overview
You’ll notice satin reacts differently depending on humidity and moisture, which can affect adhesion and mildew resistance.
Sunlight and UV exposure will gradually fade and break down the finish, so location matters.
Rapid temperature swings can cause the sheen to crack or chalk faster than in stable climates.
Humidity And Moisture
Since satin finishes sit between flat and glossy, they balance breathability and sheen—but humidity and moisture still change how they cure and hold up. You’ll notice satin sheds light dampness well, making it suited for porch ceilings, garden decor trim, or sheltered siding, while interior accents transfer to outdoor use cautiously.
High humidity slows drying, increases tackiness, and risks mildew; rapid moisture cycles can crack the film.
- Dry spells: better cure, stronger film.
- Persistent damp: higher mildew, softer finish.
- Ventilation and primer: prevent moisture traps and extend life.
Sunlight And UV Exposure
How does constant sun and UV exposure change a satin finish? You’ll notice accelerated color fading and brittle binders that can lead to surface peeling if protection’s lacking. Satin resists grime but UV breaks pigments and weakens the film, so you’ll need UV-resistant formulations and regular inspections. Apply light-reflective primers, schedule touch-ups, and use protective coatings to prolong life.
| Effect | What to watch for |
|---|---|
| UV degradation | Chalky surface, dullness |
| Color fading | Loss of vibrancy |
| Film embrittlement | Cracks, flaking |
| Surface peeling | Edges lift, paint peels |
Temperature Fluctuations
Wondering how hot days and cold nights affect a satin finish? You’ll notice temperature swings stress coatings: expansion and contraction can cause hairline cracks, peel, or loss of sheen.
Proper prep and adaptable formulas help. Pay attention to color matching after repairs since fading varies across exposures, and protect areas where texture enhancement is critical.
- Choose elastomeric or flexible satin for high fluctuation zones.
- Time painting for moderate temperatures to ensure cure and adhesion.
- Inspect and touch up promptly to maintain uniform color matching and texture enhancement.
Satin in Hot, Sunny Climates: Fading and Heat Issues
When your home sits in a hot, sun-drenched area, satin finishes can show both benefits and drawbacks: they resist dirt better than flat paints but are more prone to visible fading and heat-related gloss shifts over time. You’ll notice color vibrancy diminishes faster on south- and west-facing walls, especially with saturated hues.
High temperatures can soften binders, causing mild texture variation and occasional sheen pooling in crevices. To limit issues, pick UV-resistant formulations, lighter tones, and high-quality pigments.
Regular inspections and timely touch-ups preserve appearance; proactive maintenance prevents the uneven dulling and gloss inconsistencies that heat accelerates.
Satin in Cold, Wet Climates: Freeze/Thaw and Moisture
Because satin sits between flat and semi-gloss, it handles moisture differently and can show problems in cold, wet climates if you don’t plan for freeze/thaw cycles and trapped moisture. You should expect moderate moisture resistance but not miraculous protection.
Prep and drainage matter: seal gaps, use breathable primers, and guarantee siding sheds water so pockets won’t trap moisture and cause blistering during freeze/thaw swings. Pick high-quality satin formulated for exterior use, and inspect yearly for soft spots or peeling.
Follow these priorities:
- Guarantee proper substrate prep and breathable primers.
- Provide drainage and eliminate trapped moisture.
- Choose exterior satin with proven moisture resistance.
Satin Near Coasts: Salt Air and High-Humidity Performance
If you’re using satin near the coast, expect higher maintenance. Satin resists dirt better than flat but still shows salt air deposits and streaking, so you’ll clean surfaces more often.
Coastal humidity encourages mildew and blistering when moisture gets behind paint; inspect caulking and joints regularly and fix leaks fast. Choose high-quality, mildew-resistant satin formulations and apply proper primer for adhesion.
Allow longer dry times when humidity’s high to avoid trapping moisture. Plan for periodic touch-ups and annual washing with a mild detergent to remove salt buildup—proactive upkeep keeps satin looking smooth and performing well.
Color and Sheen: How Dark Colors Behave in Satin
Coastal exposure and maintenance needs aside, your color choice and sheen interact in ways that affect appearance and longevity—especially with dark hues in satin. You’ll notice color behavior that shows heat absorption and subtle gloss retention, so dark satin can reveal imperfections and retain warmth, accelerating wear in sun-exposed areas.
Consider these practical effects of sheen impact on dark paints:
Consider these practical effects: dark satin absorbs heat, reveals flaws with subtle gloss, and shows fading—plan UV-resistant maintenance.
- Dark satin absorbs more heat, increasing thermal cycling stress.
- Slight gloss highlights surface flaws, making prep and priming essential.
- Fading and chalking are more noticeable, so choose UV-resistant formulas and plan maintenance.
How Sheen Changes Perceived Color and Texture
How does sheen change what you see? You notice Satin shifts Color perception: it deepens hues in low light and brightens them under direct sun, so the same paint looks different across façades. Satin also emphasizes Texture variation—subtle bumps catch highlights while flat areas appear smoother. Use the table to compare effects visually and mentally.
| Surface Condition | Perceived Change |
|---|---|
| Smooth, even | Color appears richer |
| Rough, weathered | Texture pops; color seems lighter |
Knowing this helps you predict appearance across walls and trim without redoing finishes.
Application Tips for a Smooth, Consistent Satin Finish
When you’re aiming for a smooth, consistent satin finish, preparation and technique matter more than brand names or fancy tools. You’ll clean surfaces, sand imperfections, and address mildew or loose paint before you start.
Pay attention to color matching when touching up areas so sheen differences don’t reveal repairs.
Thoughtful primer selection guarantees adhesion and uniform absorption across different materials, reducing lap marks.
Apply paint in even, controlled strokes and maintain a wet edge to avoid overlaps.
Control temperature and humidity for consistent drying.
Don’t skimp on inspection and light sanding between coats for a flawless, durable satin result.
- Prep thoroughly
- Match color precisely
- Use proper primer selection
Brushes, Rollers, and Sprayers: Best Methods for Satin
Having prepped, matched color, and primed correctly, your next decision is which application tool will give the satin finish you want. You’ll choose brushes for trim and tight spots—use high-quality synthetic bristles to avoid streaks.
Rollers cover broad siding; pick a short-nap sleeve for smoothness and keep a wet edge. Sprayers deliver the most uniform sheen on large surfaces but require masking and thinning as directed.
Consider color coordination when switching tools to maintain consistent coverage. Also weigh environmental impact: sprayers overspray more, brushes waste less, and cleanup method affects solvent runoff—plan accordingly.
Drying Times and Recoat Windows for Satin Exteriors
Because satin finishes balance durability and slight sheen, you’ll want to pay close attention to drying and recoat windows to avoid lap marks or soft spots. You should wait the recommended tack-free times—typically 1–4 hours for water-based satin, longer in cool or humid conditions—before light recoat. Full cure may take weeks.
Monitor surface feel and sheen to assure proper color matching and minimize texture variation. Follow these quick rules:
- Test a small panel for tack and sheen before full recoat.
- Increase drying time in high humidity or low temperature.
- Use consistent application speed to reduce lap marks.
Common Application Mistakes That Ruin Satin Finishes
You’ll ruin a satin finish fast if you skip proper surface prep—dirt, loose paint, and glossy spots stop new coats from adhering and leave blotchy sheen.
Using the wrong tools, like a coarse brush or low-nap roller, creates brush marks and uneven texture that stand out on satin.
Take time to sand, clean, prime as needed, and pick the right applicators to keep the finish smooth and uniform.
Poor Surface Preparation
When surfaces aren’t properly cleaned, sanded, and primed, even the best satin paints won’t adhere or look smooth. You’ll see peeling, uneven sheen, and trapped surface contamination that ruins the finish and can alter the meant paint color. Prep determines longevity; don’t skip it.
- Remove dirt, mildew, and chalking to prevent bubbles and lift.
- Sand glossy or rough spots so satin lays down evenly.
- Apply a compatible primer to seal stains and promote adhesion.
Follow these steps and your satin exterior will resist weathering and retain consistent color and sheen.
Using Wrong Tools
Wondering why your satin finish looks streaky or brush-marked? You probably grabbed the wrong tools. Using low-quality brushes or rollers leaves nap lines and trapped air, wrecking color consistency and sheen.
Don’t use indoor rollers outdoors; pick a smooth, high-density roller or a fine-bristle synthetic brush designed for satin. Spray guns need proper tip size and technique, or you’ll get orange peel.
Also match caulking tools and sanding pads to the surface—coarse grit creates visible defects under satin.
Finally, remember primer selection matters: wrong primer plus wrong tools multiplies flaws, so choose both carefully.
Fixing Peeling, Chalking, or Flaking on Satin Paint
Seeing satin paint peel, chalk, or flake can be frustrating, but you can usually restore the finish without replacing all the siding. Start by scraping loose paint, then sand feathered edges for smooth progressions to maintain color consistency.
Clean surfaces thoroughly to remove chalk; don’t skip this step or new paint won’t bond. Spot-prime exposed areas to guarantee primer adhesion, using a compatible exterior primer. Follow with satin topcoat, blending into surrounding areas.
- Remove loose material and sand.
- Clean and degrease for proper bonding.
- Spot-prime, then repaint to match.
Preventing and Treating Mildew on Satin Surfaces
Watch for tiny black or green spots and musty odors so you can identify mildew early before it stains your satin finish.
Use gentle, safe cleaners—like diluted bleach or oxygen bleach with a soft brush—and rinse thoroughly to remove growth without damaging the paint.
To prevent return, keep surfaces dry, trim nearby vegetation, and choose mildew-resistant primers or paints for long-term protection.
Identify Mildew Early
How can you spot mildew on satin surfaces early before it damages the finish? You’ll watch for subtle signs so mildew prevention works. Inspect shaded, damp areas where surface porosity traps moisture. Look for faint gray-green specks, soft fuzzy patches, or discoloration that won’t rub off easily.
Check edges, seams, and textured trim weekly after wet weather. Use a small mirror or flashlight into corners and under eaves. Note changes in paint breathability; increased chalking or dark spots suggest colonization.
If you catch growth early, you’ll limit spread and avoid deep staining that exploits porosity.
- Inspect frequently
- Focus on porous zones
- Record and act quickly
Safe Cleaning Methods
1 simple routine will keep satin finishes clean and stop mildew from taking hold: rinse, gentle scrub, and rinse again. You’ll start with a garden hose rinse to loosen dirt.
Then mix mild detergent or a 1:3 bleach-to-water solution for stubborn mildew. Use a soft brush, work in small sections, and avoid aggressive scrubbing that damages satin sheens.
Rinse thoroughly and let surfaces dry in sunlight when possible. Test any cleaner on a hidden spot first to protect the finish and your paint color choices.
For interior decorating continuity, match cleaned areas to surrounding panels to avoid patchy appearance.
Long-Term Prevention Strategies
Keeping up with regular cleaning helps, but you’ll also want a few long-term strategies to stop mildew from returning on satin surfaces. You’ll prevent recurring growth while protecting finish integrity, minimizing color fading and avoiding surface cracking. Follow these three targeted steps:
- Improve drainage and airflow around siding; trim plants and add gutters to keep surfaces dry.
- Apply mildew-resistant primer and a quality satin exterior paint; recoat before wear shows to prevent color fading.
- Inspect yearly for tiny cracks; repair and touch up promptly to stop moisture entry that leads to mildew and surface cracking.
When to Choose Semi-Gloss or Gloss for Trim Instead
Wondering whether to use semi-gloss or gloss for your trim? Choose based on exposure and desired look.
If you need easy cleaning and moisture resistance—around entryways, windows, or eaves—go gloss for maximum durability.
Semi-gloss works when you want durability without overly highlighting imperfections; it balances reflection with a softer finish.
Consider color matching carefully: high-gloss can make colors read brighter and sharper, while semi-gloss tones them slightly down.
Also weigh texture variation on adjacent surfaces—smooth trim benefits from gloss, whereas textured siding pairs better with semi-gloss to avoid exaggerated sheen differences.
Design Uses: Where Satin Boosts Curb Appeal
If trim often calls for semi-gloss or gloss, satin is your go-to for larger surfaces where you want a polished look without the high shine. You’ll use satin to highlight architectural planes and soften contrasts, relying on color matching to keep facades cohesive.
Satin’s mild reflection enhances depth without glare, so paint blending between elements looks intentional. Consider these strategic uses:
- Main siding for a refined, durable backdrop.
- Porches and columns to show detail subtly.
- Accent walls that need texture without competing shine.
You’ll boost curb appeal by balancing sheen, tone, and durable finish.
Coordinating Satin Siding With Doors, Trim, and Accents
When you pair satin siding with doors, trim, and accents, aim for contrast in both sheen and color so each element reads clearly from the street. You’ll pick a main siding hue in satin that reflects light softly, then use color coordination to choose a door color that pops and trim that frames.
Select a higher-sheen or matte finish for trim to create subtle texture contrast and highlight profiles. Keep accent details—gutters, shutters, house numbers—in a unifying tone to avoid visual clutter.
Test swatches at different times of day to confirm balance before committing.
Longevity Expectations: How Often Satin Needs Repainting
You can generally expect satin exterior paint to need repainting every 5 to 7 years under normal conditions.
Harsh sun, salty air, heavy moisture, or poor prep can shorten that timeline and force earlier touch-ups.
Knowing your local climate and maintenance habits helps you plan timely recoats and avoid bigger repairs.
Expected Recoat Timeline
Because satin sits between flat and gloss in sheens, it offers a balanced mix of durability and touch-up friendliness, so you’ll typically plan to repaint exterior satin every 5 to 8 years depending on exposure and maintenance.
You should watch for fading, chalking, and surface wear; minor spots can be touched up to extend life. Keep records of color matching and note any texture variation before repairs so touch-ups blend.
Follow this simple timeline:
- 5 years — high sun or coastal exposure, inspect annually.
- 6–7 years — moderate exposure, address small failures.
- 8+ years — sheltered areas, expect full repaint.
Factors Accelerating Repainting
The repaint timeline above gives a baseline, but several factors can speed up how often you’ll need to refresh exterior satin. If you pick darker Color choices, they’ll fade faster under intense sun, pushing repaint cycles sooner.
High-traffic areas, like entryways and railings, collect grime and scuffs that dull finish prematurely. Texture variations—rough siding or stucco—trap dirt and promote wear more than smooth surfaces, so you’ll clean and repaint sooner.
Poor prep, low-quality primers or paints, and persistent moisture or mold also shorten life. Factor local climate, exposure, and maintenance into your repaint schedule to avoid surprises.
Warranty and Manufacturer Claims to Verify for Satin Exteriors
When evaluating satin exterior paints, check the warranty details and manufacturer claims closely so you know what protections and performance the product actually promises. You’ll want clear coverage terms, expected lifespan, and conditions that void claims. Verify fade resistance guarantees, color matching promises (especially if you request touch-up kits), and whether warranty covers peeling or chalking.
Consider how exterior satin choices relate to interior trends when coordinating finishes across surfaces.
- Confirm duration and scope of coverage.
- Check required maintenance and application conditions.
- Ask about color matching accuracy and available touch-up support.
Document claims and store receipts for future claims.
Low-VOC and Eco-Friendly Satin Paint Options
If you want satin finishes that meet warranty promises and reduce indoor toxins, look for low‑VOC and eco‑friendly formulas that balance durability with better air quality.
You’ll pick products labeled low VOC or zero VOC to cut VOC emissions and lessen environmental impact during application and curing. Check third‑party certifications and product datasheets for measured emissions and resin durability.
Prep and proper application still matter: even low‑VOC paints need correct surface prep to resist peeling and mildew.
Choosing greener satin options helps you protect occupants and the environment without sacrificing the long‑term performance your exterior needs.
Cost-Saving Strategies When Using Satin Exterior Paint
Although satin finishes strike a balance between sheen and durability, you can still cut costs by choosing the right product, prepping efficiently, and scheduling work to minimize waste and labor.
You’ll save by buying quality satin that covers well, matching exterior color samples to your interior decor palette to avoid repainting, and selecting a finish that complements fabric texture cues for porch cushions and awnings.
Plan prep in dry weather, repair only what’s necessary, and reuse drop cloths.
Prioritize tools that speed application.
Consider DIY for simple sections, but hire pros for high, intricate areas to avoid costly mistakes.
- Buy higher-coverage satin
- Prep smart, reuse materials
- DIY selective sections only
How to Test Satin on Your House Before You Commit
Before you commit, test satin paint on a small, representative area of your house to see how it looks and wears in real conditions. Pick a spot with typical sun, shadow, and exposure. Try different primer selection if substrate varies. Paint samples in varying light, note color matching at dawn, noon, dusk. Inspect texture, sheen, and water beading after rain. Track results for weeks before scaling up.
| Mood | Note | Action |
|---|---|---|
| Confident | Even sheen | Proceed |
| Unsure | Slight fade | Recoat |
| Frustrated | Poor match | Adjust color |
| Relieved | Good hold | Schedule |
| Curious | Weather test | Monitor |
Frequently Asked Questions
Can Satin Be Used on Garage Floors or Concrete Patios?
Yes — you can use satin on garage floors or concrete patios, but you’ll prioritize garage durability and proper concrete staining prep; you’ll seal, choose a concrete-formulated satin product, and expect moderate sheen with good wear resistance.
Does Satin Finish Affect Solar Reflectance or Energy Efficiency?
Yes — satin finish slightly lowers solar reflectance compared to flat, but you won’t sacrifice major energy efficiency; pick lighter colors to boost reflectance, and you’ll still enjoy durable, easier-to-clean exterior surfaces without regret.
Are There Special Warranties for Professional Satin Application?
Yes — you can get specialized warranties covering professional application, and they’ll often extend labor and finish guarantees if certified installers apply satin coatings, but you’ll need documentation, specific prep standards, and approved product lists to qualify.
How Does Satin Interact With Exterior Siding Insulation Systems?
Satin works with most exterior siding insulation systems if you check insulation compatibility and prep surfaces; you’ll guarantee siding adhesion by using proper primers, avoiding moisture traps, and choosing breathable coatings that won’t compromise thermal or vapor performance.
Can Pets or Wildlife Damage a Satin Exterior Finish?
Yes — you should expect some pet damage and wildlife impact: pets scratch or rub, birds peck, and raccoons or squirrels scuff finishes. You’ll want tougher prep, regular touch-ups, and protective trim or coatings.
Conclusion
Satin is a smart middle ground for exteriors: it hides minor flaws better than gloss while resisting dirt and mildew more than flat. Consider that satin finishes typically reflect about 10–25% of light—enough to reveal texture but not every imperfection—so you get durability without screaming shine. If you want easier cleaning, modest sheen, and solid longevity, satin’s a practical choice; just test samples and check warranties before you commit.