Can You Spray Paint an Exterior Door
Yes — you can spray paint an exterior door and get a smooth, professional finish if you prep and pick the right products. Clean, sand, and prime the surface first, mask hardware and glass, and use exterior-grade paint or enamel suited for the door material. Avoid spraying warped doors, damp conditions, or surfaces with flaking paint. Work in proper temperature and ventilation, follow safety steps, and keep drying time in mind; keep going to learn the best techniques and timing.
Who This Guide Is For

If you’re prepping to refresh a home’s curb appeal or tackling a rental turnover, this guide is for you. You’ll find practical tips whether you’re a DIY homeowner, landlord, or property manager needing quick, durable results.
You’ll learn how color psychology influences first impressions and how to choose hues that suit modern tastes or complement historical styles without clashing. You don’t need pro experience, just basic prep, safety awareness, and patience.
This guide helps you weigh aesthetic choices, finish durability, and time investment so you can decide when to spray, when to call a pro, and what outcome to expect.
Quick Answer: Can You Spray Paint an Exterior Door?
Although it takes some prep, you can absolutely spray paint an exterior door and get a smooth, durable finish that looks professional. You’ll need proper cleaning, sanding, priming, and weather-appropriate paint to guarantee adhesion and longevity.
Spray application saves time and minimizes brush marks, but control overspray and protect hardware and surrounding surfaces.
Spray painting speeds the job and avoids brush marks—just manage overspray and shield hardware and nearby surfaces.
Choose colors with intent—color psychology influences curb appeal and mood, while referencing historical styles can help maintain period accuracy.
With ventilation, temperature control, and the right equipment, you’ll achieve a resilient, attractive door.
Follow safety and drying guidelines to lock in that long-lasting finish.
When Spray Painting Beats Brushing or Rolling
When you want the smoothest, fastest finish with the least visible brushwork, spray painting usually outperforms brushing or rolling. You’ll choose spraying when the door has intricate panels, tight crevices, or textured trim where rollers leave stipple and brushes leave strokes.
Spraying saves time on large flat surfaces and gives even color laydown, which matters if you’re leveraging color psychology to make an entrance feel bold or calming. Mask door hardware, glass, and surrounding trim carefully; spraying’s overspray demands thorough prep.
You’ll still sand, prime, and apply thin, multiple coats to achieve durable, professional-looking results.
When You Should Not Spray an Exterior Door

You shouldn’t spray an exterior door if it’s warped, because the finish won’t sit evenly and flaws will be obvious.
Don’t spray in consistently high-moisture environments, since paint can fail or bubble before it cures.
And if the existing finish is peeling or flaking, you should strip or thoroughly sand it first rather than just spraying over it.
When Door Is Warped
If the door’s face bends or twists noticeably, don’t spray it—warped wood or metal won’t take an even finish and the paint will crack or peel as the material moves. You should address warpage before painting.
Inspect gaps, hinges, and frame; consider warpage remedies like planing, stiffening with battens, or replacing the core. Fix door alignment so it closes without pressure. If you can’t stabilize the door, skip spraying to avoid wasted effort.
Consider these steps to decide:
- Measure gap variance.
- Test swing and latch.
- Try tightening or rehanging.
- Replace if deformation persists.
High Moisture Environments
Because high humidity and persistent dampness keep surfaces from curing properly, don’t spray an exterior door in moist conditions—you’ll risk runs, blistering, and poor adhesion. You should wait for dry forecasts; indoor décor and color psychology choices don’t matter if paint fails. Moisture traps under finish, causing staining and lifting. Use a hygrometer, pick days below 50–60% humidity, and avoid spraying after rain or heavy dew. Protect nearby plants and finishes. Consider postponing to protect investment and desired color impact.
| Risk | Effect |
|---|---|
| High humidity | Slow curing |
| Dew | Blushing |
| Rain | Wash-off |
| Damp wood | Poor adhesion |
| Condensation | Stains |
Peeling Or Flaking Finish
One common sign you shouldn’t spray an exterior door is visible peeling or flaking finish. If you see a peeling finish or flaking paint, don’t spray over it—you’ll trap loose material and worsen adhesion.
You need to remove compromised layers first, then assess substrate damage and moisture. Follow these steps to decide:
- Scrape loose paint until edges are firm.
- Sand feathered areas to create a smooth profile.
- Prime exposed wood or metal with a suitable bonding primer.
- Repaint only after primer cures and surface is clean.
Skipping prep risks rapid failure; address peeling or flaking before spraying.
Which Doors Are Best for Spraying (Metal, Fiberglass, Wood)
When choosing a door to spray, consider how the material affects adhesion, prep time, and final durability.
Metal doors take spray well, require degreasing and rust treatment, and offer strong door security when seals and hardware are maintained.
Fiberglass needs light sanding and a bonding primer; it resists dents and benefits from weatherproofing techniques for long life.
Solid wood accepts paint beautifully but demands more prep—filling, sanding, and sealing to prevent moisture issues.
Hollow-core or poorly made doors may warp or flake.
Match primer and paint to material, and prioritize proper sealing and hardware protection for lasting results.
Should You DIY or Hire a Pro for Spraying?
Deciding whether to DIY or hire a pro comes down to your skill level, budget, and tolerance for prep and cleanup. Spray painting looks fast but requires careful masking, ventilation, and steady technique to avoid runs or overspray.
You’ll weigh time versus finish: pros deliver smooth, fast results and can advise on color psychology and eco-friendly paints. DIY saves money if you’re confident.
Consider:
- Time available and willingness to practice.
- Desired finish quality and warranty.
- Budget for labor versus supplies.
- Environmental preferences and paint choices.
If unsure, get estimates and ask for samples before committing.
Tools and Protective Gear You Need
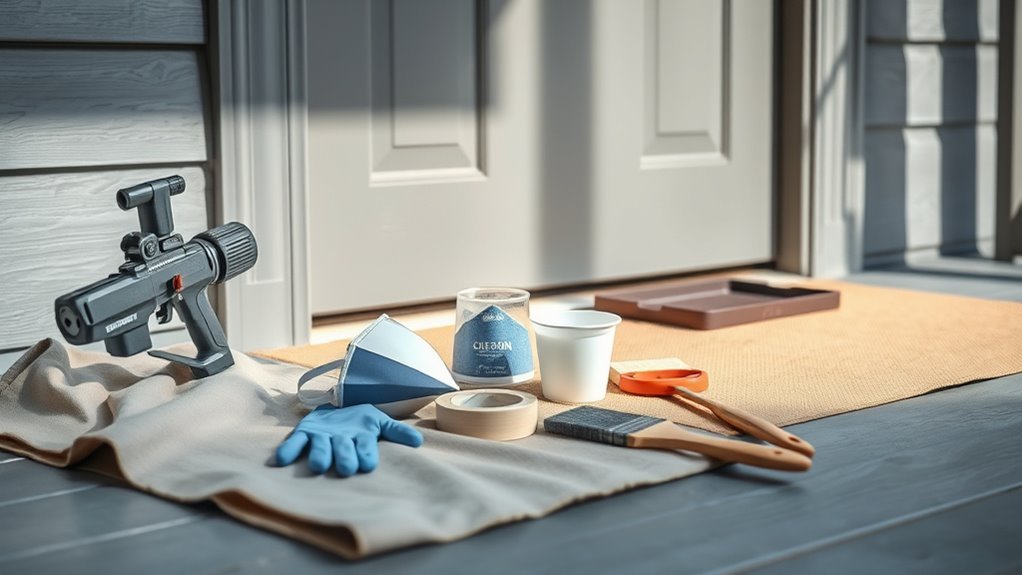
Because a clean, professional spray finish depends as much on preparation as technique, you’ll want the right tools and protective gear before you start. Gather drop cloths, painter’s tape, a tack cloth, sanding blocks, and a good respirator rated for paint fumes.
A flawless spray finish starts with prep—collect drop cloths, tape, tack cloths, sanding blocks, and a respirator.
Use nitrile gloves, safety goggles, and a disposable suit if you’re sanding old finishes. Keep a fan or ventilation strategy to control overspray and fumes.
Bring color swatches to evaluate color psychology and match historical styles for authenticity. A work stand or sawhorses steadies the door.
Prep tools and PPE prevent mistakes and protect you.
Comparing Sprayers: HVLP vs. LVLP vs. Airless
When choosing a sprayer for your exterior door, think about the finish you want: HVLP gives the most precision and the smoothest result.
If you’re balancing speed and coverage, LVLP and airless units will get the job done faster but with different atomization and overspray trade-offs.
I’ll walk you through when each type makes the most sense so you can pick the right tool.
HVLP: Precision And Finish
A HVLP sprayer gives you the control and smooth finish most DIYers want for exterior doors, delivering low overspray and fine atomization that keeps edges crisp and reduces wasted paint. You’ll appreciate how it preserves color combinations and improves paint durability when you take time on setup and technique.
Use steady passes and thin coats, sanding between layers for a showroom look. Consider these benefits:
- Precise control for clean edges and hardware protection.
- Fine atomization for uniform sheen and fewer runs.
- Reduced overspray for tidy surroundings and less waste.
- Better finish longevity when applied correctly.
Airless & LVLP: Speed Vs Coverage
While HVLP excels at detail, you’ll reach the finish line faster with airless sprayers and get a balance of speed and control with LVLP models. Choosing between them comes down to whether you prioritize rapid coverage (airless), reduced overspray and decent atomization (LVLP), or the precision HVLP delivers.
You’ll choose airless for large, flat doors when time matters and surface durability is key, accepting harsher atomization and more prep.
LVLP gives you better color matching and less wasted paint than airless, with smoother coats than basic HVLP at moderate speed.
Match sprayer to project size, finish expectations, and weather conditions.
When to Use an Aerosol Spray Can for Doors
If you need fast, even coverage on small to medium doors or want to avoid setup and cleanup of a sprayer, reach for an aerosol can. You’ll appreciate portability, quick touch-ups, and control for detailed work. Use aerosols when you want to experiment with color blending or add texture via artistic techniques without heavy equipment.
- Quick spot repairs and hardware-area touch-ups.
- Lightweight projects where wind or power access limit sprayers.
- Layered finishes and subtle gradients using light passes.
- Temporary or seasonal color trials before committing.
Mask carefully, work in thin coats, and cure between layers.
Choosing the Right Paint Type for Exterior Doors
You’ll want to weigh sheen options—satin and semi-gloss hide flaws and shed moisture better than flat finishes.
Decide between oil and water-based formulas based on durability needs, odor tolerance, and drying time.
Also consider how much surface prep each type requires so your finish lasts.
Paint Sheen Options
Which sheen should you pick for your exterior door? You’ll balance appearance, durability, and maintenance while considering color psychology and eco-friendly options. Think about traffic, weather, and desired gloss.
- Matte — hides flaws, feels modern, low glare; needs touch-ups more often.
- Satin — subtle sheen, forgiving, easy to clean; a common practical choice.
- Semi-gloss — durable, highlights trim and details; cleans well but shows imperfections.
- High-gloss — striking, very durable, highlights flaws and prep quality; best for accents.
Match sheen to style and maintenance needs, and choose low-VOC or water-based products when possible.
Oil Vs. Water
Wondering whether oil- or water-based paint will give your exterior door the best finish and longevity? You’ll choose based on durability, drying time, and appearance.
Oil gives a hard, glossy finish that resists wear and highlights historical styles, but it takes longer to dry and needs solvents.
Water-based (acrylic) dries fast, cleans up with soap, resists yellowing, and holds color better over time.
Consider color psychology: vivid acrylics maintain hue, while oil can deepen tones for a traditional look.
Match the paint type to your aesthetic and maintenance willingness to get the best long-term result.
Surface Preparation Needs
Now that you’ve weighed oil versus water-based paints, think about how each one affects your prep work. You’ll strip, sand, and clean differently depending on solvent compatibility and desired paint durability.
Oil-friendly primers tolerate tannins and require solvent cleanup; water-based systems need thorough deglossing and scuff sanding. Consider color blending: a primer can block previous hues and help thin translucent coats.
Follow this checklist before spraying:
- Remove hardware and mask edges.
- Strip loose finish; sand to clean feathered edges.
- Clean with appropriate solvent; let fully dry.
- Apply compatible primer for adhesion and durability.
Best Paint Finishes for Exterior Doors
Because your front door faces the elements and handles constant use, choosing the right paint finish matters. You’ll want a durable, easy-to-clean option—satin and semi-gloss are top picks: satin hides imperfections while resisting dirt; semi-gloss offers greater moisture and scuff resistance, highlighting trim and door hardware.
For craftsman or rustic styles, a low-sheen eggshell can work if maintained. Avoid flat finishes; they’re prone to staining and hard to clean.
Consider current color trends when selecting sheen to confirm the finish complements the hue. Test a small area to verify adhesion, appearance, and long-term wear before committing.
Primer Options That Bond to Metal, Wood, and Fiberglass
To get a durable, professional finish on metal, wood, or fiberglass doors, pick a primer formulated to bond to each substrate and to the topcoat you’ll use. You want adhesion, corrosion resistance for metal, tannin blocking for wood, and flexible adhesion for fiberglass. Consider primers that enhance paint durability and support color psychology by preserving true tones.
- Epoxy or etching primer for bare metal — prevents rust and promotes adhesion.
- Oil-based or shellac primer for stained wood — blocks tannins.
- Acrylic-bonding primer for fiberglass — offers flexibility.
- Universal adhesion primer — for mixed-material doors.
Do All Door Materials Need Primer?
For wood doors you’ll usually want a primer to seal grain and improve adhesion.
Metal doors often need a rust-inhibiting primer before you spray.
For fiberglass and PVC, check the product labels—some require primer, others have paint-and-primer-in-one options.
Wood Doors: Primer Recommended
Although not every door material needs a primer, you’ll almost always want one on wood: it seals the grain, evens porosity, and improves adhesion so your topcoat looks smooth and lasts longer.
You’ll prep by sanding, cleaning, and masking door hardware, and pick a primer that suits your chosen color options to avoid excessive coats. Benefits include better durability and truer color.
Consider these steps:
- Sand and clean to remove oils and old finish.
- Mask hardware and glass.
- Apply a high-quality exterior wood primer thinly.
- Lightly sand between primer and topcoat for a flawless finish.
Metal Doors: Often Necessary
If you’ve handled primer on wood, you’ll find metal doors usually need it even more because bare metal won’t hold paint well and can rust under the finish. You’ll strip grease, sand lightly, and apply a metal-specific primer to guarantee adhesion and corrosion protection.
Primer also evens surface imperfections so spray coats go on smoother and last longer. When choosing a topcoat, think about color psychology—bold hues invite attention, neutrals convey calm—and match finishes to Historical styles of your home for cohesive curb appeal.
Skipping primer risks peeling, stains, and faster maintenance cycles you’ll regret.
Fiberglass And PVC: Check Labels
Because fiberglass and PVC vary so much, you’ll want to check the manufacturer’s label before skipping primer. You’ll find some surfaces need special adhesion primers, others accept paint directly. Consider finish, durability, and how color psychology affects curb appeal and perceived door security.
- Read label for recommended primer type and adhesion instructions.
- Sand lightly if label permits to promote mechanical grip.
- Use primer designed for plastics or a bonding primer when specified.
- Test a small area first to confirm adhesion and final color tone.
Follow labels to guarantee longevity and the look you want.
How to Test Paint Adhesion Before You Spray
Before you spray, confirm the new paint will stick to your door by running a few quick adhesion checks—this saves time and prevents costly rework.
Pick an inconspicuous spot and scuff lightly with fine sandpaper, then apply a small test patch of the chosen paint; note finish and how color psychology choices may appear under real light.
After curing, press clear tape over the patch and peel sharply; if paint lifts, strip and prime.
Also test compatibility with weatherproofing techniques like sealers or topcoats by applying them to another patch and repeating the tape test before full spraying.
How to Clean an Exterior Door Before Painting
Now that you’ve confirmed the paint will adhere, clean the door thoroughly so the new finish bonds and looks uniform. Wipe dust, pollen, and grease with a mild detergent solution, then rinse and dry. Remove hardware or mask it. Sand lightly only to dull gloss, not strip layers.
Clean the door thoroughly—wipe with mild detergent, rinse and dry, remove or mask hardware, and lightly dull the gloss.
- Use a soft cloth and soapy water.
- Rinse completely; let the door dry.
- Degrease handles and panels before painting.
- Inspect for remaining dirt or mold.
Cleaning prepares the surface so your chosen color combinations and any decorative accents sit evenly and last longer.
Safe Ways to Remove Old Paint and Flaking Finish
When old paint is peeling or flaking, you’ll want to remove loose material and stabilize remaining layers so the new coat adheres and looks smooth.
Start by testing for lead if your home predates 1978; use a kit or pros if positive.
Peel or chip away loose bits with a putty knife, then apply a chemical stripper per instructions for stubborn areas—work outdoors or in a ventilated space, wear gloves and a respirator.
After residue removal, treat exposed bare wood with primer to protect against moisture and preserve door security hardware.
Consider color coordination before final primer and finish choices.
Sanding Basics for Wood, Metal, and Fiberglass Doors
After you’ve stripped loose paint and primed any bare wood, sanding shapes the surface for a smooth, long-lasting finish. You’ll choose grit by material: coarse for damaged wood, medium for metal, fine for fiberglass.
Work with the grain on wood, use a sanding block on flat areas, and avoid aggressive sanding on fiberglass to prevent burns.
Keep a vacuum or tack cloth handy to remove dust so primers and eco friendly paints adhere properly.
Think about color psychology when selecting finish sheen; smoother surfaces reflect light differently, influencing perceived color and mood.
- Assess material
- Select grit
- Sand gently
- Clean thoroughly
Filling Dents, Gouges, and Nail Holes on Doors
Start by evaluating how deep and widespread the dents, gouges, and nail holes are so you can pick the right repair method.
Choose a filler formulated for your door material—wood putty for timber, epoxy for fiberglass, or metal filler for steel—and follow the manufacturer’s instructions.
Once cured, sand the patch flush and smooth so the finish will spray evenly.
Assess Damage Severity
Before you pick up filler or sandpaper, take a close look at every dent, gouge, and nail hole to determine how deep and widespread the damage is. You’ll note whether damage affects only the surface or penetrates to core material, which guides repair time and materials.
Also consider how finish choices, color psychology, and historical styles influence visible repair decisions. Use this quick checklist to assess severity:
- Surface dents only — minimal prep.
- Shallow gouges — need lightweight filler.
- Deep gouges or exposed core — structural repair.
- Multiple or clustered defects — consider panel replacement.
Document findings before proceeding.
Choose Appropriate Filler
Now that you’ve cataloged the damage, pick a filler that matches the door material and the depth of the defect. For shallow nail holes, use lightweight wood filler or exterior spackling.
For deeper gouges, choose a two-part epoxy or exterior-grade wood filler. Apply in thin layers, slightly overfilling so you can trim later. Let cure fully per product instructions.
Match texture so paint and primer adhere; consider how finish and color psychology will affect perceived smoothness and hue.
Avoid filling around loose door hardware until it’s secure. Clean tools immediately and keep a small test patch to confirm compatibility.
Sand And Smooth Surface
Once the filler has fully cured, sand each repair flush with the surrounding surface so seams disappear and the door reads as one plane. You’ll work progressively: start coarse, finish fine, and inspect under raking light. Match contours so paint sits evenly and reflects historical styles accurately. Consider color psychology when choosing final sheen—smooth surfaces enhance depth and mood.
Follow this process:
- Remove high spots with 80–120 grit.
- Blend edges with 180–220 grit.
- Finish with 320–400 grit for primer-ready smoothness.
- Clean dust thoroughly before priming and spraying.
You’ll create a seamless base for lasting results.
Masking Hardware, Glass, and Surrounding Siding
While you’ve prepped the door, take time to carefully mask hardware, glass, and nearby siding to prevent overspray and drips. Remove or loosen door hardware if possible, label screws, and keep parts organized.
While prepping the door, carefully mask hardware and glass; remove or label screws and secure coverings to prevent overspray.
Use low-tack painter’s tape on trim and around glass seams, and apply thin plastic or paper sheeting for larger sections.
For door hardware you can’t remove, wrap with folded tape and cover with a small bag secured by tape. Press tape edges firmly to seal.
Check from both sides and in low light for gaps. Proper masking glass and finishes saves cleanup and protects adjacent surfaces.
Set Up Overspray Protection and Drop Cloths
Before you spray, lay down proper overspray protection and drop cloths so paint won’t land where it shouldn’t. You’ll protect walkways, plants, and trim, and keep color schemes clean while prepping for possible hardware upgrades.
Place heavier canvas cloths under the door, secure plastic sheeting to nearby siding, and tape seams tightly so wind won’t lift edges.
- Clear area of debris.
- Anchor drop cloths with weights.
- Cover plants and fixtures with plastic.
- Tape edges and overlap seams.
Check edges before spraying; neat protection prevents accidental color transfer and saves cleanup time.
Best Weather and Humidity for Spraying an Exterior Door
Pick a mild day — aim for about 50–85°F (10–29°C) — so paint cures evenly without drying too fast or too slow.
Keep humidity between 40–60% to prevent poor adhesion or extended tackiness.
If conditions fall outside that range, wait for a better day or use climate control in a garage.
Ideal Temperature Range
If you’re spraying an exterior door, aim for temperatures between about 50°F and 85°F with relative humidity under 60% to get good atomization, proper flow, and reliable drying times. You’ll want stable, mild conditions so paint doesn’t sag, blister, or cure too fast.
Consider timing for color combinations and any hardware upgrades so finishes match once cured. Follow this checklist before spraying:
- Morning or late afternoon to avoid heat spikes.
- No direct sun on the door surface.
- Winds under 10 mph to limit overspray drift.
- Temperatures steady for several hours post-coating.
Optimal Humidity Levels
Along with temperature, humidity plays a large role in how paint atomizes, levels, and cures on an exterior door. So aim for relative humidity between about 30% and 60% during application and the first few hours of drying.
You’ll avoid blistering and slow cure when humidity’s moderate; too high traps moisture, causing fisheyes and poor adhesion, while too low speeds drying and can leave brush or spray marks.
Check local weather, consider Seasonal trends—mornings in spring or fall often work best—and paint when Outdoor lighting is steady so you can spot runs and ensure even coverage as the finish sets.
Choosing an Indoor vs. Outdoor Spray Location
Because spray painting creates overspray, fumes, and variable drying conditions, choosing whether to work indoors or outdoors depends on ventilations, weather, and the finish you want. You’ll weigh Indoor ventilation limits against wind, dust, and temperature outdoors.
If you use aerosol cans, mask and ventilate strongly indoors; outside, watch wind that ruins smooth coats. Consider these points to decide:
- Airflow: steady indoor ventilation vs. unpredictable breeze.
- Containment: control overspray indoors; outdoor needs drop cloths.
- Temperature/humidity: stable inside; outdoor may slow curing.
- Safety: fumes build up indoors; outdoors lowers inhalation risk.
Pick the site matching finish and safety.
How to Thin Paint Properly for Your Sprayer
Before you spray, check the paint’s viscosity with a viscosity cup or by brushing a little on a test board so you know if it’s too thick.
If it’s too heavy for your sprayer, thin it gradually using the manufacturer’s recommended thinner and keep notes on ratios.
Make small adjustments and test-spray until you get a smooth, even mist without runs.
Check Paint Viscosity
While thinning paint for a sprayer might seem minor, getting the viscosity right is essential for even coverage and clog-free spraying. You’ll test flow with a viscosity cup or by spray-testing on cardboard, adjusting slowly until you get a smooth atomization.
Keep color matching in mind—over-thinning can alter hue and hide quality. Watch for runs and orange peel; those signal too thin or wrong spray techniques.
Follow these steps:
- Measure with a cup or meter.
- Thin incrementally, stir thoroughly.
- Spray-test and wait for full flash-off.
- Record ratio and conditions for consistency.
Adjust Thinner Ratio
Once you’ve determined the paint’s starting viscosity, thin it gradually and test frequently so you don’t overdo it—add small amounts (typically 5–10% by volume) and stir thoroughly between additions, then spray a test panel to check atomization and coverage.
You’ll match thinner ratio to your sprayer, following manufacturer specs and environmental conditions. In a spray booth you’ll see how adjustments affect finish and color shift; use color theory to anticipate tint intensity when thinning solvent-based pigments.
Keep notes: mix percentages, nozzle size, air pressure, and ambient temp. Reproduce the ideal ratio for consistent, professional door coatings.
Adjusting Spray Pattern and Pressure for Doors
Want a smooth, even finish on your door? You’ll adjust spray pattern and pressure to match paint type, surface detail, and desired finish durability while keeping color coordination in mind. Start conservative and test on scrap.
- Narrow pattern + lower pressure for tight panels and crisp edges.
- Wide pattern + moderate pressure for flat, broad sections to reduce passes.
- Increase pressure slightly for thicker coatings; reduce for thin or fast-evaporating paints.
- Always test, then fine-tune to prevent runs and guarantee uniform coverage.
These adjustments protect finish durability and help the door’s color coordination with trim and siding.
Spray Technique: Distance, Speed, and Overlap
Because consistent distance, steady speed, and proper overlap work together to produce an even coat, keep the gun 6–12 inches from the door (adjust per gun type). Move at a steady, walk-like pace, and overlap each pass about 50% so wet edges fuse without runs.
You’ll start with horizontal passes for panels, then vertical for flat faces, maintaining the same length and rhythm. Watch edges and hardware, feathering slightly to avoid buildup.
Use light practice strokes on scrap to dial speed. When matching existing finish or doing color matching, test a small area under the same light before finishing the whole door.
How Many Coats to Spray for Durable Coverage
Before you spray, make sure the door is clean, sanded, and primed so each coat bonds properly.
You’ll usually apply two thin topcoats over a primer for durable coverage, adding a third only for high-traffic doors or color changes.
Follow the paint’s recommended drying and recoat times so each layer cures fully before the next.
Surface Preparation Needs
When you prep an exterior door properly, you set the stage for fewer coats and longer-lasting coverage. Sanding, cleaning, and priming remove imperfections that make paint soak up unevenly.
You’ll also coordinate color schemes and plan hardware upgrades before spraying so edges, glass, and trim get masked. Follow this checklist to guarantee adhesion and uniform finish:
- Sand smooth, degloss, and remove loose finish.
- Clean with degreaser, rinse, and dry thoroughly.
- Prime compatible with your topcoat and substrate.
- Mask and remove or protect hardware, hinges, and glass.
Proper prep prevents peeling, blotching, and wasted coats.
Recommended Coat Count
If you want durable, even coverage from a sprayer, plan on applying multiple thin coats rather than one heavy one; this approach builds film thickness while reducing runs and orange peel.
You’ll typically spray two to three finish coats after a primer, adjusting for color schemes that may need extra coverage—deep reds or dark blues often require an additional pass.
Light, even layers bond better and resist wear from daily use and weather.
Mask hardware upgrades or remove fixtures before spraying to avoid overspray.
Inspect between coats for smoothness and fill any imperfections so the final finish looks professional and long-lasting.
Drying And Recoat Time
Although temperature and humidity influence tack and cure, you’ll usually wait 15–30 minutes between light spray coats and 24 hours before heavy handling or installing the door.
You’ll apply thin, overlapping passes to avoid runs; two to three topcoats usually give durable coverage.
Consider color psychology when choosing finish sheen and hue—darker colors may heat and affect curing.
If you use eco-friendly paints, follow manufacturer recoat windows; low-VOC formulas can need longer flash times.
Plan drying zones and protect hardware.
- Prep well
- Thin coats
- Follow recoat times
- Final cure check
Drying Times Between Coats and How to Speed Cure
Because paint needs both time and the right conditions to form a durable film, you should wait the recommended drying interval between coats and adjust your process to speed curing when necessary. Check the manufacturer’s label for recoat windows, and keep temperatures and humidity within range.
Use a fan or portable heater to circulate warm, dry air—don’t blast with high heat. Remove hardware so air reaches edges and to aid consistent color matching across surfaces.
Thin coats cure faster than one heavy coat. Allow extra time for low-temperature or high-humidity days, and handle the door gently until fully cured to avoid marks.
When and How to Sand Between Coats
When the previous coat feels dry to the touch but not fully cured, lightly sand between coats to knock down dust nibs, smooth brush or spray texture, and promote adhesion for the next layer.
You’ll use fine-grit (220–320) sandpaper or a sanding sponge, working gently and wiping with a tack cloth. Focus on edges and panels where color contrast or buildup shows. Sanding improves paint durability and creates a uniform surface for the following coat.
Steps to follow:
- Wait appropriate dry time.
- Sand lightly, keep pressure even.
- Clean thoroughly.
- Inspect under good light before recoating.
Applying a Protective Topcoat to Doors
Before you seal the paint, decide on the right topcoat for the door’s exposure and finish—clear polyurethane for high-traffic exterior doors, sparing-use satin or gloss varnish for enhanced durability, or a water-based acrylic sealer if you need UV resistance and quick drying.
Before sealing paint, choose the topcoat—polyurethane for high-traffic exteriors, varnish for durability, or water-based acrylic for UV protection.
Remove hardware before coating to avoid drips and guarantee even coverage; label screws and hinges for reassembly.
Test the chosen topcoat on a scrap painted panel to confirm compatibility with your color options and sheen preference.
Apply thin, even coats, follow drying times, and lightly sand between coats for a smooth, long-lasting finish.
Using UV-Resistant Clear Coats on Exterior Doors
When you finish painting, apply a UV-resistant clear coat to shield color and finish from sun damage and fading.
You can spray, brush, or roll these topcoats—spraying gives the smoothest result while brushing or rolling may be easier for touch-ups.
Check the manufacturer’s guidance for recoat times and plan periodic inspections to maintain longevity.
UV Protection Benefits
Why let sun damage ruin a freshly painted door when a UV-resistant clear coat can lock in color and gloss? You get UV protection that slows fading and prevents yellowing.
And added weather resistance that shields against moisture and temperature swings. You’ll extend paint life, maintain appearance, and reduce maintenance frequency.
- Preserve color intensity longer.
- Maintain glossy finish against UV breakdown.
- Boost resistance to rain, snow, and humidity.
- Lower need for repainting and repairs.
Choose a clear coat rated for exterior use so your door stays vibrant and durable with minimal upkeep.
Application Methods
How do you get the most durable, UV-resistant finish on your exterior door? Start by choosing a clear coat rated for UV protection and match its sheen to your decorative finishes.
Spray in thin, even passes, keeping the nozzle moving to avoid runs and guarantee uniform color blending where panels or accents meet. Allow tack time between coats per manufacturer instructions, usually 10–20 minutes.
Then, apply 2–3 light coats for protection without obscuring decorative details. Mask hardware and surrounding trim, work in mild, dust-free conditions, and test a small area to confirm adhesion and the final look before finishing.
Maintenance And Longevity
After spraying your UV-resistant clear coats, plan a simple maintenance routine to keep the finish protective and attractive for years. You’ll inspect, clean, and touch up to preserve gloss and prevent UV fade that alters color psychology and undermines historical styles. Follow a seasonal checklist and act promptly on chips.
- Inspect for cracks, haze, or wear every 3 months.
- Clean gently with mild soap, rinse, and dry to avoid abrasive wear.
- Touch up small chips with matching spray or brush before moisture intrusion.
- Recoat every 3–5 years based on exposure to sun and climate.
Avoiding Common Spray Problems: Runs and Orange Peel
When you spray a door, paying close attention to technique and conditions will prevent runs and orange peel before they start. You’ll keep spray cans or HVLP guns moving in steady, overlapping passes, holding the nozzle the correct distance.
Thin coats beat heavy ones; allow proper flash time between coats and watch humidity and temperature. Use the right thinner and nozzle for your chosen eco-friendly paints to get smooth atomization.
Test on scrap to dial settings. Consider color psychology when choosing sheen—glossier finishes show imperfections more, matte hides minor texture.
Clean filters and lines to avoid sputtering.
Fixing Runs, Drips, and Texture Issues After Spraying
If you spot runs or drips after spraying, act quickly to smooth them before the finish cures. Lightly sand the affected area to level the run, then feather the edges so the texture matches the surrounding surface.
Finally, re-spray a thin, even coat to blend the repair and restore a uniform texture.
Smooth Out Runs
Notice a drip or uneven texture on your freshly sprayed door? You can fix runs quickly to preserve finish and respect color psychology and historical styles that influenced your choice.
Lightly sand the affected area with fine grit, wipe clean, then feather the edges for a smooth blend. If necessary, strip the run back to sound paint and re-spray thin, controlled passes. Let each coat dry thoroughly.
Finish by polishing with ultra-fine abrasive or rubbing compound for a uniform sheen.
- Assess severity
- Sand gently
- Reapply thin coats
- Polish for consistency
Even Out Texture
Runs and drips are just one part of texture problems you’ll face after spraying; you also need to address orange peel, graininess, and overspray to get a factory-smooth finish.
First, sand imperfections with 320–400 grit, feathering edges until texture blends. Clean, tack, and apply thin scuff coats to build a uniform film.
If orange peel persists, wet-sand with 800–1000 grit, then polish.
Match paint sheen and color options carefully so repairs don’t show. Work in stable weather conditions to avoid new defects.
Finish with a light clear coat or polish for consistent gloss and a professional look.
Removing Overspray From Windows, Trim, and Siding
How do you clean overspray from windows, trim, and siding without damaging surfaces? You act quickly.
Use mild solvent for glass, plastic-safe cleaner for trim, and soft brushes for siding. Protect door hardware—consistent door hinge maintenance prevents grime buildup—and check seals as part of weatherproofing techniques before you start.
Follow this sequence:
- Test cleaner on an inconspicuous spot.
- Soften overspray with appropriate solvent; don’t scrub hard.
- Gently remove residue with plastic scraper and microfiber.
- Rinse and dry; inspect seals and hinges, reapply weatherproofing if needed.
Spraying Recessed Panels and Decorative Door Details
Now that overspray is cleaned and hardware is protected, focus on recessed panels and decorative details, where technique matters more than speed. You’ll work slowly with light passes, aiming for even coverage without pooling in crevices. Thin coats build depth, maintain door security by avoiding drips that can gum locks, and preserve weather resistance by sealing edges. Use a brush for tight corners, then mist-spray to blend brush marks. Check edges and threshold last.
| Area | Tip |
|---|---|
| Panels | Thin, overlapping passes |
| Molding | Back-and-forth misting |
| Corners | Light brush then spray |
| Threshold | Extra sealing coat |
Painting Door Hardware Without Removing It
If you’re keeping the hardware on the door, start by thoroughly cleaning and scuffing each piece so the paint will stick.
Pick a paint and primer made for metal and exterior use, and test it on a hidden spot first.
Mask off the surrounding trim, glass, and door surface carefully to prevent overspray.
Prepping Hardware Surface
Before you paint, give the hardware a careful prep so the finish sticks and moving parts keep working. You’ll protect hardware durability and guarantee paint color coordination with the door. Clean with mild degreaser, dry thoroughly, and mask moving parts tightly. Lightly scuff surfaces so primer bonds.
- Remove grime: soap, brush, rinse.
- Scuff: 220-grit for adhesion.
- Mask: tape and plastic over levers, keyways.
- Lubricate: apply graphite or silicone after paint cures.
Work methodically, check function before spraying, and replace tape as needed to avoid seepage and sticking.
Choosing Proper Paint
After prepping and masking your hardware, pick a paint that bonds well to metal and stands up to handling and weather. Choose a primer designed for metal to improve adhesion and prevent flaking.
For finish, select a durable spray enamel or oil-based topcoat; these resist fingerprints and outdoor exposure.
Consider color psychology when picking tones—brass hues feel classic, black reads modern, and warm metallics feel inviting.
If you prefer lower VOCs, seek eco-friendly paints formulated for metal; they now offer similar durability.
Test a small hidden spot first, then apply thin, even coats for best results.
Protecting Surrounding Areas
While you can leave handles and hinges in place to save time, you’ll need to mask them thoroughly so paint never reaches moving parts or finish you want to keep. Protect trim, glass, and weatherstripping with painter’s tape and plastic sheeting. Consider finish-compatible primers on exposed metal for paint durability. Think about color coordination between hardware and door to avoid clash.
- Clean hardware to remove dirt and oils.
- Tape seams tightly; use plastic for large areas.
- Apply primer sparingly on metal edges.
- Remove tape after tack stage for crisp lines.
Work patiently; neat masking saves touch-ups.
Color Choices That Boost Curb Appeal and Resale
Looking to make a strong first impression? You’ll pick a door color that complements exterior style and interior decor visible through windows.
Choose a door color that complements your home’s exterior and the interior glimpsed through the windows.
Neutral tones like navy, charcoal, or deep green appeal broadly and photograph well for listings.
Accent colors—bright red, sunny yellow, or teal—add personality without overpowering a facade when balanced with trim.
Consider neighborhood trends and curb appeal: buyers often prefer polished, cohesive palettes.
Pair your choice with simple gardening tips—coordinated planters or contrasting blooms—to frame the entry and highlight color.
Keep finishes durable and glossy enough to resist weather and show cleanliness.
Matching New Paint to Your Existing Door Color
Check the existing finish—wood grain, gloss level, or primer—so you know what you’re matching.
Match the paint sheen to that finish to keep reflections and wear consistent.
Then spray a small, inconspicuous area to confirm color and adhesion before doing the whole door.
Assess Existing Finish
Because you want the new coat to blend seamlessly, start by identifying the current finish and color type on your door. Inspect surface gloss, note any textures, and test a small area with solvent to see if paint softens.
Consider color psychology—how the hue affects curb appeal—and whether the shade fits local historical styles.
- Clean a patch and note original pigment.
- Sand lightly to reveal substrate and layers.
- Use a color card or chip for accurate matching.
- Photograph in natural light for reference when buying paint.
Document findings before buying to guarantee a true match.
Match Paint Sheen
When you match the paint sheen, make sure the new coat reflects light the same way the existing finish does so the repaired or repainted area doesn’t stand out. Check whether the door is matte, satin, semi-gloss, or gloss; each hides or highlights texture differently.
Choose a sheen that balances aesthetics and finish durability for exterior exposure. For color blending, slightly adjust the tint if weathering has faded the original, and feather edges to minimize gradual change lines.
Use the same paint base (oil or water) to avoid adhesion problems, and clean and prime bare spots before spraying for best results.
Test Small Area First
Before you spray the entire door, try the paint on a small, inconspicuous spot to confirm the color and sheen match under real light and weather conditions. You’ll avoid surprises and guarantee any color combinations you planned actually work.
Test multiple coats and let them cure; outdoor light changes hue. Check edges, hardware shadows, and how decorative stencils read against the finish. If it looks off, adjust tint or sheen before committing.
Use this checklist:
- Apply base coat and let dry.
- Add second coat to match final coverage.
- View at different times of day.
- Note adjustments for tint or sheen.
Spray-Painting Storm Doors and Screen Doors
Want a faster, more durable update for your storm or screen door? You can spray-paint these doors, but prep matters. Remove hardware and mask screens to avoid clogging; clean grime and sand loose paint.
Choose paint formulated for outdoor use and compatible with the door material. Think color psychology — a bold hue can boost curb appeal while neutral tones stay subtle.
Keep coats thin, drying fully between passes to prevent drips. Reassemble hardware and check door security after painting; hinges and locks must function smoothly.
Regular maintenance, not just color, preserves appearance and protection.
Special Steps for Metal Exterior Doors
Because metal reacts differently than wood or fiberglass, you’ll need a few extra prep and application steps to get a durable, even finish. You’ll strip loose paint, degrease, and sand lightly to key the surface. Pick primers and paints formulated for metal and rust inhibition. Consider color psychology and historical styles when choosing hue and sheen to suit curb appeal.
- Remove rust with wire brush and converter.
- Clean with solvent; rinse and dry completely.
- Apply metal primer; sand between coats.
- Spray thin, even coats; cure per manufacturer.
Finish with a protective clear coat for longevity.
Special Steps for Fiberglass Exterior Doors
While fiberglass doesn’t absorb paint like wood, you still need to prep its smooth surface so coatings will adhere and last. Scuff lightly with fine-grit sandpaper, clean with a degreaser, and remove dust.
Mask hardware and seals to protect door security components, and consider removing locks for thorough coverage.
Use a bonding primer formulated for fiberglass, then spray thin, even coats from 8–12 inches, keeping runs at bay.
Choose a durable exterior paint color and finish that resists UV and scuffing.
Allow proper cure time between coats and before rehanging hardware to ensure a long-lasting, secure, attractive result.
Special Steps for Solid Wood Exterior Doors
Switching from fiberglass to solid wood means you’ll adjust your prep and technique to account for grain, moisture, and finish layers. You’ll remove door hardware, strip old varnish if needed, and check for cracks or raised grain.
Condition the wood with a stabilizing primer, then sand lightly between coats. Match paint colors to wood tone and exterior style, using thinner spray passes to avoid runs. Seal edges and end grains to prevent moisture intrusion.
- Remove hardware and label parts.
- Strip or degloss existing finish.
- Prime with a wood conditioner.
- Sand between coats and topcoat.
Safety Gear and Ventilation When Spray Painting
Wondering what gear you need before you pull the trigger on a spray gun? You’ll want a respirator rated for paint fumes, eye protection, and disposable gloves to prevent skin contact. Wear a coverall or old clothes and non-slip shoes.
Set up good airflow: open nearby windows and doors, use a box fan blowing outward, and position a second fan to draw fresh air in. Work outdoors or in a well-ventilated garage to control overspray and to test Color options on scrap first.
Check Weather considerations—avoid windy or humid days that reduce control and drying performance.
VOCs, Disposal, and Environmental Tips for Door Paint
When choosing paint, check VOC levels on the label because high-VOC formulas can cause headaches and long-term health risks if you’re not careful.
Don’t pour leftover paint or solvents down drains—follow local hazardous-waste guidelines or take them to a collection center.
You can also opt for low-VOC or water-based options and reuse or properly seal leftovers to minimize environmental impact.
VOC Content And Risks
Curious about what’s in that can of door paint and how it can affect your health and the environment? You should check VOC content labels: low-VOC and water-based options reduce painting risks like headaches, dizziness, and long-term respiratory effects.
When you spray, vapors spread fast; ventilate and wear a respirator. Consider these points:
- Identify VOC level on the label.
- Choose low-VOC or no-VOC formulas when possible.
- Use proper PPE and airflow during spraying.
- Limit exposure time and keep others, pets away.
Being deliberate about VOCs protects your health and lowers environmental impact.
Responsible Disposal Methods
How should you get rid of leftover door paint without harming yourself or the environment? You should follow responsible disposal steps: keep cans sealed, store upright, and label them.
Take oil-based or aerosol cans to a hazardous waste facility; many communities offer collection days. Water-based paint can often be dried (kitty litter or paint hardener) and thrown with regular trash if solid.
Never pour paint down drains or into soil; that increases environmental impact.
Reuse, donate, or offer leftover paint to neighbors first.
Wear gloves and ventilate when handling cans, and check local rules for specific disposal requirements.
Cost Estimate: DIY Spray vs. Hiring a Pro
Although tackling a door yourself can save money up front, you’ll need to weigh the cost of paint, primer, masking materials, a sprayer (or rental), and your time against a pro’s labor and finish quality.
You’ll also consider color psychology and historical styles when choosing paint and expect slight imperfections without professional equipment.
Estimate costs:
- Materials: paint, primer, tape, sandpaper.
- Equipment: sprayer purchase vs. rental.
- Labor value: your time and potential rework.
- Pro fee: prep, spray booth, warranty.
If you value speed and flawless finish, hiring often justifies the higher price.
Time Estimate for a Typical Exterior Door Spray Job
When you plan a typical exterior door spray job, expect the whole process—from prep to final touch-ups—to take anywhere from 3 to 6 hours for a single door, depending on your experience and drying times.
You’ll spend 45–90 minutes cleaning, sanding, masking, and setting up a spray area.
Applying primer and two thin coats takes about 60–120 minutes plus flash time between coats.
Allow drying and curing time per product—don’t rush.
Color blending and controlled spray techniques add time if you’re matching or fading shades.
Final inspection and light touch-ups take 15–30 minutes.
Troubleshooting Paint Failure Months Later
If your door starts peeling, cracking, or blistering months after painting, don’t assume it’s hopeless—most failures have identifiable causes you can fix. Inspect surface adhesion, moisture, and sun exposure first. Consider whether poor prep, incompatible primers, or trapped moisture caused the issue.
Check how color coordination choices affected heat absorption on darker hues. Remove damaged paint, sand to sound substrate, and clean thoroughly. You may need to redo with proper primer and exterior-grade topcoat.
- Identify cause.
- Test adhesion.
- Reprep and prime.
- Refinish after hardware removal and cure fully.
Seasonal Maintenance After Repainting Your Door
Because your door faces weather year-round, plan a simple seasonal check to keep the new finish looking its best. Inspect for chips, cracking, or peeling after major seasonal changes and touch up small areas with matching spray or brush-on paint.
Wipe down dirt and pollen, clean hardware, and lubricate hinges to prevent squeaks and wear.
Check seals and weatherstripping for gaps that let moisture in; replace as needed to protect the finish.
Look for gaps or damage that could invite insects and rodents—pest prevention is part of maintenance.
Keep a small kit handy for quick repairs between full repaints.
Small Upgrades After Painting: Hardware and Trim Ideas
Now that your door’s finish is fresh and you’ve handled routine upkeep, you can focus on small upgrades that amplify curb appeal and function. Swap hardware for a cohesive look: knobs, hinges, and deadbolts in matching finishes.
Add trim or a new threshold to frame the door and improve insulation.
Consider door decoration like wreaths or house numbers for personality.
Don’t forget Weatherproofing tips: upgrade sweeps, caulk gaps, and use foam tape to keep drafts out.
- Match finishes
- Upgrade threshold
- Add decor thoughtfully
- Seal edges properly
How to Know When to Repaint Your Exterior Door
When your door starts showing visible wear—faded color, peeling paint, chalky film, or water stains—you’ll know it’s time to repaint. These signs mean the finish no longer protects the wood or metal and can let moisture and UV damage set in.
Check for cracking around joints, swollen edges, or stiffness that signals swollen wood or failing seals—issues that hurt door security and let drafts undermine energy efficiency.
If hardware rusts or the finish flakes after weather exposure, repainting and resealing will restore protection.
Repaint before rot or corrosion worsens to avoid costly repairs and maintain function.
Printable Tools and Materials Checklist for the Job
Before you start, gather a concise, printable checklist of tools and materials so you won’t interrupt the job to hunt for supplies. You’ll want items that speed prep, guarantee safety, and support color matching and proper hardware removal. Print this and tick boxes as you go.
- Sandpaper (various grits), tack cloth, degreaser
- Primer, spray paint (test swatch for color matching), clear coat
- Drop cloths, painter’s tape, respirator, gloves, safety glasses
- Screwdrivers, pliers, masking paper, small brushes for touch-ups
Keep the checklist accessible and update it for each door’s condition.
Frequently Asked Questions
Can Spray Painting Affect My Door’s Weatherstripping or Seals?
Yes — spray painting can affect your door’s weatherstripping and seals if overspray or solvent-soaked paint contacts them; you should protect trim based on door material to guarantee proper paint adhesion and preserve seal flexibility and function.
Will Spray Paint Trap Moisture Inside a Hollow-Core Door?
A homeowner painted their hollow core door and later found moisture infiltration; yes, spray paint can cause interior trapping of humidity if you seal vents or gaps. You should ventilate, use breathable primers, and avoid sealing completely.
Can I Spray Paint a Prefinished Door Without Stripping the Factory Coating?
Yes — you can spray paint a prefinished door without stripping the factory coating, but you should sand and clean thoroughly for good surface preparation, use proper primer, and expect paint durability to depend on adhesion and topcoat quality.
How Long Before Reinstalling Hardware After Spray Painting?
You should wait 24–48 hours before reinstalling hardware; patience pays off like a handshake sealing a deal. Proper surface preparation boosts paint durability, so guarantee the finish’s cure time before handling to avoid chips or smudges.
Can Insects or Dirt Stick to Paint While It’s Curing Outdoors?
Yes — insects and dirt can stick while paint’s curing outdoors. You’ll use insect prevention measures like fine mesh screens and avoid dusty times to reduce dirt adhesion; gentle blowing or tack cloth removes light debris before it bonds.
Conclusion
Yes — you can spray paint an exterior door, and when you do it right, the finish looks smooth and professional. Spray painting’s best for metal and fiberglass doors or when you want a quick, even coat; avoid it on delicate carved woods or in windy, humid conditions. For example, a neighbor swapped a faded steel door for a spray-painted navy finish last summer: it cut painting time in half and held up through rain with proper primer and topcoat.