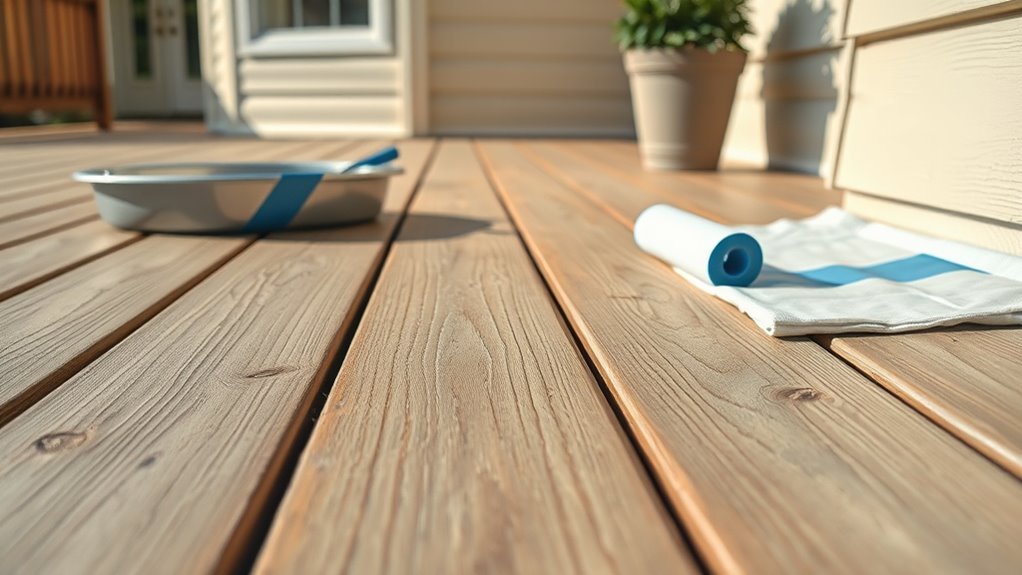
How Long to Let Deck Dry Before Painting
You should wait until your deck is fully dry before painting—usually 24–72 hours after rain or washing, but longer in cool or humid weather. Aim for wood moisture under about 12–15% using a pin or pinless meter; test shaded spots and joints. If you don’t have a meter, check that boards feel warm and not spongy and that tape or plastic tests show no trapped damp. Keep conditions warm and dry for best results, and more guidance follows below.
How Long Should a Deck Be Dry Before Painting?
Before you paint, make sure the deck is completely dry — typically 24 to 72 hours after the last rain for most paints and stains, but longer if conditions are cool or humid. You’ll check moisture with a meter or by taping a plastic sheet to boards overnight; if condensation forms, wait.
Plan around garden furniture and move pieces off the work area so airflow reaches the wood. Consider whether deck lighting could trap moisture beneath fixtures and remove or shield them.
Don’t paint on dew-prone mornings; aim for several dry, warm hours before and after application for proper adhesion and cure.
Quick Rule of Thumb: Drying Times for Decks
Now that you know how to confirm a deck is dry enough to paint, use a simple rule of thumb to estimate drying time: plan on 24–72 hours of dry weather after the last rainfall for most paints and stains. Longer in cool or humid conditions.
Gauge by touch and appearance: wood that’s warm and dry will accept finish evenly. If you’ve done stain removal or pressure washing, allow extra drying, since trapped moisture can linger.
For ongoing deck maintenance, schedule projects during forecasted stretches of sun and low humidity. When in doubt, wait: better to delay than to seal in moisture.
How to Test Deck Moisture With a Meter?
When you’re ready to get precise, use a moisture meter to check whether the wood is dry enough to paint or stain. Choose a reliable pin or pinless meter, calibrate per instructions, and test several boards across the deck—near stairs, shaded spots, and close to the house.
Aim for moisture readings below 12% for most paints; wood stains may accept slightly higher levels. Record measurements and wait longer if readings are elevated.
Regularly checking during prep is smart deck maintenance and directly improves paint durability. Recheck after heavy rain and before final coating to ensure consistent, acceptable moisture levels.
Simple DIY Moisture Tests for Decks
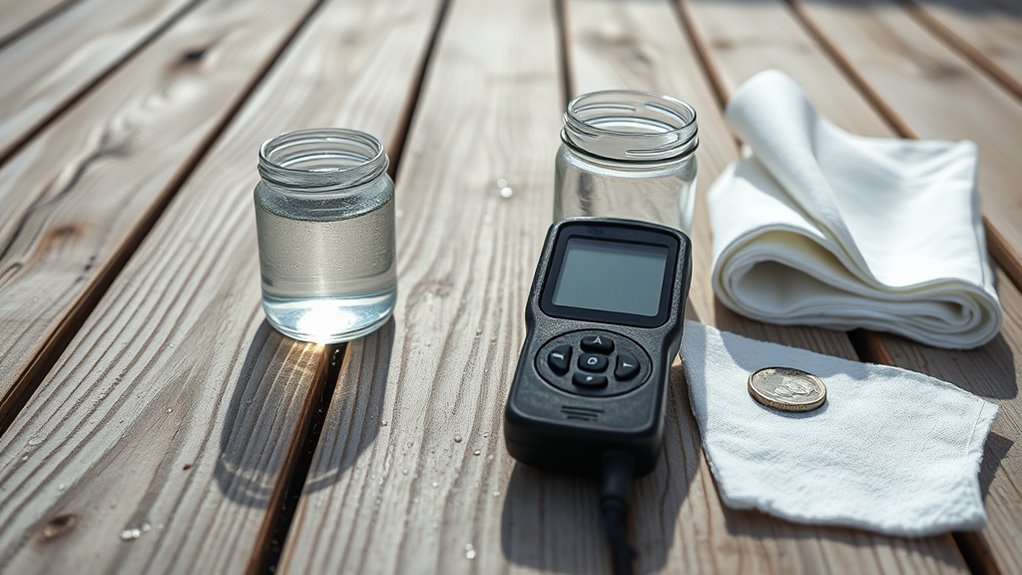
If you don’t have a moisture meter handy, a few quick DIY checks can give you a good sense of whether your deck is dry enough to paint. Feel the boards: they should be cool and not spongy. Tap with a coin—duller sound can mean moisture. Check under deck furniture for trapped damp. Consider how recent rain and landscape integration (sprinklers, splashback) affect drying.
| Test | What to look for | Action |
|---|---|---|
| Touch | Dry, not tacky | OK to paint |
| Tap | Crisp sound | OK |
| Hidden spots | No dark patches | Move furniture, wait |
Drying After Power Washing: Realistic Wait Times
After power washing, you’ll want to do a surface moisture check by pressing a fingernail or clear tape to the wood to see if water beads or darkens the grain.
Expect drying times to vary with temperature, humidity, and sun exposure—anything from 24 hours in hot, dry weather to several days in cool or humid conditions.
Use those simple checks rather than a fixed schedule to decide when the deck is truly ready to paint.
Surface Moisture Check
Once the power washer’s rinse has stopped and the deck looks clean, you’ll need to confirm the wood is truly dry before painting.
For proper Deck Maintenance and Surface Preparation, use a moisture meter on several boards—surface and ¾” deep—to get reliable readings. Aim for below 15% moisture for most paints and stains; oil-based finishes may tolerate slightly higher levels.
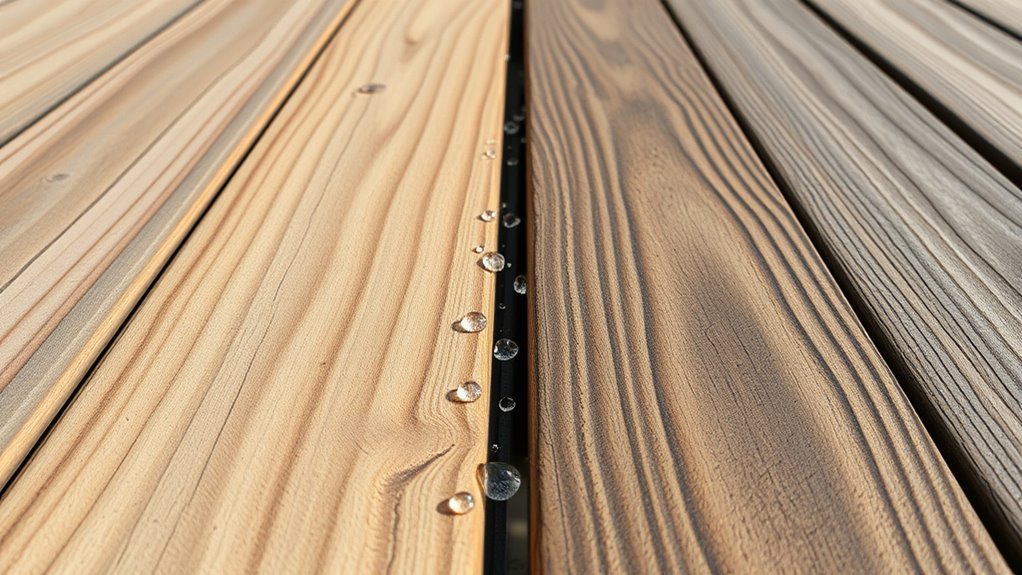
Also press a 2×2 plastic sheet to the wood overnight: trapped condensation indicates lingering dampness. Check joints and shaded areas, since they hold moisture longest.
Only paint when readings and the plastic test both show dry conditions.
Weather-Dependent Timing
Because drying depends mostly on weather, you’ll want to plan painting around temperature, humidity, sun exposure, and wind rather than a fixed number of days.
After deck cleaning or power washing, expect rapid drying in warm, low-humidity conditions—often 24–48 hours. Cooler, humid, or overcast periods can stretch drying to several days or a week.
Direct sun and steady breeze speed evaporation; overnight dew slows it down.
Move garden furniture off the deck to avoid trapping moisture beneath items.
Always test surface moisture before painting: press a clean cloth or use a moisture meter; paint only when readings are consistently low.
How Recent Rain Affects Painting Readiness
If it rained recently, you’ll need to confirm the deck’s surface is fully dry before painting, since residual moisture can prevent proper adhesion and lead to peeling.
Check under garden furniture and along seams where water hides; lift cushions and move planters to inspect boards. Use a moisture meter or press a clean white cloth—if it darkens, wait longer.
After heavy rain, allow several dry days and consider re-sanding raised grain before deck sealing or painting.
Don’t assume surface dryness; test multiple spots, especially shaded areas. Only proceed when readings and visual checks consistently show dry, uniform wood.
How Temperature and Humidity Control Drying Speed
While you’re preparing to paint, remember that temperature and humidity are the two biggest factors that control how fast your deck dries. Warmer air speeds evaporation, and lower humidity lets moisture leave the wood more easily.
You should monitor daytime highs and overnight lows: aim for consistent warmth (around 50–85°F) and relative humidity under 70% for reliable drying.
Ventilation and sunlight help, so plan work on dry, breezy days.
If you’ve recently done deck staining or applied wood treatment, allow extra drying time in cool, humid conditions.
Check moisture content with a meter before painting to guarantee readiness.
How Deck Type Affects Drying: Softwood vs Hardwood (And Composite Notes)
If your deck’s made of softwood like pine or cedar, you’ll usually need to wait longer for it to dry because those boards soak up more moisture.
Hardwood decks dry faster and more evenly, so you can often paint sooner.
While composite decking doesn’t absorb water the same way and typically only needs surface drying.
Keep these differences in mind when scheduling paint so you don’t trap moisture under the finish.
Softwood Drying Times
Because softwoods absorb and release moisture faster than hardwoods, they’ll usually dry to paint-ready levels sooner — often within a week or two in warm, dry conditions — though exact timing depends on species, thickness, and weather. You should check wood grain orientation and moisture absorption with a moisture meter; end grain dries faster than face grain. Thin boards and sunny exposure speed drying; shaded, humid conditions slow it. Wait until moisture reads 12% or below for exterior paint. Monitor after rain; recheck before priming. Use the table below to compare typical drying scenarios.
| Condition | Typical Days | Notes |
|---|---|---|
| Warm/Sunny | 7–14 | Fastest |
| Cool/Dry | 14–21 | Moderate |
| Humid/Shaded | 21+ | Slow |
| After Rain | 3–7 | Recheck before priming |
Hardwood And Composite Notes
Softwoods dry faster, but hardwoods and composite decking behave quite differently, so you’ll need to adjust your drying expectations and testing methods.
With hardwoods, dense grain holds moisture longer; wait extra days and use a moisture meter to confirm levels under 15% for reliable paint adhesion. Hardwoods offer superior deck durability, so proper prep preserves that advantage.
Composite decks shed water but resist penetration, so drying matters less — instead, clean and ensure surfaces are oil- and wax-free for coating compatibility.
For both, test small areas: if paint adheres cleanly after curing, proceed; otherwise, extend drying or improve surface prep.
How Previous Stains or Sealers Change Repaint Timing
When you’re repainting, previous stains or sealers can speed up or slow down how long the deck needs to dry before you apply new paint. If a previous sealer repels water, you’ll need thorough deck cleaning and time for cleaners to neutralize residues. Solvent-based removers dry faster than water-based ones.
Gel or oil stains often require longer off-gassing and may need sanding before repainting. Transparent or semi-transparent stains let moisture escape quicker than heavy film-forming sealers.
Factor in color selection too: darker paints hide stains but may trap heat, affecting cure times. Always test a small area first.
How Wood Age and Old Finishes Affect Drying Needs
Older wood soaks up and releases moisture differently than new lumber, so you’ll need to adjust drying expectations.
If the deck still has old stains or sealers, they’ll slow down absorption and can trap moisture, affecting how long you should wait.
Over years moisture can migrate within the boards, so test several spots rather than assuming the surface is dry.
Wood Age Impacts Absorption
Because wood’s density and prior coatings change how it soaks up water and finishes, you’ll need to adjust drying time based on age and what was previously applied.
Older boards with tighter wood grains often repel moisture less predictably, so you’ll check moisture content more frequently and allow extra drying days after rain or washing.
Newer lumber soaks more evenly; consider brief extra drying if recently milled or treated.
If you plan staining techniques that penetrate, aim for lower moisture readings than for surface paints.
Use a moisture meter and local climate cues to decide when it’s truly ready to accept coatings.
Effect Of Previous Finishes
Building on how wood age alters absorption, you also need to take into account what finish is already on the boards, since old paints, varnishes, or sealers change how moisture moves and how new coatings will adhere. You should inspect and test adhesion before major Deck cleaning and Paint preparation. Old oil finishes repel water, cured paint can trap moisture, and failing sealers let water in unevenly. Plan stripping or scuffing accordingly and allow extra drying after removal.
| Finish type | Effect on drying | Prep action |
|---|---|---|
| Oil-based | Repels surface water | Strip/scuff |
| Old paint | May trap moisture | Test/prime |
| Sealer | Variable absorption | Remove/clean |
Moisture Migration Over Time
As wood weathers and previous finishes break down, moisture moves differently through the deck and you need to account for that when planning drying times. Older boards soak and release water unevenly, so measure moisture content before painting.
Combine visual inspection with simple tests and consider past treatments: oil, stain, or film finishes alter migration.
- Check moisture with a meter across several boards.
- Sand or strip areas where finish hinders drying.
- Allow longer dry periods after rain; use fans if needed.
- Use weather forecasting to pick extended dry windows.
Good deck maintenance speeds drying and improves adhesion.
Best Time of Day and Week to Paint for Faster Drying
When you pick the right time of day and week to paint your deck, the finish dries faster and looks better. Aim for late morning into early afternoon on a dry, mild day so the surface warms and moisture evaporates without overheating the paint.
Choose a period of several consecutive dry days—ideally midweek when dew’s gone and humidity’s lower—to avoid rewetting between coats. Check weather forecasts for stable conditions.
During surface preparation, you’ll remove contaminants and allow a uniform cure for deck stains or paint. Work when temperatures are within the product’s recommended range and avoid weekends with uncertain showers.
How to Speed Deck Drying With Fans, Sun, and Ventilation
You can speed drying by pointing fans across the deck to keep air moving and lift moisture.
Set up the work when the sun hits the deck for the longest stretch and angle boards so sunlight reaches as much surface as possible.
Also, open vents or clear debris under the deck to improve airflow beneath and prevent trapped dampness.
Position Fans Strategically
If you want the fastest, most consistent drying, position fans to create a steady airflow across the deck surface and keep vents or doors open to pull moisture away. You’ll speed drying without harming wood or finish when you follow simple steps tied to Deck maintenance and Painting techniques.
- Aim fans parallel to boards to move moisture along grain.
- Use intake and exhaust fans to force cross-ventilation.
- Elevate fans slightly to avoid pooling air and to reach gaps.
- Combine low-speed continuous airflow with periodic higher bursts.
Check moisture with a meter before painting; don’t rush the coating.
Maximize Sun Exposure
Although clouds or shade can slow things down, maximizing sun exposure is the quickest passive way to dry a deck. You’ll move garden furniture out of direct sun paths so planks get full light; even small shifts reduce shading.
Angle umbrellas, relocate potted plants, and trim overhanging branches to open sightlines to the sky. Check morning and afternoon sun patterns so you schedule staining when the deck’s driest.
Use light-colored covers for items you can’t move to reflect heat away. Coordinate these changes with your overall landscape design to maintain curb appeal while speeding drying.
Improve Airflow Beneath
When you boost airflow under the deck, moisture escapes faster and surface drying speeds up. So combine fans, strategic sunlight, and ventilation to cut drying time considerably.
Position garden furniture to avoid blocking gaps, tilt cushions, and prop items on blocks so air circulates.
Use outdoor lighting posts to hang lightweight reflective panels that redirect sun and warmth under the deck.
- Place box fans to push air through joist spaces.
- Create vents at low and high points for crossflow.
- Remove debris and trim plants that trap humidity.
- Check for pooling and adjust slope for runoff.
Drying will be noticeably faster.
When to Delay Painting Even If the Surface Looks Dry
Because surface dryness can be deceptive, you should still hold off on painting until you’ve checked for deeper moisture and environmental risks. You’ll probe boards with a moisture meter, inspect end grain and hidden joists, and schedule tests after rain or morning dew.
For smart deck maintenance, mark readings and repeat over several dry days. Don’t paint if readings exceed paint-maker recommendations or if humidity stays high.
Check weather forecasting for upcoming rain, high humidity, or temperature swings that can trap moisture under finish. Waiting prevents peeling, mildew, and wasted effort—so err on the side of patience.
Choosing Paints and Coatings for Borderline Moisture Conditions
If your deck still feels a bit damp, choose moisture-tolerant paints like 100% acrylics or specialized deck coatings that flex with wet-to-dry cycles.
You can add adhesion-promoting primers or bonding agents to help paint stick on borderline-moist boards.
Before you paint, wash, brush, and sand to remove contaminants and open the grain so coatings bond properly.
Moisture-Tolerant Paint Types
Although you’ve waited as long as practical, sometimes weather or tight timelines leave your deck slightly damp; in those borderline cases, choosing a moisture-tolerant paint or coating can let you move forward while minimizing adhesion problems and mold risk.
You’ll still consider deck aesthetics and paint color selection, but prioritize formulations designed for high substrate moisture.
- Acrylic latex with moisture-friendly binders — flexible, breathable.
- Elastomeric coatings — bridge tiny cracks, resist water intrusion.
- Oil-modified alkyds with modern additives — durable in damp conditions.
- Mildew-resistant specialty primers/topcoats — protect finish and slow mold.
Test a small area before full application.
Additives To Improve Adhesion
When your deck’s surface holds a bit more moisture than you’d like, pairing the right additives with moisture-tolerant paints can boost adhesion and cut down on peeling.
Common modifiers include adhesion promoters, penetrating primers, and dispersants that help bind paint to damp wood or concrete.
You should pick additives rated for exterior use and compatible with your paint system, testing a small area first.
Use adhesion promoters to improve bonding, penetrating primers to seal slightly damp pores, and dispersants to stabilize pigment in wet conditions.
Incorporate these choices into routine deck maintenance and consult weather forecasting to time application windows.
Surface Prep For Damp Boards
Because decks rarely dry perfectly between spring rains, you’ll often need coatings that tolerate a bit of moisture without compromising adhesion or durability. You should prep damp boards carefully: sweep debris, use a deck brush to open the wood grain, and let surface moisture stabilize (not soak). Consider water-repellent primers and moisture-tolerant deck staining products formulated for higher RH. Test a small area first. Follow these steps:
- Remove dirt and mildew with a mild cleaner.
- Sand glossy spots lightly to reveal fresh wood grain.
- Apply a breathable, moisture-tolerant primer.
- Use compatible deck staining or paint per label.
How Primer Choice Affects Acceptable Surface Moisture
If you choose a moisture-tolerant primer, you’ll be able to paint sooner because those formulas bond to slightly damp wood and resist blushing and adhesion failure.
You should match primer type to board moisture: oil-based and certain alkyd primers tolerate higher residual dampness than standard latex, while specialized primers for Historic restoration handle older, variable timbers. Check product specs for allowable wood moisture percentage.
For Creative color projects, primers with stain-blocking and tinting capacity give truer topcoat hues on imperfect surfaces.
Always test a small area, follow flash times, and guarantee surface is free of contaminants before priming.
Why Paint Peels If You Paint Too Soon (And How to Avoid It)
Although it may seem quicker to paint right after cleaning, applying topcoat to damp deck boards causes the paint to lose adhesion and peel as the wood dries and moves. You’ll notice bubbling, flaking, and failure where moisture trapped beneath the finish expands.
Protect nearby garden furniture and wait for proper dryness after exterior cleaning.
To avoid peeling, follow these steps:
- Test moisture with a meter; under 15% is ideal.
- Allow 24–72 hours of dry weather after washing.
- Use breathable primer formulated for damp-tolerant application if needed.
- Recheck boards before painting to ensure stable moisture.
Troubleshooting Peeling, Blistering, and Adhesion Issues
When paint starts to peel, blister, or refuse to stick, you can usually trace the problem to moisture, surface contamination, or poor preparation; diagnosing the cause quickly helps you choose the right fix.
Inspect for trapped moisture by probing boards and checking recent weather. Remove loose paint, clean with a proper deck cleaner or TSP substitute, and sand to sound wood.
Probe boards and weather for moisture, strip loose paint, clean with deck cleaner or TSP substitute, then sand to sound wood.
Use a primer made for damp-prone areas if minor moisture remains. Match paint type and finish for color coordination and overall deck aesthetic.
Test a small patch, let it cure fully, then proceed with full recoating to guarantee adhesion.
Professional vs DIY Drying Standards: What Pros Look For
Because pros work on tight schedules and long-term results, they set drying standards you can emulate to avoid costly failures. You’ll learn what professionals check so your deck maintenance and stain removal efforts don’t go to waste. Follow these pros’ priorities:
- Surface dryness: wood feels dry and shows no dark patches.
- Moisture thresholds: pros wait for manufacturer-recommended percentages before painting.
- Weather window: they pick consecutive dry days with moderate temps and low humidity.
- Prep integrity: they ensure stain removal and cleaning residues are fully rinsed and dry.
Adopt these standards to match pro outcomes with DIY care.
Tools to Monitor and Manage Deck Moisture
If you want reliable results, use the right tools to measure and manage deck moisture instead of guessing by touch. You’ll want a pin or pinless moisture meter to read wood percentages—pin meters give depth-specific readings, while pinless scan broader areas.
Combine meters with a handheld hygrometer to track ambient humidity. Use infrared thermometers to spot damp spots after rain and look for condensation risk.
For management, apply moisture barriers where needed: flashing, breathable under-deck membranes, or sealants that allow vapor escape. Record readings and recheck after drying periods so your deck staining waits until moisture levels stay consistently low.
How to Plan Your Painting Timeline Around Seasonal Weather
Those moisture readings tell you when the deck’s physically ready, but seasonal weather shapes how long that readiness lasts and when you should schedule painting. You’ll plan around temperature, humidity, and forecast windows so your deck maintenance holds up and your chosen paint color cures properly. Consider these steps:
- Pick a 48–72 hour dry window with lows above 50°F and humidity under 70%.
- Avoid painting before or during heavy pollen, leaf drop, or storms that raise moisture.
- Schedule early fall or late spring for stable temps and fewer extremes.
- Factor local microclimates and a backup date for unexpected wet spells.
Pre-Paint Readiness Checklist
Before you paint, run through a focused readiness checklist so you don’t waste time or materials on a job that won’t last. You’ll confirm dryness, repair boards, and choose finishes that suit climate and traffic. Prioritize deck maintenance tasks, clean thoroughly, and test moisture with a meter. Pick primers and eco friendly paints, and schedule work for consecutive dry days. Gather brushes, rollers, and safety gear.
| Task | Status |
|---|---|
| Moisture test | |
| Repairs & cleaning | |
| Paint & tools ready |
Tick items off, then start painting with confidence.
Frequently Asked Questions
Can I Paint Deck Railings Differently Than the Deck Boards Regarding Moisture Timing?
Yes — you can paint railings differently than deck boards, but you’ll wait for each deck surface to reach proper moisture levels so paint adhesion isn’t compromised; test moisture and match coatings to substrate and exposure for best results.
Will Painted Furniture on the Deck Affect Drying or Painting Schedule?
Yes — painted furniture can affect drying and painting schedule; you’ll adjust timing to avoid tackiness, guarantee color matching, and protect paint durability by spacing projects, covering pieces, and letting layers fully cure before moving or stacking.
How Long Should New Wood Decking Acclimate Before Painting After Installation?
You should wait 2–4 weeks for new wood decking to acclimate before painting; you’ll apply wood treatment first, let it cure fully, then paint to guarantee proper paint adhesion and avoid peeling or trapped moisture.
Does Nearby Landscaping or Sprinklers Change Deck Drying Time Recommendations?
Like a sponge in rain, you should expect Landscaping impact and Sprinkler influence to extend drying time; they’ll keep the wood wetter, so delay painting longer, monitor moisture content, and adjust timing based on actual surface dryness.
Can Moldy or Algae-Covered Boards Be Painted Without Full Cleaning and Drying?
No—you shouldn’t paint over moldy or algae-covered boards without full cleaning and drying; you’ll need mold removal and algae treatment first, then let the wood dry completely so paint adheres and won’t trap moisture or regrowth.
Conclusion
You don’t have to wait forever — aim for wood at or below 15% moisture before painting, and you’ll avoid peeling and wasted effort. If you’re worried a meter or DIY test’s overkill, remember a quick probe or the cup test takes minutes and can save days of rework. Plan around weather, dry thoroughly after power washing, and don’t paint damp wood — it won’t stick, no matter how enthusiastic you are.