How Long to Let Wood Dry Before Painting
You should wait until the wood’s moisture content is stable and appropriate—generally 6–12% for interior pieces and under about 12–15% for exterior work—before painting. New or pressure‑treated lumber can take days to months to reach those levels depending on temperature, humidity, and sun exposure. Use a moisture meter and let stained or treated surfaces fully cure. Follow manufacturer times and control humidity with fans or dehumidifiers to improve adhesion, and keep going for more specifics.
Quick Answer: How Long to Wait Before Painting Wood
How long should you wait before painting wood? You’ll usually wait 24–72 hours for new lumber to acclimate and for surface moisture to drop; kiln-dried boards often need less time. Check with a moisture meter—aim for 6–12% indoors.
Sand after the wood grain raises and apply knot filling where resinous knots bleed; let fillers cure fully per product instructions. If you’ve sealed end grain or used stain, allow recommended dry times before topcoats.
In humid conditions or for exterior projects, extend drying time. Don’t rush: proper moisture and cured knot filling guarantee adhesion and a smooth finish.
Who Should Use This Guide and When
If you’re refinishing furniture, building outdoor projects, or touching up trim, this guide is for you. It’ll help you decide the best timing based on wood type, moisture level, and weather.
Use it before you paint so you won’t waste time or ruin a finish.
Ideal Users
Whether you’re a weekend DIYer tackling a porch refresh, a professional painter managing project timelines, or a furniture restorer preserving grain and finish, this guide helps you decide when wood’s dry enough to paint and what to watch for before you start.
You’ll find practical tips if you’re refinishing indoor cabinets, prepping exterior siding, or reviving heirloom furniture. Use it when moisture content, wood grain visibility, or expected paint sheen matter to the outcome.
It’s aimed at homeowners, contractors, and hobbyists who want reliable checks, avoid adhesion issues, and guarantee durable, attractive finishes without needless delay.
Best Timing
You’ve seen who benefits from this guide; now let’s pin down the best timing so you know when to act.
If you’re prepping rough-cut lumber, newly milled boards need longer drying so wood grain tightens and surface moisture drops.
If you’ve stripped old paint, wait until the substrate reaches stable moisture content—use a meter.
For indoor projects, pick low-humidity days and allow extra ventilation.
Exterior work needs several dry days after rain and before a forecasted storm.
Wait until the wood feels dry, the grain looks uniform, and your chosen paint sheen lays down smoothly without beading.
Why Wood Moisture Matters for Paint Adhesion
Because wood soaks up and releases moisture with the air, its moisture content directly affects how paint bonds to the surface. You’ll notice high moisture lifts paint, blurs wood grain detail, and prevents proper adhesion.
Too-dry wood can draw solvents from paint, altering application and reducing paint sheen. Moisture shifts after painting cause cracking, peeling, or blistering as the substrate expands and contracts.
You should check moisture before priming, confirm surfaces are stable, and choose compatible primers and paints. Managing moisture lets paint form a continuous, flexible film that clings to the wood instead of failing prematurely.
Ideal Moisture: Target Percentages for Interior vs Exterior Wood
When preparing to paint, aim for wood moisture levels that match the space: interior wood should be about 6–8% MC (moisture content), while exterior wood is best around 9–14% depending on local climate and exposure. You’ll check moisture with a reader, noting variations by species and Woodgrain patterns that may trap moisture.
Match paint color and finish to expected movement. Follow this quick checklist:
Match paint color and finish to expected wood movement; use the quick checklist to ensure proper adhesion and durability.
- Interior trim: 6–8% MC for stable adhesion.
- Furniture: 6–8% MC, acclimate indoors first.
- Siding: 9–14% MC, allow seasonal equilibrium.
- Decking: 9–14% MC, avoid painting wet wood.
How Climate and Season Change Drying Time
Where you’re and when you do the work will change how fast wood loses moisture. Higher temps speed drying, while high humidity slows it, so you’ll need more time in muggy conditions.
Plan around seasonal swings—cold damp seasons can double drying times compared with warm, dry months.
Temperature Effects On Drying
Although moisture leaves wood faster in warm, dry air, you’ll see big changes across climates and seasons that affect how long you should wait before painting. Temperature alters how wood grain opens and how paint sheen cures. You should adjust drying time based on expected daily highs and lows.
- Above 70°F: drying speeds up, wait less if nights stay warm.
- 50–70°F: moderate pace, check moisture content before priming.
- 32–50°F: slow drying, risk of incomplete cure and dull paint sheen.
- Below freezing: don’t paint; wood won’t dry properly and coatings can fail.
Humidity’s Impact On Time
Temperature sets the pace, but humidity really determines how long wood holds onto moisture, so you should factor local humidity patterns into your painting schedule.
High humidity slows evaporation, especially in dense wood grain and areas with high knot density where moisture collects. You’ll want to extend drying time after rain or in coastal climates.
Low indoor humidity speeds drying but can cause surface checks. Use a moisture meter to confirm equilibrium moisture content before priming.
Monitor relative humidity during and after drying windows, and prioritize sheltered, ventilated spaces so paint adheres to properly dried, stable wood.
Seasonal Weather Considerations
Because seasons change both average temperature and humidity patterns, you’ll need to adjust drying schedules by time of year and local climate—drying runs faster in warm, low-humidity summers and much slower during cool, damp winters or rainy seasons.
You should monitor conditions and adapt so wood grain stabilizes before painting to preserve paint durability.
Consider these seasonal tips:
- Summer: faster drying—check moisture content more often.
- Spring/Fall: variable—avoid finishing during wet spells.
- Winter: use controlled indoor drying to prevent trapped moisture.
- Rainy season: postpone exterior work or use shelters and dehumidifiers.
Softwood vs. Hardwood: Drying Differences
When you’re deciding how long to let wood dry before painting, remember that softwoods and hardwoods behave differently.
You’ll find softwoods dry faster but absorb finishes unevenly because their wood grain is more open, so you should allow extra time for moisture to equalize before priming.
Hardwoods hold moisture longer and can show raised grain, affecting paint sheen if not prepped correctly.
Sanding, sealing, and ensuring uniform moisture content prevents blotching and uneven gloss.
Check moisture with a meter and aim for stable readings appropriate to your environment.
Adjust drying time based on species, thickness, and local humidity.
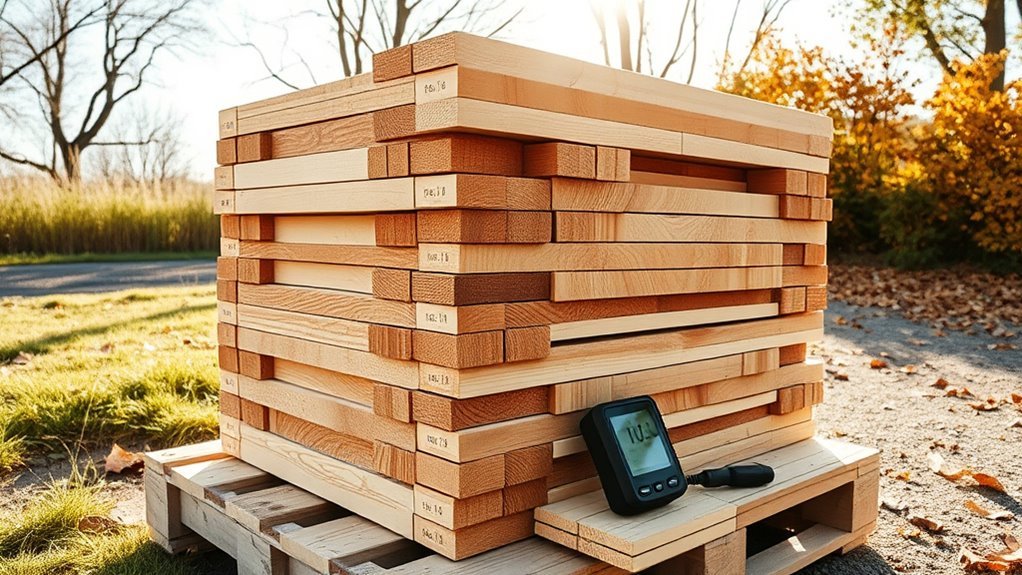
Drying Time for Freshly Cut Lumber Before Priming
Softwood and hardwood differences matter, but freshly cut lumber brings its own timing concerns before you prime it. You want moisture content near 12-15% for interior work; exterior pieces can be a bit variable but should be stable. Check boards with a moisture meter and watch wood grain for raising that affects finish.
Fresh-cut boards need time—air-dry, sticker-stack, and reach stable 12–15% moisture before priming to avoid grain issues.
Consider these steps:
- Air-dry in a covered, ventilated spot until MC stabilizes.
- Sticker-stack to promote even drying and prevent cupping.
- Re-check MC in center and ends before priming.
- Sand lightly to settle the grain for consistent paint sheen.
Prime only when the wood’s stable.
Drying Time for Pressure-Treated Lumber Before Painting
If you’re planning to paint pressure-treated lumber, wait until its moisture content drops and stabilizes—typically several weeks to several months depending on treatment, species, and local climate.
You’ll want the lumber below about 15% moisture for best adhesion. Check with a moisture meter in several boards and depths; surface dryness alone can be misleading. Let boards air-dry under cover and upright for airflow, protecting end grain.
Once stable, examine the wood grain for raised fibers that might affect the paint finish; smooth or lightly sand only if needed.
Apply a quality primer and paint finish recommended for treated wood.
Drying Time After Sanding and Cleaning Wood Surfaces
Because sanding and cleaning raise the wood’s surface moisture and open the grain, you should let the surface dry thoroughly before priming or painting. You’ll wait so the wood grain seals properly and the paint sheen stays even.
Typical drying time is 1–48 hours depending on humidity, temperature, and wood type. Check moisture with a meter or touch; it should feel dry and cool.
- Low humidity, warm temps: 1–4 hours
- Moderate conditions: 6–12 hours
- High humidity or dense wood: 24–48 hours
- Always verify with a moisture meter or visual inspection
How Long to Wait After Staining Before Painting
After staining, you’ll usually wait 24 to 48 hours for oil-based stains and 1 to 2 hours for most water-based stains, but check the product label for exact drying times.
Before painting, make sure the stained surface is fully dry, lightly sanded if needed, and wiped clean to remove dust or residue.
Proper prep and patience help the paint adhere and prevent blotches or peeling.
Drying Time Guidelines
When you’ve stained wood and are ready to paint, let the stain fully cure rather than just feel dry to the touch. Curing can take anywhere from 24 hours to several days depending on stain type, temperature, humidity, and wood species.
You’ll check drying by smell and tackiness, and note that dense wood grain or recent knot filling can slow curing. Follow these practical timing guidelines:
- Oil-based stain: 24–72 hours.
- Water-based stain: 12–48 hours.
- Gel stain: 24–72 hours; ventilate well.
- Exterior pieces: allow extra days in cool or humid conditions.
Wait fully to avoid adhesion problems.
Surface Prep Tips
To guarantee paint sticks and looks smooth, let the stain fully cure and the surface reach room temperature and low humidity before you start sanding or priming. Check the manufacturer’s cure time, then test by touching a hidden spot — it should feel dry and not tacky.
Lightly sand with fine grit to smooth raised wood grain, wipe with a tack cloth, and remove dust.
Choose a primer compatible with your stain type; oil-based seals tannins better on hardwood. Match primer and topcoat for desired paint sheen.
Allow recommended recoat times, and only paint when the surface stays consistently dry.
Drying Time After Preservatives or Water Repellents
If you’ve treated the wood with a preservative or water repellent, give it enough time to cure before painting so the finish will adhere and dry properly. You’ll want to wait until the surface feels dry and the smell fades to avoid trapping solvents.
Check for absorption and test a small patch. Preserve wood grain and prevent premature color fade by letting treatments fully set.
- Read product label for recommended cure time.
- Feel surface; no tackiness means likely ready.
- Perform a water-drop test for absorption.
- Sand lightly if raised fibers appear before priming.
How Paint and Primer Type Affect Required Wood Dryness
Although different paints and primers tolerate moisture to varying degrees, you’ll get the best adhesion and finish by matching your product choice to the wood’s dryness.
Oil-based primers handle slightly higher moisture than latex, so you can coat sooner, but they trap moisture more if applied too wet.
Latex finishes breathe better; they suit slightly damp surfaces but need drier wood for ideal paint durability.
Stains penetrate along the wood grain and require very dry substrate to avoid blotching.
For topcoats, choose systems designed for the expected moisture and aim for the lowest feasible moisture content before painting.
Reading Product Labels: Recommended Dryness
You’ve seen how primer and paint types affect how dry the wood should be, so now check product labels for the manufacturer’s recommended moisture levels and application conditions. Read carefully: labels often specify acceptable wood grain orientation, surface prep, and whether knot filling is required. Follow instructions to avoid adhesion problems or staining.
Check product labels for recommended wood moisture, temperature/humidity ranges, surface prep, and primer compatibility before painting.
- Note stated maximum moisture percentage.
- Check temperature and humidity ranges.
- Look for surface prep: sanding, cleaning, knot filling.
- Confirm recoat times and primer compatibility.
If labels conflict between products, follow the primer’s guidance or contact the manufacturer for clarification before painting.
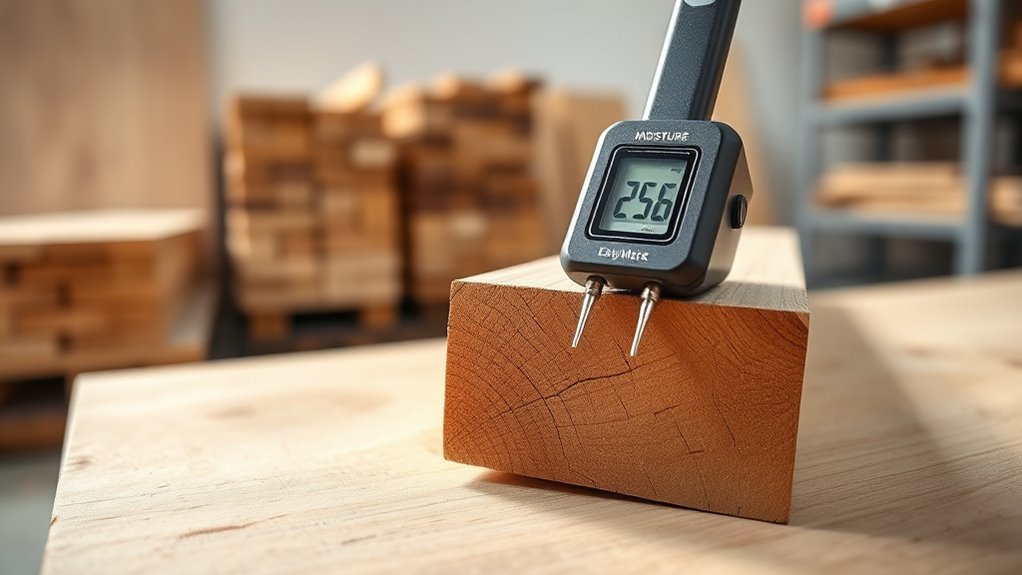
How to Measure Wood Moisture With a Moisture Meter
When you’re ready to confirm that wood is dry enough to prime or paint, a moisture meter gives you a quick, reliable reading so you can avoid costly adhesion and staining problems.
Hold the meter flat against the wood, following the manufacturer’s instructions, and take readings across the board: near edges, center, and along the wood grain to spot variations.
Aim for the paint finish manufacturer’s recommended moisture percentage.
Record multiple readings over days to confirm stability.
If moisture’s too high, delay painting until readings drop.
Clean contact points and store the meter properly to keep readings accurate.
Pin vs. Pinless Meters: When and How to Use Each
If you’re deciding between pin and pinless moisture meters, think about where you need readings and how invasive you can be. You’ll use pin meters for precise depth readings by piercing the surface, which helps when wood grain variation matters.
Pinless meters scan larger areas without damage, preserving finish durability and surface appearance.
- Use pin meters for core moisture and localized spots.
- Use pinless for quick surveys and sensitive finished pieces.
- Calibrate for species and account for wood grain orientation.
- Compare both methods on the same board to confirm consistency before painting.
Simple No‑Meter Tests to Check Wood Dryness
Although they won’t replace a moisture meter, a few simple hands-on checks let you gauge whether wood is dry enough to paint.
Feel the surface: coolness or dampness means more drying time.
Press a clear plastic bag over the wood for an hour; condensation inside signals moisture.
Snap or tap thin trim—dry wood gives a crisp sound, wet wood sounds dull.
Inspect wood grain: raised or swollen fibers suggest moisture.
Test in an inconspicuous spot with paint color to check adhesion; poor bonding or blistering means wait.
Combine tests for confidence before priming and painting.
Speed Up Wood Drying: Ventilation, Heat, and Sun
To speed up wood drying, combine good ventilation, gentle heat, and direct sunlight so moisture moves out efficiently without damaging the grain. You’ll position lumber off the ground, tilt boards for airflow, and rotate them daily to dry evenly while watching for checks or warping.
Balance drying speed to avoid surface case hardening that traps moisture and invites insect infestations. Try these steps:
- Stack boards with stickers every 12–18 inches for airflow.
- Face boards toward sun without overheating ends.
- Use low, even heat sources and avoid open flames.
- Monitor moisture and inspect for splits or pests.
How Dehumidifiers and Fans Change Drying Time
When you add dehumidifiers and fans, they work together to pull moisture out faster than air-drying alone. You’ll speed drying by lowering relative humidity and increasing airflow across surfaces, helping moisture move out of the wood grain rather than staying trapped.
Place fans to create cross-ventilation and position dehumidifiers to collect moisture efficiently; run both until moisture meter readings hit your target. That faster dry time reduces the risk of trapped moisture affecting adhesion and prevents late bleeding that can alter paint sheen.
Check periodically—overdrying can raise cracking risk—then paint when readings are stable.
Sunlight vs. Shade: Impacts on Exterior Wood Drying
If your exterior wood sits in direct sunlight, it’ll dry noticeably faster because heat and light speed evaporation.
If it’s in shade, expect slower drying as cooler, damper conditions retain moisture.
Factor this into your timing so you don’t paint before the wood’s truly dry.
Sunlight Speeds Drying
Although shaded areas can feel safer for paint prep, direct sunlight dramatically speeds moisture loss from exterior wood, so you’ll see drying times drop by hours or even days in bright sun. You should use that to your advantage: sunlight pulls water from the wood grain, letting you check moisture content sooner and reducing wait time before priming.
Beware fast drying around knots; prioritize knot sealing to prevent bleed-through.
Quick tips:
- Test moisture in sun-exposed and sheltered spots.
- Allow extra time after rain for dense grain.
- Seal knots immediately.
- Prime when readings are stable.
Shade Slows Evaporation
Because shaded areas cut the sun’s heat and wind exposure, wood in those spots will hold moisture far longer than pieces left in full sun. You’ll need extra drying time before painting to avoid trapped moisture that lifts finish or causes mildew.
Check the wood grain for dampness—darker grain often signals retained water. Use a moisture meter or the touch test over several days.
Plan for lower paint adhesion and altered paint sheen if you rush; glosses show imperfections more. If shade is unavoidable, choose breathable primers, extend cure times, and wait until the wood reads within recommended moisture levels.
Preparing Damp Wood: Repair vs. Replace
When you find damp or rotted sections, decide quickly whether to repair or replace based on the extent of damage and structural importance. You’ll inspect wood grain direction, decay depth, and fastener integrity, and consider paint compatibility with patching materials.
If repair’s viable, remove soft wood, treat with preservative, and use epoxy or dutchman patches that match grain. Replace when framing, load-bearing members, or widespread rot’s present.
- Remove damaged wood to sound edges.
- Test surrounding moisture content.
- Choose filler that bonds to grain.
- Replace whole board if structural risk exists.
Signs You’ll Cause Problems by Painting Too Soon
If you paint wood before it’s dry, you’ll often see peeling and blistering as the trapped moisture pushes the finish off.
You’ll also risk mildew growth and dark staining that can ruin the look and lead to rot.
Spotting these signs early lets you stop and properly dry or replace the wood before repainting.
Peeling And Blistering
Though it looks tempting to slap on a fresh coat as soon as the wood seems dry, painting too soon often leads to peeling and blistering that ruins the finish. You’ll notice raised bubbles and edges lifting where trapped moisture expands under the paint.
Poor adhesion follows if you painted over damp sap or uneven wood grain without proper knot sealing. Check these signs before you paint:
- Small blisters across flat boards
- Paint flaking in strips along planks
- Edges lifting near seams or trim
- Soft spots under paint when pressed
Address moisture and prep fully to avoid rework.
Mildew And Staining
Because damp wood traps spores and tannins, you’ll see mildew and staining show up quickly if you paint too soon. You’ll notice dark patches along the wood grain where moisture lingers, and tannin bleed can tint light finishes.
Mildew raises health and longevity concerns, and stains telegraph through thin coats, ruining color uniformity and paint sheen. Letting wood dry fully prevents trapped moisture from feeding fungal growth and stops soluble compounds from migrating.
If you spot early discoloration, strip and dry the surface, treat mildew, sand affected grain lightly, then recoat when moisture content and appearance are stable.
Which Primers to Use on Marginally Damp Wood
When wood’s still a bit damp, pick a primer formulated for higher moisture rather than forcing a standard product to perform. You’ll want products that block tannins, resist mildew, and adhere to slightly wet surfaces without trapping excessive moisture.
Consider these choices:
- Oil-based primers — excellent tannin blocking and good for exposed wood grain.
- Acrylic latex primers labeled “damp surface” — fast-drying and low odor.
- Shellac-based primers — superb stain sealing, but mind ventilation.
- Bonding primers — designed to stick where others slip.
Test a small area to check adhesion and final paint sheen before committing to full coverage.
Painting Strategies for Wood With Fluctuating Moisture
When you’re dealing with wood that goes through wet and dry cycles, check moisture levels regularly with a meter before and during the project.
Choose moisture-tolerant primers and paints formulated for variable conditions to prevent blistering and adhesion failure.
Also try to control temperature and humidity on-site—use dehumidifiers, temporary shelters, or schedule work during stable weather windows.
Assess Moisture Regularly
If your wood’s moisture content can change with the seasons or indoor humidity, check it frequently with a reliable moisture meter so you don’t paint over damp wood.
You’ll want to monitor spots where wood grain soaks differently and where paint sheen might hide minor dampness.
Follow a simple routine:
- Measure at several depths and locations.
- Record readings and note trends over weeks.
- Compare interior vs. exterior surfaces.
- Wait for stable readings within your paint manufacturer’s recommended range.
Use Moisture-Tolerant Coatings
Because wood can still absorb moisture even after drying, choose coatings that tolerate slight fluctuations so your paint job lasts longer. You’ll pick flexible primers and topcoats formulated for substrate movement; they bridge small dimensional shifts without cracking.
Inspect wood grain orientation and sand properly so coatings adhere evenly. Select a paint sheen that balances durability and breathability—typically satin or low-sheen finishes perform well.
Apply thin, even layers and allow recommended recoat times to build protection without trapping moisture. Test a small area first to confirm adhesion and appearance, especially on older or character-rich boards with varied wood grain.
Control Environmental Conditions
Although wood keeps breathing with seasonal changes, you can still get a durable finish by controlling the painting environment: work at stable temperature and humidity, keep airflow gentle and consistent, and avoid applying paint during rapid swings (like right after rain or heating startup).
You’ll manage moisture movement in the wood grain and protect the paint finish by following clear steps:
- Monitor humidity with a hygrometer; aim for 40–60%.
- Maintain room temperature within manufacturer recommendations.
- Use gentle fans or filtered ventilation to avoid dust and rapid drying.
- Delay painting after weather events until equilibrium returns.
How Long to Wait Between Coats Based on Wood Dryness
When the wood’s surface feels dry but the core still holds moisture, you’ll need longer between coats to prevent trapped dampness from causing blistering or poor adhesion. Check moisture with a meter; below 12-15% is ideal before applying subsequent coats.
For dense wood grain, wait 24–48 hours between primer and first topcoat. For porous, open-grain lumber, allow 48–72 hours.
Higher humidity or low temperature extends these intervals.
Lightly scuff between coats to promote paint sheen consistency and adhesion.
Always follow product directions: some modern paints allow shorter recoat windows, but moisture is the limiting factor.
Troubleshooting Blistering, Peeling, and Bubbling
If paint starts blistering, peeling, or bubbling, act quickly to diagnose the cause so you can fix it before the damage spreads. Check these common issues and remedies so you can restore a smooth finish that follows the wood grain and maintains desired paint sheen.
- Trapped moisture: probe under bubbles; dry wood fully before repainting.
- Poor adhesion: sand to remove loose edges and reveal clean grain for better bonding.
- Contamination: clean oil, sap, or dust; contaminants prevent proper adhesion.
- Incompatible coatings: verify previous finish and choose a compatible topcoat to avoid chemical reactions.
Tools and Products to Improve Paint Adhesion on Wood
Before you paint, pick the right sanding tools and grit to create a smooth, toothy surface that helps paint stick.
Use a quality primer or sealer tailored to the wood type, and consider adhesion-promoting additives for tricky substrates or exterior jobs.
These simple products and tools will cut down on peeling and improve long-term finish durability.
Sanding Tools And Grit
Although you might be enthusiastic to paint, prepping wood with the right sanding tools and grit is essential for lasting adhesion. You’ll follow the wood grain, sanding with it to avoid scratches and to smooth areas after knot filling.
Choose tools and grits based on condition and goals:
- Start with 80–100 grit for heavy stock removal or rough knots.
- Use 120–150 grit for general smoothing and shaping.
- Finish with 180–220 grit for paint-ready surfaces and good adhesion.
- Consider a sanding block or orbital sander for even pressure and consistent results.
Replace papers when worn to keep effectiveness.
Primers And Sealers
When you want paint to last and resist stains, choose a primer or sealer that matches the wood type and the topcoat—oil-based or latex primers block tannins and knots on hardwoods, while acrylic primers work well on softwoods and previously painted surfaces.
Pick a sealer to stabilize porous wood grain so the finish goes on evenly; it reduces blotching and helps control paint sheen.
Use stain-blocking primers for sap, and shellac-based primers for severe bleed-through.
Apply thin, even coats, sand lightly between coats for better bonding, and let primers fully cure before you add the final topcoat.
Adhesion-Promoting Additives
If you want paint to grip wood better, use adhesion-promoting additives and tools that modify either the surface or the coating so bonding is stronger and more durable. You’ll prep the wood grain, choose the right primer, and control paint sheen for a lasting finish. Consider these options:
- Sanding blocks or abrasive pads to open grain and remove contaminants.
- Chemical adhesion promoters (silane-based) that boost primer bonding.
- Bonding primers formulated for smooth or oily woods.
- Additives you mix into paint to increase flexibility and surface wetting.
Follow manufacturer instructions and test a small area before full application.
Job Timelines: Decks, Siding, Trim, and Furniture
Planning realistic timelines for painting decks, siding, trim, and furniture will keep your project on schedule and protect your work from moisture-related problems.
You should let newly installed or pressure-treated wood dry until its moisture content matches ambient conditions—often 1–3 months for decking, 2–6 weeks for siding, and 1–4 weeks for trim and small furniture, depending on species and climate.
Test with a moisture meter and watch wood grain for raised fibers after initial wetting.
Allow primer and paint adequate cure between coats so paint sheen stays consistent.
Schedule work around dry days and avoid rushing through prep or curing.
Seasonal Checklist for Painting Wood in Wet Climates
Because wet climates can stall painting and invite rot, you should follow a seasonal checklist that protects wood at every stage—from storage and acclimation to priming and curing—so your finish lasts and looks right. You’ll prep and monitor moisture, watch temperature windows, and choose coatings that respect wood grain and desired paint sheen. Follow this concise plan:
- Store lumber elevated, covered, ventilated; acclimate outdoors under shelter.
- Measure moisture content; wait for consistent readings below 12–15% before priming.
- Prime with breathable, mold-resistant products; seal end grain.
- Paint during multi-day dry forecasts; allow full cure before exposure.
Maintenance to Preserve Painted Wood After Application
Once your paint has cured, keep up a simple maintenance routine to protect that investment and prevent moisture, mildew, or wear from undoing your work. Inspect annually for peeling, check seams and flashing, and feel the paint texture—rough spots hide moisture. Clean gently with mild detergent, rinse, and dry to preserve color and repel mildew from the wood grain. Touch up chips quickly, sanding edges smooth so repairs blend. Reapply a clear UV-protective coat every few years on exposed surfaces. Store caulks and spare paint labeled by batch for consistent color and texture when you retouch.
| Task | Frequency |
|---|---|
| Inspection | Annually |
| Cleaning | Biannually |
| Touch-ups | As needed |
| UV coat | Every 2–4 years |
Frequently Asked Questions
Can I Paint Wood Stored Indoors That Was Previously Outside Without Drying It First?
You shouldn’t; you’ll need surface preparation and moisture measurement first. Bring indoor-stored wood to stable indoor moisture content, sand and clean surfaces, then recheck moisture with a meter before painting to guarantee proper adhesion and finish.
Does Painting Over Mildew-Treated Wood Require Extra Drying Time?
About 90% of mildew returns if moisture stays; yes, after mildew removal you’ll need extra drying time. You should wait until wood’s moisture content is under 15% and fully dry before priming and painting.
How Long Before Varnishing Wood Previously Painted With Oil-Based Finishes?
You should wait until wood moisture is below 12% and the old oil-based finish has cured—typically 24–72 hours for light sanding, but allow 7–30 days drying time for full cure before varnishing to guarantee proper adhesion.
Can I Seal End-Grain Quickly to Speed up Overall Drying Before Painting?
Yes — you can seal end-grain quickly to speed overall drying; studies show end grain absorbs up to 40% more finish. Use end grain sealing and drying accelerants cautiously, testing compatibility to avoid blush or adhesion issues.
Will Painted Wood Boxed for Shipping Need Re-Drying Before Finishing?
No, boxed painted wood usually won’t need re-drying before finishing if wood moisture was low before shipping and paint adhesion stayed good, but check for trapped humidity and allow airing if surfaces feel damp or tacky.
Conclusion
You’ve waited long enough for the wood to stop weeping—now it’s time to paint. Think of moisture as the wood’s mood: when it’s calm (below about 12–15% for exterior, 6–8% for interior), your paint will stick and smile back. Use a moisture meter, pick the right season and primers, and treat the surface like skin—clean, dry, and primed. Paint now, and your work will wear like armor, not cling like wet cloth.