How to Paint New Plaster Walls (Beginner Guide)
You’ll get a great finish by confirming new plaster is fully cured and dry, sealing it with the right primer, and using a mist coat before your topcoats. Start by testing porosity and moisture, repair any cracks or loose areas, sand and dust, then primе with a bonding or acrylic primer thinned as a mist coat. Use appropriate rollers and work wet‑edge to wet‑edge. Keep ventilation and drying times in mind, and the full guide shows step‑by‑step tips.
Why This Guide for Painting New Plaster Walls
Because new plaster behaves differently than drywall, you need guidance that addresses its specific drying, priming, and paint-adhesion needs. You’ll learn why waiting for cure, choosing the right primer, and testing adhesion matter more on plaster than on modern substrates.
This guide blends practical tips with context: it nods to historical techniques so you respect original finishes, and it considers color psychology to help you select tones that suit light, room function, and period character.
You’ll avoid common mistakes, save time, and get a durable, attractive finish that honors plaster’s quirks without needless complexity.
Quick Step‑By‑Step: Paint New Plaster in 7 Actions
When your new plaster has cured and you’re ready to finish, follow these seven clear actions to get a durable, attractive paint job without guesswork. Prep: sand and dust. Prime: use a plaster-specific primer. Patch: fill imperfections, sand smooth. Paint: apply two thin coats, maintaining wet edges. Trim: cut in corners and around fixtures. Finish: inspect and touch up. Clean: wash tools, manage paint storage for leftovers; label cans and note color mixing ratios.
| Step | Action | Tip |
|---|---|---|
| 1 | Prep | Dust thoroughly |
| 2 | Prime | Use right primer |
| 3 | Paint | Two thin coats |
Is Your Plaster Fully Cured and Ready to Paint?
Before you grab paint, check that the plaster’s dry time has finished—new plaster often needs several days to a couple of weeks depending on thickness and conditions.
Give the surface a light hardness test by pressing a fingernail or tapping with a coin; it should feel firm and not chalky.
If it’s still soft or powdery, wait longer and recheck until it’s fully cured.
Drying Time Check
If you’ve just finished plastering, don’t rush to paint — cured plaster feels dry but can still be damp inside, so you need to check it properly before priming.
Measure moisture with a reliable meter across multiple spots and at different depths; readings under 0.5% (or manufacturer spec) usually mean safe painting.
Wait longer in cool or humid rooms, and ventilate to speed drying.
Test a small primer patch to assess adhesion and how color psychology and paint texture will appear once fully cured.
Record dates and readings so you don’t guess—confidence beats haste when finishing new plaster walls.
Surface Hardness Test
Moisture readings and a small primer patch tell you a lot, but you still need to confirm the plaster’s surface hardness before painting. Lightly press a fingernail into an inconspicuous area; fully cured plaster resists denting and won’t crumble.
Try a gentle scrape with a utility knife—sharp, clean shavings mean hardness, powdery residue means more cure time. Check multiple spots, especially where texture patterns vary, since low spots can hold moisture longer.
If surfaces pass, dust and apply your chosen primer, then test paint color on a sample patch. If not, wait and retest every few days.
How to Test Plaster Moisture and Cure Time
Start by checking the surface for any damp spots or cold patches with your hand or a paper towel.
Use a moisture meter for a precise reading—plaster should be below the manufacturer’s recommended moisture level before you paint.
If readings are high, give the plaster more time to cure and recheck periodically.
Check Surface Dampness
Before you paint, check the plaster for dampness so you don’t trap moisture and ruin the finish. Run your hand over the wall; cold or clammy spots signal retained moisture.
Press tissue or paper towel against suspect areas for several minutes; darkening or stickiness means it’s still wet.
Look for discoloration, efflorescence, or soft patches that prevent proper color blending and undermine texture enhancement.
Wait additional drying time if any signs appear, improving ventilation and using gentle heat if needed.
Recheck before priming so your paint adhesion and finish last without blistering or peeling.
Use Moisture Meters
If you want reliable readouts on plaster dryness, use a moisture meter to confirm cure time instead of guessing by touch. You’ll measure moisture levels across the wall, spotting damp patches that visual checks can miss.
Choose the right meter—pin type for depth checks, pinless for surface scans—and follow manufacturer calibration steps. Take readings in several places and record values over days to track the curing process.
Aim for consistently low, stable readings before priming or painting. Moisture meters reduce risk of paint failure and save time by confirming when the plaster’s ready rather than relying on subjective judgment.
Allow Proper Curing
Now that you’ve checked moisture with a meter, let the plaster reach its full cure so paint will adhere and finish properly. You’ll test and wait: use a meter, watch drying time, and avoid sealing too soon. Proper curing preserves wall texture and ensures color theory choices read true under final light.
- Measure: multiple spots, repeat over days.
- Wait: follow plaster manufacturer cure times.
- Verify: below recommended moisture percent before priming.
Be patient — rushing causes peeling, uneven sheen, and altered color. Once dry, prime and paint for a durable, accurate finish.
How to Spot Hairline Cracks and Surface Defects
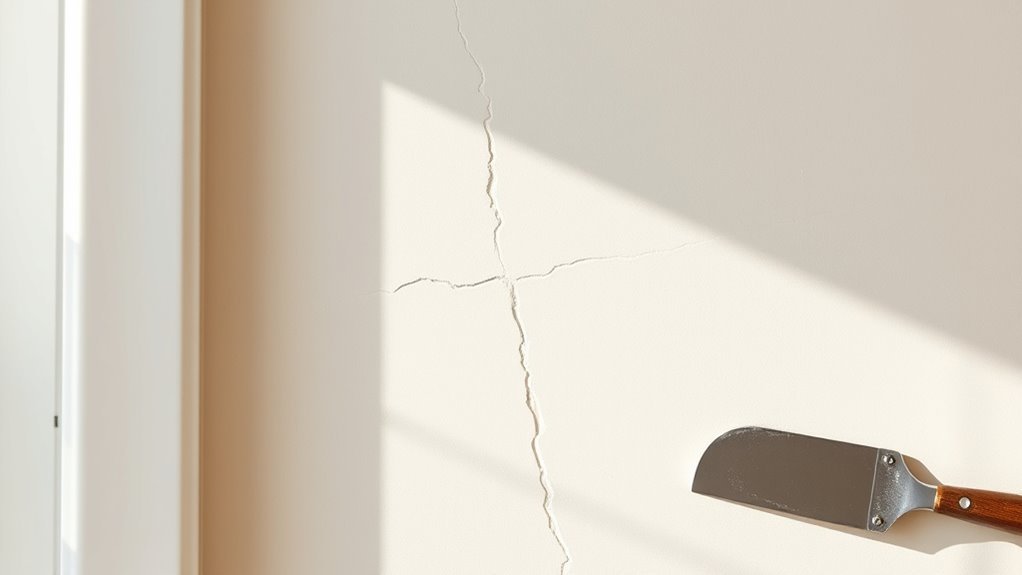
When you’re inspecting freshly skimmed plaster, look closely for hairline cracks, pinholes, and surface scuffs that a quick glance can miss—these small defects will telegraph through paint if you don’t catch them now.
Walk the room in good light, raking it with a handheld lamp to reveal subtle faults.
Run your fingertips over the wall; raised edges, gritty spots, or shallow depressions signal surface imperfections.
For precise crack detection, use a magnifying glass and mark defects with light pencil dots.
Photograph areas for reference, then plan targeted sanding, filling, and re-skimming before priming and painting.
When to Repair Plaster Versus Repainting
Having identified hairline cracks and surface defects, decide whether those flaws need repair or can be covered with paint. You’ll weigh visibility, longevity, and finish.
After spotting hairline cracks, weigh visibility and durability—repair when texture or longevity matters, otherwise repaint.
If texture patterns are disrupted or cracks run through multiple coats, repair first. If defects are minor and hidden by color matching, repainting may suffice.
- Visible texture disruption: repair to restore surface integrity.
- Isolated, shallow flaws: consider spot priming and repainting.
- Future durability concern: repair before finishing.
You’ll choose repair when structural continuity or precise texture and color matching matter; otherwise, repainting saves time.
Repair Small Holes and Pinholes in Plaster
If small holes and pinholes mar your plaster, you can fix them quickly with minimal tools and a light touch. Clean dust, press a little ready-mixed filler or spackling into each hole with a putty knife, then smooth flush. Let dry fully, sand lightly with fine grit, and wipe clean. Prime patched spots to seal differences before painting. When matching finish, consider paint sheen—flat hides minor imperfections, satin shows more. If you mix touch-up paint, use careful color mixing and test on a scrap. Feather edges for an invisible repair and repaint the wall section.
Fix Larger Cracks and Delaminated Plaster Areas
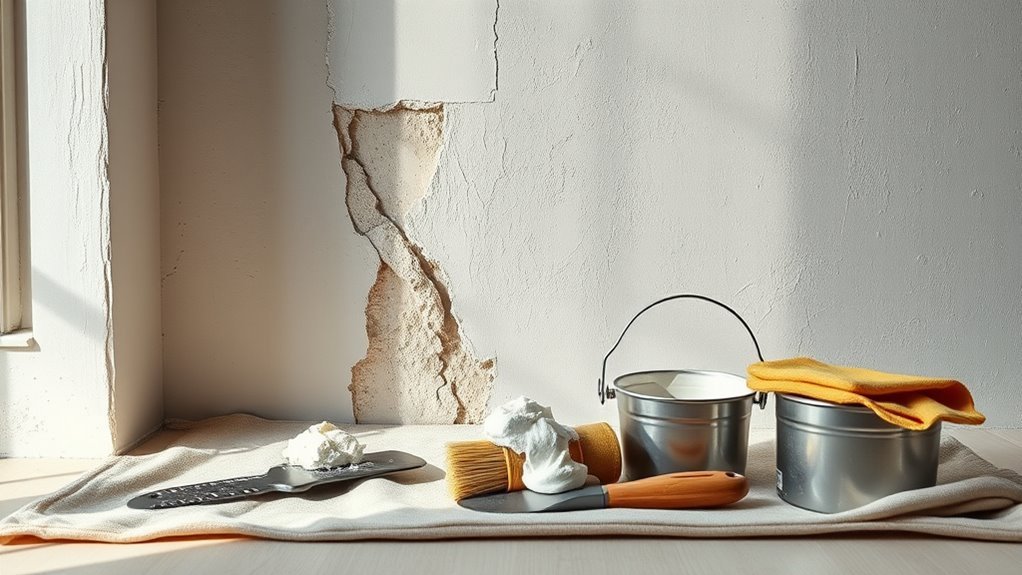
First, inspect the crack and any peeling plaster to judge how deep and widespread the damage is. If the plaster’s loose or the crack runs into the lath, you’ll need to remove the unstable material.
Reinforce with mesh or plaster washers, and apply a suitable repair compound. After the patch cures, sand smooth and prime before repainting.
Assess Damage Extent
Before you pick up paint, take a close look at the plaster to determine how deep and widespread the damage is—small hairline cracks can usually be patched, but larger cracks, crumbling edges, or areas where the plaster has pulled away from the lath need more involved repair.
Inspect for soft spots, voids, and separation, noting whether damage follows a pattern or is isolated. Photograph areas and mark boundaries.
Consider color consistency and texture matching when planning fixes so final repairs blend. Prioritize safety and stability; if in doubt, consult a pro.
- Map severity
- Note size
- Track spread
Repair And Reinforce
When larger cracks, crumbling edges, or plaster that’s pulled away from the lath appear, you’ll need to repair and reinforce those areas so new plaster and paint adhere properly. Remove loose plaster, clean back to sound substrate, and staple or screw new backing where lath is exposed.
Apply bonding agent, then a base coat of plaster or patching compound, embedding reinforcing mesh over voids and wide cracks. Feather successive coats to match surrounding plane, sanding between layers.
Aim for texture matching before final skim so paint won’t reveal repairs. Prime repaired spots for color blending and uniform finish.
Skimming Tips for an Even Plaster Surface
Although skimming looks simple, getting a smooth, even plaster surface takes the right tools, technique, and a steady hand. You’ll work in thin layers, feather edges, and keep mixes creamy.
Although skimming seems simple, achieving an even plaster finish demands the right tools, technique, and a steady hand
Practice consistent pressure and long, overlapping passes to avoid ridges. Sand lightly between coats, wipe dust, and check in raking light for imperfections.
For Decorative finishes or Historical restoration, match original textures and respect substrate conditions. Remember to cure plaster fully before priming.
- Mix consistency: lump-free, creamy.
- Stroke technique: long, even passes.
- Inspection: raking light, touch test.
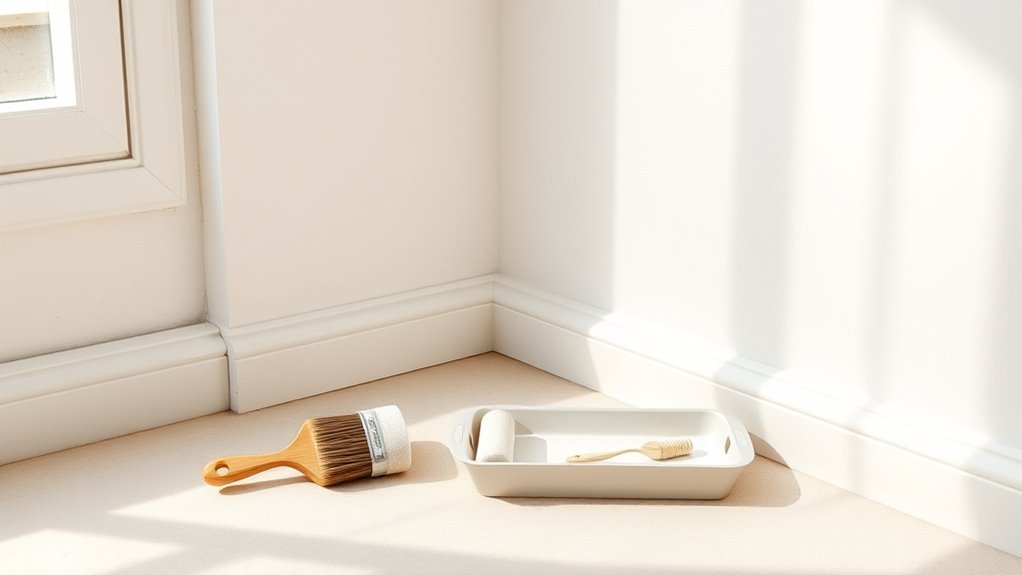
Tools and Materials to Buy for New Plaster Painting
Before you start painting, gather the essential tools—brushes, rollers, trays, sandpaper, and a good ladder—so you won’t stop midway.
You’ll also need surface prep supplies like filler, joint compound, tack cloths, and a quality sanding block to guarantee a smooth base.
Finally, choose the right primer for new plaster and a compatible paint finish to get durable, even coverage.
Essential Painting Tools
Because new plaster needs careful handling to get a smooth, lasting finish, you’ll want the right tools on hand before you start. You’ll need quality brushes, rollers, and trays that suit fine wall textures; a soft-nap roller helps avoid stipple. Include a reliable paint roller extension, an angled sash brush for trim, and a good-quality roller frame to control finish.
For color matching, bring paint chips and a sample pot to test on a small area. Keep a paint stirrer, mixing paddle, drop cloths, and painter’s tape handy. Clean tools after use to protect your finish.
- Brushes
- Rollers
- Tape
Surface Preparation Supplies
When you’re prepping new plaster, having the right surface-prep supplies makes the difference between a smooth, durable finish and a job that needs rework—so stock sanding blocks, fine-grit sandpaper (220–320 grit), a drywall or plaster primer, and a quality filler for hairline cracks.
You’ll also want a soft-bristle brush to remove dust, a tack cloth, spackling knives in varied widths, and a dust mask.
For textured areas, keep a sanding sponge and a texture-smoothing tool.
Have paint trays, mixing sticks, and basic color mixing aids on hand to match samples.
Good supplies speed repair and respect wall textures.
Primer And Paint Types
You’ve got your surface prepped and dust-free, so next you’ll pick primers and paints that bond to new plaster and resist flash-popping or peeling. Choose a water-based alkali-resistant primer for fresh plaster, or a shellac primer if stains or heavy moisture worry you.
Consider finish: matte hides imperfections, eggshell balances durability and washability.
- Pick primer for adhesion and alkalinity protection.
- Select paint finish based on room use and light—remember Color theory for mood and perception.
- Opt for Eco friendly finishes when possible to reduce VOCs and improve indoor air quality.
Keep labels and coverage in mind.
Masking and Protecting Trim, Floors, and Fixtures
Before you lay down drop cloths or tape edges, plan the sequence of protection so you don’t trap paint where it’ll be hard to remove later. Start by removing switch plates and outlet covers; label them.
Cover floors with breathable cloth drop cloths, taping seams to prevent trip hazards. Use painter’s tape on trim, pressing edges firmly for clean lines around baseboards and window casings.
Protect fixtures with plastic and secure with low-tack tape. If you’ll add decorative stenciling or emphasize wall texture, mask adjacent trim tightly to avoid bleed.
Keep a small brush and blade handy for quick touch-ups.
Cleaning New Plaster Before Painting
With trim and floors protected, turn your attention to the plaster surface itself so paint will adhere and look its best. You’ll clean to remove residues that hinder adhesion and affect Color blending and Texture enhancement.
Start with a soft brush to loosen debris, then wipe with a damp sponge; avoid soaking the plaster. If stains persist, use a mild detergent solution, rinse, and let fully dry. Check for remaining marks under good light.
Begin with a soft brush, wipe with a damp sponge, spot-clean with mild detergent, rinse, and fully dry.
Finally, vacuum gently to pick up fine particles before priming. Follow this order to guarantee an even finish and predictable blending when you paint.
- Brush
- Wipe
- Rinse
How to Remove Plaster Dust Before Priming
Although the plaster may look smooth, fine dust clings to the surface and will ruin primer adhesion, so start by removing that dust thoroughly.
First, vacuum walls with a brush attachment to lift loose plaster dust, working top to bottom. Next, wipe with a slightly damp microfibre cloth to capture remaining particles; rinse cloth often.
For corners and trim, use a soft-bristled brush.
Allow the wall to dry completely.
Inspect for surface contamination like fingerprints or smudges and repeat cleaning where needed.
Only when the surface is visibly clean and dry should you apply a suitable primer for new plaster.
Sand New Plaster Without Scarring the Surface
Once the plaster’s fully cured and cleaned, sand it gently to feather joints and remove minor imperfections without gouging the surface. Use fine-grit paper (120–220) and a light touch; keep sanding motions even and avoid lingering in one spot. Wear a mask and vacuum often to see progress.
Gently sand cured, clean plaster with fine grit—feather joints, avoid gouging, keep even strokes, mask up and vacuum.
- Check smoothness with raking light to catch low spots.
- Blend edges so texture matches surrounding plaster for uniform color mixing later.
- Test a small area to verify sanding won’t alter paint sheen.
Finish readying the wall for priming and sealing steps.
How to Apply Sealer to Even Out Porosity
Before you prime, seal the new plaster to even out its porosity so paint will absorb uniformly and show consistent color.
First, perform porosity testing by misting water on a few spots—darker areas absorb more, showing high porosity.
Choose a compatible sealer and apply a thin, even coat with a roller or brush, working from top to bottom.
Allow full drying per manufacturer instructions, then recheck porosity testing; repeat if water soaks in unevenly.
Keep ventilation steady and avoid overapplication, which seals too much and causes adhesion issues.
Clean tools promptly and proceed to priming when the surface feels uniform.
Which Primer Works Best on Fresh Plaster
- Acrylic: breathable, easy cleanup
- Alkyd: strong adhesion
- Bonding: best for new plaster
When to Use Stain‑Blocking Primers on Plaster
You’ve picked a primer that sticks to fresh plaster, but you’ll still run into stains that need special handling. Use stain‑primers when you spot water marks, tannin bleed from wood trim, nicotine, or patched areas that show through after sealing.
Test small areas: heavy discoloration or high surface porosity means a stain‑blocking coat is required before your regular primer or paint. Apply one recommended coat of a quality stain‑primer, allow full curing, then inspect under daylight.
If staining returns, add another coat. This prevents bleed‑through and keeps topcoats even, saving time and avoiding rework later.
Brushing vs Rolling Primer: Which to Use on Plaster
Wondering whether to brush or roll primer on plaster? You’ll choose based on surface detail and finish goals. Brushing grabs into crevices and suits subtle historical finishes; rolling speeds coverage on flat areas. Consider these points:
Wonder whether to brush or roll primer on plaster? Brush detailed areas, roll broad planes for faster, more uniform coverage.
- Texture: brushing for edges and relief; rolling for broad planes.
- Absorption: plaster soaks primer unevenly, so target high‑absorbency spots first.
- Visual: brushing yields slight variation, rolling gives uniform fields—use color psychology to predict how light and hue read on walls.
Work methodically: cut in with a brush, then roll large sections for efficient, cohesive priming.
Best Roller Nap and Brush Types for Plaster Walls
When choosing tools for plaster, pick roller naps and brushes that match the wall’s texture so you’ll get even coverage without leaving lint or brush marks.
For smooth new plaster, use a 3/16″–1/4″ microfiber nap; it spreads primer and paint thinly and resists shedding.
Lightly textured surfaces work best with 3/8″–1/2″ nylon-polyester naps to reach shallow pores.
Use angled sash brushes for cutting in and a high-quality synthetic blend for edges to avoid visible strokes.
Keep color mixing nearby in a well-ventilated area and maintain paint ventilation while you work to disperse fumes.
How Long to Wait Between Primer and Paint on New Plaster
After you prime new plaster, you’ll usually wait at least 24 hours for the primer to dry before applying paint.
Check the primer’s label for specific cure and recoat times—some water-based primers can be recoated in 2–4 hours while others and oil-based formulas may need 24–48 hours.
Also consider humidity and temperature, since damp conditions can extend drying and cure times.
Drying Time Before Painting
Because fresh plaster soaks up moisture differently than drywall, you’ll want to let primer fully dry before applying topcoat to avoid adhesion problems or uneven finish. Wait times vary: 2–4 hours for quick-dry primers, 24 hours for water-based primers on new plaster, longer in humid conditions. Check manufacturer instructions and touch tests.
- Dry to touch: no tackiness.
- Dry for sanding: firm, not crumbly.
- Paint-ready: consistent matte appearance.
Consider how drying affects texture patterns and final color palettes; uneven drying can deepen texture or shift hue. Control ventilation and temperature for reliable results.
Primer Cure And Recoat
Now that you’ve confirmed the primer’s surface is dry and sandable, plan the cure and recoat window before applying topcoat so paint adhesion and uniform finish aren’t compromised. You’ll typically wait 24–48 hours for water-based primers and 48–72 hours for alkyds, depending on humidity and temperature.
Lightly sand glossy spots, remove dust, and test a small area to check adhesion.
Proper cure helps color blending across the wall and supports texture enhancement techniques like light scumbling or knockdown. If conditions are cool or humid, extend the wait; rushed recoats can trap solvents and cause peeling or uneven sheen.
Choosing the Right Paint Finish for Plaster Walls
Curious which finish will work best on your new plaster walls? You’ll weigh sheen, durability, and appearance. Consider how light and cleaning affect look and longevity, and remember color mixing can alter perceived sheen and hide imperfections.
Curious which finish suits your plaster? Balance sheen, durability, light, and cleaning—test samples to see how color and texture reveal flaws.
- Matte: hides flaws, softer look, lower paint durability for high-traffic areas.
- Eggshell: subtle sheen, easier to clean, good balance for living spaces.
- Satin/Semi-gloss: highlights texture, very durable and washable—best for trim and busy rooms.
Choose based on room use, light levels, and desired maintenance; test samples before committing.
When to Thin Paint for Better Penetration on Plaster
If your new plaster is very dry and you’re working with a high-viscosity paint, you should consider thinning it to improve absorption.
Thinning by a small amount helps the paint penetrate the plaster instead of sitting on the surface.
Start with the manufacturer’s recommended reducer and test on a scrap area before you proceed.
When Plaster Is Very Dry
Because very dry new plaster soaks up paint like a sponge, you’ll often need to thin your first coat to help it penetrate and bond rather than just sit on the surface. You’ll check dryness by touch and timing; if it’s powdery or over a week old in low humidity, thin slightly.
Thinning helps adhesion and reveals true color—important when matching historical plaster or applying Color theory principles for undertones. Follow a measured approach:
- Add 5–10% water or manufacturer-recommended thinner.
- Test a small area; wait to evaluate soak-in and drying.
- Adjust before rolling full sections.
With High-Viscosity Paint
When you’re working with high-viscosity paints on new plaster, you’ll often need to thin them more than standard finishes so they can penetrate instead of sitting on the surface. Test small areas with water or manufacturer-approved reducer until the paint wets the plaster without running.
Stir thoroughly to guarantee even color mixing and consistent body. Apply thin coats with a brush or low-nap roller, letting each cure slightly before the next.
If you want subtle effects, combine thinning with texture techniques like light dragging or stippling. Always check adhesion after drying; if lift occurs, thin more or use a primer.
How Many Coats Do New Plaster Walls Need?
Although new plaster can look smooth and ready, it usually needs a primer and at least one topcoat to get a durable, uniform finish. You’ll typically apply a mist coat (thinned primer), then one or two topcoats depending on coverage and sheen.
Consider a color consultation to confirm final hue and whether an extra coat will prevent show-through. Choose eco friendly primers to seal the porous surface and reduce odor.
Typical approach:
- Mist coat to stabilize plaster.
- First full topcoat for opacity.
- Second topcoat for durability and even sheen if needed.
Applying the First Coat of Paint on New Plaster
Before you start, make sure the mist coat has fully dried so your first full coat will adhere evenly and prevent lap marks.
Tape trim, protect floors, and stir paint thoroughly to guarantee consistent color mixing.
Work from top to bottom, cutting in edges with a brush before rolling broad areas.
Use even pressure and overlap each pass slightly for uniform coverage.
Ventilate the room to dissipate paint fumes—open windows and run a fan.
Allow the recommended drying time before evaluating coverage and adding additional coats.
Clean brushes promptly and store leftover paint sealed for touchups.
Wet‑Edge Technique to Avoid Lap Marks
Keep a consistent wet edge as you paint so each stroke blends into the next and you don’t get lap marks.
Work in small, manageable sections to finish each area before the paint starts to dry.
Use a proper roller technique—light, even pressure and a final tip-off—to smooth overlaps.
Maintain A Consistent Wet Edge
When you paint, work in manageable sections so the edge you just rolled or brushed stays wet until the next pass; that wet-edge technique prevents overlap marks and keeps the finish uniform. You’ll maintain a consistent wet edge by controlling speed, paint load, and overlap. Focus on color blending and texture matching as you feather edges. Keep a wet tray and slightly damp roller cover to extend open time.
- Reload often to avoid dry streaks.
- Use light, even pressure for seamless joins.
- Backroll or tip-off quickly to blend laps.
Stay deliberate; consistency beats rushing.
Work In Small Sections
Having a consistent wet edge sets you up to work in small, controlled sections so each stroke blends into the next without leaving lap marks. You’ll tackle one manageable area at a time, keeping paint wet and edges feathered. Focus on even coverage, watch drying times, and use compatible Color mixing practices if touching up hues. Choose Eco friendly finishes where possible to reduce fumes while you work. Use the table below to plan sections and timing.
| Section | Size | Dry Time |
|---|---|---|
| Corner A | 3×3 ft | 30 min |
| Middle B | 4×4 ft | 35 min |
| Window C | 2×3 ft | 25 min |
| Door D | 3×5 ft | 40 min |
Use Proper Roller Technique
Although it takes practice, using a proper roller technique lets you maintain a wet edge and avoid lap marks by keeping paint evenly distributed and strokes consistent. You’ll control the Roller grip and pressure, work fast enough to overlap wet areas, and match paint sheen across panels. Follow these focused steps:
- Load roller evenly, avoid drips, use moderate Roller grip pressure to leave a thin, uniform layer.
- Roll in a “W” pattern, then fill without lifting to preserve the wet edge and blend seams.
- Feather edges with light strokes, checking paint sheen for uniform reflection and coverage.
How to Avoid Flashing on New Plaster
If you want a smooth, uniform finish on new plaster, take steps to prevent flashing—the uneven sheen or color that appears when parts of the plaster absorb paint differently.
First, seal the plaster with a high-quality primer, applying even coats and allowing full cure time so absorption is consistent.
Seal new plaster with a quality primer, apply even coats, and allow full cure so absorption remains consistent.
Use the same base paint for test patches to check color matching and sheen.
Work wet-edge to wet-edge, maintaining a consistent roller nap to aid texture blending.
Blend repaired areas into surrounding plaster before paint dries.
Inspect under varied light, touch up only where primer or texture differs.
Cutting In Clean Lines on Plaster Corners
Once your primer and paint are even, you’ll focus on cutting clean lines at plaster corners to keep the room looking professional. Use a sharp angled brush, steady wrist, and light pressure to follow the corner edge. Pay attention to color matching and texture blending so corners read seamless, not patched.
- Tape only if edges are uneven.
- Feather brush strokes toward the flat wall.
- Rework thinly—avoid heavy paint buildup.
Step back, inspect in good light, and touch tiny flaws with a fine brush. Clean lines sell craftsmanship; practice makes them consistent.
Working Around Windows, Doors, and Outlets
When you’re painting near windows, doors, and outlets, take time to prep each opening so edges stay sharp and hardware isn’t damaged. Tape trim and glass with low-tack painter’s tape, remove switch and outlet covers, and mask recessed hinges.
Use an angled brush to cut in tight lines; steady your wrist and work slowly for crisp edges.
Use an angled brush to cut in tight lines—steady your wrist and work slowly for crisp, clean edges.
If replacing or repainting trim, consider color matching to adjacent walls or trim for a cohesive look.
Feather brush strokes to avoid hard overlap and maintain subtle texture blending at seams.
Reinstall hardware only after paint fully cures to prevent smudges and sticking.
Handling Textured or Uneven Plaster Finishes
Although textured or uneven plaster can feel intimidating, you can tackle it efficiently by evaluating the surface first and choosing the right prep and tools. Start by identifying high spots, loose plaster, and deep textures. You’ll decide whether to sand, skim, or leave texture for aesthetic reasons.
- Remove loose material and sand rough peaks for basic texture smoothing.
- Apply a thin skim coat to level severe unevenness; feather edges for seamless transitions.
- Prime and perform finish sealing to lock in porosity and ensure even topcoat adhesion.
Work methodically, use proper PPE, and test a small area before full application.
Painting Ceilings and High Plaster Walls Safely
Before you start on ceilings or tall walls, put on basic safety gear—goggles, a dust mask, and a secure pair of shoes.
Use proper ladder techniques, keeping your hips between the rails and moving the ladder as needed rather than overreaching.
For paint application, work with a roller and extension pole so you can reach high areas safely and maintain even coverage.
Safety Gear Essentials
Because you’re working above your head and on unstable surfaces, the right safety gear is essential to avoid falls, eye injuries, and inhaling dust or paint fumes. You’ll follow basic safety precautions and wear protective clothing to limit skin exposure and contamination.
Always use a respirator rated for paint fumes and fine dust, shatterproof goggles, and gloves that resist solvents. Consider a hard hat if overhead hazards exist. Keep a bright headlamp for shadowed ceilings.
- Respirator: organic vapor + P100
- Eye protection: anti-fog goggles
- Clothing: coveralls + slip-resistant shoes
Check gear before each session.
Proper Ladder Techniques
Now that your safety gear is checked and fitted, focus on proper ladder use to keep yourself steady while painting ceilings and high plaster walls. Choose a ladder rated for your weight and tools, set it on firm, level ground, and lock spreaders.
Face the ladder, keep hips between rails, and maintain three points of contact. Don’t overreach; move the ladder instead.
Secure paint cans with a hook or belt to prevent spills. Inspect rungs, locks, and feet before each use—Tool maintenance prevents failures.
Have a helper steady the base for added ladder safety when working at height.
Roller And Pole Methods
When you’re tackling ceilings and high plaster walls, using a roller with an extension pole keeps you steady on the ground while reaching high areas safely and efficiently. You’ll choose a sturdy pole, a balanced roller, and an appropriate nap for smooth plaster. Keep movements slow and overlap strokes to avoid drips. Mind safety: clear the area and wear eye protection.
- Prep: mix paint for even coverage; practice color mixing on a test board.
- Technique: maintain a wet edge; use light pressure and long strokes.
- Cleanup: follow proper paint disposal; clean rollers immediately after use.
Drying Times and Testing for Tack‑Free Paint
After fresh plaster’s skim coat has cured, you’ll still need to let paint and primers dry fully before applying additional coats; otherwise you risk lifting or uneven finish. Check manufacturer’s recommended dry times, but factor humidity and temperature—cool, damp rooms take longer.
Test for tack by lightly touching an inconspicuous spot; it should feel dry, not sticky. Wait longer if paint texture seems gummy or uneven. Remember that color theory won’t affect drying but can mislead you about coverage; darker hues may need extra coats.
Only proceed when coats are fully tack‑free to avoid smudging or trapping moisture.
Spot‑Sanding Between Coats for a Super Smooth Finish
If you want a truly smooth, professional finish, spot-sanding between coats is the simplest way to remove imperfections like brush marks, drips, or dust nibs without cutting through the fresh film.
Wait until the coat is fully dry, then lightly sand problem spots with fine 220–320 grit. Work gently, wipe with a tack cloth, and recoat.
Consider how texture patterns affect light and the perceived depth of color; subtle sanding evens reflectance so color psychology reads as meant.
Follow this simple routine:
- Locate flaws.
- Lightly sand.
- Clean and recoat.
Troubleshooting Streaks, Brush Marks, and Sagging
Spot-sanding will catch many minor flaws, but some streaks, brush marks, and sags need different fixes. Inspect under good light, note texture variations and color matching issues. Rework small streaks by lightly sanding, then feather with a thin glaze or touch-up coat. For brush marks, switch to a high-quality synthetic brush or roller and maintain a wet edge. For sags, scrape, sand, and recoat thinly. Use this quick checklist:
| Problem | Cause | Fix |
|---|---|---|
| Streaks | Poor overlap | Sand, thin coat |
| Brush marks | Wrong brush | Upgrade, technique |
| Sags | Thick paint | Scrape, thin coats |
Solving Uneven Sheen or Absorption on Plaster
If some areas look glossier or soak up paint faster, start by identifying those sheen differences across the wall.
You’ll test absorption with a small water or primer patch to see how each spot behaves.
Then apply a consistent sealer or primer to even out the surface before repainting.
Identify Sheen Differences
When your freshly painted plaster shows patchy gloss or blotchy absorption, you’re looking at sheen differences—areas where the surface took the paint unevenly. You’ll spot sheen contrast between previously damp or porous patches and surrounding areas.
Walk the room in varied light, angling your view to reveal shiny versus matte zones. Note locations and size so you can plan corrections that restore finish uniformity.
- Map: mark spots under different lighting.
- Inspect: feel for texture or moisture variability.
- Record: photograph angles to compare after fixes.
Test Paint Absorption
Now that you’ve mapped and photographed the sheen variations, test paint absorption to find how porous each patch really is. Dab a small amount of diluted paint on discreet spots, time drying, and note how quickly it soaks in versus beads. Record results next to photos so you’ll target prep accurately.
Use consistent dilution so comparisons are valid. If absorption affects final look, plan color mixing accordingly to maintain hue across patches.
Also consider whether surface porosity will alter texture enhancement techniques like glazes or faux finishes, and adjust your application method based on those test outcomes.
Apply Consistent Sealer
Because uneven sheen or porosity will show through any topcoat, you should seal the whole wall with a consistent primer or sealer before painting. You’ll stop blotchy finish and create a uniform base for color mixing and final coats. Use a product suited for plaster, apply evenly with roller and brush, and watch drying times.
- Prep: clean, sand lightly, remove dust.
- Apply: thin, overlapping passes; keep edges wet.
- Finish: inspect for sheen differences; spot-prime as needed.
Maintain tools—proper brush maintenance prevents streaks and contamination—so your sealed surface stays flawless for painting.
Dealing With Mould, Efflorescence, or Water Stains on Plaster
If moisture has left stains, efflorescence, or mould on your new plaster, you’ll need to tackle those issues before painting so the finish bonds and looks right.
Identify efflorescence causes—salts from damp masonry—and stop the moisture source. Scrub salts with a stiff brush and rinse; allow thorough drying.
For mould, wear a mask, clean with a fungicidal wash or diluted bleach, then rinse and dry fully.
Treat affected areas with an appropriate primer or stain-blocking sealer once dry.
Practice mold prevention by fixing leaks and improving ventilation so paint adheres and stains don’t return.
Maintenance Tips to Keep Painted Plaster Looking New
When you want painted plaster to stay fresh, a few simple, regular actions will prevent dirt buildup, scuffs, and moisture damage—so you won’t need frequent repainting. You’ll protect finish and preserve how color psychology influences room mood by keeping surfaces clean and touch-up ready.
Wipe gently with a damp microfiber cloth, avoid harsh cleaners, and address stains promptly. For decorative techniques like faux finishes, seal edges and clean per manufacturer guidance.
Follow this short maintenance checklist:
- Dust weekly; spot-clean marks within 24 hours.
- Inspect for moisture or mold monthly.
- Touch up chips and reseal decorative areas as needed.
Cost‑Saving Tips Without Sacrificing Finish Quality
Saving on your plaster-painting project doesn’t mean skimping on quality; plan strategically, invest in a few key supplies, and you’ll get durable, professional-looking results for less. Start by patching and sanding yourself—good prep avoids costly touch-ups.
Buy mid-range paint and stretch it with proper roller technique rather than splurging on premium brands. Learn basic historical techniques like limewash blending for texture without expensive additives.
Use color psychology to pick hues that need fewer coats (mid-tones hide imperfections). Reuse drop cloths, clean brushes promptly, and compare local store deals to time purchases during sales for maximum savings.
Eco‑Friendly Paints and Primers Suitable for Fresh Plaster
You can keep costs down and reduce environmental impact by choosing low-VOC or zero-VOC paints and primers specifically formulated for fresh plaster. You’ll protect indoor air quality and still get good adhesion if you pick Eco‑friendly options labeled for new plaster or high-alkaline surfaces.
Look for Sustainable primers that block efflorescence and seal pores.
- Choose a breathable, water-based primer designed for fresh plaster.
- Use low-VOC emulsions with good coverage to minimize coats.
- Select certification labels (e.g., Green Seal) to verify claims.
Test a small area, cure fully, then apply topcoat as directed.
When to Hire a Pro for Plaster Prep or Painting
If the plaster has widespread cracks, loose sections, severe moisture damage, or the job feels bigger than a weekend project, hire a pro to guarantee the surface is repaired and primed correctly.
You should also call an expert if your space features historical decor that requires conservation techniques or matching original textures. Pros handle structural fixes, moisture remediation, and surface consolidation before priming.
Hire skilled painters when you want complex textured finishes, feathered repairs, or exact color matching on heritage trim.
Get written estimates, ask for references, and confirm they use compatible primers and breathable paints suited to new plaster.
Common Mistakes DIYers Make on New Plaster Walls
Because new plaster needs careful handling, DIYers often rush steps or skip key products and end up with peeling, uneven sheen, or visible repairs. You should avoid these mistakes: not priming, painting damp plaster, or using cheap rollers.
Consider color theory early so tones suit light on fresh surfaces, and plan furniture placement to test how finishes read in the room. Don’t overload filler—sand feathered repairs thinly.
Test primers and paints on a small area, and wait full cure times before topcoats. If you follow those steps, you’ll prevent blowbacks and get a durable, uniform finish.
Quick Checklist Before Your First Paint Stroke
Before you lay down any paint, make sure the plaster is fully dry—moisture will ruin adhesion and finish.
Check that the surface is clean, smooth, and patched where needed, and that you’ve sanded and dusted off any residue.
Finally, confirm you’ve got the right primer, paint sheen, brushes and rollers for plaster so your first stroke goes on right.
Surface Dryness Check
Although the plaster may look dry, you’ll want to verify its moisture level before touching a brush. You’ll prevent bubbling, poor adhesion, and ruined Color mixing or Texture enhancement outcomes by checking properly.
- Use a moisture meter on several spots; under 0.5% (or manufacturer spec) is usually safe.
- Press a clear plastic sheet against the wall for 24 hours; condensation means it’s still damp.
- Feel for coolness or tackiness with your hand; dry plaster feels room-temperature and powdery.
Do these checks in different areas and at different heights so your first coat performs as intended.
Plaster Surface Prep
When your plaster has passed the dryness checks, take a few quick, targeted steps to guarantee a smooth, long-lasting finish.
Walk the room, feel for rough spots, sand high ridges with fine-grit paper, and vacuum dust.
Fill hairline cracks and pinholes with a suitable filler, let it cure, then sand flush.
Wipe surfaces with a damp cloth to remove residue and let dry.
Protect trim and floors with masking and drop cloths.
Consider how your chosen color schemes and texture options will interact with surface smoothness before priming.
Inspect once more; you’re ready to prime.
Tool And Paint Selection
Want to make sure your first coat goes on smoothly? Choose quality tools and paints: a good roller (medium nap), angled brush, and extension pole.
Match paint type to plaster—matte or eggshell latex works best after priming.
Consider color mixing if you’re tinting; mix small test batches and stir thoroughly.
Check labels for VOCs and coverage.
Prepare a compact paint storage plan: airtight lids, pour spouts, and date labels to keep leftovers usable.
Final checklist:
- Tools: roller, brush, pole
- Paint: primer, finish, correct sheen
- Logistics: color mixing plan, paint storage, cleanup supplies
Quick Reference: Materials, Drying Times, Coverage
Before you start painting, gather the right materials and understand drying times and coverage so you can work efficiently and avoid costly mistakes. You’ll need primer, quality emulsion, rollers, brushes, sandpaper, and drop cloths. Consider color blending and texture matching when choosing paint finish and tools. Follow drying times: primer 2–4 hours, first coat 4–6 hours, recoat 24 hours if humid. Coverage varies: test a small area. Use the table below for quick checks.
| Item | Quick Note |
|---|---|
| Primer | Seals plaster |
| Paint | Coverage 10–12 m²/L |
| Tools | Rollers for texture |
| Drying | See times above |
Frequently Asked Questions
Can I Paint Over Wallpapered Plaster Without Stripping It First?
You can, but you shouldn’t; Wallpaper removal and proper surface preparation matter. If wallpaper’s smooth, sealed, and firmly adhered, prime with an adhesion primer and skim joints. Otherwise strip it, repair plaster, then repaint for lasting results.
Will Textured Plaster Require Different Primer Dilution Ratios?
Yes — you’ll adjust primer mixing for plaster texture; rougher surfaces need less dilution for better grip, smoother ones can handle more water. Always follow product guidelines and test a small area before full application.
Are VOC Regulations Affecting My Paint Choice for Occupied Homes?
Absolutely — you’re not imagining it: VOC regulations dramatically steer paint safety choices, and you’ll need low- or zero-VOC options for occupied homes to protect occupants, comply with rules, and avoid lingering fumes that feel unbearably toxic.
Can Humidity Affect Plaster Curing After Painting Is Finished?
Yes — humidity impact matters: if it’s high, you’ll slow plaster curing and risk blistering, mold, or poor adhesion; if it’s too low, curing can be uneven and crack, so control humidity for proper plaster curing.
How Do I Match New Plaster Paint to Existing Aged Walls?
You’ll color match by bringing samples to test patches, aging finishes with glaze or diluted paint, and paint blend edges feathering outward; you’ll adjust tint and sheen until the new plaster visually integrates with existing aged walls.
Conclusion
You’ve got this. Think of fresh plaster like new soil: it needs time, testing, and gentle care before you sow color. Check moisture, skim hairline cracks, prime properly, and use patient, even coats—don’t rush the cure. If things look tricky, call a pro. With the right prep and a steady hand, your walls will bloom into a smooth, durable finish that feels like a room taking a deep, contented breath.