How to Paint Patterns on Walls (DIY Guide)
You can paint crisp wall patterns yourself by planning scale and colors to match light and furniture, prepping and priming clean walls, then mapping a level grid and marking reference points. Use quality latex paint, painter’s tape or stencils, foam rollers and angled brushes, and offload excess paint to avoid pooling. Work methodically, remove tape while tacky, and touch up edges with fine brushes; follow maintenance tips for long life — keep going to learn step-by-step techniques.
Choose a Pattern That Fits Your Room and Style
Which pattern suits your room and style? You’ll pick one by evaluating scale, furniture, and mood. Look for Pattern inspiration in magazines, online galleries, and fabric swatches, then test small sketches on paper.
Consider how Color palettes interact with light—cool tones expand, warm ones cozy up a space. Match pattern scale to room size: large motifs need broad walls; tiny repeats work in tight areas.
Keep balance: one patterned focal wall with simpler surroundings prevents overwhelm. You’ll also factor in existing textiles and artwork so the finished wall complements, not competes, with your decor.
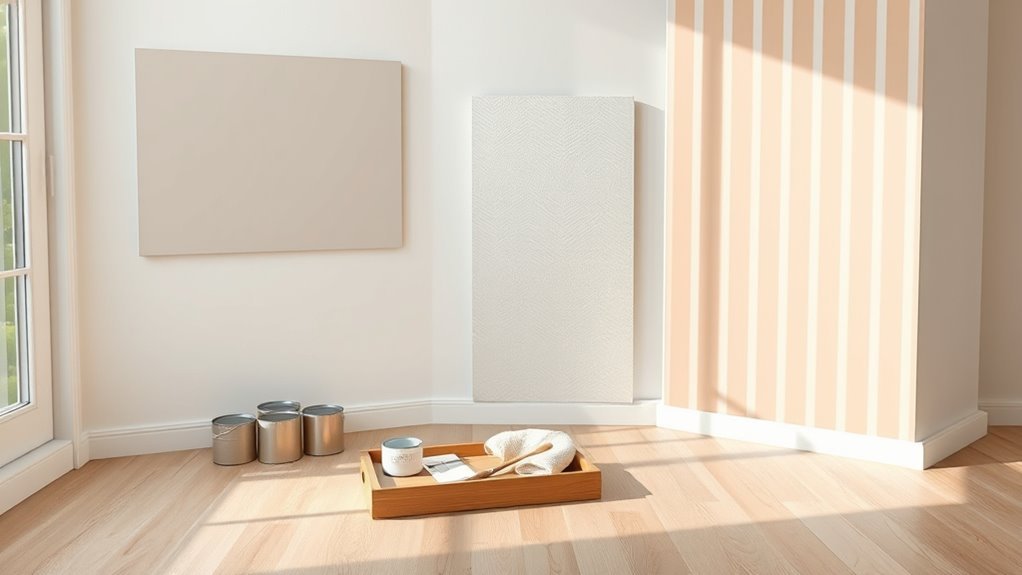
Tools and Paint You Actually Need
Before you pick colors, gather the right tools and quality paint so the job goes faster and looks professional. You’ll need high-quality latex or acrylic paint (matte, eggshell, or satin depending on wall texture), a primer, angled brushes for edges, foam rollers for smooth coverage, and a couple roller covers in the right nap.
Add painter’s tape, a level, a measuring tape, a pencil, and washable drop cloths. For patterns, include stencils or masking tools and a small trim brush for crisp lines.
Understand basic color theory to choose shades that layer well and read clearly once painted.
Prepare Walls for Flawless Adhesion
Before you roll any paint, clean and dust the walls so dirt and grease won’t block adhesion.
Patch holes and cracks with spackling or caulk, sand smooth, and wipe away residue.
Finish with a suitable primer to guarantee the paint bonds evenly and lasts longer.
Surface Cleaning And Dusting
Although it’s tempting to skip this step, thoroughly cleaning and dusting your walls is vital for paint to stick and look smooth. You’ll start with surface dusting using a microfiber cloth or electrostatic duster, working top to bottom to remove cobwebs and loose grit.
Wipe with a mild detergent solution for oily spots and rinse with clean water; avoid soaking drywall. For bathrooms or basements, address mildew with a diluted bleach solution for mold prevention, then rinse and dry completely.
Let surfaces dry fully before priming or painting to guarantee adhesion and an even finish.
Repairing Holes And Cracks
Once your walls are clean and dry, inspect them closely for nail holes, dents, and hairline cracks so you can fix them before priming.
For small holes, push in spackling with a putty knife, smooth flush, and let dry.
Use a utility knife to widen and remove loose material from deeper gouges.
Apply a setting compound for larger repairs, layer if needed, sanding between coats until seamless.
For hairline cracks, use a flexible crack filling product and embed fiberglass tape on recurrent splits.
Clean dust, wipe with a damp cloth, and guarantee repairs are fully cured before any sanding or painting.
Priming For Better Adhesion
If you want paint to stick, seal, and look even, start with a quality primer that matches your wall type and the paint you’ll use. You’ll clean, sand, and remove dust so the primer bonds; this surface priming guarantees peeling and shows true color.
Choose an oil or latex primer based on previous finishes and stains. Apply evenly with a roller, cutting edges with a brush, and follow manufacturer dry times.
Priming offers an adhesion boost that reduces coats and hides repairs. For patterned walls, primer ensures crisp lines and consistent sheen, making your final design pop.
Measure and Map Your Pattern Layout
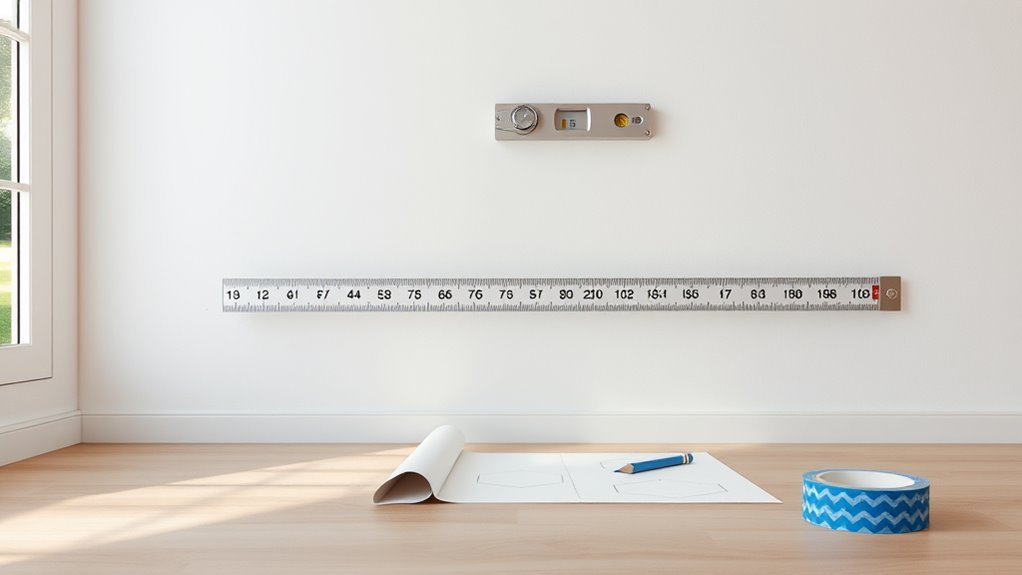
Before you paint, measure your wall accurately so your pattern fits and repeats evenly.
Transfer those dimensions into a scale grid on paper or directly on the wall to plan spacing and alignment.
Mark a few clear reference points so you’ll have reliable guides as you lay out and paint the pattern.
Measure Your Wall Accurately
While you gather your tape measure and level, start by mapping the wall with clear, evenly spaced reference marks so your pattern will line up perfectly, especially around doors, windows, and outlets.
Measure each segment horizontally and vertically, noting total wall measurement and individual obstacle widths. Use a plumb bob or level to transfer marks straight down.
Record dimensions on a simple sketch, labeling corners and ceiling height. Double-check critical distances for symmetry and adjust marks if needed.
Accuracy planning prevents wasted paint and misaligned repeats. Take photos of your marks as a backup before you begin painting.
Create A Scale Grid
Once you’ve confirmed your wall measurements, draw a scale grid on paper and transfer it to the wall so your pattern layout stays accurate; use the same scale so each square represents a fixed real-world size. Consider color psychology when placing hues across the grid, and note wall texture to adjust paint types. Sketch motifs in grid squares, keep proportions, and test a small area first.
| Grid Square | Design Idea |
|---|---|
| A1 | Accent motif |
| A2 | Neutral band |
| B1 | Repeated dot |
| B2 | Gradient swatch |
| C1 | Focal panel |
Mark Reference Points
With your scaled grid and motif sketches in place, mark clear reference points on the wall so you can reproduce the pattern reliably as you paint. You’ll measure from fixed features—corners, baseboard, ceiling line—then transfer those distances across the grid.
Use a pencil dot or light chalk at intersections, labeling key coordinates to avoid guesswork. For repeat motifs, establish a primary anchor point and note offsets for each repeat.
Consider temporary wall anchoring like painter’s tape tabs or small removable nails for guides. Check symmetry and levelness as you go; adjust marks before applying paint to guarantee consistent alignment.
Transfer Geometric Designs With Painter’s Tape
If you want crisp, repeatable geometric patterns, painter’s tape is your best tool. Lay out a grid with a level and chalk, then apply tape along straight lines, pressing edges firmly to prevent bleed.
Plan colors ahead—use color psychology to choose hues that set mood and aid furniture coordination.
Work in small sections, remove tape while paint is tacky for the sharpest edges.
For angled shapes, cut tape to length and overlap slightly at joints.
Clean edges with a damp cloth if needed.
Label each taped area so you can paint methodically and achieve consistent, professional results.
Use Stencils and Register Repeats Cleanly
Pick a stencil material and scale that suits your wall and paint type so the pattern stays crisp.
Align each repeat with a registration mark or edge to keep the design consistent across the surface.
Use low-pressure stippling, a light coat of paint, and a sealant or tape edge to prevent bleed for sharp lines.
Choose The Right Stencil
How big a pattern do you want to repeat, and how much detail can your stencil actually handle? You’ll pick a stencil that suits scale, wall texture, and skill.
Consider Stencil techniques: rigid plastic for crisp edges, adhesive-backed for clean placement, or hand-cut for custom motifs.
Match Pattern inspiration to room size—large motifs breathe in open spaces, small repeats fit tight areas.
Check cut bridges so fine details won’t collapse, and test on cardboard before committing.
Think about paint viscosity and dabbed versus rolled application.
Choose durable material so repeats stay consistent and cleanup stays simple.
Align Repeats Precisely
When you’re ready to stencil, align each repeat before you paint so patterns line up perfectly across the wall; mark registration points with pencil or low-tack tape, then test position on scrap.
Work methodically from a corner or center line so pattern symmetry stays consistent. Hold the stencil flat and secure it at each repeat, checking matches at overlap lines.
If you use multiple colors, plan color blending zones and layer carefully, letting dries set between passes.
Keep a small level and measuring tape handy to confirm vertical and horizontal alignment as you progress.
Prevent Paint Bleed
Before you paint, seal your stencil edges and register points so paint can’t sneak under the template; press firmly and tack with low-tack painter’s tape. Use a stencil brush or foam roller with minimal paint—offload excess on a rag first—to avoid pooling.
For register repeats, align marks precisely and clamp guides so each pass matches. Wipe any drips immediately and sand tiny runs before the next coat.
Consider Paint safety: ventilate, wear a mask, and keep lids closed. Think Color psychology when choosing contrasts; crisp edges make patterns read sharper and influence mood more effectively.
Create a Seamless Ombre or Gradient Wall
Want a dramatic, professional-looking wall without complex brushes or stencils? You can create a seamless ombre by planning top-to-bottom color stops and testing swatches.
Start with a base coat, then mark light, mid, and dark bands.
Next, work wet-to-wet, using a large, dense roller and horizontal back-and-forth strokes where colors meet.
Blend with a slightly damp sponge or dry brush to feather edges.
Maintain even pressure for consistent color blending and avoid harsh lines.
Finish with light stippling to add texture enhancement and visual depth.
Let layers dry slightly between passes to control merging and preserve smooth progressions.
Paint Straight Stripes Without Wobble
To paint straight stripes without wobble, start by choosing quality painter’s tape to get crisp edges.
Use a level and a chalk line to mark exact guides before you tape.
Then load your brush or roller and paint with steady, even strokes to avoid drips and uneven lines.
Choose Quality Painter’s Tape
Because crisp, straight stripes start with the right tape, pick a high-quality painter’s tape that sticks well without tearing paint when removed. You’ll avoid bleed and protect underlying finishes, which matters when exploring color psychology or pairing with eco-friendly paints.
Choose tape rated for your surface and paint type, remove it at the recommended angle, and replace any pieces that lose adhesion.
- Low-tack for delicate surfaces
- Medium-tack for standard drywall
- High-tack for textured walls
- Specialty paper tape for curves and trim
Test a small strip first to confirm clean release.
Use Level And Chalk
After taping your edges, grab a long bubble level and a chalk line to mark crisp, straight guides for each stripe. You’ll use level tools to verify horizontals or verticals, sighting across the wall and adjusting until the bubble centers.
Snap chalk marking lines lightly so they’re visible but easy to remove. Work from a fixed starting point, measuring equal distances and rechecking with the level tools as you go.
If walls aren’t plumb, transfer multiple reference points rather than relying on one spot. Let the chalk settle, then press tape firmly along the line to lock in perfectly straight paint borders.
Paint With Steady Strokes
When you load your brush or roller, keep your wrist steady and use long, confident strokes that run parallel to the taped edge so the paint lays down evenly and the stripe stays true. You’ll control wobble by practicing basic brush techniques and checking paint consistency before you start.
Maintain a light, even pressure and reload before the edge dries to avoid dragging. Work in manageable sections, feathering ends to blend.
Follow this stepwise approach:
- Test stroke on scrap to confirm paint consistency.
- Hold brush at a slight angle.
- Use full-arm motion, not just wrist.
- Inspect and touch up promptly.
Paint Chevrons, Triangles & Angular Wall Shapes
If you want a bold, modern look, chevrons, triangles and angular shapes give any room instant personality with relatively little effort.
Start by planning pattern symmetry on paper, choosing color combinations that suit your room’s mood.
Plan pattern symmetry on paper and pick color combinations that set your room’s mood.
Measure and mark with a level and pencil, then apply painter’s tape along edges for crisp lines.
Use a small roller for even coverage and remove tape while paint is tacky to avoid peeling.
For repeats, create a cardboard template to speed layout and guarantee consistency.
Touch up edges with a fine brush, step back often, and correct any misalignments promptly.
Paint Freehand Florals and Organic Patterns
Gather your paints, a range of brushes from round to flat, and a few pencils for light sketching so you’re set to paint florals and flowing shapes.
Start with simple pencil outlines to map your composition, then build petals and leaves with confident, varied brushstrokes.
Keep proportions and spacing in mind as you work, adjusting your sketch or paint to maintain a balanced, organic pattern.
Materials And Brushes
Although you don’t need expensive tools to paint freehand florals and organic patterns, choosing the right materials and brushes makes the process easier and your results cleaner. Consider paint types that suit wall textures and apply color theory basics so hues harmonize.
Pick brushes for line work, filling, and texture work; test on scraps first.
- Round detail brush — controlled lines and tiny petals.
- Flat synthetic brush — smooth fills and crisp edges.
- Fan or stipple brush — soft blending and textured effects.
- Small angled brush — precise stems and tapered leaves.
Keep a damp rag, palette, and quality painter’s tape nearby.
Sketching And Composition
When you map out your composition, start with loose, light sketches to block major shapes and movement across the wall; this helps you balance scale, negative space, and focal points before committing to paint.
You’ll refine motifs—florals, vines, leaves—keeping overall rhythm natural yet intentional. Use simple guides for spacing to maintain pattern symmetry where needed, but let organic variation breathe.
Test color contrast on a scrap to assure foreground and background read well from a distance. Transfer guides with charcoal or chalk, erase lightly, then build layers.
Trust proportion, step back often, and adjust lines before applying final paint.
Layer Colors for Vivid, Non-Muddy Results
If you want colors that stay vivid instead of turning muddy, plan your layering and let each coat dry completely before adding the next. You’ll use smart color layering to protect hues and achieve vivid results while avoiding glaze buildup.
Work from light to dark where possible, and test blends on scrap board. Follow these steps:
Work light to dark when painting, and always test blends on scrap board before committing.
- Prime with a neutral base for true color.
- Apply thin, even coats; let each dry fully.
- Use opaque paint for base layers, translucent for glazes.
- Seal with a clear matte or satin varnish after curing.
Keep tools clean and mix small batches.
Fix Common Mistakes and Small Paint Errors
Mistakes happen, but you can fix most common paint errors quickly with the right tools and a calm approach. When you spot drips, uneven edges, or stray marks, act while paint’s wet: smooth drips with a wet brush, feather edges, and wipe away smudges. For dried small errors, sand lightly, apply touch-up paint in thin layers, and blend with a soft brush. Keep a clean rag, small brush, fine-grit sandpaper, and matching paint handy. Use patience; quick fixes beat redoing whole sections.
| Problem | Quick Fix | Preventive Tip |
|---|---|---|
| Drips | Smooth wet | Thin coats |
| Spots | Wipe | Drop cloths |
| Edges | Feather | Use tape |
Time-Saving Techniques That Keep Quality High
Although you might rush, smart prep and the right tools let you save time without sacrificing a professional finish. You’ll plan layout, batch tasks, and use efficient tools so Creative color mixing stays consistent and Pattern continuity isn’t lost. Work methodically to avoid rework.
- Tape once: mark guides and keep lines clean to cut touch-ups.
- Batch steps: mix all colors, prime, and roll similar sections together.
- Use quality rollers and angled brushes to cover faster with control.
- Keep a color log and sample board so mixes match and patterns align.
Protect Trim, Floors, and Finish Crisp Edges
When you’re ready to paint, protect trim and floors first so you avoid time-consuming touch-ups later. Use painter’s tape for crisp lines, cardboard or drop cloths for floors, and plastic for nearby furniture. Apply a clear surface sealing coat on bare wood before taping to prevent bleed. For corners, use angled brushes and a steady hand; remove tape while paint is tacky for sharp edges. Consider quick touch-up kits for mishaps.
| Task | Tool |
|---|---|
| Trim protection | Painter’s tape |
| Floor coverage | Drop cloths/plastic |
| Edge finishing | Angled brush & sealant |
Choose Accent Colors & Pattern Scale for Small Rooms
Because small rooms feel crowded if every surface competes for attention, pick one accent color and a restrained pattern scale to create depth without overwhelming the space. You’ll use an accent palette to anchor the room and control visual noise.
Choose patterns with modest pattern proportion—small repeats or single large focal stripes—so walls read calm from a distance. Balance contrast and saturation: muted hues recede, brighter tones highlight. Test swatches in natural light.
Consider these guidelines:
- Limit accent palette to 1–2 colors plus neutrals.
- Use small-scale repeats for tight spaces.
- Reserve bold scale for one feature wall.
- Aim for low-contrast combos.
Adapt Paint Patterns for Textured or Imperfect Walls
If your walls show texture or imperfections, tailor patterns to work with—not against—those surface quirks: choose designs that mask irregularities, use larger-scale motifs where bumps are prominent, or embrace texture by selecting paint sheens and techniques that highlight it subtly.
Inspect wall texture and accept imperfections upfront. Pick matte or eggshell finishes to minimize sheen on rough areas, or use satin to accentuate intentional texture.
Inspect and accept wall texture—choose matte or eggshell to hide flaws, or satin to showcase intentional texture.
Opt for bold, simple patterns—stripes, large geometrics, or staggered blocks—to distract from flaws.
Test a small sample, adjust brush or roller pressure, and plan seams to avoid drawing attention to imperfect surfaces.
Estimate Paint, Tape, and Material Costs
Start by measuring the room’s square footage and calculating how many gallons you’ll need—most cans cover about 350–400 sq ft—so you can buy just enough paint without overpaying.
For accurate cost estimation, list colors, primer, tape widths, rollers, and brushes, then price them from local stores or online.
Factor in extra for touch-ups and pattern complexity.
Material sourcing affects timeline and budget; compare brands and bulk discounts.
- Paint (gallons + primer)
- Painter’s tape (various widths)
- Tools (rollers, brushes, trays)
- Extras (drop cloths, sandpaper, patching compound)
Maintain and Refresh Patterned Walls Over Time
When you want patterned walls to keep looking crisp, establish a simple maintenance routine that includes gentle cleaning, timely touch-ups, and seasonal inspections to catch wear before it spreads.
You should dust and wipe with a soft cloth and mild detergent, avoiding scrubbing that damages edges. Keep leftover paint labeled for swift color-matched touch-ups.
Inspect seams and high-traffic areas quarterly for chips or fading; prime small spots before repainting to guarantee adhesion.
For long-term pattern preservation, control humidity and sunlight with blinds or UV film.
Document your pattern layout and colors so future repairs match exactly.
Frequently Asked Questions
Can Patterned Walls Be Painted Over With Wallpaper Later?
Yes — you can wallpaper over patterned walls, but you’ll need good color matching and surface prep. You’ll remove loose paint, smooth textures, and consider pattern maintenance to prevent bleed-through or show-through under the new wallpaper.
Are Any Patterns Suitable for Exterior Walls?
About 70% of homeowners prefer simple motifs, and yes—you can use many patterns outdoors if you choose Exterior texture and weather resistance wisely; pick durable paints, textured finishes, and sealants so patterns stay bold through sun, rain, and freeze.
How Do Pets Affect Long-Term Pattern Durability?
Pets can shorten pattern durability: you’ll see pet scratches and pet fur abrasion, plus oils and dirt. You should choose durable paints, add protective clear coats, keep nails trimmed, groom pets often, and clean fur promptly.
Can Renters Remove Patterned Paint Without Damaging Walls?
Yes — you can, but you’ll need careful wall preparation and gentle paint removal. You’ll patch holes, clean, sand lightly, use safe solvents or heat cautiously, prime, and repaint to avoid damage and satisfy your lease.
What Safety Precautions for Lead Paint or Old Surfaces?
Like finding a hidden coin in attic dust, you’ll treat surprises cautiously: you’ll follow lead safety rules, test for lead, seal area, use HEPA vacuum, wet-scrape or encapsulate, and guarantee old surface prep avoids dust and contamination.
Conclusion
You’ve got the tools, the tape, and a clear map—now imagine stepping back to see crisp shapes or flowing motifs wrap your room like a freshly tailored suit. Trust your measurements, pick colors that sing together, and let small imperfections add character rather than ruin the scene. With simple upkeep and the right touch-ups, your patterned wall will keep looking intentional and vibrant, turning everyday walls into a signature backdrop you’ll love.