How to Paint Perfect Lines on Walls Like a Pro
You’ll get razor‑sharp lines by prepping, choosing the right tape and tools, and using steady cutting‑in techniques. Clean and dry the wall, sand glossy spots, and fill dents before you tape. Apply appropriate painter’s tape, burnish the edge, or seal it with a thin bead of base color or clear caulk. Paint toward the tape lightly, score and remove at a low angle while tacky, and touch up with a fine brush—keep going to learn pro tricks.
Quick Overview: How to Get Perfect Paint Lines
If you want crisp, professional-looking paint lines, plan your approach and use the right tools: quality painter’s tape, an angled brush or edger, a steady hand, and a clean surface.
You’ll prep by cleaning, sanding light imperfections, and ensuring surfaces are dry.
Pick paint with consistent sheen for easy color matching and test a small area.
Tape edges tightly, press down the lip, and cut in with controlled strokes, keeping excess paint off the tape.
Mind brush maintenance—clean and reshape bristles after each use to preserve edges.
Remove tape slowly at a 45° angle for sharp results.
Your Step-by-Step Workflow for Crisp Wall Edges
When you want crisp wall edges, follow a clear, repeatable workflow that combines careful prep, the right tape and tools, and controlled painting techniques.
Start by planning lines and choosing colors with color psychology in mind so edges enhance mood.
Plan your lines and pick colors thoughtfully—use color psychology so crisp edges boost the room’s mood and impact.
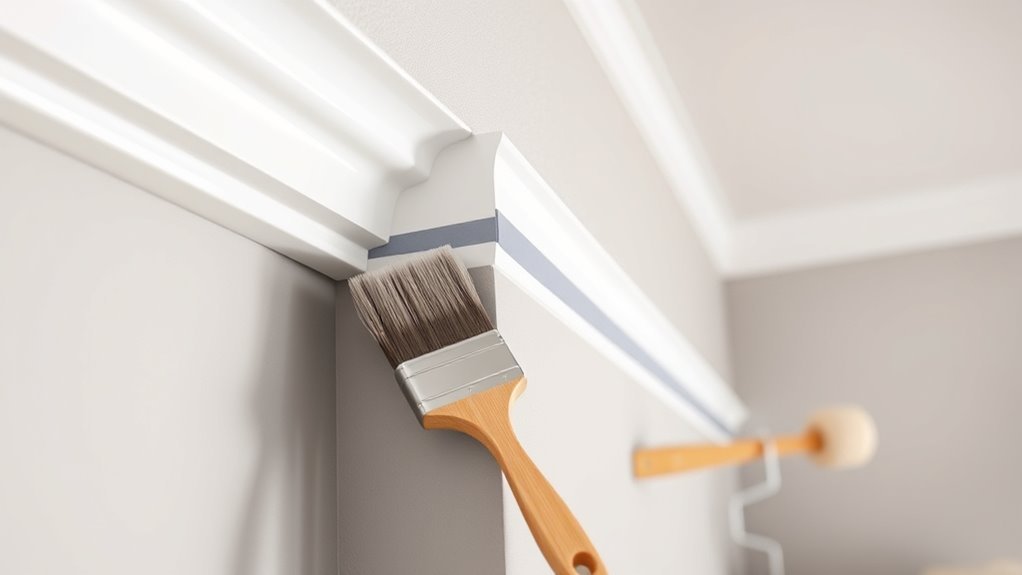
Mask edges with quality painter’s tape, press firmly, and use an angled brush to seal the tape edge with a thin coat of the base color.
After drying, apply your topcoat with light, consistent strokes away from the tape.
Remove tape at a 45° angle while paint’s tacky to prevent tears.
Inspect and touch up tiny flaws for professional results.
Essential Prep: Clean, Dry, and Smooth the Wall
Before you paint, make certain the wall is completely clean, dry, and smooth so your lines will lay down sharply and last longer. Start by dusting and wiping with a mild detergent, rinsing and allowing full drying to prevent bleed or tackiness.
Sand glossy spots lightly to create tooth; wipe away residue. Remove grease with a degreaser where needed.
Prime bare or stained areas to guarantee consistent color payoff and accurate color psychology effects.
Choose eco friendly paints when possible to reduce fumes during drying. Proper prep saves time, helps tape adhere, and ensures crisp, professional-looking edges.
Repair Dents and Holes Before You Tape
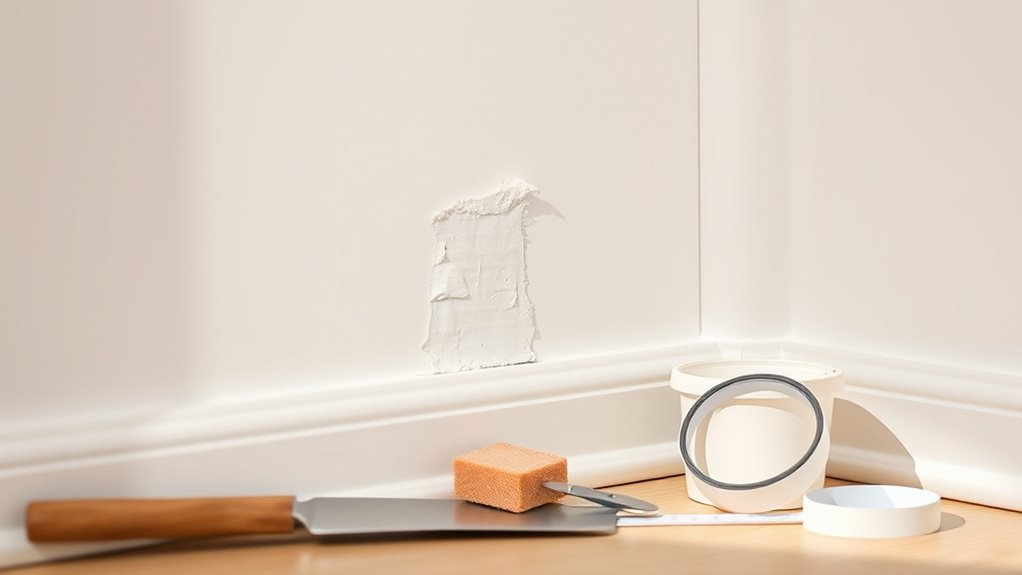
Now that the wall’s clean, dry, and sanded, fix dents and holes so your tape sits flat and your lines stay sharp. Patch small dings with lightweight spackling; press firmly, smooth with a putty knife, and let it cure.
For larger holes, use a mesh patch or joint compound in layers. Match surrounding texture if you have textured finishes—stippling or skim techniques keep repairs invisible.
Sand lightly once dry, remove dust, and test with tape.
Use eco-friendly paints to finish, reducing strong odors while blending patched spots into the rest of the wall before you tape for painting.
Sand and Feather Edges for Sharper Lines
Because sharp shifts catch paint and show through tape, sand and feather the edges of your repairs so tape lays flat and lines stay crisp.
Use fine-grit sandpaper to knock down ridges, working outward from the repair until gradation feels smooth under your hand.
Feather joint compound thinly to avoid ridges that telegraph through topcoats. Check texture blending by viewing from an angle and rework any visible seams.
After sanding, wipe dust and inspect under natural light to confirm an even surface for paint.
Proper feathering also aids color matching, letting new paint integrate seamlessly with existing wall finish.
Measuring and Marking Straight Guide Lines
Measure twice and mark once so your guide lines stay accurate and you avoid rework.
Use a level or laser to get perfectly straight references, then transfer those lines onto your tape or wall at consistent points.
Once your marks are set, you’ll have a reliable path to follow for crisp, straight paint edges.
Measure Twice, Mark Once
Before you touch the brush, take time to measure and mark precise guide lines so your edges come out straight and even. You’ll measure twice to avoid costly mistakes: measure, note, remeasure, then mark with a pencil at consistent intervals. Use a straightedge to connect marks for crisp lines.
Consider how placement affects color psychology and how clean borders echo historical wall art traditions. Number corners, double-check dimensions against furniture and trim, and step back to verify alignment.
Keep marks light so they erase or get covered. This disciplined routine saves time and yields professional-looking, precise paint lines.
Use A Level Or Laser
Now that your marks are laid out, grab a level or laser to turn those pencil points into an exact straight line. Hold the level firmly, align the bubble or beam with the marks, and trace a faint pencil line.
If using a laser, mount it stably, confirm the height at multiple points, and pencil along the beam for consistent guides.
Double-check corners and door frames so paint edges meet crisp.
Keep ventilation tips in mind while working—open windows and use a fan when prepping and painting.
Avoid smudging by letting any erased guide lines settle before applying tape or paint.
Transfer Lines From Tape
Once you’ve got your straight pencil guides, stick low-tack painter’s tape along the line and use a tape measure to mark equal intervals so you can snap a perfectly straight transfer line across long spans. Press tape edges firmly to prevent bleed and snap chalk from those marks for quick alignment.
Work in manageable sections, removing and reapplying tape if walls aren’t continuous. When painting, match texture matching by using the same roller nap and pressure.
For crisp edges, peel tape back at a 45° angle while paint’s tacky. Consider color blending at joins to hide minor inconsistencies.
Snap Chalk Lines Without Mistakes
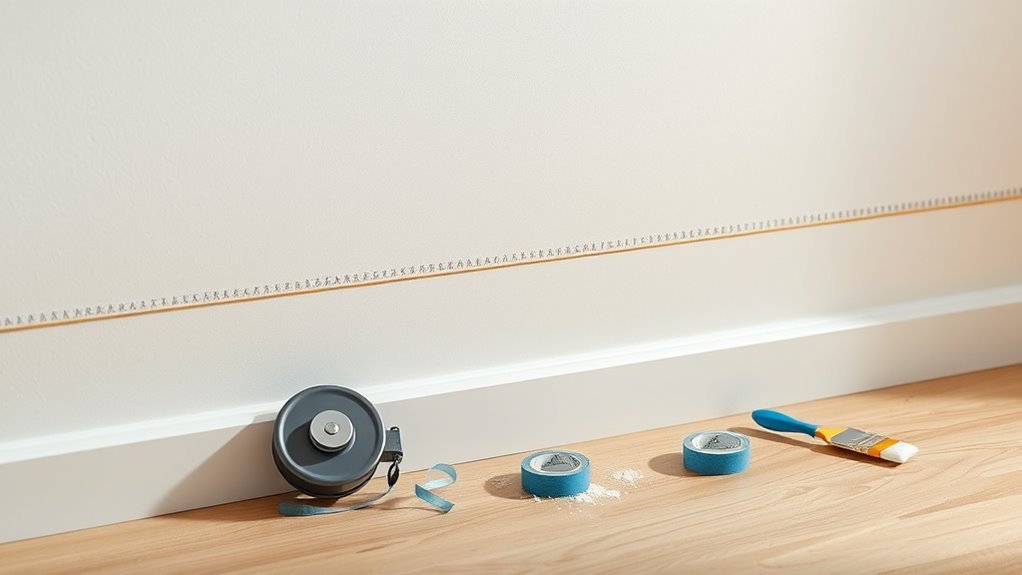
If you want crisp, straight guide lines every time, learn the right way to snap a chalk line so it’s taut, aligned, and free of slack or excess powder. Measure and mark endpoints, anchor the reel firmly, and pull the line taut; you’ll avoid slack that ghosts when you snap.
Use fine-powder chalk for delicate faux finishes or projects involving color blending so excess dust won’t smear wet paint. Snap sharply once, step back to confirm alignment, and re-snap only if needed.
Clean off chalk residue before painting to prevent texture issues, and store the reel dry to keep lines consistent.
Using a Laser Level for Perfect Alignment
After you’ve snapped chalk lines, a laser level gives you a steadier, faster way to mark long runs and multiple reference points without re-snapping. You’ll set the unit on a tripod or magnetic mount, power it, and rotate or switch beams to transfer level or plumb lines across walls.
Rely on laser accuracy for consistent reference points when measuring and taping, and check the beam against a known level to confirm calibration. Use simple alignment techniques: mark beam intersections, transfer to corners, and recheck at midpoint.
This reduces guesswork and speeds prep for crisp, professional paint lines.
What Tools Pros Use for Crisp Paint Lines
While pros rely on steady hands, they also use the right tools to make crisp paint lines fast and repeatable. You’ll want tools that control flow, protect adjacent surfaces, and aid color blending while ensuring edge smoothing.
Pros pair steady hands with the right tools to control flow, protect surfaces, and create crisp, repeatable paint lines.
- High-quality angled sash brush for precise cutting-in.
- Slim foam roller for thin coats right up to edges.
- Paint edger tool with a refillable pad for consistent pressure.
- Flexible metal or plastic straightedge to steady your hand.
Use solvent-resistant trays and calm lighting.
With these, you’ll cut clean lines, blend colors smoothly, and finish edges like a pro.
Painter’s Tape Types and Best Uses
Because different tapes handle paint, surfaces, and temperatures differently, choosing the right painter’s tape makes sharp edges much easier to get.
Use delicate-surface tape for fresh drywall or wallpaper to avoid tearing. Medium-adhesion tape suits most interior trim and baseboards.
For rough or textured surfaces, grab high-adhesion or multi-surface options to seal edges. Use specialty tapes for curves or stained wood to protect finishes.
Match tape selection to your paint type and drying conditions; this matters when experimenting with color psychology or switching to eco-friendly paints that may have different drying behaviors.
Remove tape slowly for the cleanest line.
Why Quality Painter’s Tape Matters
When you pick a high-quality painter’s tape, you get cleaner edges, fewer touch-ups, and less frustration at removal. You’ll protect delicate finishes, preserve color psychology effects, and honor historical wall techniques by keeping lines crisp where patterns or period details matter.
Quality tape reduces bleed, peels off cleanly, and saves time.
- Adhesion that holds without damage
- Clean removal at any paint stage
- Flexibility for slight curves and textures
- Consistent width for repeatable results
Choose tape that matches surface and paint type so your lines look professional and your project stays efficient.
Tape Placement for Ceilings and Trim
Pick the right tape for ceilings and trim—use a low-tack option for fresh drywall and a stronger painter’s tape for textured surfaces.
Align the tape edge precisely where you want the paint line, pressing it flat along the ceiling or trim. Run a putty knife or your fingertip over the edge to seal it so you get sharp, clean lines.
Choose The Right Tape
If you want crisp lines between ceilings and trim, start by selecting painter’s tape designed for the surface and paint type—low-tack for delicate finishes, medium for standard walls, and high-adhesion for textured or rough surfaces.
Consider tape width for coverage and protection, and check the paint history of the surface—previous coats and sheen affect adhesion and removal.
Think about color matching only to avoid visible tape edges under translucent paints.
Choose a brand tested for clean removal at your expected dwell time.
- Surface type
- Dwell time
- Tape width
- Adhesion level
Tape Edge Alignment
Although aligning tape sounds simple, placing it precisely against ceilings and trim makes the difference between a razor-sharp line and a noticeable wobble.
Press the tape edge firmly along the joint, smoothing with your fingertip or a plastic tool to eliminate gaps where paint can bleed. Keep the tape parallel to the trim profile and check alignment from different angles under good light.
For contrast walls, think about color psychology—crisp lines enhance perceived brightness or calm.
When using eco-friendly paints, guarantee tape adhesion works with their finish; test a small strip first to confirm clean removal.
Seal Tape For Sharp Lines
When you’re ready to seal tape for ceilings and trim, press it down firmly and run a flat tool or your fingernail along the edge to create a tight bond—that seal’s what keeps paint from bleeding under the tape. You’ll account for ceiling texture and nearby wallpaper removal patches to avoid gaps.
Follow these steps:
- Clean surface, remove loose wallpaper and dust.
- Apply painter’s tape, align to trim or ceiling line.
- Burnish tape with a plastic scraper or credit card.
- Check corners and textured spots; add short tape strips where needed.
Remove tape at a 45° angle while paint is tacky.
Cutting Tape Cleanly at Corners and Seams
Because corners and seams concentrate paint buildup, cutting tape cleanly there makes the difference between a crisp edge and a ragged one. You’ll align tape so it bridges the joint, then fold it sharply at the corner and press down for a snug fit.
Use a fresh utility blade held at a shallow angle to score through the top layer only, peel back the excess, and remove the inner strip.
For seams, overlap tape slightly and cut through both layers for a seamless joint. This technique preserves decorative finishes and honors your color selection without lifting underlying paint.
How to Seal Tape Edges to Stop Bleed-Through
If you want truly sharp paint lines, seal the tape edges before you roll—doing so blocks seepage and gives you cleaner results. You’ll prevent bleed-through by creating a thin barrier at the tape line. Use these steps:
- Press tape firmly with a plastic card to bond edges.
- Run a thin bead of clear acrylic caulk or specialized sealant along the tape, smoothing with your finger or a putty knife.
- Let fully cure; it’s crucial for high color contrast areas or glossy paint sheen differences.
- Remove tape at a 45° angle while sealant is tacky for crisp edges.
How to Paint Along Taped Edges Without Seepage
Although you’ve already sealed the tape, you’ll still want to paint in a way that minimizes pressure and prevents seepage—load the roller or brush sparingly, start a few inches away from the tape, and roll or brush toward the line with light, even strokes so excess paint doesn’t get forced under the edge.
Work in short sections, feathering each pass to blend without pushing paint under tape. Dab any tiny blobs with a damp brush before they dry. Keep brushes clean between colors to avoid contamination—proper brush storage matters.
If you need touch-ups, use a fine artist’s brush and correct immediately for crisp, professional lines.
The Reverse Roll Technique Explained
When you want an ultra-crisp edge against tape or trim, use the reverse roll technique: load your roller lightly, start a few inches away from the taped line, and roll toward the tape so the roller’s dry edge meets the tape first—this presses paint away from the gap rather than forcing it under.
You’ll then lightly roll away from the tape to smooth. Remember color mixing can affect opacity; test blends first.
Keep leftover paint sealed for proper paint storage.
- Load roller sparingly.
- Roll toward tape first.
- Smooth away from tape.
- Remove tape when tacky-dry.
When to Use a Paint Edger Tool or Guard
Wondering whether a paint edger or guard will save you time and hassle? You’ll reach for an edger when you need crisp lines quickly along trim, ceilings, or tight corners without extensive taping.
Use a guard if you’re preserving adjacent surfaces or protecting freshly blended color blending zones while you work. Choose an edger when surfaces share consistent texture; pick a guard if texture matching matters and you’ll feather edges by hand afterward.
Practice on scrap to judge pressure and paint load. When speed, control, and minimal cleanup matter, these tools let you work smarter and finish neater.
Pros and Cons of Paint Shields and Trim Guides
You’ll find paint shields and trim guides vary a lot in ease of use, with some snapping into place instantly and others needing practice. They can give excellent precision for straight edges but cheaper models may wobble or let paint seep under.
Consider durability and cost too—metal or high‑quality plastic lasts longer but costs more up front.
Ease Of Use
Although both paint shields and trim guides are made to simplify cutting in, they work differently and you’ll want to pick the tool that matches your comfort level and the job’s demands. You’ll find shields are lightweight and fast; guides give more control but need setup.
Think about decorative techniques and color coordination when choosing—some tools suit patterned edges better.
- Shields: quick, portable, minimal prep
- Guides: stable, adjustable, better for long runs
- Learning curve: shields are easier to start with
- Cleanup: shields need less time, guides may trap paint
Choose based on speed versus setup.
Precision And Accuracy
Because precise edges make a project look professional, you’ll want a tool that consistently keeps paint from seeping under the barrier. Paint shields give crisp lines quickly, while trim guides offer steadier alignment over long runs.
You’ll trade speed for control: shields work well for quick cuts but can skip when you need consistent pressure; guides need setup but reduce touch-ups.
Both limit accidental color mixing on adjoining surfaces and let you organize Brush storage nearby for fast swaps.
Choose by task: small touch-ups favor shields, full-room edging benefits from guides, and practice beats product alone.
Durability And Cost
Having picked between shields for speed and guides for steadiness, you should also weigh how long each tool lasts and what it costs.
You’ll find shields are cheap, light, and fine for quick jobs, but plastic can warp or scratch texture patterns and need replacing after heavy use.
Metal trim guides cost more but endure, keeping wall color progressions crisp over years.
Consider maintenance, storage, and frequency of projects when choosing.
- Initial cost vs lifespan
- Replacement frequency
- Effect on texture patterns
- Impact on final wall color fidelity
Choosing the Right Paint for Clean Edges
Want crisp, straight lines that don’t bleed? Choose paints formulated for edges: high-hide, low-splatter, and quick-dry formulas reduce bleeding and let you control edges. Consider color psychology when selecting tones—contrast affects perceived sharpness. Pick finishes: satin or eggshell for slight sheen, semi-gloss for durable, clean edges. Look for eco friendly options with low-VOC primers and paints to protect indoor air. Match primer to surface and pigment load to wall porosity. Use the table below to compare properties quickly.
| Property | Benefit |
|---|---|
| Low-VOC | Better air quality |
| Quick-dry | Less bleeding |
| High-hide | Fewer coats |
| Sheen | Edge definition |
Picking Brushes and Rollers for Precise Edging
If you want razor-sharp edges, start by choosing the right brush and roller for the job. You’ll pick tools that suit trim width, paint type, and surface texture; consider nap length for rollers and bristle quality for brushes.
Mind paint behavior during color mixing and keep your ventilation setup ready to clear fumes. Use these choices to control bleed, build even coats, and maintain steady strokes:
Be mindful of paint behavior when mixing and ensure ventilation to control bleed, build even coats, and steady strokes
- Small roller for flat walls
- Narrow brush for tight corners
- Foam brush for smooth finishes
- Tapered mini-roller for trim transitions
Test tools on scrap before committing to full-edge work.
Sash Brush vs. Angled Brush: Which to Use?
You’ll notice sash brushes are wide and stiff while angled brushes have a tapered, slanted edge—each shape affects how the paint lays down.
Choose the sash brush when you need broad, steady strokes and the angled brush for tight corners and precise control.
Think about the task—trim, corners, or long straight runs—to pick the tool that matches the job.
Brush Shape Comparison
When you’re aiming for crisp, clean edges, choosing between a sash brush and an angled brush comes down to the shape of the bristles and the kind of control you need. You’ll pick sash for long straight strokes and angled for tight corners; both affect paint laydown, color mixing behavior, and cleanup.
Consider bristle profile, stiffness, handle length, and designated surface.
- Flat sash: straight edge for long runs.
- Angled sash: tapered tip for trims.
- Filbert-like: blends edges subtly.
- Short chisel: reaches tight gaps.
Store brushes properly—brush storage prevents splaying and preserves shape.
Precision And Control
Because precision hinges on control, choosing between a sash and an angled brush comes down to the stroke you need and the space you’re maneuvering.
You’ll favor a sash brush when you want straight, steady strokes along trim; its flat profile gives broad contact and minimizes wobble.
Choose an angled brush when you need tight corner work or to follow tapered edges; its slanted bristles let you pivot with confidence.
Either way, practice your wrist tension and loading to avoid drips.
Also consider how color psychology affects edge sharpness and select eco-friendly paints that flow well for cleaner lines.
Best Uses By Task
If you need clean edges on large flat trim, reach for a sash brush for steady, broad strokes. Switch to an angled brush for tight corners, window sashes, and tapered moldings where pivoting matters. You’ll choose based on task, paint type, and desired finish—consider color psychology when planning contrast and use eco-friendly paints when possible.
Quick guide:
- Sash brush: long runs, flat casing, smooth coverage.
- Angled brush: corners, trim detail, precise cut-ins.
- Synthetic bristles: latex and eco-friendly paints, easy cleanup.
- Natural bristles: oil-based work, smoother lay of color.
How Much Paint to Load on Your Brush
Although the exact amount varies with brush size and paint thickness, load just enough to cover the bristles’ lower third so you get smooth strokes without drips. Dip, then tap the brush against the can lip to remove excess; avoid overloading that causes pooling along edges.
For narrow trims, use less paint, for broader edges slightly more, but never so much that it flakes or drips. Remember, color mixing can alter viscosity, so stir thoroughly and check how paint spreads before starting.
Also consider lighting considerations: bright, angled light reveals thin or heavy spots, so adjust loading accordingly as you work.
How to Maintain a Steady Hand While Edging
Hold the brush with a relaxed, tripod grip so your wrist stays flexible and controlled.
Rest your forearm or elbow on a steady surface to reduce shake, and use small shoulder-driven movements for long strokes.
Breathe evenly and work at a calm, consistent pace to keep lines straight.
Proper Grip Technique
When you steady your hand for edging, grip the brush like a pencil—between your thumb and first two fingers—with the handle resting lightly against your middle finger so you get control without tension. Keep your wrist relaxed and move from the forearm, not the fingers, to prevent shakiness. Light pressure, steady speed.
- Anchor fingertip lightly to the wall.
- Use short strokes for correction.
- Maintain a consistent paint load.
- Pause to re-wet for even coverage.
Also mind tools: good color mixing prevents overworking edges, and proper paint storage keeps viscosity consistent so your grip technique stays effective.
Arm Support Methods
Now that your grip is set, support is what keeps that steady hand from wobbling as you edge. Rest your forearm on a padded mahlstick or the flat of your other hand to create a stable pivot.
Brace your elbow against your hip or a ladder rail for longer runs. Use your little finger or the handle end of the brush lightly against the wall as a guide—test this on varying wall textures to avoid snags.
For decorative motifs, steady support lets you control fine curves and repeat patterns consistently. Change positions every few minutes to prevent tremor and maintain precision.
Breathing And Pace
Although steady breathing seems small, it’s what keeps your hand from wandering during edging. You’ll combine breathing exercises with deliberate pace control to steady movement and reduce tremors. Focus on exhale timing and smooth strokes.
- Inhale deeply for two counts, exhale for three to calm nerves.
- Anchor your elbow, move your wrist slowly—match stroke speed to exhale.
- Pause between strokes, reset grip and breath to avoid drift.
- Practice short sessions, increasing duration as steadiness improves.
You’ll notice cleaner lines when breath and pace sync; stay patient and consistent for pro results.
Using an Angled Brush for Crisp Control
If you want razor-sharp lines, pick an angled brush that fits the trim width and hold it at a slight angle so the longer bristles lead the stroke; you’ll get precise control and fewer touch-ups.
Match your brush to wall texture—smoother walls need finer bristles, textured walls demand stiffer ones.
Load sparingly, tapping excess on the tray to avoid drips. Use steady, single strokes and reset the brush frequently for consistent paint load.
Consider color psychology when choosing contrast levels; higher contrast needs crisper edges.
Practice on scrap material, then proceed confidently along edges for professional results.
Feathering Paint for Invisible Transitions
When you’re blending two paint tones or touching up an edge, feathering softens the shift so it disappears to the eye; you’ll work with light pressure and short strokes to blend wet edges seamlessly.
Keep brush maintenance in mind: clean and reshape bristles between passes so strokes stay precise. Practice gentle gradient pulls after color mixing to match tones.
Clean and reshape bristles between passes; practice gentle gradient pulls after mixing to keep strokes precise and tones matched.
Try this routine:
- Load minimal paint.
- Start at the junction, pull outward.
- Overlap strokes, reduce pressure.
- Step back, inspect in natural light.
You’ll avoid harsh bands and create invisible smoothings that read as one surface.
How to Remove Tape Without Ruining the Line
Because the paint film keeps curing after you’ve applied the final coat, pull the tape at a low angle and slowly so you don’t lift fresh paint or leave a ragged edge.
Work while paint is tacky but not wet: wait until the surface resists gentle touch.
Score the edge with a utility knife on delicate trims to separate tape from cured paint.
Pull back along itself steadily, not straight down.
If wall texture grabs tape, go extra-slow to avoid tearing.
Clean any tiny hairs with a fine brush.
Mind color blending near joins so you preserve crisp contrast without disturbing adjacent tones.
Fix Minor Bleeds and Touch-Up Fast
If you spot paint bleeds, clean them up right away with a damp cloth or a small scraper so the spot’s tidy before it dries.
Match the original paint color and finish to avoid noticeable patches.
Use a thin brush and feather the edges into the surrounding wall for a seamless touch-up.
Clean Up Bleeds Quickly
Although tiny bleeds seem harmless, you’ll want to tackle them right away to keep lines crisp and avoid larger touch-ups later. Act fast: dab excess paint with a damp cloth before it dries, then smooth the edge with a fine brush. Consider wall texture when choosing pressure and tools so you don’t make the bleed worse.
If paint’s set, lightly sand and prep before repainting the stripe.
- Blot gently to lift fresh bleed.
- Use a fine, angled brush for precision.
- Match sheen and do subtle color mixing off-wall.
- Feather edges for seamless repair.
Use Matching Paint
Want your touch-ups to disappear? Use matching paint so repairs blend instantly with the surrounding wall. Keep a labeled sample of the original finish or record the brand, sheen, and formula for precise color coordination.
Dab a tiny amount where the bleed or nick is, let it dry, and compare in different light before committing. If you’re unsure, mix small increments until it’s right; test on a scrap.
Use the same gloss—matte, eggshell, satin—for seamless texture. Work quickly on fresh bleeds, and store leftover matched paint for future touch-ups to save time and ensure consistency.
Feather Edges Smoothly
When a tiny bleed or nick mars an otherwise clean edge, feathering the paint keeps your touch-up from standing out; you’ll blend the new coat into the old so the repair fades away. You’ll work with attention to finish, matching sheen and considering color combinations and wall textures so the fix disappears.
Follow these precise steps:
- Lightly sand the blemish and surrounding paint.
- Thin a dab of matching paint with water or extender.
- Use a small brush, dragging outward in soft strokes.
- Feather edges, let dry, then inspect and repeat if needed.
How to Fix Major Edge Problems After Paint Dries
If your painted edges dried with ragged lines, bleed-through, or lifted tape, you can still fix them cleanly without stripping the whole wall. Assess contrast between colors; heavy color contrast shows flaws, so sand rough beads, remove loose paint, and feather with fine sandpaper. Use a steady hand and small angled brush to re-cut edges, minimizing visible brush strokes. For bleed-through, apply a tinted primer and repaint the edge. Clean tape lines by running a utility blade gently. Final step: touch up with matching sheen and inspect under natural light.
| Problem | Fix | Tool |
|---|---|---|
| Ragged edge | Sand + repaint | Angled brush |
| Bleed-through | Tinted primer | Roller |
| Lifted tape | Remove loose paint | Utility knife |
| Visible stroke | Light sanding | Sandpaper |
| Color contrast | Blend edge | Small brush |
Painting Stripes and Geometric Accents Accurately
After you’ve corrected edge problems and perfected your base coats, you’re ready to lay out stripes and geometric accents with confidence. Measure and mark with a level and pencil, testing your color palette on scrap to judge lighting effects. Use low-tack painter’s tape, burnish edges, and apply thin coats to avoid bleed.
Once base coats and edges are perfected, measure, tape, and apply thin coats—burnish edges and touch up tiny bleeds.
- Plan pattern scale to room size.
- Snap chalk lines for long runs.
- Use a foam roller for crisp fills.
- Remove tape while paint’s tacky.
Work methodically, keep edges clean, and touch up tiny bleeds with a fine brush.
Overlapping Two-Tone Paint Cleanly
Although overlapping two-tone paint might look tricky, you can get a razor-sharp edge by prepping carefully and using the right sequence.
Start by taping a crisp line and sealing the tape with the base color to prevent bleed-through. Once sealed, roll the second color up to the tape, then remove tape when paint is tacky, not wet.
If you need a touch-up, thinly mix matching paint for minimal color mixing and feather with a small angled brush. Keep brush storage simple—wrap brushes in plastic between sessions to avoid drying.
Work steadily and let layers cure fully for the cleanest overlap.
Working Around Windows, Doors, and Trim
When you’re painting around windows, doors, and trim, good masking and taping are your first line of defense against sloppy edges. Use low-tack painter’s tape and press it down firmly.
Then cut in carefully with a steady brush to create crisp lines where the wall meets trim. Work methodically section by section so you can remove tape while the paint is still slightly tacky for the cleanest result.
Masking And Taping Techniques
Want crisp lines around windows, doors, and trim? Use masking and taping techniques that protect surfaces and speed your work. Prep surfaces, clean edges, and choose quality painter’s tape. Consider nearby color mixing or paint storage to avoid interruptions.
- Clean and dry surfaces for tape adhesion.
- Use low-tack tape on fresh trim, medium-tack on painted surfaces.
- Overlap tape at corners and press edges firmly with a putty knife.
- Remove tape at a 45° angle while paint is tacky to prevent peeling.
Practice on scrap trim to learn pressure and timing for perfect edges.
Cutting In Around Trim
If you’re doing precise work around windows, doors, and trim, cutting in by hand gives you the cleanest edges without relying solely on tape.
Start with a steady sash brush and load it sparingly to avoid drips. Anchor your wrist on the trim, pull a smooth stroke, and cut just inside the line toward the painted wall.
Feather the edge for subtle color blending where new paint meets old. Match brush type to wall textures to prevent snagging.
Take breaks to assess lines in natural light and touch up immediately for consistently sharp, professional results.
How to Paint Textured Walls Neatly
Because textured walls catch paint differently than smooth ones, you’ll need a slightly different approach to get crisp edges and even coverage. Start by tapping in paint with a thick-nap roller to push pigment into grooves, then use a brush for edges. Protect textured ceilings when cutting in above, and plan shifts if you’ll add wall murals later.
Tap paint into grooves with a thick-nap roller, then carefully brush edges—protect ceilings and plan mural transitions.
- Choose a high-quality angled brush.
- Load less paint to avoid drips.
- Use short, controlled strokes along texture.
- Feather out edges with a dry brush.
Work patiently, checking from different angles for missed spots.
Speed Tips for Large Rooms and Long Runs
When you’re tackling a large room or long run, start by prepping the surface thoroughly so paint sticks and edges stay crisp.
Use a cutting-in tool to speed up straight lines without sacrificing control.
Keep a wet edge as you work so seams blend and you don’t have to retrace sections.
Prep The Surface
Before you tape or roll, take a fast walk-through and knock down any loose paint, nail heads, and dust so you won’t be redoing work later. You want smooth, clean surfaces for consistent lines and true color—remember color psychology affects how light and texture read.
For large rooms, work section by section, sanding only rough spots and filling holes quickly. Choose eco-friendly paints to reduce fumes during long runs.
Quick checklist:
- Sand bumps and feather edges.
- Fill holes; wipe dust away.
- Prime high-contrast areas.
- Lay out a logical painting path.
Keep tools organized to save time.
Use A Cutting-In Tool
If you want crisp edges without slowing down, grab a good cutting-in tool and let it do the heavy lifting. You’ll move faster along long runs when the tool holds the right paint load and releases smoothly, keeping lines sharp.
Use a tool with a comfortable handle and replaceable pads to avoid dragging. For large rooms, keep extra pads and coordinated paint storage nearby so you can swap colors and maintain consistent color blending without backtracking.
Practice light, steady pressure and short strokes. Clean and store the tool properly between sessions to prolong life and preserve performance.
Maintain A Wet Edge
Because paint dries quickly across wide surfaces, keeping a wet edge is the fastest way to avoid lap marks and blend long runs smoothly. You’ll work faster and get seamless lines by planning your path and using consistent pressure. Watch lighting effects to spot drying differences, and maintain similar color mixing in each batch.
- Start at a corner and move steadily toward natural light.
- Work in sections no wider than your roller’s reach.
- Reload before edges dry; overlap wet into wet.
- Use a pole and extension for steady, continuous strokes.
Stay methodical, and you’ll maintain a perfect wet edge.
Keep Lines Consistent: Thickness and Spacing Tricks
When you’re aiming for uniform stripes, set your guides carefully and stick to one method for marking thickness and spacing so every line matches the last. Use a consistent tool—tape, laser level, or a ruler—to measure each band, and mark both top and bottom edges before taping.
Keep a spacing template for repeatable gaps and label sections as you go. For crisp edges, press tape firmly and remove it while paint is tacky.
Match paint application for color blending and texture matching by using the same brush or roller and stroke technique across all stripes to maintain uniform sheen and thickness.
Weather, Humidity, and Drying: Prevent Bleed
Though paint feels like a simple surface coat, weather and humidity play a big role in whether your tape seals and lines stay sharp, so you should plan around drying conditions to prevent bleed. You’ll monitor weather conditions and humidity effects before and during painting.
Though paint seems simple, weather and humidity dictate tape seals and line sharpness—plan drying to avoid bleed.
Choose a day with moderate temperature and low humidity, or control ventilation and heating indoors. Apply thin coats, let each dry fully, and remove tape at a 45° angle while paint’s slightly tacky.
Quick checklist:
- Check forecast for stable temps.
- Measure room humidity.
- Ventilate or dehumidify.
- Allow extra dry time.
Tools and Products Pros Keep for Edging
Good planning around temperature and humidity sets you up to finish sharp edges, but the right tools and products make the difference between a pro-looking line and a messy one. You’ll keep quality angled brushes, flexible edgers, low-tack painter’s tape, razor blades, and a slim trim roller.
Choose high-density foam for smooth finishes and solvent-resistant brushes for specialty paints; consider color psychology when selecting trim contrast. Pros also store test swatches and mini rollers to preview sheen.
Historical trends in trim widths guide modern choices. Pack items in a rolling kit so you’ll work fast, neat, and consistently.
How to Practice Edging Skills Quickly at Home
Set up a couple of small practice panels with different textures so you can rehearse without risking a wall.
Practice taping clean edges and using different tape types to see what sticks and what bleeds.
Then work on steady freehand drills—slow, controlled strokes to build muscle memory.
Set Up Practice Panels
If you want to practice edging without risking your walls, build a few portable practice panels you can tack up and reuse; they’ll let you focus on technique, not cleanup.
Cut lightweight plywood or foam board to 2–3 sizes, attach a simple frame for hanging, and prime both sides. Keep a small kit nearby for color mixing and brush storage so you can switch hues and tools fast.
Practice panels let you simulate corners, baseboards, and trims.
- Mount panels at working height
- Mark straight guidelines
- Test brush angle and pressure
- Clean and rotate panels between sessions
Master Tape Techniques
When you’re ready to practice edging quickly, mastering painter’s tape makes the biggest difference between crisp lines and feathered edges. Start by cleaning and drying the surface so tape adheres evenly, then press it firmly along your guideline with a plastic putty knife to seal the edge before painting.
Pick tape width that matches your line, label panels for repeated drills, and test with a tiny paint swatch. Use light coats, remove tape while paint is tacky, and angle your pull for a clean release.
Consider Color psychology when choosing hues and try eco-friendly paints to practice responsibly.
Freehand Steady Drills
Although you won’t rely on tape here, developing a steady hand is fast if you practice targeted drills that build control, rhythm, and muscle memory. Start on flat samples or low-visibility walls, mark consistent guidelines, and repeat short, focused exercises—like pulling steady 3–6 foot strokes, varying brush angles, and alternating dominant and non-dominant hands—to sharpen edging skills quickly at home.
You’ll also learn how paint flow, color mixing choices, and wall textures affect stroke behavior. Try these drills:
- Slow long pulls for steady rhythm.
- Short quick stops for control.
- Angle shifts for edge definition.
- Weak-hand repeats for balance.
Cost-Saving Tips Without Losing Edge Quality
Saving money on painting doesn’t mean you have to compromise sharp, professional-looking edges; with a few smart choices you can cut costs while keeping quality high.
Choose mid-grade brushes and rollers that hold paint well—good tools reduce touch-ups.
Buy paint in bulk for large areas and test sample pots for color psychology to avoid costly repaints.
Use eco-friendly paints when possible; they often dry faster and minimize primer needs.
Prep thoroughly: clean, sand, and patch once to prevent repeat work.
Practice efficient technique—load less paint, stroke steadily—and save on wasted material without losing edge quality.
When to Choose Tape vs. Freehand Edging
You’ll want to use tape when you need razor-sharp edges and the substrate is smooth enough for good adhesion.
If you need flexibility around curves, trim, or tight corners, freehand edging gives you control and speed.
Consider the surface texture and paint type—tacky paints or rough walls often favor freehand, while smooth surfaces and high-contrast colors benefit from tape.
Tape For Sharp Edges
Wondering whether to tape or freehand the edges? You’ll choose tape when you need ultra-clean lines, consistent color blending control, and precise texture matching along seams. Tape reduces touch-ups and speeds work on straight runs.
- Use high-quality painter’s tape for crisp edges.
- Seal tape edges with the base color before cutting in.
- Remove tape at a 45° angle while paint is tacky, not wet.
- Replace tape between coats to prevent bleed.
Tape’s predictable result helps on high-contrast borders and complex trim where perfection beats flexibility.
Freehand For Flexibility
If you prefer speed and a natural finish, freehand edging gives you the flexibility to adapt to curves, tight corners, and textured surfaces without the setup tape requires. You’ll choose freehand when lines don’t demand razor-sharp perfection or when wall textures make tape unreliable.
Steady your wrist, load a small angled brush, and work in short, confident strokes. Freehand also helps when ongoing color mixing changes shades mid-job; you can blend edges seamlessly.
Practice on scrap material to refine pressure and angle. Use minimal paint on the brush, tidy mistakes with a damp cloth, and accept slight organic variation.
Surface And Paint Factors
Because the wall’s texture and the paint’s behavior change how clean a line will look, pick tape for very smooth surfaces and paints with low penetration, but go freehand on rough or highly textured walls where tape can’t seal.
You’ll also weigh drying time and finish. Use tape when you need razor edges, consistent color blending, or a foolproof barrier; choose freehand for organic edges and subtle feathering on uneven wall texture.
- Smooth walls + thin paint = tape.
- Textured walls + thick paint = freehand.
- Fast-drying paint favors tape.
- Matte finishes hide minor imperfections.
Common Mistakes That Ruin Crisp Lines (And How to Avoid Them)
When paint edges look ragged, it’s usually due to a few predictable mistakes you can fix: taping too late, using worn brushes, skipping primer, or applying paint too thickly.
You’ll also encounter color blending errors when you don’t feather the overlap or remove excess paint from the brush. Avoid rushing tape removal; pull slowly at a 45° angle while paint is slightly tacky.
Practice proper tool maintenance—clean brushes, replace frayed edgers, and use quality tape. Control paint load, use steady strokes, and let coats dry fully.
Those habits prevent bleeds, streaks, and uneven texture so lines stay sharp.
Final Checklist: Inspect and Finish Crisp Wall Lines
You’ve fixed the common causes of ragged edges, so now it’s time to inspect and finish those lines properly. Walk the room with good light and a steady eye. Check for bleeds, missed spots, and uneven texture. Confirm color matching from your Color mixing notes before touching up. Maintain brush care—Brush cleaning between coats preserves edge control.
Walk the room with good light, inspect for bleeds and texture, then touch up carefully for crisp edges.
- Use a magnified inspection at eye level.
- Feather tiny flaws with a fine angled brush.
- Remove tape slowly at a 45° angle after curing.
- Reapply a thin coat where sheen or coverage differs.
Finish, step back, and admire crisp results.
Frequently Asked Questions
How Do I Paint Perfect Lines on Wallpapered Walls?
You’ll prep the wallpapered wall carefully, doing wall preparation like cleaning and smoothing seams, then apply high-quality painter’s tape, press edges, use a brush-cutting technique, and remove tape while paint’s tacky for crisp lines.
Can I Achieve Crisp Edges With Low-Voc or Eco-Friendly Paints?
About 70% of consumers choose low‑VOC products; yes, you can get crisp edges with eco friendly paints if you use high‑quality acrylics, sharp tape, a light brush cut‑in, and peel tape while the paint’s tacky.
How Do I Protect Electrical Outlets and Switches During Edging?
You’ll shut off power, remove covers if you can, then use electrical tape over exposed terminals and painter’s tape around edges to mask switches and outlets; leave protective gaps, press edges firmly, and paint carefully with a brush.
What’s the Best Way to Paint Around Crown Molding With Intricate Profiles?
You’ll tape the crown molding, work with a small angled brush, and cut into intricate profiles slowly, feathering strokes and wiping excess. Use filler for gaps, sand, then touch up for crisp, professional-looking crown molding edges.
Can Lighting (Natural/Artificial) Affect How Straight My Paint Lines Appear?
Yes — lighting effects can make lines look crooked; you’ll notice imperfections more under angled or harsh light. Choose consistent lighting and appropriate paint sheen to minimize glare, and you’ll see truer edges while painting and inspecting.
Conclusion
You’ve done the prep, repaired dents, sanded edges, and chosen tape or freehand—now comes the reveal. Don’t rush: peel tape slowly at a 45° angle while paint’s slightly tacky, touch any tiny flaws with a fine brush, then stand back. Wait for the light to show every line. If something still nags you, there’s one last trick that can save the day—will you use it, or keep your perfect edge as is?