How to Paint Tall Stairwell Walls Safely and Easily
You can paint tall stairwell walls safely and easily by planning access, prepping surfaces, and using the right gear. Start by repairing and priming, mask trim and floors, and set up stable access like a scaffold or ladder with levelers and a helper. Use extension poles, rollers, and angled brushes to work top-to-bottom, keep a wet edge, and wear fall protection and respirators. Follow with touch-ups and careful teardown — keep going for detailed tips and troubleshooting.
Quick Step-by-Step Plan for Painting Tall Stairwell Walls

Before you start, gather your gear and map the job: move furniture, lay drop cloths, secure a stable ladder or scaffolding, and check for loose plaster or trim that needs repair.
You’ll prime high areas first, then cut edges with a brush, working top-down to prevent drips.
Use an extension pole and roller for broad strokes, keeping a wet edge for even coverage.
Monitor light to judge true Color theory effects as you apply coats.
Clean brushes promptly and follow local regulations for paint disposal; store leftover paint sealed and labeled for touch-ups, not down drains.
What You’ll Be Able to Do After Reading (Scope & Outcomes)
When you finish this guide, you’ll confidently prep, prime, and paint tall walls and stairwells safely and efficiently, knowing which tools and techniques produce smooth, even results. You’ll choose safe ladder setups, select brushes, rollers, and extension poles, and apply even coats without drips. You’ll understand color psychology to pick hues that enhance light and space, and you’ll know how to read labels for eco friendly paints and low-VOC options. You’ll troubleshoot common issues and estimate materials and time so projects stay on schedule and budget.
| Skill | Outcome |
|---|---|
| Prep | Clean, repair, mask |
| Tools | Select and use safely |
| Paint | Apply even coats |
| Finish | Inspect and touch up |
Who Should DIY and When to Hire a Pro
You should honestly assess your comfort with ladders, scaffolding, and large-scale cutting-in before you start. If you’re uneasy with height, complex prep, or achieving a flawless finish, hire a pro who’s the equipment and experience.
For straightforward jobs where you’re confident in your skills and safety, DIY can save money.
Assess Your Skill Level
If you’ve tackled a few mid-height rooms and feel steady on a ladder, you can likely handle tall walls yourself; otherwise, hiring a pro will save time and reduce risk. Assess your skill honestly: can you control a pole sander, manage drip-free cutting in corners, and keep consistent paint texture across large expanses?
Consider design choices too—color psychology matters when picking tones for a stairwell’s light and mood, so guarantee you can visualize and execute them. If you hesitate on any task—height work, finish uniformity, or color impact—practice on a smaller wall before committing to the full stairwell.
Know When To Hire
Wondering whether to tackle tall walls yourself or call in a pro? You should DIY if you’re comfortable with ladders, basic painting techniques, and managing prep and cleanup. Choose a simple color choices plan and practice consistent strokes; that keeps results predictable.
Hire a pro when ceilings are very high, access is hazardous, or you need complex finishes like faux textures or precise color matching. Pros bring gear, scaffold experience, and efficient timelines.
Get quotes, check references, and confirm insurance. If safety, time, or specialty work exceed your skills, hiring a pro prevents costly mistakes and speeds completion.
Ladder vs. Extension Ladder vs. Scaffold for Stairwell Walls
When painting stairwell walls, you’ll want to compare a step ladder’s stability tips, how to set up an extension ladder safely, and the advantages a scaffold brings.
Check ladder feet, secure points, and always maintain three points of contact on a step ladder.
For taller or longer projects, a scaffold gives steadier footing, more room for tools, and less repositioning.
Ladder Stability Tips
Which option keeps you safest and most stable on a stairwell: a stepladder, an extension ladder, or a scaffold?
You’ll prioritize ladder maintenance and follow safety regulations before picking gear.
Stabilize feet, use nonslip pads, and never stand on top rungs.
Anchor systems and a helper improve balance, and scaffolds beat ladders for long jobs.
- rubber feet gripping tile
- a helper holding base
- spreader braces locked tight
- platform level on stair treads
- tool belt freeing hands
Inspect for cracks, loose bolts, and wear.
If anything’s wrong, don’t use it — repair or replace.
Extension Ladder Setup
Because stairwells combine uneven footing and tight clearances, setting up an extension ladder there needs extra care to keep you safe and steady.
Position the base on firm, level ground or use a ladder leveler on stairs so the feet don’t slip.
Keep the ladder at a 4:1 angle, and extend it at least three feet above the top support.
Tie or brace the top against a secure structure, and have a helper foot and spot the base.
Wear a safety harness anchored to a reliable point if you’ll lean or work high.
Inspect locks, rungs, and feet before climbing.
Scaffold Advantages
Choosing the right access method can make stairwell painting safer and faster, so weigh ladders, extension ladders, and scaffolds by stability, reach, and setup complexity.
You’ll find scaffolds give the best platform for wide walls and lengthy sessions. Prioritize scaffold safety and follow scaffold assembly instructions; a stable platform reduces fatigue and accidents.
Compare trade-offs: ladders are quick but limited, extension ladders reach high but need skill, scaffolds take time yet boost productivity.
- narrow stair treads with ladder base wobble
- tall uninterrupted wall with scaffold platform
- awkward angles needing extension ladder adjustments
- easing paint cans on scaffold deck
- securing guardrails during scaffold assembly
When to Rent a Rolling Scaffold or Aerial Lift
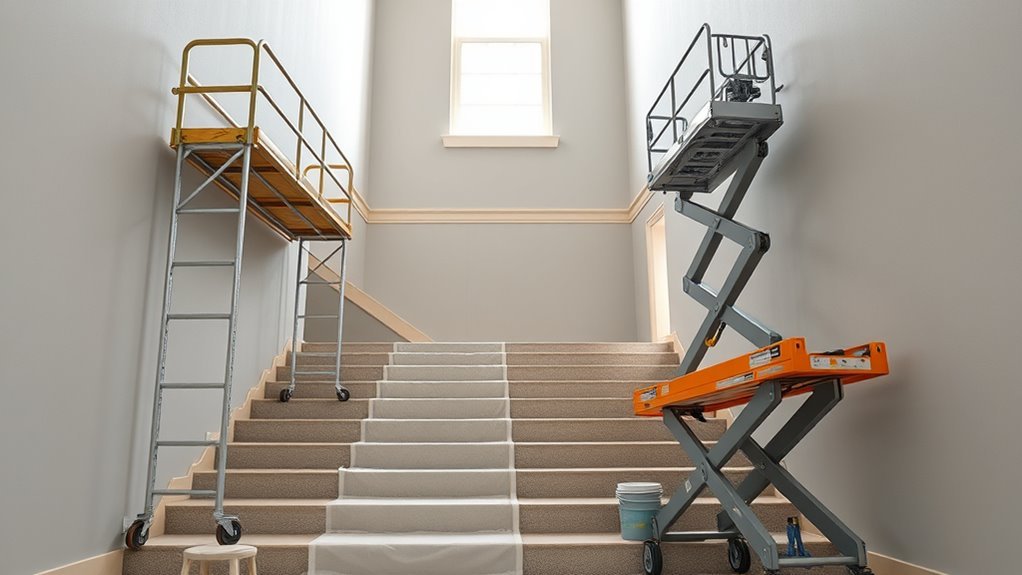
If your walls are taller than a two- or three-step ladder can safely reach, rent a rolling scaffold or aerial lift to work efficiently and reduce fall risk.
Choose a scaffold when you need broad, steady platforms for brushing large sections, switching color palettes, or blending paint sheen across wide areas.
Pick an aerial lift for narrow stairwells, tight turns, or precise touch-ups where mobility and vertical reach matter.
Factor in ceiling height, stair geometry, and how long you’ll need equipment.
Check rental weight limits, platform size, and whether you’ll need an operator or training to use the lift safely.
Essential Safety Gear to Wear and Have on Hand
Even when you’re working from a scaffold or lift, wear gear that protects your eyes, lungs, skin, hands, and feet—so you stay safe and keep working comfortably. You’ll need personal protection for airborne mist from paint sprayers and for accidental slips or scrapes. Always inspect items before use and replace damaged gear.
Even on lifts or scaffolds, wear inspected eye, respiratory, skin, hand, and foot protection to stay safe.
- ANSI-rated hard hat and eye protection
- NIOSH respirator or mask suitable for paint fumes
- Nitrile gloves and long sleeves for skin protection
- Non-slip work boots with ankle support
- Safety harnesses anchored per manufacturer guidelines
Keep a first-aid kit and fire extinguisher nearby.
Securing Ladders on Stairs and Uneven Landings
Before you set a ladder on stairs or an uneven landing, take time to assess the staircase geometry so you know where the rails, treads, and offsets will support it.
Use adjustable ladder levelers to get the feet stable on different heights, and position the ladder so weight is centered.
Finally, secure the ladder with straps or tie-offs to a solid anchor to prevent slipping or shifting while you work.
Assess Staircase Geometry
When you’re working on stairs or an uneven landing, take a moment to assess the geometry so you can position ladders safely and efficiently. You’ll check Staircase geometry and Wall angles to pick the best approach.
Visualize contact points, clearance, and footing before moving gear. Imagine how a ladder sits relative to treads and walls, then adjust placement.
- Ladder base on a flat tread
- Top resting against a cheek wall
- Ladder rung alignment with step risers
- Side clearance for paint buckets
- Headroom under overhead cornices
Make small moves, re-evaluate sightlines, and never guess stability.
Use Ladder Levelers
1 simple tool can make a tricky stair or uneven landing safe: ladder levelers. You attach levelers to your ladder’s base to stabilize feet on differing steps or slopes, reducing wobble and improving ladder safety.
Set them so the ladder sits plumb, test by pushing sideways, and tighten all locks before climbing. Use a helper to hold the ladder while you adjust and position for painting.
Stable support minimizes movement that can cause drips or missed spots, helping paint durability by letting you maintain consistent strokes.
Inspect levelers for wear before each use and replace damaged parts promptly.
Secure Ladder With Straps
Levelers give your ladder a solid base, but straps add another layer of safety on stairs and uneven landings by holding the ladder firmly in place. You’ll loop ladder straps around the rung and anchor point, cinch tight, and test stability before climbing.
Pair straps with safety harnesses when working high or alone to prevent falls.
Visualize setup:
- Strap wrapped around banister, taut and locked
- Ladder foot wedged against stair nose
- Anchor secured to stable post or beam
- Harness tether clipped to a separate anchor
- Spotter holding lower section while you ascend
Always inspect straps and anchors for wear before use.
Building a Stable Platform on Narrow Staircases
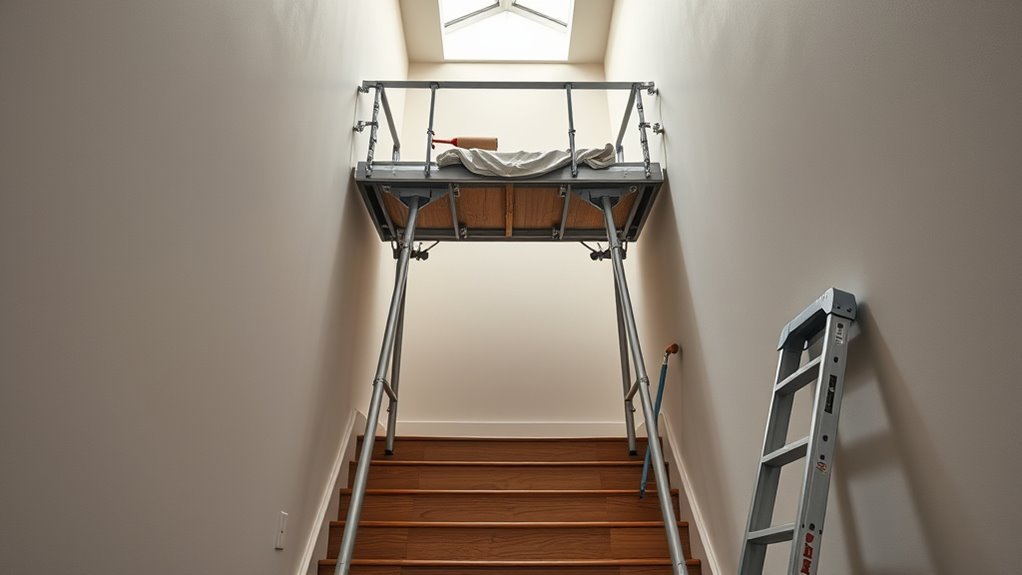
Because narrow staircases limit where you can set up equipment, you’ll need a compact, stable platform that fits the tread width and still supports your weight and tools.
Pick a commercially made stair scaffold or build a low-profile platform using doubled planks, non-slip tread covers, and adjustable brackets anchored to risers.
Check load ratings and tighten all fasteners before use.
Position tool trays within arm’s reach to avoid leaning.
Maintain three points of contact when mounting or dismounting.
Consider how creative color schemes and eco-friendly paints will look from stair landings so you can plan safe access and cleanup.
Use Pole Extenders and Roller Frames
Pick a pole extender that’s compatible with your roller frame and can lock securely at the length you need. Attach the roller frame firmly, test the connection, and make sure the roller spins freely without wobble.
Use smooth, controlled strokes with the extended pole to maintain even paint coverage and reduce fatigue.
Choosing Compatible Pole Extenders
When you’re matching pole extenders to roller frames, focus on thread type, length range, and weight capacity to guarantee a secure, comfortable setup. You’ll check pole compatibility and compare extension options so the roller’s secure, balanced, and light enough to control.
Inspect threads (male/female), confirm locking mechanisms, and test full extension for wobble. Pick materials that reduce fatigue and match paint texture needs.
- A threaded metal joint clicking tight
- A telescoping pole sliding smooth
- A foam grip fitting your hand
- A lightweight carbon section lifting easy
- A locked collar holding steady
Using Roller Frames Correctly
Although you’ve matched a pole extender to your roller, using the frame correctly is what keeps your finish even and your arm from tiring. Grip the frame near the throat, not the end, so leverage stays balanced when extended.
Center the paint roller on the frame’s cage; a crooked sleeve causes skips and extra passes. Check locking collars before each use to prevent collapse.
Roll with steady, overlapping strokes and avoid pressing hard—let the roller do the work for consistent coverage and safer posture.
For roller safety, wear gloves and safety glasses, and stow the pole vertically when you pause.
Lighting Tips for Shadowed Stairwells
Because stairwells are narrow and vertical, they often trap shadows that make painting and everyday use harder; good lighting changes that. You’ll use ambient lighting for shadow reduction, then add directional sources to reveal textures and true paint color.
Position lights to minimize glare and hotspots so you can see edges while working. Consider portable work lights and temporary wall-mounted fixtures to brighten high areas safely.
- a warm ceiling fixture casting even glow
- adjustable LED work light on a tripod
- strip lights along the handrail for low-level depth
- recessed uplights to lift shadowed corners
- battery puck lights for tight spots
Estimating Paint and Materials for Tall Walls
If you’re tackling tall walls, start by calculating surface area so you know how much paint and how many supplies you’ll need; measure wall widths and ceiling heights, subtract windows and doors, and factor in multiple coats and texture.
Next, divide total square footage by coverage per gallon on the chosen paint can, then add 10–15% for waste and touchups.
Count primer, rollers, extension poles, brushes, drop cloths, ladders or scaffolding, plus caulk and tape.
Consider how color psychology affects coverage choices—darker hues may need extra coats—and how paint texture changes mileage and application method.
Paint Types and Finishes for Stairwells and Landings
When painting stairwells and landings, you’ll want finishes that stand up to traffic and scuffs.
Choose durable sheens like satin or semi-gloss for walls and trim.
And consider moisture-resistant formulations if the area gets damp.
That way your work stays cleaner longer and needs fewer touch-ups.
Durable Paint Finishes
Looking for a finish that stands up to constant foot traffic, scuffs, and frequent cleaning? You want durable paint that combines good paint color retention with protection for varying wall texture. Choose satin or semi-gloss for easy wiping, or an eggshell if you prefer subdued sheen.
Consider stain-blocking primers and high-adhesion formulations for older surfaces.
Visualize results:
- Smooth semi-gloss reflecting light down the stairwell
- Satin finish forgiving on minor imperfections
- Eggshell softening bold paint color choices
- Matte enamel hiding subtle wall texture while resisting smudges
- Tough acrylic for long-lasting touch-up ease
Pick based on look and traffic.
Moisture Resistant Options
Why choose moisture-resistant paint for stairwells and landings? You’ll reduce damp stains, peeling, and ongoing maintenance by selecting finishes designed to repel humidity.
Use mold resistant paint in areas with poor ventilation or occasional condensation to inhibit mildew growth. Choose semi-gloss or satin finishes for frequent cleaning and better moisture barriers than flat paints.
For basements or exterior-facing walls, consider epoxy or acrylic-modified coatings that provide robust protection.
Always prep surfaces: repair leaks, apply a quality primer labeled for moisture control, and guarantee proper drying between coats. That combination keeps tall stairwell walls protected and easier to maintain.
Choosing Rollers, Nap Length, and Brushes
Because the right tools make the job quicker and neater, pick rollers, nap lengths, and brushes that match your wall texture and paint type. You’ll choose Brush selection for edges and trims; use synthetic for latex, natural for oil. Match Roller nap to surface: short for smooth, medium for light orange peel, long for rough. Use extension poles with a 9–12″ roller frame for reach. Keep a 2–3″ angled brush for cutting in and a small trim brush for corners.
- soft nap rolling across smooth plaster
- thick nap hugging textured block
- angled brush slicing crisp lines
- pole extending reach
- brush drying between coats
Which Primer and When to Use Stain Blockers
After you’ve picked the right rollers and brushes, pick a primer that matches the surface and the problem you’re solving: use a bonding primer on slick surfaces, a high-build primer on patched drywall, and a stain-blocking primer wherever tannins, water stains, smoke, or marker might bleed through.
After choosing brushes and rollers, match the primer to surface needs—bonding for slick, high-build for patches, stain-blocking for bleed-through
You’ll assess porosity, repairs, and color change to choose oil- or latex-based primers.
Use priming techniques that guarantee even coverage: work top-down, feather edges, and sand between coats if needed.
For severe discoloration, apply dedicated stain blocker applications per label, allow full cure, then spot-check before topcoating for a consistent finish.
Prepping Angled and Awkward Stairwell Surfaces
Start by walking the stairwell and noting every angle and awkward plane so you know what you’ll be working with.
Mask hard-to-reach trim, light fixtures, and railings before you sand or prime to keep edges clean.
Patch cracks and seams with flexible filler and smooth them flush so paint lays down evenly.
Assess Surface Angles
Wondering how to tackle weird angles and tight stairwells? You’ll first assess surface angles to plan safe access and proper surface preparation for consistent paint adhesion. Walk the stairwell, note slopes, corners, and gradual shifts. Measure steepness and height, sketch tricky zones, and decide on ladders, poles, or scaffolding.
Consider how light hits surfaces to reveal imperfections.
- Narrow landing with a low ceiling
- Sharp corner between wall and soffit
- Slanted drywall above stairs
- Small recessed nook near railing
- Irregular joint lines and trim
These observations guide tools, prep steps, and efficient staging.
Mask Hard-To-Reach Areas
If you want crisp lines and protection for fixtures in cramped stairwells, mask hard-to-reach areas methodically before you paint. Start at the top and work downward, securing trim, railings, light fixtures, and vents with low-tack painter’s tape.
Use pre-folded tape for tight corners and stretchable tape for curved banisters. Apply removable sheeting or paper to cover floors and steps, taping edges to prevent bleed.
For angled junctions, use a narrow brush and Paint pattern techniques to feather edges before rolling. Check tape adhesion as you go and replace any loose sections to avoid drips and uneven lines.
Repair Cracks And Seams
When you’re prepping angled and awkward stairwell surfaces, repairing cracks and seams is essential to get a smooth, long-lasting finish. You’ll inspect joints, tap out loose plaster, and choose flexible fillers for crack repair. Use a putty knife, sand between coats, and apply seam sealing tape where edges meet.
After primer, recheck for hairline flaws before painting.
- a thin hairline running along a corner
- a recessed seam between drywall sheets
- bubbling plaster near an angle
- a narrow gap where trim meets wall
- a patched spot needing feathered sanding
These steps prevent future cracking and visible seams.
Repairing Cracks, Nail Pops, and Plaster at Height
Because repairs at height can catch you off guard, you’ll want a clear plan before you climb: inspect for hairline cracks, nail pops, and loose plaster, mark trouble spots, then choose the right tools and patching materials so you can work safely and efficiently. Use crack filling for hairline splits; widen and clean deeper cracks, apply filler, sand smooth. For nail pops, pull, reset and use nail securing techniques or screws with patching compound. For loose plaster, remove loose sections, adhesive and plaster patch. Work from stable scaffolding or platform; wear eye protection and secure your ladder.
| Task | Material |
|---|---|
| Crack filling | Lightweight filler |
| Nail securing | Screws & compound |
Taping and Protecting Trim, Floors, and Treads
Before you paint, protect trim, floors, and treads so splatters and drips don’t create extra work later. You’ll prep edges with quality painter’s tape for trim protection, lay down breathable rosin paper for floor masking, and secure drop cloths on stair treads.
Before painting, protect trim, floors, and stairs—tape edges, lay rosin paper, and secure drop cloths to prevent drips.
Work from top down, smoothing tape edges to prevent bleed. Replace or cover hardware and use low-tack tape on delicate surfaces.
- Mask baseboards with 2-inch tape
- Cover hardwood with rosin paper rolls
- Drape canvas drops over railings
- Tape stair nosing and risers firmly
- Use plastic sheeting for nearby fixtures
Check edges before painting.
Cutting In Ceilings and Corners Safely From a Platform
Before you start cutting in ceilings and corners from a platform, pick a stable, height-appropriate platform like a scaffold or adjustable work platform.
Secure the work area by locking wheels, clearing trip hazards, and keeping tools within easy reach.
Use a sharp angled brush or edger and steady hand techniques to keep lines crisp without overreaching.
Choose The Right Platform
Wondering which platform will keep you steady while cutting in ceilings and corners? You’ll prioritize platform safety and ladder selection: pick stable scaffolds or platform ladders rated for your weight and tools. Check fittings, guardrails, non-slip surfaces, and easy height adjustment before climbing.
Visualize your workspace:
- a wide platform with guardrails at hip height
- a scaffold base on level ground with outriggers
- a platform ladder centered under the seam
- a painter reaching comfortably without overreaching
- a tool tray within arm’s reach and below chest level
Choose the simplest, sturdiest option that lets you work squarely and confidently.
Secure The Work Area
Once you’re up on a stable platform, secure the work area so nothing shifts or trips you while cutting in ceilings and corners. Move furniture placement away from the platform and cover remaining pieces with drop cloths to keep splatters off while maintaining clear egress.
Tape off baseboards and use non-slip matting beneath feet to prevent skids. Keep a small bucket for brushes, rags, and cleanup within arm’s reach so you won’t lean and lose balance.
Confirm paint color selection and test swatches at height before painting so you won’t need risky readjustments once you’ve started.
Use Proper Cutting Tools
When you’re cutting in from a platform, use the right tools to keep control and reduce strain: a high-quality angled sash brush for tight corners, an edger with a comfortable grip for straight ceiling lines, and a small trim brush for touch-ups.
You’ll work steady, balanced on the platform, and rely on Proper cutting tools plus routine Paintbrush maintenance to avoid drips and splayed bristles.
Picture your setup:
- Angled sash brush hugging the corner
- Edger gliding along the ceiling line
- Small trim brush for neat fixes
- Wrist steady, platform secure
- Clean brushes resting on a rag
Keep brushes clean and stored upright.
Efficient Rolling Technique for Large Vertical Surfaces
Although tall walls can feel intimidating, you’ll make steady progress by using a consistent rolling rhythm, the right nap roller, and a full paint tray so you’re not constantly reloading.
Start top-down, rolling in vertical passes and slightly overlapping each stroke to blend edges; that’s a fundamental painting techniques tip.
Use extension poles and a lightweight roller to reduce fatigue and keep pressure even.
Maintain a wet edge and work in manageable sections.
Match roller nap to your wall texture and consider how color selection will affect coverage—darker or stronger hues may need more coats, so plan accordingly.
Avoiding and Fixing Drips, Runs, and Lap Marks
Because paint tends to pool and sag on vertical surfaces, you’ll want to control how much paint your roller or brush holds and work with deliberate, overlapping strokes to prevent drips and runs. Use proper painting techniques: load less, tap off excess, and keep a wet edge.
If a drip appears, smooth it immediately with a loaded brush. Light sanding and a thin glaze fix dried runs. Consider color selection for touch-up blends.
Visualize common problem spots:
- Corner seams collecting excess
- Top edges where gravity pulls paint
- Under banisters and rail brackets
- Behind light fixtures
- Narrow ledges and trim
Working in Sections to Reduce Fatigue and Keep Wet Edges
Controlling drips and keeping a wet edge is easier if you break the wall into manageable sections before you start rolling. You’ll paint top-to-bottom in strips, resting between panels to reduce fatigue and preserve the wet edge. Use creative techniques like staggered starts and consistent overlap; plan color coordination for even sheen and mood. Take short breaks, hydrate, and switch arms if needed. A simple table can mirror your rhythm and feelings as you work:
| Focus | Pace | Feeling |
|---|---|---|
| Top strip | Slow | Calm |
| Middle | Steady | Confident |
| Bottom | Controlled | Relieved |
| Finish | Smooth | Proud |
Best Approach for Banisters, Half-Walls, and Landings
When tackling banisters, half-walls, and landings, plan your sequence so you paint trim and railings before rolling adjacent flat surfaces. Work from top down to avoid drips on fresh paint.
You’ll prep surfaces, sand glossy railings, tape delicate edges, and protect floors.
Prioritize Banister maintenance by tightening spindles and wiping grime before priming.
Consider Half wall design passages—cap molding often needs brushwork.
Use a steady brush for rails, small roller for tight flat areas, then full roller for larger planes.
Visualize the job with simple scenes:
- Brushed railing drying in the stairwell light
- Taped half-wall edge
- Masked landing floor
- Neat cap molding
- Even rolled wall finish
Ventilation, Weather, and Drying-Time Tips
If you paint in a well-ventilated area, your coats will dry faster and fumes will be less hazardous, so open windows, run exhaust fans, and create cross-breezes whenever possible.
Monitor air quality with a simple CO2 or VOC meter, and pause if readings spike.
Choose mild-weather days: moderate temperature and low humidity speed drying and reduce tackiness.
Use quick-dry formulas or additives when ventilation’s limited, and keep doors open between sessions to accelerate curing.
Wear a respirator for prolonged work to limit paint fumes exposure.
Plan coats around weather forecasts and allow full dry times before reusing stairs or applying trim.
How Many Coats Do You Really Need?
Usually two coats: a primer or stain blocker, then a color coat — add a third for strong or dramatic changes.
Choose eco friendly paints for low odor and faster recoat times, and remember color psychology—lighter hues cover differently than deep tones.
Visualize the result:
- Smooth first coat sealing joints and imperfections
- Second coat building depth and hiding roller marks
- Optional third coat for saturated, dramatic colors
- Trim touched separately for crisp edges
- Inspect in daylight before declaring done
Clean-Up, Tool Care, and Safe Teardown
Because cleanup makes the difference between a quick weekend job and lingering mess, tackle tool care and teardown right after you finish painting. Gather cleaning supplies, rinse brushes and rollers promptly, and label leftover paint. Lower ladders and secure hardware; don’t rush dismantling scaffolds. For tool maintenance, oil moving parts, inspect for damage, and store everything dry. Fold drop cloths inward to trap debris. Dispose of used tape and empty cans responsibly. Leave the space only when steps and rails are dry and stable.
| Relief | Pride | Calm |
|---|---|---|
| Clean | Fixed | Safe |
| Done | Rest | Secure |
Troubleshooting Common Problems After Painting Tall Walls
Once your tools are cleaned and the scaffolding is down, take a careful walk around the room to spot any issues that can show up after painting tall walls. Look for drips, bare spots, streaks, or uneven sheen. Check edges where rollers met trim and inspect corners for missed touch-ups. Consider whether color mixing errors or poor paint storage caused inconsistencies.
After scaffolding comes down, walk the room to spot drips, bare spots, streaks, and uneven color.
Fix problems promptly: sand light drips, feather edges, re-roll with proper technique, and remix small batches if needed.
- Tiny drip trails under sconces
- Pale bands near ceilings
- Roller texture differences
- Patchy corners by stairs
- Slight color shifts on big walls
When to Call a Professional Painting Contractor
If your walls are unusually high, the layout is complex, or the job involves scaffolding and specialty equipment, call a professional—it’s safer, faster, and usually gives a better finish than attempting it yourself. You should hire pros when safety risks, tricky access, or strict color schemes and paint sheen choices matter. They’ll advise on prep, ventilation, and warranty. Use the table to compare scenarios and outcomes:
| Situation | Risk | Pro Benefit |
|---|---|---|
| Extreme height | High | Proper rigging |
| Complex trim | Medium | Precise edges |
| Specialty finish | Medium | Consistent sheen |
| Limited time | Low | Faster completion |
Cost-Saving Tips and Upgrades for Long-Lasting Results
When you plan upfront and prioritize a few smart upgrades, you’ll cut long-term costs and keep tall walls looking great for years. You’ll save by choosing durable finishes and mixing modern Eco friendly paints with Traditional techniques for prep and priming.
Upgrade tools once, maintain surfaces, and fix small damage early.
- A quality roller and extension pole gleam, not flake
- Proper primer seals plaster, preventing stains
- Low-VOC, mildew-resistant Eco friendly paints protect long-term
- Sand and caulk joints using Traditional techniques for smooth walls
- Regular touch-ups beat full repaints later
Frequently Asked Questions
Can I Paint Stairwell Walls With Wallpaper Still on Them?
You can, but you shouldn’t; wallpaper removal and surface preparation give better results. You’ll remove loose paper, repair seams, sand, prime, then paint. Skipping prep risks peeling and uneven finish, so plan proper prep.
How Do I Paint Around a Chandelier or Hanging Light Fixture?
About 70% of accidents happen near fixtures, so you’ll protect yourself: you’ll use chandelier protection, turn power off, attempt light fixture removal if comfortable, or mask and wrap the hanging light, then paint carefully around it.
Will Painting Affect Smoke Detector or Sprinkler Functionality?
Yes — if you spray paint carelessly, you’ll reduce smoke detector sensitivity and risk sprinkler system interference; you should cover detectors, avoid spraying near heads, shut systems when required, and follow manufacturer safety guidelines to prevent malfunctions.
Can I Use a Paint Sprayer Indoors Without Professional Help?
Can you handle it yourself? Yes—you can use a paint sprayer indoors if you control indoor ventilation, mask up, protect surfaces, and work in stages. Doing so speeds paint drying time but requires careful prep and cleanup.
How Do I Match New Paint to Faded Existing Stairwell Color?
You’ll color match by taking a cleaned sample to a store, using paint blending to tint fades, and testing small patches. If needed, feather the new paint into old areas so shifts disappear and the stairwell looks uniform.
Conclusion
You’ve got the plan and know when to DIY or call in pros, so go ahead and tackle those tall stairwell walls with confidence. Use the right access—ladder, scaffold or lift—keep safety front and center, and clean up like a pro so your work lasts. If problems crop up, troubleshoot or call a contractor. Now grab your brushes, cue the iPod, and make that towering space look amazing—no jousting required.