How to Place Painting on Wall – Easy Step-by-Step Guide
Hang your painting at eye level (about 57 inches to the center) so it feels natural and balanced. Pick a wall with flattering light and consider furniture alignment—center the artwork over sofas or mantels and leave 6–12 inches above them. Use paper templates, a level, and the right anchors for your wall type; studs or heavy-duty anchors for large pieces. Add felt bumpers to prevent rocking. Keep going to get quick tips on spacing, anchors, and maintenance.
Quick Answer: Hang a Painting Straight and Damage-Free
If you want a straight, damage-free result, pick the right hardware for your wall type, measure carefully, and level as you go.
Choose the right hardware, measure precisely, and level as you go for a straight, damage-free hang.
You’ll start by locating studs or using anchors for drywall, then mark the center point at eye level or gallery height.
Use a bubble level or laser, drill pilot holes, and hang securely.
Consider the painting’s weight and frame—wire vs. D-rings change hanger placement.
Think about color theory and art history briefly: placement affects perception and context, so align scale and sightlines with nearby works.
Step back, adjust slightly, and tighten fasteners for a final check.
Who This Guide Is For and What You’ll Learn
You’re about to learn straightforward, practical steps whether you’re hanging your first print or arranging a whole gallery wall. This guide suits you if you care about interior decor, want damage-free methods, or treat pieces as an art investment. You’ll get clear tools, measurements, and mounting options so you’ll avoid guesswork and wasted time.
| Who’s it for | What you’ll learn |
|---|---|
| New homeowners | Simple hanging basics |
| Renters | Non-damaging fixes |
Choose the Spot: Light, Sightlines, and Room Use
Because lighting, sightlines, and how a room’s used shape how a painting reads, pick a spot where natural or artificial light highlights the piece without causing glare or sun damage.
Choose a spot where light flatters the painting without glare or sun damage, and sightlines suit how the room’s used
Consider where people stand or sit: direct views from seating, entryways, or work zones matter more than empty walls.
Match the painting’s scale and palette to existing color coordination to keep the composition cohesive.
Check wall textures—smooth surfaces suit delicate frames, textured walls can add contrast or demand bolder works.
Avoid high-traffic spots that risk bumps or moisture.
Test placement with temporary hooks and inspect at different times of day.
Ideal Height: The 57-Inch Eye-Level Rule
You’ll usually hang artwork so its center sits about 57 inches from the floor, which matches average eye level and keeps pieces feeling natural.
If your ceilings are low or you’re mounting above furniture, you can adjust upward so the work reads well in the space.
Always prioritize comfortable viewing over rigid rules.
Standard Eye-Level Placement
Wondering where to hang your artwork so it looks naturally placed? Use the 57-inch rule: center the artwork at 57 inches from floor to center. Measure carefully, mark the wall, and adjust for hanging hardware.
Consider color coordination and frame styles so the piece integrates with the room—match tones to nearby furnishings and choose frames that compliment scale and mood. If grouping works, treat the group as one unit and find its center.
Stand back and view from typical sightlines to confirm placement. This standard eye-level placement creates balance, feels intuitive, and keeps your art comfortably within daily view.
Exceptions For Ceilings
If your room has unusually low or high ceilings, stick with the 57-inch rule for eye level but shift the art’s vertical placement proportionally so it reads natural in the space. You’ll honor the 57-inch anchor while adapting for ceiling exceptions and maintain visual balance.
For very low ceilings, lower the center slightly; for tall ceilings, raise it but keep it approachable. Consider ceiling mounting only when a work is meant to be viewed from far below or when architectural features demand it.
- Measure from floor to ceiling; calculate proportional shift.
- Test with paper templates at multiple heights.
- Prioritize sightlines, not strict rules.
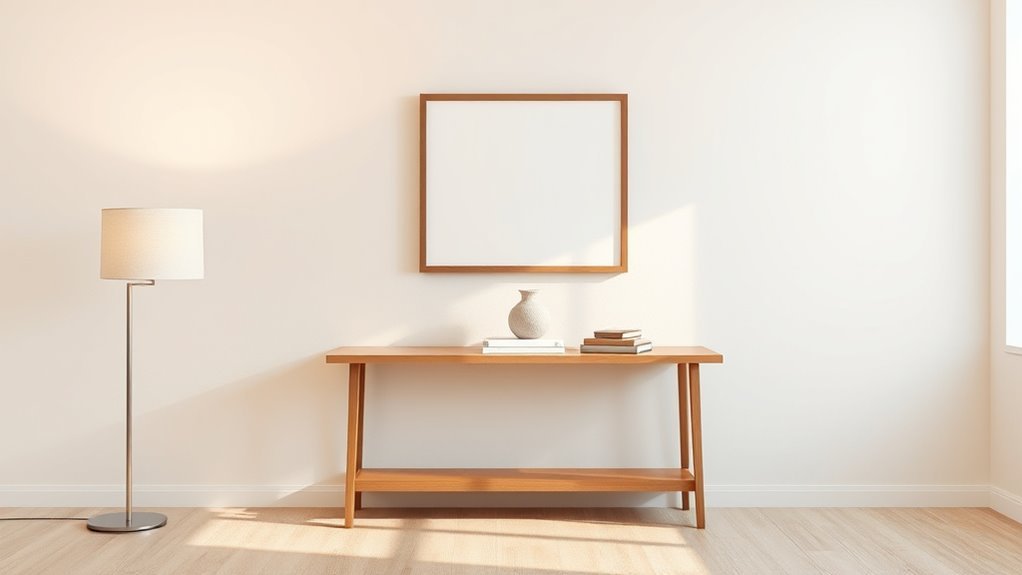
Centering Art Above Furniture and Mantels
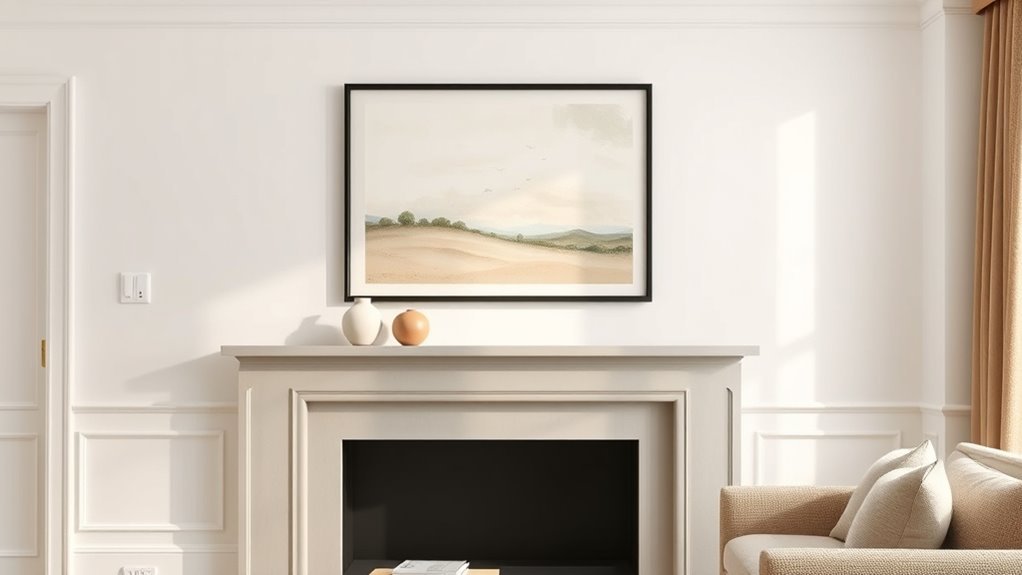
When you hang art above furniture or a mantel, aim to place the center of the piece slightly above the furniture’s top—usually 6–12 inches—to keep eye flow natural.
Match the painting’s width and scale to the furniture, generally covering about two-thirds to three-quarters of the piece below.
Align the artwork’s center with the furniture’s center so the whole arrangement reads as one balanced unit.
Ideal Vertical Placement
Although the exact height can vary with ceiling and furniture, you should generally hang artwork so its center sits about 57–60 inches from the floor, and adjust slightly when centering above furniture or a mantel. You’ll balance eye level with the piece’s relationship to nearby objects. Consider color coordination and frame styles to unify the composition and avoid visual jarring.
Measure from the floor to the painting’s center, then mark the wall. When above a mantel, keep a 3–6 inch gap; above low furniture, aim for 6–9 inches.
- Measure accurately.
- Mark center height.
- Adjust for sightlines.
Width And Scale
Because visual balance depends on proportion, think of the furniture or mantel as part of the artwork’s frame and choose a painting that complements its width—aim for art that spans about two-thirds to three-quarters of the piece below it.
You’ll center the work visually, keeping edges clear of crowded objects. Consider height so the painting’s scale suits the furniture’s mass; a low, long buffet needs a wider composition than a slim console.
Use color coordination to tie the painting to nearby textiles or décor, and pick Frame styles that echo the room’s finish so the artwork feels integrated, not tacked on.
Alignment With Furniture
If you want the artwork to feel intentional, center it over the furniture or mantel so the visual midpoint of the piece aligns with the midpoint of the item beneath it. This keeps the eye comfortably balanced and prevents the art from seeming tacked on.
You’ll also consider height — hang so the center sits about 57–60 inches from the floor or slightly higher above mantels. Match scale, color coordination, and framing styles to the furniture to create cohesion.
Use simple layouts and negative space to avoid clutter.
- Measure span and center precisely.
- Balance scale and color.
- Coordinate frames and style.
Pick the Right Painting Size for Wall Scale
When you choose a painting, let the wall’s proportions and furniture layout guide the size so the artwork feels intentional rather than lost or overpowering. Measure available wall space, leaving a comfortable margin around the piece—often 10–20% of the wall width.
For above furniture, aim for artwork that’s about two-thirds to three-quarters the width of the piece below. Consider color contrast to make sure the painting reads at distance, and pick frame styles that balance scale without adding bulk.
If you’re unsure, mock up with paper templates at full size before committing—it’s quick, accurate, and saves mistakes.
Layout Options: Single, Pair, Trio, or Gallery
Decide whether a single statement piece or a grouped arrangement fits your space and style.
For a single painting, center it at eye level and let it breathe.
For pairs or trios, balance spacing and symmetry.
If you want more personality, plan a gallery wall with consistent spacing and a unifying theme.
Single Piece Placement
Wondering how to choose between a single statement piece, a balanced pair, a rhythmic trio, or a full gallery wall?
For single piece placement, pick a painting that complements your color palettes and responds to wall textures; you want contrast without clash. Hang at eye level (center ~57–60″ from floor) and anchor with furniture or negative space to avoid floating. Measure, mark, and use proper hardware for weight.
- Choose scale: match painting size to wall and nearby furniture.
- Centering: align focal point with room sightlines.
- Lighting: add directional light for impact and depth.
Gallery Wall Arrangements
Although you can anchor a wall with a single dramatic piece, pairing, grouping in threes, or creating a full gallery lets you control rhythm, balance, and focal points across the space.
Choose a layout that fits your wall: single for impact, pair for symmetry, trio for rule-of-thirds balance, or a salon-style gallery for dynamic interest.
Plan spacing, align centers, and test arrangements on the floor.
Use consistent color coordination to unify varied artworks, and mix or match frame styles to add contrast without chaos.
Hang at eye level, adjust for furniture, and step back often to refine overall harmony.
Plan Spacing and Mockups Before You Hang
Before you put any nails in the wall, lay out your spacing and mockups so you know exactly how the arrangement will look and feel; this saves time and prevents misaligned or awkward groupings. Use paper templates or cardboard cutouts to test positions, considering Color coordination and Frame styles so pieces harmonize. Stand back and tweak until balance feels right.
- Map heights and gaps visually with templates to maintain consistent spacing.
- Group by theme or size, swapping mockups to check rhythm and focal points.
- Photograph setups to compare options and finalize before you hang.
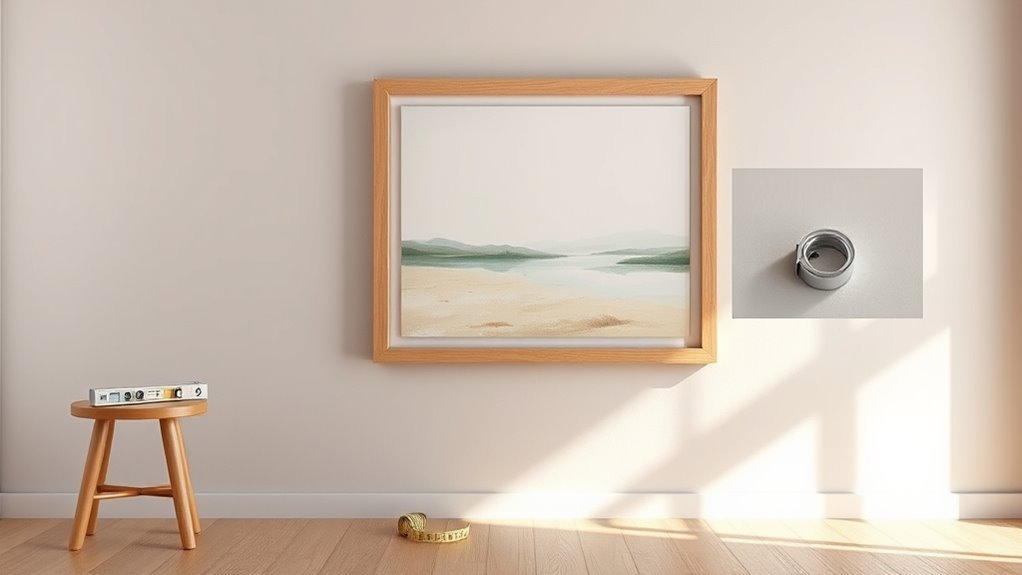
Essential Measuring Tools and Why They Matter
You’ll rely on a reliable tape measure to get exact dimensions so your painting sits where you want it. Use a level to make sure the frame isn’t crooked.
A stud finder can help you anchor heavy pieces safely. These basic tools cut mistakes and save time when you hang anything on the wall.
Tape Measure Accuracy
Because precise measurements make the difference between a crooked picture and a perfectly centered one, your tape measure has to be accurate and reliable. You’ll pick the right placement faster when your tape’s markings are clear and the hook sits flush.
Check for stretched blades, worn numbers, and a tight locking mechanism. Consider how measurements relate to color theory and frame styles so spacing complements composition.
- Inspect blade for wear and test against a known ruler.
- Verify hook integrity and zero-point accuracy before marking.
- Use consistent units and double-check key distances for symmetry.
Leveling Tools Importance
When you hang a painting, a reliable level turns guesswork into precision, keeping frames square and lines true so your arrangement looks intentional. You’ll use a bubble or laser level to counter uneven wall texture and ensure alignment with trim or other art. Levels help accommodate color contrast that tricks the eye; don’t rely on visual judgment alone. Carry a small level in your toolkit and verify after each adjustment. Quick checks save re-hanging.
| Tool | Purpose |
|---|---|
| Bubble level | Simple horizontal/vertical |
| Laser level | Long straight lines |
| Torpedo level | Tight spaces |
| Frame level | Accurate centering |
Stud Finder Use
If you want a secure anchor, start with a stud finder—this simple tool tells you where the wall studs sit so you can avoid drywall-only anchors that pull out. You’ll locate solid wood or metal supports, align hangers, and protect artwork and frame styles.
Use it before planning placement or matching color theory to a wall.
- Scan slowly: mark stud edges, then center for strongest hold.
- Confirm: tap or probe to verify density and avoid pipes or wires.
- Mount: choose screws sized for the stud and the painting’s weight, then hang securely.
Mark Placement Without Ruining the Paint
Before you commit to drilling or hammering, mark the placement precisely without damaging the wall paint by using low-tack solutions like painter’s tape, a pencil lightly tapped through a tape window, or removable adhesive dots; these let you place, check, and adjust marks cleanly and peel away without leaving residue. You’ll check alignment with a level, note center points, and consider Color coordination and Frame styles so marks reflect final look. Use temporary templates cut from paper for larger pieces.
| Tool | Tip | Result |
|---|---|---|
| Tape | Window for pencil | No scuff |
| Dots | Small spacing | Removable |
| Paper | Template | Accurate placement |
Find a Stud Fast (Wood and Metal Studs)
You’ll learn quick tricks to find studs behind your wall without guessing. Use a reliable stud finder and simple tapping to confirm wood or metal before you drill.
Once located, pick the right screws or anchors so your painting stays secure.
Quick Stud Detection
When you need to hang a painting quickly and securely, finding a stud fast is the fastest way to guarantee the anchor will hold; you’ll use a few simple tricks—listening, measuring, and tapping—to locate both wood and metal studs without special tools.
Use sight and sound: knock along the wall, mark where a solid response starts, and note distances from corners or outlets. Consider Color contrast and Frame styles when planning placement so edges align to studs visually.
- Tap rhythmically to hear denser spots.
- Measure standard 16″ or 24″ spacing from a corner.
- Probe with a thin nail to confirm.
Secure Fastening Tips
Looking for a reliable hold? You’ll want to locate studs quickly—use a magnet or stud finder, then confirm by tapping.
For wood studs, drive a pilot hole and use a heavy-duty screw or hanger. For metal studs, install toggle bolts or self-drilling anchors rated for the weight.
Position fasteners into studs whenever possible. If not, choose wall anchors matched to wall texture and load.
Measure twice, level once, and tighten carefully to avoid cracking paint or damaging frames.
Consider how Color harmony and frame placement interact with mounting height so your secured painting complements the room.
What Wall Material Do You Have? Drywall, Plaster, Brick?
Before you start drilling, identify your wall material—drywall, plaster, or brick—as each needs different anchors and tools. Check wall texture and paint compatibility first; textured plaster may hide cracks, while smooth drywall shows scuffs and needs gentle patching. Brick or masonry will need a masonry bit and proper plugs.
- Drywall: locate studs, note wall texture, and avoid overloading spans.
- Plaster: pre-drill slowly to prevent cracking; use light taps and don’t force fasteners.
- Brick: drill into mortar when possible, consider sealing holes and match paint compatibility for touch-ups.
Which Anchor to Use: Plastic, Toggle, or Molly
Now that you know your wall type, pick an anchor that matches the load and substrate. Choose Anchor options that suit drywall, plaster, or masonry, and think about Wall reinforcement needs for medium-weight pieces. Use plastic anchors for light frames, molly bolts for medium loads and hollow walls, and toggle bolts when strength matters in drywall.
| Anchor Type | Best For | Notes |
|---|---|---|
| Plastic | Small, light frames | Easy, low cost |
| Molly | Medium frames, hollow walls | Expands for grip |
| Toggle | Heavier drywall loads | Highest holding power |
Match anchor to weight and wall; test gently.
Hardware for Heavy Frames and Mirrors
When you’re hanging heavy frames or mirrors, pick hardware rated for the weight and the wall type so the piece stays secure and safe. You’ll want sturdier options than basic nails: use anchors, wall studs, or heavy-duty hooks designed for large loads.
Consider how mounts affect Color coordination if visible, and choose finishes that blend with the frame to protect appearance and support art preservation.
Think about visible mounts: match finishes to your frame to preserve appearance and protect the artwork.
Measure twice, mark stud locations, and test anchors before final hanging. Use a level and have a partner steady the piece while you fasten it.
- Anchors rated for weight
- Stud-mounted bolts
- Heavy-duty wall hooks
Picture Wire vs. D-Rings vs. Sawtooth: Choose One
If you want secure, level hanging and easy adjustments, pick the mounting that fits your frame and wall. You’ll choose picture wire for flexibility and slight leveling after hanging; it’s good for varied hooks but can stress hanging points if unwrapped, so use proper knots and consider art preservation when tensioning.
D-rings sit flush, offer strong, predictable anchoring, and suit heavier pieces—follow framing techniques by placing them symmetrically.
Sawtooth hangers work for lightweight, centered frames and quick installs but aren’t ideal for valuable or heavy art.
Match hanger type to weight, wall material, and conservation needs for best results.
Hang a Painting: One-Nail and Two-Nail Methods
Although you can hang many paintings with a single nail, choosing between one-nail and two-nail methods depends on the frame, weight, and how level you want the piece to stay.
You’ll use one nail for light frames or sawtooth hangers; it’s quick and hides hardware.
Two nails suit wider frames or when you want perfect leveling; they resist tilting.
Consider Frame styles and Color coordination so the hanging method complements the room and artwork.
- Single nail: best for light pieces and minimal hardware.
- Two nails: adds stability and precise leveling.
- Adjust: tweak nails for perfect alignment.
How to Hang Large or Heavy Paintings Safely
Smaller frames can often get away with a single nail or two, but large or heavy paintings need a different approach to keep them secure and your wall intact. Use wall anchors, toggle bolts, or a French cleat; locate studs with a detector and distribute weight across two points. Consider frame styles and Color coordination when choosing placement and hardware so the piece complements the room. Always have a helper and wear safety goggles.
| Hardware | Weight Limit | Notes |
|---|---|---|
| Toggle bolt | 50+ lbs | Good for hollow walls |
| Wall anchor | 20–50 lbs | Use multiple |
| French cleat | 100+ lbs | Best for heavy pieces |
| Stud screws | 80+ lbs | Most secure |
| Picture rail | varies | Decorative option |
Level and Adjust: Tricks to Get Frames Perfectly Straight
When you’re ready to fine-tune placement, start with a reliable bubble level or a laser level to get the frame perfectly horizontal. Stand back, squint, and tilt minutely until the bubble centers or the laser aligns with the top edge.
Consider how the piece interacts with nearby color schemes and complementary art styles, adjusting height for eye-level balance.
- Tighten hanging hardware gradually while checking level.
- Use small felt bumpers on bottom corners to prevent rocking.
- Recheck after sitting or door use; make micro-adjustments with shims or a slotted hanger.
Final check: step back and confirm visual harmony.
Create a Gallery Wall: Plan, Spacing, and Mockups
If you want a cohesive gallery wall, start by laying out your plan on the floor or with paper templates on the wall so you can tweak arrangements and spacing before making holes. Measure the space, choose a focal piece, and arrange supporting works around it.
Aim for consistent centerline height and balanced negative space; keep spacing uniform, typically 2–4 inches for tight clusters or 4–8 for airy displays. Consider color harmony across pieces and introduce texture contrast with mixed media or mats.
Photograph mockups from the designed viewing angle, adjust grouping, then mark hanging points. Proceed to hang confidently.
Hang Multiple Pieces Evenly Without Paper Templates
Start by measuring and marking where each piece will go so you know the exact layout before you hang anything.
Use a level to keep tops aligned and check spacing as you go.
Run painter’s tape between marks to set consistent gaps and step back to confirm the arrangement.
Measure And Mark
Want your gallery wall to look balanced without taping up paper templates? Measure and mark precisely so spacing and sightlines honor color psychology and nod to art history’s compositional rules. Use a pencil and small ruler to map centers and top edges, then transfer measurements to the wall.
- Measure frame widths and desired gaps, mark centers at eye level for main pieces.
- Measure vertical offsets for varied heights, note distances on tape or paper for installers.
- Mark nail or hook points from frame hardware, double-check symmetry before drilling.
Work steadily; good marks save time and keep arrangements cohesive.
Use A Level
With your measurements marked, grab a level to align multiple pieces quickly and accurately—no paper templates required. Hold the level against the top edge of the first frame, adjust until the bubble centers, then mark that point for the next hook.
Move the level horizontally to transfer the same plane to adjacent spots, repeating for each frame so they sit flush and consistent.
Keep composition in mind: use Color theory to balance warm and cool tones across the arrangement, and match Frame styles for unity.
Step back periodically to confirm visual alignment before installing hardware.
Space With Tape
When you’re hanging multiple pieces, use painter’s tape to map their spacing on the wall before you drill any holes. Start with wall preparation: clean the surface and measure eye-level height. Use tape measurement marks to set consistent gaps and outline each frame’s top and sides.
- Mark centers and edges with short tape strips, checking alignment with a level.
- Measure between tapes for equal spacing, adjust until the composition looks balanced.
- Transfer tape marks to hardware positions, then remove tape and install hooks or nails.
This method avoids paper templates and gives precise, adjustable placement.
Protect Walls and Frames: Bumpers, Felt Pads, Anti-Tip
To keep your walls and frames looking sharp, attach small bumpers or felt pads to the picture’s corners and back so it won’t scratch paint or shift on the hook. You’ll protect finishes and reduce scuffs while adding a narrow gap for airflow.
Attach small felt bumpers to picture corners and backs to prevent scratches, reduce scuffs, and allow airflow.
Use rubber or silicone anti-tip devices on heavy pieces to prevent tipping in busy areas and secure wire with a quick-release safety loop for extra hold.
Choose quality framing accessories rated for the artwork’s weight, and replace adhesive pads if they peel.
Regularly check bumpers and anti-tip anchors to maintain reliable wall protection and stable display.
Fix Common Problems: Crooked Frames and Sagging Wire
If a frame’s hanging looks off or the wire’s sagging, you can fix both quickly with a few simple checks and adjustments.
First, level the frame using a small spirit level and tighten or reposition the wire so it sits higher on the hooks; this reduces tilt and keeps color coordination with surrounding pieces balanced.
Second, swap weak wire or D-rings for sturdier hardware rated for the weight; inspect hooks against wall texture to guarantee secure anchoring.
Third, add discreet bumpers to the lower corners to stop rocking and protect paint.
Recheck level after each tweak.
Seasonal and Lighting Tweaks to Keep Balance
You can tweak your painting’s look with seasonal color accents—swap nearby textiles or small decor to warm or cool the scene.
Adjust your lighting direction as the sun moves or for different seasons, angling fixtures to reduce glare and highlight texture. Those small changes keep the artwork balanced and feeling intentional year-round.
Seasonal Color Adjustments
When seasons shift, tweak the painting’s surrounding colors and lighting so it always feels in harmony with the room. You’ll use seasonal decor and subtle palette swaps to maintain color harmony without moving the artwork.
Rotate cushions, throws, or a nearby vase to reflect warm or cool tones, and adjust lamp shades or bulbs for softer seasonal moods.
- Swap small accents: change pillows or vases to echo the painting’s dominant hues.
- Layer textiles: add a throw or rug that picks up seasonal undertones.
- Trim visual clutter: simplify nearby items so the painting reads clearly each season.
Lighting Direction Changes
Although light shifts with the seasons and fixtures, you can keep your painting looking balanced by adjusting lamps, shades, and natural light paths to match the artwork’s focal points. You’ll monitor lighting mood, tweak fixture angles, and reposition shades so highlights land where meant. Rotate or tilt frames slightly to control shadow play and prevent glare. For seasonal sun changes, move floor lamps or add dimmers to retain consistent contrast. Use reflective surfaces sparingly. Consult the quick reference below for simple adjustments.
| Situation | Adjustment |
|---|---|
| Harsh noon sun | Add sheer curtain |
| Dim winter light | Increase bulb wattage |
| Afternoon glare | Angle lamp away |
| Evening warmth | Use warm dimmer |
Patch Holes and Repair Paint After Removal
Once the artwork’s hardware is down and the wall’s bare, start by evaluating each hole’s size and depth so you know what filler and tools to use. Match your approach to wall textures and paint colors so repairs blend. Clean debris, apply filler, and smooth; larger holes need mesh patching. Sand lightly once dry, then prime to seal differences.
- Small holes: spackle, sand, spot-prime.
- Medium holes: patch kit, sand, prime wider area.
- Large damage: mesh, joint compound layers, sand, prime.
Touch up with matching paint and feather edges for an invisible finish.
When to Hire a Pro for Installation or Art Handling
If you’re dealing with heavy, high-value, or oddly shaped pieces, hire a pro to avoid damage to the art or your wall. You should also call a specialist when works require climate control, museum-grade hanging systems, or custom framing techniques you can’t replicate safely.
Pros know art preservation—proper handling, padding, and transport minimize risk. If the piece spans structural studs, is mounted over a fireplace, or needs suspension hardware, get expert installation.
Hiring saves time and protects your investment; for rentals or historic walls, professionals prevent costly mistakes. When in doubt, consult a conservator or experienced installer.
Quick Checklist to Hang Any Painting Confidently
Before you start drilling, get a quick checklist together so you can hang any painting confidently. You’ll move faster and avoid mistakes when you confirm basics: wall type, hanging hardware, and visual alignment with the room. Check how the painting complements interior color and how it interacts with furniture placement.
Measure twice, mark once, and use a level. If weight or wall material is uncertain, test anchors or consult a pro.
- Confirm wall material, painting weight, and correct anchors.
- Test placement against interior color and furniture placement.
- Mark height, level, and drill carefully.
Frequently Asked Questions
How Do Humidity and Temperature Affect Stretched Canvas Over Time?
You’ll see humidity and temperature cause the stretched canvas to expand, contract, warp, or mold, so you’ll control climate impact for canvas preservation by keeping stable, moderate humidity and temperature and using ventilation or dehumidifiers.
Can Hanging Affect Home Insurance Coverage or Claims?
Yes — how you hang artwork can affect coverage and claims: you’ll protect paintings and Painting preservation efforts by using proper fixtures and documenting condition, since insurers consider Insurance implications when determining liability, damage cause, and payout eligibility.
Are There Non-Penetrating Options for Brick or Stone Exterior Walls?
Yes—you can. I once used a magnetic sign like a fridge magnet to illustrate strength: non penetrating anchors and exterior mounting options (magnetic mounts, adhesive systems, stainless clamps) let you secure art to brick or stone without drilling.
How to Transport Large Framed Art Safely Through Narrow Stairwells?
You’ll measure stair clearance, remove glass if possible, pad edges, and secure corners so artwork stability’s preserved; reinforce the frame with corner braces or straps, carry vertically, and use two people and a dolly for tight turns.
What Archival Methods Prevent Yellowing or Canvas Deterioration?
About 70% of fading happens within a painting’s first 10 years; you’ll use archival quality materials, control humidity, avoid direct sun, and add UV protection glazing, so the canvas won’t yellow or deteriorate.
Conclusion
You’ll nail this—literally and figuratively. With the 57-inch rule, proper centering, and a level, your walls will look like a curated gallery rather than a chaotic flea market. You’ll rescue rooms from boredom, save paint from unnecessary patching, and avoid crooked catastrophes that haunt dinner parties. Follow the steps, tweak for light and furniture, and you’ll hang like a pro—no scaffolding, no drama, just perfectly placed art that somehow makes your whole home smarter.