How to Remove Paint From Basement Walls
You can remove paint from basement walls by first identifying the wall and paint type, testing for lead if the paint is old, and protecting the area with plastic and PPE. Choose a method—chemical stripper for porous masonry, heat or scraping for layered paint, or abrasive/soda blasting for tough jobs—work in small sections, ventilate, neutralize residues, and dispose of waste per local rules. Follow moisture checks and gentle techniques to avoid substrate damage, and keep going to learn specific step-by-step tips.
Quick Plan: How to Remove Paint From a Basement Wall
Before you start, make a quick plan: clear the area, protect floors and vents, and pick the right removal method for your wall type and paint (chemical stripper, heat, or mechanical).
You’ll assess surface condition, test a small patch, and choose PPE.
For older homes, weigh historical preservation against stripping aggressiveness so you don’t erase character or original finishes.
Use artistic techniques—gentle scraping patterns, soft bristle brushes, layered solvent application—to control removal and avoid substrate damage.
Schedule ventilation and disposal, gather tools, and set time blocks.
Stop and reassess after each stage to guarantee safe, effective progress.
When You Must Remove Basement Paint (Vs. Repainting)
If the existing paint is peeling, flaking, blistering, or trapping moisture, you need to remove it rather than simply repainting—doing a fresh coat over a compromised surface only delays failure and can hide underlying problems like efflorescence or mold.
Remove paint when you see widespread adhesion loss, persistent damp stains, or recurring mold despite cleaning. Also strip if multiple layers create thickness issues or you must change color dramatically—color matching over textured, layered paint rarely succeeds.
Check paint sheen inconsistencies; glossy spots over matte areas signal poor adhesion. When in doubt, test a small strip to assess substrate health.
How to Identify Basement Wall Material: Concrete, Block, Drywall, Plaster
When you start evaluating a basement for paint removal, the first step is to identify the wall material—concrete, concrete block, drywall, or plaster—because each one needs different prep and repair.
Tap and listen: hollow sounds mean drywall or plaster; solid dull tones point to concrete or block. Look for mortar joints or hollow cores to spot block. Surface hardness and resistance to scraping help distinguish concrete from softer plaster.
Check wall textures: smooth, taped seams indicate drywall; layered skim suggests plaster. Note any color mixing from previous coats at edges to confirm layered paint history before you plan removal.
How to Tell Latex vs. Oil-Based Paint
You can often spot latex vs. oil-based paint by looking for clues like sheen, brush marks, and yellowing.
If visual hints aren’t clear, rub a hidden spot with denatured alcohol or mineral spirits to see whether the paint softens (alcohol for latex, spirits for oil).
Also check any labels or the paint’s age—older cans or “alkyd” wording point to oil-based coatings.
Visual Clues To Paint Type
Because latex and oil-based paints age and react differently, you can often tell which one’s on your basement walls by looking closely at a few visual cues.
Check finish: oil-based often has a smoother, glossier sheen; latex may look slightly chalky as it loses oils.
Inspect cracks and flaking: oil-based tends to yellow and become brittle, showing clear, curled flakes; latex chips in irregular, powdery pieces.
Note brush marks and color mixing—oil holds brush lines differently, showing subtle blending where layers overlap, while latex layers sit more uniformly once paint drying completes.
Smell faintly: older oil may retain a heavier odor.
Solvent Reaction Test
Want to know for sure whether that paint is latex or oil-based? You can perform a simple solvent reaction test. Dampen a cotton swab with denatured alcohol or an eco friendly solvents option like citrus-based cleaner. Rub a small inconspicuous area: latex softens/color transfers with alcohol; oil-based resists alcohol but reacts to mineral spirits. Record results for historical paint analysis if you’re documenting finishes.
| Solvent | Reaction |
|---|---|
| Denatured alcohol | Latex: softens/transfers |
| Citrus-based cleaner | Eco friendly: similar to alcohol |
| Mineral spirits | Oil-based: softens/transfers |
| No change | Likely oil-based; test again |
Label And Age Inspection
How old is that paint can and what does its label tell you? Check manufacturer dates, batch codes, and words like “latex,” “acrylic,” or “alkyd.” If the label’s faded or missing, note sheen descriptions—”eggshell” alone doesn’t mean oil.
You’ll learn age cues from can style and logos; older cans often mean oil-based formulas. For projects involving historical preservation, document label info before removal.
Smell test and solvent reaction confirm type, but label saves time. Also consider artistic techniques noted on labels—pigment and binder hints reveal whether paint will strip cleanly or need stronger methods.
When and How to Test for Lead Paint
If your basement walls were painted before 1978 or you see chipping and dust, you should test for lead before sanding or stripping.
You can use an EPA-recognized DIY test kit for a quick screen, but positive or unclear results mean you should hire a certified lead inspector or risk assessor.
They’ll explain options like XRF testing or lab analysis and advise safe removal or containment.
When To Test
Because older paint often contains lead, you should test before sanding, scraping, or disturbing any coated surfaces in your basement. Test if your home was built before 1978, after renovations, or when pets/children frequent the area. Even if you’re following modern painting trends or choosing hues based on color psychology, safety comes first.
| When to Test | Why it matters |
|---|---|
| Before renovation | Prevents airborne lead during work |
| After damage | Disturbed paint can release particles |
| Before occupancy | Protects vulnerable residents |
Schedule testing early and stop work if tests indicate lead; then consult pros for safe removal.
Testing Methods Explained
Wondering which test to use? You’ll choose based on age, condition, and budget.
DIY test kits detect lead chemically—swabs give quick yes/no results but can miss lead under multiple layers or different pigments.
Lab testing of paint chips is definitive: you collect small samples, note color matching and paint sheen, and send them for X-ray fluorescence (XRF) or atomic absorption analysis.
XRF scans in place without removing material and reports concentrations, useful when you want to preserve surfaces.
If you suspect lead, err on the side of caution: combine a reliable DIY screen with professional lab or XRF confirmation.
Essential PPE: Respirators, Gloves, Eye and Skin Protection
When you tackle paint removal, wear proper PPE to protect your lungs, eyes, and skin from dust, fumes, and chemical splashes. You’ll choose a NIOSH-rated respirator for dust or solvent fumes, chemical-resistant gloves, splash goggles, and coveralls. Consider outdoor temperature when selecting respirator cartridges and fast-drying solvents; paint color can affect solvent choice and drying time. Inspect gear for damage and replace filters per manufacturer guidance.
| Item | Use | When to Replace |
|---|---|---|
| Respirator | Dust/solvent fumes | When breathing becomes harder or filters smell |
| Gloves | Chemical protection | If torn or swollen |
Set Up Ventilation and Temporary Air Control
Before you start stripping paint, set up clear ventilation and temporary air controls so dust and fumes flow away from you and out of the basement. Open windows and run exhaust fans directed outdoors; seal doorways with plastic sheeting and tape to prevent contaminants migrating to living areas.
Position one intake fan to bring fresh air from a clean source and one exhaust to pull air through the work zone. Use HEPA-filtered air scrubbers if available.
Keep ventilation steady while you test small areas—this helps preserve underlying wall textures for later color matching and avoids spreading dust.
Moisture Checks: Using a Hygrometer and Visual Inspection
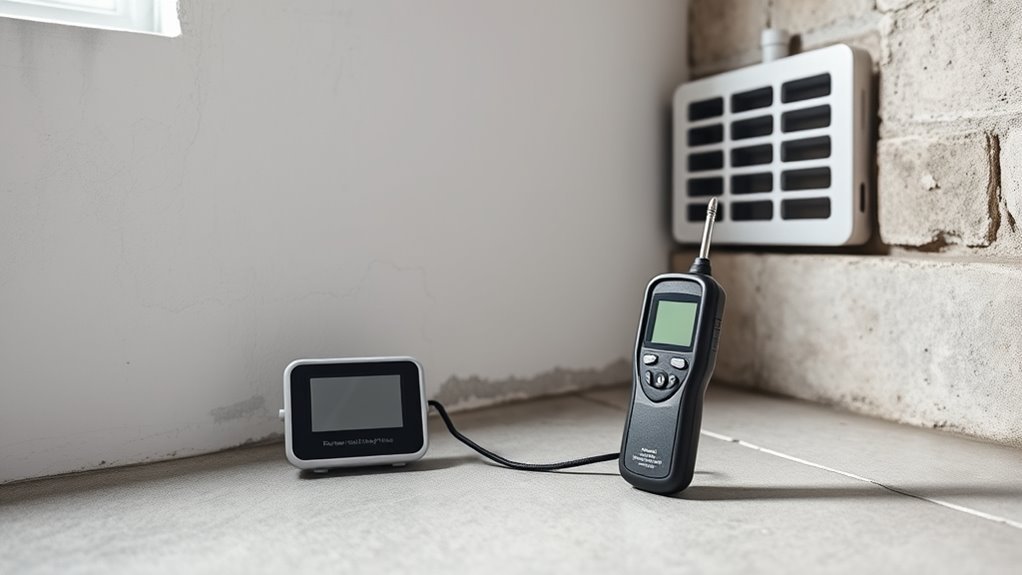
Because paint won’t stick or strip cleanly on damp walls, check moisture levels carefully with both a hygrometer and a visual inspection before you start work.
You’ll measure humidity levels across the room, noting hot spots near corners and the floor. Hold the hygrometer against different walls and log readings; watch for condensation, efflorescence, or soft flaky paint.
If you spot persistent damp, consider improving moisture barriers first. Trust your senses and the meter—wet walls ruin results.
Use this simple checklist to guide decisions and protect your time, effort, and the finished surface:
- Fear of wasted effort
- Frustration at rework
- Relief from clear data
- Confidence in proceeding
When to Delay Paint Removal for High Humidity
If the hygrometer shows high humidity, you’ll want to wait for drier conditions before stripping paint.
Don’t expose freshly revealed masonry or wood to moisture—cover or delay work so surfaces can stay dry.
Aim to schedule paint removal on dry days when humidity is low and forecasts look clear.
Wait For Lower Humidity
When humidity’s high, hold off on stripping paint — moisture softens finishes, slows drying, and makes cleanup messy, so you’ll get better, safer results once the air’s drier. Check humidity levels with a hygrometer before you start; high moisture raises the risk of sticky residues and stronger paint fumes that linger.
Wait for a day under 50% relative humidity, or run dehumidifiers until readings stabilize. Plan around dry weather, and ventilate well when you do work.
- Frustration melts away
- Relief when surfaces cooperate
- Pride in cleaner results
- Safety regained
Protect Freshly Exposed Surfaces
High humidity can leave newly stripped masonry or drywall vulnerable—so don’t rush into repainting or sealing until surfaces dry and any salts or efflorescence have been addressed.
You should inspect for damp spots and white deposits; trap moisture will ruin primers and paint film. If humidity’s high, cover exposed areas with breathable tarps or temporary barriers that let moisture escape while blocking dust.
Use dehumidifiers and fans to accelerate drying before you apply artistic techniques or attempt precise color matching. Delaying treatment prevents flaking, staining, and failed adhesion, saving time and preserving the integrity of your restored basement walls.
Schedule On Dry Days
Because moisture undermines stripping and cleanup, plan paint removal for dry days so you’ll get cleaner, safer results. You’ll avoid swollen paint, muddied residue, and sticky surfaces that trap dust. Check forecasts and humidity readings; postpone work above ~60% relative humidity.
Use outdoor ventilation when possible and run dehumidifiers to speed drying. Delaying also protects your choice of paint color options later, since underlying moisture can alter adhesion and tint.
- Frustration from failed stripping
- Pride in a crisp, even surface
- Relief when cleanup’s simple
- Confidence in future paint color options
Choose Chemical vs. Mechanical Paint Removal Methods
Deciding whether to use chemical strippers or mechanical methods comes down to the paint type, the wall material, and how much work you want to do.
Choosing chemical strippers or mechanical removal depends on paint type, wall material, and how much effort you want.
You’ll weigh chemical cleaning against mechanical scraping: chemical cleaners soften multiple coats and reach crevices, cutting labor but requiring ventilation, plastic sheeting, and safe disposal.
Mechanical scraping—hand scrapers, grinders, or pressure washers—gives immediate removal without solvents but can gouge surfaces and create dust.
For tight budgets choose hand tools; for speed pick chemicals with proper PPE.
Test a small area first to confirm effectiveness, then proceed consistently to protect the wall and your health.
When to Use Removers on Masonry vs. Drywall
After you’ve chosen a chemical or mechanical approach, determine whether the wall is masonry or drywall before you pick a remover and technique. Masonry tolerates harsher strippers and wire brushing; drywall needs gentler methods to avoid paper damage.
Consider underlying texture, porosity, and whether you’ll need color matching later or to restore paint sheen. Test a small area first.
- You’ll feel relief when the right method preserves substrate.
- You’ll panic less if you spot-test first.
- You’ll appreciate how proper removal eases repainting.
- You’ll avoid costly repairs by matching remover to wall type.
Best Chemical Strippers for Concrete and Cinder Block
When tackling paint on concrete or cinder block, you’ll want to pick a stripper formulated for porous masonry so it penetrates without damaging the substrate.
Pay attention to application method and dwell time—too short and paint won’t release, too long and the masonry can be harmed.
Also follow safety precautions and local disposal rules for used stripper and rinsate to protect yourself and the environment.
Choosing The Right Stripper
Because concrete and cinder block soak up paint differently than drywall, you’ll want a stripper formulated for masonry—one that penetrates porous surfaces without damaging the substrate. You’ll pick a product based on strength, safety, and cleanup ease.
Consider VOC levels if you’re in a confined basement, and factor in color matching and aesthetic considerations for any residual tint or primer needs. Test a small area first.
- Relief when paint peels cleanly
- Confidence in a safer formula
- Frustration avoided with less scrubbing
- Pride in restored, even walls
Choose brands with clear masonry labels and good reviews.
Application And Dwell Time
If you want the stripper to work, apply it evenly in a thick, continuous coat and let it dwell long enough for the chemistry to break the bond—typically 20 minutes to several hours depending on product strength and paint thickness.
You’ll monitor softened paint with a scraper; don’t let the stripper dry. Work in small sections so dwell time stays consistent across the wall.
Test a hidden patch first to confirm compatibility with concrete or cinder block and to check how removal affects any underlying color matching or residual paint sheen.
Rinse or neutralize per label before moving to the next area.
Safety And Disposal Guidelines
After you’ve softened and removed paint, pay close attention to safety and disposal for the chemical strippers you used on concrete or cinder block. You’ll face safety hazards like fumes, burns, and contamination unless you act.
Wear respirator, gloves, and eye protection; ventilate the area; and never mix products.
Contain runoff and collect residues in sealed, labeled containers. Follow local hazardous-waste rules for disposal and don’t pour leftovers down drains.
Store unused stripper in original containers with secure lids, away from heat—proper chemical storage prevents accidents.
If unsure, contact your local waste authority for guidance.
Best Chemical Strippers for Drywall and Plaster
Looking for the best chemical strippers for drywall and plaster? You’ll want low-odor, water-based gel strippers that lift latex and oil paints without saturating paper-faced drywall.
Choose products labeled for interior use and plaster; they reduce residue that complicates color matching and won’t alter paint sheen on adjacent samples.
For stubborn oil-based coats, consider a stronger, solvent-based paste designed for vertical surfaces, applied thinly.
Always test a small area to confirm effectiveness and substrate compatibility.
Favor biodegradable formulas when possible to simplify disposal.
Keep ventilation and personal protective gear ready, and follow manufacturer limits for contact time.
How to Apply and Neutralize Chemical Paint Strippers Safely
When you’re ready to strip paint, work in well-ventilated conditions. Don gloves, eye protection, and a respirator rated for organic vapors, and follow the product label for surface prep and application thickness.
Apply stripper evenly, timing it per instructions; don’t over-apply. Scrape gently, keeping tools angled to avoid gouging.
Neutralize residue as directed—often with water, a specific neutralizer, or alcohol—then rinse thoroughly and dry.
- You’re relieved when old paint peels clean.
- You’re cautious about fumes and skin contact.
- You’re empowered by following chemical safety steps.
- You’re mindful of choosing eco friendly solvents elsewhere.
Low-Odor and Eco-Friendly Stripper Options
If you want to avoid harsh fumes and minimize environmental impact, choose low-odor, bio-based, or waterborne paint strippers that still dissolve old coatings effectively. You’ll find eco friendly solvents labeled biodegradable or plant-derived; they work on multiple paint types and reduce airborne toxins.
Odorless paint removers are ideal for confined basements—ventilate anyway and test a small area to confirm effectiveness. Apply per directions, allow sufficient dwell time, then scrape gently to protect masonry.
Neutralize and rinse according to manufacturer instructions to prevent residue. Dispose of waste responsibly at a hazardous-waste facility or per local regulations.
Use Heat Guns Safely on Basement Walls
When using a heat gun on basement walls, pick a lower temperature to soften paint without scorching the masonry or releasing toxic fumes.
Keep the gun several inches from the surface and move it steadily to avoid overheating one spot.
You’ll want to wear gloves and eye protection and stop immediately if the wall gets too hot or starts smoking.
Choose Appropriate Heat Settings
Because heat guns can quickly damage masonry and paint underneath, you need to pick the lowest effective temperature and adjust gradually as you test small areas. You’ll watch for bubbling or softening, avoiding scorch marks that ruin color matching later. Use ventilation techniques to clear fumes and keep visibility.
Start at 300°F, increase in 50°F steps only if paint won’t lift, and keep sessions short to prevent heat soak. Trust surface reaction, not time. Remember to cool tested spots before scraping.
- Frustration when paint resists
- Relief when layers lift
- Anxiety about damage
- Satisfaction at progress
Maintain Safe Distance
Although you’ll want to get close enough to see paint soften, keep the heat gun at a steady 2–4 inches from the wall surface to avoid scorching masonry or driving fumes into the substrate.
Hold the gun perpendicular and move it in smooth, overlapping passes so you heat paint evenly without lingering. Wear safety gear—heat-resistant gloves, eye protection, and a respirator—since flakes and fumes pose risks.
Set up a proper ventilation setup with fans directing air outdoors and seal off other areas. Take breaks to let surfaces cool, and test small spots before proceeding across the whole wall.
Using Infrared Paint Removers for Stubborn Layers
If chemical strippers and heat guns haven’t budged old, multiple paint layers, infrared paint removers can soften coatings evenly without charring the masonry; you’ll use infrared heating to penetrate layers and respect paint chemistry so binders loosen rather than burn.
You set up the panel, move steadily, and watch paint craze before lifting. Safety gear and ventilation still matter. Expect patience—this isn’t instant.
- Relief when stubborn coats finally peel
- Frustration turning to triumph as texture returns
- Anxiety eased by controlled, low-scorch heat
- Satisfaction in preserving underlying masonry
Work methodically and remove softened paint as it releases.
Scrapers and Putty Knives: Technique to Avoid Substrate Damage
When you’re ready to scrape, hold the tool at a low angle and push with steady, even pressure so the blade lifts paint without gouging the masonry; keep the edge sharp and switch to a flexible putty knife for curved or fragile areas to follow the surface rather than force it. You’ll work small sections, testing pressure to protect decorative finishes and varied wall textures. Use firm strokes, avoid prying under sound paint, and clean blades often. Slow, deliberate technique prevents substrate damage and reduces patching.
| Tool | Use |
|---|---|
| Stiff scraper | Flat areas |
| Flexible knife | Curves |
| Narrow blade | Corners |
| Wide blade | Large flats |
Power Sanding Basics for Basement Walls
Before you start power sanding, make sure you’ve picked the right tool and safety gear: a random-orbit sander with 60–120 grit sanding discs works well on painted masonry, and you’ll need a fitted respirator, eye protection, and hearing protection because dust will be heavy.
You’ll work steadily, keeping the sander flat to avoid gouges and checking progress frequently so you don’t remove underlying decorative finishes unintentionally.
Control dust with a shop-vac attachment and seal the room; dampening isn’t recommended for paint removal.
Watch for signs of pest infestation hidden in cracks.
Trust your pace; rushed sanding causes damage.
- Frustration
- Relief
- Caution
- Pride
Using Grinders and Wire Brushes on Masonry
Although grinders and wire brushes can speed paint removal on masonry, you’ll want to match the tool to the surface and task so you don’t gouge mortar or leave deep scratches. Use lower-speed grinders with cup brushes on flat concrete and reduce pressure near joints.
Reserve stiff wire brushes for textured block or flaking paint, not delicate brick faces. Test a small area to gauge how much underlying color mixing or remnants alter final appearance; aggressive abrasion can reveal different base tones and affect paint sheen if you plan to repaint.
Always wear eye, respiratory, and hand protection and vacuum debris promptly.
When to Use Abrasive Blasting (Sand, Soda, Walnut)
If the wall’s masonry is fragile or the paint’s deeply adhered, you’ll need to choose your blasting method carefully.
Compare media — sand is aggressive, soda is gentler and better for delicate surfaces, and walnut works well for paint without damaging substrate.
Also weigh safety and environmental factors like dust control, containment, and proper PPE before you start.
Surface And Paint Condition
When paint has hardened into multiple thick layers, flaked badly, or contains stubborn coatings like oil-based or industrial primers, you’ll want to think about abrasive blasting methods such as sand, soda, or walnut shells. Each media excels with different surface and paint conditions, so pick the one that matches your wall material and contamination level.
You’ll assess adhesion, substrate fragility, and previous treatments before blasting. Consider whether you need intact decorative finishes or color matching afterward.
Emotional stakes matter: restore pride, avoid damage, regain safety, and speed the job.
- Frustration at stubborn paint
- Hope for clean walls
- Relief from progress
- Pride in results
Media Suitability Comparison
Which blasting media fits your basement walls depends on the paint type, substrate softness, and cleanup constraints. If you’ve got thick, flaking paint on sturdy concrete, sand blasting removes material fast but can etch softer block.
Soda blasting’s gentler action strips paint while preserving masonry texture, so you’ll use it when media compatibility with delicate substrates matters. Walnut shell is ideal for removing paint from brick or painted wood without aggressive abrasion.
Consider post-blast cleanup: soda dissolves cleaner residues, walnut leaves husks to sweep, sand creates fine dust. If you want museum-quality results like an art gallery, pick the gentlest compatible media.
Safety And Environmental Concerns
Because abrasive blasting kicks up powders, particles, and sometimes toxic paint chips, you need to weigh health, legal, and disposal risks before you start. You’ll consider media: sand (harsh, regulated), soda (gentler), walnut (gentlest). Use PPE, containment, and ventilation strategies; pair blasting with eco friendly solvents for spot cleaning only. Check local regs for lead/PCBs and get waste testing. If risks are high, hire a certified contractor.
- Fear of contamination is real.
- Mess can overwhelm without prep.
- Legal fines can be severe.
- Long-term health impacts matter.
Protect Nearby Surfaces From Dust and Debris
Before you start scraping or sanding, cover floors, furniture, and any fixtures with heavy-duty drop cloths or plastic sheeting and tape down the edges so dust can’t sneak underneath.
Work from clean to dirty, removing small items and sealing vents with painter’s tape.
Use plastic zip walls to shield adjacent rooms and hang tacky mats at exits to catch tracked debris.
Run a HEPA-filtered shop vacuum while you work and pause for periodic cleanups to limit settled dust.
Keep a damp microfiber cloth handy for spot wiping.
Note how artistic techniques and historical contexts influence care when preserving decorative surfaces.
Containment for Lead-Contaminated Paint Removal
When you’re dealing with lead-contaminated paint, set up a sealed work area before you do any scraping, sanding, or demolition to prevent deadly dust from spreading. You’ll isolate the zone with plastic sheeting, zipper doors, and negative air machines, remembering the historical context of lead use to respect risks.
Seal vents and cover floors; post warning signs so others stay away. Containment minimizes environmental impact and protects families.
Use HEPA vacuums and change PPE outside the area.
Emotionally, this feels heavy but necessary:
- Fear for loved ones’ safety
- Anger at past practices
- Relief when contained
- Resolve to finish safely
Safe Disposal of Paint Chips, Rags, and Contaminated Waste
If you’ve been working in a contained zone, treat all paint chips, rags, and dust as contaminated waste and package them immediately in heavy-duty, puncture-resistant bags or sealed containers labeled “Lead-Contaminated,” so they don’t escape during handling. Seal containers, minimize handling, and store them in a secure area awaiting disposal. Check local hazardous-waste rules; many areas ban curbside disposal. Consider certified paint recycling programs for usable leftovers to reduce environmental impact. Hire licensed hazardous-waste haulers for large amounts. Clean tools with care and store cleanup materials as waste. Table below summarizes quick steps.
| Action | Purpose |
|---|---|
| Seal & Label | Prevent spread |
| Check Local Rules | Legal disposal |
| Recycle Options | Reduce environmental impact |
Temporary Fixes vs. Full Removal: How to Decide
If the paint issue is cosmetic or limited to a small area, you can try a temporary fix like spot-sanding and repainting to buy time.
But if the coating is peeling across large sections, trapping moisture, or contains suspected lead, you’ll need full removal to protect the structure and health.
Assess the extent, underlying damage, and safety risks to decide which route makes sense.
When A Temporary Works
Wondering whether a quick patch will do or if you need to strip the paint completely? You can choose a temporary fix when damage is minor, cosmetic, and not spreading.
Improve interior lighting and check ventilation systems to guarantee moisture isn’t hiding problems. Temporary works buy time while you plan full removal.
- Relief: quick results calm you instantly
- Simplicity: minimal tools, less disruption
- Cost: lower immediate expense eases stress
- Time: fast fixes fit busy schedules
Use temporary methods for aesthetics and short-term protection, but monitor regularly for signs that a permanent solution is required.
When Full Removal Needed
Temporary patches can buy you time, but you’ll need full removal when paint failure signals deeper issues: widespread peeling, bubbling over large areas, persistent moisture stains, mold growth, or repeated flaking after patching.
You should assess substrate damage, ongoing water intrusion, and health risks; if moisture or mold persists, full removal and wall repair are nonnegotiable.
Consider historical preservation before stripping original finishes—consult specialists if the wall has heritage value.
Weigh aesthetic considerations versus cost and disruption: full removal restores appearance and durability but requires drying, repairs, and resealing.
Choose full removal when repair won’t stop recurrence or protect occupants.
Removing Paint From Block Seams and Mortar
When paint gets into block seams and mortar joints, you’ll need a different approach than for flat surfaces because those crevices hold pigment and texture that resist simple scraping. You’ll work slowly: use a stiff nylon brush, a grout brush, or a small carbide chisel to loosen flakes, then apply a poultice or low-VOC remover, letting it dwell before agitating. Rinse with a wet vacuum and neutralize residues.
Consider how color mixing or paint branding influenced the layers you see so you choose solvents wisely.
Think about how color mixing and brand formulations shape paint layers, then pick solvents accordingly.
- Frustration at stubborn spots
- Relief when mortar clears
- Pride in restored texture
- Caution with chemicals
Removing Paint From Poured Concrete Walls
Because poured concrete is dense and nonporous, you’ll need stronger mechanical and chemical methods than you used on block seams. You’ll grind or media-blast stubborn paint, test a small patch with a concrete-safe stripper, and rinse thoroughly.
Protect floors and plan furniture arrangement before work so cured dust won’t settle on items. Check lighting considerations—bright, angled light reveals missed spots.
Wear respirator, goggles, and heavy gloves. After removal, apply a concrete primer to seal pores and improve new paint adhesion.
Inspect for efflorescence or moisture; address issues before repainting to guarantee lasting results.
Stripping Paint From Drywall Without Tearing the Paper
Before you start stripping paint from drywall, you’ll want to prep the surface by cleaning, masking trim, and sanding loose edges so the paper stays intact.
Choose a gentle, drywall-safe stripper or a low-temperature heat gun and test a small area to make sure the paper doesn’t bubble or peel.
Work slowly and lift softened paint with a plastic scraper to avoid tearing the paper.
Prep Surface Carefully
If you want to strip paint from drywall without tearing the paper, take a gentle, methodical approach and work in small sections.
Prep surface carefully: clean grime, test a hidden patch, and note paint durability so you don’t overwork the paper. Record any color mixing evidence that hints at multiple layers.
Protect floors and fixtures, score loose edges, and use soft tools to lift flakes.
- You’re cautious, not frantic.
- You’re respecting the wall’s integrity.
- You’re aware of hidden layers.
- You’re relieved when progress is steady.
Move slowly, pause to reassess, and avoid forcing removal.
Use Gentle Strippers
With the wall prepped and loose paper scored, switch to gentle chemical strippers designed for drywall so you lift paint without softening the paper backing. You’ll apply small sections, let the stripper act briefly, then scrape with a plastic blade to avoid tearing paper. Work slowly; test a hidden area for color matching and adhesion before doing large swaths. Neutralize residue, rinse, and dry fully to protect the paper. For finish restoration, sand minimally and spot-prime paper areas. Follow manufacturer safety steps and ventilate well to protect yourself and the basement.
| Step | Action |
|---|---|
| 1 | Test |
| 2 | Apply |
| 3 | Neutralize |
Removing Paint From Textured or Rough Surfaces
Because textured or rough basement walls trap paint in crevices, removing it takes more effort and the right approach than smooth surfaces do. Start with texture analysis to identify high and low spots, then focus on surface preparation: clean, dry, and mask surrounding areas.
Use scrapers, wire brushes, or oscillating tools gently to avoid damage. Test a small area first.
- You’ll feel relief when crevices clear.
- You’ll regain control over a messy job.
- You’ll appreciate cleaner, safer walls.
- You’ll enjoy seeing progress after patience.
Finish with light sanding and a vacuum to remove residue before repainting.
Dealing With Multiple Paint Layers and Tough Coatings
After you clear crevices and prep the wall, you’ll often find layers of old paint or stubborn coatings that won’t come off with a scraper alone. Work in small sections: test a chemical stripper rated for masonry, follow safety instructions, and use a stiff nylon brush to lift softened layers.
For very tough coatings consider heated tools cautiously, avoiding excessive surface damage. Remove residues with a neutralizing rinse and let the wall dry fully.
When repainting, assess color matching and paint sheen to guarantee new coats blend and perform well. Keep records of products used for future maintenance.
How to Address Efflorescence and Salt Damage
If you spot a white, powdery residue on your basement walls, that’s likely efflorescence from salts leaching out of the masonry.
You should brush or vacuum away loose salt before repainting so it doesn’t interfere with adhesion.
Then address the moisture source and consider a vapor barrier or waterproofing to prevent future salt buildup.
Identify White Powder
Notice a chalky white powder on your basement walls? You’re likely seeing efflorescence, not paint residue, though it can cling like dust over paint. You’ll want to identify it clearly before cleaning or repainting.
- Frustration: it looks like failed paint, undermining your efforts.
- Worry: salt can signal moisture issues that you can’t ignore.
- Urgency: addressing the cause prevents repeat problems.
- Relief: recognizing white powder lets you choose the right fix.
Tap the area—powder brushes away, crystals remain. Smell and texture differ from paint. Test small spots to confirm and plan repairs.
Remove Loose Salt
How do you get rid of loose salt without spreading it everywhere? Start wetting the area lightly to suppress dust, then use a soft brush or vacuum with a HEPA filter to lift salts gently. Dispose of collected residue in a sealed bag.
Test a small patch before aggressive scrubbing to protect remaining surfaces. After cleaning, assess the substrate for damage and apply appropriate salvage techniques for mortar or paint loss.
When repainting, choose breathable products and consider decorative finishes compatible with masonry so trapped salts won’t ruin the new look. Document conditions for future maintenance.
Prevent Future Efflorescence
Because efflorescence returns when moisture and salts keep cycling through your walls, you need to interrupt that cycle before repainting or repairing surfaces. Seal cracks, improve exterior grading, and install proper gutters so water moves away. Use a breathable masonry sealer to block salts while letting walls dry.
Control humidity inside with a dehumidifier and avoid placing indoor plants directly against basement walls. Watch for garden pests that exploit damp areas and fix sources promptly.
- Frustration turned relief when leaks stop.
- Pride in a dry, healthy basement.
- Worry fades as salt stains vanish.
- Confidence in lasting repairs.
What to Do If Paint Removal Reveals Mold or Mildew
If paint removal uncovers mold or mildew, don’t ignore it—address it right away to protect your health and prevent further damage. You should wear PPE, isolate the area, and use a mold-specific cleaner or diluted bleach for Mildew treatment. After cleaning, dry thoroughly and improve ventilation to aid Mold prevention. If growth returns or covers large areas, call a pro.
| Action | Benefit |
|---|---|
| PPE & isolate | Protects you |
| Clean & dry | Removes spores |
| Improve ventilation | Prevents recurrence |
Repairing Cracks and Spalled Concrete After Stripping
Once you’ve stripped the paint, inspect the walls closely for hairline cracks, wider fissures, and areas where concrete has spalled away; addressing these now prevents water intrusion and further deterioration. Patch small cracks with epoxy or cementitious filler.
After stripping paint, inspect and patch hairline cracks and spalls to prevent water damage and future deterioration.
Enlarge and clean larger voids, then apply a polymer-modified repair mortar. Remove loose debris, let repairs cure fully, and sand smooth where needed.
Consider professional help for structural damage. Proper repairs protect stored items and support artwork preservation and pest prevention. You’re restoring strength and peace of mind—don’t rush the process.
- Relief at visible progress
- Confidence in a solid wall
- Pride in careful work
- Calm knowing pests stay out
Preparing Stripped Masonry for New Coatings or Sealers
Once the paint’s gone, you’ll need to sweep, vacuum, and wash the masonry to remove dust, efflorescence, and loose debris so coatings can bond properly.
Check the surface for gaps, spalled areas, and hairline cracks, and patch them with an appropriate mortar or patching compound.
Let repairs cure fully, then re-clean the area before applying primers, sealers, or finish coats.
Surface Cleaning And Debris Removal
Want a durable finish that sticks? You’ll clean and clear before sealing so Decorative finishes and Wall textures bond properly. Remove loose paint, dust, and efflorescence with a stiff brush or vacuum, then rinse with low-pressure water. Let surfaces dry fully; trapped moisture ruins coatings.
- Feel relieved when grime lifts away.
- Imagine fresh texture ready for transformation.
- Breathe easier knowing contaminants are gone.
- Anticipate a lasting, even coat.
Use mild detergent for oil or dirt, avoid harsh acids, and wear protective gear. Proper cleaning prevents adhesion failure and keeps new coatings looking their best.
Masonry Repair And Patching
After you strip paint and let the masonry dry, inspect the surface for cracks, spalled areas, and loose mortar so you can prioritize repairs that prevent water intrusion and guarantee a smooth substrate for coatings.
You’ll remove loose material, rake joints, and use a masonry cleaner where needed.
Mix patching mortar or tuckpoint with compatible materials, apply in thin layers, and tool joints to match texture.
Let repairs cure fully before sanding or sealing.
Install appropriate moisture barriers or breathable sealers to protect repairs, then consider decorative finishes only after confirming stability and dryness to assure adhesion and longevity.
Best Primers and Paints for Basements After Stripping
Because basement walls face moisture, efflorescence, and uneven surfaces after stripping, you’ll want primers and paints that block water, resist mold, and adhere well to masonry. Choose a high-alkali masonry primer, a mold-resistant latex primer, or an epoxy primer for severe issues.
Pick paints with breathable formulas to avoid trapped moisture. Consider color matching to brighten dark spaces and select a practical paint sheen—eggshell or satin hides imperfections while shedding light.
Use top-quality rollers and brushes for even coverage.
- Relief: see walls renewed
- Confidence: long-term protection
- Pride: a cleaner basement
- Calm: fewer surprises
How to Apply Waterproofing Paint or Sealant Correctly
Now that you’ve chosen the right primer and paint, it’s time to apply a waterproofing coat that actually works—follow a methodical approach so the sealant bonds, sheds water, and lasts.
Clean and dry the wall, repairing cracks and efflorescence. Stir sealant thoroughly; avoid aggressive color mixing that alters formulation.
Clean, dry, and repair the wall; stir sealant gently—don’t overmix pigments that change the formulation.
Test a small area for adhesion and preferred paint sheen—most waterproofing finishes are flat to satin.
Use a brush for corners, roller with nap for flats, and back-roll to remove bubbles.
Apply two thin coats, allowing full cure between coats.
Inspect uniformly and touch up missed spots for continuous protection.
Cost and Time Estimates: DIY vs. Professional Removal
You can save money by doing the paint removal yourself, but expect to spend significant time and physical effort on scraping, sanding, and cleanup.
A pro will charge for labor, disposal, and any specialized equipment, so get an itemized quote to compare.
Consider long-term costs too—proper professional prep can reduce future repairs, while DIY shortcuts might cost more down the road.
DIY Time And Labor
While tackling paint removal yourself can save on labor costs, it’ll demand more of your time and physical effort than hiring pros. You’ll plan, strip, sand, and clean, balancing learning curves like artistic techniques for delicate finishes or handling historical paint that needs care.
Expect longer weekends and sore muscles, but also satisfaction from doing it yourself.
- You’ll feel empowered when progress shows.
- You may get frustrated by stubborn flakes.
- You’ll worry about damaging surfaces.
- You’ll celebrate the finished wall’s transformation.
Set realistic timelines, pace yourself, and budget extra hours for unexpected challenges.
Professional Cost Breakdown
After weighing the time and effort you’ve put in (and the aches that come with it), it’s worth comparing what hiring pros will cost and how much time they’ll save.
Professionals typically charge per square foot or hour; expect $1.50–$4/ft² or $50–$120/hour depending on scope. They’ll bring tools, manage dust control, and optimize interior lighting for detailed work.
Strong basement ventilation and moisture controls reduce recoat delays and health risks, which you mightn’t handle well DIY.
Factor in faster turnaround—often a day or two for average rooms—plus cleanup.
Get written estimates and confirm ventilation and lighting plans.
Long-Term Cost Comparison
1 clear way to decide whether to DIY or hire pros is to compare upfront and ongoing costs against time savings and risks. You’ll do a cost analysis and honest expense comparison: DIY saves labor but costs time, tools, and possible rework. Pros charge more now but cut risk and finish faster. Consider warranty value and resale impact. Factor in your hourly worth and disruption to life.
- Frustration if you misjudge scope
- Relief when pros finish fast
- Anxiety over hidden repairs
- Pride in a job you completed
Make the number-driven choice that fits your priorities.
When to Hire a Licensed Lead Remediation Contractor
If your basement paint is testing positive for lead or you suspect old lead-based coatings, hire a licensed lead remediation contractor to protect your family and comply with regulations.
You should call one when peeling, chalking, or dust suggests deterioration, when renovations will disturb painted surfaces, or when children or pregnant people use the space.
A pro handles containment, HEPA cleanup, legal disposal, and documentation you’ll need for resale or permits.
Don’t DIY if you plan to change interior decor or switch paint color—disturbing leaded layers heightens risk.
Choose licensed experts to reduce exposure and guarantee work meets health and safety standards.
Questions to Ask Paint-Removal Contractors
Now that you know when to call a licensed lead remediation contractor, you’ll want to ask the right questions before hiring anyone to remove paint from your basement. Ask about certifications, experience with lead-safe practices, and whether they offer Eco friendly alternatives for removal and disposal.
Confirm timelines, guarantees, and how they’ll protect your space. If you plan to repaint, ask about Paint color matching and whether they test and prep surfaces for new coatings.
Gauge communication style and references. Trust your instincts; the right contractor should answer clearly and respectfully.
- Worried about safety?
- Want sustainable options?
- Need precise color match?
- Seeking reliable timing?
Local Permits and Disposal Rules for Basement Paint Work
Before you start scraping or blasting paint in your basement, check local permits and disposal rules so you won’t face fines or unsafe handling of hazardous waste. You’ll need to verify whether lead testing is required, obtain work permits, and follow rules for hazardous waste vs. regular construction debris.
Contact your municipality for drop-off locations and labeled-bag requirements, and ask about transport limits. Consider the weather forecast when scheduling exterior containment or wet methods to avoid runoff.
Note disposal rules may vary by paint color if classified as hazardous. Keep receipts and permit copies until the project’s complete.
Common Mistakes That Ruin Paint Removal Projects
When you rush into paint removal without testing for lead, planning containment, or choosing the right method, you’ll likely create more work, hazards, and costs than you solve.
You’ll also risk ruining underlying textures, obscure artistic techniques, or damage surfaces meant for decorative finishes. Don’t skip prep.
- You panic and scrape aggressively, then regret the gouges.
- You skip containment and spread dust through the house.
- You use a universal stripper and strip away subtle textures.
- You ignore ventilation and pay with health issues.
Plan, test, and match method to substrate so you preserve finish and stay safe.
Troubleshooting: Paint Won’t Come Off or Substrate Is Damaged
If you followed prep but still hit stubborn patches or accidental damage, don’t panic—you can troubleshoot systematically.
First, identify why paint won’t come off: multiple coats, epoxy, or improper stripper? Test a small area with a stronger method, but avoid over-scraping that damages substrate.
If masonry or drywall is marred, repair with patch compound or masonry filler, sand smooth, and prime.
When blending repairs, match color matching and paint sheen—test swatches once dry to ensure seamless blend.
If adhesion remains poor, use a bonding primer.
Reassess ventilation and technique before repeating removal to avoid repeat damage.
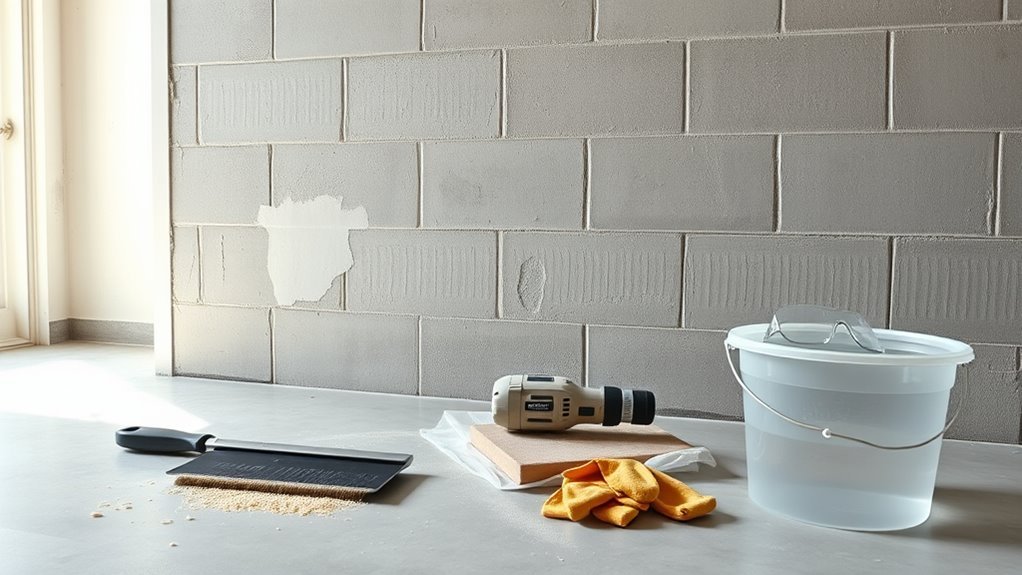
Tools Checklist for Basement Paint Removal
Because good results start with the right gear, gather a compact kit that covers safety, surface prep, paint removal, and cleanup. You’ll want PPE—respirator, goggles, gloves—since dust, fumes, and stripping chemicals can hit hard. Pick scrapers, wire brushes, sanding blocks, and a heat gun for stubborn layers. Include drop cloths, a shop vacuum, and containers for waste.
Note paint branding on cans and any color mixing notes so you can match or document what’s removed. Emotions matter; feeling prepared keeps you calm and confident.
- Relief: a clear plan
- Confidence: quality tools
- Control: safety gear
- Pride: clean results
Step-by-Step DIY Removal Workflow for a Single Wall
Now that you’ve assembled the right gear and safety kit, it’s time to tackle a single basement wall step by step. Start by clearing the area and laying drop cloths.
Now that you’ve gathered gear and safety kit, clear the area and lay drop cloths before starting.
Then score any flaking paint. Test a small patch with your chosen remover or heat tool, working from bottom up to prevent streaks.
Scrape softened paint with a broad putty knife, shifting to finer tools near details.
Rinse or vacuum residue, let the wall dry, and inspect for stubborn spots.
Consider Historical preservation principles if uncovering old layers and use Artistic techniques to blend repaired sections before priming.
How to Maintain Treated Basement Walls to Avoid Repainting Soon
While regular upkeep may seem minor, taking a few proactive steps will keep treated basement walls looking fresh and delay the need to repaint. You’ll inspect monthly for moisture, address leaks fast, and keep ventilation moving to prevent peeling.
Use gentle cleaners and test any product for compatibility, prioritizing eco friendly options when possible. Preserve original character if your space involves older materials—historical preservation matters—so choose reversible treatments.
Nurture paint with touch-ups rather than full coats, and protect high-traffic areas.
- Notice small stains early; act before they spread.
- Feel proud of ongoing care.
- Save money long-term.
- Keep your space healthy.
Frequently Asked Questions
Can I Remove Paint From Basement Walls in Winter Without Freezing Issues?
Yes — you can, but you’ll face winter temperature challenges and must control basement wall moisture. Use heated space, dehumidifiers, low-temperature-safe strippers, and allow proper curing; otherwise coatings or substrates can freeze, peel, or trap moisture.
Will Stripping Paint Affect My Home Insurance or Resale Disclosures?
Potential pitfalls provoke: you’ll want to check insurance implications and resale disclosures, since stripping can reveal damage or lead to claims; document work, keep receipts, and disclose condition changes when selling to avoid surprises and legal issues.
Are There Pets-Safe Paint Strippers and Cleanup Methods?
Yes — you can use pet safe alternatives like soy or citrus strippers and non-toxic cleaners; you should ventilate, keep pets away, and use eco friendly cleanup with biodegradable rags and sealed waste bags to protect animals.
How Long Before Reoccupying the Basement After Chemical Stripping?
Like a storm clearing, you’ll wait 24–72 hours before reoccupying; you’ll monitor paint stripper safety and chemical odor concerns, ventilate continuously, use odor meters or sniff tests, and only return when smells and fumes are gone.
Can Paint Removal Trigger Radon-Release or Affect Radon Testing?
Yes — paint removal can disturb surfaces and temporarily increase radon release, so you shouldn’t test immediately afterward; wait for ventilation stabilization, then perform radon testing to guarantee accurate, unaffected results.
Conclusion
Removing paint from a basement wall takes planning, the right tools, and safety checks, but you can do it yourself without wrecking the structure. For example, after testing for lead and identifying a concrete block wall, a homeowner used a chemical stripper on a small patch, then a wire brush and pressure washer to clear residue—saving time and avoiding costly replacement. Follow testing, substrate-appropriate methods, and maintenance to keep the wall paint-free longer.