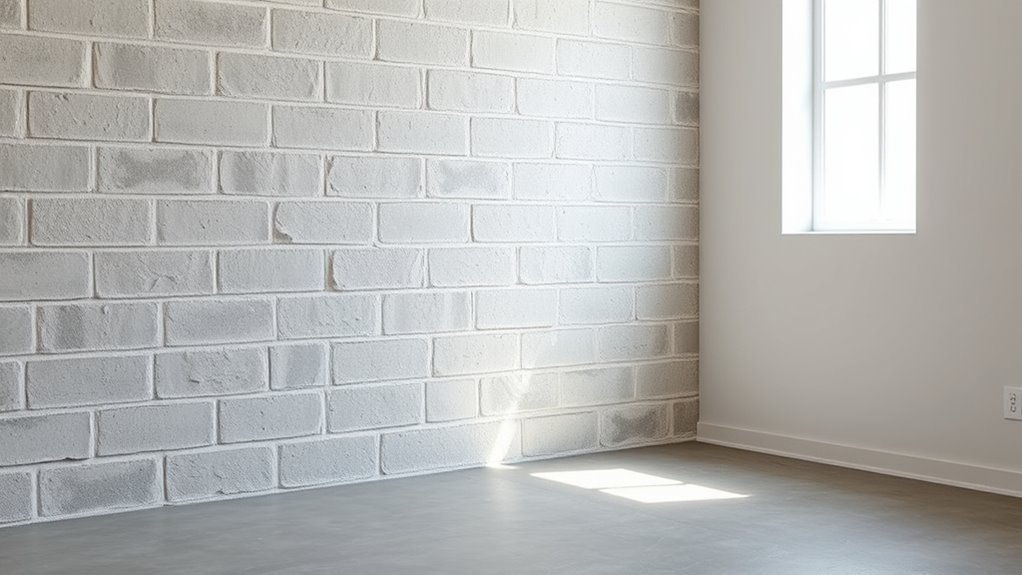
Is It OK to Paint Cinder Block Walls?
Yes — you can paint cinder block walls if you address moisture and structural issues first and use proper prep, primer, and breathable masonry paint. Fix leaks, efflorescence, or crumbling mortar, then clean, patch, and prime for best adhesion. Choose breathable or elastomeric coatings based on dampness and desired durability, and pick low‑VOC paints for health. With the right steps you’ll get a durable, attractive finish — keep going to learn practical prep and product choices.
Quick Decision: Should You Paint Cinder Block?
Wondering whether you should paint cinder block? You’ll weigh appearance, moisture, and context quickly.
If blocks sit in a historic building, respect historical preservation rules before altering surfaces.
For modern or utilitarian spaces, painting boosts looks, resists staining, and simplifies cleaning.
Check for efflorescence or leaks first; painting won’t fix structural or moisture problems.
Choose breathable, eco friendly paints when possible to limit VOCs and allow masonry to breathe.
If you need a fast, reversible change, consider stain or limewash.
Decide based on condition, regulations, and long-term maintenance needs—don’t rush.
Quick Answer: Is It OK to Paint Cinder Block Walls?
Can you paint cinder block? Yes — you can, and it’s often safe and effective if you prep and choose suitable paints. You’ll improve appearance, add moisture resistance, and create surfaces for artistic murals.
Yes — painting cinder block is safe and effective with proper prep and the right masonry paints.
Still, respect historical preservation when dealing with older masonry; consult guidelines or experts before altering heritage structures.
Use masonry primer and breathable paint on exterior blocks to avoid trapped moisture. Inside, sealed or semi-gloss finishes work.
For art, pick acrylics or specialized mural paints and protect with a clear coat.
In short, painting cinder block is generally okay when you consider substrate condition and preservation needs.
When Painting Cinder Block Is Worth It
You’ll find painting cinder block worth it when you want to improve aesthetics quickly and give a room a cleaner, more finished look. It also helps protect against moisture when you use the right masonry paint or sealant.
Finally, a well-painted, sealed wall can boost durability and even increase your property’s value.
Improve Aesthetics Quickly
When your space feels cold or unfinished, a fresh coat of paint on cinder block walls can transform the room fast—brightening dark corners, hiding stains, and giving a more polished look without major renovation.
You can update the color palette to match current aesthetic trends, creating cohesion with furniture and textiles. Painting’s quick payoff makes it ideal when you want instant improvement.
- Pick a neutral base, then add an accent wall to lift the room.
- Use lighter hues to reflect light and enlarge the feel.
- Coordinate finishes with décor for a deliberate, modern appearance.
Protect Against Moisture
Why worry about moisture? You’ll want to prevent damp from seeping through porous cinder block, which can cause efflorescence, mold, and peeling paint.
Start by sealing cracks and applying a breathable masonry primer that blocks water but lets vapor escape.
Choose paints formulated for masonry; they bond better and resist moisture cycling.
Use color accents to brighten damp-prone spaces without masking problems, and select textured finishes where needed to hide minor imperfections while maintaining breathability.
Monitor humidity and address drainage or external leaks first—painting helps protect, but it won’t fix structural water issues on its own.
Increase Durability And Value
If you want your cinder block walls to last and add resale appeal, painting can be a smart investment. You’ll protect surfaces, prevent moisture damage, and make maintenance easier, so buyers see value. Use breathable masonry primer and quality paint to extend durability.
Consider decorative patterns to break monotony and draw attention to key areas, while leveraging color psychology to influence perceived space and mood. Think strategically about finishes and upkeep costs.
- Seal with masonry primer for lasting protection.
- Apply color and patterns to boost curb appeal.
- Maintain periodically to preserve value.
When You Should Avoid Painting Cinder Block
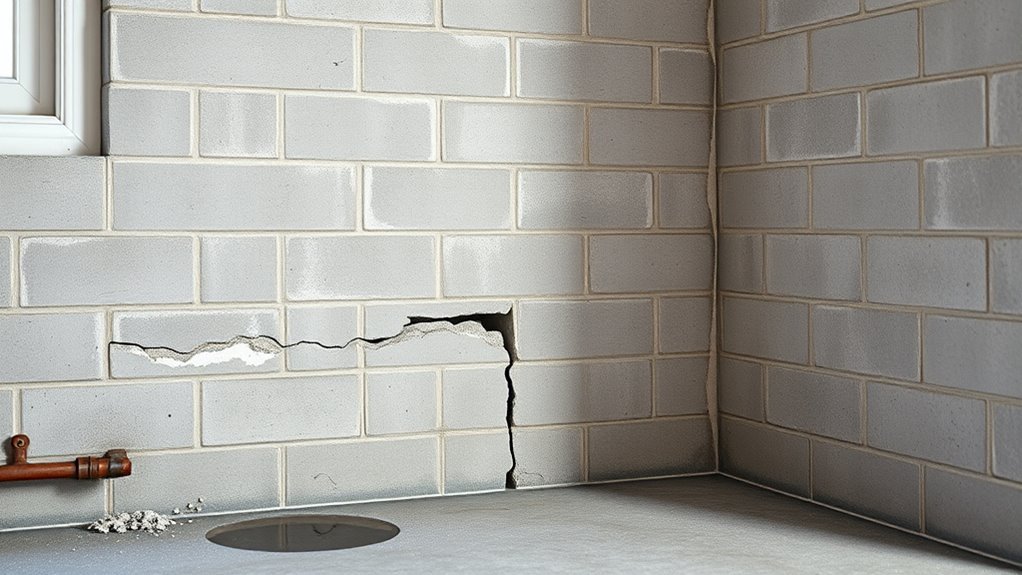
Don’t paint cinder block if the wall has structural cracks or crumbling mortar, since paint won’t fix those issues and can hide serious damage.
If the block has ongoing moisture or efflorescence problems, painting can trap water and make things worse.
Also avoid painting historic or protected surfaces where coatings could violate preservation rules or alter original materials.
Structural Integrity Concerns
When cinder block shows major structural issues—large cracks, bulging, crumbling mortar, or signs of shifting—you should avoid painting until a qualified contractor assesses and repairs the wall.
You’ll also pause if repairs will require added artificial ventilation during curing or if contractors recommend delaying cosmetic choices tied to color psychology until stability’s confirmed. Addressing structure first prevents trapped stresses or concealed damage.
- Have a professional inspect load-bearing defects and recommend fixes.
- Don’t paint over temporary shims, patches, or loose units.
- Confirm repairs cure fully and pass inspection before repainting.
Ongoing Moisture Problems
Because ongoing moisture can undermine paint adhesion and hide continuing damage, you should avoid painting cinder block until you’ve diagnosed and stopped the source of the water.
If blocks stay damp, paint will blister, peel, or trap salts that worsen surface durability. You should measure moisture absorption and locate leaks, rising damp, or poor drainage before repainting.
Fix gutters, exterior grading, and interior vapor issues, then let masonry dry fully. Only paint when moisture tests confirm stable, low readings and repairs are proven.
Otherwise, painting masks problems and shortens finish life, forcing repeated, costly maintenance.
Historic Or Protected Surfaces
If your cinder block walls are part of a designated historic property or fall under local preservation rules, you should hold off on painting until you confirm allowable treatments. You’ll need approval because historic preservation aims to keep original materials visible and unimpaired.
Painting without consent can harm historic fabric and trigger fines or required restoration. Also check for surface contamination—lead paint, oil, or biological growth—that may demand remediation before any treatment.
Consult preservation officers, document existing finishes, and follow accepted methods.
- Contact local preservation authority.
- Test for surface contamination.
- Follow approved restoration guidelines.
Types of Cinder Block Surfaces (Smooth, Split-Face, Sealed)
Although cinder block walls all look similar at a glance, the surface type—smooth, split-face, or sealed—changes how paint adheres and what finish you’ll get.
You’ll find smooth blocks accept primer and provide an even, modern backdrop that supports color psychology choices—calm neutrals or bold accents.
Split-face offers texture that plays with light; use thinner coats and consider stain or masonry paint to preserve depth without obscuring character, especially if historical preservation matters.
Sealed blocks repel water and may need scuffing or a bonding primer so paint sticks.
Match product to surface for durable, attractive results.
How Moisture Affects Cinder Block Paint
When moisture’s present in or behind cinder block, paint won’t just look bad—it can fail prematurely, blistering, peeling, or promoting efflorescence that leaves white, powdery stains. You’ll want to address humidity before choosing paint color options because trapped water undermines adhesion and hides true tones.
Poor cinder block insulation can let condensation form, cycling moisture through the masonry and finishes. Consider these points before painting:
- Use breathable masonry primers and paints to allow vapor transfer.
- Improve insulation and drainage to reduce steady moisture exposure.
- Expect lighter paint color options to reveal stains more than darker tones.
How to Test Cinder Block for Moisture Problems?
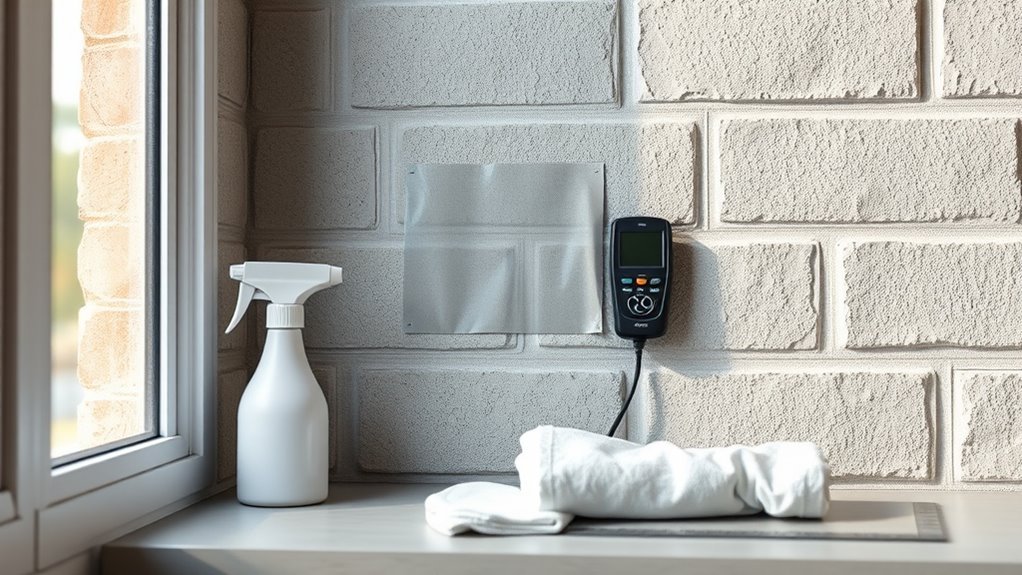
Before you paint, check the blocks for moisture so you don’t lock water into the wall and ruin the finish. Use a moisture meter across several blocks, inside and out, reading percentages; anything above manufacturer recommendations means delay.
Before painting, test block moisture with a meter—delay if readings exceed manufacturer limits.
Do a simple plastic-sheet test: tape a 12×12 inch clear sheet to the block for 24–48 hours and inspect for condensation.
Look for efflorescence, dark patches, or crumbling mortar—signs of ongoing damp. Note how moisture affects surface texture; rough, powdery areas may need attention.
Only when dry should you assess color options and primer needs to guarantee a lasting coat.
Fixing Moisture and Drainage Issues Before Painting
Before you paint, inspect the area for obvious water sources like leaking gutters, downspouts, or cracks that let groundwater in.
Fix any leaks and seal cracks, then make sure exterior grading and gutters direct water away from the foundation.
If surface drainage is poor, add extensions, swales, or a French drain so moisture won’t keep seeping through the blocks.
Inspect For Water Sources
Because moisture is the main reason paint fails on cinder block, you need to track down every possible water source before you paint.
Inspect walls for leaks, rising damp, and condensation; note areas where waterproof coatings were applied or where historical preservation limits interventions. Use a moisture meter and check after rain.
- Check interior plumbing, wall penetrations, and HVAC for leaks.
- Examine flashing, window sills, and roof intersections for seepage.
- Look for ground-level splashback, gutter overflows, and downspout issues.
Fix identified sources first; painting over active moisture guarantees failure and wastes effort.
Improve Exterior Drainage
Want your paint to stick and stay? Improve exterior drainage before you paint cinder block walls to prevent rising damp and peeling. Grade soil away from foundations, extend downspouts, and add French drains or swales to divert water. Repair cracked mortar and guarantee gutters stay clear so water won’t pool against blocks.
If you’re working on historic structures, balance historical preservation with modern drainage fixes—use reversible or minimally invasive methods. Choose coatings and Eco friendly finishes compatible with moisture control to protect the wall and environment.
Proper drainage saves paint, masonry, and long-term maintenance headaches.
How to Check for Efflorescence and Salt Stains
If you suspect white, powdery deposits on your cinder block, inspect the surface closely for efflorescence and salt stains by rubbing a dry cloth over several spots and checking for residue, discoloration, or a crystalline film.
You’ll note active salts leave a powder; persistent stains may darken when damp. Test small areas before painting; salts can reappear under new finishes and ruin your color schemes or decorative patterns.
Use a stiff brush, water, and a mild masonry cleaner to remove residue. If deposits return quickly, address moisture sources.
Then dry thoroughly and consider a salt-resistant primer.
- Visual check
- Cloth rub test
- Clean and dry
Diagnosing Cracks, Spalling, and Structural Issues
After checking for efflorescence and treating any salt issues, you should inspect the block for cracks, spalling, and other structural concerns before painting. Tap hollow areas, probe spalled faces, and note hairline versus through-cracks. Small repairs, sealants, and proper primers will help paint adhere and not hide damage. Consider color psychology when choosing hues that can make rooms feel safer or calmer, and ensure ventilation systems won’t push moisture into repaired areas.
| Issue | Indicator | Action |
|---|---|---|
| Hairline crack | Fine lines | Fill and prime |
| Spalling | Flaky surface | Remove, patch |
| Deep crack | Through-wall | Monitor |
When to Call a Pro for Structural or Moisture Issues
When you spot recurring damp spots, widening cracks, or masonry that sounds hollow when tapped, call a pro—these signs can point to foundation movement, ongoing water intrusion, or failing mortar that simple patching won’t fix.
You’ll want an expert assessment if you see efflorescence, interior mold, or stair-step cracks. A pro can recommend repair methods that respect historical preservation or suggest moisture-management strategies compatible with eco friendly finishes.
- Structural engineer evaluation for load-bearing concerns.
- Waterproofing contractor for persistent leaks and drainage fixes.
- Masonry specialist for repointing, stabilization, and compatible finishes.
The Best Paint Types for Cinder Block Walls
When choosing paint for cinder block, you’ll want products made for masonry that handle porous surfaces. Masonry latex paint gives good breathability and easy cleanup.
Elastomeric masonry coatings offer thicker coverage and superior crack-bridging for moisture-prone walls. I’ll outline the pros and best uses of each so you can pick the right option.
Masonry Latex Paint
Because cinder block soaks up and releases moisture differently than drywall, you’ll want a paint made specifically for masonry—masonry latex is usually the best choice. It adheres well, breathes to reduce trapped moisture, and resists peeling.
You can pick Color options that suit basements, garages, or exterior walls, and use texture effects to hide imperfections without heavy prep. Apply with a roller or sprayer after cleaning and priming with a masonry primer. Maintain ventilation and follow drying times.
Consider these practical tips:
- Clean and repair joints first.
- Use primer rated for masonry.
- Apply two thin coats for coverage.
Elastomeric Masonry Coating
Elastomeric masonry coatings offer the strongest protection for cinder block walls, combining thick, flexible coverage with exceptional waterproofing and crack-bridging ability. You’ll appreciate how elastomeric fills hairline cracks and resists moisture intrusion, making it ideal for exterior foundations and retaining walls.
Apply over properly prepared, dry block; use primers if recommended. Note breathability limits—trapped moisture can harm substrates, so assess drainage and vapor barriers first.
For historical preservation projects, choose formulations that won’t obscure masonry details or violate conservation guidelines.
Look for eco-friendly paints with low VOCs to minimize environmental impact while ensuring durable, long-lasting protection.
Why Choose Breathable Masonry Paint for Cinder Block
Although cinder block is durable, you’ll want breathable masonry paint so trapped moisture can escape instead of causing peeling, efflorescence, or mold. You protect structure and finish while keeping design goals—color psychology helps you pick tones that calm, enliven, or match period sensibilities important in historical preservation.
Choose breathable masonry paint for cinder block—let moisture escape, prevent damage, and preserve historic appearance with appropriate colors.
Choose breathable formulations that let vapor pass but shed water.
- Permeability: lets moisture exit, preventing damage.
- Durability: resists surface wear without sealing moisture inside.
- Aesthetics: maintains appearance and respects historic texture.
Use breathable paint to balance longevity, performance, and appropriate visual impact.
When to Use Elastomeric Coating Instead of Paint
If your cinder block sits in a spot with heavy moisture or water intrusion, you’ll want to think about an elastomeric coating because it handles wet conditions far better than standard paint.
You should also pick elastomeric when the wall has severe surface cracking, since its flexible film bridges gaps and prevents water from seeping in.
In short, use elastomeric for moisture-prone walls or badly cracked surfaces where regular masonry paint won’t protect long-term.
Heavy Moisture Areas
Wondering when regular masonry paint just won’t cut it? You should choose elastomeric coating in heavy moisture areas where water intrusion, rising damp, or frequent condensation overwhelms standard paints.
Elastomeric seals pores and bridges hairline gaps, protecting structure without harming historical preservation goals if you use compatible products. Also consider eco-friendly paints for lesser-moisture zones, but don’t rely on them where hydrostatic pressure exists.
Inspect for mold, efflorescence, and active leaks first. Follow these steps:
- Identify moisture sources and repair.
- Test breathing/compatibility with existing finishes.
- Apply manufacturer-recommended primer and two elastomeric coats.
Severe Surface Cracking
When cracks in your cinder block are wide, deep, or actively moving, regular paint won’t bridge them and you’ll need an elastomeric coating instead. Elastomeric fills gaps and flexes with temperature shifts and settling, preventing water intrusion that enlarges fissures.
Prep by cleaning, routing loose mortar, and using compatible sealants before coating. You can still use color psychology to choose hues that soften repaired areas or match surroundings, but avoid concealing structural issues with decorative finishes.
For historic structures, consult preservation guidelines—historical preservation rules may restrict materials or colors, and professionals can recommend reversible, appropriate treatments.
Latex vs. Acrylic Masonry Paint: Pros and Cons
Although both latex and acrylic masonry paints are water-based and easy to work with, they differ in durability, flexibility, and breathability in ways that affect how well they’ll protect cinder block walls. You’ll weigh longevity against moisture control and surface movement, and consider color psychology when picking tones that suit function or historic context for historical preservation projects.
Choose latex for affordability and easier cleanup; pick acrylic for tougher weather resistance and adhesion.
- Latex: lower cost, decent coverage, less flexible.
- Acrylic: superior durability, better UV and freeze–thaw resistance.
- Application: prep and primer matter for either choice.
Choosing Paint Sheen for Cinder Block Surfaces
When choosing a sheen for cinder block, you’ll weigh matte versus gloss to balance appearance and light reflection.
Higher sheens boost durability and washability for areas that need frequent cleaning, while matte hides surface imperfections better.
Think about where the wall is and how much wear and visibility it will get before you decide.
Matte Versus Gloss
If you want a durable, low-profile finish that hides surface flaws, matte paints are your go-to. They conceal imperfections and soften colors.
But if you need easier cleaning and a bit of light reflection, a higher-gloss sheen will serve better.
You’ll choose by balancing appearance, maintenance, and room mood: color psychology guides how sheen alters perceived depth and warmth. Eco-friendly paints limit VOCs regardless of sheen.
Consider texture and lighting; matte conceals pits, gloss emphasizes lines.
Match sheen to use and aesthetic without overthinking.
- Matte: hides imperfections, softens color
- Satin: subtle sheen, moderate cleanability
- Gloss: highlights texture, easy wipeability
Durability And Washability
Because cinder block surfaces take a beating and attract dust, grease, and scuffs, you’ll want a paint sheen that stands up to cleaning without degrading the masonry or finish. Choose satin or semi-gloss for balance: they resist scrubbing, repel stains, and dry to a durable film that won’t flake with normal maintenance.
Use an appropriate masonry primer first to improve adhesion and longevity.
Consider color options wisely—darker tones hide marks but show dust, lighter hues need more frequent cleaning.
Look for eco-friendly paints with low VOCs and mildew resistance so you can clean confidently while minimizing environmental impact.
Hiding Imperfections
Although cinder block’s rough texture hides some flaws, choosing the right paint sheen will do most of the work for you. You’ll minimize visible bumps and hairline cracks by matching sheen to surface: flatter sheens conceal better; satin or eggshell slightly highlight texture while resisting scuffs.
Consider how Color options affect perception—lighter shades reveal imperfections, darker tones can mask them. Use Texture enhancements like thin masonry skim coats before painting if you need smoother results.
Balance appearance with maintenance: higher sheen cleans easier but shows defects. Follow this quick checklist:
- Flat for concealment
- Eggshell for balance
- Satin for durability
Recommended Primers & Sealers for Cinder Block
When preparing to paint cinder block, start with a primer or sealer designed for masonry so your topcoat adheres and lasts. Choose a breathable masonry primer for exterior or a high-adhesion acrylic for interior block.
You’ll want a product that resists efflorescence and seals porous surfaces to prevent moisture migration. Consider water-repellent sealers for basements and lime-stabilizing options for older construction—remember Cinder block history informs moisture issues.
Match primer type to your paint and desired finish, and pick neutral undertones to complement paint color trends. Test a small area, follow manufacturer cure times, and recoat only when fully dry.
How to Pick a Primer for Raw vs. Sealed Block
If your block is raw and porous, you’ll want a high-penetration masonry primer to seal and stabilize the surface before painting.
For already sealed or painted block, choose a primer formulated for slick or nonporous surfaces to promote adhesion.
Picking the right type up front saves you from peeling or uneven coverage later.
Raw Block Primer Choice
Choosing the right primer hinges on whether your cinder block is raw or already sealed, because each surface soaks up and bonds with paint differently.
For raw block, pick a high-penetration, masonry-specific primer that seals pores, controls alkalinity, and creates an even base. Consider color psychology when planning final hues and choose eco-friendly paints to limit fumes.
Prepare by cleaning and repairing mortar joints first. Then select:
- Deep-penetrating, masonry primer for absorption control.
- Alkali-resistant primer to prevent blistering.
- Breathable, mildew-inhibiting primer for damp areas.
Apply per label and allow full cure before topcoating.
Sealed Block Primer Selection
Because sealed cinder block won’t absorb primer the same way raw block does, you’ll need a product that bonds to a nonporous surface and evens out gloss and old coatings. Choose a high-adhesion bonding primer or an acrylic-alkyd hybrid formulated for slick substrates; they promote consistent topcoat coverage and reduce flashing.
If you’re dealing with historic masonry, prioritize primers compatible with historical preservation guidelines and reversible finishes.
Think about color psychology: a tinted primer can mute stark greys or enhance warmth so one coat of paint looks true. Test adhesion and tint on a small area before committing to the entire wall.
Tools and Materials You’ll Need
Before you start painting cinder block walls, gather the essential tools and materials so you won’t interrupt the job once it begins. You’ll want quality rollers, brushes, and trays sized for textured surfaces, plus drop cloths and painter’s tape. Pick color combinations beforehand and choose eco friendly paints to reduce fumes. Don’t forget safety gear—gloves, goggles, and a respirator if needed.
Before painting cinder block walls, gather quality rollers, brushes, drop cloths, eco-friendly paint, and safety gear.
- Primer compatible with sealed block and masonry paints
- Heavy-nap roller, angled masonry brush, extension pole
- Eco friendly paint, mixing bucket, stir sticks
Have everything ready to work efficiently.
Proper Surface Preparation: Step-by-Step
Now that your tools and materials are ready, prepare the cinder block surface carefully to guarantee the paint will adhere and last. Inspect blocks for cracks, efflorescence, and loose mortar; mark repairs. Use a masonry patch for holes, rake out and repoint deteriorated joints, and let cureset fully.
Sand rough areas and etch smooth blocks per product instructions for better adhesion. Prime with a masonry-specific primer to seal porous concrete and block dust.
Consider how color psychology affects primer and finish choices—lighter tones brighten basements, darker hues hide stains. For historic buildings, consult Historical preservation guidelines before altering surfaces.
Cleaning Cinder Block: Pressure Wash vs. Manual Scrub
When choosing how to clean cinder block, weigh the trade-offs between pressure washing and manual scrubbing. You’ll decide based on surface condition, time, and nearby landscaping.
Pressure washing clears grime fast but can damage mortar if too powerful. Manual scrubbing gives control and targets crevices. Both affect paint adhesion, which ties into color psychology choices and the final visual impact when you apply eco-friendly paints.
- Pressure wash: fast, risks over-saturation and erosion.
- Manual scrub: labor-intensive, preserves delicate areas.
- Prep tip: test a small area, let blocks fully dry before priming and painting.
Removing Efflorescence and Mineral Stains Safely
Although efflorescence and mineral stains can look like surface dirt, they actually form from salts drawn out of the masonry. You’ll need the right cleaners and techniques to remove them without damaging the block.
You should dry-brush loose salt, test a mild acidic cleaner (muriatic diluted or a vinegar solution) in an inconspicuous spot, and rinse thoroughly.
Use poultices for stubborn stains and avoid over-scrubbing that gouges the block.
Consider how color psychology affects your paint choice afterward—lighter paints show residues more—and respect historical preservation guidelines on older structures before altering appearance.
Repairing Cracks, Holes, and Spalled Areas
Before you paint, you should inspect each block to assess the severity of cracks, holes, and spalled areas so you know which repairs are cosmetic and which need structural attention.
Use appropriate patch materials—masonry repair mortar for large voids, hydraulic cement for active leaks, and concrete patch or epoxy for smaller chips—to match the block’s strength and bond.
Proper prep and the right product will guarantee your paint adheres and the repairs last.
Assessing Damage Severity
If your cinder block wall shows cracks, holes, or spalled areas, don’t assume paint will hide structural problems—you need to assess and repair damage first. You’ll inspect depth, length, and location: hairline cracks differ from chunks missing near load points. Note color matching and texture variation needs for later finishing so repairs blend with surrounding blocks.
Prioritize safety—large voids or shifting blocks mean a pro should evaluate load-bearing concerns. Document findings and take photos. Then plan repairs that address root causes, like moisture or settling, before repainting.
- Measure and photograph damage.
- Classify severity.
- Decide if pro help’s needed.
Proper Patch Materials
When you’re repairing cracks, holes, or spalled areas in cinder block, choose patch materials that match the block’s strength, porosity, and exposure conditions so the repair bonds and lasts.
Use hydraulic cement for active leaks, cementitious patch for shallow spalls, and a polymer-modified mortar for structural cracks; follow manufacturer mixing ratios.
Prep surfaces by removing loose material and dampening the block. Trowel or caulk depending on gap size, then tool to blend.
After curing, sand or skim to match texture finishes. Select paints with suitable color options and breathable masonry primers so patched areas remain durable and visually consistent.
How to Fill and Finish Mortar Joints Before Painting
A clean, even set of mortar joints makes painted cinder block walls look intentional and professional, so you’ll want to repair cracks, missing mortar, and uneven tooling before applying primer. Tidy joints help paint adhere and make Color coordination with trim or accents easier, especially when using Eco friendly paints that highlight surface uniformity.
Follow these steps to fill and finish joints efficiently:
Follow these steps to efficiently fill and finish joints for a clean, professional cinder block finish
- Clean joints of dust and loose mortar, then dampen slightly.
- Pack polymer-modified mortar or patch compound into gaps, tooling flush with blocks.
- After curing, sand lightly, vacuum, and apply masonry primer before painting.
When and How to Repoint Mortar Before Painting
Before you paint, check mortar for gaps, crumbling, or recessed joints that could let moisture undermine the new finish. If joints are loose or missing more than 1/4 inch depth, repoint before painting.
Remove damaged mortar to a consistent depth, brush away dust, and dampen the block slightly. Mix mortar to match original color and surface texture; you’ll want color coordination with your chosen paint so repaired areas don’t stand out.
Pack mortar firmly, tool joints to match profile, and let cure fully per manufacturer directions. Once cured and dry, inspect for shrinkage and touch up before priming.
How to Apply Primer to Cinder Block
Before you prime, you’ll clean and repair the block, removing dirt, efflorescence, and loose mortar so the surface soaks up the primer evenly.
Pick a masonry or masonry-specific acrylic primer with good penetration and mildew resistance to match interior or exterior conditions.
Apply the primer with a masonry brush or roller in even coats, letting each coat dry fully before painting.
Surface Preparation Steps
When you’re ready to prime cinder block, start by making sure the surface is clean, dry, and free of loose mortar or efflorescence; any contaminants will prevent good adhesion. You’ll also consider how color psychology affects final appearance and respect historical preservation if the wall is part of an older structure. Follow these preparation steps before applying primer:
- Scrub with a stiff brush and trisodium phosphate solution, then rinse and let fully dry.
- Repair cracks and tuckpoint loose mortar; sand rough spots and remove dust.
- Apply a masonry sealer to porous blocks and mask adjacent areas for neat edges.
Choosing The Right Primer
Now that the surface is clean and patched, pick a primer formulated for masonry to guarantee proper adhesion and moisture control. You’ll choose between penetrating sealers for porous blocks or block-filling primers for smoother coverage.
Apply with a roller and brush into joints, working top to bottom, and allow full cure before topcoat.
Consider color psychology when selecting primer tint—subtle warm or cool bases affect final hue and coverage.
If you prefer low odor, look for eco-friendly paints and primers labeled low-VOC.
Follow manufacturer spread rates, and don’t thin unless instructed; two coats often ensure uniform sealer performance.
Rolling and Brushing Techniques for Block Surfaces
Although block surfaces can be rough and uneven, you can get an even, durable finish by combining rolling for coverage and brushing for detail. Choose a thick-nap roller to push primer and paint into pores, improving paint durability and matching current color trends with uniform texture.
Use a stiff brush for mortar joints and edges, feathering to avoid lap marks. Work wet-on-wet for consistency. Clean tools between coats.
- Roll main field with overlapping strokes for full coverage.
- Brush joints and corners, tamping paint into crevices.
- Inspect and touch up after the first coat dries to guarantee uniformity.
How to Spray Paint Cinder Block Safely and Efficiently
Before you spray, clean and patch the block and apply a suitable primer so paint bonds and moisture won’t cause problems.
Use steady, overlapping passes with the sprayer held at the right distance and pressure to get even coverage in pores and joints.
Let each coat dry fully and follow recommended curing times before exposing the wall to moisture or heavy use.
Surface Preparation
When you’re getting ready to spray paint cinder block, proper surface preparation makes the difference between a durable finish and peeling paint. Start by cleaning, repairing, and priming so the paint adheres and lasts.
You’ll want to remove dirt, efflorescence, and loose mortar with a stiff brush and detergent, then rinse and let dry.
Choose primers compatible with your topcoat and consider color coordination to minimize coats. Use eco-friendly paints when possible to reduce fumes.
Follow these steps:
- Clean: pressure wash or scrub, remove efflorescence, dry completely.
- Repair: tuckpoint cracks, patch holes, sand rough spots.
- Prime: masonry primer, full coverage, dry thoroughly.
Spray Technique
If you want an even, durable finish on cinder block, spray painting is the fastest method but it demands the right technique and safety precautions. You’ll wear a respirator, goggles, and gloves, and mask nearby openings.
Test spray on a scrap to gauge pressure and overlap—keep the nozzle moving to avoid drips. Hold the gun 8–12 inches away, use smooth, parallel passes, and apply several light coats rather than one heavy one.
Consider Color palettes before spraying so you maintain consistency.
Explore Texture options by adjusting distance or using specialty nozzles for smooth or stippled effects.
Drying And Curing
How long will your spray job really need to set? You’ll wait longer on porous cinder block; surface texture soaks paint, slowing dry time. Work in 50–70°F, low humidity, and gentle airflow.
Touch tests help: tacky indicates more cure needed. Consider color psychology — darker hues can appear uneven while curing, so allow full cure before judging shade.
- Light tack: 24–48 hours, avoid heavy contact.
- Recoat window: 2–4 hours for thin coats; follow manufacturer.
- Full cure: 7–30 days depending on porosity, humidity, and paint type.
Patience prevents runs and ensures durable finish.
How Many Coats of Paint Do You Need?
Because cinder block soaks up paint differently than drywall, you’ll usually need more than a single coat to get even coverage and durability.
Cinder block soaks up paint more than drywall, so expect more than one coat for even, lasting coverage.
Start with a masonry primer to seal pores; that boosts paint durability and reduces the total topcoats you’ll need.
For light, consistent color options you might get away with two topcoats over primer; darker or bold hues often need three for uniformity.
Use a roller and brush to work paint into hollows.
Inspect in good light between coats and touch up thin areas.
Proper prep and priming matter more than piling on unnecessary coats.
Drying Times and Ideal Weather Conditions
After you’ve applied primer and the recommended topcoats, pay close attention to drying times and weather conditions so each layer cures properly and bonds to the block. You’ll want consistent temperature and humidity—ideally 50–85°F and below 70% humidity.
Consider color selection, since darker hues absorb heat and dry faster outdoors. Also plan ventilation strategies to remove moisture indoors and speed curing; use fans and dehumidifiers. Monitor surfaces between coats to avoid trapping dampness.
- Wait manufacturer-recommended time, extended in cool or humid weather.
- Avoid painting before rain or freeze.
- Use airflow and controlled humidity for best results.
How to Paint Interior Basement Cinder Block
If you’re prepping basement cinder block for paint, start by cleaning and repairing the surface so the primer and topcoat will adhere evenly. Scrub with a degreaser, rinse, and patch cracks with masonry filler; let it cure.
Prep cinder block by cleaning, degreasing, rinsing, and patching cracks so primer and paint adhere evenly.
Sand any rough spots, then apply a masonry primer sealed for damp areas. Choose paint texture—flat hides imperfections, while satin or eggshell resists scuffs.
Use a roller designed for block and back-brush into joints for full coverage. Consider color psychology: lighter hues open the space, warm tones add coziness.
Finish with ventilated drying and inspect for missed spots before recoating.
How to Paint Exterior Cinder Block Walls
Moving from basement interiors to exterior cinder block brings new challenges—weather, moisture, and UV exposure affect product choice and prep.
You’ll start by cleaning mildew, efflorescence, and any graffiti removal residue, then repair cracks and apply a breathable masonry primer.
Choose exterior elastomeric or masonry paint rated for UV and moisture; think about color psychology to influence curb appeal and perceived scale.
Work on dry days, use rollers for grooves, and back-brush for adhesion.
Finish with a clear masonry sealer if recommended.
- Clean and repair
- Prime appropriately
- Paint with weatherproof coatings
How to Paint Garage Cinder Block for Durability
Because your garage sees heavy use, dirt, moisture, and temperature swings, choose products and prep steps that maximize adhesion and wear resistance. Clean thoroughly, degrease, and repair cracks with masonry filler; let cures fully.
Etch or use a masonry primer to promote bonding, especially on smooth blocks. Select a durable elastomeric or epoxy finish made for concrete — consider eco friendly paints to reduce VOCs without sacrificing toughness.
Apply two thin coats, allowing recommended dry times. Seal edges and floor-line with a flexible sealant.
For garages in historic settings, balance historical preservation with modern protective coatings to respect character.
Color Choices That Make Cinder Block Look Modern
When you pick colors that emphasize clean lines and contrast, cinder block instantly reads as contemporary rather than utilitarian. You’ll use color psychology to choose hues that calm, energize, or define spaces.
Neutral palettes—warm greys, soft taupes—lend sophistication; bold accents create focal points. Choose finishes that highlight texture without gloss. Prefer eco friendly paints to reduce VOCs and keep indoor air quality healthy. Pair color with minimalist trim and lighting to reinforce modernity.
- Soft neutral base for cohesion
- Deep accent for contrast
- Pale trim to sharpen edges
These choices make block feel intentional.
How Paint Affects Thermal and Moisture Performance
If you paint cinder block, the coating can change how the wall handles heat and moisture. You’ll affect breathability: impermeable paints trap moisture, raising risk of efflorescence and mold, while breathable masonry paints let vapor pass.
Paints with reflective pigments can improve thermal insulation modestly by reducing heat gain, helpful in hot climates.
Choose eco-friendly paints to lower VOCs and avoid moisture-blocking additives that worsen damp issues.
Prep and proper sealers for cracks keep moisture out without sealing pores.
Balance paint choice with your climate and any existing waterproofing to protect both structure and indoor air quality.
Common Painting Mistakes and How to Avoid Them
Although you might be enthusiastic to finish, rushing or skipping prep creates most painting problems on cinder block walls. You’ll want to clean, repair cracks, and use a proper primer so paint adheres and moisture won’t sneak through.
Think about color psychology when choosing tones—lighter shades brighten basements, darker hues hide stains. Prefer eco friendly paints to reduce odors and VOC exposure while keeping coverage strong.
- Skipping primer: leads to peeling and uneven color.
- Using wrong brush/roller: causes blotchy texture on porous blocks.
- Ignoring curing time: invites premature wear and failures.
Long-Term Maintenance and When to Repaint
Because cinder block walls face moisture, settling, and abrasion over time, you’ll want a simple maintenance routine to keep paint looking good and protect the wall beneath.
Inspect yearly for cracking paint, efflorescence, or mortar gaps. Address small cracks with masonry caulk and touch up with the original formula to match sheen and protection.
Inspect annually for cracks, efflorescence, or mortar gaps; seal small fissures with masonry caulk and touch up paint to match sheen.
Clean gently with a soft brush and mild detergent—avoid pressure washing that can erode mortar.
For historically significant structures, consult historical preservation guidelines before altering finishes.
Consider using eco-friendly paints that breathe and resist mildew.
Plan repainting every 5–10 years depending on exposure and condition.
How to Handle Mold and Mildew After Painting
When you spot mold or mildew on freshly painted cinder block, act quickly to prevent staining and spread. You’ll wear gloves and a mask, ventilate, and test a small area to ensure cleaners won’t affect your finish or color psychology choices.
Use a mild bleach solution or commercial mildew remover, scrub gently with a soft brush, then rinse and dry thoroughly to preserve paint durability.
If spores recur, address moisture sources—dehumidify, improve drainage, and seal cracks.
For stubborn or widespread growth, call a professional to avoid health risks and protect your freshly painted surface.
- Isolate and ventilate
- Clean and rinse
- Fix moisture
Cost: DIY vs. Professional Painting
Deciding between DIY and hiring a pro comes down to your budget, skill level, and timeline.
If you’re handy, DIY saves labor costs; expect to pay for primer, masonry paint, rollers, sealant, and possibly masonry patch kits. You’ll invest time learning techniques for even coverage and for painting creative patterns.
Pros charge more but deliver speed, expertise with porous cinder block, and warranty options. Ask both about eco friendly paints; they may raise material costs slightly but reduce fumes.
Compare quotes, factor prep and cleanup, and decide whether savings justify your time and risk versus professional reliability.
Alternative Finishes: Limewash, Stucco, Veneers
If you want a look that goes beyond paint, limewash, stucco, and veneers each offer distinct textures and performance for cinder block walls. You can choose limewash for a breathable, subtle patina that respects historical preservation and shifts with light, using color psychology to soften spaces.
Stucco gives durable, sculpted character and hides imperfections while letting you control texture and hue.
Veneers deliver a finished, high-end appearance—stone, brick, or tile—without heavy structural work.
- Limewash: breathable, rustic, light-responsive.
- Stucco: durable, textured, customizable.
- Veneers: refined, structural-looking, versatile.
Environmental & Health Considerations for Painting Cinder Block
Beyond choosing finishes like limewash, stucco, or veneers, you should weigh the environmental and health impacts of painting cinder block—both the short-term hazards during application and long-term effects of off-gassing, moisture traps, and disposal.
Consider environmental and health impacts of painting cinder block—short‑term application hazards and long‑term off‑gassing, moisture, disposal.
You’ll want low-VOC or zero-VOC paints to reduce VOC emissions and indoor air risks. Consider breathability: impermeable coatings can trap moisture, invite mold, and degrade blocks.
Choose eco-friendly pigments and recycled-content primers when possible. Use proper PPE, ventilate during application, and dispose of leftover materials responsibly.
For sensitive spaces, test patches and consult product datasheets to balance durability, safety, and sustainability.
Frequently Asked Questions
Can Painting Cinder Block Increase Home Resale Value?
Yes — painting cinder block can boost resale value if you use decorative finishes and prioritize surface preparation; buyers notice fresh, sealed walls, improved curb appeal, and perceived maintenance, so invest in quality materials and proper prep for best returns.
Will Paint Hide Block Color Variations and Stains Permanently?
Yes — but only temporarily: like a bandage, good Surface preparation and primer matter, and quality paint durability will mask color variations and stains, yet deep stains or efflorescence can reappear without thorough cleaning and sealing.
Can I Paint Over Masonry Sealer or Waterproofing Membranes?
Yes—you can paint over many masonry sealers or waterproofing membranes, but you’ll need thorough surface preparation and a compatible primer to guarantee paint adhesion and long-term paint durability; otherwise coatings may peel or fail prematurely.
Does Painted Cinder Block Meet Local Building or Fire-Code Requirements?
Sometimes yes, but you’ll need to verify local codes: painted cinder block can meet building and fire-code requirements if paint doesn’t compromise structural integrity or moisture resistance, and you follow approved materials, finishes, and inspection rules.
How Do Paint Warranties Apply to Masonry Surfaces?
Warranties vary: you’ll void many unless you follow specified surface preparation and use approved primers, substrates, and application methods; manufacturers tie paint durability guarantees to those steps, documented conditions, and proper maintenance.
Conclusion
You can paint cinder block, but choose carefully: painted blocks boost curb appeal and can cut water absorption by up to 60%, reducing moisture problems long-term. If blocks are damp, cracked, or meant to breathe (unsealed basements, historic work), don’t paint—repair, seal, or use breathable finishes instead. For mold, fix leaks, clean with mildew remover, then prime. Weigh DIY vs pro costs and consider limewash, stucco, or veneers for lasting, healthier results.