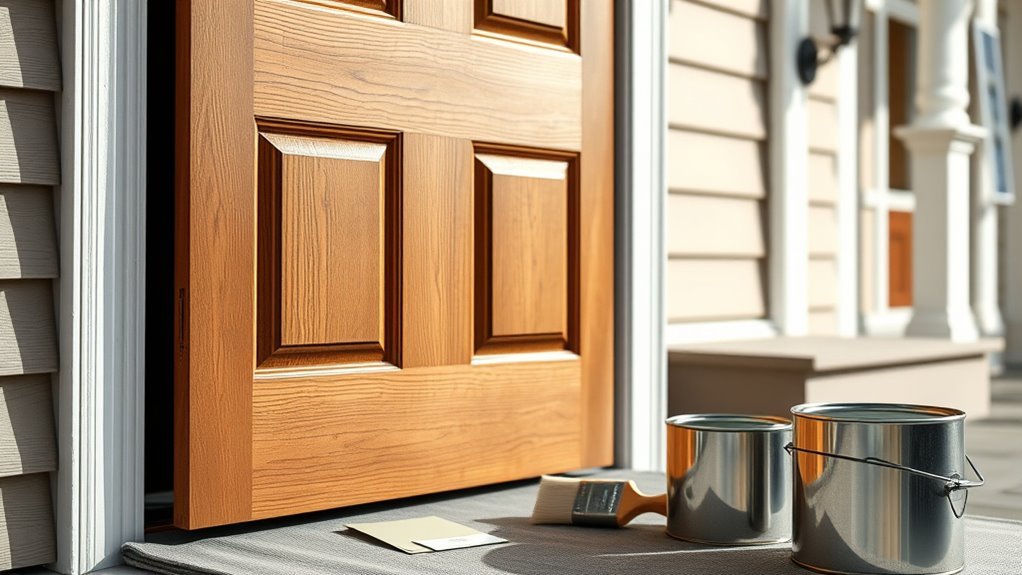
What Is the Best Paint for Exterior Doors?
You should pick a high-quality exterior acrylic-latex enamel for most doors because it combines weather resistance, flexibility, quick drying, and easy cleanup. Choose a semi-gloss or gloss for scuff resistance and easy wiping, or satin for a softer look that still cleans well. Match primer and paint to the door material—wood, metal, or fiberglass—and factor climate when selecting mildew or UV-resistant formulations; keep going to learn practical prep, application, and finish tips.
How to Choose the Best Paint for an Exterior Door
When choosing paint for an exterior door, focus on durability, finish, and compatibility with the door material.
Focus on durable, compatible finishes that suit your door material for long-lasting exterior protection and style.
You’ll weigh gloss levels for easy cleaning and scuff resistance, and pick a formulation that adheres to wood, metal, or fiberglass.
Consider paint color psychology to convey warmth, security, or modernity—choose bold hues for contrast or neutrals for subtlety.
Check reputable door paint brands for weather-rated products and clear application instructions.
Test swatches in natural light, evaluate dry-time and maintenance, and read user reviews.
That lets you select a finish and color that looks great and lasts.
Latex vs Oil-Based: Which Resists Weathering Best?
When you pick paint for an exterior door, think about how each type handles sun, rain, and temperature swings.
Latex tends to stay flexible and resist cracking as the door expands and contracts, while oil-based formulas often offer tougher surface durability but can become brittle over time.
We’ll compare their weathering performance and flexibility so you can choose what lasts longest for your climate.
Durability Under Elements
Because exterior doors face sun, rain, and temperature swings, choosing between latex and oil-based paints comes down to which material handles those stresses best. You want paint offering weather resistance and UV protection so finishes don’t chalk, fade, or crack. Latex dries faster, resists mildew, and maintains color under UV, while oil-based seals well, repels water, and often lasts longer on high-traffic doors. Consider climate: humid or sunny spots favor quality exterior latex; areas with heavy rain or impact might suit oil-based. Below is a quick comparison to help you decide.
| Property | Latex vs Oil |
|---|---|
| Dry time | Latex faster |
| UV protection | Latex better |
| Water resistance | Oil excels |
| Durability | Oil often longer |
| Maintenance | Latex easier |
Paint Flexibility Differences
Although both latex and oil-based paints form protective films, they differ in how much they flex with the door as temperatures and humidity change. That flexibility determines long-term resistance to cracking and peeling.
You’ll find latex offers superior paint elasticity, stretching and contracting with wood or metal without splitting, which boosts weather resistance in fluctuating climates.
Oil-based coatings harden to a tougher, less flexible finish that resists abrasion but can crack where movement is frequent.
Choose latex where movement and moisture vary; pick oil-based for stable conditions needing extra hardness.
Consider substrate, climate, and maintenance when deciding.
Why Exterior Enamel Is a Top Pick for Front Doors
If you want a finish that stands up to weather, heavy use, and frequent cleaning, exterior enamel delivers durable, low-maintenance protection with a smooth, attractive sheen.
You’ll appreciate enamel benefits like hard, chip-resistant surfaces and long-lasting color retention that reduce repainting. It resists moisture and grime, so routine wiping keeps your entry looking neat.
Because it levels well, enamel enhances door aesthetics by smoothing imperfections and providing uniform coverage on wood, metal, or fiberglass.
You can expect straightforward application and easy touch-ups, making enamel a practical choice when you want a resilient, polished front-door appearance.
High-Gloss or Satin: Which Finish for Your Door?
Wondering whether to choose high-gloss or satin for your exterior door? You’ll pick based on style and upkeep.
High-gloss benefits include a durable, easy-to-clean surface that makes colors pop and resists scuffs; it suits bold, modern looks and stands up to frequent handling.
Satin advantages are a softer sheen that hides minor imperfections and offers a more traditional, understated appearance while still cleaning reasonably well.
You’ll choose high-gloss if you want maximum shine and durability; pick satin if you prefer subtlety and forgiving coverage.
Both finishes handle weather well when applied with proper exterior paint.
How Door Material Changes Exterior Paint Choice (Wood, Metal, Fiberglass)
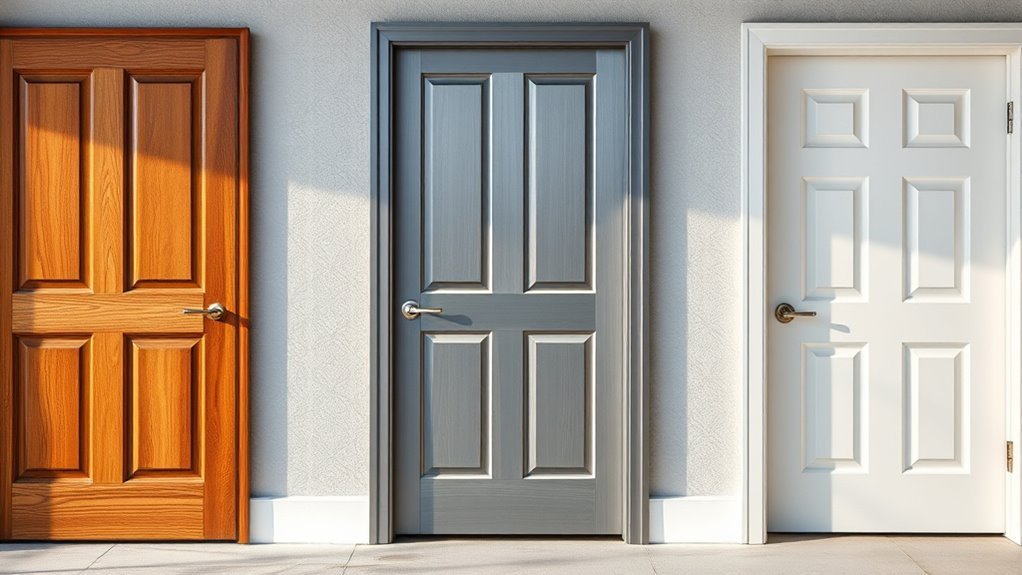
Your door material changes what primer and paint you pick, so you’ll want different prep and products for wood, metal, and fiberglass.
For wood, sealers or stains and a durable exterior paint protect against moisture and sun.
For metal, use rust-resistant coatings, and for fiberglass choose paints and primers that prioritize flexibility and strong adhesion.
Wood: Seal And Stain
Wood doors demand a different approach than metal or fiberglass. You’ll focus on wood finishing and wood maintenance to protect grain and prevent wood aging.
Choose staining techniques that enhance the wood grain and suit natural finishes rather than opaque paint. Prioritize wood preservation with quality sealant application—penetrating sealers and sparing topcoats let the wood breathe while shedding moisture.
Prep by sanding, cleaning, and testing stain color on a hidden section. Reapply sealant periodically as part of routine maintenance to guard against UV and moisture.
With proper care you’ll keep the door beautiful and structurally sound for years.
Metal: Rust-Resistant Coatings
While wooden doors rely on sealers that let the grain breathe, metal doors demand coatings that stop corrosion and bond to smooth surfaces. You’ll choose primers and paints formulated for rust prevention and durability.
Prep is critical: remove rust, sand edges, and clean thoroughly before coating application. Consider these steps:
- Apply a metal-etching primer to promote adhesion.
- Use a rust-inhibiting primer where bare metal shows.
- Topcoat with an oil-based or exterior enamel for toughness.
- Finish with thin, even coats and proper drying times for long life.
This approach protects and keeps metal doors looking sharp.
Fiberglass: Flexible, Adhesion-Focused Paint
Because fiberglass expands and flexes with temperature changes, you’ll want paints and primers that stay bonded and elastic rather than rigid.
Choose a flexible exterior acrylic or 100% acrylic latex primer formulated for nonporous surfaces to promote adhesion and prevent cracking.
Use topcoats with elastomeric properties to follow movement and resist peeling.
Pick finishes that highlight current color trends—deep blues, charcoal, or saturated greens—while considering maintenance.
Proper prep—cleaning, light sanding, and compatible primer—boosts paint longevity.
Spot-test adhesion and apply thin, even coats in recommended conditions to guarantee a durable, attractive fiberglass door finish.
Best Primers for Exterior Doors
If you want a durable, smooth finish that lasts, start with the right primer for your exterior door. You’ll pick primers that seal, promote adhesion, and resist moisture.
Look for best eco friendly primers if low VOCs matter, and compare top rated brands for warranty and performance.
Choose eco-friendly, low-VOC primers and compare top-rated brands for warranty, performance, and peace of mind.
Consider these primer types:
- Oil-based for sealing knots and durability.
- Bonding primers for glossy or slick surfaces.
- Latex/all-purpose for easy cleanup and flexibility.
- Shellac for stain blocking and quick drying.
Prep, apply evenly, sand between coats, and don’t skip primer on repaired or bare areas.
How Climate Affects Exterior Door Paint Selection
When choosing paint for your exterior door, consider how your climate stresses finishes: hot, sunny areas need UV-resistant, heat-stable coatings.
In cold, freeze-prone regions you’ll want flexible paints and primers that resist cracking and moisture intrusion.
For humid or coastal locations pick mildew-resistant, corrosion-inhibiting formulations that stand up to salt and damp.
Hot, Sunny Climates
Though bright sun makes for beautiful weather, it also speeds up fading, chalking, and heat-related warping on exterior doors.
So you’ll need paint that stands up to UV, intense heat, and occasional temperature swings. Choose formulations with strong sunlight reflection and proven heat resistance to lower surface temps and slow degradation.
Prep and finish matter: prime, seal edges, and use a UV-resistant topcoat.
Consider these priorities when selecting paint:
- High-UV acrylic latex for flexibility and durability
- Light-reflective pigments to reduce heat load
- Elastomeric coats for minor movement
- Quality primer and UV topcoat for long-term protection
Cold, Freeze-Prone Areas
Because freezing temperatures and moisture put paint under repeated stress, you’ll want products that stay flexible, resist cracking, and seal out water.
In cold, freeze-prone areas, choose frost resistant paints formulated to tolerate cycles of freeze-thaw without losing adhesion. Look for high-elastomeric or low-VOC exterior enamels that accommodate thermal expansion and contraction of wood or metal.
Prime surfaces with a cold-weather primer and guarantee full cure times between coats. Maintain good door seals and drip edges to minimize trapped moisture.
Regularly inspect and touch up chips promptly to prevent moisture intrusion and extend the finish’s lifespan.
Humid, Coastal Regions
If you live in a humid, coastal area, pick paints that resist moisture, salt spray, and mildew while allowing the door to breathe and move with changing humidity.
You’ll face humidity effects, salt air, temperature fluctuations and other coastal challenges that shorten paint longevity. Prioritize moisture resistance, UV-stable pigments to limit color fading, and flexible coatings.
Use weatherproofing techniques and regular maintenance to extend service life. Consider:
- Marine-grade or exterior acrylic latex for mildew resistance.
- High-quality primer with corrosion inhibitors.
- UV-resistant topcoat to prevent color fading.
- Tight seals and routine inspections for durability.
Paint Formulations That Resist UV Fading
When you pick a paint meant to resist UV fading, focus on its chemistry and additives: high-quality acrylic or urethane-modified acrylic binders combined with UV absorbers and HALS (hindered amine light stabilizers) slow chalking and color loss, while pigments with strong lightfastness keep hues true longer.
You should choose formulations touting UV resistant additives and long lasting pigments; check technical data for lightfastness ratings and accelerated UV testing.
Satin or semi-gloss sheens reflect more UV than flat finishes, aiding durability. Proper surface prep and thin, even coats let the formulation perform; recoat intervals depend on exposure and pigment stability.
Paints and Techniques That Prevent Peeling and Blistering
Start by sanding, cleaning, and priming the door so paint bonds to a stable, dry surface.
Then pick flexible exterior coatings—like high-quality acrylic or elastomeric—and apply them per the manufacturer’s instructions.
Those steps together cut the risk of peeling and blistering as the door expands and contracts.
Surface Preparation Essentials
Proper surface preparation stops peeling and blistering before you even open the paint can: strip failing paint, sand glossy surfaces to a dull profile, and clean off dirt, grease, and mildew so new coatings can firmly bond.
You’ll use surface cleaning techniques like detergent wash, TSP alternatives, and mildew remover; mask or remove door hardware considerations to avoid staining.
After prepping, follow this checklist:
- Remove loose paint and smooth edges.
- Degrease and rinse thoroughly; let dry.
- Sand to create a keyed surface; wipe residue.
- Prime bare wood, metal, or patched areas.
Do repairs and priming before painting for lasting adhesion.
Choose Flexible Exterior Coatings
Although paint flexibility might sound like a minor detail, choosing a coating that moves with your door is one of the most effective ways to prevent peeling and blistering over time.
You should select flexible coatings formulated for exterior use so temperature shifts and humidity won’t crack the finish. Apply high-quality primer compatible with the topcoat to improve adhesion, then use thin, even passes with a brush or sprayer to avoid trapping solvents.
Maintain proper cure times and avoid painting in extreme conditions. These practices boost exterior longevity, keeping your door resilient and attractive while minimizing maintenance and costly recoats.
How to Read Paint Durability Ratings and Warranties
When you’re choosing paint for an exterior door, durability ratings and warranties tell you how long the finish should hold up and what the manufacturer will cover if it doesn’t—so learning to read them saves time and money.
Choosing paint for an exterior door? Read durability ratings and warranties to know lifespan, coverage, and save time and money.
Check paint ratings for abrasion, UV and adhesion scores, and expected lifespan. Read warranty details for exclusions, required prep, and transferability. Ask about pro vs. consumer claims.
- Look for lab-tested metrics.
- Note covered failures and fixes.
- Confirm maintenance requirements.
- Keep receipts and photos to file claims if needed.
Best Low‑VOC and Eco‑Friendly Exterior Door Paints
Now that you know how to read durability ratings and warranties, you’ll want to pick paints that minimize health and environmental impacts without sacrificing performance.
Look for brands offering low VOC paints with durable exterior acrylic or enamel formulas; they resist weathering and clean up with mild soap.
Check third‑party certifications and ingredient transparency to confirm eco friendly options.
Consider water‑based alkyd hybrids for adhesion and hardness without strong odors.
Test a small area to verify coverage and longevity.
Proper surface prep and a quality primer matter more than marketing—those steps extend life while keeping your home healthier and greener.
How Color Choice Affects Heat Absorption and Paint Life
Because darker hues absorb more sunlight, they raise surface temperatures on exterior doors and can accelerate fading, cracking, and finish failure, while lighter colors reflect heat and help paint last longer.
You should weigh aesthetics, color psychology, and energy efficiency when choosing a shade. Dark doors in hot climates demand more durable coatings; pale tones reduce thermal stress.
Consider these practical points:
- Pick lighter colors to lower surface heat and extend coating life.
- Use UV-resistant finishes if you prefer deep tones.
- Factor in the door material’s heat tolerance.
- Balance curb appeal with long-term maintenance costs.
Which Paints Are Easiest to Clean on Exterior Doors?
Which finishes wipe clean most easily and stand up to outdoor grime? You’ll want semi-gloss or high-gloss acrylic latex—both offer durable, nonporous surfaces that resist dirt and moisture.
These easy care finishes let you remove pollen, bird droppings, and fingerprints without damaging the film. For metal or fiberglass doors, consider enamel or urethane-modified paints with similar sheen.
Use gentle cleaning techniques: soft cloth or sponge, mild detergent, and rinsing; avoid abrasive pads and strong solvents that dull the finish.
Recoat with quality topcoats if wear appears. Proper choice saves time and keeps your exterior door looking fresh.
How to Prepare a Wood Door for Exterior Painting
Start by removing all hardware so you can work cleanly and keep hinges, knobs, and screws from getting paint on them.
Wipe the door thoroughly with a mild cleaner to remove dirt, grease, and mildew that will prevent paint from adhering.
Sand any glossy areas and repair dings or cracks with wood filler before priming so you get a smooth, long-lasting finish.
Remove Hardware And Clean
Take off the doorknob, deadbolt, kick plate, and any mail slots before you sand or paint—working around hardware makes the job harder and risks drips or uneven edges.
You’ll save time and get cleaner lines by doing full hardware removal, then store screws in labeled bags.
Next, focus on door cleaning to remove dirt, grease, and mildew so paint adheres properly.
- Wipe with mild detergent and water.
- Rinse and dry thoroughly.
- Use TSP for stubborn grime, then rinse.
- Inspect gaps and jambs for trapped debris.
Let the door fully dry before moving on.
Sand And Repair Surface
Now that the door is clean and hardware is out, prep the wood by sanding and repairing any damage so paint will stick and look smooth.
Start with surface cleaning to remove dust from prior steps, then perform a texture assessment to identify rough spots, old finish, or gouges.
Use medium-grit sandpaper, follow grain direction, then finish with fine grit for a uniform surface.
Fill cracks or holes with exterior wood filler, let it cure, and sand flush.
Wipe the door again to remove residue.
Prime bare or repaired areas before painting to guarantee adhesion and a flawless finish.
How to Prep a Metal Door to Prevent Rust Before Painting
Before you apply any paint, remove loose rust and old finish so the new coating can bond properly; you’ll want to use a wire brush or a power sander with a medium-grit disc to get down to bare metal where corrosion has begun.
Next, degrease with a solvent and rinse; let the door dry fully.
Apply a rust converter on remaining oxidized spots, then a metal primer rated for exterior use.
Maintain rust prevention techniques as part of regular metal door maintenance to extend life.
Tips:
- Clean annually.
- Touch up scratches immediately.
- Use corrosion-resistant hardware.
- Repaint every 5–7 years.
How to Prep a Fiberglass Door for Good Paint Adhesion
Metal and fiberglass require different prep, so switch your approach when working on a fiberglass door.
Start by cleaning with a mild detergent and water, removing dirt, oils, and waxes; rinse and dry thoroughly.
Lightly scuff the surface with fine-grit sandpaper to dull the gelcoat, then vacuum and tack-rag to remove dust.
Wipe with a solvent like isopropyl alcohol for final degreasing.
Repair any gouges with a compatible filler, sand smooth, and clean again.
Use a primer formulated for fiberglass to guarantee adhesion.
These fiberglass surface preparation and adhesion promotion techniques help paint bond and last.
Best Brushes, Rollers, and Tools for Smooth Door Finishes
If you want a professional, smooth door finish, the right brushes, rollers, and tools make all the difference. Choose brush types for detail and flat areas, matching bristle to paint consistency to avoid visible brush strokes.
Pick roller nap based on texture options—short nap for smooth panels, slightly thicker for subtle grain. Practice roller techniques to blend edges and prevent ridges.
Maintain tools: clean brushes promptly, reshape bristles, and store rollers covered. For finish application, work wet edge to wet edge and monitor paint consistency for even coverage.
Clean and store tools promptly—reshape bristles, cover rollers, and work wet edge to wet edge for even coverage.
Regular tool maintenance extends life and guarantees consistent results.
- High-quality angled sash brush
- Foam roller, 4–6mm nap
- Mini roller for panels
- Synthetic bristle for latex
How to Apply Primer and Paint for a Smooth Finish
When you start priming and painting, work systematically so each coat lays down smoothly and bonds well to the door; begin by sanding, dusting, and masking hardware and edges.
Use primer application techniques like thin, even strokes and back-brushing to eliminate runs and guarantee adhesion.
Apply primer to cover bare wood or repairs, let it cure per label instructions, then sand light between coats for smoothness.
Choose high-quality exterior paint and load your brush sparingly, cutting in corners before rolling panels.
Respect paint drying times, avoiding recoat or handling until fully dry to prevent tackiness and imperfections.
How Many Coats Do Exterior Doors Really Need?
How many coats you need depends on the paint type, the door material, and the finish you’re after; generally, two coats cover most exterior doors if you follow proper door surface preparation and paint application techniques.
Use a quality primer for bare or repaired areas, then apply thin, even coats to avoid drips.
Use a quality primer on bare or repaired spots, then apply thin, even coats to prevent drips.
Consider these scenarios:
- Smooth, prepped wood — two coats after primer.
- Previously painted, good coverage — one to two coats.
- Dark-to-light color change — two to three coats.
- High-gloss or high-traffic — two thin coats for durability.
Adjust by inspection: full, even coverage is the goal.
How Long to Wait Between Coats and Before Rehanging a Door
Let the paint fully dry to the touch before you add another coat. Check the manufacturer’s recommended drying time and wait that minimum, usually a few hours for latex and longer for oil-based finishes.
Lightly sand between coats only when the surface feels dry and tack-free. For best adhesion, apply additional coats within the recoat window specified on the label to avoid lifting.
Before rehanging, confirm the final coat has cured per instructions—curing often takes longer than surface drying. Plan your rehang schedule around full cure to prevent scuffs, misalignment, or paint transfer when the door returns to its frame.
Which Drying Times Matter for Exterior Door Projects?
Although paint labels list a range of times, you should focus on three key drying metrics for exterior doors: tack-free (dry to the touch), recoat (when you can safely apply another layer), and cure (when the finish reaches full hardness).
You’ll plan paint application around these milestones to avoid runs, adhesion problems, or damaged finishes.
Consider environmental factors—temperature and humidity—since they affect drying times. Prioritize cure for handling and weather exposure.
Quick checklist:
- Tack-free: initial safe touch
- Recoat: next layer timing
- Full cure: safe rehanging/handling
- Adjust for temp/humidity
How to Paint Decorative Panels, Glass, and Hardware Areas
Painting decorative panels, glass, and hardware on an exterior door takes a steady hand and the right prep, since mistakes stand out and can compromise function.
First, remove or mask hardware, using low-tack tape and paper to protect locks and hinges.
For raised panels, sand lightly and use painter’s tape to isolate edges—try decorative panel techniques like brush-cutting and rolling shallow sections separately.
For glass painting tips, clean thoroughly, scuff with a pad, and use specialty glass primer plus thin enamel or acrylic designed for glass.
Paint in thin coats, allow full drying between passes, and remove tape before final cure.
How to Refinish an Old Painted Door Without Full Stripping
You don’t always need to strip an old painted door to get a fresh, durable finish—careful prep and the right products can revive it with less mess and risk.
Begin by evaluating adhesion and cleaning grime; door surface preparation matters most. Sand glossy areas lightly, scuff-sand with 120–220 grit, then wipe dust. Use suitable primers or bonded clears when paint is intact but aged.
Consider these refinishing techniques:
- Clean and degloss thoroughly.
- Spot-sand and feather edges.
- Apply bonding primer to slick spots.
- Topcoat with exterior enamel or acrylic for durability.
Finish hardware protection and curing time are essential.
How to Repair Chips, Cracks, and Rot Before Painting
Before you pick a paint, assess the door for all chips, cracks, and any soft or rotted areas so you know what needs attention.
Use a suitable filler or epoxy for small chips and cracks, sanding smooth once it cures.
For rot, cut back to solid wood and either patch with a wood repair product or replace the damaged section before priming and painting.
Assess Damage Thoroughly
Though a fresh coat can hide minor blemishes, you’ll get lasting results only if you inspect the door closely for chips, cracks, and rot first.
Start a damage assessment by probing suspect areas with a screwdriver and shining a flashlight inside cracks. Note soft spots, peeling paint, and moisture stains.
Decide on repair options based on severity: temporary patch, epoxy consolidation, section replacement, or full panel swap. Record dimensions and materials before buying supplies.
Prioritize structural integrity over cosmetic fixes so paint adheres well and lasts. If rot is extensive, consider professional evaluation to avoid recurring problems.
Fill Chips And Cracks
Start by cleaning the damaged area so the repair materials can bond properly. Remove loose paint and dust, sand edges, and dry the surface. Choose appropriate filling techniques: use wood filler for small chips, epoxy for structural gaps, and flexible crack fillers for hairline splits. Apply in thin layers, let cure, then sand smooth. Prime repaired spots before painting to guarantee adhesion and uniform finish. Follow manufacturer cure times and avoid overfilling. Check surrounding seams for movement to prevent recurrence.
| Tool | Use |
|---|---|
| Putty knife | Smooth filler |
| Sandpaper | Level surface |
| Epoxy | Large gaps |
| Filler tube | Hairline cracks |
| Primer | Seal repairs |
Repair Or Replace Rot
If wood rot has compromised the door’s integrity, you’ll need to decide whether to repair or replace the affected section based on how deep and widespread the damage is.
Inspect the area, probe with a screwdriver, and mark soft wood. Use appropriate repair techniques: epoxy consolidants for shallow rot, patching with wood filler for small voids, or splice replacement for structural loss.
Sand and prime repaired areas, then paint. For lasting results, follow rot prevention steps:
- Improve drainage and weatherstripping.
- Keep threshold and sill sealed.
- Maintain paint and caulk.
- Guarantee proper ventilation.
Sealants and Topcoats That Add Extra Exterior Protection
When you want your exterior door to withstand sun, rain, and frequent use, adding a clear sealant or durable topcoat gives essential extra protection. These products lock out moisture, reduce UV damage, and make cleaning easier without changing the color or texture of your paint.
You’ll choose between sealant types like polyurethane, spar varnish, and water-based clear coats based on flexibility and UV resistance. Consider topcoat benefits such as abrasion resistance and easier maintenance.
Apply in thin, even coats, follow drying times, and avoid trapping solvents—proper selection and application extend paint life and protect door materials.
How to Maintain and Touch Up Exterior Door Paint Over Time
Keep a simple routine to preserve your door’s finish and handle small blemishes before they spread. You’ll clean monthly, inspect for chips, and address wear promptly using paint maintenance tips and basic touch up techniques.
Follow these steps:
- Wash with mild soap, rinse, dry.
- Sand tiny rough spots, remove dust.
- Apply primer to bare wood or metal.
- Feather in matching paint, finish with protective topcoat.
Use matching sheen and thin coats to blend repairs. Store leftover paint for future touch-ups and note color codes so you can quickly restore appearance and protection.
Common Mistakes That Shorten Exterior Door Paint Life
You’ll shorten your door’s paint life if you skip proper surface prep, like cleaning and sanding before priming.
Using the wrong paint—interior formulas or low-quality exterior paint—also causes premature peeling and fading.
And if you ignore regular maintenance, small chips and dirt will quickly turn into bigger problems.
Poor Surface Preparation
Because paint only sticks to a clean, stable surface, skipping proper prep is the fastest way to cut an exterior door’s finish life short. You’ll reduce peeling and blistering by using basic surface cleaning techniques and acknowledging primer importance before painting.
Do this:
- Remove dirt, grease, and chalk with a mild detergent and rinse thoroughly.
- Sand glossy or rough areas to create uniform tooth for adhesion.
- Repair cracks and fill gaps, then sand smooth.
- Apply a compatible primer to seal and promote adhesion.
Prep saves time and prevents failures; don’t rush these steps or skip the primer.
Using Wrong Paint Type
If you pick the wrong type of paint, it’ll peel, crack, or fail long before its time—especially on an exterior door that’s exposed to weather and friction.
You should choose a durable exterior-grade acrylic or oil-based formula designed for doors and trim; interior paints lack UV and moisture resistance.
Using low-quality or wrong-sheen paint compromises paint longevity and speeds color fading, especially on sun-facing doors.
Match paint chemistry to the substrate—wood, metal, or fiberglass—and follow manufacturer recommendations for primers and topcoats.
Picking the proper type upfront saves time, prevents premature repainting, and keeps your door looking crisp longer.
Neglecting Regular Maintenance
Picking the right paint is only half the job; neglecting routine care will still shorten its lifespan. You’ll need preventative upkeep to protect finish and avoid costly repainting. Set a simple schedule: wash, inspect, touch up, and reseal as needed.
Perform seasonal inspections to catch cracks, peeling, or swollen edges before moisture does serious damage.
- Clean dirt and pollen gently every few months.
- Check weatherstripping and thresholds during spring and fall.
- Sand and spot-prime small defects promptly.
- Recoat high-wear areas yearly or biannually.
Stay proactive and your door’s paint will last much longer.
How to Match Your Door Color to Curb Appeal and Trim
When you choose a door color that complements your home’s exterior and trim, you instantly boost curb appeal and make the entrance feel intentional.
Pick hues that create color harmony: coordinate with dominant siding, use trim as an accent cue, or choose a contrasting shade for a focal point. Test small samples in different light to confirm undertones.
Consider architectural style—traditional homes suit muted tones, modern ones handle bold choices.
Match finish to maintenance needs: gloss for durability, satin for subtlety.
Keep hardware and nearby landscaping in mind so everything reads as a cohesive, welcoming statement.
DIY vs Pro: How Much Will Painting an Exterior Door Cost?
Curious whether you should tackle painting your exterior door yourself or hire a pro? You’ll weigh time, finish quality, and money. A clear cost comparison helps: DIY supplies cost less upfront, while pros charge for labor and skill.
Consider risks like prep mistakes or longer timelines that erode DIY savings.
- Materials (primer, paint, brushes): low to moderate cost.
- Time investment: factor your hourly rate.
- Quality of finish: pro often superior, fewer touch-ups.
- Unexpected repairs: can raise total cost.
Use estimates from local suppliers and pros to decide what fits your budget.
When to Hire a Professional Painter for Doors
If your door needs complex surface prep—like stripping old paint, repairing rot, or sanding intricate panels—you’ll save time and get better results by hiring a pro.
You should also consider a pro when you’re short on time or working with a tight budget that can’t absorb mistakes and rework.
Finally, bring in someone experienced if you want specialty finishes or have delicate hardware that needs protected or removed properly.
Complex Surface Preparation
Because door surfaces can hide problems that simple sanding won’t fix, you’ll want to assess the scope before tackling the job yourself: deep gouges, rot, multiple old paint layers (especially lead-based), warped or swollen wood, and intricate moldings or glass inserts all demand specialized tools and techniques.
If you see those signs, consider a pro. They’ll apply proper surface cleaning techniques, choose compatible primers, and follow primer selection tips to prevent peeling.
A professional will also handle containment and safety for lead or mold. When you need expertise, hire someone to guarantee durability and a flawless finish.
- Damage assessment
- Lead-safe prep
- Specialized tools
- Controlled environment
Time Or Budget Constraints
Pressed for time or watching your wallet? You’ll weigh time saving techniques against cost when deciding to hire a pro.
If you’ve got tight deadlines, pros finish prep and painting faster, avoiding mistakes that cost more later.
If budget’s the issue, consider budget friendly options: hire for prep only, buy your own paint, or schedule off-season for discounts.
Do a quick cost-benefit: factor in your time value, tool rental, and potential touch-ups.
Choose a pro when complexity or limited hours make DIY likely to drag on or result in subpar, costly repairs.
Specialty Finishes Or Hardware
Wondering when to call a pro for specialty finishes or tricky hardware? You should hire a skilled painter if you want flawless specialty textures or delicate metallic finishes that resist weather and wear.
Pros protect hardware, match sheen, and prep surfaces correctly. Consider these situations:
- Complex specialty textures requiring consistent pattern and depth.
- Metallic finishes that need antique glazing or protective clear coats.
- Doors with intricate or fixed hardware that risks damage.
- Time constraints or a high-expectation exterior facelift.
A pro saves you time, prevents costly mistakes, and delivers durable, shop-quality results you’ll actually enjoy.
Specialty Paints: Anti‑Mold, Heat‑Reflective, and Other Problem Solvers
When you need more than just color, specialty exterior door paints solve specific problems—anti‑mold formulas resist mildew in damp climates, heat‑reflective coatings cut surface temperatures in sun‑baked areas, and other engineered finishes tackle issues like salt corrosion or graffiti.
You’ll pick anti mold paints where humidity invites staining and choose heat reflective coatings to reduce fading and expansion. Look for mildew inhibitors, UV stabilizers, and corrosion-resistant binders.
Application is like regular paint but follow manufacturer prep and recoat intervals. These targeted products extend life and cut maintenance, so match the formula to your local exposure and problem.
Best Seasons and Timing for Exterior Door Painting
Pick a clear, mild stretch of weather—ideally temperatures between 50–85°F (10–29°C) with low humidity—to guarantee paint adheres and dries properly.
You’ll get the best results in late spring or early fall when temperatures are stable and rain is less likely to interrupt drying.
If you must paint in summer or winter, choose paints rated for those conditions and plan for longer cure times.
Ideal Weather Conditions
Although timing matters less than surface prep and paint quality, choosing the right season and daily conditions makes exterior door painting easier and yields a longer-lasting finish.
You’ll want conditions that enhance weather resistance and limit temperature fluctuations and moisture exposure, accounting for seasonal changes without waiting for perfect skies.
- Paint when humidity is low to avoid adhesion problems.
- Avoid painting during rapid temperature swings that stress curing.
- Don’t paint if rain is forecast within 24 hours.
- Prefer mild, dry days with temperatures within the paint’s recommended range.
Plan short windows; monitor forecasts and act when conditions align.
Best Times Of Year
If you want the longest-lasting finish, aim for late spring through early fall when temperatures are steady, humidity is lower, and drying times are predictable. You’ll pick spring painting for fresh starts and forgiving weather; summer works if you avoid extreme heat, and autumn readiness helps seal doors before cold. Plan coats on calm, dry days and allow full curing between layers. Test a small area first and watch forecast lows; frost or rain will ruin new paint. Choose breathable, exterior-grade paint and seal edges for lasting protection.
| Feeling | Season |
|---|---|
| Hopeful | Spring |
| Confident | Summer |
| Secure | Autumn |
Safety and Environmental Precautions When Painting Doors
Because exterior-painting projects expose you to dust, fumes, and chemicals, take precautions that protect your health and the environment.
Wear safety gear—gloves, goggles, respirator—and guarantee proper ventilation to minimize paint fumes.
Monitor weather conditions so coatings cure safely and runoff’s reduced.
Keep children protection and pet safety top of mind: block access, move toys, and seal off work zones.
- Choose low-VOC or water-based paints to lower environmental impact.
- Use drop cloths and absorbent barriers to catch spills.
- Follow local rules for paint disposal.
- Store leftover paint sealed, labeled, away from heat.
How to Test a Small Paint Sample on Your Exterior Door
When you’re ready to see how a color and finish will perform, test a small paint sample on an inconspicuous section of the door so you can judge adhesion, coverage, and true color in real conditions.
Clean that spot, sand lightly, and remove dust. Apply primer if your chosen system requires it, then brush or roll a thin coat of paint sample.
Let it cure fully—check after recommended drying time and again after 24–48 hours. Inspect for drips, texture, color shift in different light, and adhesion.
Repeat on a second spot if your door has varied exposure. Document results before committing.
Quick Decision Checklist: Pick Paint, Primer, Finish, and Timing
Checklist time: pick your paint, primer, finish, and timing by answering four quick questions—what surface are you covering, what exposure will it face, which finish matches both look and durability needs, and what weather window gives proper curing.
Use this checklist to choose paint, primer, finish, and timing that suit color trends and boost door aesthetics.
Use this checklist to pick paint, primer, finish, and timing that follow color trends and elevate door aesthetics.
- Surface: wood, metal, fiberglass—pick compatible primer and paint.
- Exposure: sun, rain, salt—choose UV and mildew-resistant formulas.
- Finish: high-gloss for durability, satin for subtle sheen and easy cleaning.
- Timing: paint when temps and humidity are within product specs for full cure.
Frequently Asked Questions
Will a Painted Exterior Door Void My Home Insurance or Warranty?
Usually it won’t void your home insurance or warranty, but you’ll want to confirm specifics with your insurer and manufacturer. You’ll protect paint durability and insurance coverage by using recommended products and professional application, avoiding damage claims.
Can Exterior Door Paint Be Applied Over Lead-Based Paint Safely?
Like tiptoeing past a sleeping dragon, you can safely paint over lead with care: follow lead paint safety guidelines, encapsulate or remove flakes, and prioritize exterior door preparation—clean, prime with a bonding primer, then apply durable topcoat.
How Do Local Building Codes Affect Exterior Door Paint Choices?
Local building codes can limit finishes, require fire-rated or low-VOC products, and influence color durability choices; you’ll need to check regulations and factor climate considerations so you pick compliant, long-lasting paints suited to local conditions.
Will Color Change Affect My HOA Approval or Neighborhood Covenants?
Like a flag on your porch, you’ll need HOA or covenant approval before changing color; you’ll want to contemplate color psychology and neighborhood aesthetics, since bold shifts can spark objections or require formal permission.
Can I Use the Same Paint on My Storm/Screen Door and Main Exterior Door?
Yes — you can, but match paint type to storm door materials: use a durable exterior paint formulated for metal or wood as needed. That guarantees paint durability and consistent appearance while resisting weathering and abrasion.
Conclusion
Think of your exterior door as a lighthouse—paint is its beacon. Choose enamel for durability, match primer to substrate, pick latex for ease or oil for long-term weather resistance, and select gloss or satin for the look and maintenance you want. Time the job in mild, dry weather, follow safety steps, and test a sample first. With the right choices, your door will stand bright and steady, guiding visitors and weathering seasons with grace.