How to Remove Exterior Paint From Wood the Right Way
You can remove exterior paint from wood the right way by matching method to project size and safety needs: use citrus or soy strippers and hand-scrape for delicate areas, a heat gun or biodegradable chemical stripper for large runs, then sand with the grain and neutralize residues. Test a small spot first, wear PPE, check for lead with a certified kit, and follow local disposal rules. Keep tools, timeline, and repair steps ready, and you’ll find detailed guidance ahead.
How to Use This Guide to Remove Exterior Paint From Wood
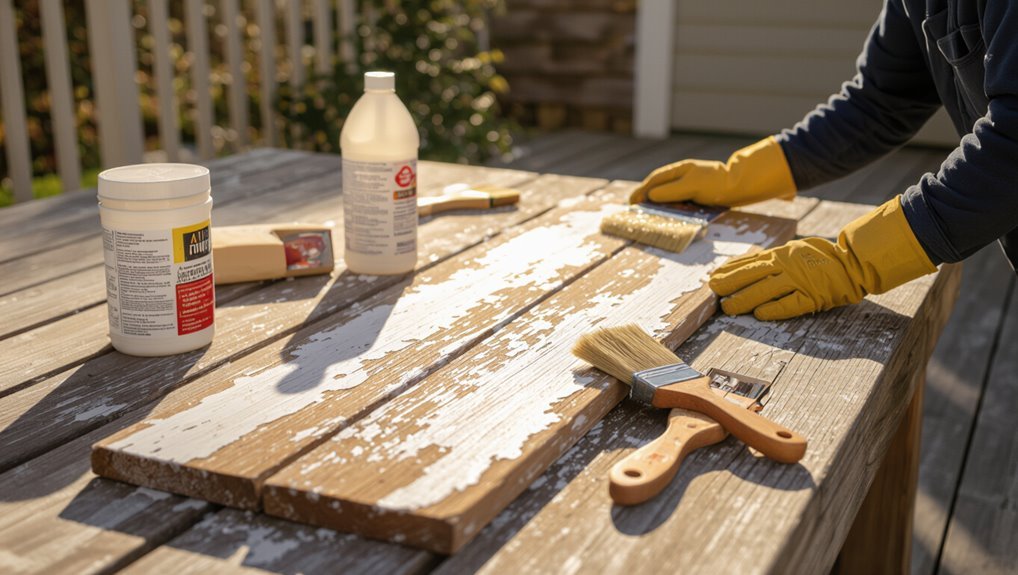
Before you start, skim the guide to match the method to your project: whether you’re stripping a small trim piece or restoring an entire porch will determine the tools, time, and safety gear you need.
Use chapters on paint removal techniques to pick a safe, effective approach, then follow wood care tips for sanding, sealing, and finishing.
You’ll save time and avoid damage.
Quick Decision Guide: Safest, Fastest, and Gentlest Options
Start by thinking about safety: you’ll want to try gentler, low-toxicity methods before moving to harsher treatments.
If you need speed, consider power sanding or a chemical stripper rated for exterior use, but use proper protection.
Balance your priorities—pick the least aggressive option that will get the job done.
Safer Methods First
Think of this section as your quick decision guide to the safest, fastest, and gentlest ways to remove exterior paint from wood.
You’ll choose safer methods first: eco friendly solutions and alternative techniques that protect wood and you.
Consider:
- Citrus or soy-based strippers for gentle softening.
- Hand-scraping with a putty knife and sanding by hand.
- Heat gun on low, moving steadily to avoid scorching.
Fastest Removal Options
1 clear choice for fast paint removal is a heat gun used with steady, sweeping motions—it’s quick and effective when you keep the temperature moderate and work in short passes to avoid scorching the wood.
Pair it with a wide scraper, or use a chemical stripper for larger areas. These fast methods and efficient techniques save time, but wear protection and test a small spot first.
When to Strip Paint Vs. Repaint Over It
When deciding whether to strip old exterior paint or simply repaint over it, assess adhesion, surface condition, and the paint system’s history; if paint flakes, bubbles, or shows underlying wood rot, you should strip to expose solid substrate before refinishing.
Use stripping benefits to restore grain, or choose repainting techniques for sound surfaces.
- Flaking
- Intact
- Damaged
How to Identify Lead-Based Exterior Paint
If your house was painted before 1978, the exterior paint could contain lead—look for cracked, chalky, or multiple layers of old paint as signs.
You shouldn’t assume it’s safe, so use a certified lead test kit or hire a professional to sample and analyze the paint.
Take precautions while testing to avoid spreading dust or chips.
Signs Of Old Paint
Peeling, cracking, chalky residue, and multiple paint layers are common signs that exterior wood paint is old—and that it might contain lead.
You should note reduced paint durability and varied surface textures.
Imagine:
- Flaking edges like dried petals.
- Powdery chalk under your finger.
- Thick, uneven layers hiding newer coats.
Treat these as warnings and proceed cautiously.
Testing For Lead
Because older exterior paint can contain lead, you’ll want to confirm whether it’s present before you start any removal work.
Use EPA-approved lead testing kits or hire a certified inspector for accurate results.
If tests are positive, follow strict safety protocols: isolate the area, wear PPE, wet methods to reduce dust, and consider professional abatement to protect your household and neighbors.
Legal and Safety Rules for Working With Lead Paint
When you’re dealing with old exterior paint, first confirm whether it contains lead, because federal, state, and local rules govern how you must handle and dispose of it; failing to follow them can trigger fines and health risks.
You must follow safety regulations for lead hazards: use proper PPE, seal the work area, and hire certified contractors when required.
- HEPA vacuum
- Containment
- Certified disposal
How Weather and Season Affect Exterior Paint Stripping
If you plan your stripping around temperature and moisture, you’ll get cleaner results and avoid damage to the wood or the stripping chemicals.
Consider weather impact: avoid freezing or extreme heat, and keep humidity low for effective chemical action and drying.
Seasonal considerations matter—spring and fall offer moderate temps.
Plan around rain forecasts, let wood dry fully, and protect exposed areas during curing.
Choosing a Method by Project Size and Paint Condition
Now that you’ve planned around weather and drying, pick a stripping approach that matches the scope of the job and how the paint is holding up.
Do a clear paint assessment, then match method to project scope. Visualize scale:
- Small: hand-scrape, sand.
- Medium: power tools, heat gun.
- Large: contractor equipment, staged sections.
Choose based on time, safety, and wood condition.
Chemical Paint Strippers for Exterior Wood: Pros and Cons
Although chemical strippers work faster than scraping alone, they demand careful handling and the right product for exterior wood. You’ll balance speed with safety precautions and consider environmental impact. Use PPE, contain runoff, and neutralize residues. Pros: efficient, deep removal. Cons: toxic, disposal issues, surface damage risk.
| Benefit | Drawback | Note |
|---|---|---|
| Fast | Toxicity | Use PPE |
| Thorough | Disposal | Contain runoff |
Choose the Right Chemical Stripper for Exterior Wood
You’ll want to weigh the main chemical stripper types—caustic, solvent, and bio-based—so you know which works best for your paint and wood.
Consider safety and compatibility: check label warnings, required PPE, and whether the stripper’s chemistry will harm the wood or nearby finishes.
Also factor in environmental concerns like VOCs, disposal rules, and runoff prevention before you start.
Chemical Stripper Types
Choose a chemical stripper based on the wood’s condition, the type of finish, and environmental or safety constraints.
You’ll weigh chemical stripper effectiveness against environmental impact and ease of cleanup.
Pick one that suits paint thickness and wood age:
- Gel — clings to verticals, slow-acting.
- Paste — controlled, good for detailed trim.
- Liquid — fast, best for large, flat surfaces.
Safety And Compatibility
With the type of stripper picked—gel for verticals, paste for trim, or liquid for flats—you should next match its safety profile and chemical compatibility to your wood and surroundings.
Read labels, don proper safety gear, and guarantee ventilation.
Perform small compatibility testing on an inconspicuous area to check staining or softening.
Choose formulas that balance effectiveness with safer handling for your project.
Environmental Considerations
While you focus on effective paint removal, take time to contemplate the environmental impact of your stripper choice; water-based, biodegradable, or low-VOC formulas reduce harm to soil, plants, and waterways compared with traditional methylene chloride or high-VOC solvents.
Choose eco friendly practices and sustainable materials, and picture outcomes:
- Gentle runoff nourishing soil.
- Healthy plants beside cleaned siding.
- Clear stormwater, safer wildlife.
Apply Solvent and Caustic Strippers Safely
Before you start, make sure you’ve picked the right stripper for the job and set up a well-ventilated workspace, because solvent and caustic products can damage wood and harm you if misused.
Wear gloves, eye protection, and a respirator; follow label directions for solvent safety and neutralization.
Test a small area, work in manageable sections, and dispose of waste per local hazardous-waste rules.
Low‑VOC and Biodegradable Stripping Gels: When to Use
If you’re concerned about fumes, disposal, or working indoors, low‑VOC and biodegradable stripping gels offer a safer alternative to stronger solvent or caustic products.
You’ll choose biodegradable options and eco friendly solutions when odor, cleanup, and waste matter.
Picture application steps:
- Spread gel; wait.
- Scrape softened paint gently.
- Rinse residue; repeat if needed.
Heat Guns for Exterior Wood: Pros and Cons
Heat guns strip paint fast and can be very effective on thick exterior coatings, so you’ll save time compared with chemical gels.
You’ll need to take safety precautions—wear heat-resistant gloves and eye protection, watch for lead paint hazards, and control sparks or nearby combustibles.
Also plan on careful surface prep and scraping to remove softened paint without gouging the wood.
Effectiveness And Speed
Because a heat gun softens paint quickly, you’ll see large sections lift within minutes, making it one of the fastest methods for stripping exterior wood when conditions are right.
You can apply efficiency techniques and time saving methods by working systematically:
- Follow grain to peel strips.
- Hold gun steady for even heat.
- Scrape softened paint promptly to prevent rehardening.
Risks And Safety
When you use a heat gun on exterior wood, you’re speeding up paint removal but also raising real safety risks you need to manage: you should do a risk assessment, follow safety precautions, wear PPE, and avoid ignition sources.
| Hazard | Mitigation |
|---|---|
| Burns | Gloves, distance |
| Fire | Clear area |
| Lead dust | Test first |
| Smoke | Ventilate |
| Damage | Lower temp |
Surface Preparation Needs
If you’re planning to use a heat gun on exterior wood, prepare the surface so the tool works efficiently and safely: remove loose debris, mask off nearby trim and glass, and dampen or cover adjacent plants and materials that could scorch.
Use surface cleaning techniques and a wood condition assessment before heating.
Visualize:
- peeling layers
- charred edges
- bare grain exposed
Use a Heat Gun Without Scorching the Wood
A heat gun speeds paint removal on wood, but you’ve got to control the temperature and distance to avoid scorching the grain.
Start on a low heat setting, test on scrap to match heat settings to wood types, and keep the nozzle moving.
Hold the gun several inches away, soften paint until it bubbles, then scrape gently.
Don’t overheat or linger.
When to Use Infrared Paint Removers
One good time to reach for an infrared paint remover is when you’re working on delicate or historical wood that could scorch, smoke, or emit toxic fumes from aggressive heat or chemical strippers.
You’ll use infrared technology for controlled softening, prioritizing paint safety.
Visualize the process:
- Paint lifts gently.
- Grain stays intact.
- Minimal residue for cleanup.
Sanding Strategies for Removing Exterior Paint on Wood
Start by picking the right grit sequence so you don’t gouge the wood—begin with a coarser grit to remove paint, then step up to finer grits for a smooth finish.
Sand with the grain whenever possible to avoid scratches and keep the surface even.
Control dust with a shop vacuum, tack cloths, or a respirator and masking to protect yourself and nearby areas.
Choose Grit Sequence
Begin with a coarse grit to remove most of the paint, then work progressively to finer grits to smooth the wood and prepare it for refinishing.
You’ll use grit selection and sanding techniques to control removal and finish.
Visualize stages:
- 60–80 grit for heavy removal
- 100–120 grit for blending
- 150–220 grit for final smoothing before sealing or painting
Sanding Direction Matters
Because wood has a grain, you should sand along that grain whenever possible to avoid scratches that will show through the new finish.
You’ll start cross-grain only to remove stubborn paint, then reorient with the grain for final passes.
Use varied sanding techniques—hand, block, or orbital—lightening pressure as you finish.
This protects fibers and supports long-term wood preservation.
Dust Control Techniques
When you’re sanding exterior wood, controlling dust is as important as choosing the right grit—you’ll protect your health, the surrounding area, and the finish’s adhesion.
Use these dust control methods and monitor air quality:
- Vacuum-equipped sander capturing particles.
- HEPA air purifier near the work zone.
- Wet-sanding small areas or misting to minimize airborne dust.
Best Sandpaper Grits and Tools for Exterior Wood
Before you power up a sander, pick grits and tools that match the job: coarse grits (40–80) strip thick, multiple coats quickly; medium grits (100–150) smooth rough edges and blend remaining finish; fine grits (180–220) prep the wood for repainting or staining.
Choose sandpaper types (aluminum oxide, silicon carbide) and hand or detail tools; use proper sanding techniques, inspect progress, and change grits progressively.
Using a Random‑Orbit Sander Safely on Exterior Trim
If you’ve never used a random-orbit sander on exterior trim, start by tuning your setup and safety habits so you don’t damage delicate profiles or the surrounding surfaces.
You’ll apply proper sander techniques and prioritize trim safety:
- Use fine-grit pads and gentle pressure.
- Move with the grain, keep the pad flat.
- Mask nearby glass and edges before sanding.
Hand‑Stripping Techniques for Delicate Woodwork
Because delicate mouldings and carved details can’t take the aggressiveness of power tools, you’ll rely on hand‑stripping to remove paint precisely without gouging the wood.
Use small scrapers, dental picks, nylon brushes and scrubbing pads, applying minimal pressure and solvent where needed.
Practice careful hand tools techniques to follow grain lines, protect edges, and prioritize finish preservation so original profiles stay intact.
Combine Scraping, Sanding, and Chemical Stripping Effectively
Before you start, make sure you’ve prepped the area, worn proper PPE, and tested a small spot to choose the safest stripper.
Work in stages: scrape loose paint first, follow with targeted chemical stripper for stubborn layers, then finish with sanding to smooth the wood.
Move methodically so you remove paint without damaging the surface.
Prep And Safety
Start by clearing the work area, putting on proper PPE, and planning each step so you can move smoothly between scraping, sanding, and chemical stripping without backtracking.
You’ll follow paint removal techniques and safety precautions, keep dust contained, and protect plants.
Visualize tasks:
- Remove loose paint.
- Isolate work zone.
- Prep disposal and cleanup.
Stepwise Removal Process
Work methodically: combine scraping, sanding, and chemical stripping in clear stages so each step prepares the wood for the next and you avoid needless rework.
Start with manual scraping to remove loose layers, then apply appropriate stripping techniques where paint adhesion is persistent.
Neutralize and clean residues, sand progressively to smooth fibers, and inspect for remaining spots before finishing with primer or new paint.
Protecting Wood Grain and Profiles During Stripping
When you strip paint from exterior wood, take care to preserve the grain and carved profiles by choosing gentler methods and testing them on hidden areas first.
Use wood preservation techniques and a stripping methods comparison to pick gentle approaches.
Visualize the goal:
- Soft chemical gel to lift paint.
- Low-heat or infrared for thin layers.
- Fine-detail hand tools and soft brushes.
Best Tools for Scraping Exterior Paint From Wood
You’ll want to match the tool to the job: handheld scrapers and putty knives are great for tight corners and delicate profiles.
For larger, flatter areas you can use power sanders or oscillating sanders to speed things up.
When paint’s stubborn or multilayered, chemical paint strippers can loosen it before you scrape or sand.
Handheld Scrapers And Putty
Although power tools can speed the job, handheld scrapers and putty knives give you the control you need to remove peeling or loose exterior paint without gouging the wood.
You’ll use handheld advantages and putty techniques to work carefully. Visualize the action:
- Thin blade scraping along grain.
- Narrow tip for corners.
- Wide knife for smoothing and filling.
Power Sanders And Sanders
Power sanders speed paint removal on large exterior surfaces, letting you strip old layers more evenly than handheld scrapers.
You’ll choose sander types—orbital for finesse, belt for heavy stock removal—and follow proper sanding techniques: move with the grain, use progressively finer grits, clamp loose boards, and wear PPE.
Keep dust containment and avoid gouging to preserve wood for repainting.
Chemical Paint Strippers
When sanding’s too slow or you’re working around delicate trim, chemical paint strippers give you a faster, less abrasive way to lift old finishes from exterior wood.
You’ll choose formulas, follow application techniques, and respect safety precautions.
Visualize the process:
- Thick gel melting paint.
- Scraper lifting soft layers.
- Clean wood revealed for primer.
Set Up Containment and Protect Surrounding Areas
Start by clearing and covering the work area so paint chips and dust stay contained: move furniture and plants away, sweep the floor, and lay down drop cloths or plastic sheeting extending several feet beyond the work zone. Use containment methods, surface protection, and cleanup procedures that limit spread and respect environmental considerations.
| Task | Material |
|---|---|
| Floor | Drop cloth |
| Plants | Plastic |
| Edges | Tape |
| Debris | Seal bags |
| Disposal | Local rules |
Personal Protective Equipment for Exterior Paint Removal
Before you start stripping paint, make sure you’ve got the right PPE: a certified respirator for dust and fumes, chemical-resistant gloves, and eye/face protection.
Don’t skip a respirator when sanding or using chemical strippers, and choose gloves rated for solvents. Fit your face shield or goggles properly so debris and splashes can’t reach your eyes or skin.
Proper Respiratory Protection
Removing exterior paint can kick up dangerous dust and fumes, so you need the right respiratory protection every time you work.
You’ll assess respiratory hazards and choose protective gear that fits. Wear a NIOSH-rated respirator, seal gaps, and swap cartridges per label.
- Tight seal
- Fresh cartridges
- Clean straps
Chemical-Resistant Gloves
One pair of chemical-resistant gloves can keep your hands safe from solvents, strippers, and lead-contaminated dust while you remove exterior paint.
You should choose glove materials (nitrile, neoprene, butyl) based on chemicals used and follow safety precautions: inspect for tears, change gloves often, avoid touching your face, and dispose of contaminated gloves per local regulations to prevent exposure.
Eye And Face Shields
While you’re stripping exterior paint, wear eye and face shields to protect against flying debris, chemical splashes, and dust that can injure your eyes and skin; you should practice safety awareness and choose protective gear that fits.
- Full-face shield for splashes
- Goggles under a visor for particles
- Disposable face cover for dust and mist
Dust Control and Vacuums for Exterior Sanding
Because exterior sanding kicks up a lot of dust and old paint chips, you should control it from the start with the right tools and setup.
Use compatible dust collection systems on sanders and HEPA-filtered shop vacs. Choose vacuum types rated for lead or hazardous dust when needed.
Seal work areas, run continuous extraction, and empty filters outdoors to minimize cleanup and airborne particles.
How to Neutralize and Rinse After Chemical Stripping
After the stripper has done its job, you’ll need to choose the correct neutralizer (acid or alkaline) recommended by the product and apply it evenly to stop the chemical reaction.
Use a stiff brush or low-pressure sprayer to work the neutralizer into the wood, then follow with a thorough rinse using clean water until runoff tests neutral.
Finish by blotting or allowing the surface to dry completely before sanding or refinishing.
Neutralizer Selection And Use
When chemical strippers lift paint from wood, you’ll need to neutralize the surface to stop the reaction and prevent residue that can interfere with new finishes.
Choose neutralizer types (acidic, alkaline, or solvent-based) and follow clear application techniques.
Visualize steps:
- Apply evenly with brush.
- Wait specified dwell time.
- Blot and remove residues, then let wood dry before finishing.
Thorough Rinse Techniques
Now that you’ve neutralized lifted paint, you’ll need to rinse thoroughly to remove chemical residues that can affect adhesion and finish appearance.
Use low-pressure water and a soft brush, working with the grain to avoid damage. Rinse until runoff is clear, then blot excess moisture and let wood dry completely.
These effective techniques guarantee thorough rinsing and a clean surface ready for priming.
Repairing Wood Damage Found After Paint Removal
Inspect the bare wood carefully for rot, cracks, gouges, or nail pops so you know exactly what repairs are needed before refinishing.
Use damage assessment tips and basic wood restoration techniques to plan fixes. Then act:
- Replace rotten sections.
- Fill gouges with epoxy or wood filler.
- Drive or reset nails, sand smooth.
Prime repaired areas before repainting.
Tackling Stubborn Multiple Paint Layers
Peeling back multiple layers of exterior paint can be stubborn, but with the right tools and approach you’ll strip it down efficiently without damaging the wood.
Start by testing small areas to assess paint adhesion, then combine heat, chemical strippers, and careful scraping as removal techniques.
Work in sections, clean residue promptly, and protect surrounding surfaces to avoid gouging the substrate.
Prepare Stripped Exterior Wood for Primer and Paint
Before you prime and paint, make the wood surface clean, dry, and smooth so the new coatings will bond properly and last.
You’ll do focused wood surface preparation: remove dust, sand for uniform texture, and repair gouges.
Use proper primer application techniques—thin coats, brush or roller work, and back-rolling.
- Sanded
- Cleaned
- Patched
Best Primers for Stripped Exterior Wood
Now that the wood is sanded, cleaned, and patched, pick a primer that matches the surface condition and your topcoat choice.
Choose oil-based for raw or tannin-rich wood, latex for ease and breathable finishes, or bonding primers for tricky surfaces.
Choose oil-based for raw or tannin-rich wood, latex for ease and breathability, or bonding primers for tricky surfaces.
Consider primer types for mildew resistance and stain blocking.
Test for surface adhesion, follow manufacturer directions, and apply evenly for durable paint performance.
How Long to Wait Before Repainting Stripped Wood
Once the primer and any fillers have fully cured, wait until the wood is completely dry and free of dust before you apply the topcoat.
Your repainting timeline depends on temperature and humidity; follow product cure times and inspect moisture content.
Visualize the stages:
- Bare, stripped wood.
- Primed and cured surface.
- Sanded, clean, ready for paint — proper wood preparation.
Eco‑Friendly and Home Remedy Stripping Options
You can tackle paint removal with greener choices like citrus- or soy-based solvents and simple home remedies such as vinegar or baking soda.
Pair those with mechanical tools—scrapers, wire brushes, or an orbital sander—to reduce chemical use.
If you need stronger action, choose low-VOC, biodegradable chemical strippers labeled safe for wood and follow all safety instructions.
Natural Solvent Alternatives
While commercial paint strippers work fast, you can often remove exterior paint using eco-friendly solvents and common household remedies that cut fumes and chemical exposure.
You’ll use natural solvents and eco-friendly options like citrus, soy, or heat-activated gels.
Visualize:
- Orange oil softening layers.
- Soy paste lifting flakes.
- Gentle alkaline wash rinsing residue.
Follow product instructions and test a hidden spot.
Mechanical Removal Tools
Grab the right tools and plan your approach: mechanical removal methods—scraping, sanding, heat application, and gentle abrasion—give you control without harsh chemicals, and many eco-friendly options and home remedies can reduce dust and waste.
You’ll use paint scraper techniques for loose layers, choose sanding methods for smooth changes, try low‑heat or infrared for stubborn spots, and collect debris for proper disposal.
Safe Chemical Strippers
After you’ve tried scraping, sanding, or gentle heat and still have stubborn paint residues, safe chemical strippers can finish the job with less effort and lower environmental impact than traditional solvents.
You’ll choose safe alternatives, follow chemical safety, and protect wood grain.
Imagine:
- A paste easing flakes.
- A citrus gel lifting layers.
- A biodegradable soak rinsing clean.
Cost Comparison: DIY Vs Hiring a Professional
How much will it cost you to strip exterior paint from wood yourself versus hiring a pro? You’ll weigh DIY Cost (strippers, tools, time) against Professional Fees (labor, disposal). DIY saves money but demands effort; pros cost more yet move faster and guarantee results.
| Option | Typical Range |
|---|---|
| DIY Cost | $30–$300 |
| Professional Fees | $300–$2,000 |
What to Expect When Hiring a Professional Paint Remover
Expect clear communication and a tidy work area when you hire a professional paint remover: they’ll inspect the wood, explain their chosen method (chemical, heat, or abrasive), give a firm estimate and timeline, and outline any prep you need to do or hazards to expect.
You’ll discuss cost considerations and project timelines.
Visualize results:
- Clean stripped grain
- Minimal dust
- Even surface ready for refinishing
Common Mistakes That Damage Wood During Paint Removal
One common mistake is rushing the job and using too much force — you might gouge the wood with a heat gun, metal scraper, or aggressive sanding when you try to speed things up.
You can also strip without testing chemicals, ignore grain direction, or skip protective measures.
Know these common pitfalls, pause to assess, and follow wood preservation practices to prevent irreversible damage.
Troubleshooting Paint That Won’t Come Off
If paint refuses to come off despite patience and proper technique, start by identifying why it’s holding fast — old oil-based coatings, multiple layers, or stubborn primer often resist standard methods.
Diagnose paint adhesion issues, then try targeted approaches:
- Heat to soften layers.
- Chemical stripper for oil-based build-up.
- Mechanical sanding for final cleanup.
You’ll tackle stubborn paint removal efficiently.
Seasonal Maintenance to Avoid Future Full Stripping
When you keep up with seasonal maintenance, you’ll prevent weather and wear from forcing a full strip later on.
Inspect painted wood each season, remove mildew, and address peeling spots promptly.
Use gentle seasonal cleaning, touch up chips with compatible paint, seal exposed edges, and follow simple maintenance tips like clearing gutters and trimming plants to minimize moisture and sun damage.
Storing and Disposing of Paint and Stripper Waste Safely
Keeping up with seasonal touch-ups also means handling leftover paint and stripper properly so they don’t create hazards later.
You should follow local paint disposal rules and label containers. Store sealed cans in a cool, ventilated spot away from children.
For safe waste management, consider hazardous waste pickup.
Visualize:
- Sealed cans
- Absorbent-soaked rags in metal tins
- Labeled, dated storage boxes
Tools and Supplies Checklist for an Exterior Strip Job
1 practical kit will save you time and keep the job safe: gather personal protective equipment (gloves, respirator rated for organic vapors, eye protection), hand tools (scrapers, putty knives, wire brushes), power tools with dust collection (orbital sander, heat gun if allowed), chemical strippers and neutralizers appropriate for exterior wood, drop cloths and tape, collection containers for waste, and a first-aid kit—ensure each item is in good condition and you know how to use it before you start.
For a concise tools overview, list essentials, check functionality, and plan supply sources like local hardware stores, specialty suppliers, or reputable online retailers.
Project Timeline and Workflow for a Typical Porch
Once you’ve gathered your kit and assessed the porch, map a clear, phased timeline—prep, stripping, cleanup, and finish—so you can work in predictable blocks and avoid weather or drying surprises.
Once your kit’s ready, set a phased timeline—prep, strip, clean, finish—to work in steady, weather-proof blocks
Use project management basics to schedule crews and materials for workflow efficiency.
Visualize tasks:
- Remove fixtures, tarps
- Strip paint sectionally
- Sand, seal, final touches
Inspecting and Verifying Successful Paint Removal
Before you move on to sanding or repainting, inspect the stripped surface closely to confirm you’ve removed paint down to bare, sound wood without gouging or leaving residue in cracks.
Use tactile and visual inspection methods, a light, and magnification to spot remnants. Test adherence with a fingernail or scraper.
Record areas needing retreatment and choose appropriate paint removal techniques for stubborn spots.
Frequently Asked Questions
Can Exterior Paint Stripping Damage Nearby Masonry or Concrete?
Yes — you can damage nearby masonry or concrete during paint removal; you should use paint removal techniques that minimize runoff and contain debris, and you’ll install surface protection like drop cloths, barriers, and gentle methods to prevent harm.
How Do You Handle Painted Wood With Rot or Insect Infestation?
Inspect to confirm infestation and rot before cleaning; you’ll remove compromised wood, treat adjacent areas with wood treatment to kill pests and seal, replace rotten sections, and follow rot prevention measures to restore structural integrity and finish.
Are There Insurance Implications for Lead Paint Removal on Rental Properties?
Yes — you’ll face insurance implications: lead paint regulations can affect coverage, require certified abatement, and increase premiums. As a landlord, you’re responsible; rental property responsibilities include disclosure, safe removal, and documenting compliance for insurers.
Can Pressure Washing Replace Stripping for Large Siding Areas?
Yes — you can’t always substitute stripping; pressure washing effectiveness varies, and you’ll need siding maintenance tips to avoid damage. You’ll weigh time, paint condition, and substrate—think short-term speed versus long-term thoroughness and care.
What Records Should Homeowners Keep After a Professional Strip Job?
You should keep receipts, contracts, paint removal techniques documentation, waste disposal records, testing and inspection reports, warranty papers, and photos; you’ll track homeowner responsibilities like permits, lead-safe certifications, and maintenance plans for future reference.
Conclusion
You’ve got the tools and the plan—now go steady and stay safe. For example, when you stripped a 1920s porch last summer, you tested for lead, used a chemical stripper in small sections, and finished with gentle sanding; the result was smooth, durable wood ready for primer. By choosing the right method, following safety rules, and disposing of waste properly, you’ll protect yourself and preserve the wood’s life for years to come.