How to Remove Wall Decals Without Removing Paint Safely
You can remove wall decals without stripping paint by working slowly and safely: turn off HVAC, ventilate, and wear gloves and eye protection. Test a hidden spot with tape to check adhesion. Warm the decal with a hair dryer or low heat gun, then peel it back slowly at a low angle using a plastic scraper. Remove residue with isopropyl alcohol, diluted soap, or citrus solvent, patch any tiny lifts with spackle and touch up paint, and keep going for more tips.
Before You Start: Safety, Prep, and Paint Risks
Before you peel anything off the wall, take a moment to protect yourself and the room: turn off HVAC to avoid spreading dust, open a window for ventilation if you’ll use heat or solvents, and wear gloves and eye protection when handling adhesive removers.
You’ll gather safety gear, test a small patch, and do careful wall preparation to assess paint adhesion and avoid damage during removal.
Quick Checklist to Remove Wall Decals Without Damaging Paint
Before you pull a decal off, test a small hidden spot to make sure the paint’s firmly bonded.
Use gentle heat from a hair dryer to soften the adhesive while you peel slowly at a low angle.
Once the decal’s off, remove leftover adhesive with a mild solvent and a soft cloth so you don’t strip the paint.
Test Paint Adhesion
Want to know if the paint will hold up when you peel the decal? Test a small corner: press a piece of clear tape, then pull at 45°.
Check for paint lift to assess paint durability and surface compatibility. Try a discreet spot like behind furniture.
If paint flakes or sticks to the tape, stop and reconsider removal methods or seek professional advice.
Use Gentle Heat
If your tape test shows the paint held up, you can use gentle heat to loosen the decal adhesive so it peels more cleanly.
Hold a hair dryer on low to medium, keeping it 6–8 inches away. Adjust heat settings and limit heating duration to short bursts (10–20 seconds) while gently lifting an edge.
Stop if paint softens or discolors.
Remove Adhesive Residue
1 simple trick for clean walls: tackle leftover adhesive with gentle products and steady pressure so you don’t harm the paint.
Use adhesive removal techniques like rubbing alcohol, mild dish soap, or a commercial adhesive remover applied sparingly.
Test first, work gently with a soft cloth or plastic scraper, then rinse and pat dry.
Those effective cleaning solutions preserve finish and prevent discoloration.
Identify Your Wall Finish and Paint Type
Before you start, identify your wall finish and paint type so you can choose the right removal method.
Check the paint sheen—flat, eggshell, satin, or gloss—because higher sheens are less porous and hold decals differently.
Also run a quick texture test (press a fingernail in an inconspicuous spot) to see how delicate the surface is.
Determine Paint Sheen
Start by looking closely at your wall’s surface and finish—glossy, satin, eggshell, or flat—because the paint sheen affects how adhesive removes and how easily the paint can lift.
Determine sheen effects: higher gloss usually means greater paint durability and less risk when peeling.
Note finish before attempting removal, and choose gentler methods for lower-sheen, less durable paints.
Test Wall Texture
Now check the wall’s texture and paint type, since sheen alone doesn’t tell the whole story.
You’ll inspect wall texture types—smooth, orange peel, knockdown, or plaster—and test a small decal edge with heat and adhesive remover.
Note texture compatibility: delicate textures or flat paint need gentler methods to avoid lift or damage.
Proceed slowly and reassess.
How to Test Decal and Paint Adhesion in a Small Spot
Because paint types and adhesives vary, you should always check a small, inconspicuous spot to see how the decal comes off and whether the paint lifts.
Do a quick adhesion testing routine to assess decal types and paint bonding before full removal.
- Clean area gently
- Warm decal with hairdryer
- Peel slowly at 45°
- Note paint lift or residue
- Use mild solvent if needed
When to Avoid DIY and Call a Pro
If the decal covers a textured surface, spans a large area, or the paint looks fragile during your spot test, call a pro—this kind of job risks significant paint damage or uneven removal that’s hard to fix on your own. You should seek expert advice and professional services when seams, moldings, or old paint complicate removal.
| Situation | Action |
|---|---|
| Textured wall | Call pro |
| Large decal | Call pro |
| Fragile paint | Call pro |
| Molding edges | Call pro |
| Old paint | Call pro |
Tools You’ll Need for Safe Decal Removal
You’ll want the right heat source and a few gentle tools before you start. A hair dryer or heat gun on low will soften the adhesive without damaging paint, and a plastic scraper, microfibre cloth, and adhesive remover help lift the decal cleanly.
Keep everything within reach so you can work steadily and avoid rushing.
Heat Source Options
When removing wall decals, choose a gentle, controllable heat source so you can soften the adhesive without damaging paint or wallpaper.
You’ll use modest heat sources and consider alternative methods if paint is delicate. Pick tools that let you target small areas and adjust temperature so you don’t scorch finishes.
- Hair dryer (low/medium)
- Heat gun (low setting)
- Warm towel
- Steam cleaner (gentle)
- Infrared lamp
Gentle Removal Tools
Gather a few simple, gentle tools before you start removing decals so you can work slowly and protect the underlying paint or wallpaper.
You’ll need a hair dryer or heat gun on low, a plastic scraper, microfibre cloths, mild adhesive remover, and painter’s tape.
Use gentle adhesive techniques, test solutions first, and apply protective covering options for nearby trim and floors to prevent damage.
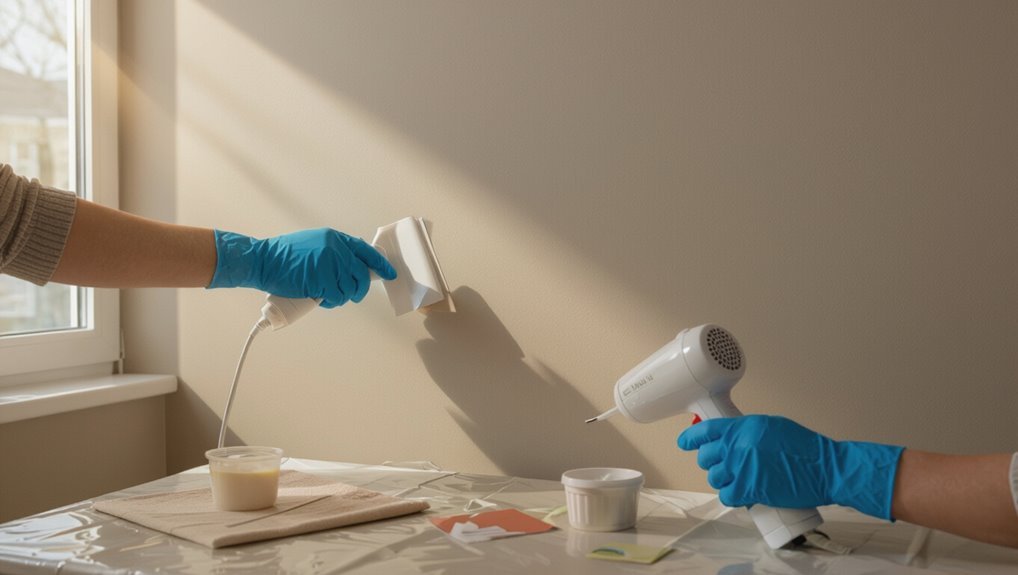
Use Heat to Remove Wall Decals (Hair Dryer or Heat Gun)
Warm the decal slowly to soften the adhesive before peeling.
You’ll use warm air from a hair dryer or low‑setting heat gun for controlled heat application. Move in small circles, keep the tool 6–8 inches away, and test a corner. Pause to avoid overheating.
- Low heat setting
- Even motion
- Short bursts
- Protective distance
- Test first
Gentle Peeling Technique to Lift Decals Without Paint Damage
With steady hands and patience, start at a softened corner and peel the decal back slowly, keeping the angle shallow to reduce pull on the paint.
You’ll use gentle peeling motions, holding the sheet taut near the wall and pausing if resistance rises. Work evenly across the piece, reheat mildly if needed, and stop immediately if paint lifts to reassess using other effective techniques.
Use Dental Floss or Fishing Line for Stubborn Edges
If a corner won’t budge, slip a length of dental floss or thin fishing line behind the edge and saw gently back and forth while pulling downward to cut the adhesive without tugging the paint.
You’ll adapt technique based on decal lifespan and adhesive types to avoid damage.
- Work slowly
- Use fresh floss/line
- Keep angle shallow
- Support surrounding paint
- Clean residue gently
Make a DIY Adhesive Solvent Safely
Though you can buy commercial adhesive removers, you can also make a simple, effective solvent at home using common household ingredients—just follow safety steps and test a small hidden area first.
Mix equal parts warm water and mild dish soap, or dilute rubbing alcohol with water for tougher residue.
Use gloves, ventilate, and try DIY solvent recipes as safe adhesive options that minimize paint risk.
Low‑Chemical Adhesive Removers That Won’t Strip Paint
You can use gentle solvents like citrus-based removers, rubbing alcohol diluted with water, or a mild dish soap solution to loosen adhesive without harming paint.
Apply them sparingly with a soft cloth or cotton swab and blot—don’t rub aggressively—to avoid lifting finish.
Test the solution on a hidden spot first and let it sit briefly before gently scraping residue away.
Gentle Solvent Options
Start with mild, paint-safe solvents like isopropyl alcohol (70%–91%), citrus-based adhesive removers, or a diluted dish soap solution — they loosen adhesive without attacking most latex paints.
You’ll use gentle solvents that respect paint by targeting adhesive properties. Test first in an inconspicuous spot.
- Isopropyl alcohol (70%–91%)
- Citrus solvent
- Diluted dish soap
- White vinegar (diluted)
- Rubbing alcohol wipes
Paint-Safe Application Methods
When using low-chemical adhesive removers, work in thin, controlled steps so you don’t overwhelm the paint: apply a small amount with a soft cloth or cotton swab, let it sit just long enough to loosen residue, then gently blot or lift—repeating only as needed and always testing a hidden spot first.
You’ll monitor paint application compatibility, match remover to decal materials, and rinse gently.
Safe Scraping: Choose the Right Scraper and Angle
Pick a scraper that matches your decal and wall: a soft plastic or silicone-edged tool for painted drywall to prevent gouges, a razor blade held at a low angle for glass or ceramic, and a flexible putty knife for textured surfaces.
Use a safe scraper and maintain the ideal angle to lift edges without digging.
- Test on an inconspicuous spot
- Work slowly, steady pressure
- Keep blade clean
- Change angle if resistance rises
- Support surrounding paint
Remove Adhesive Residue Safely: Solvents, Wipes, and Alternatives
After you’ve lifted the decal, you’ll often be left with sticky residue that needs careful removal to protect the surface.
Use removal techniques like warm soapy water, rubbing alcohol, or citrus-based solvents; assess solvent effectiveness and surface compatibility first.
Try warm soapy water, rubbing alcohol, or citrus solvents—test each for effectiveness and surface compatibility first.
Try eco-friendly options and adhesive alternatives (vinegar, baking soda).
Follow product recommendations, application methods, safety measures, and cleanup tips to avoid damage.
Repair Small Paint Lifts, Scuffs, and Texture
Small paint lifts, scuffs, and minor texture damage are fixable with a few simple tools and careful technique, so you don’t have to repaint an entire wall.
Use basic paint repair techniques and surface preparation tips:
- Clean area gently
- Lightly sand loose edges
- Apply spackle for texture
- Sand smooth when dry
- Touch up with matching paint
Prevent Future Damage: Priming and Decal Placement Tips
If you want decals to come off cleanly next time, prime and plan their placement before you stick them on: a proper primer creates a uniform surface that reduces adhesive bite and makes removal easier, while thoughtful placement avoids vulnerable spots like textured areas, high-traffic zones, and freshly repaired patches.
| Surface | Primer | Placement |
|---|---|---|
| Smooth | Use bonding | Avoid corners |
| Fresh paint | Wait cure | Mid-wall |
| Glossy | Sand first | Low-traffic |
| Patch | Feather edges | Test small |
Special Cases: Vinyl Decals and Textured‑Painted Walls
When you’re dealing with vinyl decals or textured-painted walls, you’ll need different removal tactics than you use on smooth, flat surfaces; each material behaves differently and calls for tailored heat, adhesive, and scraping approaches to avoid damage.
- Test heat and peel slowly: vinyl removal techniques.
- Use soft tools on texture.
- Try adhesive remover cautiously.
- Clean residue with mild soap.
- Patch tiny texture flaws if needed.
Common Mistakes That Cause Paint to Peel : and How to Avoid Them
Because paint only sticks to a clean, sound surface, common mistakes like skipping prep, using the wrong primer, or peeling decals off too quickly often pull paint away with them.
You can avoid damage by prepping properly, matching products to the surface, and removing decals slowly and with heat or adhesive solvent as needed.
Check paint durability, follow wall preparation steps, test a small area, and work patiently.
Frequently Asked Questions
Can Decals Removal Harm Wallpaper Adhesive Bonds?
Yes — decal removal techniques can damage wallpaper adhesive bonds if you’re aggressive; you’ll want to use gentle wallpaper preservation methods, slow peeling, heat or adhesive solvent sparingly, and test a hidden spot before proceeding across larger areas.
Are Electric Heat Guns Safe for Vintage Lead-Based Paint?
Blistering beware: you shouldn’t. You’ll risk releasing lead paint particles if you use a heat gun; you’ll need safer strategies like chemical strippers, cold methods, or a certified abatement pro to prevent poisoning and contamination.
Will Sunlight Fade Surrounding Paint After Decal Removal?
Yes — sunlight effects can gradually fade surrounding paint after decal removal, so you should protect exposed areas and use paint preservation methods like UV-resistant sealants or repositioning coverings to minimize uneven fading and color loss over time.
Can Decals Be Removed From Painted Metal Surfaces Safely?
Yes — you can remove decals from painted metal surfaces safely. You’ll manage decals adhesion by heating gently, peeling slowly at a low angle, using adhesive remover if needed, then cleaning and drying to protect the metal surface finish.
How Long After Painting Should I Wait to Apply/Remove Decals?
Promptly place decals after paint’s pleasant polish: you’ll wait paint curing duration—usually 24–72 hours for touch-dry, 7–30 days for full cure—so decals application timing avoids lifting, ensuring secure stick and safe removal later.
Conclusion
Removing wall decals carefully preserves your paint and saves time — and it matters: studies show about 30% of renters face paint damage disputes when removing stickers. You can avoid becoming that statistic by testing adhesion, using gentle heat or adhesive removers, and peeling slowly at a low angle. If paint lifts despite precautions, patch small areas promptly or call a pro. Plan decal placement and use primer next time to prevent repeat damage.