How to Get Peeling Paint Off Your Deck the Right Way
You can restore a peeling-painted deck the right way by first scraping loose paint, sanding to feather edges, and replacing any rotten boards. Clean and rinse thoroughly, let the wood dry, then prime bare areas before applying quality exterior deck paint or stain. Use chemical strippers, heat, or power sanding for extensive peeling, but follow safety and disposal rules. If you stick with this guide you’ll get step-by-step methods, tool lists, and maintenance tips to finish the job.
Quick Answer How to Remove Peeling Paint from Your Deck
Start by scraping loose paint. Then sand the surface smooth and clean off dust.
Patch any damaged boards, prime bare wood, and repaint with a deck-specific finish.
You’ll get best results by working methodically and letting each coat dry fully.
One-paragraph direct solution summary
If your deck paint is peeling, strip loose paint with a scraper or wire brush.
Sand or use a power sander to feather edges.
Clean the surface thoroughly, let it dry, then prime and repaint with a high-quality exterior deck paint.
For large areas, consider a chemical stripper or pressure washer (used carefully) and always repair rotten boards before finishing.
You’ll follow steps for how to get peeling paint off deck efficiently.
Basic Understanding Why Deck Paint Peels
You’ll want to know that paint peels for a few common reasons—poor prep, moisture, and old or incompatible paint.
The type of wood and your climate affect how quickly paint fails, since softwoods and wet, fluctuating conditions trap more moisture.
Watch for widespread, deep peeling or soft, crumbly boards, because that often signals underlying rot or structural problems that need repair before repainting.
Common causes of peeling paint
When paint peels from a deck, it’s usually a sign that something beneath the surface isn’t supporting the coating—moisture, poor preparation, or incompatible products are the most common culprits.
You’ll often see peeling from trapped damp, peeling over old loose finish, inadequate priming, or applying the wrong paint or stain.
Mechanical wear, nail pops, and failed adhesion after rushed drying also cause failure.
How wood type and climate affect peeling
Because different woods absorb, expand, and hold moisture in their own ways, the species you’ve got and the climate you live in play a big role in whether paint will stick or lift.
Softwoods and porous hardwoods soak primers differently, seasonal humidity cycles cause repeated swelling and shrinking, and sun or persistent dampness breaks bonds faster—so choose coatings and timing for your specific wood and weather.
When peeling indicates structural or rot problems
If paint is flaking in concentrated spots or along boards that feel soft, don’t just blame a bad finish — check for rot or structural damage underneath.
You should inspect, probe, and act fast. Consider:
- Probe suspect areas with a screwdriver for softness.
- Replace or sister compromised joists or boards.
- Treat remaining wood and improve drainage to prevent recurrence.
Assessing Your Deck Before You Start
Before you start scraping, run a quick safety checklist and confirm any local permits you might need.
Check paint adhesion and the underlying wood for rot or loose boards so you know whether you can refinish or need repairs.
Gather the tools and materials—scrapers, sanders, PPE, and appropriate cleaners—so you’re ready to work efficiently.
Safety checklist and required permits
Start by running through a quick safety checklist and confirming any local permits you might need so you don’t run into legal or hazard surprises.
Then follow this compact plan:
- Wear PPE: goggles, respirator, gloves, non-slip shoes.
- Protect surroundings: tarps, neighbors’ property, runoff control.
- Check regulations: disposal, lead-paint rules, required inspections or permits.
How to inspect paint adhesion and wood condition
Once you’ve secured permits and set up safety gear, walk the deck methodically to test paint adhesion and inspect the wood for damage: press a fingernail or use a scraper to see if paint flakes off easily.
Tap boards to listen for hollow sounds that indicate rot, look for discoloration, soft spots, raised grain, and fastener issues, and mark areas that need patching, sanding, or full board replacement.
Check railings, stairs, and hidden undersides for similar issues.
Tools and materials you’ll need
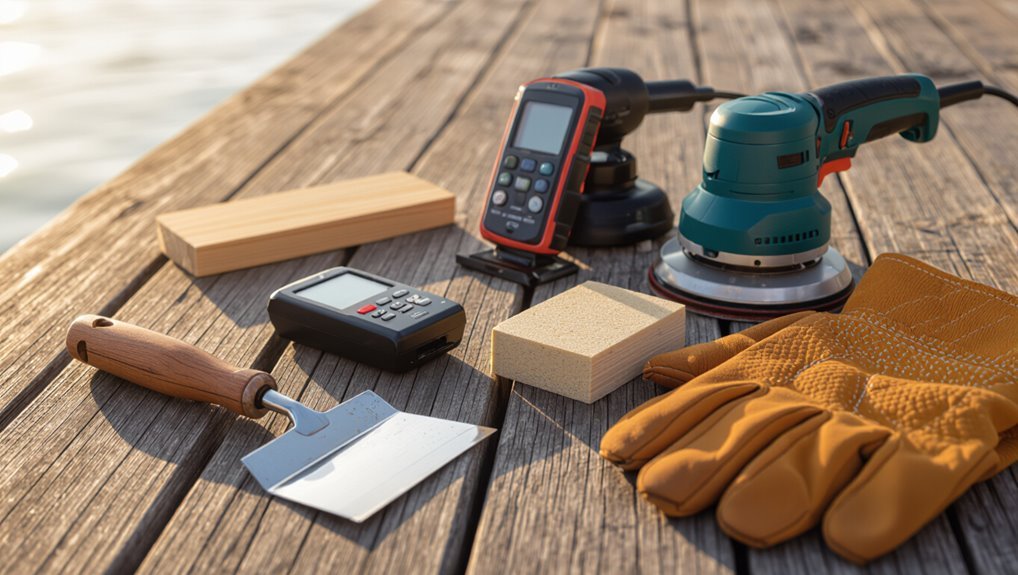
Tools and materials are what make the job manageable, so gather them before you lift a scraper: you’ll need safety gear (glasses, gloves, dust mask or respirator), hand tools (scrapers, putty knife, sanding blocks, wire brush), power tools for heavier work (orbital sander, circular saw or oscillating tool for board replacement, pressure washer if using), paint-removal supplies (chemical stripper if desired, drop cloths, plastic sheeting), deck repair items (exterior wood filler, replacement fasteners, deck boards), and finishing materials (primer, stain or deck paint, brushes, rollers, and a roller tray).
- Prioritize safety
- Match tools to damage
- Prep for cleanup
Step-by-Step: The Right Way to Remove Peeling Paint
Before you start, clear and protect the area, then clean the deck so you’re working on a stable surface.
For light peeling you’ll try soft methods like gentle scraping and chemical strippers, while extensive failure calls for mechanical tools and dust control.
If the paint might contain lead, test first and follow legal safety protocols, then finish by thoroughly cleaning and preparing the bare wood for repainting.
Preparation: clearing, cleaning, and protecting surroundings
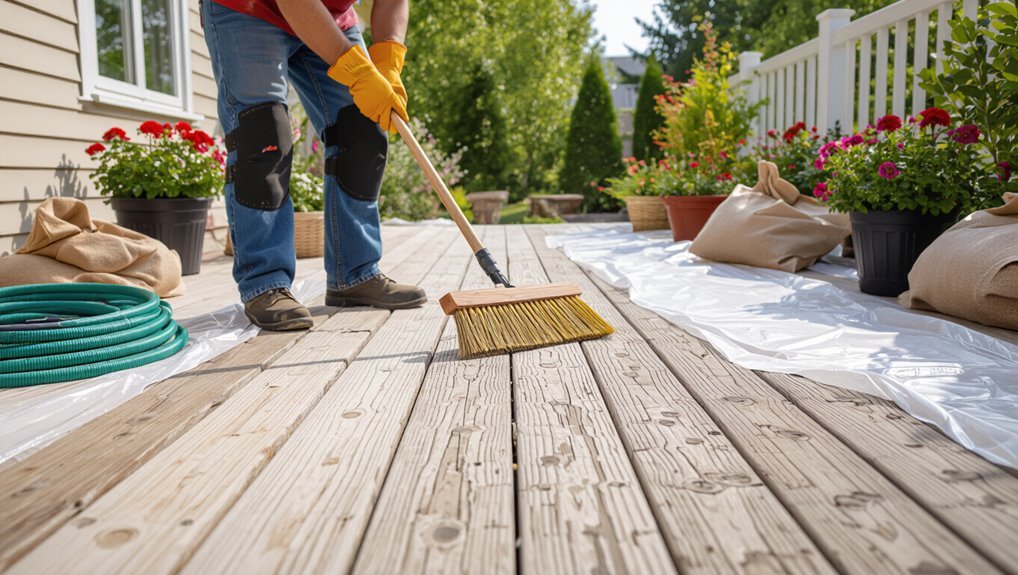
Start by clearing the area so you have space to work and nothing you care about will get damaged; move furniture and potted plants away, trim overhanging branches, and sweep loose debris off the deck.
Clean surfaces with a mild detergent and rinse, then protect surroundings with tarps and masking.
Consider:
- Cover plants
- Block runoff
- Protect hardware
Soft removal methods (for lightly peeling paint)
Start by washing the deck with soap, water, or a commercial deck cleaner to lift dirt and loosen paint flakes.
For remaining soft or lightly peeling spots, use a hand scraper and then sand by hand—start with 80–100 grit for stubborn areas and finish with 120–150 grit for a smooth surface.
You’ll avoid damage by working gently and checking your progress often.
Soap, water, and deck cleaners
If paint is only flaking lightly, you can usually remove it with soap, water, and a deck cleaner without sanding or power tools.
Wet the deck, apply a deck cleaner per label, scrub with a stiff brush, and rinse thoroughly.
Repeat stubborn spots, let wood dry completely, then inspect for remaining loose paint.
Proceed to priming or recoating when surface is clean and dry.
Scraping and sanding by hand techniques and grit recommendations
Once the deck is clean and dry, move on to removing any remaining loose paint by hand before you reach for power tools.
Use a sharp putty knife or stiff scraper at a low angle, working with the grain.
Sand edges and rough spots by hand—start 80–100 grit to remove coating, finish 120–150 grit for smoothness.
Wear gloves and a dust mask.
Mechanical removal methods (for extensive peeling)
When peeling is widespread you’ll need mechanical methods like power sanding and orbital sanders—I’ll walk you through the step-by-step setup and technique.
You’ll also learn safe use of heat guns and infrared removers, plus precautions to avoid burns and scorched wood.
Finally, we’ll cover chemical paint strippers: types, how to apply and remove them, and how to neutralize surfaces afterward.
Power sanding and orbital sanders step-by-step
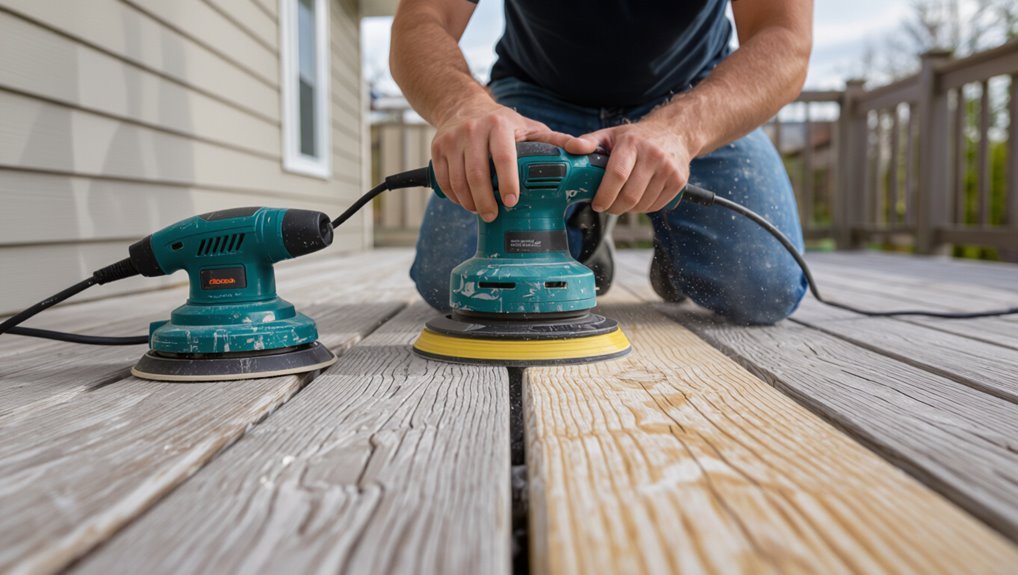
Power sanding and using an orbital sander are the fastest ways to strip large areas of peeling paint, and you’ll want to prepare carefully before you start.
Wear PPE, clear the area, and mask plants.
Start coarse grit to remove paint, then switch finer to smooth. Move evenly, don’t linger, and vacuum dust frequently.
Inspect for bare wood, then clean before refinishing.
Heat guns and infrared removers safety tips
After sanding large areas, you may find stubborn paint islands that mechanical abrasion won’t remove cleanly—heat and infrared tools can loosen those spots quickly.
Wear heat-resistant gloves, eye protection, and a respirator for fumes. Keep the nozzle moving to avoid scorching wood, test a hidden area, and cool surfaces before scraping.
Keep a fire extinguisher nearby and never leave the tool unattended.
Chemical paint strippers types, application, and neutralization
1 clear step: choose the right chemical stripper for your deck’s paint type and wood—these products fall into three main categories (caustic/soda, solvent-based, and bio/chemical or soy-based), and each differs in effectiveness, odor, safety gear required, and cleanup method.
Test a small area, apply per instructions, scrape softened paint, rinse or neutralize as directed, and dispose of residues safely.
Dealing with lead paint testing and legal/safety protocols
Concerned your deck might’ve lead-based paint? Get a certified test kit or hire a certified inspector before you strip.
Follow local regulations for notification, disposal, and contractor requirements.
Use HEPA vacuums, wet methods, and avoid dry sanding; wear a respirator and disposable coveralls.
Keep children and pets away, seal debris in labeled bags, and document compliance for safety and liability.
Cleaning and preparing the bare wood after paint removal
Once you’ve removed the peeling paint, wash and brighten the bare wood to remove dirt, mildew, and lingering old finish.
Then let it dry completely before proceeding.
Check each board for rot or splits and repair or replace any damaged sections.
Finally, inspect and tighten or replace loose fasteners so the deck is structurally sound and ready for finishing.
Washing, brightening, and allowing proper drying time
Start by rinsing the deck thoroughly to remove loose debris.
Apply a deck cleaner or oxygen bleach per label, scrubbing stubborn stains with a stiff brush. Rinse thoroughly until water runs clear.
Use a wood brightener if needed to restore pH and color.
Let the deck dry completely—usually 48–72 hours depending on weather—before sanding or refinishing to guarantee proper adhesion.
Repairing damaged boards, replacing sections, and fastening checks
After the deck’s dry and clean, inspect every board for soft spots, deep gouges, rot, and loose fasteners so you can decide which boards need repair or replacement.
Remove damaged boards, cut out rotten sections, and fit new lumber to match grain and thickness.
Replace corroded screws with coated deck screws, toenail or sister boards where needed, and sand rough edges before sealing or painting.
Choosing the Right Finish After Paint Removal
Now that your deck’s bare, you’ll weigh paint, stain, and sealer—each has clear pros and cons for durability, appearance, and maintenance.
Pick products matched to your wood species and local climate to prevent peeling and rot.
Apply them with the right prep, tools, and drying times to get long-lasting results.
Paint vs stain vs sealer pros and cons
When you’re deciding how to finish your deck after stripping paint, weigh durability, appearance, and maintenance: paint gives a solid, color-fast film that resists wear but can chip and hide wood grain; stain penetrates and highlights the timber while offering varying levels of UV and moisture protection with easier touch-ups; and clear or semi-solid sealers preserve natural look but need more frequent reapplication.
| Option | Key point |
|---|---|
| Paint | Durable, hides grain |
| Stain | Enhances grain, variable protection |
| Sealer | Natural look, frequent recoat |
| Choice | Balance aesthetics vs upkeep |
Selecting products for your wood type and climate
Choosing the right finish depends on the wood species and the climate where your deck sits, since each combination calls for different protection levels and product chemistries.
You’ll match oil or water-based finishes to hardwoods or softwoods and pick UV, mildew, or waterproofing additives for your region.
Consider:
- Local climate demands
- Wood porosity and grain
- Maintenance frequency and lifespan expectations
Application best practices for long-lasting results
Once you’ve removed the peeling paint and prepped the wood, pick a primer that matches your deck material and weather exposure—alkyd primers for durability, latex for easy cleanup—and apply a thin, even coat.
For paint or stain, use long, consistent strokes with a high-quality brush or roller, follow manufacturer drying times, and plan for two coats for best coverage.
Finish with a breathable sealer or topcoat suited to your climate to lock in protection and extend the life of the finish.
Primer selection and application tips
1 clear primer choice will make the finish last: pick a high-quality primer formulated for exterior wood that bonds well to bare and previously painted surfaces, blocks tannin bleed, and matches the topcoat type (oil or water-based) so you don’t get adhesion problems later.
Apply with even, thin coats, sand between coats if recommended, allow proper drying times, and spot-prime knots or bare patches for uniform coverage.
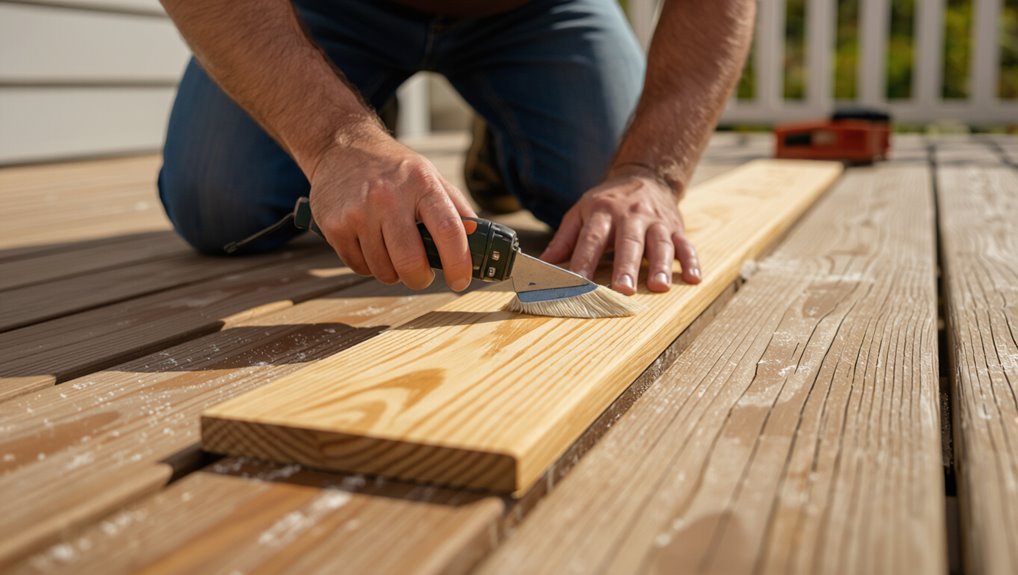
Painting/staining techniques and recommended coats
With a properly selected and applied primer in place, you’ll want to focus on the finish itself: pick a paint or stain suited to your deck’s exposure and the primer’s base, apply thin, even coats, and follow the manufacturer’s guidance on number of coats and drying times to guarantee long-lasting protection.
Use a brush for edges, a roller for flats, allow full cure between coats, and inspect for missed spots.
Common Mistakes to Avoid When Removing Deck Paint
Don’t sand so aggressively that you gouge the wood, and don’t skip checking for moisture or hidden rot before you refinish.
Take your time between steps—wet wood or rushed coats lead to poor adhesion and faster failure.
Dispose of paint chips and chemical wastes safely and according to local rules to avoid hazards.
Over-sanding and wood damage
Although sanding feels like the fastest fix, over-sanding can seriously damage your deck by eating into the wood, creating uneven spots, and exposing soft grain that’ll splinter and absorb stain poorly.
You should sand only to remove loose paint, blend edges, and smooth roughness. Use appropriate grit progression, moderate pressure, and test small areas so you don’t thin boards or create gouges that require costly repairs.
Ignoring moisture and rot issues
Sanding can fix surface problems, but it won’t help if underlying moisture or rot is present; you’ll just strip paint off wood that’s already failing.
Inspect boards, joists, and end grain for softness, discoloration, or mold.
Replace or repair compromised lumber and address drainage, flashing, and ventilation before repainting.
Treat surrounding soil and fasteners to prevent recurrence and guarantee a lasting finish.
Rushing between steps (insufficient drying, poor adhesion)
If you rush from stripping to painting without letting the wood and any primers fully dry, the new finish won’t bond properly and will peel or blister sooner than expected.
Let each layer dry per manufacturer recommendations, check moisture content, and avoid painting after rain or high humidity.
Take time between coats so paint adheres, lasts longer, and saves you from redoing the job prematurely.
Unsafe disposal of paint waste
When you scrape or strip paint from your deck, don’t toss the paint chips, solvents, or rinse water in the yard or down the storm drain — they can contaminate soil and waterways and may contain lead or other toxins.
Bag debris, absorb liquids with cat litter, and take hazardous waste to a proper disposal facility.
Follow local rules and label containers to avoid fines and harm.
Maintenance and Prevention: How to Keep Paint from Peeling Again
To keep paint from peeling again, you should set a seasonal inspection and cleaning routine so small issues don’t become big problems.
Check ventilation, direct water runoff, and sun exposure around the deck and make adjustments—trim plants, redirect gutters, or add shade where needed.
When you spot wear, decide quickly whether a spot recoat will do or if you need to strip and start over.
Seasonal inspection and cleaning routine
Because regular care keeps small problems from becoming major repairs, you should build a simple seasonal inspection and cleaning routine for your deck.
Check for loose boards, flaking paint, and rusted fasteners. Sweep and remove debris, wash mildew, and let wood dry before touch-ups.
- Inspect: structural and finish issues
- Clean: debris, mildew, stains
- Touch-up: small paint repairs promptly
Best practices for ventilation, water runoff, and sun exposure
Alongside inspections and prompt touch-ups, managing airflow, drainage, and sun exposure will keep paint bonded and lasting longer.
Position vents, trim vegetation, and allow gaps under furniture so boards dry quickly. Confirm slope directs runoff away, clear gutters and downspouts, and seal gaps around posts.
Use UV-resistant coatings and provide partial shade where intense sun accelerates fading and breakdown.
When to recoat vs when to strip again
When deciding whether to recoat or strip again, check how well the remaining paint is adhering and how much bare wood is exposed.
If flakes cling and most areas are sound, sand, prime and recoat.
If paint crumbles, large bare patches exist, or moisture damage shows, strip to bare wood, repair, prime and apply a proper exterior paint or stain for lasting protection.
Comparison of Removal Methods
You’ll want to weigh effectiveness, cost, time, and safety when choosing a removal method so you get the best result for your budget and schedule. Below is a quick snapshot to help you compare common approaches at a glance. Use it to decide whether to DIY or hire a pro.
| Method | Cost | Best for |
|---|---|---|
| Chemical strippers | Moderate | Stubborn paint, careful cleanup |
| Heat gun | Low–Moderate | Small areas, quick removal |
| Power sanding | Low–High | Large areas, fast but dusty |
Effectiveness, cost, time, and safety comparison
Because each deck and paint job is different, choosing a removal method comes down to four practical factors: how well it strips paint, how much it costs, how long it takes, and the risks involved.
You’ll find chemical strippers excel at effectiveness but cost more and need PPE; sanding’s cheaper but dusty and slow; heat guns work fast but risk burns; pressure washing’s quick yet can damage wood.
Scenario-Based Guidance (When to Choose Which Method)
If you’re fixing small spots or a few boards, hand scraping and a heat gun will usually do the trick without much fuss.
For large decks with partial peeling you’ll likely want a sander or pressure washer to save time, while historic or sensitive materials call for gentler, non-abrasive methods or a conservation specialist.
If money’s tight, stick with DIY options; if you value speed and guarantee, hire a pro.
Small deck or spot repairs
Small repairs and touch-ups keep a deck looking good without the time or cost of a full refinish.
For isolated peeling, scrape loose paint, sand edges smooth, and clean the area.
Prime bare wood, then apply compatible paint or stain in thin coats.
Match texture and color, feather edges, and let dry fully.
Inspect annually and touch up as needed.
Large deck with partial peeling
Often you’ll face a large deck where peeling affects only sections rather than the whole surface; in that case you’ll need to decide whether to spot-repair, refinish affected boards, or strip and reseal entire areas based on extent of damage, underlying rot, and long-term goals.
Inspect systematically, replace rotten boards, sand edges to feather boundaries, and match finish to surrounding decks so repairs blend and last.
Historic decks or sensitive materials
When you move from repairing modern boards to working on a historic deck or one made from sensitive materials, you’ll need a different mindset and methods.
Test small areas, use gentler removers, and avoid aggressive abrasion that damages original fabric.
Prioritize preservation: consult preservation guidelines, document finishes, and consider reversible, conservation-grade products.
When in doubt, seek a specialist experienced with historic wood.
Budget-conscious vs professional contractor options
If you’re on a tight budget, you can tackle peeling paint yourself with basic tools and careful prep, but hire a contractor if the job is large, involves hazardous paint (lead), or you lack time and experience.
For small areas, DIY saves money; rent a sander, buy stripper, and follow safety steps.
Hire pros for warranties, complex repairs, or confined spaces.
FAQ
Got questions? You’ll get clear answers to common concerns like causes, tools, timing, safety, and coats — for example:
- moisture vs. prep
- pressure washing and stripping
- lead testing, wait times, and coatings
Read on and you’ll know what to do next.
How do I know if paint peeling is caused by moisture or poor prep?
Wondering whether moisture or poor prep caused your deck paint to peel?
Check where paint lifts: rising from seams, fasteners, or blistered boards suggests moisture; large, uniform sheets or flaking across well-sealed boards points to poor adhesion from inadequate sanding or priming.
Smell mildew, look for water stains, and test adhesion with tape—these quick signs help you diagnose before repairing.
Can I use a pressure washer to remove peeling paint?
Once you’ve identified whether moisture or poor prep caused the peeling, you’ll want to decide how to remove the loose paint—using a pressure washer is a common option.
You can strip flaking paint quickly, but use a low-pressure fan nozzle and keep the wand moving to avoid gouging wood.
Test a small area first, wear eye protection, and collect debris for proper disposal.
How long should I wait after stripping before refinishing?
After stripping paint, wait until the wood is completely dry—usually 24 to 72 hours depending on temperature, humidity, and how deep you stripped—before refinishing.
Test dryness by pressing your palm or a moisture meter; wood should feel cool and the meter read below manufacturer’s recommended level.
Don’t rush: applying stain or sealer to damp wood causes poor adhesion, blotching, and premature failure.
Is it safe to sand old paint without testing for lead?
Waiting for the wood to dry is important, but you also need to think about what’s in the old paint before you start sanding.
Don’t sand suspect paint without testing for lead first. Use a DIY kit or hire a certified tester.
If lead’s present, follow containment, PPE, and disposal rules or hire professionals to avoid health risks to you, your family, and the environment.
How many coats of paint or stain does my deck need for durability?
If you want a durable finish, aim for two thin coats rather than one thick one—this applies to both paint and semi-transparent stains.
Apply a quality primer if needed, let each coat dry fully, and lightly sand between coats for adhesion.
For solid-color stains or high-traffic areas, consider a third maintenance coat after a year or two to refresh protection and color.
Conclusion + Call to Action
Before you start, run through a quick checklist—safety gear, weather, tools, and a test patch—to make sure you’re ready.
If the job looks bigger than you expected or involves lead paint or structural issues, you’ll want to hire a pro.
I’ll show how to find a qualified contractor and what to ask so you get the right help.
Final checklist before you begin
You’ve got the tools, safety gear, and a clear plan—now run through this quick checklist to make sure you won’t hit surprises once you start: confirm weather and dry forecast, clear and protect nearby plants and surfaces, test a small area, have replacement boards/fasteners ready, check power/tool cords, review disposal rules, and schedule breaks.
Ready? Start confidently and work methodically.
When to hire a pro and how to find one
When the job looks bigger than expected—extensive rot, stubborn lead-based paint, or uneven structural issues—call a pro so you don’t waste time or make costly mistakes; a qualified contractor will assess hidden damage, handle permits and disposal, and deliver a safe, long-lasting finish.
- Check licenses and insurance.
- Read recent reviews and ask for references.
- Compare detailed bids and warranties before hiring.