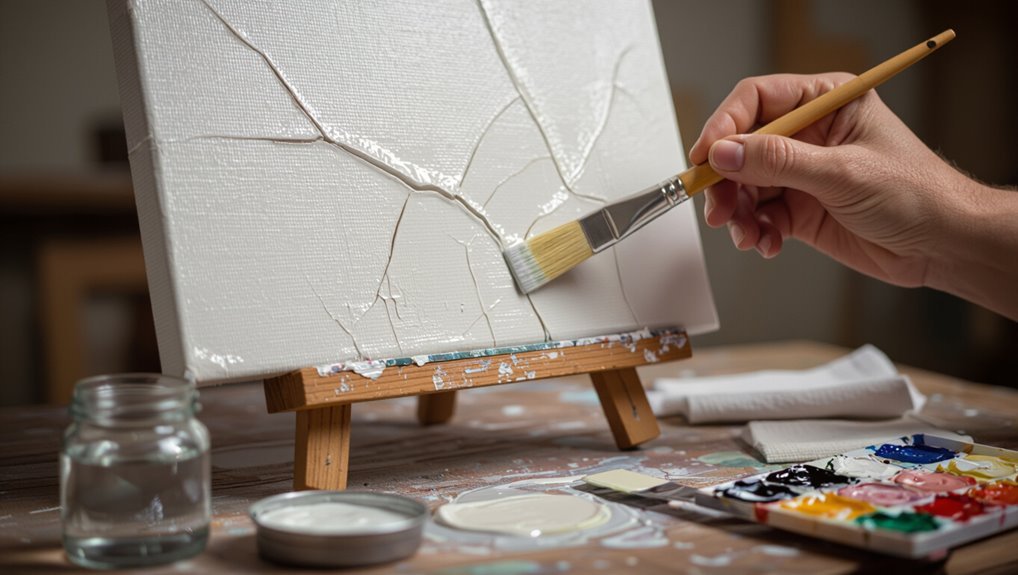
Why Is My Acrylic Paint Cracking? Causes and Fixes
If your acrylic paint is cracking, it usually means the film’s adhesion or flexibility failed—often from poor surface prep, overly thick or fast-drying layers, incompatible underlying coatings, contaminants like oil or wax, or drastic temperature and humidity swings. Check crack depth, pattern, and whether paint is flaking to decide repair or repaint. Clean, sand, use flexible mediums, prime, and apply thin even coats to prevent it. Keep going and you’ll find fixes, prevention tips, and when to call a pro.
Quick Fixes When Acrylic Paint Cracks
When acrylic paint cracks, you can often repair it quickly without stripping the whole piece—start by gently cleaning the area with a soft brush or damp cloth to remove dust and loose flakes.
Then stabilize edges by pressing them down and applying a thin layer of acrylic medium or flexible varnish to seal and bond the paint back to the surface.
You’ll prioritize Acrylic longevity, Paint flexibility, Surface compatibility, Repair techniques, Paint adhesion, Material choices, Layer management, Environmental factors, Maintenance tips, Painting strategies.
Quick Answer: Why Acrylic Paint Cracks
If your surface wasn’t cleaned, sanded, or primed properly, the paint won’t bond and is more likely to crack.
You’ll also see cracking when paint layers are too thick or dry at different rates, creating stress between them.
Fixing those prep and layering issues usually stops the problem.
Surface Not Prepared
Because a clean, sanded, and primed surface gives paint something to grip, neglecting prep is the most common reason acrylics crack.
If you skip cleaning, sanding, or priming, surface adhesion fails and layers can lift. Poor adhesion reduces paint flexibility and causes brittle patches.
Prep properly: degrease, sand smooth, and apply suitable primer so your acrylics bond and move without cracking.
Paint Layer Stress
Although acrylics dry into flexible films, stacking thick or fast-drying layers can create internal stress that makes them crack.
You should balance paint flexibility and application techniques to avoid tension. Consider environmental factors and material compatibility, plus substrate choice and drying conditions.
Control humidity and temperature management, and use maintenance strategies to preserve finishes.
- Thin coats
- Slow drying
- Flexible mediums
- Compatible primers
Spot the Difference: Cracking vs Crazing vs Flaking
You’ll want to tell cracking, crazing, and flaking apart because each needs a different fix.
Cracking shows as distinct breaks in the paint film.
Crazing is a network of fine surface lines.
Flaking is paint lifting away in chips.
Knowing those visual and structural cues helps you choose the right repair.
Cracking Versus Crazing
Wondering how to tell cracking from crazing? You’ll use visual inspection to spot patterns and assess cracking causes versus crazing differences.
Check:
- paint layering and drying conditions for tension issues
- substrate selection and material compatibility factors
- flexibility factors affecting movement
- repair techniques plus preventive measures like proper layering and compatible substrates
Flaking Versus Cracking
When you’re diagnosing paint failures, distinguishing flaking from cracking is key because each shows different causes and needs different fixes; cracking looks like a network of fine lines where the film has split, while flaking involves whole pieces lifting or peeling away from the substrate. You’ll check flaking causes, adhesion factors, surface types, moisture effects, temperature impacts, drying techniques, layer interactions, paint stability, cracking solutions, paint flexibility.
| Flaking causes | Cracking solutions | Paint stability |
|---|---|---|
| Moisture effects | Drying techniques | Temperature impacts |
Quick Inspection Checklist: Assess Severity
Before you decide on repairs, do a quick walkaround to gauge how severe the cracking is and whether it’s spreading.
Check these points to link observed damage to cracking causes and likely fixes:
- Note crack pattern and depth; consider surface treatment and substrate compatibility.
- Smell for moisture; assess moisture control and environmental factors.
- Inspect paint layering and paint flexibility.
- Review application methods, drying techniques, maintenance practices.
When to Repair vs Repaint an Acrylic Piece
First, you’ll assess how deep and extensive the cracks are to see if a local fix will hold.
Then check whether the surface and underlying support are stable enough for patching rather than a full repaint.
Finally, weigh the time and cost—minor repairs save money, but extensive damage often makes repainting the smarter choice.
Assess The Crack Severity
How bad does the crack really look and feel? Do a quick crack evaluation using clear severity indicators to decide repair versus repaint. Check these points:
- Surface depth: hairline or deep gap?
- Length: isolated or sprawling?
- Paint adhesion: flakes or stable?
- Underlying color match needs: minor touch-up or full repaint?
Decide: shallow/stable = repair; deep/unstable = repaint.
Consider Surface Stability
When you decide whether to repair or repaint an acrylic piece, check how stable the surface is—lift a corner of the flaking paint, press gently across the crack, and tap nearby areas to spot loose layers; if the ground or paint flakes away, or the substrate feels powdery or soft, you’ll need a more extensive repaint rather than a simple patch.
Consider Acrylic stability, Surface integrity, Substrate flexibility, Environmental factors, Material compatibility, Application techniques, Paint layering.
Weigh Time And Cost
If you want to decide whether to repair or repaint an acrylic piece, weigh how much time and money each option will take against the work’s value and your goals:
- Estimate time management needs and project planning steps.
- Run a cost analysis including material expenses.
- Factor budget considerations and labor or replacement value.
- Use value assessment to choose repair when economical, repaint when transformative.
Immediate Hairline Repair Steps
Because quick action limits further paint loss, start by evaluating the hairline crack’s depth and surrounding adhesion before you touch it.
Act quickly: assess the hairline crack’s depth and surrounding adhesion before doing any repair work.
For hairline repair, gently clean, assess crack assessment, and test surface compatibility.
Choose repair techniques matching paint formulation and acrylic adhesion, favoring flexible mediums to maintain paint flexibility.
Work in controlled drying conditions, use careful layering strategies, and follow cracking prevention steps to stabilize the area.
Fixing Deeper Cracks and Flaking Layers
Before you start repairs, assess the underlying damage to see if the substrate or earlier paint layers are compromised.
Stabilize any flaking areas by consolidating loose paint and removing unstable bits.
Once secure, fill, prime, and repaint to restore a smooth, durable finish.
Assess Underlying Damage
When deeper cracks or flaking layers appear, you’ll need to inspect beyond the paint surface to determine how much of the substrate and ground are compromised.
Assess underlying issues by checking:
- signs of environmental factors like humidity cycles
- poor paint interaction with the ground
- substrate compatibility problems (wood, canvas tension)
- failures from application techniques or rapid drying conditions
Stabilize And Repaint
Start by securing any loose paint and stabilizing the affected area so you don’t lose more of the original surface.
Gently consolidate flakes with an appropriate adhesive, sand minimally, and prime exposed ground.
Use careful repainting techniques: thin, compatible layers that restore adhesion and texture.
Monitor paint stability as layers cure, correcting edges or texture before final varnish to prevent future lifting.
Consolidate Fragile Paint Before Work
Although the cracked paint looks stable, you should consolidate fragile areas before any cleaning or retouching to prevent further loss; use a reversible adhesive applied sparingly with a fine brush or syringe to secure flakes and soften edges so they can be handled safely during treatment.
- Choose consolidation techniques suited to the substrate.
- Test adhesive compatibility first.
- Work from center outward.
- Record materials and placement for reversibility.
Best Fillers and Primers for Cracked Acrylics
After you’ve consolidated fragile paint, choose fillers and primers that match both the mechanical flexibility and the porosity of the original layers so repairs move with the surrounding acrylic and don’t flag new stress points.
Consider filler types and primer brands for surface compatibility; material selection and product recommendations guide repair techniques.
Follow layering methods, drying conditions, application tips, and maintenance strategies to guarantee durable, compatible restores.
How to Sand and Re-Prime Safely
Before you re-prime, you’ll need to sand back to a smooth, clean surface so the new primer bonds properly.
Use progressively finer grit and wipe away dust between passes to avoid sealing contaminants under the primer.
When you prime, pick a compatible, low-VOC product and apply thin, even coats while following safety and ventilation guidelines.
Proper Surface Preparation
When you’re prepping a cracked acrylic surface, sanding and re-priming carefully will give new paint something solid to bond to and help prevent future failures.
You should assess surface characteristics, substrate flexibility, and material compatibility, then control environmental factors, drying techniques, and paint consistency.
Follow practical layering strategies, application methods, and maintenance practices:
- Remove loose paint
- Feather edges
- Clean and degrease
- Lightly sand to key
Safe Priming Techniques
If you’ve removed loose paint and feathered the edges, sand the area with progressively finer grit and re-prime using compatible products to restore a stable, uniform surface; wear a respirator and eye protection, work in a well-ventilated space, and trap dust with a vacuum or tack cloth so contaminants don’t compromise adhesion.
For safe priming, choose compatible materials, create ideal surfaces, apply flexible layers, and follow drying techniques and adhesion strategies.
How Paint Thickness Causes Cracking
Although a thicker coat might seem like it gives better coverage, excessive paint thickness actually increases the risk of cracking because the outer layer dries faster than the inner layer, creating tension that pulls the film apart.
Thicker paint may seem better, but excessive film builds internal tension as outer layers dry faster, causing cracks.
You can control this by managing paint viscosity, application technique, drying conditions, underlayer compatibility, environmental factors, layering strategy, paint formulation, and surface texture.
- Thin coats
- Slow drying
- Compatible underlayers
- Smooth texture
Impasto: Why Heavy Texture Cracks
Building up heavy impasto adds striking dimension, but thick textured layers create the same moisture and drying differentials that make thick coats crack: the outer ridges and peaks dry and skin over quickly while dense, buried mass stays wet and continues to shrink, so tensile stresses form along edges and between layers.
You’ll manage impasto techniques with texture management, thickness control, medium selection, layer integration, application pressure, drying strategies, surface interaction, and paint flexibility.
Fast-Drying Acrylics: Stress Cracks Explained
When you grab a fast-drying acrylic to speed a project, remember that rapid surface skinning can trap moisture underneath and create internal stresses that lead to fine, spiderweb-like cracks. The paint’s quick polymer film formation reduces its ability to relax as the deeper layers continue to shrink.
- Balance fast drying techniques with suitable acrylic mediums and paint additives
- Monitor drying conditions and environmental factors
- Mind layer interactions and application methods
- Verify surface compatibility and meet flexibility requirements based on paint formulations
How Uneven Drying Creates Splits
When the surface of acrylic paint skins over quickly, you’ll lock moisture beneath that still-wet, thicker underlayer.
As that underlayer shrinks while drying, it pulls against the rigid surface film and causes splits.
You’ll see this most where thin, fast-drying layers cover heavy-bodied passages.
Fast Surface Drying
Although the top layer of acrylic can seem dry to the touch within minutes, that surface skin traps moisture underneath and creates tension that pulls and splits as the lower layers continue to cure.
You’ll notice fast surface drying shortens overall drying time contrast, causing cracks.
To prevent this, try:
- Lower heat or airflow
- Use retarders
- Apply thinner layers
- Increase ambient humidity
Thick Underlayer Shrinkage
If you let paint build up too thickly, the lower layers will shrink more than the surface as they lose water and coalesce, pulling the rigid skin apart and causing splits.
You should manage paint layering and thickness impact to preserve paint integrity: control drying conditions and moisture control, consider substrate compatibility and texture influence, and optimize underlayer adhesion and flexibility factors to reduce shrinkage effects.
How Temperature Swings Cause Brittle Drying
Because acrylics cure by coalescing polymer particles, sudden temperature swings can force the drying film to become rigid before solvents have evaporated evenly.
Sudden temperature swings can lock acrylic films before solvents evaporate evenly, causing brittle, crack-prone paint—monitor studio climate.
You’ll see this as brittle, crack-prone paint. You should monitor temperature extremes and adjust climate control in your studio environment to protect acrylic durability and paint flexibility.
- Check drying conditions
- Avoid rapid heating/cooling
- Reduce environmental factors
- Allow gradual cure
How High Humidity Traps Moisture and Causes Fissures
High humidity can lock moisture into the drying acrylic film, preventing solvents from escaping and leaving tiny pockets that later become fissures as the paint contracts.
You’ll notice humidity effects when moisture retention delays cure, compromising paint integrity.
Adjust drying conditions and studio climate to limit environmental impact.
Use dehumidifiers, controlled ventilation, and humidity solutions to stabilize your painting environment and prevent fissures.
How Direct Sunlight Damages Drying Acrylics
When you leave wet acrylics in direct sunlight, the surface dries so quickly that the underlying layers stay soft and trapped, creating stress that leads to cracking and delamination.
You’ll see sunlight exposure accelerate drying times, cause UV damage and heat effects, and promote color fading.
Protect paint integrity with shade, slower curing, and protective measures against harsh environmental factors.
- Shade artwork
- Use UV varnish
- Control temperature
- Monitor drying times
How Poor Surface Prep Leads to Adhesion Failure
If you skip proper sanding, cleaning, or priming, acrylics won’t bond to the substrate and are far more likely to lift, flake, or peel.
You should follow surface preparation and adhesion techniques, choose priming methods suited to substrate flexibility, and consider texture application limits.
Ignore contaminant removal, environmental factors, or drying conditions and your paint will fail—prep determines lasting adhesion.
Cleaning and Degreasing: Remove Contaminants First
Before you paint, remove surface oils and grease—these will stop acrylics from bonding.
Wipe panels with an appropriate solvent using a clean, lint-free cloth and follow with a dry tack rag to pick up dust and debris.
If you skip this step, dust or residual solvent can cause cracking or poor adhesion later.
Surface Oil Removal
Although it may not look like much, any oil, grease, or wax on the surface will prevent acrylic paint from adhering properly, so you need to remove contaminants first.
Use oil removal techniques and surface preparation tips to prep surfaces. Clean gently, test small areas, and dry fully.
- Mild detergent wash
- Degreasing solvent
- Abrasive scuffing
- Rinse and dry thoroughly
Solvent Wipe Technique
After removing surface oils and grime, you’ll want to follow up with a solvent wipe to lift any remaining contaminants that soap and scuffing won’t catch.
Choose solvent types for surface compatibility, test small areas, and use proper application methods.
Respect drying times to protect paint flexibility and underlayer adhesion.
This step aids crack repair and should be part of regular maintenance practices.
Dust And Debris Control
When you clean and degrease, start by removing loose dust and debris so solvents and primers can bond to a stable surface; you’ll improve dust control and surface cleaning by addressing environmental factors and workspace organization.
Use these steps for debris prevention and regular maintenance:
- Wipe and degrease with lint-free cloths
- Use air filtration and HEPA vacuums
- Install protective covers
- Schedule routine inspections and cleaning
How Glossy Underlayers Cause Later Problems
If you seal a surface with a glossy underlayer, you’ll often lock in a slick film that prevents later layers from bonding properly.
You’ll see glossy layers reduce underlayer adhesion and upset surface compatibility.
Poor application methods and fast drying times raise surface tension, harming layer interactions.
Poor application and rapid drying increase surface tension, disrupting layer bonding and compromising paint performance.
That lowers paint flexibility and undermines paint integrity, so adjust painting techniques to avoid future failures.
Fixing Paint Applied Over Glossy Layers
Because glossy underlayers block proper bonding, you’ll need to remove or modify that slick film before repainting to prevent future cracking.
Address glossy surfaces and adhesion issues with correct cleaning methods and sanding; guarantee surface compatibility and primer selection for paint layering.
Consider texture differences, drying times, application techniques, and use flexible materials where movement occurs.
- Sand glossy layer
- Clean thoroughly
- Use suitable primer
- Test flexibility
Incompatible Materials: Oil vs Acrylic Issues
If you paint acrylic over an older oil layer, the faster-drying acrylic can’t flex with the slower oil beneath, so cracking and flaking often follow.
Likewise, putting oil over cured acrylic can cause adhesion problems unless you use proper primers and isolation layers.
You’ll want to test and follow the rule: oil under acrylic is risky, acrylic over oil needs careful preparation.
Oil Under Acrylic
When you layer acrylic paint over an oily ground, the acrylic will dry into a brittle film while the oil beneath remains flexible and tacky.
As a result, stresses between the layers often lead to cracking, delamination, or discoloration. You must manage oil absorption, acrylic adhesion, surface tension, and underlayer compatibility to avoid failure.
- Oil contamination and oil residue
- Paint flexibility and binder quality
- Layer interaction
- Medium selection
Acrylic Over Oil
You’ve already seen how oil beneath acrylic can leave a tacky, flexible layer that destabilizes the brittle acrylic film above; the reverse—applying acrylic over existing oil paint—creates related but distinct problems. You risk poor adhesion, cracking, and delamination unless you respect oil paint compatibility and modify acrylic layering techniques.
| Problem | Fix |
|---|---|
| Poor bond | Scuff & primer |
| Flex mismatch | Isolate layer |
| Yellowing | Use barrier |
| Cracking | Test patch |
How Additives and Mediums Can Weaken Film
Although additives and mediums can give acrylics desirable working qualities—like slower drying, increased gloss, or greater flow—they can also undermine the paint film’s strength if they’re overused or mismatched.
Although additives and mediums enhance acrylics, overuse or mismatch can weaken the paint film.
You must watch Additive effects on Medium stability and Binder types to avoid Flexibility concerns, poor Layer adhesion, adverse Chemical reactions, or altered Surface interaction and Texture impact under varying Drying conditions.
- Paint compatibility
- Flexibility concerns
- Layer adhesion
- Chemical reactions
How Pigment Load and Poor Mixing Affect Flexibility
If you pack a mix with too much pigment and not enough binder, the film will be brittle and prone to cracking.
You’ll also see areas that didn’t get blended properly—streaks that dry harder or flake off.
Addressing pigment load and thorough mixing will improve flexibility and uniformity.
High Pigment, Low Binder
When pigment load is high and binder is scarce, the paint film becomes brittle and prone to cracking because there’s not enough flexible resin to hold pigment particles together. Poor mixing only makes this worse by leaving dry pigment clumps and weak spots.
- Use flexible additives to restore paint elasticity
- Adjust high pigment ratios for surface compatibility
- Improve mixing techniques to avoid voids
- Control drying conditions and consider substrate flexibility
Inadequate Mixing Streaks
Because pigment clumps don’t disperse evenly, you’ll see streaks that create weak, inflexible bands in the dried film; those concentrated zones have less binder per pigment particle, so they crack more easily under stress.
You can prevent inadequate mixing and streak formation by using proper blending and mixing techniques, adjusting paint consistency and medium ratios to improve pigment distribution and avoid color separation.
How Old or Expired Acrylics Behave Differently
As acrylics age, their chemistry and handling change in ways you’ll notice quickly: paints often thicken, skin over, lose elasticity, and become more prone to crawling or cracking on the surface.
As acrylics age their chemistry shifts—paints thicken, skin over, lose elasticity, and crack or crawl on the surface.
You’ll see clear expired paint behavior and recognize old acrylics by these signs:
- Increased viscosity and clumps
- Patchy drying, surface skinning
- Reduced flexibility, brittle films
- Poor adhesion, flaking edges
Supports Matter: Flexible vs Rigid Substrates
Whether you’re painting on canvas that flexes or a rigid panel, the substrate changes how the acrylic film needs to stretch.
You should match paint elasticity to the support to avoid cracking or flaking as the surface moves.
Also make sure you prepare and prime the support properly to prevent adhesion failure.
Flexible Vs Rigid Surfaces
When you paint with acrylics, the support you choose matters because flexible surfaces like canvas move and stretch while rigid ones like wood stay fixed. That movement directly affects cracking, adhesion, and long-term stability.
You should consider Surface compatibility, Paint adhesion, Texture impact, and Substrate choice to match Support stability and Movement response.
- Flexible materials vs Rigid surfaces
- Layer interaction risks
- Application method matters
- Preventive preparation
Paint Film Elasticity Needs
Because supports flex and settle differently, your acrylic paint must have enough elasticity to follow that movement without cracking or peeling.
You should consider elasticity factors like binder type, film thickness, and drying rate.
Choose formulations with greater paint flexibility for flexible supports, thin even layers, and avoid overly rigid coatings.
Match film properties to substrate movement to prevent stress fractures.
Preventing Adhesion Failure
If your painted surface sits on a flexible support like canvas or wood panel that will bend or expand, you need to manage adhesion differently than you’d on rigid supports.
Flexible substrates demand primers and application methods that accommodate movement so the paint film stays bonded instead of lifting or flaking.
Use these tips:
- Choose primers matching substrate types and material compatibility.
- Apply adhesion techniques and surface treatments for paint flexibility.
- Control drying conditions and environmental factors.
- Adjust application methods to reduce stress and delamination.
How Substrate Movement (Canvas, Wood) Creates Cracks
Though the paint layer looks solid, the support beneath—canvas or wood—shifts with humidity, temperature, and stress. Those movements pull and flex the paint until it cracks.
You must consider canvas flexibility versus wood stability, substrate tension, and material compatibility.
Environmental factors and movement absorption affect paint adhesion, structural integrity, paint layering, and drying rates, so choose supports and layers that accommodate motion.
How Framing and Mechanical Stress Worsen Cracking
The way you mount, stretch, and frame a painting can amplify the movements of canvas or wood and turn minor substrate shifts into visible cracks.
How you mount and frame a painting can magnify subtle material shifts, turning minor movement into visible cracks.
You’ll worsen cracking when framing techniques or mechanical stress concentrate strain. Manage canvas tension and guarantee support stability to reduce risk.
- Check stretcher bars for warping
- Avoid overtight mounting
- Cushion contact points
- Use flexible hanging hardware
Spray Application vs Brushwork: Different Risks
When you switch between spraying and brushing, you change how paint lays down and how it cures, which affects cracking risk. You’ll balance spray application techniques with brushwork precision to manage paint adhesion challenges, drying time differences, texture impact, application pressure, layering strategies, weather conditions, material compatibility, and surface texture considerations.
| Method | Risk |
|---|---|
| Spray | Overspray/crusting |
| Brush | Brush marks |
| Hybrid | Incompatibility |
| Surface | Texture issues |
Multilayer Techniques: Building Compatible Layers
When you build multilayer acrylics, start with flexible, fast-drying underlayers and finish with stiffer top coats to prevent cracking.
Pay attention to layer order and match drying times so each film bonds properly without trapping stress.
Choosing flexible underlayers and compatible materials lets your paint system move together as it cures.
Layer Order Essentials
Because layers interact physically and chemically, you’ll want to plan their order before you paint so each layer supports the next.
You’ll arrange layer techniques to respect acrylic flexibility, drying methods, surface compatibility, texture management, and paint adhesion.
Follow concise rules:
- Start with stable ground and primer
- Build flexible underlayers
- Add texture mid-process
- Finish with compatible, less elastic topcoats
Matching Drying Times
After planning layer order, you’ll need to match drying times so each coat cures in a way that supports the next.
You should stagger thin and thick applications, use heat or airflow controlled drying techniques, and prefer similar sheen and formulation for paint compatibility.
Test small samples to confirm cure rates before committing. That prevents stress between layers and reduces cracking risk.
Flexible Underlayers
If you want durable multilayer acrylics, start with a flexible underlayer that moves with the substrate and relieves stress from subsequent stiffer coats.
You’ll choose flexible materials and consider underlayer choices, binder ratios, medium selection, and paint elasticity.
Match substrate compatibility and surface flexibility, use slow drying techniques, and plan layering strategies and application methods.
- flexible materials
- binder ratios
- drying techniques
- layering strategies
How Repeated Varnishing Reveals or Causes Cracks
When you repeatedly varnish a painting, each new layer can tighten the surface and gradually highlight hairline fractures that were previously invisible.
Varnish doesn’t just sit on top—it alters how the paint film moves and responds to stress.
You should consider varnish types, application techniques, environmental factors, paint consistency, drying times, surface treatments, then plan restoration methods and repair strategies to minimize further cracking.
Choosing Compatible Paints and Mediums
Because incompatible paints and mediums expand, contract, or cure differently, you should choose materials that age and move together to avoid stress and cracking.
Choose paints and mediums that age and move together to prevent stress, cracking, and premature failure.
Match color compatibility and pigment integrity, confirm binder balance and drying properties, and assess surface adhesion.
Consider paint layering, texture matching, application methods, and flexibility needs.
- Check medium selection
- Test paint layering
- Note texture matching
- Verify surface adhesion
How to Adjust Paint Consistency for a Flexible Film
Although acrylics naturally form a hard film as they dry, you can make them more flexible by adjusting consistency and binder proportions; thin the paint lightly with solvent-free acrylic medium or add a small amount of flexible polymer to maintain cohesion without weakening color or adhesion. Use proper paint viscosity, medium selection, consistency adjustment, mixing techniques, and application methods to get a durable flexible film.
| Step | Action | Tip |
|---|---|---|
| 1 | Measure viscosity | Use flow cup |
| 2 | Add medium | Start small |
| 3 | Mix gently | Avoid aeration |
| 4 | Test film | Check flexibility |
Drying Setup: Humidity, Temperature, and Airflow Best Practices
Adjusting consistency and binder proportions gives you a more flexible film, but how that film dries will determine whether it stays crack-free.
Control humidity, temperature, and airflow in your drying environment to match paint consistency and drying duration.
Tips:
- Maintain stable moisture levels and humidity control.
- Use temperature regulation to avoid rapid curing.
- Apply proper ventilation and airflow management.
- Consider climate considerations and studio conditions.
Best Surfaces and Priming to Reduce Cracking Risk
Choose a stable, suitably rigid support and prime it correctly, and you’ll cut the chance of acrylic paint cracking before it ever starts.
Pick ideal surface choices like primed canvas board, sealed wood, or gessobord, and consider flexible substrate options for wear.
Follow surface preparation essentials: effective cleaning strategies, appropriate surface treatment methods, and select priming material types that guarantee acrylic paint compatibility using best priming techniques.
Application Techniques That Minimize Stress (Thin Layers, Scumbling)
When you build color in thin, controlled layers and use techniques like scumbling, you keep film stress low and let each coat fully cure before the next goes on.
Use thin layers and scumbling techniques to manage texture and surface tension; control paint consistency and application pressure; favor flexible finishes and gentle drying methods.
- Brush application: light strokes
- Layering strategies: wait to cure
- Texture management tips
- Consistency checks
How to Test Materials and Techniques Before the Final Piece
After you’ve practiced thin layers and scumbling on sample boards, test runs help you confirm how paints, mediums, and supports behave together before committing to the final piece.
Use testing techniques to check material compatibility, paint consistency, and substrate evaluation.
Perform a flexibility assessment, try different priming options, practice your layering strategy, and compare drying methods so you can adjust mixes and avoid cracking.
Maintenance and Storage to Prevent Post-Dry Cracking
If you want your acrylic work to stay stable, store and handle it with care right from the first dry day. You’ll prevent stress and future cracks by following simple paint maintenance and proper acrylic storage.
- Keep pieces flat, supported, dust-free.
- Control humidity and temperature.
- Avoid stacking or heavy framing pressure.
- Use archival varnish and allow full cure before sealing.
Quick Troubleshooting Flow for Common Crack Scenarios
You’ve handled storage and care, now move quickly to identify and address cracks before they worsen. Check environmental factors, substrate compatibility, and painting tools; test paint flexibility and layering methods. Adjust acrylic mediums and drying techniques as needed to fix common cracking causes.
| Symptom | Likely Cause | Quick Fix |
|---|---|---|
| Fine fissures | Fast drying | Slow drying medium |
| Large flakes | Poor adhesion | Re-prime |
| Surface crazing | Brittle layer | Add flexibilizer |
Common Myths About Acrylic Cracking : Debunked
While cracking in acrylics can seem mysterious, many beliefs about what causes it are misconceptions that lead you to the wrong fix. You’ll want myth busting and clear guidance on common misconceptions:
- Acrylic durability isn’t absolute; poor surface adhesion matters.
- Overstiff layers harm paint flexibility.
- Incorrect drying techniques and environmental factors accelerate failure.
- Check paint compatibility before DIY restoration methods or repair techniques.
When a Conservator or Restorer Is Necessary
When cracking goes beyond hairline crazing or starts affecting paint adhesion, it’s time to call in a professional conservator or restorer. You’ll need specialist assessment, conservation techniques, and adherence to restoration ethics to protect value and integrity. Below is a quick comparison table.
| Problem | Action | Specialist |
|---|---|---|
| Structural loss | Stabilize | Conservator |
| Flaking paint | Consolidate | Restorer |
| Varnish damage | Remove/recoat | Conservator |
Resources and Products Trusted by Pros
After a conservator has assessed the damage and decided on treatment, you’ll want to know the specific tools, adhesives, and varnishes professionals trust for long-term stability and reversible work.
Use acrylic mediums sparingly; follow professional recommendations for archival adhesives and varnishes.
Trusted items include:
- pH-neutral adhesives
- Conservation-grade isolation varnish
- Reversible adhesives
- Specialty acrylic mediums
Action Plan: Prevent Cracking on Your Next Painting
Plan ahead to keep your next acrylic painting crack-free: choose stable supports, match paint layer flexibility, and control drying and humidity from the start.
You’ll use proper acrylic techniques, sensible color selection, and tested mixing ratios.
Adopt consistent application methods, layering strategies, and texture effects suited to surface types.
Monitor environmental factors and follow maintenance tips to maximize paint longevity and avoid future cracking.
Frequently Asked Questions
Can Additives Reverse Existing Cracks Without Repainting?
No, additives can’t reverse existing cracks without repainting; their additive effectiveness helps crack prevention when mixed in before or during application, but they won’t reliably restore already cracked acrylic paint—you’ll need repair or repainting.
Is It Safe to Heat-Set Cracked Acrylics to Reflow the Film?
Gently: don’t. You’re risking surface ruin by heat-setting cracked acrylics to reflow the film; improper heat settings can alter paint properties, soften or discolor layers, and worsen cracks—so avoid heat and opt for repair or repaint.
Will Acrylic Cracking Affect Artwork Resale Value?
Yes — cracking can reduce resale value by signaling poor artwork preservation, but you can mitigate losses with restoration, clear documentation, professional appraisal, and targeted resale strategies that disclose condition while highlighting provenance and artistic significance.
Can Framed Paintings Crack From Environmental Pollutants?
Yes — studies show museums report pollutant exposure raising degradation risk by up to 30%. You’ll see framed paintings crack when environmental factors like ozone, sulfur dioxide, or airborne particulates attack varnish and paint layers over time.
Are There Consumer-Grade Kits for Emergency Paint Consolidation?
Yes—you can buy consumer-grade emergency kits for paint consolidation; they’re sold to hobbyists and conservators, include adhesives, applicators, and instructions, and you’ll want to test compatibility before applying to fragile or historic paintings.
Conclusion
So now you know the usual suspects—surface prep, thick layers, and environmental swings—but here’s the thing: one tiny overlooked step could undo hours of work. Before you sign a piece “done,” pause and inspect for early signs, fix what you can, and decide whether conservation or a fresh start is wiser. Take those simple preventive habits into your next painting, and you might just avoid that sinking crack you dread.