How to Paint Ceiling Over Stairs Safely and Easily
You can safely and easily paint a stairwell ceiling by planning access, clearing the area, and choosing stable equipment like a scaffold or ladder with levelers and non-slip mats; secure fixtures, wear PPE, and patch any holes first. Work in small sections with a low-profile roller and angled brush, keep a wet edge to avoid drips, and ventilate while paint dries. Follow cleanup and disposal rules, and keep a plan for tougher repairs if you want more detailed guidance.
What You’ll Learn: Paint a Stairwell Ceiling Safely
Before you start, you’ll learn the safe steps for painting a stairwell ceiling: how to set up secure access, choose the right ladder or scaffold, protect walls and stairs, and work without straining your back or neck.
You’ll get practical guidance on evaluating stairwell design, selecting suitable paint finishes, prepping surfaces, taping edges, and using ergonomic techniques so you finish cleanly and safely.
Why Stairwell Ceilings Need Different Techniques
You’ll face tight headroom that limits ladder placement and movement.
Lighting will be uneven or behind you, so you’ll need strategies to see what you’re painting.
And because access is tricky, you’ll have to prioritize safety and use the right tools for stable reach.
Limited Headroom Challenges
In a stairwell you’re working with tight vertical space, so standard ceiling techniques won’t cut it—you’ll need tools, methods, and safety steps tailored to low clearance.
You’ll choose headroom solutions like low-profile rollers, angled extension poles, and compact scaffolds.
Plan creative access points, secure footing on steps, work incrementally from top down, and use spotters so you won’t overreach or risk a fall.
Irregular Lighting Issues
Any stairwell lighting can play tricks on you, so you’ve got to adjust your painting approach to account for uneven shadows and glare.
Inspect at different times, position temporary lighting solutions to reveal flaws, and choose paint sheens that minimize glare.
Use subtle color contrast to balance depth without harsh shifts.
Work in small sections and step back frequently to verify even coverage.
Safety And Access
1 essential rule: treat stairwell ceilings like a different job than a flat-room ceiling — they demand extra planning for safe access, steady footing, and fall prevention.
You’ll use platforms, secured ladders, and harnesses as needed, keep workspace organization tight to avoid trips, and plan paint stages so you’re never overreaching.
Always check anchor points and lighting before you start.
Decide: DIY vs. Hire a Professional
Wondering whether you should tackle the ceiling over your stairs yourself or hire a pro?
Weigh DIY Benefits like cost savings and control against Professional Expertise for safety, difficult angles, and quality finish.
If you’re comfortable with ladders, prep, and patience, go DIY.
Comfortable with ladders, prep, and patience? Then tackling the stair ceiling yourself can be rewarding.
If access, time, or skill are limited, hire a pro to guarantee efficiency and a flawless result.
Measure and Map the Stairwell Before You Paint
Before you open a can of paint, measure and map the stairwell so you know exactly what you’re dealing with. Note stairwell dimensions, obstacles, and light sources to shape your painting strategy. Sketch walls, ceiling, rails, and access points.
| Area | Width/Height | Notes |
|---|---|---|
| Ceiling | 3.6m x 2.4m | Fixture location |
| Walls | 0.9m each | Handrail clearance |
| Landing | 1.2m | Access step |
Check Codes, Permits, and Landlord Permission
With your stairwell measurements and sketch in hand, check local building codes, permits, and—if you rent—get landlord permission before you start painting.
Confirm whether permits or inspections are required for ceiling work, especially near egress routes. Document approvals and keep copies.
If you’re renting, obtain written landlord consent specifying allowed alterations and restoration expectations to avoid disputes or withholding of deposits later.
Identify Hazards: Lights, Vents, and Headroom
Because stairwells pack fixtures and tight clearances into a small space, you need to identify hazards like light fixtures, vents, and limited headroom before you paint.
Walk the stairs, note lighting placement and vent locations, mark protrusions, and measure clearance at different points.
Maintain headroom awareness while planning paint strokes and protective coverings to avoid damage and injury.
Choose Safe Access: Ladder, Scaffold, or Platform
Noting lights, vents, and tight headroom tells you what access you’ll need, so pick equipment that keeps you stable and clear of obstacles.
Consider options for ladder stability and scaffold safety before you start.
- Extendable ladder — use with spotter, check footing.
- Folding platform — low-profile, steady on steps.
- Mobile scaffold — use when headroom and reach demand it.
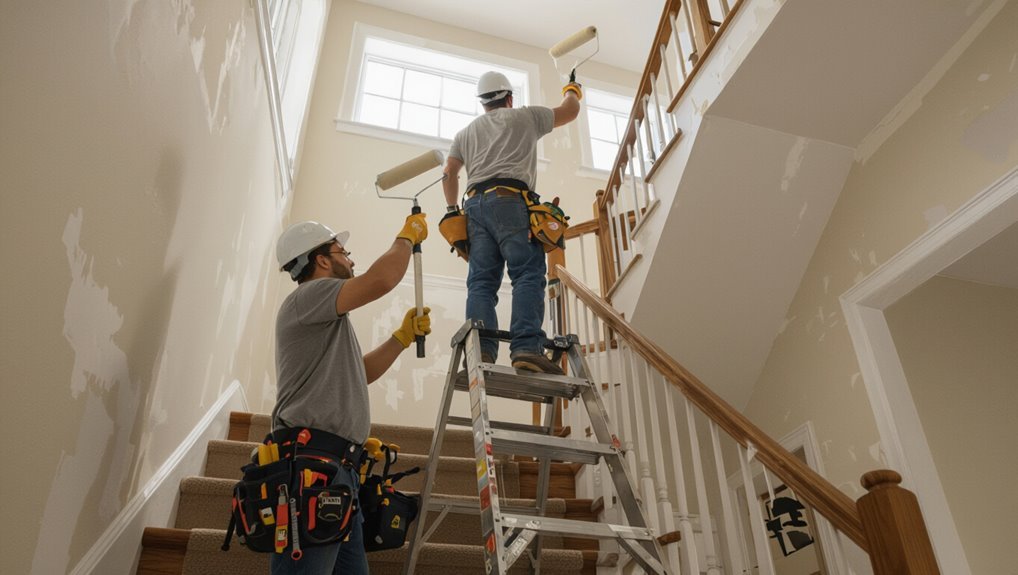
Set Up a Staircase Scaffold Safely
If your staircase prevents a standard scaffold or ladder from sitting level, set up a purpose-built staircase scaffold that lets you work squarely and safely across the incline.
Inspect components, confirm staircase alignment, lock adjustable legs, and level platforms.
Check every component, align the scaffold to the stairs, lock adjustable legs, and ensure platforms are level before use
Anchor base points, use guardrails, and check scaffold stability before climbing.
Keep tools secured and maintain clear footing while painting.
Stabilize Ladders on Uneven Stairs
When you set a ladder on uneven stairs, start by securing the base so it won’t slip on the tread or riser.
Fit a ladder leveler to compensate for the height difference, then check that the rails are plumb before climbing.
For extra security, anchor the ladder with sandbags or weight at the base to prevent shifting.
Secure Ladder Base
Start by evaluating the stair profile and picking a ladder setup that lets you create a stable base on the uneven steps. You’ll focus on ladder stability and secure ground support.
Do three things:
- Place non-slip mats under feet.
- Use plywood blocks to level where needed.
- Anchor the top to a secure rail or beam.
Check firmness before climbing.
Use Ladder Leveler
A ladder leveler lets you safely compensate for uneven stair treads by adjusting each foot independently, so you can set the ladder plumb without shimming every step.
Attach the leveler per manufacturer instructions, extend until level, and test gently before climbing. This improves ladder stability and ladder safety on stairs, letting you focus on painting rather than constant repositioning.
Anchor With Sandbags
Sandbags give you a simple, reliable way to stabilize a ladder on uneven stairs—place them over the ladder base or hang them from the lower rung to keep feet from slipping or shifting.
You’ll focus on sandbag placement for proper ladder stabilization.
- Position base bag toward downhill foot.
- Secure a rung-hung bag.
- Test stability before climbing.
Essential PPE for Stairwell Ceiling Work
Protect your eyes, lungs, and head before you step onto the ladder or scaffold—working on a stairwell ceiling stirs up dust, paint fumes, and hidden debris that can injure you.
Wear protective gear: safety glasses, a respirator mask, gloves, knee pads, a hard hat, non slip shoes, and a fall harness if you’re exposed to drops.
Inspect and fit everything snugly.
Tools You Need for Stairwell Ceilings
You’ll need a compact set of essential painting tools—roller with extension, angled brushes, tray, and drop cloths—to work efficiently on a stairwell ceiling.
Don’t forget safety and access equipment like a sturdy ladder or platform, harnesses if needed, and good lighting to keep you steady and visible.
Next, we’ll cover which specific tools and safety gear best suit common stairwell layouts.
Essential Painting Tools
One clear advantage of assembling the right tools before you start is that they speed the job and keep you safe on the stairs.
You’ll choose paint types and paint finishes suited to ceiling textures, pick proper roller sizes, and plan lighting solutions and ventilation methods.
- Quality rollers and brushes
- Drop cloths and trays
- Safety gear and ladder options
Safety And Access Equipment
Because working over stairs raises fall and trip risks, you should equip yourself with the right safety and access gear before you touch a brush.
Wear harnesses or a tether, non-slip shoes, goggles, and a hard hat as core safety equipment.
Use adjustable scaffolding, platform ladders, or extension poles for stable access solutions, and keep a spotter nearby to monitor balance and tool drops.
Best Paint Types and Finishes for Stairwell Ceilings
Picking the right paint and finish for a stairwell ceiling matters more than most people think because it affects light, durability, and how much you’ll notice imperfections.
Choosing the right stairwell ceiling paint matters—it shapes light, hides flaws, and boosts durability.
You should prioritize paint durability and thoughtful color selection for narrow, high-traffic shafts.
Consider finishes:
- Flat—hides flaws, low sheen.
- Eggshell—gentle sheen, easy to clean.
- Semi-gloss—durable, reflects more light.
Choosing Primer and Stain-Blocking Options
After you’ve settled on paint type and finish, protect that work by choosing the right primer and stain-blocking strategy.
You’ll want stain blocking primers for water, smoke, or tannin bleed-through. Spot-prime stains, then apply a full coat if needed.
Consider color selection—use a tinted primer when possible to improve coverage and reduce topcoat coats, especially with darker or contrasting hues.
Pick the Right Roller, Pole, and Brush Sizes
When you’re ready to roll, choose tools that match the ceiling height and the texture you’re covering: a 9–12-inch roller with a 3/8- to 1/2-inch nap works well for smooth or lightly textured ceilings, while thicker naps (3/4-inch or more) grab paint on popcorn or heavy texture.
Match your roller to ceiling height and texture: 9–12″ with 3/8–1/2″ nap for smooth, thicker naps for popcorn.
Pick roller types and pole lengths, plus brushes for edges:
- 9–12″ roller
- Telescoping pole
- 2–3″ angled brush
Protect Floors, Walls, and Fixtures From Drips
Start by laying down a continuous barrier—drop cloths or plastic sheeting taped at the edges—so paint drips can’t reach floors, stairs, or nearby furniture.
Secure drip cloths around stair treads and under light fixtures, and hang protective tarps over walls and fixtures where needed.
Use painter’s tape to seal seams, weight edges to prevent trips, and check coverings periodically for paint buildup.
Mask Railings and Banisters Without Damage
Masking railings and banisters without causing scratches or stripped finish means using the right materials and a gentle touch: wrap padded painter’s tape around spindle tops and edges, cover longer runs with kraft paper or plastic sheeting secured with low-tack tape, and protect delicate hardware with microfiber or felt before taping.
Use these masking techniques and protective coverings:
- Pad spindles.
- Tape low-tack.
- Wrap hardware.
Prep the Ceiling: Clean, Patch, and Sand
Clear the surface first: vacuum or brush away dust and cobwebs, wipe greasy spots with a mild detergent solution, and let the ceiling dry completely before you touch any repairs.
Next, use targeted cleaning techniques for stains, then inspect for cracks or holes.
Select appropriate patching methods, apply joint compound or spackle, sand smooth once dry, and remove dust before priming and painting.
Dealing With Textured, Popcorn, or Lead Paint
If your ceiling has texture—whether light stipple, heavy popcorn, or suspected lead-based paint, you’ll need a different approach than for smooth surfaces: assess the texture type first, then choose removal, encapsulation, or specialized preparation based on its condition and safety risks.
- Test for lead, call pros for lead paint removal.
- Repair loose texture, use textured ceiling solutions.
- Prime/encapsulate where removal’s unsafe.
Paint in the Right Order for a Clean Finish
Start with proper prep so you’re not fixing problems after the paint dries.
Mask edges, clean surfaces, and prime any repaired areas before you touch the ceiling.
Finish with the topcoat last to seal everything and give a uniform, durable look.
Prep Work First
Before you pick up a brush, prep the stairwell so you won’t have to redo work later: remove light fixtures or cover them, mask off trim and walls, lay drop cloths on steps, and sand or patch any rough spots on the ceiling.
Follow these steps to handle ceiling materials and painting techniques efficiently:
- Clean and sand surfaces.
- Mask and protect fixtures.
- Check for damage and prime where needed.
Topcoat Last
When you’re ready to paint, apply the topcoat last so your finish stays crisp and durable.
After priming and cutting in, wait for full drying before topcoat application to avoid streaks and tackiness.
Work from the highest point downward, maintain even strokes, and use proper ventilation.
This order maximizes finish durability, reduces rework, and gives a professional-looking ceiling over stairs.
Cutting In Safely Along Stairs and Lights
Although ceilings over stairs demand careful attention, you can cut in cleanly by working methodically and using the right tools; hold a sharp angled brush and steady yourself on the stair tread or a secure platform.
Cut ceilings over stairs carefully: use a sharp angled brush, steady yourself on the tread or a secure platform.
Paint toward the light source to spot missed areas, and keep your strokes short and controlled to avoid drips.
- Use proper cutting techniques.
- Protect stair lighting.
- Keep balance and take breaks.
Roller Technique for Even Coverage on Angles
Start by loading a short-nap roller evenly and rolling out excess on a tray so you’ve got a controlled, damp roller rather than a dripping one; this helps you navigate the slope and tight angles without slinging paint. Use gentle pressure, follow angles with short strokes, and feather edges. Practice roller techniques for angled surfaces to keep coverage smooth and streak-free.
| Tip | Action |
|---|---|
| Pressure | Light, consistent |
| Stroke | Short, overlapping |
| Angle | Follow slope |
| Finish | Feather edges |
Work in Sections to Reduce Drips and Disruption
Because paint on a sloped ceiling can run quickly, break the job into manageable sections so you can keep a wet edge and control drips.
Work in small sections on a sloped ceiling to maintain a wet edge and prevent runs and drips.
Work a few feet at a time, finish each band before moving on, and overlap slightly to blend.
Use section planning and drip control techniques:
- Tape and mark bands
- Paint one band, catch drips
- Smooth overlaps to blend seamlessly
Light the Workspace So You Don’t Miss Spots
You’ll want bright LED fixtures to give you true color and clear coverage while you work.
Position lights evenly along the stairwell to eliminate shadows and spot missed patches.
If the built-in lighting isn’t enough, bring in temporary work lamps to fill gaps and keep your hands free.
Use Bright LED Fixtures
While the paint’s still wet, good lighting makes the difference between a streaky ceiling and a professional-looking finish.
Use bright LED fixtures to create a bright ambiance and enjoy energy efficiency while you work.
Consider:
- High CRI LEDs for true color.
- Cool daylight bulbs to spot flaws.
- Portable LED work lights for focused coverage.
Position Lights Evenly
When you evenly space lights along the stairwell, shadows shrink and you can clearly see every inch of the ceiling as you paint.
Position fixtures so light placement follows the run of stairs, minimizing glare and dark spots.
Adjust light brightness to reveal texture and missed patches without washing out color.
Check from multiple angles as you work to guarantee consistent coverage.
Add Temporary Work Lamps
Since stairwell lighting can cast odd shadows, set up portable work lamps to illuminate every nook while you paint.
You’ll avoid missed spots with good temporary lighting solutions and focused workspace illumination. Position lamps at different heights, angle lights to eliminate glare, and secure cords.
- Use bright LED lamps
- Angle to reduce shadows
- Tape or cover cords
Drying Times, Ventilation, and Smell Control
Air out the stairwell and plan for proper drying times to avoid tacky paint, extended odor, or drips that re-wet your finish.
Check the paint can for drying times, keep humidity low, and use ventilation methods like box fans and open windows to speed curing.
For smell control, run fans, use activated charcoal or baking soda, and avoid tight spaces until odors dissipate.
Touch-Ups: Fix Common Mistakes Quickly
If you spot runs, missed spots, or uneven texture after the ceiling dries, act quickly to fix them before they set into the finish.
Use proper paint techniques and matching color selection to blend repairs.
Then:
- Sand lightly and feather edges.
- Spot-prime glossy areas.
- Reapply thin coats with steady strokes.
Check under good light and touch up until seamless.
Cleanup, Scaffold Teardown, and Waste Disposal
When you’re done painting, follow a checklist to make cleanup efficient and safe, starting with removing dropsheets and rinsing tools.
Take down the scaffold methodically—lower platforms and guardrails one piece at a time while someone steadies the base.
Dispose of paint and solvents according to local regulations and seal cans or absorb liquids before putting them in the right waste stream.
Safe Paint Disposal Practices
Because paint and solvent residues can harm people and the environment, you should clean tools, dismantle scaffolding, and dispose of waste deliberately and safely.
Use eco-friendly methods when possible and treat leftovers as hazardous waste.
Follow steps:
- Drain and seal cans; label contents.
- Use local hazardous-waste drop-off or approved recycler.
- Rinse tools in minimal water, capture rinse for proper disposal.
Efficient Scaffold Teardown
Start by clearing the work area and lowering the scaffold to a stable, accessible height so you can dismantle components safely and efficiently.
Inspect scaffold materials for damage, label reusable parts, and disassemble systematically—platforms, guardrails, frames.
Stack and secure pieces for transport. Follow scaffold safety guidelines, wear gloves, and handle waste responsibly.
Load debris and leftover supplies for proper disposal or recycling.
Thorough Cleanup Checklist
1 clear checklist keeps the final phase efficient and safe: gather your tools, clear drop cloths and masking, and sort leftover paint, brushes, and hardware into reuse, recycle, or discard piles.
- Pack scaffold parts, label fasteners, inspect for damage.
- Bag hazardous waste, follow local disposal rules.
- Restock cleaning supplies and restore workspace organization for future jobs.
When to Call a Pro: Structural, Electrical, or Lead
Know when to quit and call a pro: if the ceiling joists look compromised, wiring runs through the area, or the paint might contain lead, stop and get a specialist.
You’re responsible for homeowner responsibilities like securing the area and documenting damage, but follow professional recommendations for structural repairs, electrical work, or lead abatement.
Don’t risk DIY when safety or code compliance is at stake.
Time-Saving Tips and Final Safety Checklist
Before you start painting, grab a few quick prep shortcuts—tack cloths, painter’s tape, and a lightweight drop cloth will cut setup time.
Keep a final safety checklist handy to confirm ladder placement, secure lighting, and a spotter if you’re working over stairs.
When you’ve checked those items, you’ll move faster and safer through the job.
Quick Prep Shortcuts
A few targeted shortcuts will shave hours off your ceiling project without cutting corners.
You’ll focus on quick cleaning and staging prep materials for efficiency. Follow these steps:
- Vacuum dust, wipe spots, tape edges.
- Pre-mix paint, load multiple rollers.
- Set drop cloths, keep ladder tools nearby.
These steps speed work while keeping quality; save the safety checklist for later.
Final Safety Checklist
1 simple checklist will keep you safe and speed the finish: confirm stable ladder placement, wear eye and respiratory protection, secure drop cloths to prevent trips, and keep a charged phone within reach. Use safety gear, mark hazards, and review emergency plans before painting.
| Item | Action | Checked |
|---|---|---|
| Ladder | Stabilize | ☐ |
| Gear | Don PPE | ☐ |
| Area | Secure cloths | ☐ |
| Phone | Charged | ☐ |
Frequently Asked Questions
Can I Paint a Stairwell Ceiling With the Power on to Wired Lighting?
Yes — you can paint with the power on, but you should prioritize safety precautions and lighting considerations: use insulated tools, avoid touching fixtures, cover exposed wiring, work with a spotter, and consider shutting power for any risky tasks.
How Do I Prevent Paint From Splattering on Fabric-Covered Furniture?
Imagine a fortress of sheets: you’ll use paint protection like armor, draping furniture covers tightly, taping edges, elevating pieces on blocks, and keeping a damp cloth ready to wipe splatters before they dry so fabric stays pristine.
Will Bathroom or Kitchen Exhaust Fans Affect Ceiling Paint Adhesion?
Yes — exhaust fans can affect adhesion. You should focus on paint preparation and control humidity impact; dry, clean surfaces stick better, and you’ll want proper ventilation during curing to prevent peeling and blistering.
Can I Use a Ceiling Paint That Matches Wall Color Exactly?
Yes — you can use ceiling paint that matches wall color exactly, but you’ll notice differences in sheen and texture; choose a flat or matte ceiling paint, test samples under lighting, and adjust tint for consistent color matching.
How Long Before I Can Hang Pictures Back on the Stairwell Walls?
How long? You can hang artwork after 24–48 hours for touch-dry paint, but wait 7 days for full cure before arranging stairwell decor to avoid smudges or shifting; you’ll guarantee stable adhesion and clean results.
Conclusion
You’ve now got the know-how to conquer that stairwell ceiling like a fearless paint wizard—without turning your hallway into a slapstick disaster movie. Measure, map, secure scaffolding, and choose the right tools; touch up mistakes before anyone notices. If wiring, structure, or suspicious old lead paint shows up, call a pro—no heroics. Follow the checklist, work methodically, and you’ll finish fast, clean, and proud, with zero acrobatics and maximum wow.