Best Paint Finish for Bathroom Cabinets That Can Handle Humidity
You should use a semi‑gloss water‑based acrylic or a waterborne alkyd finish on bathroom cabinets because they resist moisture, wipe clean easily, and hold up to frequent use. Satin is a softer alternative if you want less shine but still need humidity resistance. Always prep with a high‑adhesion, mildew‑resistant primer and apply thin, even coats for best durability. Keep humidity controlled while the paint cures, and keep going for tips on prep, products, and care.
Quick Answer Best Paint Finish for Bathroom Cabinets
Go with a semi-gloss finish for bathroom cabinets.
It’s durable and resists moisture and staining, so it holds up well in humid conditions.
You’ll also get a smooth, easy-to-clean surface that keeps cabinets looking fresh.
One-sentence recommendation
If you want a durable, easy-to-clean finish that resists moisture and frequent use, choose a semi-gloss or satin acrylic latex paint formulated for cabinets.
For what paint finish for bathroom cabinets, pick semi-gloss for higher sheen and wipeability or satin for a softer look with good durability; both handle humidity well when applied over proper priming and cured paint.
Short explanation of why this finish works in humid bathrooms
Because bathrooms stay humid and get splashed, semi-gloss or satin finishes form a tighter, less porous surface that resists moisture penetration and cleans easily; they also repel mildew, tolerate frequent wiping, and hold up to steam without softening.
You’ll avoid peeling and water stains, and touch-ups blend well. Use proper primer and ventilation to maximize durability and protect wood or MDF from long-term humidity damage.
Basic Understanding Paint Finishes and Humidity
Paint finishes describe the sheen level—flat to high-gloss—and each sheen has trade-offs in durability, hiding imperfections, and ease of cleaning.
In a humid bathroom you’ll face risks like swelling, peeling, and mold unless you choose a finish and prep that resist moisture.
Focus on durability, moisture resistance, and cleanability when picking a finish for your cabinets.
What are paint finishes? (sheen levels and characteristics)
When you choose a finish for your bathroom cabinets, you’re picking how much shine and durability the surface will have; sheens range from flat to high-gloss and each affects moisture resistance, cleaning ease, and how imperfections show.
Flat hides flaws but cleans poorly. Satin balances sheen and wipeability. Semi-gloss and gloss boost scrubbability and water tolerance but highlight flaws.
Choose by use and look.
How humidity affects painted surfaces (swelling, peeling, mold)
Shine and durability matter, but in a bathroom you also have to think about humidity and how it affects painted surfaces.
Moisture can cause wood to swell, seams to open, and paint to lose adhesion, which leads to peeling. Persistent dampness feeds mold and mildew growth on painted finishes.
Proper ventilation and quick drying reduce these risks and preserve your cabinetry.
Key performance factors for bathroom cabinets (durability, moisture resistance, cleanability)
Because bathroom cabinets handle daily use and constant moisture, you should prioritize three performance factors: durability, moisture resistance, and cleanability.
Choose finishes that resist scratches and chips, seal edges to block water, and tolerate frequent wiping without dulling.
Look for semi-gloss or satin paints, proper primer, and topcoats that prevent mold and allow easy stain removal for long-lasting, low-maintenance cabinetry.
Primary Recommendation Best Finish Options Ranked
For bathroom cabinets, you’ll usually want semi-gloss because it handles moisture, cleans easily, and resists wear.
If you prefer ultra-durable, showy surfaces choose high-gloss for trim or small areas, but be ready for every imperfection to stand out.
Satin or eggshell can work when you want softer sheen—just know they’re a bit less moisture-resistant—and matte/flat is generally a poor pick for humid, high-contact bathrooms.
Semi-gloss (why it’s best)
Anyone updating bathroom cabinets will find semi-gloss hits the sweet spot: it offers high moisture resistance, scrubbability for soap scum and fingerprints, and a bright, durable surface that holds up in humid conditions. You’ll get easy cleaning, reliable wear, and a subtle sheen that complements fixtures without glaring. Compare benefits below:
| Feature | Benefit | Use |
|---|---|---|
| Moisture | Resists dampness | Baths |
| Cleaning | Scrubbable | Daily maintenance |
High-gloss (when to choose it)
When you want a mirror-like, ultra-durable surface that pops in small bathrooms or modern spaces, choose high-gloss—it’s the best pick for bold, easy-to-clean cabinets that stand up to moisture and frequent wiping.
Use high-gloss for trim, vanity faces, or hardware-like accents where scratches are less noticeable and reflections amplify light.
Prep thoroughly and apply thin, even coats for a flawless finish.
Satin/eggshell (pros and cons in bathrooms)
Although not as reflective as high-gloss, satin and eggshell finishes give bathroom cabinets a soft, low-sheen look that hides imperfections and still wipes clean, making them a versatile middle ground between matte and gloss.
You’ll get decent moisture resistance, easy maintenance, and less visible wear than high-gloss, though they show stains and scuffs more than gloss and need occasional touch-ups.
Matte and flat (why generally not recommended)
If you want a truly modern, understated look, matte and flat paints can be tempting—but they’re usually not the best choice for bathroom cabinets.
You’ll find they absorb moisture, show stains and scuffs more readily, and resist cleaning poorly.
In humid rooms you’re better off with more durable, wipeable finishes like satin or semi-gloss to protect wood and preserve appearance.
Recommended Paint Types and Products
For bathroom cabinets you’ll usually want a water-based acrylic/latex enamel because it handles humidity, dries fast, and cleans up easily.
Traditional oil-based alkyds still offer durable film but they yellow and have stronger fumes, which is why modern waterborne alkyds and hybrid formulas are popular—they give alkyd toughness with lower VOCs.
If you need extra abrasion and moisture resistance, plan to finish with a clear topcoat or polyurethane.
Water-based (acrylic/latex) enamel paints benefits for humidity
A water-based acrylic or latex enamel gives you strong humidity resistance without the long dry times and strong odors of oil-based paints, so it’s often the best choice for bathroom cabinets.
You’ll get durable, nonyellowing coverage, quick curing, and easy cleanup with soap and water.
These enamels resist mildew, flex slightly with temperature shifts, and accept clear topcoats for extra protection.
Oil-based alkyds pros, cons, and modern alkyd alternatives
While water-based enamels handle moisture and quick turnarounds well, oil-based alkyds still hold appeal for bathroom cabinets when you want exceptional leveling and toughness.
You’ll get durable, hard films that resist abrasion and show fewer brush marks, but expect longer dry times, stronger odors, and yellowing over time.
Consider modern alkyd alternatives formulated for lower VOCs and improved cure without the old drawbacks.
Waterborne alkyds and hybrid formulas (best of both worlds)
Because they blend the durability of alkyds with the quick drying and low-VOC benefits of waterborne systems, waterborne alkyds and hybrid formulas give you the best of both worlds for bathroom cabinets.
You get hard, chip-resistant surfaces that cure faster than traditional oils, clean up with soap and water, and resist moisture.
Choose satin or semi-gloss for easy cleaning and balanced sheen.
Clear topcoats and polyurethanes for extra protection
Think of a clear topcoat as the final armor for your bathroom cabinets: it locks in color, adds abrasion resistance, and boosts moisture protection without changing the look.
You’ll pick water-based polyurethane for low odor and clarity, or oil-based for tougher wear.
Apply thin coats, sand between, and cure fully to endure humidity and daily wear.
- Confidence
- Relief
- Pride
- Calm
How to Prepare and Paint Bathroom Cabinets for Humidity Resistance
Start by checking your cabinet material and overall condition so you know whether to repair, sand, or replace parts before painting.
Clean and degrease thoroughly, then sand and prep the surface for primer—use a high-adhesion, mildew-resistant primer designed for humid environments.
Finally, pick the best application method for your cabinets (brush for detail, roller for panels, or spray for a smooth, durable finish).
Step 1: Assess cabinet material and condition
Before you pick paint or primer, take a close look at what your cabinets are made of and how they’re holding up; the substrate and condition dictate your products and prep.
Check for solid wood, veneer, laminate, or MDF, note water damage, loose joints, warping, or peeling finish.
Identify repairs, fill gaps, and decide if replacement is wiser than refinishing.
Step 2: Cleaning and degreasing
Scrub cabinets thoroughly to remove grease, soap scum, and mildew—contaminants that prevent primer and paint from bonding and that can encourage mold in humid bathrooms.
Use a degreaser or trisodium phosphate substitute with warm water, a sponge, and scrub brush.
Rinse twice, wipe dry, and let cabinets air for at least 30 minutes.
Wear gloves and ventilate the room.
Step 3: Sanding and surface prep
1. You’ll sand to remove gloss and smooth imperfections so paint adheres. Start with 120–150 grit, feather edges, then finish with 220 grit for a fine surface.
Fill holes and seams with a fast-drying wood filler, sand flush, and remove dust with a tack cloth or vacuum.
Confirm drawers and hinges are labeled and protected before you move to priming.
Step 4: Priming best primer types for humid environments
Once you’ve sanded and cleaned the surfaces, choose a primer formulated for high-humidity spaces so paint bonds and resists moisture-related failures; water-based acrylic primers and shellac or oil-based primers each offer different advantages—acrylic for low odor and easy cleanup, oil-based for superior sealing, and shellac for blocking stains and mold spores—so pick one compatible with your topcoat and cabinetry material.
Apply thin, even coats, allow full cure, and spot-sand between coats for a smooth, moisture-resistant base.
Step 5: Choosing application method (brush vs. roller vs. spray)
When you pick between brushing, rolling, or spraying, consider surface detail, desired finish, and how much moisture protection you need; each method affects film thickness, leveling, and durability differently, so choose the one that best balances control and coverage for your cabinets.
Use a brush for edges and trim, a short-nap roller for flat panels, and spray for the smoothest, most even protective film.
Step 6: Number of coats and dry time considerations for humid climates
After you’ve picked the best application method, plan how many coats you’ll apply and how long each needs to dry in high humidity.
Apply two thin coats of primer and two of topcoat for durability, allowing extended tack-free times—usually 2–4 hours per thin coat in damp conditions.
Use a dehumidifier or fan to speed drying and wait longer between coats if surfaces feel cool or tacky.
Step 7: Curing time and when to reinstall cabinets
Before you reinstall anything, let the finish fully cure—this is different from dry-to-touch and takes longer in humid bathrooms.
Follow manufacturer cure times (often 7–30 days); shorter times mean tacky, vulnerable surfaces.
Keep doors open for airflow, use dehumidifiers, and avoid heavy use.
Reattach hardware and return items only when the finish resists fingernail pressure and smells have faded.
Comparison Table Finish vs. Durability vs. Cleanability vs. Appearance
Because your bathroom sees moisture, frequent touch, and occasional spills, choosing the right cabinet finish means balancing durability, cleanability, and appearance. Use this quick comparison to decide what fits your needs.
| Finish | Durability | Cleanability |
|---|---|---|
| Semi-gloss | High | Easy |
| Satin | Moderate | Good |
| Oil-based enamel | Very high | Very easy |
Common Mistakes That Reduce Humidity Resistance
Don’t skimp on primer or grab the wrong one—poor adhesion lets moisture get under the finish.
If you apply too-thin or too-few coats, or paint in high humidity without proper drying time, the finish will fail faster.
Also avoid low-quality paints and incompatible topcoats that can peel or amber in wet conditions.
Skipping primer or using wrong primer
If you skip primer or pick the wrong one, your bathroom cabinet finish won’t bond properly and moisture will creep in over time.
You’ll get peeling, blistering, and stain bleed-through.
Use a moisture-blocking, adhesion-promoting primer matched to your substrate and topcoat—oil-based or high-quality bonding primer for laminate, stain-blocking for tannin-rich woods.
Proper priming prevents failure and extends finish life.
Applying too-thin or too-few coats
When you lay on paint too thin or stop after only one coat, the protective film won’t form properly and humidity will seep through seams and brush marks.
You should apply full, even coats and follow the manufacturer’s recoat times. Thin layers cure faster but offer less protection; multiple proper coats build a durable, moisture-resistant barrier that resists peeling, staining, and mildew.
Painting in high humidity without proper drying time
Although you might be enthusiastic to finish, painting in high humidity without allowing proper drying time undermines the coating’s adhesion and moisture resistance.
You’ll risk tacky, clouded, or blistered finishes that trap moisture and invite peeling.
Wait for recommended cure times, use dehumidification or fans, and apply coats only when previous layers are fully dry to maintain a durable, humidity-resistant cabinet surface.
Using low-quality paint or incompatible topcoats
Because your finish depends on the products you choose, using cheap paint or mixing incompatible topcoats will quickly undermine humidity resistance and shorten the life of your cabinets.
You’ll get peeling, blistering, or soft spots when water vapor penetrates weak binders.
Pick quality, moisture-rated paints and compatible primers/topcoats, follow manufacturer cure times, and test adhesion before finishing to guarantee long-term protection.
Maintenance and Long-Term Care for Painted Bathroom Cabinets
To keep painted bathroom cabinets looking good, you’ll want a simple cleaning routine using mild, non-abrasive cleaners and a soft cloth to avoid finish damage.
For chips or worn spots, do small repairs with light sanding, touch-up paint, and a thin recoat to blend and protect the surface.
If damage is widespread or the finish is repeatedly failing, plan to refinish or replace the cabinets rather than patching endlessly.
Cleaning best practices and safe cleaners
1 simple routine will keep painted bathroom cabinets looking fresh: wipe spills promptly, clean gently weekly, and handle grime with safe, mild products.
Use microfiber, diluted dish soap, and a soft brush for crevices. Rinse and dry thoroughly to prevent water spots and mildew.
- Gentle soap — reassuring
- Microfiber — comforting
- Vinegar mix sparingly — cautious
- Soft brush — confident
Small repairs: touch-ups, sanding, and recoating
Keep touch-ups simple and timely so small nicks don’t become big problems; you’ll save time by addressing chips, peeling, or worn edges as soon as you spot them.
Clean area, sand lightly to smooth, wipe dust, and apply matching touch-up paint or thin coat with a small brush.
For larger wear, scuff-sand whole panel and recoat with same finish for consistent protection.
When to refinish or replace cabinets
Small, timely touch-ups will keep your cabinets looking good longer, but sometimes wear goes beyond a quick sand and paint.
If doors warp, hinges fail repeatedly, mold returns, or structural damage appears, refinish only if frames are sound.
Replace when repair costs approach replacement or functionality and alignment are compromised.
Choose replacement for persistent moisture damage or when you want updated layout and durability.
Cost and Time Estimates
You’ll want to compare typical material costs—such as primer, paint, and topcoat—since satin, semi-gloss, and high-gloss finishes can vary in price.
Decide whether you’ll tackle the job yourself (which can take a weekend) or hire a pro (which is faster but pricier).
Consider each finish’s longevity and expected ROI so you can balance upfront cost, time, and how long the cabinets will stay looking good.
Typical material costs by finish type
Most homeowners pay different amounts depending on the finish you choose: basic lacquer and oil-based paints run cheapest, mid-range options like acrylic enamel or waterborne alkyd cost a bit more, and specialty finishes—spray-applied conversion varnish, milk paint, or high-end lacquer—carry the highest material price and often need more drying time and prep supplies.
Expect roughly $15–30 per quart for basics, $25–50 for mid-range, and $50–120+ for specialty products and additives.
Time required for DIY vs. professional jobs
Beyond material costs, time is the other big factor that affects whether you tackle bathroom cabinet refinishing yourself or hire a pro.
If you DIY, expect 2–4 weekends for sanding, priming, multiple coats, and curing, depending on drying times and complexity.
A professional can finish in 1–2 days, saving you hours but adding labor costs and scheduling.
Longevity expectations and ROI
When you pick the right finish and prep the cabinets properly, expect painted surfaces to last 5–10 years in a typical bathroom before showing wear.
Durable options like catalyzed lacquer or marine-grade finishes can stretch that to 10–15 years.
Refacing or replacing doors may offer a different lifespan and resale impact.
You’ll weigh upfront cost, labor, and expected life to judge ROI.
Visual Guide Before, During, After
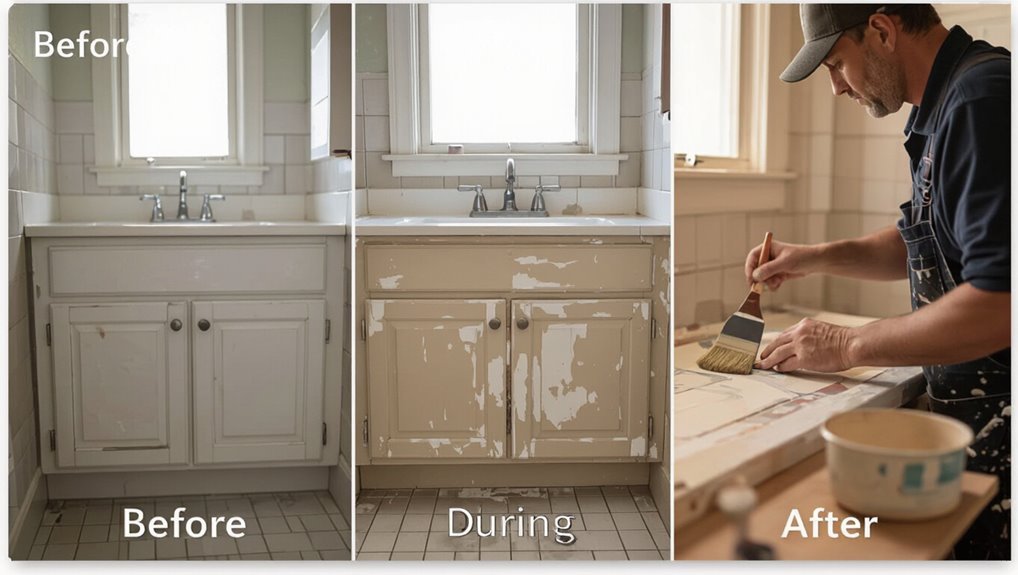
Before you pick up a brush, take a clear photo of your cabinets and note areas with chips, water damage, or heavy grime so you’ll know exactly what to repair and clean first.
During prep and painting, photograph progress: sanding, primer, first and final coats.
After curing, shoot final images from the same angles to compare, document finish uniformity, and note touch-up spots for future maintenance.
FAQ Frequently Asked Questions
You’ll find quick answers here to common concerns like whether semi-gloss always beats satin, if exterior paint works for humid bathrooms, and how long paint should cure before it meets steam.
I’ll also cover which finish hides flaws best while resisting moisture and whether water-based paints hold up on cabinets.
Use these FAQs to pick the right finish and timing for a durable, good-looking result.
Is semi-gloss always better than satin for bathrooms?
Wondering whether semi-gloss always beats satin for bathroom cabinets?
You’ll find semi-gloss resists moisture and cleans easily, but satin hides imperfections and looks softer.
Choose semi-gloss for high-traffic, very humid baths; pick satin for a more forgiving, subtle look in gentler humidity.
Either finish holds up when you prep, prime, and use quality paint—match finish to use and style.
Can I use exterior paint on bathroom cabinets for humidity protection?
Can you use exterior paint on bathroom cabinets to boost humidity protection? Yes — exterior paints are formulated to resist moisture and UV, so they can add durable protection.
However, pick a product compatible with indoor ventilation and odors, sand and prime properly, and guarantee finishes are safe for interior use.
Exterior acrylic latex is a common, effective choice for humid bathrooms.
How long should paint cure before exposing cabinets to steam?
If you choose an exterior acrylic or other moisture-resistant paint for your bathroom cabinets, give it proper curing time before subjecting it to steam.
Wait at least 7 days for light use and up to 30 days for full chemical and moisture resistance, depending on product instructions, humidity, and temperature.
Test a small area before regular steam exposure to verify durability.
What finish hides imperfections best while resisting moisture?
Although no finish will magically erase major flaws, a satin or semi-gloss waterborne acrylic will do the best job of hiding small imperfections while standing up to moisture. Its moderate sheen smooths the eye without reflecting every bump, and modern formulas resist humidity and clean easily.
You should prep well, fill gaps, sand lightly, and apply thin, even coats for the smoothest, most durable appearance.
Are water-based paints durable enough for cabinet surfaces?
Wondering whether water-based paints hold up on cabinets? You’ll find modern water-based formulas are durable, low-odor, and resist yellowing.
Use a quality acrylic or polyurethane-acrylic enamel, sand between coats, and apply a clear protective topcoat for high-traffic cabinets.
Proper surface prep and multiple thin coats are essential—do that, and water-based finishes perform very well in humid bathroom environments.