Can Latex Paint Be Used on Metal
Yes — you can use latex paint on metal if you prep and prime correctly. You’ll need to remove rust, grease, and loose coatings, scuff or sand the surface, and apply a rust-inhibiting or metal-specific primer that’s compatible with latex. Use thin, even topcoats, allow proper dry and cure times, and seal seams on outdoor pieces for extra protection. Follow these steps and you’ll get durable results; keep going to learn specific tips, tools, and timing.
Who This Guide Is For and What You’ll Learn
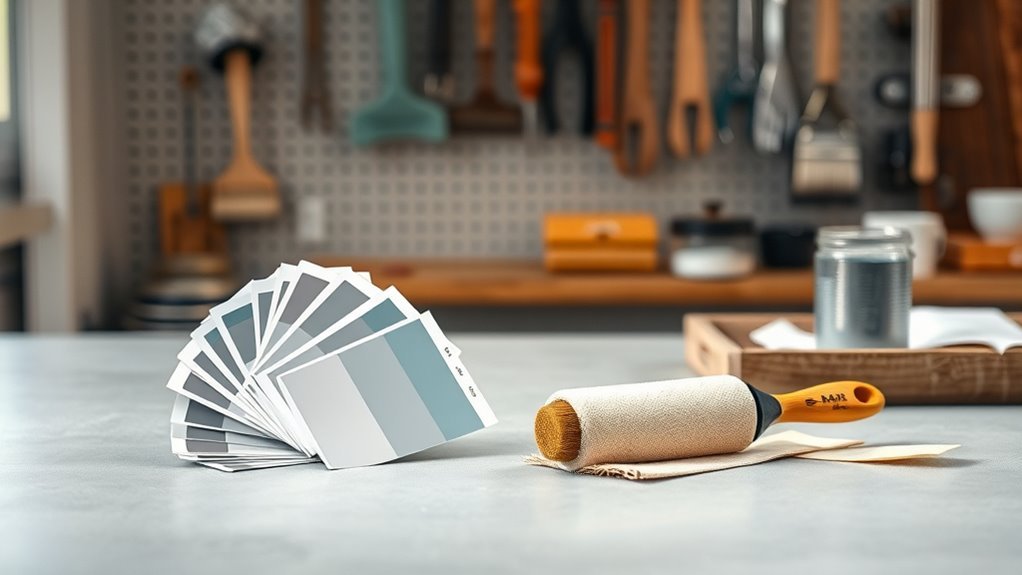
If you’re a DIYer, homeowner, or pro considering latex paint for metal surfaces, this guide will help you decide when it’s appropriate and how to get durable results. You’ll learn prep steps—cleaning, rust removal, and primer choices—so paint adheres.
I’ll show practical tips for application, drying times, and maintenance to extend finish life. Expect clear advice on when latex fits versus when oil-based or specialty coatings are better. You’ll also get brief Brand comparison notes and guidance on Color mixing limitations for outdoor exposure.
This guide keeps recommendations actionable so you can test and finish confidently.
Short Answer: Can You Use Latex Paint on Metal?
Yes—you can use latex paint on metal, but you’ll need to prep the surface and pick a compatible primer first.
You should remove rust, clean and sand the metal so the paint can adhere.
Then choose a primer labelled for metal and latex topcoats to guarantee durability.
Surface Preparation Needed
Before you grab a quart of latex, you’ll need to prep the metal so the paint will stick and last. You’ll remove rust, grease, and loose old paint with a wire brush or sandpaper, then clean with a degreaser and rinse. Dry thoroughly. Inspect for pitting and fill as needed. Keep color matching samples and plan paint storage for leftover latex in airtight containers. Lightly scuff smooth factory finishes to improve adhesion.
| Step | Purpose |
|---|---|
| Remove rust | Prevent failure |
| Clean | Remove oils |
| Sand | Create tooth |
| Fill | Smooth surface |
| Dry | Ensure adhesion |
Primer Compatibility
Now that the metal’s cleaned and prepped, pick a primer that bonds to both metal and latex paint so your finish holds up. You’ll want a rust-inhibiting or epoxy-based primer for bare steel, or a self-etching primer for galvanized surfaces.
Apply evenly, follow drying times, and sand lightly before topcoating.
Choose primer tinting for easier color matching with your latex topcoat, especially when moving from dark to light hues.
Consider how primer influences your finish options—matte, satin, or gloss—and select products formulated for exterior or interior use to guarantee adhesion, durability, and the look you want.
Oil-Based vs Latex Paint for Metal: Which to Pick?
When you’re deciding between oil-based and latex paint for metal, think about durability, flexibility, and how long you want the finish to last.
You’ll weigh trade-offs: oil gives a hard, smooth coat that resists wear; latex stays more flexible and resists cracking in changing temperatures.
Consider color matching—oil can deepen hues, latex keeps brighter tones.
Also factor environmental impact: latex has lower VOCs and easier cleanup.
Pick based on use and exposure.
- Use oil for high-traffic, long-lasting sheen.
- Use latex for outdoor flexibility and easy maintenance.
- Match primer to ensure adhesion.
Which Metals Accept Latex Paint Best?
You’ll find latex paint sticks well to many metals, but the type matters: ferrous metals like steel and iron usually need rust removal and primer first.
Nonferrous metals such as aluminum and copper can accept latex too, though they often require a cleaner or etching primer for good adhesion.
In short, prepared surfaces outperform unprepared ones, so always clean, sand, and prime before painting.
Ferrous Metals (Steel, Iron)
Curious which ferrous metals take latex paint well? You can use latex on steel and wrought iron if you manage metal corrosion and prepare the surface.
Clean, sand, and apply a rust-inhibiting primer before your surface coating to guarantee adhesion and longevity. Consider these steps:
- Remove rust and debris thoroughly.
- Use a dedicated rust primer compatible with latex paint.
- Apply two thin latex topcoats for durability.
Painted steel gates, railings, and furniture respond well when prepped correctly. Avoid painting active, flaking rust; stabilize first.
Proper prep minimizes future corrosion and improves finish lifespan.
Nonferrous Metals (Aluminum, Copper)
How well does latex paint stick to nonferrous metals like aluminum and copper? You’ll find adhesion can be good if you address smooth, oxide-rich surfaces—cleaning and using a suitable primer helps.
Aluminum resists metal corrosion but forms a slick oxide layer that can repel paint. Copper develops patina that complicates bonding. Choose primers formulated for nonferrous metals to improve paint durability and prevent flaking.
Latex topcoats give flexible, weather-resistant finishes, but their longevity depends on surface prep and primer compatibility. For best results, test a small area first and select coatings labeled for aluminum or copper substrates.
Prepared Vs. Unprepared Surfaces
When you prep metal properly, latex paint bonds far better than it does on an unprepared, greasy, or oxidized surface. You’ll find that clean, degreased, and lightly abraded metal—especially galvanized steel or properly primed aluminum—accepts latex reliably.
Unprepared rusted or oily pieces repel adhesion and lead to flaking. Consider these steps to guarantee success:
- Clean: remove grease, rust, and loose scale.
- Prime: use a metal-specific primer for adhesion and Color matching.
- Sand: scuff for grip and choose Texture options while finishing.
Follow that sequence and you’ll extend coating life and appearance.
When Latex Is a Bad Choice for Metal
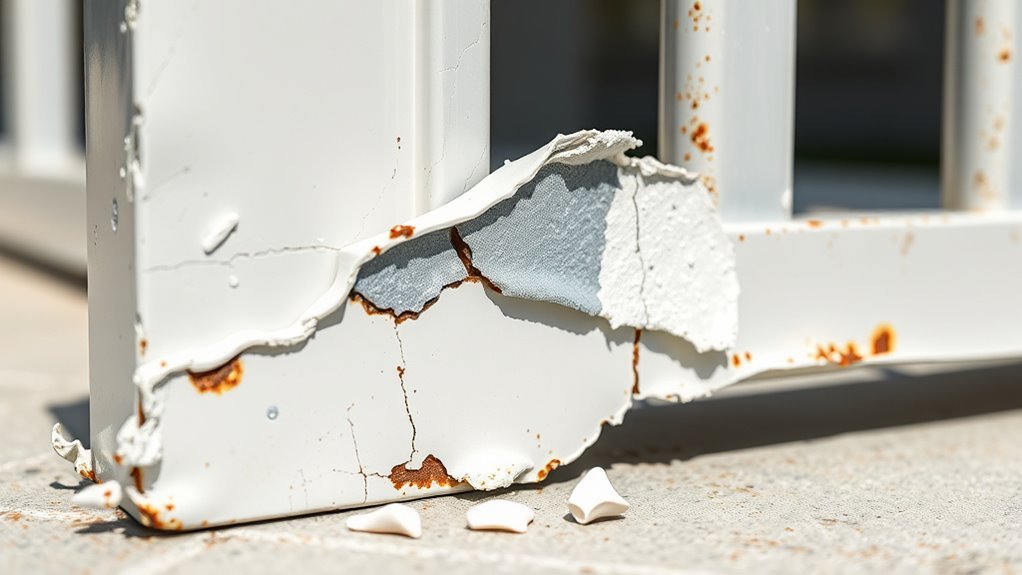
Although latex paint works well on many surfaces, there are clear situations where you shouldn’t use it on metal. If the piece already has metal rust or will face constant moisture, latex often fails because it can’t stop corrosion or bridge pitted areas.
Avoid latex on high-heat items, like grills or engines, since heat softens the film and reduces paint durability. For heavy-wear items—garage floors, toolboxes, or industrial equipment—latex scratches and chips more readily than specialized coatings.
Choose rust-inhibitive primers, epoxy, or oil-based options for those conditions to guarantee long-term protection and adhesion.
How Metal Type Affects Adhesion and Durability
Different metals bond with paint in different ways, so you’ll get much better adhesion and durability when you match your paint system to the substrate. You should identify the metal—steel, aluminum, or galvanized—because surface energy and oxide layers change adhesion and affect metal corrosion risk.
Consider paint compatibility and how coatings flex with thermal expansion. Prepare surfaces appropriately and choose coatings rated for that metal to avoid premature failure.
Key considerations include:
- Steel: high corrosion potential, needs robust corrosion control.
- Aluminum: lower surface energy, may need special adhesion promotion.
- Galvanized: zinc layer alters chemical bonding; select compatible coatings.
Do You Need Primer Before Painting Metal With Latex?
Before you paint metal with latex, assess the surface for rust, old coatings, and smoothness so you know what prep is required.
You’ll then choose a primer formulated for metal and compatible with latex—options include rust-inhibiting or bonding primers depending on the substrate.
Apply primer in thin, even coats following drying times and sanding between coats when recommended to guarantee good adhesion.
Assess Metal Surface
Want the paint job to last? You should assess the metal surface before deciding on primer. Check for rust, flaking, and contamination; smoothness affects adhesion and final paint color. Evaluate how the metal texture will interact with latex paint and whether repairs or sanding are needed.
- Inspect: look for rust, dents, old coatings.
- Clean: remove grease, dust, and loose particles.
- Test: sand a small area and apply a sample of your chosen paint color to see adhesion and appearance.
A proper assessment prevents failures and helps you choose the right prep and product.
Choose Appropriate Primer
If your metal is bare, rusty, or previously painted with oil-based coatings, you’ll usually need a primer to guarantee latex paint bonds and resists corrosion. Choose a primer formulated for metal—rust-inhibiting for iron, etch primers for aluminum. Consider adhesion, corrosion protection, and whether you need a bonding or self-etching type. Match primer tint for color matching if you’ll apply translucent or light topcoats. Store leftover primer correctly; label cans and follow paint storage guidelines to keep performance. Use the table to compare quick options:
| Type | Best For | Notes |
|---|---|---|
| Rust-inhibitor | Iron/steel | Long-term protection |
| Etch | Aluminum | Preps surface |
| Bonding | Recoats | Adheres to glossy surfaces |
| Acrylic | General | Easy cleanup |
Primer Application Tips
Deciding whether you need primer depends on the metal’s condition and the paint system you’re using. Bare, rusted, or oil-coated metal typically needs a metal-specific primer to guarantee latex paint bonds and resists corrosion.
In contrast, clean, previously latex-painted surfaces with good adhesion can often be recoated without primer after proper cleaning and scuffing.
You should:
- Clean thoroughly—remove grease, rust, and loose paint.
- Choose a primer that matches your topcoat and aids color matching.
- Apply thin, even coats and follow dry times; store leftover primer per paint storage guidelines.
Test a small area to confirm adhesion before full application.
Which Primers Work With Latex on Metal?
When you’re painting metal with latex, choosing the right primer matters more than you might think: it’s what guarantees adhesion, prevents rust, and creates a uniform surface for topcoat coverage.
You should pick primers labeled for metal bonding and corrosion resistance—etch primers for bare steel, zinc-rich primers for galvanized surfaces, and acrylic or latex-based metal primers for lightly abraded or previously painted pieces.
These options improve paint durability and reduce peeling. Match primer chemistry to both metal type and latex topcoat, follow manufacturer drying times, and apply thin, even coats so adhesion and longevity meet your expectations.
How to Remove Rust Before Painting Metal With Latex
Before you prime and paint, you’ll need to remove surface rust so the latex can adhere properly. Use a wire brush or sandpaper to get down to clean metal, then wipe away dust and residue.
Afterward, apply a rust-inhibiting primer or treatment to prevent future corrosion.
Surface Rust Removal
Want a paint job that lasts? Remove surface rust to stop metal corrosion from ruining your latex finish. Start by scrubbing loose flakes with a wire brush, then sand the area smooth to bare sound metal.
Clean residue with a degreasing solvent and dry completely.
- Use a wire brush or sanding to remove loose rust.
- Wipe with solvent and dry to remove dust and oils.
- Inspect for remaining pitting; repeat until smooth.
After removal, apply a rust-inhibiting primer per product instructions. These steps give latex paint a stable base without discussing long-term rust prevention strategies.
Preventing Future Corrosion
How will you keep new rust from undercutting your latex finish? Start by removing all loose corrosion with a wire brush or sandpaper. Then neutralize remaining rust with a rust converter.
Clean the surface thoroughly, let it dry, and apply a metal-appropriate primer designed to block moisture. Choose high-quality latex designed for metal to maximize latex durability, and follow manufacturer drying times between coats.
Seal edges and joints with a compatible sealant to prevent water intrusion. Maintain the painted metal by inspecting annually, touching up chips promptly, and addressing metal weathering signs before they advance into active corrosion.
How to Clean and Degrease Metal for Latex Paint
Once you’ve removed loose rust and old paint, thoroughly cleaning and degreasing the metal is essential to get latex paint to stick and last.
You’ll wash with warm water and a mild detergent, rinse, then use a dedicated degreaser or trisodium phosphate substitute to remove oils, grease, and residues. Rinse thoroughly and dry with clean rags or compressed air.
For best results, follow these steps:
- Apply degreaser, scrub, rinse.
- Neutralize any residue, then dry fully.
- Wipe with solvent if needed and avoid contaminating during color mixing or paint storage.
How to Sand and Scuff Metal for Better Latex Adhesion
Before you paint, make sure the metal is fully clean and dry so sanding will work properly.
Use fine-grit sandpaper or a scuff pad to create a light, even texture—don’t sand through any protective coatings.
That slight roughness helps latex paint grip the surface for a longer-lasting finish.
Prepare Surface Properly
Proper surface prep is essential if you want latex paint to stick to metal — start by removing rust, loose coating, and grease so the paint has a clean, rough surface to grip. Wear gloves, wipe with a degreaser, and rinse; let dry.
Use a wire brush for heavy corrosion, then sand with 80–120 grit to key the surface. After sanding, vacuum and tack cloth.
Prime with a metal primer recommended for latex. Remember to label leftover primer for color mixing and manage paint storage to avoid contamination.
Follow this simple routine:
- Clean
- Sand
- Prime
Create Light Scuffing
Because latex needs a slightly rough surface to bite into, lightly scuff the metal to remove gloss and give the primer something to grip. Use 220–320 grit sandpaper or a scuff pad, sanding evenly with the grain or in consistent strokes.
Wipe away dust with a tack cloth and degrease before priming. Scuffing helps primer adhere, speeds paint drying by promoting uniform film formation, and assists color matching by preventing sheen variations.
Don’t over-sand to avoid gouges; feather edges if you remove rust. After priming, let recommended cure times pass before applying latex topcoats for best durability.
Choosing a Latex Paint Formulation for Metal
When you’re picking a latex paint for metal, focus on formulation specifics rather than brand names. Choose a high-quality acrylic latex or alkyd-modified latex that promotes adhesion and paint durability, and check recommendations for metal.
Consider finish, VOCs, and whether it supports color matching to the substrate or existing pieces.
- Primer compatibility: proper bonding to bare or previously painted metal.
- Rust inhibitors: built-in corrosion resistance for longevity.
- Flexibility: resists cracking with thermal expansion.
You’ll get best results by confirming metal-specific labels, testing a small patch, and ensuring the chosen formula lists metal application.
How Many Coats of Latex Paint Do You Need on Metal?
Most metal projects need two coats of latex paint: a single primer coat followed by one or two topcoats depending on the finish and exposure.
Most metal projects require a primer plus one or two latex topcoats, depending on finish and exposure.
You’ll usually apply one topcoat for indoor, low-wear items and two for outdoor or high-contact surfaces.
Thin, even layers avoid runs and guarantee adhesion; sanding lightly between coats helps.
Consider color mixing carefully—tinting can alter opacity, so you might need an extra coat for full coverage.
Match brush selection to the finish: a synthetic-bristle brush for smooth results or a roller for larger flat areas.
Inspect in good light and add a final coat if needed.
Drying and Cure Times for Latex Paint on Metal
Before you start painting metal, factor in surface preparation time—sanding, cleaning, and priming add hours or a day before paint goes on.
Drying between coats is usually 1–4 hours depending on temperature and humidity, so plan your schedule accordingly.
Remember full cure can take up to 7–30 days for maximum hardness and chemical resistance, so handle painted metal gently until then.
Surface Preparation Time
Although latex paint can feel dry to the touch within an hour or two, you’ll need to distinguish between surface drying and full cure. Surface dryness means you can handle the metal gently, but the paint won’t reach maximum hardness and adhesion for days to weeks depending on temperature, humidity, and coating thickness.
When prepping metal, plan enough surface preparation time so primers and topcoats bond and achieve surface durability without rushing. Clean, sand, and allow tack-free intervals.
Key steps to schedule:
- Degrease and rinse, then dry fully.
- Lightly sand, remove dust.
- Apply primer and wait recommended recoat time.
Check chemical compatibility before proceeding.
Full Cure Duration
How long will latex paint actually take to fully cure on metal? You’ll usually see surface dryness within an hour or two, but full cure takes longer—often 7 to 30 days depending on temperature, humidity, coat thickness, and primer.
Lower temps and high humidity slow cure; thin coats in warm, dry conditions speed it. Wait full cure before subjecting metal to heavy use or doing color matching, since hue and sheen can shift while curing.
Proper curing maximizes paint durability and adhesion; don’t rush sanding or topcoats. Allow recommended time from product instructions for reliable, long-lasting results.
How Temperature and Humidity Affect Latex on Metal
When you’re painting metal with latex, temperature and humidity directly change how the paint cures and bonds to the surface. You’ll want moderate conditions: avoid extremes that harm metal bonding and reduce paint durability.
Cold slows cure, trapping moisture; heat speeds skinning but can cause poor adhesion. High humidity prolongs drying and invites blushing; very low humidity causes fast film formation and weak bonds.
Monitor conditions and adjust timing or environment to improve results.
- Ideal: 50–85°F, 40–60% RH
- Too cold/wet: weak adhesion, longer cure
- Too hot/dry: surface defects, reduced durability
Best Brushes, Rollers, and Sprayers for Latex on Metal
When painting metal with latex, you’ll want a synthetic bristle brush for smooth edges and durability.
Use high-density foam rollers for thin, even coats on flat surfaces.
If you’re spraying, pick airless sprayer tips sized for latex to prevent clogging and get consistent coverage.
Synthetic Bristle Brushes
Because latex is water-based, synthetic-bristle brushes are the best choice for painting metal—they hold shape, resist swelling, and give a smooth, even finish without shedding.
You’ll prefer synthetic brushes for edges, crevices, and when aiming to preserve any metallic sheen. Choose sizes and shapes that match the work: smaller angled brushes for trim, wider flats for panels, and filberts for contours.
Care for them by rinsing promptly and reshaping the tips. Advantages include consistent laydown, minimal brush marks, and durability.
Remember to remove rust and prime first so the brush-applied latex adheres and endures.
- Durability
- Smooth finish
- Easy cleanup
Foam Rollers Selection
If you want a smooth, even coat on metal, pick a dense foam roller designed for latex rather than a shaggy or high-nap cover. You’ll get better adhesion and fewer texture flaws on surfaces common in metal fabrication, and you’ll preserve latex durability. Choose sizes to match panels, use gentle pressure, and reload sparingly to avoid drips. Clean rollers promptly to extend life.
| Roller Type | Best Use |
|---|---|
| Fine foam | Smooth panels |
| Closed-cell | Prevents soaking |
| Mini foam | Tight corners |
| Wide foam | Large sheets |
| Thin nap | Light texture |
Airless Sprayer Tips
After you’ve chosen the right foam roller for smooth metal panels, switch to airless spraying for large jobs or tight, uniform finishes. Airless sprayers atomize latex into a fine, consistent mist that beats brushes and rollers for speed and even coverage.
You’ll want a tip that balances flow and atomization to protect paint durability on metal fabrication projects. Choose tip size by viscosity and desired coat thickness. Maintain pressure and overlap for even film.
Clean immediately to avoid clogs. Recommended priorities:
- Right tip orifice for latex
- Proper pressure setting
- Thorough cleaning and maintenance
How to Apply Latex Paint to Interior Metal Surfaces
When you’re ready to paint interior metal, start by cleaning and deglossing the surface so the latex will adhere properly; sand, wipe with degreaser, and remove rust. Prime with a metal-specific latex or bonding primer. Apply two thin coats, allowing full dry time for paint durability and even color matching. Ventilate and protect surroundings.
| Step | Tip |
|---|---|
| Clean | Degrease, sand, remove rust |
| Prime | Use bonding primer for metal |
| Paint | Two thin coats, even strokes |
| Finish | Inspect for coverage, touch up |
You’ll get a durable, well-matched finish if you prep and follow drying times.
How to Apply Latex Paint to Exterior Metal Surfaces
When painting exterior metal, you’ll start by cleaning, removing rust, and sanding to create a stable surface.
Then pick a high-quality exterior primer and a latex paint formulated for metal and weather resistance.
Finally, apply thin, even coats with proper drying times and use techniques that reduce runs and promote adhesion.
Surface Preparation Steps
Because metal holds paint differently than wood or plastic, you need to prep the surface carefully to guarantee the latex bonds and lasts.
Start by cleaning grease, rust, and old flaking paint with a degreaser and wire brush; rinse and dry thoroughly.
Sand smooth to give the latex tooth, then wipe with a tack cloth.
Repair deep corrosion with appropriate filler and remove loose particles.
Match surface sheen and color matching considerations when prepping adjacent areas to reduce touch-up issues and secure paint durability.
Follow these final steps before priming:
- Clean and degrease
- Sand and dust off
- Repair and dry
Primer And Paint Selection
Although metal’s smooth, nonporous surface resists paint adhesion, choosing the right primer and latex formulation locks in durability and prevents peeling.
You’ll pick a rust-inhibiting, etch or bonding primer designed for exterior metal; apply it after cleaning and de-rusting.
For latex topcoat, choose exterior acrylic latex labeled for metal — it flexes with temperature changes.
Consider color matching when replacing or touching up: get a sample swatch and test on primed metal.
Store leftover product properly: seal cans tightly and follow paint storage guidelines to preserve performance.
Proper primer and paint selection guarantees long-lasting protection and appearance.
Application And Drying Techniques
Before you paint, set up a clean, dust-free workspace and gather tools so application goes smoothly. Wipe metal, sand lightly, and tack cloth before priming.
Use a quality exterior primer compatible with latex, then apply paint in thin, even coats. Maintain a wet edge to avoid lap marks and work with the grain of the piece.
Control humidity and temperature; ideal drying is 50–85°F and low humidity.
Consider color blending for subtle shifts and use brushes, rollers, or sprayers to achieve desired texture effects.
Follow this sequence:
- Prime evenly.
- Apply two thin coats.
- Allow full cure between coats.
Painting Galvanized Metal With Latex Paint
Want to paint galvanized metal with latex? You can, but you’ll prep carefully.
Clean the surface to remove oils and white corrosion; sand lightly to dull the shiny zinc.
Apply a primer formulated for galvanized metal to prevent metal staining and guarantee adhesion.
Use high-quality latex paint and thin, even coats to avoid paint peel—don’t overload the brush or roller.
Allow full curing between coats and avoid painting in extreme temperatures or high humidity.
For outdoor items, consider a topcoat for extra protection.
With proper prep and products, galvanized surfaces will accept latex paint successfully.
Painting Aluminum & Stainless Steel With Latex Paint
When you’re painting aluminum or stainless steel with latex, good surface prep and the right primer make the job work. These metals resist paint unless you remove contaminants, roughen the surface, and block corrosion or bleed-through.
You’ll sand or scuff, degrease, and choose an adhesion-promoting primer designed for metal bonding. Apply thin latex coats and consider a topcoat for durability and a gloss finish if desired.
Follow drying times and avoid trapping moisture.
Key steps:
- Scuff and clean thoroughly.
- Use a metal-specific primer for bonding.
- Topcoat with latex for protection and gloss.
Painting Wrought Iron & Steel With Latex Paint
Shifting from aluminum and stainless, wrought iron and steel demand a different approach because they’re thicker, more prone to rust, and often have layers of old coatings or rust that interfere with adhesion.
You’ll need to remove loose scale and mill grime—wire brush, sandblast, or use chemical rust remover—so latex can bond.
Apply a rust-inhibiting primer formulated for ferrous metals to halt metal rust and improve paint durability.
Thin coats of exterior latex adhere well once the surface is prepped and primed.
Expect maintenance: inspect for chips, touch up promptly, and reseal exposed edges to prolong protection and finish.
How to Paint Metal Furniture With Latex for Longevity
Because metal furniture faces wear, moisture, and movement at joints, you’ll get the longest-lasting finish by prepping carefully and using the right products. Strip rust, sand glossy areas, and clean with a degreaser so primer bonds. Pick a metal-specific primer, then two thin latex topcoats for durability. Consider color matching to hide future touch-ups and factor color and finish into budget planning before starting. Seal high-wear spots with a clear water-based polyurethane.
Prep, prime, thinly paint, then seal high-wear metal furniture for a durable, long-lasting finish.
Follow this simple workflow:
- Prep: clean, sand, prime.
- Paint: thin coats, allow full cure.
- Protect: clear coat on edges and joints.
How to Paint Metal Doors and Frames With Latex
If your metal door or frame looks dingy or the old paint’s flaking, you can get a durable, clean finish with latex—provided you prep and prime correctly.
Start by removing hardware and sanding to smooth rust and rough metal textures; use a wire brush for heavy corrosion. Clean thoroughly, then apply a rust-inhibiting primer compatible with latex.
Choose a high-quality exterior or interior latex suited to the location and desired paint color, and use a brush for corners plus a roller for flat areas.
Apply two thin coats, allow full drying between coats, and reattach hardware once cured.
Weatherproofing Latex-Painted Exterior Metal
When you’re weatherproofing exterior metal that’s been painted with latex, focus on sealing joints, protecting edges, and adding a durable top layer to keep moisture and UV from breaking down the finish. You’ll inspect seams and rust spots, clean and prime for strong metal bonding, and guarantee paint durability by using compatible products.
Prioritize flexible sealants at movement points and corrosion inhibitors on exposed edges. Follow this simple checklist:
- Clean, remove rust, apply primer for adhesion.
- Seal seams and fasteners with exterior-grade caulk.
- Inspect annually; touch up chips to maintain protection.
That approach preserves finish and prevents water intrusion.
Using Clear Coats and Sealers Over Latex on Metal
Before you seal latex on metal, check that the clear coat is compatible—water-based sealers usually pair best with latex, while some solvent-based clears can cause lifting.
You’ll also need to clean, scuff, and fully dry the painted surface so the sealer bonds properly.
Test a small area first to confirm adhesion and appearance.
Compatibility With Clear Coats
Although latex forms a flexible, breathable film that many clear coats can adhere to, you’ll still need to match products and prep the surface to get a durable finish on metal.
You’ll check metal bonding and clear coat compatibility: some acrylic clears grip latex well, while polyurethane or epoxy clears may crack if stiffness mismatches occur. Test a small area first.
Consider these steps before sealing:
- Confirm manufacturer states compatibility with latex.
- Use compatible clears designed for flexible coatings.
- Allow full cure time to prevent trapped solvents.
Proper selection and testing avoid adhesion failures and premature yellowing.
Proper Surface Preparation
If you’re sealing latex-painted metal, proper surface preparation guarantees the clear coat bonds and the finish lasts. You’ll clean grease, remove rust, and scuff smooth latex for best Metal bonding and Paint durability. Use solvent wipe, sand with fine grit, and apply a compatible primer before clear coats. Test a small area to confirm adhesion, then choose a UV-resistant sealer for outdoor pieces. Maintain tack-free conditions and follow manufacturer cure times to avoid trapping solvents. Visualize steps:
| Clean | Sand | Prime |
|---|---|---|
| Degrease | 220–320 grit | Bonding primer |
| Wipe dry | Blow off dust | Cure fully |
How to Prevent Peeling and Flaking of Latex on Metal
When you want latex paint to stay put on metal, start by eliminating anything that could break the bond — rust, grease, loose old paint and surface oils. Then create a profile the new paint can grip with proper cleaning, sanding, and a compatible primer.
To prevent peeling and flaking, focus on metal bonding and paint compatibility, apply thin even coats, and allow full cure between layers. Follow these essentials:
- Use a primer made for metal and latex topcoats.
- Sand smoothly to a dull sheen; remove dust.
- Avoid painting in extreme humidity or temperature.
Maintain and inspect periodically to catch failures early.
How to Stop and Repair Rust Under Latex Paint
Because rust keeps progressing under paint, you need to act quickly to stop it and prevent recurrence.
Scrape loose paint and scale with a wire brush or scraper until you reach solid metal bonding.
Sand feathered edges smooth and wipe clean with a solvent to remove dust and grease.
Apply a rust converter on remaining oxidation to neutralize it.
Then prime with a corrosion-inhibiting metal primer for proper adhesion and rust prevention.
Use high-quality latex or compatible topcoat once primer cures.
Monitor the area periodically and address chips or new rust spots promptly to maintain protection and adhesion.
How to Touch Up Scratched Latex Paint on Metal
Once you’ve stopped rust and prepped the surface, touching up scratches in latex paint on metal is a straightforward, repairable task you can do yourself.
Match the paint by checking the historical context of the piece and current paint color trends to choose a formula and sheen.
Clean the area, sand lightly, and apply primer if bare metal shows.
Use a fine brush for thin coats, letting each dry fully.
Finish by feathering edges for a seamless look.
Remember to:
- Test in an inconspicuous spot.
- Build thin layers.
- Protect with clear sealer if exposed.
Common Mistakes That Ruin Latex Paint on Metal
After you’ve fixed scratches and sealed the area, it helps to know what mistakes will undo your work. Don’t paint over greasy or dirty metal; adhesion fails and bubbles form. Skipping primer invites rust and peeling.
Applying thick coats to speed the job causes drips and uneven drying. Ignoring ventilation exposes you to paint fumes and slows curing—open windows and use a mask.
Rushing recoats before the previous layer cures traps solvents and causes tackiness. Poor color matching draws attention to touch-ups, so test swatches in the actual light.
Store leftover paint properly to keep it usable for future repairs.
Troubleshooting Checklist for Failing Latex on Metal
If your latex paint is failing on metal, follow a systematic checklist to identify and fix the root cause quickly. Inspect adhesion, rust, and surface contamination. Confirm you used proper primer and that the metal was clean and dry. Check batch consistency: improper color mixing can alter binder ratios. Review paint storage history for freeze/thaw or contamination. Test a small patch after corrective prep.
If latex fails on metal, systematically inspect adhesion, rust, contamination, primer use, and storage—prep, test, and retest until resolved.
- Clean/degrease, sand, prime.
- Confirm correct thinner/temperature and repaint.
- Replace old cans; verify label and storage conditions.
Document steps and retest; repeat until adhesion and finish are sound.
When to Call a Pro for Painting Metal
When a metal project involves extensive rust, structural repair, inaccessible areas, or specialized coatings, call a professional—doing so saves time and prevents costly mistakes.
You should also hire pros if surface prep needs grit blasting, welding, or corrosion treatment beyond DIY skills. They’ll recommend suitable primers, adhesives, and compatible topcoats so your latex won’t fail when it shouldn’t.
Ask about their approach to color mixing for accurate matching and inquire how they handle paint storage to maintain product integrity.
Calling a pro also reduces warranty risks and guarantees safety when working with ladders, chemicals, or confined spaces.
Cost & Time: Latex vs Other Metal Paint Options
Because latex paint is water-based and dries faster than many oil-based and specialty metal coatings, you’ll usually spend less time on each coat and get projects finished sooner. You’ll save on labor and cure time, and supplies tend to cost less than specialized metal primers or enamels. Consider:
Because water-based latex dries faster than many metal coatings, you’ll save time, labor, and lower-cost supplies.
- Prep: degreasing and priming; latex primers are cheaper.
- Coats: fewer hours between coats speeds completion.
- Touch-ups: easy and quick matching for blemishes.
Latex may limit extreme durability compared to some alternatives, but it offers good color matching and accessible, eco-friendly options that reduce upfront cost and overall project time.
Environmental & VOC Considerations for Latex Paint on Metal
Although latex paint is water-based and generally emits fewer volatile organic compounds (VOCs) than oil-based alternatives, you still need to take into account ventilation, local regulations, and product labels when using it on metal.
You should choose low-VOC or zero-VOC formulations and check VOC regulations in your area to guarantee compliance. Proper ventilation and drying time reduce exposure, and using eco-friendly finishes minimizes environmental impact.
Dispose of brushes, rags, and leftover paint per local hazardous-waste guidelines. When working indoors, run fans and open windows; outdoors, avoid painting on windy days to limit airborne particles and runoff.
Project Timeline: Step-By-Step Plan for Painting Metal With Latex
Before you grab a brush, map out a clear timeline that breaks the job into surface prep, priming, painting, and curing so you can work efficiently and avoid shortcuts.
Start Day 1 with cleaning, degreasing, and sanding to remove rust and old coatings.
Day 2 apply a metal-specific primer; allow full flash time.
Days 3–4 apply latex coats, monitoring humidity and temperature; choose Color options that suit exposure and finish.
Final curing may take days—don’t rush.
Focus on paint durability with thin, even coats and proper drying between layers.
- Prep
- Prime
- Paint
Frequently Asked Questions
Can Latex Paint Be Used Over Existing Oil-Based Paint Without Stripping?
Yes — you can, but you’ll need good surface preparation first. You’ll sand, clean, and prime to improve paint adhesion; this prevents peeling and guarantees the latex bonds to the old oil finish without stripping everything.
Will Latex Paint Interfere With Electrical Grounding on Metal Surfaces?
Think of paint as a thin blanket: it won’t usually cause grounding interference if you clean contact points. You should test continuity; for electrical safety, scrape or use conductive pads at grounding connections to guarantee reliable contact.
Can Latex-Painted Metal Be Powder-Coated Afterward?
Yes — you can powder-coat over latex-painted metal, but you’ll need thorough surface preparation: strip or chemically remove the latex, sand to guarantee paint adhesion, and clean the substrate so the powder bonds reliably.
Are There Food-Safe Latex Paints Suitable for Metal Kitchen Surfaces?
Yes — you can find food-safe latex paints formulated for metal surfaces; you’ll need paints labeled non-toxic, NSF or FDA-compliant, and cured per instructions, and you should prime and topcoat appropriately to guarantee durability and safety.
How Does Saltwater Exposure Affect Latex Paint on Marine Metal?
Like a Victorian mariner, you’ll find saltwater rapidly undermines latex paint on marine metal: it degrades paint adhesion and accelerates corrosion resistance failure, so you’ll need marine-grade primers, sealants, and frequent maintenance to protect surfaces.
Conclusion
You’ve learned when latex shines — and when it fades — on metal, so you can confidently choose the right paint for your project. Think of latex as a friendly coat that’s great for clean, primed iron or steel in low-stress spots, but not the superhero for rusty, high-heat, or heavy-wear jobs. When in doubt, prep thoroughly or call a pro; with the right steps, your metal will wear its new finish like armor, not a costume.