How to Remove Double Sided Tape From Painted Wall
You can remove double-sided tape from a painted wall without ruining the finish by warming the adhesive with a hairdryer on low to soften it, then peeling slowly at a low angle while supporting the paint with your other hand. Use a plastic scraper or old credit card for stubborn edges, and gently remove residue with rubbing alcohol, citrus remover, or oil tested on a hidden spot. Finish with mild soapy water and a microfiber cloth, and keep going to learn safe alternatives and fixes.
What Search Intent Does This Guide Satisfy?
Why are you reading this guide? You want practical steps to remove double-sided tape without harming paint, whether you’re staging a rental, updating creative decorating, or fixing accidental adhesive spots.
Your intent is usually problem-solving: prevent peeling, preserve finish, and handle different wall texture types safely.
Your goal is practical: stop peeling, protect finishes, and adapt techniques to every wall texture.
You’re searching for quick, actionable methods, tools to use, and cautions about heat, solvents, or scraping.
You expect clear outcomes: safe removal, minimal repair, and tips to test first.
This guide satisfies that intent by focusing on safe techniques, material-specific advice, and concise prevention strategies.
Quick Answer: Remove Double‑Sided Tape From Painted Walls
If the tape’s been on the wall only a short time, heat from a hair dryer and a slow peel will usually lift it without damaging paint. You should test a small hidden spot first, especially on decorative paint or textured surfaces, since finish and texture affect adhesion.
Warm the adhesive until it softens, peel at a low angle, and stop if paint lifts. For residue, use a gentle adhesive remover or a damp cloth with mild soap, again testing first.
Work patiently, avoid scraping hard, and consider repainting small spots only if the finish comes away despite careful removal.
Step‑By‑Step: Remove Double‑Sided Tape
Start by softening the adhesive so it releases without peeling the paint. Use gentle heat or a solvent.
Then lift the tape slowly at a low angle.
Finish by removing any residue with a mild cleaner so the wall looks like new.
Soften The Adhesive
Before you pull, soften the adhesive so the tape comes off cleanly and your paint stays intact. You’ll warm the tape to loosen grip without damaging wall texture or altering paint sheen. Test a small corner first.
- Use a hairdryer on low, moving it slowly across the strip for 20–30 seconds to warm the adhesive.
- Apply a warm, slightly damp cloth for 30 seconds if heat feels risky on glossy paint sheen or fragile texture.
- Lift a corner gently with a plastic scraper; reapply heat if the tape resists, avoiding sudden jerks that strip paint.
Remove Residue Cleanly
Once the strip’s gone, tackle leftover tackiness with gentle, effective tools so your paint stays unharmed. You’ll want to test any solvent on a hidden spot to protect wall texture. Use mild soapy water first; dab, don’t scrub. If residue persists, try rubbing alcohol or a citrus-based adhesive remover sparingly. Wipe in one direction, then rinse and dry. For delicate finishes or Creative wall art areas, work slowly to avoid lifting paint. Final buffing with a microfiber cloth restores sheen without damage.
| Tool | Use |
|---|---|
| Soap | Initial clean |
| Alcohol | Stubborn tack |
Gather the Right Tools
When you’re ready to tackle the tape, gather a few basic tools to protect the paint and remove adhesive cleanly: a plastic putty knife or old credit card, fishing line or dental floss, a hairdryer or heat gun on low, rubbing alcohol or adhesive remover, a soft microfiber cloth, and a sponge with mild soapy water.
You’ll handle decorative accents carefully and adapt technique for different wall textures. Keep tools simple and safe so you don’t risk gouging paint.
- Start with heat and floss for edges.
- Use a plastic blade, then solvent for residue.
- Wipe, rinse, and inspect.
Protect Trim, Furniture, and Floors
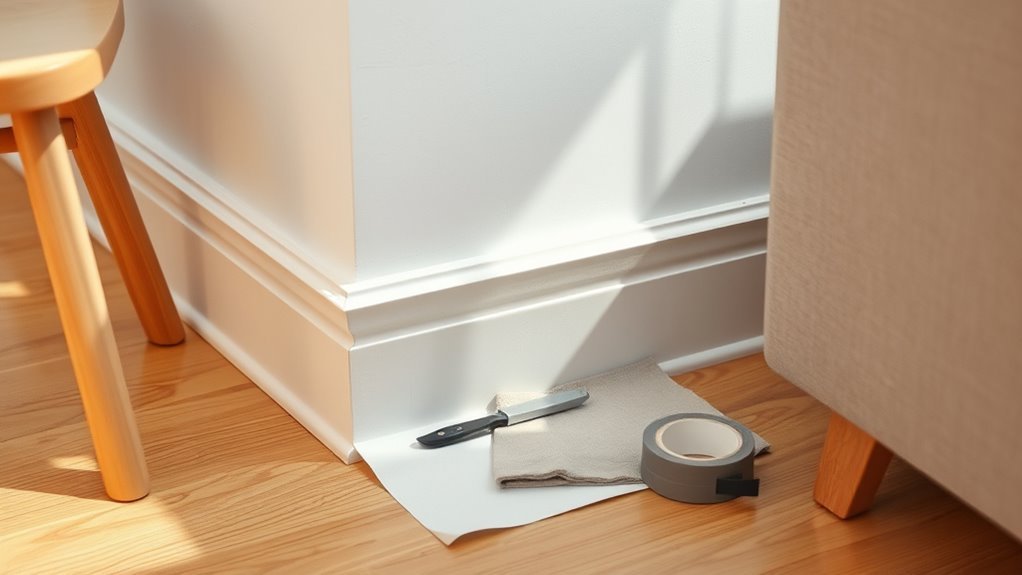
As you move from removing the tape itself to cleaning up, protect nearby trim, furniture, and floors so adhesive or solvent doesn’t cause new damage. Move decorative accents away or cover them with cloths. Lay drop cloths or plastic sheeting over floors and tuck edges under baseboards to catch drips; use painter’s tape to secure without harming trim.
If you must work near wooden or metallic trim, place cardboard shields to prevent solvent contact. For varied wall textures, test a protected corner first and avoid aggressive rubbing that can abrade raised patterns.
Keep a clean rag and waste bin close for immediate disposal.
How Paint Type Affects Tape Removal
Because different paints bond and flex differently, the type of paint on your wall changes how easily double-sided tape comes off and what removal method you should use. You’ll consider gloss, eggshell, and flat finishes and how wall texture and paint durability affect peeling risk.
Use gentler heat and slow pull on delicate, low-durability coatings; sturdier gloss resists damage and tolerates firmer technique. Match method to finish and surface feel.
- Gloss: high paint durability, pull at shallow angle, faster removal.
- Eggshell: moderate durability, slow steady heat, test small area.
- Flat/textured: low sheen, fragile with texture—work slowly.
How Adhesive Age and Type Change Your Approach
If the tape was applied recently, you can usually peel it off cleanly with steady, low-angle pulls. Aged adhesive, though, tends to harden and stick more stubbornly.
Different tape materials—foam, fabric, or clear film—also behave differently and may require heat, oil, or adhesive remover.
Evaluating both age and material first helps you choose the gentlest effective method and avoid paint damage.
Fresh Versus Aged Adhesive
When you’re removing tape, the adhesive’s age and type change everything. Fresh adhesive peels cleanly; you’ll pull slowly and avoid paint lift. Aged adhesive hardens and bonds, so you’ll need heat or solvent and more care to protect color matching and wall texture.
- Fresh: peel at a low angle, keep tension steady to prevent striping.
- Slightly aged: add gentle heat, test a hidden spot for paint reaction.
- Heavily aged: soften with solvent, work in small sections, and retouch paint if needed to restore color matching and smooth wall texture.
Tape Material Differences
Although different tapes might look similar, their backing and adhesive chemistry change how you should remove them.
You’ll treat foam, fabric, and plastic-backed tapes differently: foam stretches and leaves residue, fabric grips rough Wall texture, and plastic can snap, pulling paint.
Rubber-based adhesives soften with heat; acrylic adhesives resist heat but release with solvent.
Check Paint finish first—flat paint chips easier than semi-gloss.
Test a small hidden area with heat, oil, or isopropyl alcohol.
Peel slowly at a low angle, use a plastic scraper, and switch methods if residue remains.
Match your method to tape type and age.
Pick a Solvent That Won’t Damage Paint
While solvents can loosen stubborn adhesive, you need to choose one that won’t strip or discolor your paint. Consider paint compatibility and wall texture before reaching for anything strong. Pick mild options first and avoid long soak times.
Choose mild solvents first—consider paint type and texture, avoid strong chemicals and long soak times.
- Rubbing alcohol: gentle on most latex paints, good for smooth wall texture but use sparingly.
- Goo Gone or citrus-based remover: effective on adhesives, usually safe on cured paints—check labels for solvent strength.
- WD-40 (light application): loosens residue without aggressive fading on many finishes, but don’t soak porous or matte surfaces.
Choose carefully and proceed cautiously.
Test a Solvent on a Hidden Spot
Before you apply any solvent broadly, try it on an inconspicuous area—behind a piece of furniture, inside a closet, or near the baseboard. You’ll see how the cleaner reacts to your paint and wall texture without risking visible damage.
Dab a small amount, wait five to ten minutes, then blot gently to check for color lift, softening, or sheen change. Repeat with other solvents if needed, comparing results.
For wallpaper removal nearby, test there too since adhesives and backing can react differently. Only proceed on the main area when you’re sure the solvent doesn’t harm paint or texture.
Soften Adhesive With Heat
If the tape won’t come off with gentle pulling, warm the adhesive to loosen its grip—use a hair dryer on medium heat or a heat gun set to low and keep it moving to avoid scorching the paint.
Aim heat along the tape for 20–30 seconds, then peel slowly at a low angle to protect paint preservation and avoid lifting delicate layers.
Aim heat for 20–30 seconds, then peel slowly at a low angle to protect paint and avoid lifting.
Be cautious over varied wall textures; stippled or textured surfaces need gentler, shorter bursts.
- Test a small area first to judge heat tolerance.
- Hold the tool 6–8 inches away and move constantly.
- Stop if paint softens or discolors.
Loosen Tape Edges Without Peeling Paint
When you can’t lift the tape edge without tugging the paint, work slowly with a thin, flat tool—like a plastic putty knife or an old credit card—to nudge under the adhesive and create a gap.
Don’t pry upward; slide the tool parallel to the wall to protect finish and respect wall texture.
If the tape resists, apply mild heat briefly to soften adhesive chemistry, then continue sliding.
Peel the tape back over itself at a low angle, moving steadily and reworking stubborn sections.
Stop if paint lifts; reheat and loosen more before trying again to avoid damage.
Remove Tape From Textured and Eggshell Finishes
With textured or eggshell finishes, you’ll want to test a small hidden area first to make sure your method won’t damage the paint.
Use gentle heat from a hair dryer to soften the adhesive, and follow with a safe solvent on the test spot if any residue remains.
Proceed slowly, working in short sections to protect the finish.
Test Small Hidden Area
Before you start peeling, pick a small, hidden spot—like behind a light switch plate or inside a closet—to test how the tape and any remover will affect textured or eggshell-painted surfaces. You’ll confirm whether adhesive lifts cleanly, if texture peels, or if colors dull.
Try a quick creative wall decor removal simulation and note need for paint touch up before committing to the whole wall.
- Peel slowly for 10–15 seconds; watch for paint lift.
- Apply your chosen gentle cleaner to a cotton swab; blot, don’t rub.
- Wait 24 hours; inspect under different light angles.
Use Heat And Solvent
Although textured and eggshell finishes can cling to adhesive, you can loosen double-sided tape safely by combining gentle heat with the right solvent; start low and go slow so you don’t damage paint.
Use a hairdryer on low, warming tape for 20–30 seconds, then peel gently at a shallow angle.
For stubborn residue, apply a small amount of isopropyl alcohol or adhesive remover to a microfiber cloth and dab—don’t soak—testing first on a hidden spot.
Mind decorative wall accents and wall texture considerations: avoid scrubbing textured areas.
Wipe clean with a damp cloth and let the surface dry before rehanging.
Remove Tape From Semi‑Gloss and High‑Gloss Paint
Semi-gloss and high-gloss finishes are less porous and show every scrape, so you’ll need a gentler, more precise approach when removing double-sided tape. Start by softening adhesive with warmth from a hairdryer on low, and test a hidden spot to avoid finish damage. Treat the process like careful wallpaper removal; patience prevents pulls that could require surface priming.
Semi- and high-gloss surfaces demand gentle, patient tape removal—soften with low heat, test first, peel slowly to avoid damage.
- Warm the tape briefly, peel slowly at a low angle to reduce lift.
- Use a plastic scraper or credit card to ease adhesive without scratching.
- Clean residue with mild soapy water, blot dry, repeat if needed.
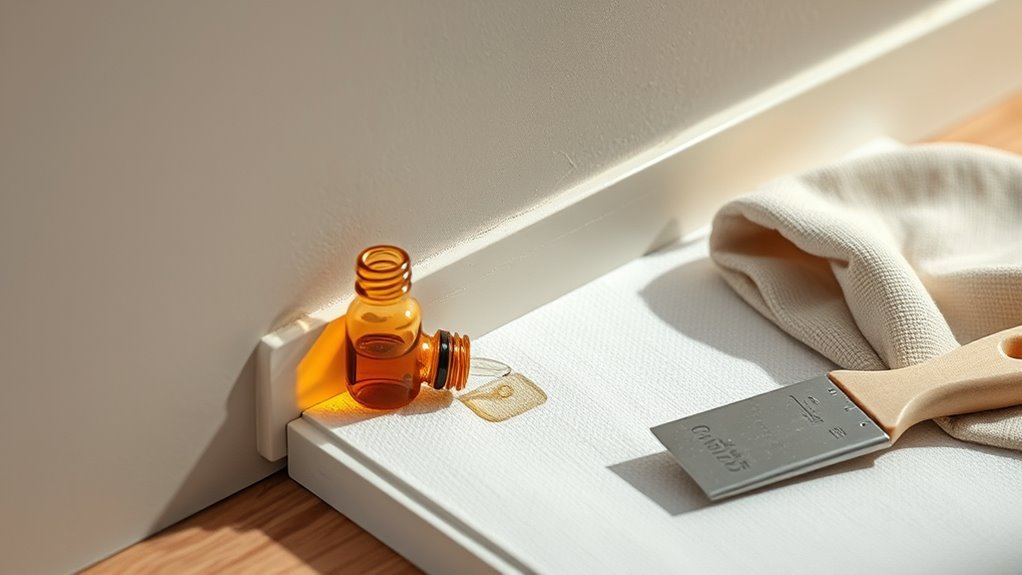
Remove Stubborn Residue With Oil‑Based Products
If residue won’t budge, test a small amount of oil (like mineral or baby oil) on a hidden spot to make sure it won’t affect the paint.
Apply the oil to the sticky area, let it sit for a few minutes to loosen the adhesive, then gently wipe.
Repeat and reapply as needed until the residue’s gone.
Test Oil On Hidden Area
Want to make sure oil won’t damage your paint? Test a small, hidden patch first. Choose an inconspicuous spot behind furniture or inside a closet, since art restoration techniques teach caution with finishes and wall texture. Use a cotton swab to apply a tiny dab of your chosen oil-based product, then wait (don’t scrub).
- Clean area: gently wipe to remove dust.
- Apply: one small dot, let it sit for 10–15 minutes.
- Inspect: check for discoloration, softening, or sheen change.
If the paint looks unchanged, you can proceed confidently; if not, stop and try a different method.
Apply Oil And Wait
Once you’ve confirmed the oil won’t harm the paint, apply a small amount of an oil‑based product (like mineral oil, peanut oil, or a commercial adhesive remover) to the tape residue and let it sit so the adhesive softens.
Work in small sections, especially near artistic murals or delicate trim, to prevent spreading oil over painted detail.
On textured finishes, let the oil penetrate longer so it reaches adhesive pockets.
Cover the area with plastic wrap to slow evaporation on porous surfaces.
Check after 5–15 minutes; if the residue is still firm, reapply and wait a bit longer before proceeding.
Wipe And Remove Residue
After the oil has loosened the adhesive, grab a clean cloth or paper towel and gently wipe the residue in the direction of the paint grain to lift the softened adhesive without spreading it. You’ll see bits come away; don’t rub hard. Work patiently so your Creative wall art and Decorative accents nearby stay safe.
If residue lingers, repeat oil application, wait, then wipe again.
Clean the area afterward with mild soapy water to remove oily film and dry.
- Use light pressure, follow grain.
- Protect nearby art and accents.
- Rinse, dry, inspect for streaks.
Use Alcohol or Acetone Safely
While alcohol or acetone can dissolve adhesive quickly, you should test a small, hidden area first to make sure the solvent won’t dull or strip the paint.
Test a hidden spot first—alcohol or acetone can remove adhesive but may dull or strip paint.
Work in a well-ventilated room and wear gloves. Dampen a soft cloth—don’t soak it—and blot gently; avoid scrubbing hard to prevent paint damage.
Limit contact time and rinse the spot with a damp cloth afterward to remove residue.
If paint softens, stop immediately and consider gentler Tape alternatives or consult instructions before proceeding.
Proper wall preparation—clean, dry surface and temperature control—improves results and reduces the need for strong solvents.
Use Consumer Adhesive Removers Safely
Because consumer adhesive removers vary in strength and ingredients, you should read labels and test a small, inconspicuous patch before treating the whole area. Wear gloves, ventilate the room, and protect nearby art supplies or plants—think like you’d protect tools in gardening tips.
Apply a tiny amount, wait, then blot; don’t rub.
- Choose a remover labeled safe for painted surfaces.
- Use a cotton swab for spot testing and precise application.
- Neutralize residue per label instructions and rinse gently.
If paint softens or discoloration appears, stop immediately and try a milder method.
Remove Tiny Adhesive Bits Without Streaking
When small sticky bits remain, pick a gentle solvent like rubbing alcohol or a citrus-based cleaner to soften them without harming the paint.
Apply it sparingly with a cotton swab and let it sit for a few seconds.
Then use a lint-free microfiber cloth to wipe in one direction to avoid streaks.
If streaks appear, immediately buff the area with a dry microfiber cloth until the finish looks even.
Gentle Solvent Options
If tiny sticky bits remain after peeling tape, reach for gentle solvents that dissolve adhesive without harming paint—rubbing alcohol, diluted white vinegar, or a citrus-based adhesive remover are good choices.
Test first in a discreet spot, especially on decorative patterns or uneven wall textures, so you don’t alter sheen or color. Apply sparingly with a soft cloth or cotton swab, let it sit briefly, then lift residue.
- Rubbing alcohol: fast, low residue—good for small spots.
- Diluted white vinegar: milder, eco-friendly option for painted surfaces.
- Citrus remover: effective on stubborn glue; use minimal amount.
Streak-Free Wiping Technique
Start with a clean, lint-free cloth and only a few drops of your chosen solvent so you can control moisture and avoid streaks. Dampen a second dry cloth for immediate buffing.
Work small sections, pressing gently to lift tiny adhesive bits from painted surfaces used for creative wall art or decorative wall decals. Wipe in a single direction, then immediately follow with the dry cloth to absorb residue and prevent streaking.
Rotate cloth surfaces to avoid spreading adhesive. If streaks appear, switch to a fresh cloth and repeat.
Finish by letting the area air-dry; inspect under different light and touch up if needed.
Clean Residue Without Leaving Smears
Wondering how to remove sticky residue without smearing paint? You’ll want gentle solvents, soft cloths, and light pressure so you don’t disturb wall texture or cause wallpaper removal issues nearby. Work in small areas, testing first.
- Apply a little solvent (rubbing alcohol or adhesive remover) to a microfiber cloth; dab, don’t rub, to lift residue.
- Use a plastic scraper at a shallow angle to peel residue without gouging paint; follow texture contours.
- Finish with a damp cloth to remove solvent traces, then blot dry to prevent streaks and sheen changes.
Wash and Prep the Wall for Touch‑Ups
Start by wiping the area to remove dust and any loose debris so the surface is ready for cleaning.
Use a soft cloth and mild detergent mixed with water to gently clean the spot without stripping paint.
Rinse with clean water and dry thoroughly before you assess any touch-ups.
Remove Dust And Debris
Before you touch up paint, wash the area to remove dust, adhesive residue, and loose particles so the patch will blend and stick properly. You’ll focus on dust removal and debris clearance before applying any filler or paint. Use gentle tools and avoid scrubbing that strips finish.
- Wipe with a dry microfiber cloth to lift surface dust.
- Use a soft-bristle brush or vacuum hose to clear crumbs or tape bits from edges and crevices.
- Blot remaining sticky specks with a tack cloth or gentle adhesive remover on a cotton swab.
Let the wall fully dry before proceeding.
Clean With Mild Detergent
Once you’ve removed dust and loose adhesive, wash the area with a mild detergent solution to dissolve remaining oils and residue so new paint will adhere evenly. Use a soft sponge and gentle circular motions, and switch to cleaning brushes for stubborn spots. Don’t scrub aggressively; you’ll avoid damaging the finish. After cleaning, inspect for residue, scuffs, or texture changes so you can plan appropriate painting techniques. The wall should feel clean and slightly tack-free before touch-ups.
| Tool | Purpose |
|---|---|
| Sponge | General cleaning |
| Brush | Detail removal |
| Cloth | Blotting |
| Bucket | Mix solution |
| Masking tape | Protect edges |
Rinse And Dry Thoroughly
After cleaning, rinse the area with clean water to remove detergent residue and loosened particles so your touch-ups won’t have adhesion problems. You should blot excess moisture with a lint-free cloth, working along the wall texture to avoid lifting loose paint.
Let the surface air-dry until it’s cool and completely dry to the touch. Check the paint finish for sheen differences; drying reveals whether you need primer or spot-sanding.
When prepping for repair, follow these simple steps:
- Blot and pat dry along the grain of the wall texture.
- Air-dry fully, then inspect paint finish.
- Lightly sand or prime only where needed.
Quick Fixes for Small Scuffs and Scratches
If you spot a small scuff or hairline scratch where you removed tape, don’t panic — you can often fix it quickly with items you already have. Gently clean the area, dab with a matching paint pen or diluted latex paint, and blend with a soft cloth. For playful hiding, use decorative wall decals or match patterns from removable wallpaper. Small touch-ups dry fast.
| Item | Action | Result |
|---|---|---|
| Cloth | Clean | Remove residue |
| Paint pen | Dab | Cover scratch |
| Water | Thin | Smooth edges |
| Tape | Mask | Precise lines |
| Decal | Apply | Conceal spot |
When to Sand and Repaint a Damaged Patch
Small touch-ups can hide most blemishes, but you should sand and repaint when the damaged area is larger than a coin, the paint is peeling or flaking, or the surface feels uneven to the touch.
If damage is bigger than a coin, peeling, or uneven, sand and repaint rather than just touch up.
You’ll prep by moving items away and using furniture protection to catch dust. Lightly sand the edges, clean the dust, and assess wall texture so the patch blends. Prime glossy or exposed areas, then apply matching paint in thin coats. Let each coat dry fully and inspect for consistency.
If texture or coverage still stands out, repeat sanding and repainting until seamless.
- Measure damage size
- Protect surroundings
- Match texture and color
How to Deal With Paint Bubbles or Lifted Paint
If you see bubbles or lifted paint after removing tape, first assess how deep the damage is to decide if a spot repair will work.
Gently soften any remaining adhesive with heat or a mild solvent so you don’t pull more paint off.
Once the surface is clean and dry, scrape loose paint, fill or sand as needed, then prime and repaint the area.
Assess Damage Severity
Wondering how bad the damage is? You’ll inspect the area closely to decide fixes based on wall texture and paint sheen. Look for lifting, bubbling, or missing flakes and note size and depth.
- Measure: small (under 1 in), medium (1–4 in), large (over 4 in) to guide repair scope.
- Surface: smooth vs. textured walls change sanding and patching approach; textured surfaces may hide minor lifts.
- Finish: glossy or high-sheen paint shows imperfections more; flat finishes tolerate small repairs.
Record findings and photos so you can choose simple spot repair or larger repainting confidently.
Soften Adhesive Residue
When paint bubbles or lifts after removing double-sided tape, you’ll want to soften the adhesive before attempting any repair so you don’t pull more paint away.
Gently heat the residue with a hair dryer on low, keeping it moving to avoid scorching or further lifting. Use a soft cloth dampened with a mild adhesive remover or rubbing alcohol to soften tacky spots; test in an inconspicuous area first to protect wall textures.
Work from the edges inward, blotting rather than rubbing. Once adhesive feels pliable, lift it slowly with a plastic scraper.
Dry thoroughly before any paint touch ups.
Repair And Repaint
Now that you’ve softened and removed the sticky residue, you can tackle any paint bubbles or lifted areas without causing more damage.
Assess the affected area: press gently to find loose paint, note wall texture, and match paint sheen before proceeding.
Sand edges smooth, remove dust, and use a primer on bare spots to guarantee adhesion.
Fill small gaps with lightweight spackle, sand when dry, and clean again.
Repaint with matched sheen, feathering edges to blend with surrounding texture.
Allow proper drying between coats, and inspect in different light to confirm a seamless repair.
- Prep and assess
- Prime and fill
- Repaint and blend
Troubleshooting: Paint Keeps Peeling
If your paint keeps peeling after you remove double-sided tape, don’t panic—peeling usually signals a bond failure between the paint and the wall rather than a tape issue alone. Check for moisture, old paint, or poor surface prep before reattaching Creative wall art or Decorative accents. Gently lift loose flakes, sand edges, and clean residue. Prime bare spots with a bonding primer, then repaint. Test a small strip of tape on a hidden area first.
| Cause | Fix | Prevent |
|---|---|---|
| Moisture | Dry, dehumidify | Fix leaks |
| Poor prep | Sand, clean | Prime surface |
| Old paint | Strip, prime | Use fresh paint |
| Adhesive residue | Clean solvent | Test tape |
| High humidity | Wait, control | Avoid damp days |
How to Avoid Common Mistakes That Strip Paint
Because tape can tug paint right off the wall, take a few simple precautions before you stick anything down. You’ll protect finish and respect historical context or cultural significance in older homes by testing and choosing low-tack options. Don’t assume all tapes behave the same; temperature and age matter.
- Test first on an inconspicuous spot for 24 hours to see adhesive effects.
- Heat gently with a hairdryer before removal to soften glue and lift without scraping.
- Peel slowly at a low angle, supporting surrounding paint with your other hand.
These steps prevent common mistakes that strip paint.
When to Call a Professional for Restoration
Sometimes you’ll be able to remove tape and clean up adhesive without damaging the finish, but there are clear signs you should call a pro for restoration.
If peeling exposes bare drywall, deep gouges appear, or large paint chips flake when you touch them, don’t risk DIY fixes. Call a restoration specialist when wall texture is uneven after removal or when patching would alter the look.
Also contact a pro if the paint sheen differs noticeably across the repair area and you can’t match it with touch-up paint. Professionals will assess, blend texture, and match sheen for a seamless result.
How to Prevent Future Tape Damage to Painted Walls
When you plan ahead and choose the right materials, you can prevent most tape-related damage to painted walls. You’ll protect finishes by testing tape on an inconspicuous spot, considering wall texture, and matching adhesive strength to the job.
Use temporary mounting methods for light decor and avoid long-term adhesion on delicate paints. Consider decorative techniques that don’t rely on tape, like command rails or removable hooks.
For lightweight decor, choose temporary mounts or non-tape options like command rails and removable hooks.
Follow this quick checklist:
- Test tape on a hidden area for paint lift and texture reaction.
- Use low-tack tape rated for painted surfaces for short-term use.
- Rotate placement and remove tape within recommended time.
Best Tapes and Mounting Alternatives for Painted Surfaces
Now that you’ve learned how to prevent tape damage, it’s worth choosing products and methods that protect paint from the start. Pick low‑tack, painter’s‑grade tapes for lightweight items and test a small hidden area first.
Consider removable mounting strips rated for painted surfaces and look for eco friendly adhesives that minimize VOCs and leave less residue.
For heavier pieces, use picture hooks, rail systems, or adhesive hooks that distribute weight and reduce peel risk.
Alternative mounting methods like command strips with release tabs, tension rods, or freestanding displays let you hang items without compromising finish.
Compare Mounting Options and Their Wall Safety
Although you can hang many things with tape, choosing the right mounting option depends on the weight, wall type, and how much you want to protect the paint. We’ll compare common methods—tape, removable strips, hooks, rails, and freestanding solutions—so you can pick the safest approach for your surfaces.
Consider wall texture and paint durability: smooth walls tolerate strips better, textured surfaces need mechanical support. Lighter items suit removable strips; heavier pieces need hooks or rails. Match method to load and finish to avoid peeling or dents.
- Strips: easy, light loads, check paint durability.
- Hooks/anchors: secure for drywall, respect wall texture.
- Freestanding: safest for fragile finishes.
Final Checklist Before Removing Tape
Before you pull the tape off, gather the right tools and assess the situation so you can avoid peeling paint or leaving residue.
Check paint age and finish; newer or matte paint peels easier. Test removal on a hidden spot with heat, dental floss, or a fishing line.
Have adhesive remover, a soft cloth, and a plastic scraper ready.
Consider nearby Decorative wall decals—remove them first or protect edges.
Note humidity and room temperature; warmer conditions loosen adhesive.
Review Wall mounting tips you used originally to reverse the process safely.
Plan slow, steady pulls at low angles to minimize damage.
Frequently Asked Questions
Can Tape Removal Damage Wallpaper Instead of Paint?
Yes — you can damage wallpaper when removing tape; you’ll pull paper layers, cause wallpaper damage, or leave adhesive residue. You should peel slowly, warm the adhesive if needed, and test a hidden spot first.
Can Humidity Affect Adhesive Removal Success?
Yes, humidity impact matters: it softens adhesives, it loosens bonds, it prolongs drying. You’ll notice adhesive behavior change—you’ll work faster when dry, you’ll need gentler heat when damp, and you’ll avoid residue and paint damage.
Are There Eco‑Friendly Adhesive Removers Available?
Yes — you can choose eco friendly options: you’ll try natural remedies like citrus-based solvents, vinegar, or rubbing alcohol, and biodegradable commercial removers; test first on a hidden spot, and work gently to protect paint.
Will Tape Removal Affect Baseboard Caulking?
By golly, yes—you can damage baseboard caulking; you’ll need to work carefully to preserve baseboard integrity and avoid paint surface damage. Use gentle heat, slow peeling, and mild adhesive remover to minimize harm.
How Long Should I Wait After Painting Before Applying Tape?
Wait at least 24–48 hours before applying tape; longer for low temps or high humidity. The painting delay depends on drying time and paint type, so consult the label and err on the side of patience to avoid damage.
Conclusion
You’ve got this — removing double‑sided tape is mostly about patience, the right tools, and slow, even pulls. Some say heat always works; in truth, heat helps most adhesives but can soften paint, so test first. Use adhesive remover or oil for stubborn residue and patch any minor paint lift quickly. To avoid repeat hassle, choose low‑tack products and prep surfaces. Follow the steps, protect surrounding areas, and you’ll preserve your paint.