Should You Remove Masking Tape Before Paint Dries
You should usually pull masking tape while the paint is still tacky—not fully wet or fully cured—to get the cleanest edge. Peel slowly at a low angle, supporting the painted surface to avoid lifting or jagged lines. Timing varies: latex often 30–60 minutes, oils take longer, and humidity or temperature change things. Test a corner first and use low‑tack tape on delicate surfaces. Keep going and you’ll find pro tips, timing charts, and fixes for mistakes.
Short Answer: When to Remove Masking Tape for Crisp Lines

If you want crisp paint lines, pull masking tape off while the paint is still tacky but not wet — usually 30–60 minutes after you finish painting, depending on temperature and paint type. You’ll angle the tape back slowly, pulling parallel to the surface to avoid lifting edges. Test a corner first; humidity and sheen change timing.
Use a razor for stubborn beads, warming enamel slightly if needed. Combine creative techniques like low-tack tape or micro-edge tapes with learned historical methods such as layering primer and allowing intermediate flash times.
With steady hands and timing, you’ll get sharp, professional edges every time.
Why Tape-Removal Timing Matters for Clean Paint Edges
Because paint continues to cure after it looks dry, pulling tape at the right moment keeps the edge crisp: remove it while the paint is still tacky enough to separate cleanly from the tape’s adhesive, and you’ll avoid pulling a cured film or leaving a jagged bead. You’ll get cleaner results when you plan removal during that narrow window.
Good surface prep minimizes seepage and uneven edges, so tape bonds where designed. Whether you’re doing tape art or trim work, steady, slow peeling at a low angle prevents lifting. Test a corner if unsure, and adjust timing for humidity and paint type.
How Drying vs. Curing Affects Edge Strength
When paint feels dry to the touch it’s usually only surface-dry, not fully cured, and that difference changes how strongly the film adheres at the masked edge. You’ll notice tacky, uncured layers cling to tape, risking lifts; fully cured films resist separation but may crack if tape is removed later. Environmental factors and surface preparation both alter drying and curing rates, so adjust timing accordingly.
| Stage | Adhesion | Risk |
|---|---|---|
| Surface-dry | Moderate | Tape pulls film |
| Partially-cured | Stronger | Edge tearing possible |
| Fully cured | Strongest | Film may split |
Quick Rule: Remove Tape While Paint Is Tacky, Not Wet

Knowing how drying and curing change edge strength helps you pick the right moment to pull tape: remove it while the paint is tacky, not soaking wet or fully hardened.
Pull tape when paint is tacky—not wet or fully cured—to preserve sharp edges and avoid smears.
You’ll avoid smears if you peel tape when paint yields slightly under your nail but still holds pigment. Pull slowly at a low angle back toward the painted area to keep a sharp line.
For creative wall patterns, steady removal prevents ragged edges and preserves clean geometry.
With eco-friendly masking, choose tapes that peel cleanly to reduce touch-ups and waste.
If paint resists, score the edge and try again carefully.
Tape-Removal Timing by Paint Type: Overview
How long you wait to pull tape depends mostly on the paint type: water-based paints usually set faster, while oil-based formulas take longer to firm up.
With latex or acrylic, you’ll often remove tape once the finish is tacky but not fully dry to avoid lifting.
For oil-based paints, you’ll typically wait longer and may need solvents or a very careful peel to prevent tearing or smearing.
Water-Based Paint Timelines
Because water-based paints dry and cure differently depending on their formulation, the best time to remove masking tape varies by paint type.
You’ll find latex and acrylic dry fast on the surface but continue curing. Remove tape within 30–60 minutes for clean lines before the film fully sets.
For low-VOC or hybrid waterborne enamels, wait longer—several hours—to prevent edge lift while still avoiding tearing.
Consider color blending and texture matching: pull tape while paint is tacky enough to keep edges crisp yet soft enough to flex slightly, matching surrounding texture.
Test on a scrap to confirm timing for your specific product.
Oil-Based Paint Considerations
When you’re working with oil-based paints, plan to wait longer before pulling masking tape than you’d with water-based types: oil formulas dry by solvent evaporation and then cure slowly, so the film can still be soft for hours.
You’ll want to balance clean lines against the risk of lifting tacky paint. Consider temperature, humidity, and the paint’s sheen when timing removal. Good surface prep and careful color mixing help reduce rework and uneven edges.
Tips to follow:
- Wait until paint is tack-free but not fully cured
- Score the edge with a blade for crisp lines
- Remove at a 45° angle
- Test on a scrap surface first
Remove Masking Tape With Latex and Water-Based Paints
With latex and other water-based paints, you should pull tape while the paint is still slightly tacky rather than bone dry.
Grip the tape at a low angle and peel back slowly to avoid lifting the new paint.
If the edge starts to tear, stop and use a sharp utility knife to cut the film and finish the removal.
Timing For Tape Removal
If you want crisp edges, don’t wait for latex or other water-based paints to fully cure—pull the masking tape while the paint is still tacky but not wet. You’ll protect edges using smart masking techniques and avoid paint lifting that ruins your finish.
Time removal after the top layer skins over; temperature and humidity change that window, so check small test strips.
- Remove tape when paint resists fingerprinting.
- Work within an hour for typical indoor conditions.
- Angle the tape back on itself slowly.
- Re-tape for complex paint blending or multi-coat work if needed.
This timing keeps lines sharp and saves touch-ups.
Proper Peel Technique
Because the right pull keeps your edges crisp, peel masking tape slowly and at a low angle to the painted surface rather than yanking it off. You’ll avoid lifting wet paint on latex and water-based finishes by pulling back toward the painted area at about 45 degrees, keeping tension steady and close to the surface.
If paint resists, score the edge with a sharp blade to prevent tears. Use simple tape removal tools—like a plastic scraper or needle-nose tweezers—to lift corners without gouging.
Learn common masking mistakes: waiting too long, pulling too fast, or using overly aggressive tape that bonds to fresh paint.
Remove Masking Tape With Oil-Based and Enamel Paints
When you’re working with oil-based or enamel paints, pull the tape slowly and steadily at a 45-degree angle while the paint is still tacky rather than fully cured. This reduces the chance of lifting dried edges.
You’ll protect paint adhesion and ease tape removal by timing the peel before a full cure. Use a steady motion, keep the angle low, and watch for resistance. If the tape bites, stop and score lightly.
- Peel slowly to avoid tearing
- Keep a consistent 45-degree angle
- Score stubborn edges with a blade
- Remove before full cure for best results
How Temperature and Humidity Change Drying and Tape Timing
Temperature speeds up or slows paint cure, so you’ll notice tape release windows change on hot or cold days.
High humidity slows drying and can make tape pull wet paint, while very low humidity can cause paint to skin over quickly.
Adjust when you remove tape based on conditions—wait longer in cool, humid weather and peel sooner when it’s warm and dry.
Temperature Effects On Drying
If you’re working in chilly or humid conditions, paint will take longer to cure and the adhesive on tape can stay tackier or fail to stick properly, so adjust your timing accordingly. Lower temperatures slow solvent evaporation, so you’ll wait longer before peeling tape to avoid lifting edges.
Higher indoor temps speed drying but can make tape bond stronger, risking paint tear when removed. When planning Creative color schemes or using Eco friendly paints, account for temperature variance and test a small strip first.
- Test a scrap piece at room temperature
- Warm the space slightly to shorten cure
- Cool to slow rapid skin formation
- Remove tape at a 45° angle
Humidity’s Impact On Paint
Because moisture in the air slows solvent evaporation and prolongs tackiness, high humidity can keep paint soft and make tape pull up wet edges if you remove it too soon. You should monitor humidity levels because elevated moisture prolongs drying stages and raises paint viscosity temporarily, affecting flow and adhesion.
In muggy conditions, wait longer before lifting tape; the film may seem set but remain soft beneath. Low humidity speeds evaporation, so edges firm faster but can skin over, risking torn paint if tape sticks.
Use a hygrometer, choose slower-drying formulas when needed, and test a small strip before committing.
Adjusting Tape Removal Timing
When humidity rises or the air cools, you’ll need to delay pulling tape because the paint film stays soft longer and can peel. Check temperature and relative humidity; cooler, damper conditions lengthen tack time.
Use Painter’s tools like a utility knife or heat gun cautiously to score or warm the tape edge. Plan Tape disposal for used strips—wet paint means messier trash.
- Wait longer in cool, humid rooms.
- Remove tape at a 45° angle for cleaner lines.
- Warm slightly to speed drying if safe.
- Keep painter’s tools clean to avoid contaminating edges.
How Surface Material Affects Tape Removal Rules
Although the basic rule—remove tape before paint fully cures—still applies, the material you’ve taped to changes how soon you need to pull it off. If surfaces were roughened during surface preparation, paint adhesion improves and tape can often stay slightly longer without tearing or lifting.
Smooth, nonporous materials like glass or metal shed paint more easily; you’ll want to remove tape sooner to avoid peeling long films. Textured or porous substrates bond more aggressively, so peel gently and consider warm, slow pulls.
Flexible plastics may snap paint layers if removed too quickly; test a corner when uncertain to protect the finish.
Removing Tape From Painted Trim vs. Drywall
When you remove tape from trim versus drywall, the timing and touch you use can make or break the edge.
Trim often needs quicker removal and a steadier pull to avoid lifting glossy paint.
Drywall tolerates a bit more drying time but shows ragged edges if you pull too fast.
I’ll explain the best technique for each surface so you can keep edges clean.
Timing For Tape Removal
If you want clean edges, the timing for removing tape differs between trim and drywall because their surfaces and paint behavior aren’t the same. You’ll want quicker Tape removal on trim—remove while paint’s tacky to avoid peeling and preserve paint durability.
On drywall, wait until paint’s set but not fully cured so paper doesn’t lift fibers.
- Trim: peel at a low angle while paint is slightly tacky.
- Drywall: wait longer; test a corner before committing.
- Use a sharp blade for any stuck spots.
- Work steadily to reduce stress on fresh paint.
Edge Cleanliness Differences
Because trim and drywall shed and accept paint differently, you’ll notice distinct edge results when you remove masking tape. Trim usually gives a crisp line if you pull the tape while paint is still tacky, whereas drywall risks paper fibers lifting and a feathered edge unless you wait until the paint has set.
You should assess surface prep: sand, clean, and prime trim and drywall differently to minimize tearing or seepage. Also consider paint viscosity and color mixing effects that change how pigments sit on edges.
Choose timing based on material, not habit, to achieve the cleanest shift between surfaces.
Technique For Trim vs. Drywall
Your approach to pulling tape should change with the surface: trim tolerates a quicker peel while drywall usually needs a gentler, more deliberate method.
You’ll peel trim at a 45° angle soon after the paint skins; that prevents lifting glossy edges.
On drywall, wait until paint’s tacky, score the edge, then pull slowly to avoid paper tears or gouges.
For projects like creative wall murals, test a corner first.
If you use eco friendly masking, low-tack tape reduces risk but still needs care.
- Peel trim quickly at 45°
- Score drywall seams first
- Test on murals
- Choose low-tack tape
Removing Tape From Painted Metal, Glass, and Tile
When working with painted metal, glass, or tile, peel tape gently and at a low, acute angle to avoid lifting paint or leaving adhesive residue.
You’ll time removal based on surface preparation and weather conditions; cool, dry days help adhesive release cleanly.
Pull slowly and steadily, keeping the strip close to the substrate to minimize stress on edges.
For stubborn residue, warm gently with a hair dryer and wipe with a soft cloth and a mild solvent suited to the surface.
Inspect edges for touch-ups, and avoid aggressive scraping that could scratch metal, chip tile, or etch glass.
How Masking-Tape Quality Affects Edge Crispness
If you want razor-sharp paint lines, choosing the right masking tape matters—its adhesive strength, edge profile, and backing material all affect how cleanly paint stops at the edge. You’ll avoid masking mistakes by matching tape to surface texture and paint type.
Low-tack tape peels cleanly; high-tack grips rough surfaces but can lift underlying finishes. Consider tape stiffness when layering coats, since flexible tape can sag and ruin edges during paint layering. Test a small section before committing.
- Adhesive level vs. substrate
- Backing thickness and stiffness
- Edge cut quality
- Compatibility with multiple coats
Best Masking Tapes for Sharp Paint Lines
When you pick a masking tape, look for one with the right adhesion strength for your surface so it sticks firmly without leaving residue.
You’ll want tapes designed to seal paint at the edge and resist bleed-through for a clean, crisp line.
Pair the tape with clean edge techniques—pressing down the edge and removing at the right angle—so your lines come out sharp.
Tape Adhesion Strength
Because the tape’s grip determines whether paint bleeds or you get a razor-sharp edge, choose masking tape with the right adhesion for your surface and paint type. You’ll balance tape durability with ease of removal: too aggressive adhesive can peel fresh paint, too weak lets paint seep.
Check surface compatibility—smooth, textured, or porous surfaces need different tack levels. Test a small strip before committing, and match tape to solvent- or water-based paints.
- Low-tack for delicate surfaces
- Medium-tack for most walls and trims
- High-tack for rough or outdoor substrates
- Specialty tapes for specific paints and temperatures
Clean Edge Techniques
While choosing the right tape matters, getting razor-sharp paint lines also depends on how you apply and seal it. You’ll press tape edges firmly, remove dust, and run a putty knife along seams to prevent bleed. For Creative color work or Pattern design, press tape after laying, paint thin coats, and peel at a 45° angle while paint’s tacky. Choose low-residue tape for curves and medium-adhesion for crisp lines.
| Tip | Use |
|---|---|
| Seal edges | Putty knife or credit card |
| Paint coats | Thin, multiple |
| Removal angle | 45° back toward painted area |
| Timing | Peel when tacky, not fully dry |
Choosing Tape for Delicate Finishes and Patterns
If you’re working with delicate finishes or intricate patterns, pick a tape that balances low tack with clean edge performance so you don’t lift paint or leave residue. You’ll want tape designed for fine lines, with gentle adhesive that respects varnishes and recently primed surfaces. Consider decorative techniques and surface preparation when choosing width and release properties so patterns stay crisp without damage.
- Use low-tack painter’s tape for sensitive trims.
- Choose thin, flexible tape for curves and complex motifs.
- Test on an inconspicuous spot first to check adhesion.
- Prefer tapes labeled for delicate surfaces and clean removal.
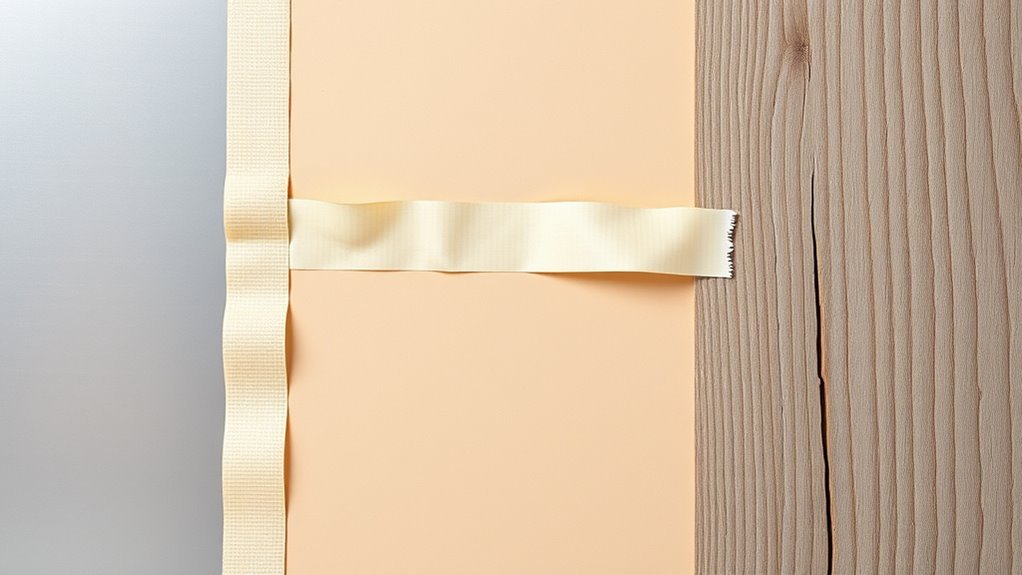
Angle, Speed, and Technique for Pulling Tape Cleanly
When you pull masking tape, keep the angle low and almost parallel to the surface to reduce paint lift.
Pull in a steady, continuous motion rather than jerking, and aim for a quick, confident tug to finish the strip cleanly.
Practicing this technique makes crisp edges much more consistent.
Pull Angle Matters
Because the way you pull tape changes how the paint edge sets, you should peel it back at a low, acute angle and do it steadily—not jerking or yanking. You’ll reduce tearing, lift, and ridge formation by keeping the tape close to the surface, letting the adhesive release gently.
Avoid common masking mistakes by not pulling straight up or too fast. If you’ve tried tape alternatives, remember they may need different angles. Practice on a scrap to find the sweet spot for your tape brand.
- Keep the pull under 30 degrees
- Pull slowly and evenly
- Support adjacent painted areas
- Warm old tape slightly before peeling
Steady, Quick Pull
Although the exact motion varies by tape and paint, you should pull in one steady, quick stroke at a low angle so the adhesive releases cleanly without dragging wet paint. You’ll keep the line crisp by holding the strip close to the surface, moving slowly at first then accelerating into a single smooth pull. Test with Tape alternatives and practice during surface prep to learn timing. Keep tension consistent and avoid jerks. If paint resists, warm it slightly or wait a touch. Use the table below to rehearse rhythm and visualize motion.
| Angle | Motion |
|---|---|
| 15° | smooth |
| 30° | steady |
| 45° | cautious |
| 60° | avoid |
Quick Steps to Remove Tape for Sharp Lines
If you want crisp, paint-shop–clean lines, pull the tape while the paint’s still slightly tacky—about 30 to 60 minutes after application for latex and sooner for fast-drying enamels. You’ll work faster and avoid tears; good ventilation tips help paint cure evenly while you prep edges.
Use a steady, low-angle pull and keep a utility knife handy for sealed corners. Decorative techniques like layering colors demand precise removal timing to protect lines.
Pull tape steadily at a low angle; keep a utility knife nearby for sealed corners and layered-color precision.
- Score the edge with a sharp blade if paint bridges the tape
- Pull tape back on itself at 45 degrees
- Work slowly and evenly
- Clean up stray paint immediately
Slow-Cure Method for Fragile or Multi-Coat Finishes
When you’re working with delicate finishes or multiple coats that need time to settle, the slow-cure method gives you control by delaying tape removal until the paint has firmed but not fully hardened. You’ll wait longer than with fast-release methods, keeping masking tape in place through initial tack and early skin formation.
Check surface preparation beforehand so edges are clean and debris-free; that reduces lifting when you finally pull the tape. Remove tape at a shallow angle after the finish yields slightly to fingernail pressure but before full crosslinking. This minimizes tearing or edge feathering while preserving crisp lines and underlying layers.
When to Score the Edge Before Removing Tape
Before you pull the tape, score the paint-to-tape edge whenever the finish feels dry to the touch but not fully cured or when multiple layers create a raised ridge. Scoring separates the paint film from the tape and prevents dragging or tearing the topcoat.
Before removing tape, score the paint edge while dry-to-touch to separate film and avoid tearing the topcoat.
You want clean lines without common masking mistakes. Use a sharp blade held flat at a shallow angle and a steady hand. If you hesitate, consider tape alternatives or delaying removal until stronger cure.
- Test a small corner first to judge tackiness.
- Score once along the entire edge.
- Pull tape slowly at 45°.
- Replace dull blades promptly.
Tools That Make Tape Removal Easier and Safer
To make removing masking tape easier and safer, you’ll want a clean razor scraper to lift stubborn edges without gouging the surface.
Pair that with a microfiber release cloth to press and pull the tape gently while catching any stray paint.
Together they help you get crisp lines and avoid damage.
Clean Razor Scraper
If you want clean, crisp edges and less risk of tearing paint, keep a razor scraper sharp and free of residue—dried adhesive or paint can snag the tape and damage the surface.
You’ll avoid common masking mistakes by using a clean blade to lift tape gently at a low angle.
As part of your painter tools kit, keep spare blades and a small bottle of solvent to dissolve sticky buildup.
Follow safety steps and change dull edges promptly to prevent gouging.
- Replace blade frequently
- Wipe blade after each pass
- Use solvent for adhesive
- Store capped and dry
Microfiber Release Cloth
A microfiber release cloth makes pulling masking tape off smoother and safer by reducing friction and preventing paint lift; after using a razor scraper to free an edge, wipe the line with the cloth so the tape peels cleanly without dragging dried paint. You’ll avoid masking mistakes by gently pressing the cloth along the edge as you pull, which stabilizes wet or semi-cured paint. It’s compact, reusable, and pairs well with Tape alternatives for delicate surfaces. Use short, steady pulls and re-wipe residue. The cloth protects edges, limits smudges, and helps you get crisp lines every time.
| Use | Benefit | Tip |
|---|---|---|
| Wiping edge | Reduces friction | Short strokes |
| Removing residue | Prevents lift | Damp cloth |
| Finishing touch | Crisp line | Reusable |
What to Do If Tape Peels Fresh Paint
When tape lifts fresh paint, don’t panic—you can often fix the damage without repainting the entire area. Assess the peel: note how much paint came off and whether the exposed substrate needs surface prep. If edges are clean, gently sand and blend using small amounts of touch-up paint; color mixing might be needed for an exact match.
If tape peels fresh paint, stay calm—assess the damage, sand feathered edges, and blend with careful touch-ups.
If paint flakes, remove loose bits and prime the bare spot before repainting.
- Clean the area and let it dry completely.
- Lightly sand feathered edges.
- Mix touch-up paint to match existing color.
- Apply thin coats, letting each cure.
Fixes for Ragged or Bleeding Paint Edges
Because ragged or bleeding edges stand out, you’ll want to address them before the paint fully cures to avoid extensive repairs later. Lightly sand dried ridges with fine-grit sandpaper, wipe dust, and feather edges with a small brush.
For narrow bleeds, use a sharp utility knife to score and lift excess, then remove gently. Apply a thin layer of matching paint with a fine artist’s brush or an angled trim brush to blend.
If you’re creating creative wall patterns or using decorative masking techniques, test fixes on a scrap board first to maintain crisp lines and consistent texture.
How to Avoid Smudges When Removing Tape Late
If you’ve left masking tape on past the recommended time, don’t rush the removal—work slowly, pull the tape back on itself at a low angle, and keep the edge close to the painted surface so you don’t drag wet paint.
Let tack soften slightly by warming with your hand or a hair dryer on low, then lift a corner and peel steadily. If paint lifts, press it back gently with a clean finger or scrap and touch up immediately.
Store leftover rolls properly for future use.
- Peel slowly and evenly
- Warm stubborn tape gently
- Keep cleanup supplies ready
- Note tape disposal and Paint storage
How to Plan Painting Order to Minimize Tape Issues
Planning the painting sequence before you lay any tape will cut down on re-taping, accidental smudges, and stressed edges; start by tackling areas that dry quickest and work from ceilings to trim to walls so you won’t disturb finished surfaces.
You’ll plan zones so wet edges won’t meet taped lines, select Painting tools that let you work fast and accurately, and schedule tasks to allow proper drying.
Begin Surface preparation—clean, sand, and prime—so tape adheres predictably.
Paint one contiguous area at a time, remove tape as recommended for each paint type, and keep a small kit ready to touch up any thin spots immediately.
Common Mistakes That Ruin Tape Lines
Now that you’ve mapped out the painting order, watch for common mistakes that can wreck crisp tape lines. You’ll avoid masking mistakes by staying attentive to surface prep, tape choice, and timing. Don’t let rushed steps undo your work; follow basic painter’s tips and correct errors quickly.
- Press tape edges firmly; gaps cause bleed-through.
- Remove old or low-quality tape; adhesive fails.
- Paint heavy coats over edges; runs lift tape.
- Peel tape too late or too early; jagged lines.
Catch these issues before finishing, and you’ll preserve sharp, professional-looking results.
Pro Tips Painters Use for Consistent Results
When you want consistently sharp paint lines, adopt a few pro habits that become routine. Work in controlled temperatures and humidity to prevent bleeding and delays that tempt you to pull tape wrong.
Press tape edges firmly and seal with a thin clear coat or base color where applicable. Remove tape at a 45° angle while paint’s tacky but not wet—this reduces tearing.
Prioritize painting safety: wear masks and ventilate when working with solvents or removers.
Keep blades sharp, rollers clean, and brushes conditioned—tool maintenance prevents stray bristles and uneven application that ruin crisp edges.
Quick Checklist to Decide When to Pull the Tape
You’ve got the right habits in place, so next make quick checks before you pull the tape to protect those crisp edges. Confirm paint is set enough to avoid smearing but not fully cured, inspect tape adhesion, and review your Surface Preparation notes. Consider Tape Alternatives only if edges look uneven.
- Gently press along the tape to test adhesion and paint lift risk.
- Check paint sheen: matte dries faster than gloss.
- Score the edge with a utility blade if paint feels tacky.
- Peel slowly at a 45-degree angle, keeping tension low.
Act deliberately to preserve lines and finish.
When to Call a Pro Instead of DIY Tape Removal
If the paint edge is delicate, the surface is valuable, or you’re unsure about scoring and peeling without causing damage, call a pro—it’s worth avoiding costly repairs.
When the paint edge is fragile or the surface valuable, hire a pro to avoid costly damage.
You should also hire help when masking tape durability seems compromised, like brittle edges or residue after a short time.
Pros assess paint adhesion, choose the right removal angle, and use heat or solvent safely to prevent lifting or scratches.
If the project involves historic trim, complex patterns, or high-gloss finishes, don’t risk it.
A professional saves time and preserves finishes, especially when mistakes would be expensive to fix.
Product-Testing Tips and Recommended Tapes
Because tape performance varies by surface and conditions, test each product before committing to a large job. You’ll learn how adhesive reacts to paint, humidity, and older finishes common with historical paint techniques. Try a small strip in an inconspicuous spot, wait the recommended cure time, then remove at a 45° angle.
- Try painter’s tape, low-tack, and a premium crepe for trim.
- Test eco friendly masking tapes for removability and residue.
- Record surface type, paint age, and removal timing.
- Use a heat gun sparingly to ease removal if adhesive resists.
Frequently Asked Questions
Will Tape Residue Damage Newly Painted Surfaces?
No, tape residue usually won’t damage newly painted surfaces, but it can interfere with paint adhesion and attract dirt; you should remove residue promptly and clean gently so tape residue doesn’t compromise the finish or future repainting.
Can You Reuse Masking Tape Removed From a Painted Project?
Yes—you can sometimes reuse masking tape if it’s clean and its adhesive hasn’t gummed up; tape removal should be gentle, and reusable masking works best for short projects, but old or stretched tape won’t stick reliably again.
Is Painter’s Tape Safe on Wallpaper or Fragile Wallcoverings?
Yes—you can, but cautiously: test first for wallcovering adhesion, use low-tack painter’s tape, peel slowly and steadily as a proper tape removal technique, and stop if paper lifts or adhesive residue appears.
How Long Can Paint Stay Under Tape Before Discoloration Occurs?
You should avoid leaving paint under tape more than 24–72 hours to prevent discoloration; use careful tape removal techniques and monitor paint adhesion quality, pulling tape back slowly at a 45° angle to minimize lifting and residue.
Does UV Exposure Affect Paint Edges Under Tape?
A stitch in time saves nine: you’ll see UV effects causing fading and brittle paint edges under tape, especially with prolonged sun exposure, so act quickly to prevent breakdown and uneven color along masked lines.
Conclusion
You should usually pull masking tape before paint fully cures — while the surface is still tacky — to get the cleanest line. Studies show painters who remove tape within 30–60 minutes after paint becomes tacky reduce edge failures by about 40%. That small timing change cuts peeling and touch-ups, saves time, and gives crisper results. When in doubt, test a hidden strip and pull slowly at a 45° angle for best control.