Can I Paint Enamel Over Latex
Yes — you can paint enamel over latex if you prep properly. You’ll clean, degloss or sand, and use a high-adhesion primer made for bonding oil or waterborne enamels to latex. Test a small patch for adhesion, match sheen, and allow full cure between coats. Watch temperature and humidity, choose the right enamel type for durability, and address any peeling or moisture first. Keep going to learn which primers, enamels, and steps give the best, longest-lasting finish.
Quick Answer: Can You Paint Enamel Over Latex – And When To Do It?

Wondering if you can paint enamel over latex? Yes—you can, but prep matters.
You’ll clean the surface, sand gloss to promote adhesion, and remove loose latex. Sometimes paint removal is necessary if the old coat’s failing.
Use a good bonding primer designed for latex-to-alkyd progression.
Apply enamel in thin, even coats, watching for runs.
For best results, test a small area to confirm adhesion and color match between the glossy enamel and existing finish.
If color matching’s critical, bring a sample to a pro mixer or use a tinted primer before you topcoat with enamel.
Who Asks This Question And What They’re Trying To Accomplish
When you ask whether enamel can go over latex, you’re usually a homeowner, renter, or DIYer trying to update trim, cabinets, or doors with a tougher, glossier finish—and you want the job to last without peeling or visible brush marks. You’re aiming for durability, better Color matching, and easier cleaning, or weighing Environmental impact of solvent-based enamels vs water-based options. Typical concerns show up like this:
| Who | Goal |
|---|---|
| Homeowner | Durable, salon-quality trim |
| Renter | Quick refresh, minimal odor |
| DIYer | Smooth finish, long wear |
You want clear guidance, not surprises.
How To Test Existing Latex Paint Before You Start
Before you commit to painting enamel over latex, test the existing paint to confirm adhesion and compatibility—this saves time and prevents peeling down the road.
You’ll perform quick checks to assess surface condition, solvent resistance, and whether color matching or environmental impact concerns require special prep.
- Clean a small area, then scuff with fine sandpaper.
- Do a solvent rub (isopropyl) to see if paint softens.
- Apply a primer patch, then enamel test stripe.
- Let cured test sit 48 hours, check for lifting or tackiness.
- Evaluate color matching under different light and note environmental impact of cleanup.
When Enamel Will Fail Over Latex : Common Adhesion Causes
If adhesion fails, it’s usually because the surface chemistry or preparation wasn’t right—oil-based enamels need a keyed, clean latex surface or a proper bonding primer to stick. You’ll see paint peeling, blisters, or poor color matching when you skip sanding, degreasing, or use incompatible products. Humidity, flexible latex undercoat, and contaminants also cause failure. Address the specific cause before recoating.
| Cause | Clue | Fix |
|---|---|---|
| Poor sanding | Smooth, glossy latex | Abrade surface |
| Contamination | Grease or wax | Clean with solvent |
| Incompatible chemistry | Immediate lifting | Use bonding primer |
| High humidity | Blisters | Wait for dry conditions |
Which Enamel Types Work Best Over Latex
When you’re choosing an enamel to go over latex, pick one that bonds well and matches your durability needs.
Oil-based alkyd enamels offer strong adhesion and a hard finish.
Waterborne acrylic enamels dry faster and clean up with water.
Urethane-modified enamels give you extra toughness and chemical resistance for high-wear surfaces.
Oil-Based Alkyd Enamel
Although oil-based alkyd enamels cure differently than latex, you can often apply them over properly prepared latex if you follow the right steps. You’ll need to address adhesion, solvent sensitivity, and compatibility before coating. Consider Color matching and Surface texture when choosing finish and prep.
- Degrease and clean the latex surface thoroughly.
- Sand lightly to dull gloss and improve adhesion.
- Apply a bonding primer designed for alkyd over latex.
- Test a small area for solvent reaction and adhesion.
- Use thin, even coats; allow extended cure times between coats.
Follow these steps and you’ll get durable, smooth results without delamination.
Waterborne Acrylic Enamel
Because waterborne acrylic enamels dry fast and flex with the substrate, they’re usually the best choice for painting over properly cured latex. You’ll get good adhesion without aggressive primers, and the low VOC formula makes cleanup easier.
Focus on surface prep: clean, scuff, and spot-prime glossy areas to promote bond. Check color matching carefully when switching sheens; a sample patch ensures the hue reads right under your light.
These enamels offer improved paint durability versus standard latex topcoats, resisting yellowing and chipping. Apply thin, even coats and allow full cure before heavy use for best results.
Urethane-Modified Enamel
If you want a tough, durable finish over latex without heavy priming, urethane-modified enamels are a strong option: they combine the abrasion and chemical resistance of polyurethane with the ease of enamel application, so they bond well to properly prepared latex surfaces and resist yellowing and scuffing better than standard latex topcoats.
You’ll still need good surface priming and light sanding for adhesion. Consider these points when choosing urethane-modified enamel:
- Excellent abrasion resistance
- Better color matching stability over time
- Moderate odor and longer cure
- Requires clean, deglossed surface
- Suitable for cabinets and trim
Water- Or Oil-Based Enamel : Which Should You Use?
When choosing between water- and oil-based enamel over latex, you’ll weigh durability and the kind of finish you want—oil tends to be tougher and glossier, while water-based is less yellowing.
You’ll also consider drying times: water-based dries faster so you can recoating sooner, whereas oil-based takes longer but levels out nicely.
Finally, think about cleanup and compatibility—water-based cleans with soap and water and plays well with latex, while oil requires solvents and a proper primer if adhesion is a concern.
Durability And Finish
Although both water- and oil-based enamels aim for a hard, protective surface, they deliver different levels of durability and distinct finishes you’ll want to match to the job. You’ll choose based on traffic, exposure, and desired paint sheen; consider color mixing limits with oil formulas before committing.
- Water-based: tougher UV resistance, easier cleanup, less yellowing.
- Oil-based: superior abrasion resistance and smoother leveling.
High-traffic areas: favor oil for longevity, unless sunlight is heavy.
Cabinets and trim: oil gives a furniture-like finish but needs solvent cleanup.
For quick recoats and subtle color mixing, water-based often wins.
Drying Time Differences
Curious which enamel dries faster and fits your schedule? You’ll find water-based enamels dry quicker—touch dry in an hour, recoatable in 2–4 hours—so you can finish projects faster.
Oil-based enamels take longer, often 6–8 hours to recoat and up to days to fully harden, but they level out smoother for high-gloss results.
When choosing, consider paint compatibility with existing latex and any required primers to prevent adhesion issues. Also factor how fast you need accurate color matching; slower-drying oil enamels can shift slightly as they cure.
Pick based on timing needs and the final look you want.
Cleanup And Compatibility
Now that you’ve weighed drying times, you’ll want to think about cleanup and compatibility, since the type of enamel you pick affects tools, solvents, and how well the new paint bonds to existing latex.
Choose water-based enamel for easier cleanup and minimal solvent odor; pick oil-based if you need a tougher finish and better adhesion over problematic latex after proper priming.
Consider color matching and long-term paint storage when selecting.
Quick tips:
- Water cleanup with soap and water
- Mineral spirits for oil-based cleanup
- Use a bonding primer for adhesion
- Label cans for color matching later
- Store unopened cans upright, cool and dry
Surface Prep Checklist Before Applying Enamel Over Latex
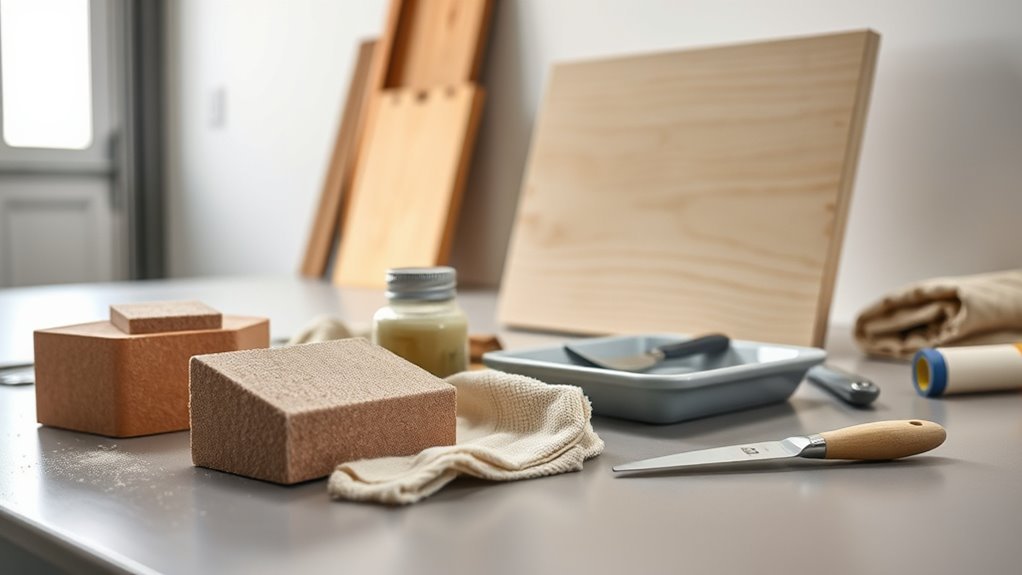
Before you apply enamel over latex, make sure the surface is clean, dry, and free of loose paint or gloss—these simple checks prevent adhesion failures and visible flaws.
Inspect for stains, mildew, and grease; clean with mild detergent and rinse thoroughly.
Repair cracks, fill holes, and sand rough edges to create a uniform plane.
Remove hardware and mask adjacent areas.
Test a small patch to confirm color matching and finish sheen expectations before committing.
Allow repairs and primer to cure fully.
Finally, wipe with a tack cloth to remove dust so the enamel lays down smoothly.
How To Scuff-Sand For Better Enamel Adhesion
If you want enamel to stick well to latex, scuff-sanding creates the slight tooth the new finish needs without removing the underlying paint. You’ll work lightly, aiming to dull shine and remove loose particles while preserving color and substrate for later color matching and texture blending.
Follow these steps:
- Choose 220–320 grit sandpaper or a fine sanding sponge.
- Sand in even, circular strokes with moderate pressure.
- Keep edges feathered to avoid ridges that hinder texture blending.
- Wipe surface with a tack cloth to remove dust.
- Inspect under good light; repeat until sheen is uniformly dulled.
When To Use A Liquid Deglosser Instead Of Sanding
When sanding would gouge delicate trim, leave visible scratches, or isn’t practical for intricate moldings, reach for a liquid deglosser instead — it quickly dulls glossy latex surfaces and removes light contaminants without changing profiles or requiring abrasive access.
When sanding would mar delicate trim or intricate moldings, use a liquid deglosser to dull gloss and clean surfaces safely.
You’ll apply it with a cloth, wipe off residue, and let the surface dry before painting.
Use a deglosser when sanding risks damaging details, when time is tight, or when pieces are fixed in place.
Keep color matching notes and paint storage info handy so final coats match earlier work and stored cans remain usable for touch-ups.
Which Primers Bond Enamel To Latex Surfaces
You’ll want a primer that’s formulated for proper bonding between enamel and latex—these products create a chemical bridge that prevents peeling.
For lightly worn or glossy latex, a surface-prep primer (often called adhesion or deglossing primer) will do the job without aggressive sanding.
On more problematic surfaces, choose a high-bond or bonding primer designed specifically to unite enamel topcoats to latex undercoats.
Proper Bonding Primers
Although latex and enamel have different chemistries, the right bonding primer will create a durable bridge between them so your enamel topcoat adheres without peeling or flashing. You’ll choose primers emphasizing primer compatibility and color matching to avoid tint surprises; look for labels specifying “bonding,” “adhesion promoter,” or “universal.”
Consider these common options:
- Shellac-based primers for tough adhesion on glossy latex
- Alkyd primers when solvent resistance is needed
- Acrylic bonding primers for flexible, waterborne systems
- Epoxy primers for high-durability applications
- Specialty adhesion promoters for slick surfaces
Test a small patch to confirm adhesion and color match.
Surface Prep Primers
If your latex surface still has gloss, dirt, or old failures, prep is the step that makes a primer actually stick—so clean, scuff, and degloss first, then spot-fill and sand smooth before applying a bonding primer designed for enamel over latex. You’ll choose primers that promote adhesion and improve paint durability while easing color matching later. Use solvent or acrylic bonding primers per surface. Test small areas. Maintain manufacturer’s dry times. Replace loose paint; wipe dust. The table below helps you compare quick options.
| Primer Type | Best For | Notes |
|---|---|---|
| Acrylic bond | Interior walls | Fast cure |
| Shellac | Stains/odors | Strong hold |
| Epoxy | High wear | Superior durability |
| Universal | Mixed substrates | Good color match tips |
How To Apply Primer On Cabinets, Trim, And Furniture
When prepping cabinets, trim, and furniture for enamel paint, start by cleaning all surfaces, repairing damage, and sanding lightly so primer bonds evenly; this saves time and prevents peeling later. Choose primer based on substrate and whether you need stain-blocking or adhesion; consider color matching for topcoat depth.
Focus on tool selection to avoid brush marks. Follow this sequence and tips:
- Remove hardware and label parts for reassembly.
- Degrease with a TSP substitute; rinse and dry.
- Fill holes, sand smooth, and tack cloth.
- Apply thin, even primer coats; let dry fully.
- Lightly sand between coats, then wipe clean.
Brushing And Rolling Techniques For Enamel Over Latex
Before you start brushing or rolling enamel over latex, make sure the surface is clean, sanded, and primed to promote adhesion.
Choose a high-quality synthetic-bristle brush for detail and a short-nap roller for smooth, even coverage.
Apply thin, even coats with light pressure, keeping a wet edge and sanding lightly between coats for a flawless finish.
Surface Preparation Steps
Though switching from latex to enamel might seem straightforward, proper surface prep makes the difference between a smooth, durable finish and peeling, brush-marked paint. You’ll clean, sand, and address imperfections before painting. Consider color matching if you’re covering a strong hue, and confirm primer selection to guarantee adhesion.
- Remove dust, grease, and mildew with appropriate cleaners.
- Sand glossy latex lightly to dull the surface and promote grip.
- Fill holes and sand smooth; remove residue.
- Apply a compatible primer tuned for enamel over latex.
- Wipe with a tack cloth and allow full drying time before painting.
Brush And Roller Selection
Since enamel levels and flow differently than latex, you’ll want to pick tools that help lay the finish smoothly without lap marks or brush strokes.
Choose a high-quality synthetic-bristle brush for water-based enamel and natural-bristle for solvent-based; match brush width to surface size.
For rollers, pick a short-nap (1/4″–3/8″) for smooth surfaces and a slightly thicker nap for light texture.
Consider color matching when switching sheen or tinted enamels to avoid visible progression.
Maintain brush care: clean according to solvent type, reshape bristles, and store upright.
Replace worn rollers and damaged brushes for best results.
Application Technique Tips
Now that you’ve chosen the right brush and roller, focus on technique to get a smooth enamel finish over latex. Work in thin, even coats, maintain a wet edge, and avoid overbrushing. Sand lightly between coats for adhesion and wipe dust away.
Monitor color mixing to keep consistency between batches, and label cans for proper paint storage.
- Load brush/roller evenly; don’t overload
- Roll in a “W” pattern, then fill in
- Use long, light strokes to level enamel
- Sand 220–320 grit between coats, then tack cloth
- Store leftover enamel sealed, upright, away from heat
Spraying Enamel Over Latex: Setup And Settings
When you plan to spray enamel over latex, proper setup and precise spray settings determine whether the finish will be smooth or problematic.
Clean, sand, and wipe the surface; use a tack cloth to remove dust. Check color matching before spraying—enamel can shift appearance over latex, so test a small area.
Thin the enamel only as manufacturer recommends for your sprayer type. Set nozzle size and pressure for medium viscosity enamel: lower pressure for HVLP, moderate for airless, and adjust fan width to avoid runs.
Arrange paint storage nearby to maintain temperature and agitation during the job.
Drying Times And Safe Recoating Intervals
How long your enamel takes to dry depends on factors like temperature, humidity, ventilation, and the thickness of the coat.
You’ll usually see tack-free times within a few hours, but full cure can take days to weeks depending on product and conditions.
To avoid adhesion problems or surface defects, follow the manufacturer’s recommended safe recoat window and wait longer in cool or humid environments.
Drying Time Factors
Although enamel will eventually bond over latex, several factors control how quickly it dries and when it’s safe to recoat. You’ll monitor temperature, humidity, and airflow first, since they directly speed or slow solvent evaporation.
Product formulation matters too—fast-dry enamels differ from alkyds—and previous latex condition affects absorption. Also consider color mixing and paint storage, which can alter consistency and drying behavior.
- Temperature: warmer speeds cure
- Humidity: high levels slow drying
- Airflow: improves solvent release
- Film thickness: thin coats dry faster
- Paint condition: old or contaminated paint delays cure
Safe Recoat Window
A safe recoat window depends on both the paints involved and the conditions during drying. You’ll wait longer for enamel over latex—typically 24–48 hours—if humidity or low temp slows cure. Check manufacturer times, test adhesion, and remember color matching can be affected by premature topcoating. Use ventilation tips: open windows, run fans, and avoid tacky feel before recoating.
| Emotion | Expectation | Action |
|---|---|---|
| Relief | 24–48 hr | Test spot |
| Anxiety | Unknown cure | Read label |
| Confidence | Proper prep | Sand/blend |
| Frustration | Poor match | Adjust color |
| Pride | Smooth finish | Wait patiently |
How To Spot Compatibility Problems Early
If you’re planning to paint enamel over latex, start by checking the existing surface for signs the two paints might clash: peeling, cracking, excessive gloss, or areas where old paint has turned powdery. You’ll also assess color mixing risk and consider environmental impact when choosing primers and cleaners.
Look for these early warning signs:
- Flaking at edges after a light scrape
- Chalky residue when rubbed with a damp cloth
- High-gloss patches resisting dulling
- Patches of different sheen or texture
- Fresh solvent test causing tackiness
Address any issue before painting to avoid adhesion failures and visible defects.
How Humidity And Temperature Affect Enamel Adhesion
Wondering why your enamel sometimes bubbles or peels after you paint over latex? Temperature and humidity affect drying rates and adhesion; you should avoid painting in extremes. Proper surface preparation and consistent conditions help with Color matching and finish uniformity. Below is a quick guide showing ideal ranges and risks.
| Condition | Ideal Range | Risk if Ignored |
|---|---|---|
| Temperature | 50–85°F | Poor cure, blush |
| Humidity | 40–60% | Blistering, slow dry |
| Cold | <50°F | Film cracking |
| Hot/Humid | >85°F/70% | Trapping solvents |
Monitor conditions, wait for stable weather, and prep surfaces thoroughly.
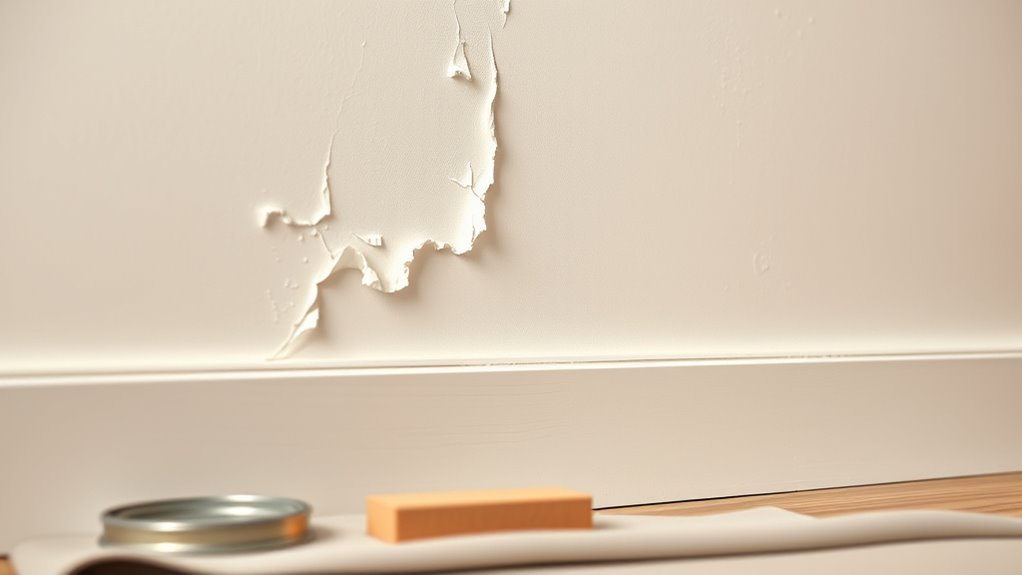
Fixing Peeling, Bubbling, Or Cracking After Enamel Over Latex
When enamel peels, bubbles, or cracks over latex, you’ll need to remove the failing finish, find the root cause, and recoat correctly to prevent recurrence. Inspect for moisture, poor adhesion, or incompatible primers.
When enamel peels over latex, remove the failing finish, identify the cause, and recoat properly to prevent recurrence
Strip loose paint, sand to feather edges, and clean thoroughly. Use proper Surface preparation and a bonding primer before recoating. Consider Color matching if you’re blending repaired areas.
- Scrape and sand to sound substrate
- Clean with a degreaser and allow to dry
- Apply a high-adhesion primer compatible with both paints
- Repaint with enamel following manufacturer conditions
- Inspect and address moisture sources promptly
How To Match Sheen And Color Across Paint Types
Although matching sheen and color across latex and enamel might seem tricky, you can get a seamless finish by understanding how each paint behaves and prepping appropriately.
Start by testing samples: apply latex, then enamel over it on boards and view in different light to judge color consistency and sheen matching. Use a primer designed for both types to even absorption and reduce gloss contrast.
Sand between coats to smooth progressions and scuff-sand enamel before additional layers. For exact color, bring a chip to the store for a matched formula or use tint-compatible primers.
Finish by evaluating in real lighting conditions.
Durability: Enamel Over Latex Vs Repainting With Latex
When you compare enamel over latex versus simply repainting with latex, focus first on how well the new coat bonds to the existing layer and whether you’ll need a primer for proper adhesion.
Consider the difference in surface hardness—enamel usually gives a tougher, more scuff-resistant finish than latex.
Finally, think about long-term maintenance: enamel can reduce cleaning and touch-ups, but repairs and repainting later may be more involved.
Adhesion And Bonding
Curious how enamel holds up over existing latex? You’ll find adhesion depends on prep, primer, and compatibility. Poor color matching or old paint storage can hide issues until peeling starts.
- Clean surface thoroughly to remove grease and dust.
- Sand lightly to create tooth for enamel to grip.
- Use a bonding primer if latex sheen is high.
- Test a small area for lift or blistering before full application.
- Allow proper curing time between coats and follow manufacturer instructions.
If you follow these steps, enamel bonds well to latex; skip them and you risk premature failure.
Surface Hardness Comparison
Now that you’ve prepped and primed for good adhesion, compare how hard the finished surface will be. Enamel typically cures to a firmer, more chip-resistant finish than latex, so you’ll notice greater surface hardness and scratch resistance.
Repainting with latex gives more flexibility and resists cracking but feels softer under impact.
If you’re concerned about aesthetic continuity, enamel can alter color blending slightly and may highlight subtle texture differences; pay attention to texture matching during prep to avoid visible shifts.
Choose enamel where durability matters; stick with latex when flexibility and easier touch-ups matter more.
Long-Term Maintenance
Although enamel forms a tougher, more chip-resistant surface that often reduces the need for frequent touch-ups, it also demands different care routines than latex—so you’ll want to weigh the trade-offs in upkeep.
You’ll notice enamel resists scuffs and cleans easily, extending repaint intervals, while latex needs more frequent recoats but is simpler to DIY and better for color matching updates.
Consider environmental impact of solvents and disposal when choosing.
Maintenance tips:
- Clean gently with nonabrasive cleaners
- Inspect for cracks annually
- Touch up small chips with matching enamel
- Repaint full areas with latex for easy color changes
- Dispose materials responsibly
Safety And Ventilation When Using Oil-Based Enamel
Because oil-based enamel releases stronger fumes and slower-healing solvents than waterborne paints, you should always prioritize ventilation and protective gear when you’re working with it. Open windows, run fans to exhaust air, and wear an organic-vapor respirator, gloves, and eye protection. Consider environmental impact and think about historical finishes that relied on solvents; respect their hazards. Keep flame sources away and limit exposure time.
| Task | Recommended PPE | Ventilation |
|---|---|---|
| Brushing | Respirator, gloves | Cross-ventilation |
| Spraying | Full-face respirator | Exhaust fan |
| Small touch-ups | Gloves | Window open |
Cleanup And Disposal Rules By Enamel Type
When you’re finished with enamel, handle cleanup and disposal according to the type. You’ll treat water-based (alkyd-modified) enamel like latex: rinse brushes with soap and water, strain solids for proper disposal, and preserve leftover paint for color matching.
For oil-based enamel, use mineral spirits, collect solvent waste in sealed containers, and take it to hazardous waste collection to protect paint durability and the environment.
For spray enamel, trap overspray and dispose of empty cans per local rules.
- Water-based brush rinse
- Solvent soak for oil-based
- Seal and label waste
- Recycle empty cans
- Check local regulations
Cost And Time Estimate For Repainting Latex With Enamel
If you’re repainting latex with enamel, expect costs and time to vary mainly by surface size, prep needed, and whether you pick water-based enamel (easier cleanup) or oil-based (more durable but pricier).
Repainting latex with enamel varies by surface size, prep, and your choice of water- or oil-based enamel.
You’ll pay for primer if adhesion’s uncertain, plus 1–2 coats of enamel; estimate 1–3 gallons for a standard room.
Labor adds hours for sanding, priming, drying between coats—plan 2–5 days total for a room.
Specialist services raise cost but help with color matching and selecting the right paint sheen.
Budget for supplies: brushes, tape, drop cloths, and minor repairs.
When To Strip Old Latex And Start Fresh
Before you start painting enamel over existing latex, check whether the old coat is flaking, chalking, or has poor adhesion—these signs mean you should strip down to a sound surface rather than just spot-prime.
If you see damage, stripping prevents peeling and ensures the new enamel bonds properly. Consider color matching if you plan to reuse the same shade, and weigh the environmental impact of chemical strippers versus sanding.
Strip and start fresh when:
- Large areas peel or bubble
- Multiple old layers hide defects
- Surface is chalky or powdery
- You need a drastically different finish
- Contamination won’t clean up
When To Hire A Pro Vs DIY For Enamel Over Latex
Deciding whether to tackle painting enamel over existing latex depends on the job’s scope, your skill level, and how much time you can commit.
Decide whether to paint enamel over latex based on project size, your skill level, and available time
If surfaces need extensive prep, repairs, or precise color matching for trim or cabinetry, hire a pro to guarantee durability and a flawless finish.
Choose DIY for small, well-prepped areas and straightforward sheen changes when you’re comfortable with sanding, priming, and ventilation.
Consider environmental factors like temperature, humidity, and VOC limits; pros handle compliance and control jobsite conditions.
Also hire a pro for large-scale projects or valuable finishes where mistakes are costly.
Quick Decision Flowchart: Should You Paint Enamel Over Latex?
Want a fast way to know whether to paint enamel over latex? Use this quick decision flowchart to decide if you should proceed, prep, or hire help. Consider Color matching and Environmental impact as part of the choice.
- Is the existing latex surface clean and glossy? Yes → scuff; No → clean and prime.
- Do you need a hard, durable finish? Yes → choose enamel; No → stick with latex.
- Is Color matching critical? Yes → test samples under real light.
- Concerned about Environmental impact? Yes → pick low-VOC options.
- Unsure or large project? Hire a pro.
Frequently Asked Questions
Can I Apply Enamel Over Latex on Exterior Surfaces Exposed to Sunlight?
Yes — you can, but you’ll need proper prep: sand, clean, and use a bonding primer so surface adhesion holds. That improves paint durability under sunlight, preventing peeling, cracking, and premature failure on exterior surfaces.
Will Enamel Yellow Over Existing Latex Paint Over Time?
Yes — oil-based enamel can yellow over time, like pages aging in sunlight. You’ll owe longevity to oil based compatibility and careful surface preparation techniques: degloss, sand, and prime to slow yellowing and adhesion problems.
Can I Use Enamel Over Latex on Floors and High-Traffic Surfaces?
Yes — you can use enamel over latex on floors and high-traffic surfaces if you do proper surface preparation, prime as needed, guarantee color matching for touch-ups, and choose a durable enamel suited to abrasion and moisture resistance.
Do Faux Finishes or Textured Latex Surfaces Accept Enamel Well?
Yes — textured or faux latex can accept enamel, but you’ll need careful surface preparation. I once sanded a stucco wall like polishing stone; with proper paint compatibility testing and primer, enamel bonds and resists wear much better.
Will Enamel Over Latex Affect VOC Emissions or Indoor Air Quality?
Yes — applying enamel over latex can raise VOCs and temporarily worsen indoor air quality; you should use low-VOC or waterborne enamels for VOC reduction, ventilate thoroughly, and monitor indoor air safety during and after painting.
Conclusion
You can confidently choose enamel over latex when surfaces are sound, smooth, and scuff-free—just test, sand, and prime. Carefully check for chalking, oil-based underlayers, or poor adhesion; otherwise, enamel brings durable, glossy defense. Save time and money by spot-priming trouble spots, or call a pro for large, peeling, or high-moisture projects. Follow the flowchart: test, prep, prime, paint. Practical preparation prevents problems and produces a professional, pleasing, long-lasting finish.