Do You Need to Scrape Off Old Paint Before Repainting Exterior Walls?
Yes — you should remove loose, peeling, chalky, or poorly bonded paint before repainting exterior walls so the new coat will adhere and last. If the old finish is sound, you can clean, degloss, and sand lightly, then prime and topcoat. Use bonding or stain-blocking primers for tricky surfaces, and follow safe removal methods for heavy buildup or lead. Proper prep saves time and money, and the next sections explain how to inspect, strip, and prime for best results.
Do You Need to Scrape Off Old Paint Before Repainting Exterior Walls? Quick Answer
Depends — you’ll usually need to scrape if the old paint is peeling, chalking, or not well bonded.
If the surface is sound, a good cleaning and light sanding can be enough.
Inspect a small area to confirm adhesion before you start.
Direct short answer (Yes/No/Depends) with one-line rationale
Yes — you should generally scrape loose or peeling paint before repainting exterior walls to guarantee the new finish adheres and lasts.
If you’re asking “do I need to scrape off old paint exterior,” here’s a quick guide to decide:
- Remove all loose or blistered paint
- Feather edges for smooth shifts
- Sand glossy surfaces for adhesion
- Prime bare wood or metal before painting
Basic Understanding Paint Layers and Exterior Surfaces
Before you start scraping, you should understand paint adhesion and why old layers affect how new paint bonds.
Different exterior surfaces—wood, stucco, masonry, metal, and vinyl—accept paint differently and may need specific preparation.
Also note whether the existing paint is oil-based, latex, or contains lead, since that changes your removal and safety approach.
What is paint adhesion and why old layers matter
Adhesion is simply how well paint clings to a surface, and it determines whether your new coat will look smooth and last or peel off in a few seasons.
Old layers affect adhesion: flaking, chalking, or incompatible coatings block proper bonding.
You’ll need to remove loose paint, abrade glossy surfaces, and clean contaminants so the new finish can mechanically and chemically adhere for long-term durability.
Types of exterior surfaces (wood, stucco, masonry, metal, vinyl) and how paint behaves on each
Different surfaces demand different paint approaches, so knowing whether you’re working with wood, stucco, masonry, metal, or vinyl helps you pick prep methods and coatings that will stick and last.
Wood needs sanding and primer for grain; stucco and masonry require breathable masonry paints and flexible primers; metal needs rust treatment and metal primer; vinyl benefits from cleaning and low-heat, flexible acrylics for adhesion.
Common types of old paint (oil-based, latex, lead-based) and implications
Knowing your surface is only half the picture — you also need to identify what’s already on it. You’ll encounter oil-based (durable, needs deglosser/primer), latex (flexible, usually bonds well), and lead-based (hazardous; requires testing/abatement). Match prep: strip or sand glossy oil, scuff latex, and never DIY disturb lead without safety measures.
| Paint type | Implication |
|---|---|
| Oil-based | Primer/degloss |
| Latex | Scuff/sand |
When You Must Remove Old Paint Clear Indicators
Look for clear signs that you must remove paint completely: widespread peeling, blistering, flaking, or heavy chalking mean a full scrape or strip is needed.
If the surface may contain lead, has extensive rot, or is heavily rusted, you’ll also need complete removal for safety.
For small, isolated failures with otherwise sound adhesion, you can usually spot-repair rather than strip the whole area.
Signs that full scraping/stripping is required (peeling, blistering, flaking, chalking)
If you see paint peeling, blistering, flaking, or heavy chalking, you’ll need to remove it before repainting to confirm the new finish adheres and lasts.
Scrape down to sound substrate, sand rough edges, and use a chemical stripper or heat where needed.
Replace any loose caulk, clean dust and chalk residue, and prime bare wood or metal to guarantee a durable topcoat.
Safety-critical cases (lead paint, extensive rot, rust)
When you’re dealing with suspected lead paint, widespread rot, or significant rust, you must remove the old coating rather than simply cover it up—these conditions create health hazards or structural failures that repainting won’t fix.
You should test for lead, replace rotten wood, and strip rusted metal to sound substrate. Hire certified pros for lead remediation and structural repairs to protect occupants and guarantee long-term results.
Situations where partial removal is sufficient (localized damage, marginal adhesion)
After you’ve addressed any health or structural hazards like lead, rot, or severe rust, you can often get away with removing only the problem spots instead of stripping an entire surface.
Inspect for blistering, peeling edges, and loose flaking; sand or spot-strip those areas back to sound substrate.
Prime bare patches, feather surrounding paint, and repaint. This saves time while ensuring adhesion and longevity.
How to Assess Paint Condition Step-by-Step Inspection
Start by walking the exterior with a simple visual checklist to note peeling, chalking, blistering, or cracking.
Then try basic adhesion tests — scrape with a knife or screwdriver and do a tape pull — and check for moisture or substrate problems that could cause failure.
Finally, test for lead if the paint is old and call a professional if you find lead or extensive deterioration.
Step 1: Visual checklist for exterior paint condition
Before you pick up a scraper, walk the perimeter and do a systematic visual check of the exterior paint so you can identify problem areas quickly.
Note blistering, cracking, peeling, chalking, mold, and faded color. Inspect trim, joints, siding seams, and around windows and doors.
Mark areas needing touch-up, full removal, or further testing so you plan labor and materials accurately.
Step 2: Adhesion tests (knife/screwdriver, tape test)
How well does the old paint actually stick?
Use a putty knife or screwdriver to gently pry at edges and check for flaking; if paint peels easily, it’s failing.
For taped areas, press strong adhesive tape, pull sharply—loose paint will lift.
Repeat around windows, trim, and siding.
Record weak spots to plan scraping, sanding, or spot-priming before repainting.
Step 3: Moisture and substrate checks
3 quick checks will tell you whether moisture or the substrate is causing paint failure.
First, look for blistering, peeling at seams, or soft spots—signs of trapped moisture.
Second, press a damp-free cotton cloth against suspected areas after rain; rapid darkening shows moisture.
Third, inspect and probe wood, stucco, or masonry for rot, powdering, or loose material that prevents adhesion.
Step 4: Testing for lead and when to call a professional
Wondering whether that old paint could be hazardous? You should test for lead before sanding or scraping.
Use EPA-approved test kits or hire a certified sampler; kits give quick results, pros provide lab confirmation.
Call a certified abatement contractor if tests are positive, if paint’s flaking extensively, or if children or pregnant people are present.
Don’t risk exposure—get professional help.
Methods for Removing Old Exterior Paint
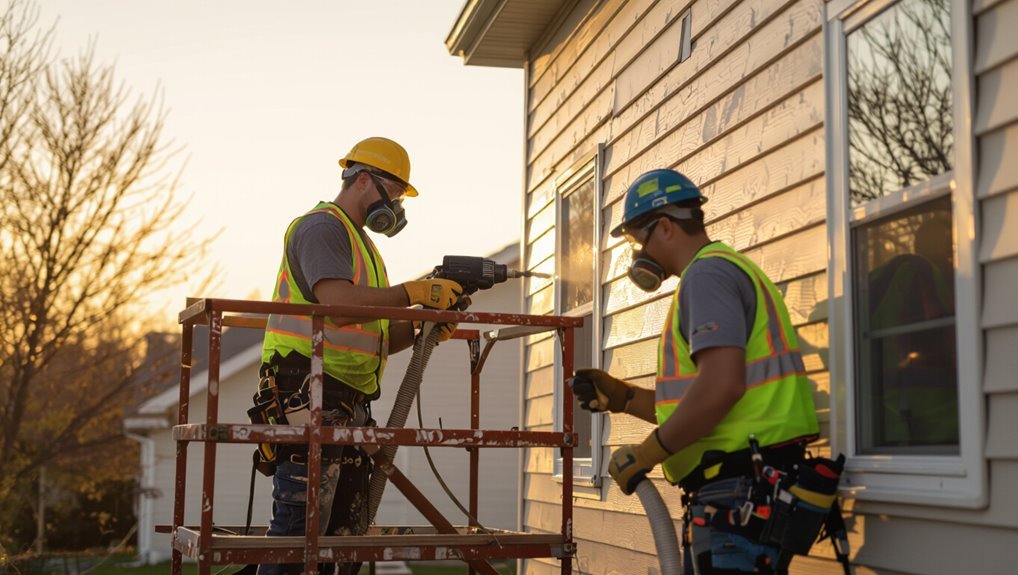
When you remove old exterior paint you’ll choose between mechanical options like scraping, sanding, power washing or powered sanding tools, chemical strippers (used with proper PPE and disposal), and heat tools such as heat guns or infrared removers, each with their own pros and cons.
I’ll explain the risks, safety steps, and effectiveness of each method so you can pick the right approach.
I’ll also cover when it’s smarter and safer to hire a professional for removal.
Mechanical methods: scraping, sanding, power washing, sanding tools
Start by tackling stubborn paint with mechanical methods: scraping, sanding, power washing, and specialized sanding tools each remove old coatings through physical force rather than chemicals.
You’ll scrape loose flakes, sand rough edges, or blast grime with a washer. Use orbital sanders for flat areas and detail sanders for trim.
Work systematically, wear protection, and stop at solid, well-adhered paint.
Chemical methods: paint strippers and safety considerations
If mechanical methods don’t budge old coatings, chemical strippers dissolve or soften paint so you can scrape it away more easily.
You should choose products rated for exterior use and for lead paint when applicable.
Wear gloves, respiratory protection, eye protection, and cover surrounding plants and surfaces.
Follow dwell times, neutralize residues per instructions, and dispose of waste according to local hazardous-waste rules.
Heat methods: heat guns and infrared removers pros and cons
Although heat tools can strip stubborn exterior paint quickly, they demand care to avoid scorching wood or releasing toxic fumes.
You’ll find handheld heat guns work fast on small areas but risk blistering and burns.
Infrared removers heat paint beneath the surface for gentler removal and less vapor, yet they’re pricier and slower.
Always use ventilation, PPE, and steady technique.
When to hire professionals for removal
Heat tools can speed up paint removal, but some situations call for a pro.
Hire professionals if the paint contains lead, the surface is high or hard to access, damage or rot hides beneath, or large areas need stripping quickly.
Pros have safety gear, containment, and disposal methods, plus experience preventing substrate harm and ensuring a smooth, durable repainting foundation.
Repainting Without Complete Removal When and How
You can often repaint without stripping every last flake if you prep the surface properly by cleaning, deglossing, and sanding loose edges.
Use a bonding or stain-blocking primer on tricky substrates to promote adhesion and hide stains.
Match your topcoat to the existing system—use latex over latex or a proper primer if switching between oil and latex—to guarantee a durable finish.
Preparation techniques when leaving old paint in place (cleaning, deglossing, sanding)
When you leave old paint in place, proper prep makes the new coat stick and look right: clean to remove dirt and grease, degloss glossy surfaces so primers and paints bond, and sand rough spots or feather edges where paint is peeling.
Use mild detergent or TSP substitute, rinse thoroughly, scuff glossy finishes with fine-grit sandpaper or liquid deglosser, and remove dust before painting.
Priming options for challenging substrates (bonding primers, stain-blocking primers)
After cleaning, deglossing, and smoothing any rough edges, pick a primer that matches the challenge you’re facing rather than assuming the same product will work everywhere.
For chalky, flaking, or slick surfaces use a bonding primer to guarantee adhesion.
For tannin stains, rust, or water marks choose a stain-blocking primer.
Apply per instructions, let cure fully before topcoating for durable results.
Compatible paint systems (topcoat choices for existing oil or latex paint)
Wondering whether you can topcoat old oil or latex paint without stripping it all off? You can, if you match systems and prep properly: sand glossy areas, clean, and use primers when needed.
Consider these topcoat options:
- Latex over latex for flexibility
- Oil over oil for hardness
- Latex over oil only with a bonding primer
- 100% acrylic for durability and UV resistance
Step-by-Step Repainting Process After Removal or Prep
Before you start repainting, take safety seriously—wear PPE, contain any lead dust, and pick the right weather window.
Then prep the surface by repairing, sanding, and cleaning. Apply the proper primer for the substrate and old paint, and choose a topcoat with the right application method and drying times.
Finish by cleaning up and disposing of old paint and materials according to local rules.
Step 1: Safety preparation (PPE, containment for lead, weather considerations)
Because safety comes first, set up personal protective equipment and containment before you touch any old paint—especially if the home was built before 1978 and may have lead-based layers.
Wear a respirator rated for dust and fumes, protective eyewear, gloves, and disposable coveralls.
Seal work areas with plastic sheeting, use HEPA-filtered vacuums, and check weather: avoid windy, wet, or extreme temperatures.
Step 2: Surface preparation (repair, fill, sanding, cleaning)
Now that you’ve secured your safety gear and contained the work area, tackle the surface so new paint will stick and look smooth.
Remove loose flakes, repair rotten wood or damaged stucco, and fill gaps and nail holes with appropriate filler.
Sand feathered edges and glossy spots, then clean thoroughly—wash, rinse, and let dry—so the substrate is sound and dust-free before priming.
Step 3: Priming recommendations by substrate and previous paint
Primer choice matters: pick one that matches both the substrate and the old paint so your new coat bonds, hides stains, and cures properly.
Use oil-based primers over bare wood or glossy alkyd paint; latex primers suit previously painted latex or masonry.
For chalky or stained surfaces, use a bonding primer or stain-blocking primer.
Metal needs rust-inhibiting primers; rust-treated areas get etch primers.
Step 4: Choosing and applying topcoat (application tips, drying times)
With the surface primed correctly, pick a topcoat that matches the room’s use and the substrate—high-traffic areas benefit from durable satin or semi-gloss finishes, while ceilings and low-touch walls work fine in flat or matte.
Apply thin, even coats with quality brushes or rollers, follow manufacturer drying and recoat times, sand lightly between coats if needed, and allow full cure before heavy use.
Step 5: Cleanup and disposal of old paint and materials
1 clear step remains: clean up thoroughly and dispose of old paint and materials safely.
Gather chips, dust, and used PPE with a HEPA vacuum and wet wipes. Seal flaking paint and debris in heavy-duty bags.
Label containers if lead might be present and follow local hazardous-waste rules.
Rinse tools, store leftover paint per instructions, and document disposal for compliance.
Common Mistakes and Problems to Avoid
Don’t skip adhesion tests or rush surface prep—you’ll pay later in bubbling or peeling.
If the existing paint might contain lead or is crumbling, call a pro for proper abatement instead of painting over it.
Also check that your primer and topcoat are compatible so you don’t get premature failure, and if problems appear, strip back to sound substrate and correct the cause before repainting.
Mistake: Skipping adhesion tests or under-prepping surfaces
Ever thought you can just slap new paint over the old and call it done? Don’t skip adhesion tests. You’ll waste paint if the old finish flakes or repels the new coat.
Scratch, tape, or pull tests reveal bonding issues. Clean, sand, and prime any glossy, chalky, or contaminated areas first. Proper prep saves time, money, and prevents premature failure.
Mistake: Painting over lead or unsound paint without professional abatement
If your home has old, chipping paint, you can’t just paint over it and hope for the best—you risk exposing yourself and others to lead dust and creating a surface that won’t hold new coatings.
You should test for lead, and if present or paint is brittle, hire certified abatement.
Don’t sand, scrape, or disturb it yourself—containment and disposal matter for safety and legality.
Mistake: Using incompatible primer/topcoat combinations
One common slip is pairing a primer and topcoat that chemically or physically won’t bond—doing that can cause peeling, blistering, or ugly finish failures soon after you paint.
Check labels: match oil-based primers with oil topcoats and latex primers with latex or specified enamel tops.
If you’re changing systems, use a bonding primer made for that change to guarantee adhesion and durability.
Troubleshooting: bubbling, peeling, premature failure and how to fix
When bubbling, peeling, or premature failure shows up, don’t assume it’s just bad luck—you can usually diagnose the cause and fix it.
Check adhesion, moisture, and surface cleanliness. Remove failed paint, sand feathered edges, treat mold or efflorescence, and allow full drying.
Prime with compatible primer, use quality exterior paint, and follow recommended conditions; test a small area before finishing.
Best Practices and Maintenance to Extend Exterior Paint Life
Time your repainting for mild, dry weather so paint can cure properly and last longer.
You should also wash and inspect surfaces seasonally, making small touch-ups as soon as you spot chips or peeling.
Finally, pick high-quality primers, paints, and protective coatings suited to your climate to maximize long-term performance.
Seasonal timing and weather considerations for repainting
If you want your exterior paint job to last, plan around seasons and weather—paint dries and adheres best on mild, dry days with temperatures between about 50–85°F (10–29°C) and low humidity.
Avoid painting during rain, heavy dew, or extreme heat. Morning to early afternoon often offers ideal drying.
Check forecasts for several days to guarantee consistent conditions before you start.
Routine maintenance tips (wash, inspect, touch-ups)
Seasonal planning sets the stage, but regular upkeep keeps your paint performing year after year.
Wash walls gently with a mild detergent and soft brush annually to remove dirt, mold, and pollen.
Inspect for cracks, blisters, and peeling after storms.
Address small problem spots with quick touch-ups—sand loose edges, prime bare areas, and repaint—to prevent larger failures and extend coating life.
Choosing durable materials and coatings for long-term performance
A few smart choices in materials and coatings will make your exterior paint last far longer and save you time and money down the road.
You should pick high-quality acrylic or elastomeric paints, prioritize UV- and mildew-resistant formulas, and use breathable primers on porous surfaces.
Consider:
- 100% acrylic exterior paint
- Elastomeric for cracks
- Breathable primer
- UV/mildew inhibitors
Cost, Time and Environmental Considerations
You’ll want to weigh the faster, cheaper option of prepping and spot-sanding against the higher labor and disposal costs of full paint removal.
Be aware of local rules for disposing of lead paint, chemical strippers, and contaminated waste, which can add time and expense.
In some cases—historic trims, severe adhesion problems, or repeated repaint cycles—the higher upfront cost of full removal pays off with longer-lasting results and lower lifecycle costs.
Comparative cost/time of full removal vs. prep-and-paint
Deciding between full paint removal and a prep-and-paint approach comes down to balancing upfront cost, time on the job, and long-term environmental impact.
Full removal usually costs more and takes longer; you’ll need labor, equipment, and drying time.
Prep-and-paint is faster and cheaper when old paint is sound, saving days and money.
Choose based on condition, budget, and schedule.
Environmental and disposal rules (lead, chemical strippers, waste)
How should you handle old paint and leftover materials to stay legal and keep people safe?
If paint might contain lead, follow local testing, disclosure, and disposal rules—use certified contractors for removal.
Neutralize and contain chemical strippers, collect contaminated debris in sealed containers, and never wash residues into drains.
Dispose of solvents, chips, and rags at hazardous-waste facilities per regulations to avoid fines and harm.
When investment in removal pays off (long-term ROI)
After handling testing, containment, and legal disposal, weigh whether full paint removal will save you money and headaches over time.
Calculate labor, disposal, and material costs versus patch-and-prime cycles.
Consider longevity gains, reduced maintenance, and energy-efficiency improvements from better adhesion and sealing.
If upfront removal extends repaint intervals and boosts resale value, the higher initial outlay can deliver a clear long-term ROI.
FAQ
You probably have a few quick questions before you start, like whether you can paint over peeling paint or if sanding will do instead of stripping to bare wood.
You’ll also want to know how to check for lead in old paint, how long to wait between primer and topcoat, and whether pressure washing can replace scraping.
I’ll answer each of these clearly so you can pick the safest, most durable approach.
Can you paint over peeling paint?
Wondering if you can paint over peeling paint? You shouldn’t.
Painting over loose, flaking paint leads to poor adhesion and rapid failure. Remove all peeling sections, feather edges, prime exposed substrate, then repaint.
For small chips, you can spot-scrape and prime; for widespread peeling, strip to sound layers.
Proper preparation guarantees a durable, attractive exterior finish.
Is sanding enough or do I need to strip to bare wood?
How far you need to go depends on the condition of the existing paint and the substrate — light sanding can be enough if the old coat is firmly adhered and free of deep cracks.
However, you must strip to bare wood whenever paint is blistering, gouged, or soaked with moisture.
Sand to scuff and remove loose edges; strip when damage, rot, or poor adhesion threatens the new finish.
How do I know if my old paint contains lead?
When did your house get painted and what condition is it in? If it was painted before 1978, it may contain lead.
You can buy an EPA-approved DIY test kit or hire a certified lead inspector for XRF testing.
Don’t sand or scrape without precautions; lead dust is hazardous. If positive, follow lead-safe work practices or hire licensed abatement professionals.
How long should I wait between primer and topcoat?
If you want a durable, smooth finish, don’t rush—follow the primer’s recommended dry time on the label, which usually ranges from 30 minutes to 24 hours depending on the product and conditions.
Check tack-free and recoat windows, consider temperature and humidity, and wait longer in cool or damp weather.
Sand lightly if needed before applying the topcoat for best adhesion.
Can pressure washing replace scraping?
Can pressure washing replace scraping? You can use a pressure washer to remove loose paint, dirt, and mildew, but you shouldn’t rely on it alone.
High-pressure water helps prep surfaces but won’t remove all peeling edges or guarantee a sound feathered profile. Scrape and sand stubborn areas, then pressure wash to clean.
Dry thoroughly before priming and repainting.