Will Duct Tape Take Paint Off Walls? Damage Risk Explained
You shouldn’t assume duct tape is safe on painted walls because its strong adhesive can lift or strip paint, especially on fresh, flat, poorly bonded, or low-quality finishes. Heat, humidity, and long contact increase the risk, and removal can leave stubborn residue that needs solvents or gentle scraping. Test a hidden spot first and use painter’s tape or low-residue alternatives for delicate or rental surfaces, and keep following advice to learn how pros avoid and fix tape damage.
Quick Answer: Is Duct Tape Safe on Painted Walls?
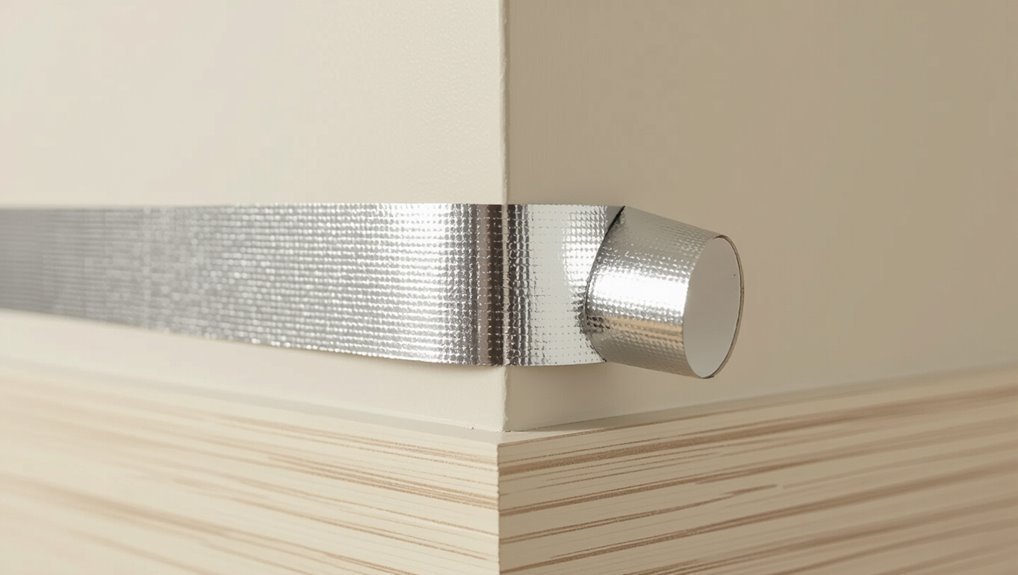
Wondering whether duct tape will ruin your painted walls? You shouldn’t assume it’s safe: duct tape’s strong adhesive can risk finish damage depending on paint type and age.
For short-term needs, use painter’s tape or low-tack tape alternatives to preserve wall protection. Test a small hidden spot first.
If you need heavy-duty hold, consider mounting strips designed to remove cleanly.
Why Duct Tape Can Pull Paint Off Walls
Because duct tape uses a very aggressive adhesive and stays bonded to surfaces, it can lift paint when you pull it off; the glue often grips the paint film stronger than the paint’s bond to the wall or the wall’s primer, so the paint peels away with the tape.
You’ll notice adhesive properties and tape age compromise surface integrity, causing flakes or sheets to come off.
Paint Types Most Vulnerable to Duct Tape
Now that you know how aggressive duct-tape adhesive can pull off paint, it helps to look at which paint types are most at risk.
You’ll find flat and matte finishes, poorly bonded latex, and thin or low-quality enamel are the most vulnerable paint options.
Tape interaction with these surfaces often strips or lifts pigment and primer, so test discreetly before applying strong adhesive.
Paint Age and Cure Time: Why It Matters
If the paint’s still young or hasn’t fully cured, the adhesive on duct tape can lift solvent, binder, or pigment right off the surface; older, well-cured paint bonds far better and resists tearing.
You should wait recommended cure times and inspect wall conditions—humidity, temperature, and substrate affect paint durability.
Tap a hidden spot first; short-term adhesion still risks peeling on weak or improperly cured surfaces.
Paint Finish: Matte vs Glossy Adhesion?
After checking cure time and surface condition, consider how finish affects adhesion: matte paints tend to be softer and more porous, so tape can grab and lift pigment or binder more easily, while glossy finishes form harder, smoother films that resist mechanical peeling.
You should assess paint sheens and finish types, account for surface texture and wall materials, and plan wall preparation to reduce tape residue and protect paint durability.
Porous vs Nonporous Walls: Tape Grip Explained
When you press duct tape onto a porous wall, the fibers and tiny pores soak up adhesive and can lock the tape in place more tightly.
On a smooth, nonporous surface the adhesive stays on top and creates stronger immediate surface adhesion but can peel more cleanly.
Consider both behaviors when you choose tape and removal timing to reduce paint damage.
Porous Surface Absorption
Because porous and nonporous walls interact with tape adhesive very differently, you’ll need to choose materials and removal methods based on the surface’s absorbency.
On porous drywall or textured plaster, paint absorption increases tape anchoring; surface texture lets adhesive sink into pores and fibers.
You’ll want low-tack tape, short dwell times, and gentle peeling at a low angle to minimize paint lift and substrate damage.
Smooth Surface Adhesion
Though smooth walls may look similar, their adhesion behavior changes a lot depending on porosity: nonporous surfaces like gloss-painted drywall or metal let tape stick only to the adhesive film, while slightly porous or satin-finished walls allow the glue to seep microscopically and increase grip.
You’ll judge adhesive properties by testing small areas, considering surface texture, finish, and paint age to predict removal risk.
How Surface Prep and Cleanliness Affect Adhesion
If you skip proper surface prep, duct tape won’t stick reliably and is more likely to pull paint when removed.
Skip surface prep and duct tape won’t hold — and it’ll likely pull paint when you peel it off.
You should focus on surface preparation and cleanliness impact: wipe dust and grease so tape application meets adhesive properties across wall texture.
Consider paint compatibility and environmental factors before sticking.
Plan removal techniques for damage prevention and weigh tape alternatives when surfaces look fragile.
How Duct Tape Adhesive Interacts With Paint
When you press duct tape onto painted surfaces, the adhesive strength determines whether it sticks cleanly or bonds too aggressively.
Different paint types and finishes change compatibility—glossy, cured paints usually hold up better than fresh or delicate finishes.
You’ll want to match tape aggressiveness to the paint to minimize lifting or residue.
Tape Adhesive Strength
Because duct tape relies on a tacky adhesive that bonds by flowing into a paint’s microscopic texture, it can lift or leave residue depending on how strong that bond is relative to the paint’s own adhesion.
You should weigh tape durability against paint strength: stronger adhesive increases surface interaction and removal risk.
Test small areas, pull slowly, and replace with low-tack options when possible.
Paint Surface Compatibility
Although duct tape’s adhesive seems simple, it interacts with paint in several specific ways you should understand: you’ll assess paint adhesion, tape compatibility, surface texture, wall materials, paint durability, and adhesive types to avoid peeling.
| Paint Type | Surface Texture | Risk Level |
|---|---|---|
| Latex | Smooth | Low |
| Oil | Rough | Medium |
| Matte | Textured | High |
Temperature and Humidity: Environmental Risks
If you store or apply duct tape in hot, cold, or very humid conditions, the adhesive can soften, harden, or lose tack much faster than you expect.
You should monitor humidity levels and temperature fluctuations because harsh environmental conditions change adhesive performance and stress painted surfaces.
That variability can undermine paint durability, increasing the chance that tape removal will lift or mar the finish.
How Contaminants (Dirt, Oils) Increase Peeling Risk
If you stick tape to a dirty surface, the grime prevents a solid bond and the adhesive can lift more easily.
Oil residues are especially bad because they break down the glue and cause spots to peel.
Even fine dust trapped under the tape creates weak points that make paint pull away when you remove it.
Dirty Surface Adhesion
When you stick duct tape to a surface covered in dirt, dust, or oils, the adhesive can’t form a full bond with the paint.
So the tape grabs loose contaminants instead of the substrate and increases the chance that paint peels away when you pull it off.
You face dirty surface adhesion challenges:
- Reduced contact area
- Contaminant transfer
- Uneven stress
- Edge lifting
Oil Residue Weakening
Because oil and greasy residues sit between the paint and duct tape, the adhesive can’t lock onto the surface and instead bonds to the contaminant layer. This weakens the overall hold and raises the chance that the paint will lift when you remove the tape.
You should clean surfaces first because oil absorption alters adhesive properties, reducing cohesion and increasing peel risk even on intact paint.
Dust Trapped Under Tape
Though dust and grit might seem harmless, they create tiny gaps between the tape and paint that let the adhesive grab loose particles instead of the surface, raising the chance you’ll peel paint off when removing the tape.
You risk uneven tape residue and altered surface texture.
Consider these steps:
- Clean thoroughly
- Use low-tack tape
- Press edges firmly
- Peel slowly and at an angle
Which Duct Tape Types Are Gentler on Paint
If you need to protect painted surfaces, choose tapes with low-tack adhesives and paper or thin cloth backings rather than heavy-duty rubberized or aggressive acrylic tapes.
You’ll find gentle options like delicate cloth and painter-specific low-adhesion tapes that reduce peel risk.
Consider tape alternatives such as removable mounting putty or low-residue strips for temporary fixes, testing a small area first to be safe.
Painter’s Tape vs Masking Tape vs Duct Tape: Which to Use?
When you’re prepping a paint job, painter’s tape is designed to give you clean lines and peel off without harming the finish.
Masking tape can work for quick jobs but may leave residue or pull at edges if left too long.
Duct tape, while strong, poses the biggest risk of paint lifting and should be avoided on painted surfaces.
Painter’s Tape Benefits
Because painter’s tape is designed for clean paint lines and low-residue removal, it’s the best choice when you want crisp edges without worrying about sticky residue or surface damage.
You’ll get painter’s tape advantages with proper tape application tips. Benefits include:
- Sharp lines
- Easy peel
- Minimal residue
- Protects finishes
Use it for trim and delicate surfaces.
Duct Tape Risks
Although duct tape feels like a quick fix, it can seriously damage painted or finished surfaces because its strong adhesive pulls at paint, varnish, and delicate trim when removed.
You’ll appreciate painter’s tape for clean edges; masking tape is gentler.
Duct tape durability comes with a trade-off: tough hold and stubborn adhesive residue.
Avoid it on fresh paint or delicate finishes to prevent costly repairs.
How to Test Tape Safely on Your Wall
Before you press any tape to the wall, pick a discreet test spot—like inside a closet or behind a piece of furniture—and clean it with a mild, non-abrasive cleaner so dust or oils don’t skew the result.
Try different tape types to compare adhesion levels.
Then follow this quick test:
- Apply a short strip.
- Wait 24 hours.
- Remove slowly.
- Inspect for lift or residue.
What to Do Before Applying Tape
If you want clean results and minimal paint damage, prep the area first by removing dust, oils, and loose paint with a mild cleaner and a soft cloth; this gives tape a consistent surface to stick to and makes testing more reliable.
Check paint age and sheen, repair flakes, and let surfaces fully dry. Good surface preparation reduces removal risk during tape application.
How to Apply Tape to Minimize Paint Damage
Before you stick anything down, make sure the surface is clean, dry, and free of dust or grease so the tape adheres evenly.
Press tape down gently along the edges to avoid air pockets and excessive pressure that can lift paint.
When removing it, pull slowly at a low angle and keep the strip close to the surface to reduce stress on the paint.
Proper Surface Preparation
When you’re preparing a surface for painting, clean, dry, and stable conditions make the biggest difference in how well tape sticks and peels cleanly. Remove dust, grease, and loose paint with a mild detergent and a soft scrub, then dry the area completely.
Follow this checklist to guarantee surface cleanliness and correct tape application:
- Vacuum or wipe dust
- Degrease spots
- Sand flaky paint
- Prime repaired areas
Gentle Removal Technique
Apply tape with care to make removal easy and protect the paint underneath.
Press edges lightly, avoid stretching, and smooth from center outward to prevent lifting.
Remove slowly at a low angle, pulling back over itself while supporting the wall with your other hand.
Use gentle techniques and consider tape alternatives like painter’s tape or low-tack adhesive for fragile or newly painted surfaces.
Tape Tension and Removal Angle: Best Practices
If you keep tape too tight or pull it at the wrong angle, you’ll increase the chance of lifting paint or leaving adhesive residue.
Keeping tape too tight or pulled at the wrong angle raises risk of paint lifting and sticky residue.
You should control tape tension and adjust removal angle for minimal damage. Follow these steps:
- Peel slowly, low tape tension.
- Lift at a shallow removal angle (close to the wall).
- Keep steady, even motion.
- Stop if paint peels.
How Long Is Too Long to Leave Duct Tape On?
You should be aware that duct tape’s adhesive gets stronger and more stubborn over time, increasing the risk of adhesive residue or paint lifting.
The type of paint—latex, oil, or a delicate finish—changes how long tape can safely stay in place.
Also consider heat, sunlight, and humidity, since environmental exposure accelerates adhesive bonding and can make removal more likely to damage paint.
Tape Adhesion Over Time
Because duct tape’s adhesive changes with temperature, surface, and time, knowing how long to leave it on matters—leave it too long and the glue can harden or migrate, making removal harder and increasing the risk of residue or surface damage.
You’ll monitor tape lifespan and adhesion quality; aim for short-term use.
- Inspect weekly
- Remove within 2–4 weeks when possible
- Warm gently before peeling
- Test a corner first
Paint Type Matters
Different paints react differently to long-term duct tape contact, so consider the coating before you decide how long to leave tape in place. You should check paint durability—flat and chalky finishes lift sooner, satin and semi-gloss resist more. Remove tape promptly to avoid tape residue and paint pull. Use low-tack tape for delicate surfaces and test a small area first.
| Paint Type | Risk |
|---|---|
| Flat | High |
| Eggshell | Moderate |
| Satin | Low |
| Semi-gloss | Low |
| Gloss | Low |
Environmental Exposure Effects
While indoor conditions matter, outdoor and fluctuating environments accelerate adhesive breakdown and paint damage.
So you should limit how long duct tape stays stuck to surfaces exposed to sun, moisture, or temperature swings.
Consider environmental impact and local weather conditions:
- Sun/UV: 1–2 days outdoors.
- Humidity: 24–72 hours.
- Cold/heat cycles: <48 hours.
- Wind/debris: remove immediately.
How to Remove Duct Tape With Minimal Paint Loss
If you act carefully and use the right tools, you can remove duct tape without taking paint with it.
Gently lift an edge, peel slowly at a low angle, and use proper tape removal techniques to reduce stress on the surface.
Match your approach to adhesive types and test a hidden spot first.
Clean residue with a mild solvent safe for your paint.
Soften Adhesive Before Removal: Methods That Work
Before you pull tape off painted surfaces, soften the adhesive to cut the chance of peeling.
You can warm the sticky area with a hairdryer, dab rubbing alcohol to break the bond, or apply a small amount of an oil-based solvent to loosen residue.
Test your chosen method on an inconspicuous spot first so you don’t damage the finish.
Apply Heat With Hairdryer
Warm the tape with a hairdryer to soften the adhesive and make removal easier: aim the hot air at the edge for 30–60 seconds, keeping the dryer a few inches away to avoid overheating the paint.
Use heat application and a controlled hairdryer technique, then peel slowly.
Steps:
- Test a hidden spot.
- Warm evenly.
- Lift corner gently.
- Reheat if needed.
Use Rubbing Alcohol
Rubbing alcohol works well to soften tape adhesive so you can remove it cleanly; dab with a cloth, wait a minute, then lift gently to avoid paint removal. Test an inconspicuous spot first. If residue remains, repeat lightly.
| Step | Result |
|---|---|
| Dab | Softens adhesive |
| Wait | Bonds loosen |
| Lift | Tape peels |
| Repeat | Residue reduces |
| Inspect | Paint intact? |
Try Oil-Based Solvent
If alcohol doesn’t lift stubborn adhesive, try an oil-based solvent to soften the glue without scraping paint.
You’ll protect finish and ease tape removal by testing, applying gently, and wiping clean.
- Test on hidden spot.
- Apply with cloth, not brush.
- Let soak briefly.
- Wipe residue with mild detergent.
Choose gentle oil based solvents and avoid over-saturating.
Heat vs Cold: Which Helps When Pulling Tape Off?
Wondering whether heat or cold will make removing tape easier?
You’ll find heat usually softens adhesive strength, letting you peel tape slowly with less paint lift; use a hairdryer and steady pull.
Cold can firm adhesive, aiding brittle-break removal for very sticky residues but may crack paint.
Choose removal techniques based on tape age and paint type, test a small area first.
Handling Delicate or Freshly Painted Surfaces
If the paint is still curing, you shouldn’t stick duct tape to it because the adhesive can pull fresh film off the surface.
Check the paint manufacturer’s recommended cure time and wait that long before applying any tape.
When you must tape sooner, choose a low-tack product and test a small, inconspicuous spot to gauge adhesion strength.
Fresh Paint Timing
When you’ve just finished painting, give the surface enough time to cure before applying duct tape or moving items nearby; freshly laid paint can be soft for days and tape can lift or leave residue if applied too soon.
Consider:
- Wait recommended cure time.
- Test a hidden patch.
- Note fresh paint durability variations.
- Remember surface preparation impact on adhesion and risk.
Tape Adhesion Strength
Beyond timing, tape choice and how strongly it sticks matter a lot when you’re working near delicate or just-painted surfaces.
You should test adhesive properties on a hidden patch, since stronger tapes can lift curing paint. Consider low-tack options to minimize surface interaction; remove slowly at a shallow angle and warm the tape slightly if needed.
Always peel back toward itself, not away.
When You Should Avoid Duct Tape Entirely
Though duct tape feels like a cure-all, you shouldn’t use it on delicate paints, textiles, or freshly finished surfaces where adhesive residue or paint lifting would cause permanent damage.
You should avoid duct tape when:
- wall materials are soft, porous, or chalky
- wallpaper or murals exist
- vintage or fragile finishes are present
- temporary repairs risk lasting harm
Consider tape alternatives before proceeding.
Safer Temporary Alternatives to Duct Tape for Walls
If you need a temporary hold without risking paint or wallpaper, choose low-tack options designed for walls: painter’s tape, removable mounting strips, and paper masking tape give secure short-term adhesion and peel off cleanly when used correctly.
For temporary solutions, you’ll want wall protection and painter’s alternatives that offer easy removability, surface compatibility, minimal damage, and varied adhesive options like wall friendly tapes.
How to Secure Heavy Items Without Tape Damage
Painter’s tape and removable strips work great for light decorations, but for heavier items you’ll need stronger, non-damaging methods that don’t rely on tape alone.
Use mounting solutions and adhesive alternatives to protect paint. Consider:
Use mounting solutions and adhesive alternatives to protect painted walls and prevent damage from heavy items.
- Heavy item: studs or wall anchors
- Secure shelving with brackets and load distribution
- Furniture placement to reduce wall strain
- Wall protection with pads and bumpers
Fix Small Paint Lifts and Chips From Duct Tape
Small nicks and lifted paint from duct tape are annoying but usually easy to repair with a few simple steps you can do yourself.
Gently clean the area, sand loose edges, and use spackle or filler before priming. Match paint and feather strokes for a seamless finish.
Understanding adhesive properties helps prevent recurrence. These paint repair techniques restore appearance quickly and neatly.
Repair Larger Peeled Areas After Tape Removal
When tape rips away a larger patch of paint, you’ll need to treat it like a mini drywall repair rather than a simple touch-up: clean and assess the damage, remove any loose material, and create a stable edge for patching.
When tape pulls off paint, treat it as a mini drywall repair: clean, remove loose bits, and stabilize edges.
Use these repair techniques:
- Sand edges smooth.
- Apply joint compound.
- Prime the repaired area.
- Feather surrounding paint for easier paint matching.
Match Paint and Blend Touch-Ups Seamlessly
After you’ve repaired and primed any ripped areas, match the paint and blend touch-ups so your fixes disappear into the surrounding wall.
Test small swatches to confirm color matching under room light, then feather edges with a damp brush or sponge for seamless blending.
Use thin coats, let each dry fully, and step back frequently to guarantee the repair is invisible from normal viewing distance.
Prevent Future Damage When Rehanging or Mounting
If you plan to rehung or mount anything, take a moment to choose the right hardware and placement so you don’t repeat the same repairs.
Pick mounting techniques that match weight and wall type, and use adhesive pads or anchors for wall protection.
Consider:
- Studs
- Anchors
- Cleats
- Adhesive strips
Measure, level, and test load before finalizing.
Protect Vintage, Delicate, or Rental Walls
Protecting vintage, delicate, or rental walls means choosing low-impact hanging methods and being deliberate about placement so you won’t cause permanent damage while rehanging or mounting.
You should prefer adhesive hooks rated for painted surfaces, picture rails, or removable mounting putty.
For vintage wall protection and rental wall considerations, avoid duct tape, test adhesives discreetly, and document any existing flaws before installing.
Documenting and Testing Before Using Tape in Rentals
Because landlords often expect walls returned in original condition, you should document and test any tape on a small, inconspicuous patch before applying it more widely.
Note rental agreements, take photos, and record results. Follow documentation practices so disputes stay clear.
- Photo before
- Test 24–48h
- Note paint type
- Keep samples
How Professional Painters Handle Temporary Taping
When painters need clean, temporary edges, they choose tapes and techniques that minimize paint lift and residue; you’ll see them select low-tack or painter’s masking tape, apply it smoothly along trim, and remove it promptly at the right drying stage to avoid damage.
You’ll learn temporary solutions and painter methods: test tape on hidden spots, press edges firmly, avoid prolonged adhesion, and pull back low and slow.
Quick Checklist: Use Tape Safely and Avoid Paint Loss
If you want clean lines without peeling paint, follow a few simple tape rules:
- Test tape on an inconspicuous spot first.
- Use low-tack or painter’s tape; consider tape alternatives like adhesive putty.
- Remove tape slowly at a 45° angle within 24 hours.
- Protect edges with drop cloths for added wall protection.
Frequently Asked Questions
Can Duct Tape Residue Stain Light-Colored Paint Long-Term?
Yes — duct tape residue can stain light-colored paint long-term if you don’t remove it promptly. Depending on duct tape longevity and surface sensitivity, adhesive can darken or seep in, so test a small area first.
Will Duct Tape Remove Wallpaper Adhesive or Paper Backing?
Yes — but cautiously: duct tape can pull wallpaper backing yet often leaves adhesive behind. You’ll weaken adhesive strength a bit, but you’ll likely need solvent, heat, or a stripper to remove stubborn backing and residue fully.
Can Repeated Taping Cause Paint Color Fading or Discoloration?
Yes — repeated taping can cause fading or discoloration: you’ll damage finish with excessive tape adhesion, accelerating paint longevity loss, causing uneven color, adhesive residue, and weakened binder that makes patches look duller over time.
Does Duct Tape Damage Textured or Popcorn Ceilings Differently?
I’ve seen a popcorn ceiling peel like stale bread when taped; yes, duct tape can damage textured or popcorn ceilings differently. You’ll harm ceiling texture more where adhesive strength is high, so test, press lightly, peel slowly.
Are Removable Adhesive Hooks Safer Than Duct Tape for Hanging Art?
Yes — you’ll find removable adhesive hooks are safer than duct tape for hanging art: they offer controlled adhesive strength, are designed for better surface compatibility, and usually peel cleanly when you follow the manufacturer’s instructions.
Conclusion
So you want to slap duct tape on the wall and call it decorating—adorable. Sure, duct tape’s heroic for quick fixes, but it’s basically a tiny paint-stealing vigilante: it loves fresh, matte, or flaky finishes and will cheerfully peel off your landlord’s favorite color. Test a scrap, wait for paint to fully cure, or use painter’s tape. Or don’t—embrace the modern aesthetic of accidental patchwork and enjoy explaining it at your next dinner party.