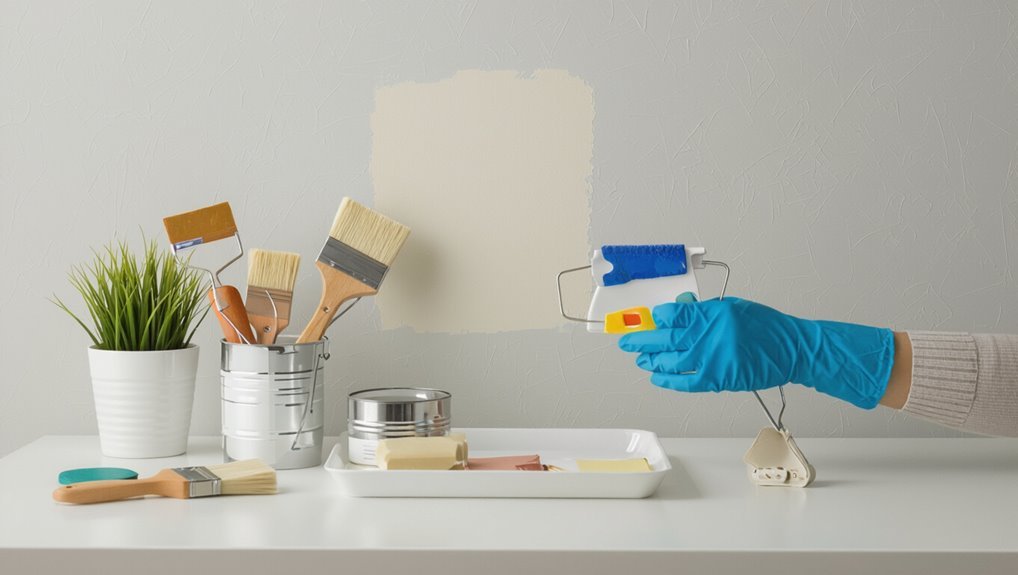
How to Remove Wall Paint Safely Without Damaging Surface
You can safely remove wall paint without harming the substrate by choosing the right method for your surface, working slowly in small sections, and using proper PPE and ventilation. Test for lead first and avoid DIY stripping if present. Soften paint with low heat or an appropriate chemical stripper, scrape gently at a 30–45° angle, or use wet sanding to reduce dust; repair and prime any damage before repainting. Keep going to learn specific techniques for drywall, plaster, and trim.
What Search Intent Does This Guide Serve?
Are you trying to strip paint for a renovation, remove a stain for resale, or learn safe techniques before tackling a weekend project?
You’re looking for practical, safe methods tailored to different surfaces. This guide matches common search behavior and anticipates user needs: clear steps, tool lists, and safety tips so you can choose an approach that protects the wall and your health.
Quick Answer: Safest Method To Remove Wall Paint (Summary)
While the absolute safest method depends on the paint type and wall surface, the best general approach is to soften the paint and remove it mechanically using heat or a chemical stripper designed for your situation, combined with proper PPE and ventilation.
You’ll prioritize surface preparation, test small areas, consider eco friendly methods where possible, and work slowly to avoid gouging or lingering residue.
Which Wall Surfaces And Finishes This Guide Covers
This guide covers the common surfaces you’ll encounter when removing wall paint: painted drywall, wood trim and moldings, and plaster or masonry.
You’ll learn which methods are safe for each material and when to use gentler approaches.
Follow the tips here to protect the surface and avoid damage.
Painted Drywall Surfaces
When you’re tackling painted drywall, know that this guide covers smooth, lightly textured, and common skim-coated finishes found in most homes and apartments. You’ll assess paint quality and follow surface preparation steps to avoid damage, using gentle stripping, sanding, or chemical methods appropriate for drywall.
| Finish Type | Common Issues | Best Approach |
|---|---|---|
| Smooth | Bonded paint | Gentle sanding |
| Light texture | Flaking | Soft scraping |
| Skim-coated | Thin coats | Test first |
Wood And Trim Finishes
Although wood trim and molding take paint differently than drywall, you’ll still use inspection and gentle techniques to avoid gouging grain or removing delicate profiles.
Test small areas, choose low-abrasion scrapers, and use chemical strippers suited for wood.
Follow wood finish techniques carefully, sand lightly with the grain, and apply recommended trim restoration tips to preserve profiles and original patina without overworking the surface.
Plaster And Masonry
If your walls are made of plaster or masonry, you’ll find they demand different removal methods than drywall or wood because they’re denser, more porous, and often have textured or lime-based finishes.
You should choose gentle stripper formulas, test small areas, use soft scrapers and nylon brushes, and follow plaster care and masonry techniques to avoid gouging, moisture damage, or disrupting historic surfaces.
How To Decide Whether To Strip Paint Or Paint Over It
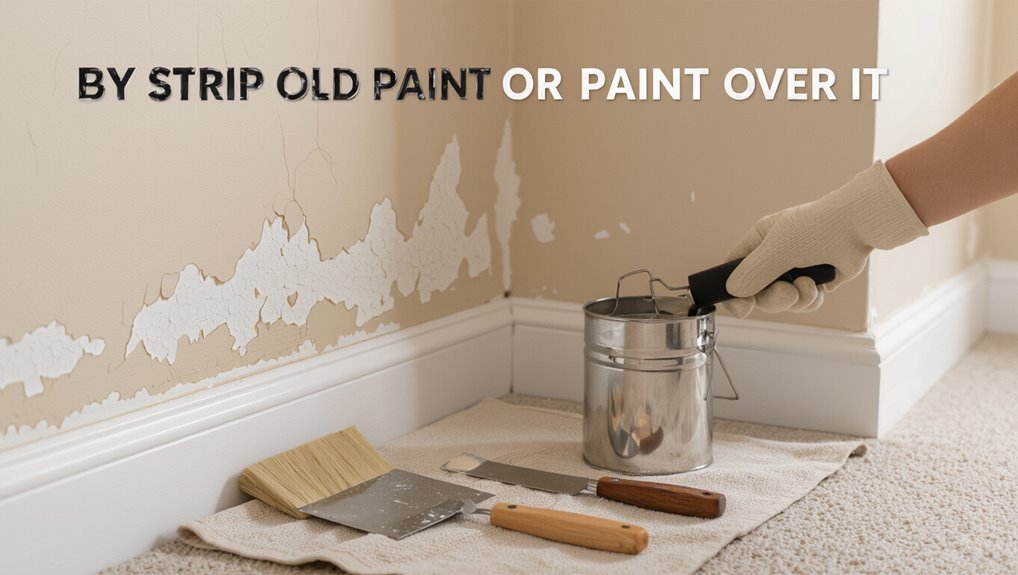
Because the choice affects cost, health, and finish quality, you should weigh several practical factors before deciding to strip paint or paint over it. Do a Surface Assessment, consider Paint Stripping Techniques, timing, budget, and desired finish. If adhesion’s good and no hazards, you can paint over; if not, strip.
| Feel | Action |
|---|---|
| Relief | Paint over |
| Anxiety | Strip |
| Pride | Prep |
| Regret | Rush |
How To Check For Lead Paint And Why It Matters
Before you start removing paint, you should look for signs of lead paint—chipped layers, homes built before 1978, or unusually soft, powdery residue.
Use a certified test kit or hire a professional inspector to confirm lead, since DIY kits vary in accuracy.
That’s important because lead hazards carry health risks and often trigger specific legal disclosure and abatement rules you’ll need to follow.
Recognize Lead Paint Signs
When you’re preparing to strip paint, knowing how to spot lead-based coatings can keep you and your family safe.
Lead paint often shows telltale signs like chalky surfaces, multiple layers from repainting over decades, or a distinctive metallic sheen on older finishes.
Use lead paint identification to choose safe removal techniques.
- Cracked or peeling paint
- Multiple old layers
- Dull, chalky texture
- Metallic shimmer
Test Kits And Methods
How can you be sure paint contains lead? Use reliable test kit options—swab kits for quick checks or lab-sent samples for confirmation.
Follow manufacturers’ instructions, work outdoors or in well-ventilated spaces, wear gloves and a respirator, and contain dust.
If tests indicate lead, choose safe methods for removal or encapsulation and consult professionals for guidance to protect occupants and surfaces.
Risks And Legal Requirements
Because lead paint can cause serious health problems—especially for young children and pregnant people, you need to know both the hazards and the rules that govern testing and removal.
You’ll do a risk assessment, follow regulations to avoid legal liabilities, and hire certified contractors when needed.
- Test certified labs
- Inspect painted surfaces
- Document findings
- Follow disposal rules
When To Call A Professional For Paint Removal
If the paint job involves lead, extensive damage, or complex surfaces, call a professional rather than tackling it yourself.
You should also hire help if you lack experience, time, or safe containment options.
Professionals bring professional expertise and proven paint removal techniques, reducing risk to your structure and health.
Get written estimates, verify licensing, and ask about cleanup and disposal plans.
Tools And PPE You Need Before Starting

Now that you’ve decided whether to call in a pro, gear up properly before you start removing paint.
Decide if you need a pro, then suit up with the right safety gear before stripping paint.
You’ll need basic safety gear and prep tools to protect yourself and the surface. Gather items that suit the job size and paint type.
- Respirator mask and goggles
- Nitrile gloves and coveralls
- Scrapers, sandpaper, heat gun or chemical remover
- Drop cloths and painter’s tape
How To Prepare The Room For Safe Paint Removal
Before you begin, clear the room and create a contained work zone: remove furniture and wall hangings, unplug electronics, and cover floors and immovable items with heavy-duty drop cloths; seal doorways and vents with plastic sheeting and painter’s tape to keep dust and fumes from spreading.
Then check ventilation and lighting, set a neutral room atmosphere, post warning signs, and follow safety measures like respirators and gloves.
How To Protect Floors, Trim, And Fixtures From Damage
Before you start scraping or stripping, protect the work area by laying down heavy-duty dropcloths to catch paint chips and liquids.
Run painter’s tape along baseboards and trim to keep edges clean and prevent accidental gouges.
Remove or cover fixtures and hardware with plastic and tape so they stay undamaged during the process.
Protect Floors With Dropcloths
Start by covering the floor with a durable drop cloth so paint drips and splatters don’t stain surfaces or create a slipping hazard.
Choose proper drop cloth types for the job and secure edges for reliable floor protection. Move furniture off or elevate pieces, and keep walkways clear.
- Canvas
- Plastic sheeting
- Craft paper
- Reusable protective mats
Cover Trim With Painter’s Tape
With the floor protected, focus next on covering trim and fixtures with painter’s tape to keep clean, crisp lines and prevent accidental damage. You’ll use precise tape application techniques, press edges firmly, and choose low-adhesive tape for delicate surfaces. Painter’s tape benefits include easy removal and neat paint edges.
| Area | Tape tip |
|---|---|
| Baseboards | Press edge |
| Window trim | Low-adhesive |
| Door frames | Overlap ends |
| Corners | Fold for angle |
| Switch plates | Cut carefully |
Shield Fixtures And Hardware
1 simple set of precautions will keep your fixtures and hardware safe while you strip paint: cover exposed surfaces with drop cloths or plastic sheeting, secure them with low-adhesive tape, and remove small hardware like doorknobs and switch plates when possible.
Use fixture protection and hardware safeguarding to prevent scratches and solvent damage.
- Tape edges tightly
- Pad large fixtures
- Bag electronics
- Store removed parts safely
How To Test A Small Patch Safely Before Full Removal
Before removing paint from a whole wall, test a small patch to confirm your chosen method works and won’t damage the substrate. You’ll try different test methods, record results, and do a patch assessment before proceeding. Use this simple log:
| Step | Result |
|---|---|
| Method A | OK/Fail |
| Method B | OK/Fail |
| Notes | Surface reaction, adhesion, finish |
Chemical Paint Strippers: How They Work And Safety Rules
Many chemical paint strippers work by breaking the bond between paint and the wall, softening or dissolving the coating so you can scrape it away; you’ll choose between caustic, solvent-based, and soy- or citrus-derived formulas depending on paint type and substrate.
You should understand chemical interactions, ventilation needs, PPE, and environmental impact. Follow label directions, test small areas, and dispose of waste properly.
- Read label
- Wear PPE
- Ventilate well
- Neutralize and dispose
Choosing The Right Chemical Stripper For Your Wall Type
Now that you know how chemical strippers work and the safety basics, pick a product that matches your wall’s material and the paint’s age and composition.
Check chemical properties for substrate compatibility, dryness tolerance, and toxicity. Use product comparisons to weigh effectiveness versus surface sensitivity.
For plaster, masonry, or painted wood, choose a low-odor, noncaustic stripper and test a hidden spot first.
Applying Solvent Strippers Safely On Drywall
Start by confirming the drywall is completely dry and free of dust or loose texture. Then work in small sections so you can control dwell time and avoid over-saturation.
Ensure drywall is fully dry and dust-free, then treat in small sections to control dwell time and prevent over-saturation.
Use proper PPE, ventilate, and test a hidden spot. Consider solvent alternatives if fumes or damage risk rise.
- Wear gloves and respirator
- Ventilate well
- Patch-test first
- Neutralize residues
Using Caustic (Sodium Hydroxide) Strippers Safely On Wood Trim
If you used solvent strippers on drywall, switching to caustic (sodium hydroxide) strippers for wood trim requires a different approach because lye reacts strongly with wood fibers and finishes.
Wear goggles, gloves, and respirator; neutralize with vinegar solution; test a hidden area; work slowly with plastic scrapers; rinse thoroughly.
Prioritize caustic safety and wood preservation to avoid scorching, swelling, or finish loss.
Using Eco‑Friendly And Citrus‑Based Strippers On Painted Walls
You can choose from gel, paste, or solvent citrus strippers depending on how thick the paint is and how vertical the wall will be.
Apply a thin, even coat, let the recommended dwell time soften the paint, then scrape gently with a plastic or putty knife to avoid gouging the surface.
Finish by rinsing or wiping residue with a mild detergent solution and disposing of waste per local guidelines.
Choosing Citrus Stripper Types
When you want a greener alternative, citrus-based strippers offer effective paint removal with far less harsh chemistry than traditional methylene chloride products.
They use d-limonene or other plant-derived solvents that break down paint while minimizing toxic fumes and environmental impact.
- Compare citrus benefits and solvent strength.
- Check VOC levels for eco friendly options.
- Match stripper viscosity to surface verticality.
- Verify compatibility with underlying finishes and substrates.
Application And Removal Techniques
1 practical approach to applying eco-friendly, citrus-based strippers is to work in small, manageable sections so you can control dwell time and removal without letting the solvent dry out; wear gloves and eye protection, keep the room ventilated, and test a hidden corner to confirm the product won’t harm the substrate or underlying finish. You’ll scrape gently, wipe residues, and rinse for Surface Safety and effective Paint Removal Techniques.
| Step | Action | Result |
|---|---|---|
| 1 | Test | Safe substrate |
| 2 | Apply | Controlled dwell |
| 3 | Remove | Clean surface |
| 4 | Rinse | No residue |
Using Heat Guns To Remove Paint Without Gouging Plaster
Aim the heat gun steadily and keep it moving to soften paint without scorching or lifting the plaster beneath.
You’ll control heat application, angle, and distance, use a scraper gently, and monitor plaster temperature to avoid damage.
Prioritize surface protection with drop cloths and low heat settings.
Follow safe ventilation and PPE practices.
- Maintain motion
- Test small area
- Use low heat
- Protect surface
Infrared Paint Removers: When To Prefer Them Over Heat Guns
If you’re working on delicate plaster or want to minimize surface damage, consider an infrared paint remover over a heat gun because it heats paint more gently and evenly.
You’ll also save time on large, multiple-layer projects since infrared penetrates and softens layers faster without blazing hot air.
Keep in mind safety: follow manufacturer instructions, wear eye and respiratory protection, and use in a well-ventilated area.
When To Use
When you’re stripping paint from delicate surfaces, intricate trim, or layers that you don’t want to scorch, choose an infrared paint remover—it heats the paint evenly beneath the surface, softening multiple layers without the high surface temperatures of a heat gun.
Use it when to strip for paint longevity, and when you need control and minimal surface risk.
- Detailed trim
- Multiple layers
- Fragile substrates
- Near finishes
Safety And Surface
Because infrared units heat paint below the surface rather than blasting the top layer, they cut the risk of scorching wood, warping trim, or damaging nearby finishes—you’ll accordingly preserve the substrate and surrounding surfaces while still loosening multiple paint layers for safe removal.
Before use, perform a surface evaluation, plan safety precautions like ventilation and PPE, and test a small area so you can proceed without harming the substrate.
Speed And Efficiency
Choose infrared when you need steady, predictable loosening of multiple paint layers without constant scraping—it warms the substrate through the paint so you spend less time managing bubbling and charring than you’d with a heat gun.
You’ll boost speed strategies and use efficiency techniques by planning passes, controlling dwell time, working sections, and pairing with gentle scrapers.
- Plan passes
- Control dwell time
- Work sections
- Pair scrapers
Manual Scraping: Best Scrapers And Blade Angles To Avoid Damage
Start with the right tool and you’ll avoid gouges, torn drywall paper, and extra sanding.
Choose scraper materials—stainless steel for durability, flexible plastic for delicate surfaces—and follow best practices: hold blade at 30–45° for paint lift, use light, controlled strokes, replace dull blades, and keep edges clean.
Test a small area first to confirm angle and pressure won’t damage the wall.
Wet Sanding Vs Dry Sanding: Which Is Safer For Walls?
Wondering whether wet or dry sanding will keep your walls safer? You’ll usually prefer wet sanding: wet sanding benefits include less dust, gentler abrasion, and reduced risk of over-sanding fragile plaster.
Dry sanding drawbacks are airborne dust, harder control, and higher chance of surface damage. Choose wet for delicate finishes; use proper grit and gentle strokes to protect paint edges and substrate.
- Less dust exposure
- Better control
- Gentler on plaster
- Easier cleanup
Using Abrasive Pads And Scrapers On Plaster Without Pitting
One simple way to avoid pitting plaster is to work with the lightest pressure and the coarsest-but-not-too-coarse pad you can get away with; that means starting with a fine abrasive or a flexible scraper and testing in an inconspicuous spot so you can feel how the surface responds. Use gentle Abrasive Techniques focused on Surface Preservation.
| Tool | Use |
|---|---|
| Fine pad | Light scuffing |
| Flexible scraper | Paint lift |
| Medium pad | Only if needed |
| Sponge | Finish cleanup |
Power Sanding: When It’s Appropriate And How To Prevent Swirl Marks
If light abrasives and flexible scrapers won’t remove stubborn layers without excessive effort, power sanding can speed the job—but only when the substrate can tolerate more aggressive action.
You should match sanding techniques to the surface and paint finishes, use progressive grits, keep the sander flat, and finish with a fine hand sand to eliminate swirl marks.
- Start coarse, then refine
- Test in inconspicuous spot
- Use dust extraction
- Maintain consistent pressure
Using Oscillating Multi‑Tools And Attachments Safely On Walls
When you need controlled precision in tight corners or to remove stubborn paint without damaging trim, an oscillating multi-tool and the right attachments give you speed and accuracy.
Choose scraper, carbide or sanding blade matched to paint and substrate. Work at low speed, keep blade flat, test small area, wear eye/respiratory protection, and use dust extraction.
Prioritize oscillating tools and wall safety.
Chemical Plus Mechanical Combos: Sequencing For Best Results And Safety
Start by prepping the area and protecting floors, trim, and vents so dust and chemicals stay contained.
Apply the chemical stripper and let it work according to the product instructions, then neutralize or wipe away residues as directed.
Finish by using gentle abrasion to remove softened paint, working from low- to high-pressure methods to avoid damage.
Prep And Protect
Combine chemical and mechanical methods in a planned sequence to make paint removal faster and safer:
Apply chemicals only after protecting surrounding surfaces and ventilating the area. Let them work per instructions, then follow with mechanical scraping or sanding using appropriate PPE and dust control.
Prepare surface preparation tools, mask and cover protective coatings, seal vents, and set up containment before you start.
- Clear area
- Mask vents
- Cover furniture
- Wear PPE
Chemical First, Then Abrade
Apply a chemical stripper first to soften the paint, then follow up by abrading—this sequence reduces labor and dust while letting you control exposure to fumes and particles. You’ll choose products mindful of chemical safety, ventilate, and test paint alternatives on scraps. Work gently to avoid surface damage and switch to hand sanding near edges.
| Step | Tip |
|---|---|
| 1 | Prep area |
| 2 | Apply stripper |
| 3 | Abrade gently |
| 4 | Clean up |
Removing Paint From Textured Walls Without Flattening Texture
When you need to remove paint from textured walls without flattening the finish, work deliberately and use gentle methods that preserve the surface profile.
You’ll rely on textured wall techniques and selective paint removal tools to lift coatings without sanding away peaks. Use soft scrapers, low-pressure chemical gels, nylon brushes, and careful spot testing.
- Soft scraper
- Low-pressure gel
- Nylon brush
- Spot test
Stripping Paint From Plaster Vs Drywall: Technique Differences
When stripping paint, you’ll notice plaster is harder and more brittle while drywall is softer and paper-faced, so you’ll need different pressure and tools.
Plaster tolerates more aggressive scraping but is less forgiving of moisture, whereas drywall swells and delaminates easily if it gets too wet.
Prepare and repair accordingly: score and patch plaster cracks differently than taped drywall seams before you finish.
Surface Hardness Differences
Because plaster and drywall wear differently, you’ll need to change your approach when stripping paint from each surface.
Consider surface hardness: plaster is tougher; drywall is softer and dents easily. Match tools and solvents to surface durability and paint compatibility to avoid gouges.
- Softer scrapers for drywall
- Stiffer blades for plaster
- Gentle chemical testers
- Light sanding first
Moisture Sensitivity Variance
Surface hardness affects tool choice, but you also have to account for moisture sensitivity: plaster tolerates water and steam far better than drywall, which swells and softens quickly.
You’ll choose gentler, low-moisture methods on drywall to limit moisture impact, preserving paper facings.
With plaster, you can use steam or damp scraping more aggressively because its surface durability resists short exposures without crumbling.
Preparation And Repair Needs
If you’re prepping plaster or drywall for paint removal, plan repairs before you strip so you don’t trap flaws under new finishes.
You’ll choose paint removal techniques and surface protection based on substrate—plaster needs gentle scraping and patching; drywall tolerates light sanding and joint compound.
Consider:
- Assess cracks and hollows
- Protect adjacent surfaces
- Pre-fill and sand repairs
- Choose compatible primers
Removing Paint From Brick, Masonry, And Concrete Safely
Masonry, brick, and concrete absorb paint differently than wood or drywall, so you’ll need methods that strip paint without damaging the substrate or mortar joints.
Use low-pressure washing, gentle chemical strippers formulated for masonry, and plastic scrapers to lift paint.
Test a small area, protect surrounding landscaping, and follow brick maintenance and masonry restoration best practices to preserve texture and mortar.
How To Remove Paint From Wood Paneling And Preserve Grain
Before you start, check the paneling for damage, rot, or veneer so you know how aggressive you can be.
Pick a gentle, wood-safe paint stripper or a heat gun on low to avoid sanding away the grain.
Work in small sections and use soft scrapers and a wood-friendly cleaner to lift paint while preserving the grain.
Assess Paneling Condition
When you’re ready to remove paint from wood paneling, start by evaluating the paneling’s condition to decide how aggressively to work and whether preserving the grain is feasible.
You’ll do a quick wall assessment to note damage, veneer wear, and finish type; that panel condition guides your approach.
- Check for rot or swelling
- Identify existing finish
- Spot cracks or holes
- Test adhesive layers
Choose Gentle Stripper
After evaluating the paneling, pick a chemical stripper that removes paint without etching the wood or obscuring the grain.
Choose low-VOC, water-based products and eco-friendly options to minimize damage and fumes.
Test a small area, follow label directions, and use proper PPE.
Consider stripper alternatives like gentle citrus or soy formulations if chemical strength threatens delicate veneers or finishes.
Preserve Wood Grain
1 simple rule will keep the grain intact: remove paint patiently and in stages, using the gentlest effective method you confirmed during testing.
You’ll prioritize wood grain preservation by choosing mild paint removal techniques, testing small areas, and avoiding aggressive sanding that flattens texture.
- Test stripper compatibility
- Soften paint gradually
- Use plastic scrapers
- Finish with light grain-following cleaning
Dealing With Multiple Old Paint Layers And Stubborn Enamel Finishes
Tackle multiple old paint layers and stubborn enamel finishes by evaluating adhesion and toxicity first: scrape a small area to see how many coats there are, test for lead if the home predates 1978, and pick tools and methods—mechanical, chemical, or heat—matched to the surface and paint condition. Use appropriate paint layering techniques and enamel removal methods.
| Tool | Use | Tip |
|---|---|---|
| Scraper | Remove loose coats | Hold shallow angle |
| Heat gun | Softens enamel | Keep moving |
| Chemical stripper | Dissolves layers | Ventilate |
| Sanding | Finish prep | Use dust control |
Removing Paint Around Trim, Baseboards, And Corners Cleanly
Working carefully around trim, baseboards, and corners makes the whole job look professional and prevents damage to adjacent surfaces.
You’ll use gentle trim techniques and precise corner strategies: score paint edges, use a thin putty knife, apply a heat gun cautiously, and pull with a flexible scraper.
Protect trim with painter’s tape and remove residue with a soft cloth and mild solvent.
Removing Paint From Ceilings Without Causing Sagging Or Cracks
After you’ve cleaned up edges and protected trim, move your attention upward—ceilings need a different approach to avoid sagging or cracking the underlying drywall or plaster.
Work small sections, use minimal moisture with a damp sponge or low-heat infrared remover, and support softened areas.
Keep strokes light, avoid heavy scraping, and monitor for ceiling sagging while practicing crack prevention by stopping at any loosened paint.
How To Avoid And Repair Common Removal Damage (Scrapes, Gouges, Tears)
When removing paint, take steps to prevent scrapes, gouges, and tears by matching your tools and technique to the surface: use putty knives with rounded tips, set scrapers at a low angle, apply even pressure, and keep blades sharp but small to avoid biting into drywall or plaster.
For damage prevention and efficient surface restoration, follow:
- Feather edges with sandpaper.
- Fill gouges with lightweight spackle.
- Smooth with a flexible putty knife.
- Prime repaired areas before repainting.
How To Neutralize Chemical Stripper Residues Before Repainting
Because chemical strippers leave alkaline or solvent residues that can interfere with primer adhesion and finish coats, you should neutralize and thoroughly rinse the surface before repainting.
Test for chemical residue effects with pH strips or solvent swabs.
Apply appropriate neutralization techniques—acid rinse for alkaline stripper, water or solvent rinse for solvents—then dry completely.
Repeat testing before priming.
How To Patch And Skim Surfaces After Paint Removal For A Smooth Finish
Begin by inspecting the stripped surface for gouges, nail holes, cracks, and uneven feather edges so you can plan the patching sequence and materials.
Begin by inspecting the stripped surface for gouges, nail holes, cracks, and uneven feather edges.
Use appropriate patch techniques, fill defects, sand flush, then apply a thin skim coating for uniform texture.
Follow this checklist:
- Clean and prep surface
- Apply patch compound
- Sand between layers
- Perform final skim coating and sanding
When To Prime: Choosing The Right Primer After Stripping Paint
Now that your surface is filled, sanded, and smooth, you’ll need to decide whether to prime and which primer will perform best.
Choose primer types based on substrate (drywall, plaster, bare wood, or previously painted surfaces) and any stains.
Follow proper application techniques—thin, even coats, correct drying times, and recommended tools—to guarantee adhesion and a uniform base for topcoat paint.
How To Dispose Of Paint Chips, Rags, And Stripper Waste Legally And Safely
You’ll need to treat paint chips, used rags, and chemical strippers as potentially hazardous and follow local hazardous waste rules for disposal.
Store materials in sealed, labeled containers and keep rags in a metal can with a tight lid to prevent unexpected combustion.
When transporting them, secure containers in your vehicle and take them to an approved household hazardous waste facility or licensed disposal service.
Proper Hazardous Waste Disposal
Because paint chips, solvent-soaked rags, and stripper residues can contain toxic heavy metals and volatile chemicals, you need to treat them as hazardous waste and dispose of them according to local regulations.
Follow rules to minimize environmental impact and legal risk.
Do:
- Use designated hazardous waste drop-offs.
- Label containers clearly.
- Don’t mix wastes.
- Ask local environmental agency for guidance.
Safe Storage And Transport
1 simple system will keep hazardous paint chips, solvent-soaked rags, and stripper residues from becoming a safety or legal problem: store them separately in clearly labeled, sealed containers and move them promptly to an approved disposal facility.
Use sturdy storage containers, absorbent liners, and tamper-proof lids.
Secure items during transport methods that prevent spills, follow local rules, and hand waste to certified handlers.
Keep Air Safe: Ventilating During And After Paint Removal
When removing paint, keep windows and doors open and run fans to create steady airflow so dust and fumes are carried out of the room; use a box fan in a window facing outward and an intake vent or open door on the opposite side to establish cross-ventilation.
You’ll protect air quality with these ventilation tips:
- Run exhaust fan continuously.
- Create cross-breeze paths.
- Use HEPA air purifier.
- Ventilate for several hours afterward.
Personal Safety: PPE Checklist For Chemical, Heat, And Sanding Methods
Before you start removing paint, make sure you’ve got the right PPE for chemicals, heat, and dust.
Wear chemical-resistant gloves and goggles when using strippers, and use a respirator and heat-resistant gloves for heat guns.
For sanding, wear a fitted N95 or P100 respirator, eye protection, and coveralls to keep dust off your skin and clothes.
Chemical Handling PPE
Although chemical stripping can speed the job, it also raises risks you need to control, so wear proper PPE every time you handle solvents, heat, or abrasive materials.
You’ll follow chemical safety and use personal protective gear to prevent exposure.
Essentials:
- Nitrile gloves and chemical-resistant sleeves
- Chemical splash goggles and face shield
- Respirator with organic vapor cartridges
- Chemical-resistant apron and boots
Heat And Dust Protection
Chemical strippers and solvents pose clear chemical hazards, but heat tools and sanding bring their own risks—burns, airborne dust, and fine particulate that can harm lungs and eyes.
You’ll wear heat-resistant gloves and a face shield near heat sources, and use N95 or P100 respirators for sanding.
Employ dust containment—plastic sheeting, negative air or vacuums with HEPA filters—to protect yourself and surroundings.
Time‑Saving Tips For Large Rooms And Whole‑House Projects
When you’re tackling large rooms or a whole house, plan and batch tasks so you strip, prep, and paint in continuous zones rather than jumping room to room; this minimizes setup time, keeps tools organized, and helps you maintain consistent results.
Use efficient techniques and solid project planning to save hours.
Use smart techniques and thoughtful planning to cut hours from projects and get consistent, professional results.
- Zone work by area
- Gather tools once
- Use multi-head tools
- Schedule drying times
Cost Comparison: DIY Methods Vs Hiring Pros For Safe Removal
Cost is a major factor when deciding whether you’ll remove paint yourself or hire professionals, and the right choice depends on the scale of work, the hazards present (like lead), and the equipment you’ll need. Balance DIY Tools costs against labor and safety. If risks or time are high, Professional Services often justify expense.
| Option | Typical Cost |
|---|---|
| DIY Tools | Low–moderate |
| Rental | Moderate |
| Pros | Higher, includes safety |
Eco‑Conscious Choices: Low‑VOC Products And Green Disposal Options
When you’re ready to repaint, choose low‑VOC or water‑based paints to cut fumes and health risks during and after removal.
Look for certified labels and ask your supplier for safer alternatives that still offer good coverage.
For old paint waste, follow local hazardous‑waste guidelines or use community take‑back programs to prevent contamination.
Low‑VOC Paint Options
Because you’re aiming to limit toxins and indoor odors, choosing low‑VOC paints is one of the simplest eco‑conscious moves you can make during a repaint.
You’ll enjoy low VOC benefits like fresher air and safer drying. Consider eco friendly alternatives such as water‑based and plant‑derived paints.
Compare labels, certifications, and performance before buying.
- Water‑based acrylics
- Natural‑resin formulas
- Zero‑VOC tints
- Certified brands
Green Paint Disposal
If you’ve chosen low‑VOC or natural paints, don’t let disposal undo those benefits — proper handling keeps toxins out of landfills and waterways.
You should store leftovers sealed, dry small amounts for curbside trash per local paint disposal regulations, and take larger quantities to hazardous‑waste or recycling centers.
Consider eco friendly alternatives like refill programs, donated usable paint, and biodegradable cleaners to minimize impact.
Troubleshooting: Adhesion, Staining, Gouges, And Residue
Though frustrating, paint problems like poor adhesion, stubborn stains, gouges, and residue usually have clear causes you can diagnose and fix; you’ll save time and avoid rework by identifying whether the issue is surface contamination, improper prep, the wrong product, or physical damage.
Address common fixes:
- adhesion issues: sand, prime, or strip.
- stain removal: solvent or spot primer.
- gouge repair: fill, sand, feather.
- residue cleanup: detergent, alcohol, or deglosser.
How To Test That All Paint Residue Is Gone Before Repainting
Before you repaint, run a simple series of checks to make sure no paint residue remains that could ruin adhesion or finish.
Start with a visual surface inspection under bright light, then rub a white cloth with mild solvent over a small area to detect transfer.
Feel for roughness or tackiness. If anything shows, clean, sand lightly, and retest until the cloth and surface are clean.
How To Preserve Historic Finishes While Removing Unwanted Top Coats
You’ve checked for paint residue and are ready to work more carefully where historic finishes may lie beneath modern top coats.
Use gentle, reversible methods and consult conservation guides to respect historic preservation techniques and paint removal ethics.
- Test small, inconspicuous areas.
- Use mild solvents or poultices.
- Employ soft tools, avoid abrasion.
- Document layers before treatment.
Seasonal And Climate Considerations For Exterior Wall Paint Removal
When planning exterior paint removal, factor in seasonal temperature, humidity, and precipitation because they directly affect drying times, chemical efficacy, and substrate sensitivity.
You’ll get better results and fewer complications by scheduling work during moderate, dry conditions, avoiding extremes of heat, cold, or damp.
Consider climate impacts on adhesion, runoff, and curing; plan seasonal timing to protect surfaces and minimize environmental risk.
Step‑By‑Step Removal Checklist You Can Follow From Start To Finish
1 clear checklist will keep your paint-removal project organized and safe from prep through final cleanup: Follow steps that respect Eco friendly methods and, when relevant, Historical preservation.
- Assess surface and hazards.
- Protect surroundings and ventilate.
- Use gentle stripping and test patches.
- Clean, repair, and seal; document changes for records.
Recommended Resources And Products For Safe Wall Paint Removal
Tools and products make the difference between a safe, efficient paint-removal job and a messy, hazardous one, so choose materials that match your surface, safety needs, and environmental goals.
Pick a respirator, gloves, drop cloths, scraper set, and heat gun or chemical stripper labeled for your surface.
Look for eco friendly options and read product recommendations, reviews, and safety data sheets before buying.
Frequently Asked Questions
Can Paint Removal Release Mold or Fungal Spores Into the Air?
Yes — disturbing old paint can kick mold or fungal spores into the air like a shaken snow globe. You’ll want mold detection steps and air quality monitoring, and you should use containment, PPE, and HEPA filtration.
Will Removing Paint Affect Nearby Electrical Wiring or Outlets?
Yes — paint removal techniques can affect nearby wiring or outlets if you don’t follow electrical safety. You’ll avoid shocks or damage by shutting power, covering outlets, keeping tools dry, and working cautiously around sockets and switches.
How to Handle Paint Removal on Walls With Built‑In Insulation Panels?
You should test a small area, wear PPE for insulation safety, and protect panels with masking and lightweight sheeting; use gentle stripping methods, avoid saturating seams, and repair or reseal panel edges after paint removal.
Are There Insurance or Permit Requirements for Large Paint Stripping Projects?
Absolutely — you’ll want to check insurance policies and permit regulations immediately; big stripping jobs can trigger claims or fines, so you’ll contact your insurer, secure permits, document work, and keep crews compliant to avoid disaster.
Can Pets Be Safely Kept in the Home During Prolonged Paint Removal?
You shouldn’t keep pets inside during prolonged paint removal; you’ll risk their health. Prioritize pet safety by relocating animals, using strong indoor ventilation, sealing work areas, and consulting a vet before returning them home.
Conclusion
You’ve stripped, sanded, and checked every corner; now stand back and breathe in the clean, fresh air like a new room revealing its true colors. Let the smooth, faithful surface feel steady under your hand—proof of care and patience. Whether you kept a historic patina or removed stubborn layers, you’ve protected the wall and your home. Celebrate the calm, knowing your work gave the space a clearer, safer voice.