How to Paint Edge of Ceiling: Clean Lines Made Easy
You’ll get crisp ceiling edges by cutting in with a steady angled sash brush, painter’s tape, and good prep. Clean and repair the edge, protect floors and furniture, anchor the brush against the wall, and use short controlled strokes while working in small sections. Press tape edges firmly and remove slowly at a 45° angle. Keep humidity and temperature in mind for drying. Follow these simple steps and you’ll find tips for faster, cleaner results below.
Quick Answer: Cut the Ceiling Edge in 7 Steps
Start by gathering your tools: an angled brush, quality ceiling paint, a steady ladder, painter’s tape, and a small bucket of water for cleanup.
You’ll follow seven crisp steps tailored to ceiling texture and edge styles, choose paint finishes and trusted paint brands, balance color contrast with wall colors and lighting effects, account for room dimensions and ceiling heights, and honor current design trends.
Cut in the Ceiling: Step-by-Step (Beginners)
Before you start, gather the right tools and materials—angled brush, roller, painter’s tape, drop cloths, and a steady ladder.
I’ll walk you through the cutting technique steps so you can make a straight, clean line between ceiling and wall.
Follow each step slowly and keep a steady wrist for best results.
Tools And Materials
You’ll need a few specific tools and materials to cut in ceiling edges cleanly: a quality angled sash brush (2–2.5 inches), a steady hand-friendly trim brush if you prefer, painter’s tape, a small roller and tray for the main area, a drop cloth, a ladder or stable step stool, and the right paint—usually a flat or low-sheen ceiling paint.
- Brushes for crisp lines
- Tape for protection
- Roller for coverage
- Ladder for access
Choose appropriate paint types and match ceiling finishes to avoid sheen mismatch.
Cutting Technique Steps
Set up your ladder at a comfortable height, steady the drop cloth, and have your angled sash brush loaded with paint so you can work without interruption.
Start by anchoring the brush against the wall, use short, controlled strokes, and maintain a steady wrist.
Practice Cutting Techniques on scrap board, work in small sections, and prioritize Edge Precision for a crisp, professional finish.
Gather These Tools for Ceiling Edges
Before you start cutting in, gather the essential painting tools like a good angled brush, tray, and extension pole so you can work cleanly and comfortably.
Don’t forget preparation and protection items — drop cloths, painter’s tape, and a ladder or step stool — to keep surfaces and yourself safe.
With the right gear on hand, you’ll finish edges faster and with fewer mistakes.
Essential Painting Tools
A few reliable tools make cutting a clean line along ceiling edges much easier: a steady angled brush, an edger or mini-roller with a shield, a quality painter’s tape, a small extension pole, a sturdy ladder, and drop cloths to protect floors.
Choose brush types and paint selection wisely; consider surface preparation, edge techniques, color matching, maintenance tips, safety precautions, lighting setup, cost estimation, and common mistakes.
- Angled brush
- Edger/mini-roller
- Tape and pole
- Ladder and cloths
Preparation And Protection
While you gather tools for painting ceiling edges, make sure you have protective gear and surface coverings ready so you can work cleanly and safely.
Inspect surfaces for damage during your ceiling condition assessment, repair cracks, and sand gloss.
Choose drop cloths, painter’s tape, goggles, mask, and ladder.
Confirm paint type selection—flat or semi-gloss—and mix supplies before taping and priming.
Best Brushes for Cutting in a Ceiling Edge
Choosing the right brush makes cutting in a ceiling edge faster and gives you a crisp, professional line.
Choosing the right brush speeds cutting in and delivers a crisp, professional ceiling edge every time.
Pick a high-quality angled sash for control, a mini roller for even paint application, and a firm nylon/poly blend for walls near ceilings.
Match brush types to paint and texture for best results.
- Angled sash brush
- Mini roller
- Nylon/poly blend
- Slim trim brush
Choose the Right Painter’s Tape for Ceiling Lines
Tape matters when you want a sharp ceiling line—pick one rated for delicate surfaces if your ceiling has fresh paint or textured plaster, and use a medium-adhesion tape on standard drywall to prevent peeling when you remove it.
Choose the best painter’s tape for your surface, press edges firmly for clean tape application, and remove slowly at a 45° angle once paint is tacky but not fully cured.
Pick Paint and Sheen for Ceilings and Trim
What finish do you want for light reflection and durability?
Decide on ceiling color and trim contrast, then pick sheen types to match use.
Matte hides flaws; eggshell adds slight warmth; satin cleans easily on trim; semi-gloss resists scuffs where needed.
- Matte: disguises imperfections
- Eggshell: subtle sheen, forgiving
- Satin: easy to clean
- Semi-gloss: durable trim finish
Prep the Ceiling Edge: Cleaning and Masking
Before you start cutting in, you’ll want to clean the ceiling edge to remove dust, cobwebs, and grease so paint will stick.
Use a damp microfiber cloth or mild detergent for stubborn spots, then let the area dry completely.
Next, mask the junction with quality painter’s tape and a plastic drop cloth to protect walls and fixtures.
Surface Cleaning Tips
Start by wiping the ceiling edge with a damp microfiber cloth to remove dust, cobwebs, and loose paint chips; a clean surface helps tape and primer stick properly.
Use surface preparation techniques and mild cleaning solutions for best adhesion.
Then:
- Scrub grease spots gently
- Rinse residue thoroughly
- Dry completely before priming
- Inspect for flaking paint to sand
Masking Techniques
1. You’ll use masking tape and tape types smartly for edge alignment and edge protection. Prioritize surface preparation, then tape application with firm pressure to prevent paint bleed. Use masking strategies: press, seal, paint, and timed masking removal for paint durability. Stay precise.
| Step | Action | Tip |
|---|---|---|
| 1 | Clean | Use primer |
| 2 | Align | Measure |
| 3 | Apply | Seal edge |
| 4 | Paint | Light coats |
| 5 | Remove | Slow peel |
Repair Cracks and Seams Before Cutting In
Check the ceiling and corners closely for hairline cracks, gaps at seams, and any loose drywall tape so you can fix them before you cut in.
Inspect ceilings and corners for hairline cracks, seam gaps, and loose tape before cutting in.
You’ll prep with quick crack filling and seam smoothing to guarantee crisp lines.
Then:
- Remove loose tape
- Apply joint compound
- Feather edges for seamless blend
- Sand lightly and wipe clean
Protect Walls, Floors, and Fixtures First
Before you cut in, cover everything that shouldn’t get paint: tape plastic or drop cloths along walls, protect floors with canvas or rosin paper, and shield light fixtures, vents, and trim with painter’s tape and plastic. Use drop cloths for floor coverings, prioritize fixture safety and wall protection, organize workspace for room prep, prevent paint spills, and guarantee edge sealing.
| Task | Material | Tip |
|---|---|---|
| Floors | Canvas/rosin | Tape edges |
| Walls | Plastic/tape | Smooth seams |
| Fixtures | Plastic/tape | Remove covers |
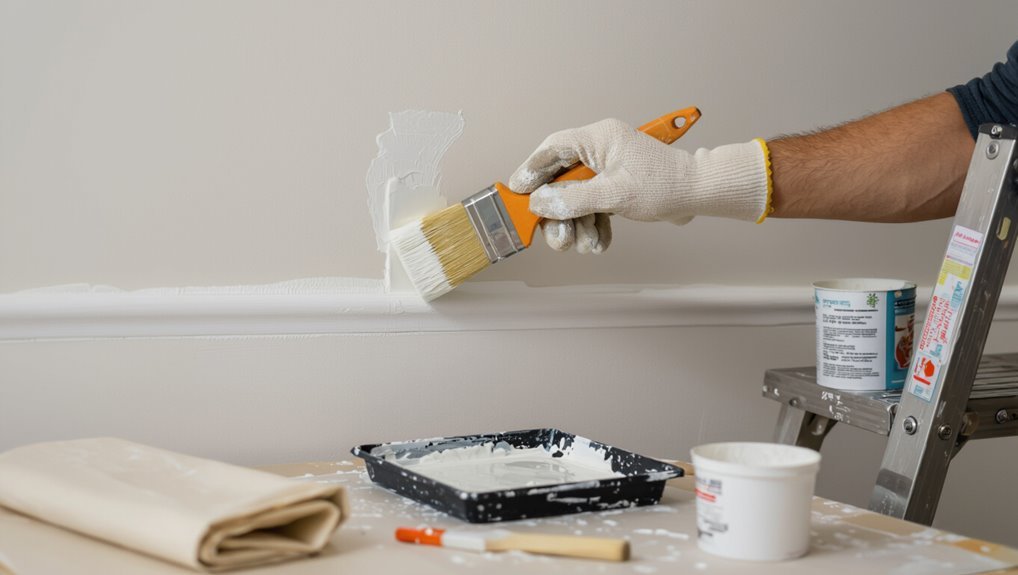
How to Hold and Angle Your Brush for a Straight Line
With your walls, floors, and fixtures protected, get ready to hold the brush so you can cut a clean, straight line along the ceiling.
Use a relaxed brush grip, steady wrist, and tiny angle adjustment as you move.
Tips:
- Anchor elbow to body
- Keep bristles half-loaded
- Maintain consistent tilt
- Pause, realign sightline
Brush Stroke Pressure and Stopping Points
Keep your pressure steady so the paint lays down evenly along the ceiling edge.
As you reach the end of a stroke, feather the brush lightly to blend the edge before you lift.
If you need to stop, pause, reposition, and restart with the same pressure to avoid visible seams.
Consistent Pressure Control
Mastering consistent pressure is key to clean, even ceiling edges—apply steady, controlled force with your brush so paint lays down uniformly and the edge stays sharp.
You’ll use proper brush technique and pressure consistency to avoid blobs and gaps. Practice these steps:
- Keep wrist relaxed and move smoothly
- Load brush sparingly
- Pause at natural joints
- Resume with same pressure
End-Point Feathering Technique
A light, controlled lift at each stroke’s end prevents a hard paint ridge and lets you blend the bead into the surrounding ceiling; practice ending with a gentle feathering motion so the bristles thin out the line instead of stopping abruptly.
You’ll use subtle feathering techniques and vary brush angles as you ease pressure, maintaining a steady tempo so each stop fades smoothly into the ceiling.
Pause And Reposition
Pause briefly at the end of each stroke and reposition your brush before starting the next pass so you control where paint builds up and where it fades.
You’ll adjust pressure to avoid ridges and preserve smooth shifts. Use these reminders for consistent painting techniques and better ceiling aesthetics:
- Lighten pressure near edges
- Pause at trim junctions
- Feather out overlaps
- Check from below for consistency
Using an Angled Sash Brush Effectively
When you want a clean, sharp line along the ceiling, an angled sash brush is the tool that gives you control and precision.
Hold the brush at a slight angle, load sparingly, and use smooth, steady strokes with angled brush techniques to cut in.
Wipe excess paint, reshape bristles, and clean immediately for proper brush maintenance so edges stay crisp.
Roller-and-Brush Combo: Speed Without Mess
Combine a roller and brush to speed up ceiling-edge painting without sacrificing neatness. You’ll use roller techniques for broad coverage and select brush types for crisp cutting-in.
Work systematically: roll near the edge, then quickly cut in with a steady hand. Keep a loaded brush, feather edges, and clean overlaps for seamless results.
Work methodically: roll close to the edge, then swiftly cut in with a loaded brush, feathering overlaps for a seamless finish.
- Prep surface
- Use light pressure
- Match nap to paint
- Maintain wet edge
Using a Paint Edger Tool for Ceilings
A paint edger lets you cut a clean line along ceiling edges faster than freehand cutting-in, so you can cover more area with less fatigue and fewer touch-ups.
Choose a quality pad, keep it evenly loaded, and work in short strokes. These paint edger advantages save time and reduce drips.
Follow simple paint edger tips: steady pressure, consistent angle, and immediate edge touch-ups.
Tape the Ceiling Edge to Prevent Paint Bleed
If you prefer extra protection beyond an edger, tape the ceiling edge to stop paint bleed and keep lines crisp.
You’ll prep surface, press tape firmly, and paint toward the tape. Proper tape application minimizes seepage; plan for careful tape removal later.
Follow these checks:
- Clean, dry surface
- Press edges with a putty knife
- Paint from ceiling to tape
- Score paint film before pulling
Remove Painter’s Tape Cleanly Every Time
1 simple step will save you touch-ups later: remove the painter’s tape while the paint is just dry to the touch, not fully cured.
You’ll peel slowly at a 45° angle, keeping tension low to avoid lifting.
Try different tape removal techniques based on painter’s tape brands and surface type.
If paint tacks, score the edge lightly before pulling to keep lines crisp.
Trim Guide and Shield Methods for Straight Lines
When you want razor‑sharp ceiling lines, start by choosing a trim that fits the corner and paint type.
Position the guide so its edge runs flush with the ceiling and hold it steady as you work.
Use shields and edging tools to block paint bleed—practice a few strokes to find the right angle and pressure.
Choosing The Right Trim
Although precise edges often come down to steady hands, the right trim tool—whether a simple painter’s tape, a long-edge trim guide, or a purpose-built shield—makes straight lines far easier to achieve.
You’ll consider trim styles, trim materials, trim finishes, trim durability, plus color contrast and trim compatibility.
Choose trim accessories that aid trim installation and simplify trim maintenance.
- Purpose
- Profile
- Material
- Finish
Positioning The Guide Correctly
Set your guide so its edge sits exactly where the ceiling meets the wall and lock it securely before you start cutting in; a loose or misaligned guide will give you just as crooked a line as painting freehand. Confirm guide alignment matches varying ceiling angles, steady pressure, and short strokes. Adjust for corners, then paint confidently.
| Tool | Tip | Purpose |
|---|---|---|
| Trim guide | Align edge | Straight line |
| Shield | Hold steady | Protect wall |
| Level | Verify | Match angles |
Shield Techniques And Tips
With your guide locked and aligned, bring a shield into play to protect the wall and give your hand a stable edge to paint against.
You’ll use shield techniques that boost edge precision and speed. Hold the shield flush, angle the brush slightly, and move steadily.
- steady pressure
- flush contact
- controlled strokes
- quick cleanup
When to Use a Laser or Chalk Line
If you want perfectly straight, consistent edges, use a laser or chalk line to guide your cutting in before you paint.
Choose laser alignment for long runs and uneven layouts; it stays visible and fast.
For long runs and uneven layouts, use a laser alignment — it’s fast, visible, and keeps lines straight.
Use a chalk line for quick, low-tech marks on short walls.
Mark lightly, snap straight, then cut in confidently—these guides save time and prevent wavy edges.
Feather Paint to Blend With the Ceiling
When you feather paint, you’re blending the new wall color into the ceiling so the cut line disappears; you’ll use light strokes, thin paint, and attention to ceiling texture to avoid harsh edges.
Practice feather blending on scrap, then:
- Load brush lightly
- Use short, soft strokes
- Match texture height
- Step back and inspect
You’ll create a seamless connection.
Fixing Paint Bleed Under Tape
A few careful steps can undo paint that’s seeped under your tape: peel the tape back slowly, score the edge with a utility knife, and wipe away any wet bleed with a damp cloth before it dries.
Check tape types and surface preparation, adjust paint consistency and brush angles, consider drying times and edge alignment.
Follow product recommendations and technique variations to prevent recurrence.
Correcting Wavy or Uneven Ceiling Lines
Now that you’ve handled bleed and tape issues, you’ll often find uneven or wavy ceiling lines are the next problem to fix.
Now that bleed and tape are fixed, next tackle uneven, wavy ceiling lines for a smooth, straight finish.
You’ll focus on Fixing unevenness and Smoothing shifts by Straightening edges, Enhancing corners, Blending colors, Repairing gaps, Addressing imperfections, and simple Refinishing techniques.
- Sand high spots
- Skim low areas
- Feather paint edges
- Use angled tool to straighten
Touching Up Small Mistakes at the Ceiling Edge
Someone will inevitably nick a line or miss a tiny spot as you work, so you’ll want quick, precise fixes that blend seamlessly with the surrounding paint. Use fine brush strokes, feather edges, and minimal paint for mistake correction. Try these touch up techniques:
| Tool | Action | Tip |
|---|---|---|
| Small brush | Light dabbing | Feather outward |
| Cotton swab | Clean edges | Less is more |
| Thin paint | Fill tiny gaps | Match sheen |
Matching New Paint to Your Existing Ceiling
Because lighting, sheen, and age change how paint looks, you’ll want to match color and finish before you roll or brush any new paint onto the ceiling.
Test samples on a small patch, observe at different times, and confirm sheen selection.
Consider these steps:
- Compare swatches under room lighting
- Use sample tins for testing
- Note ceiling texture effects
- Adjust formula with the supplier
Cutting In Around Crown Molding and Trim
When cutting in around crown molding and trim, pick a high-quality angled sash brush that fits the trim profile and holds paint well.
Use steady, controlled strokes and rest your hand on the wall or a tool to keep lines straight.
Practice a few passes and wipe excess paint from the brush between strokes to maintain a clean edge.
Choosing The Right Brush
Picking the right brush makes cutting in around crown molding and trim far easier and gives you cleaner lines. You’ll choose based on brush types, bristle materials, brush sizes and handle shapes.
Consider painting techniques and brush care to preserve performance. Match stroke patterns to edge styling for consistent results.
- Angled sash brushes
- Synthetic vs natural
- Narrow vs wide
- Short vs long handles
Technique For Clean Lines
Though cutting in around crown molding and trim looks fussy, you can get crisp, professional lines by using steady, deliberate strokes and the right amount of paint on your brush.
You’ll apply precision techniques: maintain edge alignment with painter’s focus, master brush control, use visual aids, keep workspace organization, enhance edge visibility, guarantee smooth shifts, check color matching, and practice subtle gradient blending for flawless trim.
Cutting In Around Light Fixtures and Vents
Start by turning off power to the fixtures and removing any detachable covers so you’ve got clear access to the junction box and surrounding ceiling.
Turn off power and remove covers for clear access to the junction box and surrounding ceiling.
You’ll do light fixture prep and vent cleaning before cutting in. Use angling and steady hands to avoid drips.
- Remove covers and bulbs
- Clean vents and dust surrounds
- Mask sensitive areas
- Use a sharp angled brush
Painting High Ceilings Safely and Neatly
When you’re tackling high ceilings, prioritize a safe setup and steady technique so you can work efficiently without risking falls or uneven coverage. Use proper safety measures and check ladder stability.
Choose paint types suited to ceiling styles, and plan paint selection for color coordination.
Employ ergonomic techniques, set up lighting options, and maintain workspace organization to keep edges neat and reduce fatigue.
Use Extension Handles for Precise Ceiling Edging
After you’ve secured your ladder and chosen the right paint, attach an extension handle to your roller or brush to reach ceiling edges without overreaching.
You’ll gain extension handle benefits and use precision painting techniques for steady strokes.
- Extend reach safely
- Maintain steady pressure
- Improve edge consistency
- Reduce fatigue and repositioning
Avoiding Drips and Splatters While Cutting In
Before you start cutting in, prep the work area with drop cloths and tape so any drips are easy to catch and clean.
Use proper brush techniques—steady, angled strokes and a light wrist—to keep paint on the ceiling, not on the floor.
Control your paint load by wiping excess on the can or tray to prevent blobs and splatters.
Prep The Work Area
If you want to avoid drips and splatters while cutting in, clear the room and lay down protective coverings so paint only touches drop cloths and painter’s tape—not your floors or furniture.
Use cleaning techniques first, then focus on workspace organization to move freely and reduce mistakes.
- Tape edges firmly
- Fold cloths to catch spills
- Keep rags handy
- Protect light fixtures
Use Proper Brush Techniques
Start by loading your brush lightly and tapping off excess paint on the can’s rim so you don’t drench the bristles; hold the brush at a slight angle and use short, controlled strokes to lay down a steady bead of paint along the ceiling line, wiping any drips immediately with a rag.
Use varied brush angles for precision, watch paint consistency, and keep a clean rag to catch splatters.
Control Your Paint Load
Once you’ve got a steady bead along the ceiling, pay close attention to how much paint the brush or roller is holding — too much and you’ll get drips and splatters that ruin clean edges.
Control paint load by monitoring paint consistency and adjusting brush angles.
Tips:
- Wipe excess on tray edge
- Tap, don’t shake
- Thin stubborn paint
- Reload lightly and test
How to Prevent Lap Marks at the Edge
Because your edges get the most light and attention, preventing lap marks there matters more than on the rest of the ceiling.
Work wet edges, blend each pass into the previous one, and keep a consistent paint load for lap mark prevention.
Use a light touch with a short-nap roller or brush for edge smoothing, and reload before coverage thins to avoid visible overlaps.
Humidity, Temperature, and Drying Time Tips
After you’ve nailed technique for smooth edges, pay close attention to the room’s humidity and temperature since they directly affect drying time and film formation.
You’ll manage humidity effects and temperature influence to optimize drying time and paint adhesion.
Consider environmental factors and surface preparation details:
- Monitor moisture levels and weather conditions
- Adjust HVAC or fans
- Wait longer in high humidity
- Avoid painting in extreme temperatures
How Many Coats for a Clean Ceiling Edge
How many coats you need depends on the paint type, color change, and surface porosity. You’ll usually apply one primer plus one or two finish coats for good coverage. Focus on ceiling edge preparation and paint color selection to reduce coats. Use thin, even layers and inspect under good light between coats.
| Situation | Coats |
|---|---|
| Minimal change | 1–2 |
| Strong contrast | 2–3 |
| Porous surface | 2–3 |
Drop Cloths and Tarp Layout for Ceiling Work
Cover the floor and furniture with large drop cloths or plastic tarps before you start cutting in; you’ll protect surfaces and make cleanup far quicker.
Choose drop cloth types suited to mess and grip, plan tarp placement to cover walkways. Secure edges with low‑tack tape.
Pick drop cloths for mess and grip, plan tarp coverage for walkways, and secure edges with low‑tack tape.
- Canvas for durability
- Plastic for spill protection
- Paper for light jobs
- Layered overlap for seams
Cutting In Textured and Popcorn Ceilings
When working with textured or popcorn ceilings, you’ll need a gentler cutting‑in approach than with smooth ceilings to avoid tearing texture or creating visible hard lines; use a high‑quality angled brush, light pressure, and paint thinned slightly for better flow into crevices. Use textured ceiling techniques, accept popcorn ceiling challenges, and follow this quick reference:
| Tool | Tip | Result |
|---|---|---|
| Angled brush | Light strokes | Clean edge |
| Thinned paint | Fill crevices | Smooth look |
| Feathering | Blend | Invisible shift |
Painting Drywall Seams at the Ceiling Edge
Before you paint, prep the seam by cleaning any dust and removing loose tape or drywall paper.
Apply a thin layer of joint compound, embedding tape if needed, then add one or two feathered coats.
Once dry, sand smooth and feather the edges so the seam blends into the ceiling.
Prep The Seam
1 simple step you shouldn’t skip is prepping the seam where ceiling meets wall, because a smooth, crack-free joint keeps your paint job looking professional.
You’ll do basic ceiling preparation and seam cleaning before painting. Focus on these tasks:
- Remove loose tape and dust
- Sand rough edges lightly
- Wipe with a damp cloth
- Check for gaps to address next
Apply Joint Compound
Grab your taping knife and a small hawk and spread a thin, even layer of joint compound along the seam where the ceiling meets the wall, feathering the edges to blend smoothly into the surrounding drywall.
For joint compound application, work in short, controlled strokes, keeping pressure even.
Use smoothing techniques to remove ridges and guarantee a continuous, uniform surface ready for the next step.
Sand And Feather
Sand the dried joint compound with a fine-grit sanding block, working lightly so you remove high spots without digging into the feathered edges.
You’ll refine seams using proper sanding techniques and feathering methods to blend into the ceiling.
Focus on consistent pressure, clean dust, and inspection.
- Light, even strokes
- Soft-touch pressure
- Progressive grit change
- Wipe and recheck
Repainting Greasy Kitchen Ceilings (Prep + Primer)
Start by tackling grease and grime before you even think about paint: kitchen ceilings collect airborne oils that stop primer and paint from adhering, so you’ll need to degrease the surface thoroughly, rinse, and let it dry.
Scrub with a trisodium phosphate substitute, protect fixtures, repair ceiling texture imperfections, then apply a stain-blocking primer designed for kitchen grease to guarantee lasting adhesion and coverage.
Speed up Cutting-In With a Helper
When you work with a helper, cutting-in goes much faster because one person masks and paints the edge while the other rolls the field. This way, you keep a wet edge and avoid annoying touch-ups.
Use clear helper positioning and simple communication techniques to stay coordinated.
Position helpers clearly and use simple signals so you stay coordinated and efficient while cutting in.
- Assign roles
- Keep pace matched
- Pass tools safely
- Watch wet edge
Set Up Lighting to See the Edge Clearly
Position your lights so they hit the ceiling edge from behind you and along the wall to highlight any imperfections.
Choose bulbs that minimize harsh shadows—soft, diffused LEDs work best. That way you’ll see the true line as you cut in and avoid missed spots.
Position Lights Strategically
Good lighting makes the difference between a crisp, straight line and a wobbly mess, so set up lamps or work lights to cast even illumination along the ceiling edge.
You’ll focus on light placement and ceiling brightness to reveal flaws. Position lights low and angled, avoid glare, and move them as you work:
- Angle toward the edge
- Keep lights low
- Reduce direct glare
- Adjust spacing
Use Shadow-Reducing Bulbs
Lighting setup is only half the battle; pick bulbs that cut shadows so the edge reads clearly as you work.
Choose bright, diffused bulbs with neutral color temperature to minimize harsh contrast.
You’ll experiment with positioning and shadow techniques—soft, even lighting reveals true edges.
Pay attention to lighting effects from fixtures and adjust angles so you see paint lines precisely without glare or false shadowing.
Prepare Wood Beams and Exposed Joists
Before you start painting, inspect each beam and joist for rot, insect damage, loose fasteners, or old finishes that’ll prevent adhesion.
Before painting, inspect every beam and joist for rot, pests, loose fasteners, or old finishes that block adhesion.
You’ll clean, sand, and apply wood treatment where needed, then plan beam finishing steps. Prep guarantees paint sticks and looks crisp.
- Remove dust and cobwebs
- Replace or tighten fasteners
- Sand glossy spots
- Apply primer or preservative
When to Use Masking vs. Freehand Cutting
Wondering whether to mask or cut in freehand? You’ll choose masking when surfaces are uneven, time’s short, or masking benefits like crisp edges and paint protection matter.
Go freehand for straight lines, low-traffic areas, or when you’re confident—use steady wrist, angled brush, and freehand tips like practice strokes and small sections.
Match method to edge complexity and your skill.
Pro Techniques You Can Copy (Tradesperson Tips)
Now you’ll pick up a few pro moves you can copy right away.
Focus on a sharp cutting-in technique, the right brush for your trim, and keeping steady, even pressure as you paint.
With those habits you’ll get cleaner edges and fewer touch-ups.
Sharp Cutting-In Technique
Cut a clean line every time by using the right brush, steady hand, and a simple cutting-in routine pros swear by.
You’ll master cutting techniques and paintbrush care with focused practice. Keep your wrist stable, load the brush correctly, and work in short sections.
- steady wrist
- light paint load
- feathered pressure
- immediate touch-ups
Proper Brush Selection
Choosing the right brush makes cutting-in easier and gives you crisper edges: pick a high-quality angled sash brush (2–2.5 inches for most ceilings) with flagged synthetic bristles for latex paint.
Keep a smaller 1–1.5 inch brush on hand for tight corners, and replace cheap brushes that splay or shed.
Assess brush types and bristle quality, and store brushes properly to maintain shape.
Consistent Paint Pressure
After you’ve picked and prepped the right brush, getting steady paint pressure is what separates a pro-looking cut-in from a ragged line.
You’ll learn paint pressure techniques and brush control tips to keep edges crisp. Practice these habits:
- Hold brush near ferrule for control
- Apply consistent, light pressure
- Use wrist, not arm, for small strokes
- Reload before dragging a dry edge
Train Yourself: Practice Drills for a Straight Line
Steady your hand by drilling simple, focused exercises before you touch the ceiling: tape a straight guide on the wall, load your brush with moderate paint, and practice dragging a smooth trim stroke along the edge until your wrist and elbow move as one.
Use stroke practice and practice drills to refine paint consistency, brush technique, pressure control, edge sharpening, tool handling, and line precision.
Troubleshoot Stubborn Edge Problems Fast
If paint keeps bleeding onto the ceiling, you’ll learn quick fixes to seal the gap and stop the spread.
For rough or uneven corners, we’ll show you how to smooth and feather edges so your line looks sharp.
Follow these troubleshooting steps and you’ll tackle most stubborn edge problems fast.
Fix Paint Bleed
Few things frustrate a DIYer more than paint bleeding under your tape or crooked lines at the ceiling edge, but you can fix most of these issues quickly by stopping the bleed, cleaning the edge, and re-cutting the line with the right tools.
Use these paint bleed solutions and improve tape application:
- Peel tape slowly
- Seal edge with drywall compound
- Re-cut with a sharp angled brush
- Touch up with thin coats
Smooth Uneven Corners
Once you’ve stopped paint bleed and re-cut the line, uneven or crumbling corners can still ruin a crisp ceiling edge.
But you can fix most stubborn corner issues quickly with a few targeted steps.
Sand jagged areas, apply lightweight spackle, and feather it into both surfaces.
Use corner smoothing techniques and slight angle adjustments with a flexible taping knife, then prime and repaint for a seamless finish.
Minimize Sanding After Painting the Edge
Aim for clean edges during painting so you won’t have to spend hours sanding afterward. You can prevent heavy sanding with careful technique and quick fixes.
Aim for clean edges while painting to avoid hours of sanding—use careful technique and quick fixes.
Use these sanding alternatives and edge smoothing tips to keep edges crisp:
- Wipe drips immediately with a damp cloth
- Use painter’s tape and press edges firmly
- Apply thin, even coats
- Smooth with a wet fingertip on tacky paint
Estimate Time and Cost for Cutting-In Jobs
Before you start cutting in, estimate how much time each room will take so you can schedule breaks and avoid rushed edges.
Tally the materials—tape, brushes, angled edgers, and drop cloths—and factor their cost into your budget.
That way you’ll know whether a DIY job saves money or if hiring a pro makes more sense.
Time Per Room
A typical cutting-in job for ceiling edges takes about 30–90 minutes per room depending on room size, detail, and how steady your hand is.
You’ll plan time management and room preparation to avoid delays.
Factors affect timing:
- Ceiling height and obstacles
- Trim complexity
- Paint drying pauses
- Your steady hand and experience
Materials And Costs
You’ll need just a few basic tools and materials to cut in ceiling edges efficiently, and knowing their typical costs helps you plan: choose material options that fit your budget; basic cost estimates below guide hourly expectations.
| Item | Typical Cost | Notes |
|---|---|---|
| Brush/Angled | $5–$20 | Precise control |
| Tape/Tooling | $3–$25 | Protects surfaces |
| Paint | $15–$40/gal | Finish choice impacts cost |
Protect Freshly Painted Edges While They Cure
While the paint’s tacky, take simple steps to keep edges pristine as they cure: block off the area with low-traffic tape, drape lightweight protective covers, and mark the zone so no one brushes past it.
You’ll respect curing time and guarantee paint protection. Use these precautions:
- Create a visible barrier
- Limit airflow and dust
- Keep traffic away
- Check gently after 24 hours
Maintain Brushes, Rollers, and Edgers After Use
Rinse brushes, rollers, and edgers immediately after use to prevent paint from hardening and shortening their life.
For brush maintenance and roller care, use proper rinsing with appropriate cleaning solvents and gentle cleaning methods.
Pat dry and apply bristle protection, follow a maintenance schedule for tool preservation, store with paint storage labels, organize for edger longevity, monitor brush lifespan and plan roller replacement.
How Often to Repaint Ceiling Edges for Upkeep
A good rule of thumb is to repaint ceiling edges every 5–7 years, though high-traffic rooms, kitchens, bathrooms, or areas with condensation may need touch-ups every 2–3 years.
You should set a clear repaint schedule based on wear and inspect annually for chips, stains, or mold to adjust ceiling maintenance frequency.
- Inspect annually
- Prioritize problem rooms
- Touch up small flaws
- Full repaint when faded
Safety Checklist for Ceiling-Edge Painting
Because you’ll be working overhead and on ladders, start by checking your ladder’s stability, clearing the work area of trip hazards, and making sure you’ve got proper eye and respiratory protection.
Also confirm good lighting and ventilation before you open any paint cans.
Wear appropriate safety gear, secure ladder stability on firm ground, keep tools within reach, use drop cloths, and have a phone nearby for emergencies.
When to Hire a Pro for Tricky Ceiling Edges
You’ve covered safety and prep, but some ceiling edges still demand more than careful DIY work.
Know when to contemplate hiring professionals for complex ceiling edge challenges:
- Intricate molding or historic trim that needs preservation
- High or awkward ceilings requiring scaffolding
- Visible structural damage or moisture stains
- Tight timelines or a flawless, professional finish you can’t risk
Quick Checklist: Tools, Steps, and Common Fixes
Before you start, gather the basic tools you’ll need—brushes, angled edger, painter’s tape, drop cloths, and a small roller.
Follow a simple step sequence: prep the edge, tape if needed, cut in with steady strokes, then roll the ceiling.
If you hit drips, feather them with a damp brush or lightly sand and touch up once dry.
Tools You’ll Need
Checklist: grab these essentials and you’ll save time and avoid most messes.
For proper ceiling edge preparation and clean lines, choose tools that fit the job and follow brush selection tips.
- angled sash brush (2–2.5″)
- mini roller with smooth nap
- painter’s tape and drop cloth
- step ladder and good lighting
Common Fixes Quick
1 quick run-through of common fixes will keep small problems from turning into big touch-ups: grab your angled sash brush and mini roller, have painter’s tape and a damp cloth ready, and keep a lightweight spackle or paintable caulk nearby for gaps, nail pops, and minor cracks.
You’ll spot common ceiling issues, clean edges, sand, apply spackle, prime, and use quick paint solutions for seamless results.
Frequently Asked Questions
Can Oil-Based Trim Paint Be Used on a Latex Ceiling Edge?
Yes — you can use oil-based trim paint on a latex ceiling edge if you properly scuff and prime for adhesion. You’ll get oil based advantages like durability and smoother finish, but check latex compatibility and cure times.
How to Handle Mold on the Ceiling Before Cutting In?
You’ll want to treat mold removal like fighting a tiny apocalypse: scrub with a bleach or hydrogen peroxide solution, dry thoroughly, repair or prime as needed, then proceed—your ceiling preparation prevents recurrence and guarantees paint adhesion.
Will Ceiling Paint Hide Nicotine or Heavy Staining Without Primer?
No, ceiling paint won’t reliably hide nicotine or heavy staining without primer; you’ll struggle with staining techniques and poor paint adhesion, so you should use a stain-blocking primer first to seal stains and guarantee even coverage.
Can You Paint Edge Lines With Wallpaper Installed up to the Ceiling?
Yes — you can. For example, a renovator used painter’s tape and a sharp blade to trim seams, combining wallpaper techniques with edge precision; you’ll tape, cut, and touch up paint carefully to avoid peeling or mess.
How Long Should Furniture Stay Away From Freshly Cut-In Edges?
Keep furniture placement at least 24–48 hours away from freshly cut-in edges; you’ll respect drying time and avoid smudges. For latex paint, wait 24 hours minimum; for oil-based, allow up to 48 hours before moving items.
Conclusion
You’ve got this—cutting a clean ceiling edge is all about the right prep, steady hand, and patience. Follow the steps, pick a quality angled brush and tape, and keep safety first; you’ll save time and headaches. If a corner’s giving you grief, don’t be afraid to call in a pro to tip the scales. With practice, crisp lines become second nature, and repainting stays quick and painless.