Can You Paint a Deck Over Stain? What You Should Know
Yes—you can paint a stained deck, but success depends on prep and stain type. You’ll need to clean thoroughly, sand glossy or peeling areas, identify whether the old stain is oil‑ or water‑based, and use a compatible primer so paint will stick. Make certain the wood’s dry and repair any damage first. With proper priming and thin even coats, a painted deck can last years. Keep going to learn tests, primers, and tips that boost durability.
What Search Intent Does This Guide Meet?
Wondering whether this guide matches your needs? You’re here because your search intent is practical: you want clear steps, risks, and outcomes for painting over stained decking.
This guide addresses user concerns like adhesion, prep, and durability so you can decide quickly. It’s focused on actionable info, not theory, helping you determine if painting over stain suits your situation.
Can You Paint a Deck Over Stain? Short Answer
Yes—you can paint over a stained deck, but success depends on the stain type and how well you prep the surface.
You’ll need to strip or scuff glossy or oil-based stains, clean and dry the wood, and use a suitable primer for proper adhesion.
With proper prep and the right products, the painted finish can last, though it may require more maintenance than stain.
Paint Over Stain?
Curious if you can paint over a stained deck? You can, but success hinges on stain compatibility and the look you want.
Painting can refresh deck aesthetics, hide uneven color, and change style. Oil-based stains often resist paint; some water-based finishes accept it.
Test a small area to confirm adhesion before committing to the whole deck.
Surface Prep Needed
Before you paint over stained wood, you’ll need to prep the surface so the paint will stick and last. You’ll do thorough surface cleaning to remove dirt, mildew, and loose finish.
Perform a stain assessment to know if the existing stain is oil- or water-based and how much remains. Sand glossy areas, repair damaged boards, and guarantee the deck is dry before priming and painting.
Long-Term Durability
If you’ve properly prepped the surface—cleaned, assessed the stain type, sanded glossy spots, and used the right primer—you can get several years of service from paint over stain; without those steps, though, peeling and flaking are likely within a season or two.
To maximize longevity, follow routine maintenance practices, address wear promptly, and schedule seasonal inspections to catch moisture, UV damage, or adhesion loss before repairs become extensive.
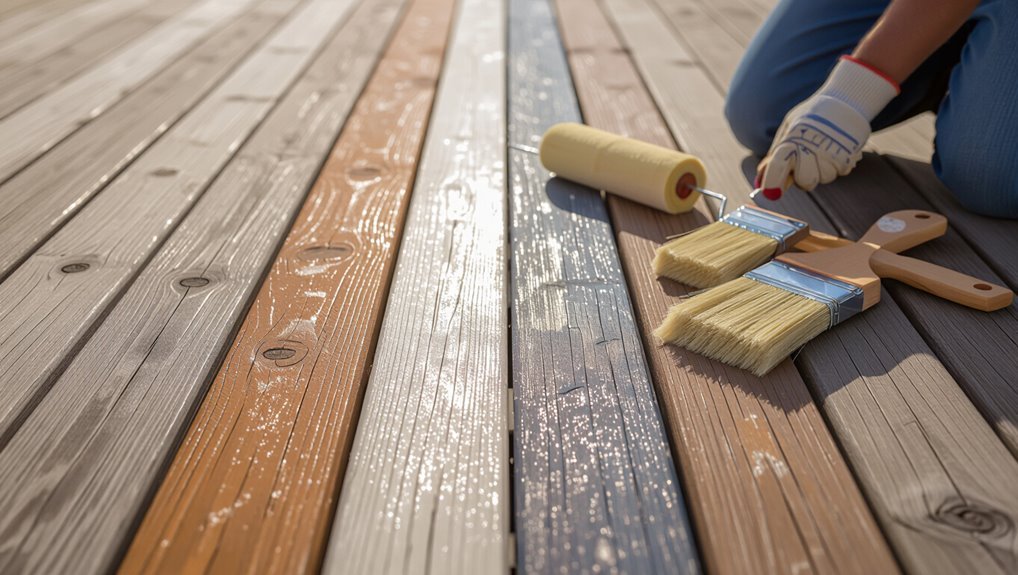
Quick Step‑by‑Step: Repaint a Stained Deck
Repainting a stained deck is straightforward when you break it into clear steps: clean, sand or strip where needed, prime or use a bonding primer, then apply paint and allow proper drying time between coats. You’ll improve deck aesthetics and pick color choices that suit your home. Follow the table checklist below.
| Step | Task | Tip |
|---|---|---|
| 1 | Clean | Use deck cleaner |
| 2 | Sand | Smooth rough spots |
| 3 | Prime | Bonding primer |
| 4 | Paint | Thin coats |
| 5 | Dry | Wait fully |
Identify Oil vs. Water‑Based Stain (3 Quick Tests)
Wondering whether your deck stain is oil- or water-based? Use three quick oil detection methods:
Rub a small area with mineral spirits—oil stains soften; with water—water beads on water-based stains; and test with denatured alcohol—water-based lifts more easily.
These stain identification techniques are simple, low-risk, and let you decide prep and product choices before painting or refinishing.
Why Oil and Water Stains Behave Differently
You’ll notice oil‑based stains often leave a surface residue while waterborne stains soak deeper into the wood.
That difference affects how well paint will stick, since surface residues can block adhesion and deep penetration can change how the wood accepts coatings.
Understanding those contrasts helps you choose the right prep method before painting.
Oil-Based Stain Residue
Because oil-based stains soak into the wood and leave oily residues behind, they behave very differently from water-based stains when you try to paint over them.
You’ll need thorough oil stain removal and to test stain compatibility before painting. Untreated residue repels paint.
- Degrease and clean with solvent
- Sand to remove surface oils
- Use a primer rated for oil-contaminated wood
Waterborne Stain Penetration
While waterborne stains soak into the wood’s pores rather than leaving oily films on the surface, they bond differently and usually allow paint to adhere more predictably.
You’ll notice greater stain absorption controls how deep pigments sit, affecting water resistance and drying time.
Prep focuses on removing loose pigment and checking for trapped moisture so paint won’t fail later.
Surface Adhesion Differences
If you’ve ever tried painting over an existing stain, you’ve likely noticed oil- and water-based stains grip the wood differently. Oil stains leave a thin, less-porous film and sit more on the surface, while waterborne stains penetrate fibers and bond within the grain.
You’ll face adhesion challenges based on surface textures and residue; prep changes accordingly.
- Sanding or scuffing oil stains
- Deep cleaning waterborne stains
- Using compatible primers
Test Adhesion: Is the Stain Still Bonded?
Want to know whether the stain will hold up under a new coat of paint? Do an adhesion testing routine: tape, pull, and scrape small areas to see if the stain peels or flakes.
For accurate stain evaluation, test multiple spots and note results. If the stain resists removal and stays bonded, you can proceed; if it fails, you’ll need to strip or sand first.
Check Deck Moisture (And Acceptable Limits)
Curious whether your deck is dry enough to accept paint? Check deck moisture with a moisture meter or simple probe; wood should be within acceptable limits before painting.
Wondering if your deck is dry enough for paint? Use a moisture meter or probe before coating.
If moisture’s too high, paint won’t adhere or may blister.
- Use a moisture meter for accurate readings
- Aim for manufacturer’s acceptable limits (often 12–15%)
- Test multiple boards and depths
When You Must Strip Stain Before Painting
If the stain is peeling or flaking, you’ll need to strip it so paint can grip the wood.
You should also strip if the deck was finished with an oil-based stain, since many latex paints won’t stick to oil without removal.
And if you’ve got severe mold or mildew that won’t scrub away, stripping is the safest option before repainting.
Peeling Or Flaking Finish
Several sections of a deck showing peeling or flaking finish mean you’ll need to strip the stain before painting.
You’ll remove loose film, clean residue, and assess wood damage.
Consider tested peeling solutions and flaking prevention steps so paint adheres properly.
- Mechanically strip loose finish
- Clean with a deck prep solution
- Repair and sand before priming
Oil-Based Stain Present
When a deck has an oil-based stain, you’ll usually need to strip it before painting because oil-based products repel waterborne primers and paints and prevent proper adhesion. You’ll recognize oil stain characteristics—deep penetration, glossy residue—and follow deck maintenance tips: strip thoroughly, clean, and sand. Restore confidence before priming.
| Feel | Action | Result |
|---|---|---|
| Frustration | Strip | Relief |
| Worry | Clean | Confidence |
| Doubt | Sand | Success |
Severe Mold Or Mildew
You might think cleaning will fix every deck problem, but heavy mold or mildew under a stain changes the game and forces you to strip before painting.
You’ll need full stain removal, targeted mold treatment, and drying before any primer. Strip to bare wood, treat spores, then repaint with mildew prevention finish.
- Strip and inspect
- Apply mold treatment
- Use mildew prevention paint
When Simple Scuffing and Cleaning Are Enough
If the stain on your deck is mostly intact and the surface just feels rough or dusty, simple scuffing and a thorough cleaning can be enough to prepare it for paint. You’ll use scuffing techniques like light sanding and cleaning methods such as deck detergent to guarantee adhesion. Check dryness, remove loose debris, then paint.
| Step | Action |
|---|---|
| 1 | Scuff lightly |
| 2 | Clean |
| 3 | Rinse |
| 4 | Dry |
| 5 | Inspect |
Prep Checklist: Tools, Cleaners, and Safety
Having prepped the surface, gather the right tools, cleaners, and safety gear before you pick up a brush.
Having prepped the surface, assemble the right tools, cleaners, and safety gear before you start painting or staining.
You’ll need reliable cleaning techniques, appropriate cleaners, and protective equipment to work efficiently and safely. Prepare materials so you won’t pause mid-job.
- Stiff brush, rollers, scraper
- Deck cleaner, mild detergent, stripper
- Gloves, goggles, respirator for safety gear
Step‑by‑Step Surface Prep for Painted Decks
Start by inspecting and evaluating the deck for loose boards, peeling stain, and areas that need repair.
Then clean and brighten the surface thoroughly so primer and paint will adhere.
Finally, prime any bare or stained spots before you apply the paint for an even, long‑lasting finish.
Inspect And Assess
Before you touch sandpaper or paint, take a careful walk around the deck and note every problem: loose boards, peeling stain, mildew, flaking paint, raised nails, and areas where water pools.
You’ll record issues affecting deck aesthetics and set maintenance frequency.
Prioritize structural fixes, note finish compatibility, and plan repairs.
- structural hazards
- finish problems
- drainage & pooling
Clean And Brighten
With the problem spots noted and repairs planned, you’ll next clean and brighten the deck so paint will stick and look uniform.
Sweep debris, apply a manufacturer‑recommended cleaning solution, scrub with a stiff brush, then rinse thoroughly.
Use oxygen bleach for mold or mildew.
Let wood dry fully.
These deck maintenance tips guarantee a clean, receptive surface without scarring fibers or leaving residue.
Prime And Paint
Once you’ve got a clean, dry deck and any repairs addressed, it’s time to prime and paint so your finish lasts and looks even.
Choose primer based on prime types (oil vs. latex), apply thin even coats, sand between coats, then finish with suitable paint finishes for decks.
Follow drying times and light traffic recommendations.
- Select primer
- Sand and clean
- Apply topcoat
Best Primers for Stained Wood (By Stain Type)
When you’re covering stained wood, choosing the right primer depends on the stain type and the condition of the surface; oil-based stains, latex stains, and gel stains each call for different adhesion and blocking properties. For stain compatibility and primer selection, pick blocking primers for oil, high-adhesion latex for water-based, and shellac or bonding primers for persistent bleed-through.
| Stain Type | Primer Type | Notes |
|---|---|---|
| Oil-based | Solvent-blocking | Stops tannins |
| Latex | Acrylic-bonding | Flexible |
| Gel | Shellac/bonding | Strong seal |
| Weathered | Etching primer | Improves grip |
Best Paints for Stained Decks (Deck Paint Guide)
Choosing the right paint for a stained deck can make the difference between a durable, slip-resistant surface and a finish that peels within a season.
So pick products designed for exterior foot traffic and stain compatibility. You’ll consider deck paint types and color selection for UV resistance, durability, and texture.
- Acrylic latex for flexibility
- Oil-modified for adhesion
- Anti-slip textured paint
Match Primer + Paint to Your Stain (Rules)
Because the wrong primer can ruin adhesion, you’ll match primer chemistry to the type of stain already on the deck.
Check stain compatibility: oil-based stains need oil- or alkyd-compatible primers, while water-based stains pair with acrylic primers after full cure.
Test adhesion with a small patch.
Prioritize primer selection that bonds to the stain and supports your chosen topcoat for durability and even coverage.
Handling Tricky Woods and Old Painted Areas
If your deck’s made of oily woods like teak or cedar, or if it has old paint peeling in spots, you’ll need to approach prep and product choice differently than for fresh, bare boards.
If your deck is oily wood or has peeling paint, adjust prep and products for proper adhesion.
You should test adhesion and consider cleaners or primers that match deck types and stain compatibility.
- Test a small area first
- Use oil-appropriate primer
- Confirm paint bonds to existing finish
Repair Blisters, Peeling, and Surface Defects
Before you paint, inspect the deck to identify what caused blisters—moisture, old finish, or poor adhesion—and note where paint is loose.
Scrape and sand away all peeling and flaking material until you reach a firm edge.
Finish by smoothing remaining surface imperfections so the new paint will bond evenly.
Identify Blister Causes
When you see blisters, peeling, or other surface defects on your deck, diagnosing the root cause is the first step to a lasting repair.
Look for causes that drive blister formation and promote moisture retention so you can address the source before refinishing.
- Trapped moisture under old stain or finish
- Poor ventilation or drainage
- Sun-heated solvents causing lift and bubbles
Remove Loose Peeling
Start by scraping and sanding away all loose, peeling, or blistered finish until you reach firmly adhered stain or bare wood; you’ll want clean, sound surfaces so new coatings can bond properly.
After debris removal, vacuum and wipe with a deck maintenance cleaner. Targeted stain removal prevents bleed-through.
Check for remaining loose fibers and repeat scraping; let wood dry fully before priming or repainting.
Smooth Surface Imperfections
If you find blisters, peeling, or other surface defects after removing loose finish, repair them so the new paint or stain lays down smoothly and lasts.
Use sanding and appropriate smoothing techniques, apply surface fillers where needed, and prime repaired areas before coating.
- Sand to feather edges and remove raised fibers
- Fill voids with compatible surface fillers
- Re-sand and clean before priming
Painting Technique for Even Coverage and Durability
Because old stain can repel paint, you’ll need to prep and apply coatings methodically to get even coverage and long-lasting results.
Start by cleaning and sanding, then use a spray technique for thin, uniform coats in tight spots.
Follow with roller application across boards for smooth texture.
Allow proper drying between coats, inspect for missed areas, and apply a final protective layer for durability.
Weather, Timing, and Curing: When to Paint
You’ll get the best results if you paint when temperatures stay within the paint’s recommended range—usually between about 50°F and 85°F—so it can level and bond properly.
Also check humidity and avoid rain for at least 24–48 hours after painting.
Finally, remember that full curing can take days to weeks, so keep foot traffic and furniture off the deck until the manufacturer’s curing time has passed.
Ideal Temperature Window
When planning to paint a stained deck, pick days when temperatures stay within the paint manufacturer’s recommended range—typically between 50°F and 85°F—so the finish can dry and cure properly without trapping moisture or becoming brittle.
You should monitor temperature considerations and seasonal timing to avoid rain, dew, or extreme swings.
- Paint during steady mild days
- Avoid early morning dew
- Skip windy, dusty conditions
Paint Curing Time
If you paint during cool, damp evenings or before an unexpected shower, the finish won’t cure properly and can stay tacky for days.
So plan your work around several dry, mild days in a row. Check weather forecasts, humidity, and temperature because environmental factors affect curing duration.
Allow full cure before heavy use—typically 24–72 hours for touch resistance, longer for full hardness depending on product and conditions.
Estimate Time and Cost to Paint Over Stain
Although painting over a stained deck can save time versus a full refinish, you’ll still need to budget for prep, materials, and drying periods.
Expect a weekend for a small deck and several days for larger or heavily stained surfaces. Use cost estimation and time management to plan.
- Prep: cleaning, sanding, repairs
- Materials: paint, primer, tools
- Schedule: weather windows, curing steps
How Long Will a Painted‑Over‑Stain Deck Last?
Because painted-over stain sits between the wood and finish, you can generally expect a lifespan shorter than a full refinish—typically 3 to 7 years depending on prep quality, climate exposure, and traffic.
You’ll extend deck longevity by ensuring good surface prep, choosing high-quality paint, and following maintenance tips like regular cleaning and touchups.
Plan inspections every season to catch wear early.
Common Causes of Peeling (And How to Avoid Them)
When paint on a deck starts to peel, it usually points to one or more preventable problems—poor adhesion, trapped moisture, or inadequate surface prep are the usual suspects.
When deck paint peels, it’s usually avoidable—most often poor adhesion, trapped moisture, or faulty surface prep.
You can prevent peeling by ensuring stain compatibility, drying fully, and preparing the deck properly. Follow these steps for peeling prevention:
- Confirm stain compatibility and clean thoroughly
- Allow full drying and moisture check
- Sand and prime surfaces before painting
Troubleshooting Bubbles, Flakes, and Adhesion Failures
Why is your deck surface bubbling, flaking, or refusing to hold paint? You’ll diagnose bubbling issues and flaking problems by checking moisture, old finish, and prep. Use adhesion techniques like sanding, primer, and proper drying. Follow concise troubleshooting tips to test small areas, fix adhesion, and prevent repeat failures.
| Mood | Action | Result |
|---|---|---|
| Frustration | Inspect | Repair |
| Relief | Sand | Bond |
Quick Decision Checklist: Paint Over Stain or Start Fresh
Ready to decide whether to paint over your deck stain or start fresh? Consider surface condition, stain types, and paint compatibility before committing.
If stain is oil-based or failed, strip. If it’s water-based and sound, you can paint after proper prep.
- Inspect adhesion and texture
- Match stain types to coating chemistry
- Budget time for stripping versus prepping
Frequently Asked Questions
Can I Paint a Stained Deck in Winter or Freezing Temperatures?
You shouldn’t paint a stained deck in winter or freezing temperatures; you’ll face poor adhesion and long curing times. Winter painting risks temperature effects like cracking, peeling, and trapped moisture, so wait for milder, consistent conditions.
Will Painted-Over Stain Increase Slipperiness When Wet?
Yes — painted stain can increase slipperiness when wet; studies show outdoor surfaces with smooth coatings raise slip risk by about 30%. You should prioritize deck safety, guarantee proper paint adhesion, and add anti-slip additives or texture.
How Does Painting Affect Deck Warranty or Homeowner Insurance?
Painting can void warranty implications if it covers manufacturer defects or alters finish; you should check terms. Insurance coverage usually isn’t affected, but notify your insurer since changes could affect claims or liability after alterations.
Can I Change Deck Color Drastically Without Stripping Stain?
Yes—you can change deck color drastically without fully stripping stain, but you’ll need aggressive stain removal techniques like sanding or chemical strippers in high-adhesion spots. Explore deck color options, primer, and high-build coatings for best results.
Are There Eco-Friendly Paint and Primer Options for Stained Decks?
Yes — you can choose low-VOC, plant-based paints and primers that use sustainable materials; you’ll want water-based formulations, proper surface prep, and roller/brush application techniques that guarantee even coverage and long-lasting adhesion.
Conclusion
You can paint over stain sometimes, but choose carefully. I once tried painting my weathered deck without stripping old oil stain; within two seasons the paint peeled like sunburned skin. Studies show painted decks over oil stains fail far sooner than cleaned, prepped surfaces. Treat the deck like skin: clean, sand, prime if needed, and pick compatible products. Do that, and your painted deck will age gracefully instead of flaking away.