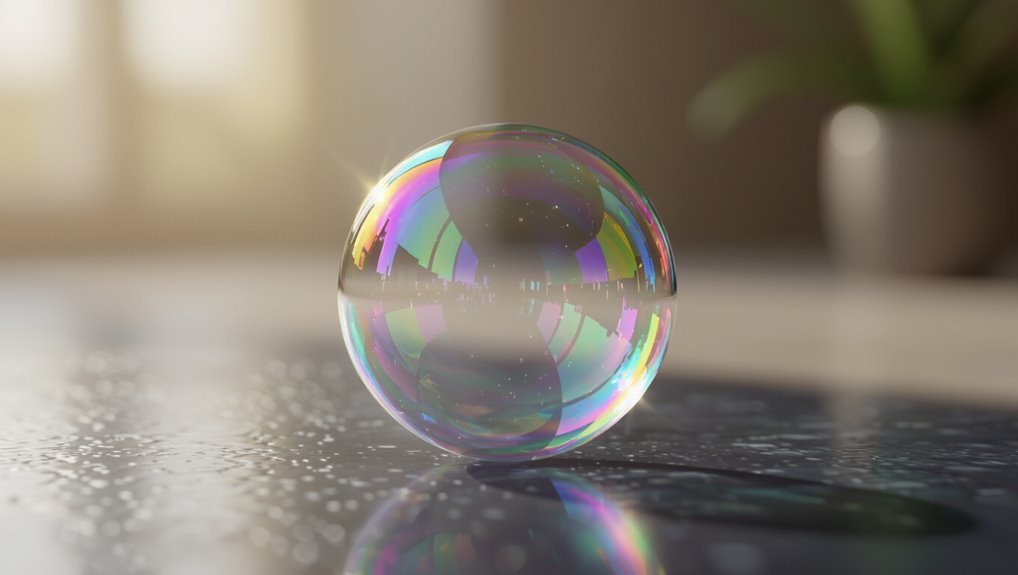
How to Paint a Bubble – Step-By-Step Guide for Realistic Bubble Effects in Art
Start by blocking in a soft circle and map the main light direction, then layer thin translucent bands for iridescence and soft core tones to keep it airy. Feather edges for ambient light and sharpen specular highlights where reflections hit. Suggest faint environmental colors and boost contrast only at the brightest spots. Use glazing or digital layers for depth, and practice quick studies to build confidence—keep going and you’ll uncover step-by-step tips, medium-specific tricks, and lighting variations.
Quick Step-by-Step: Paint a Believable Bubble
Start by blocking in the bubble’s basic shape and the major light directions so you know where highlights and reflections will go.
Then layer subtle color shifts, soft edges, and crisp specular highlights.
Balance transparency with thin iridescent bands, suggest environment reflections, and keep contrast delicate.
Use bubble symbolism sparingly and explore creative applications in composition to enhance mood without overpowering your piece.
Decide Your Bubble Style: Realistic, Stylized, or Decorative
Decide whether you want a lifelike bubble or something more playful, since realism and stylization call for different shapes, edges, and detail levels.
Think about color and iridescence—subtle, translucent hues suit realism, while bold or exaggerated colors fit a stylized or decorative approach.
Also consider the bubble’s purpose and composition so its style supports the mood and balance of your overall piece.
Realism Versus Stylization
When you pick a style for your bubble—realistic, stylized, or decorative—you set the rules that will guide every choice from color and light to line and pattern.
You’ll use realism techniques like accurate reflection and subtle highlights to mimic glass, or follow stylization examples that simplify shapes, emphasize outlines, and add patterns.
Decide mood, contrast, and detail level to stay consistent.
Color And Iridescence
Although color and iridescence will define whether your bubble reads as glassy or graphic, you can choose a subtle approach or go bold with saturated swirls—each choice changes how light and form interact. You’ll apply color theory to guide light interaction, shape emotional impact, and frame artistic interpretation.
| Style | Effect |
|---|---|
| Realistic | Soft rainbow sheen |
| Stylized | Bold color bands |
| Decorative | Patterned iridescence |
Purpose And Composition
Color and iridescence set the mood, but now you need to pin down why the bubble exists in your piece and which style will best serve that purpose.
Decide if you want realism to emphasize fragility, stylization for personality, or decoration for pattern.
Consider bubble symbolism and align choices with your artistic intent, composition, scale, and surrounding elements to support narrative and balance.
Tools and Paints for Watercolor, Acrylic, and Digital Bubbles
Materials matter: pick brushes, papers, paints, and software that suit the medium you’re using—soft round brushes and high-quality cold-press paper for watercolor, stiffer synthetic or hog bristle brushes and acrylic gessoed surfaces for acrylics, and pressure-sensitive styluses with layered-capable programs for digital work.
| Medium | Essentials |
|---|---|
| Watercolor | watercolor techniques, light washes, pans/tubes |
| Acrylic | acrylic methods, heavy body paints, gels |
| Digital | digital tools, pressure sensitivity, color palettes |
Basic Bubble Anatomy: Rim, Core, Highlight, and Colors
Now that you’ve chosen the right tools for your medium, look closely at a bubble’s anatomy to paint it convincingly.
You’ll study rim, core, highlight, and subtle hues to master bubble structure and apply color theory.
Focus on:
- Rim — thin, bright edge.
- Core — softer, muted center.
- Highlight — sharp specular spot that defines form and depth.
How Light and Environment Change a Bubble’s Look
When light or surroundings change, a bubble responds instantly—shifting its rim brightness, core softness, and the placement of its specular highlight based on light angle, intensity, and nearby colors. You’ll notice bubble reflections and environmental impact altering hues, contrast, and shadow; observe and paint accordingly.
| Light Angle | Intensity | Nearby Color |
|---|---|---|
| Top | Strong | Blue sky |
| Side | Soft | Green foliage |
| Back | Diffuse | Warm sunset |
Choose Reference Photos and Make Fast Observational Sketches
Pick photos that show the bubble under the lighting and surroundings you want to capture, then make quick observational sketches to lock in key shapes, highlights, and color shifts before you start painting.
Use reference selection and strong observational techniques.
- Choose varied lighting
- Note highlight positions
- Record subtle color shifts
Now sketch fast and stay focused.
Sketching Shapes and Arranging Overlapping Groups
Before you put paint to paper, sketch the bubble shapes lightly to lock in size, spacing, and the way they overlap so you can plan relationships between highlights and reflections.
Use simple sketch techniques to map centers and contours, vary sizes for visual interest, and apply overlap strategies to suggest depth.
Erase confidently, adjust edges, and keep lines faint to preserve later transparency.
Block In Base Tones to Create a Transparent Core
Choose muted base colors that suggest the faint tint of the bubble without overpowering it.
Start with a soft center wash, keeping edges feathered so the core reads transparent.
Work thinly and let layers build gently to preserve that airy look.
Choose Muted Base Colors
A muted base lets you suggest a bubble’s delicate, glassy interior without overpowering the highlights—so block in soft, desaturated tones where the core will sit.
You’ll use muted palettes and control color harmony to anchor transparency. Blend thin washes, avoid saturation spikes, and plan edges:
- Cool undertone
- Warm tint
- Neutral gray veil
Paint Soft Center Wash
Now that you’ve laid a muted foundation, paint a soft center wash to suggest the bubble’s transparent core.
Use diluted paint and gentle strokes, applying soft wash techniques toward the center. Keep values lighter than the perimeter, then employ subtle blending methods with a damp brush or sponge to dissolve edges.
Let layers dry partially before glazing to preserve luminosity and depth.
Paint the Rim Glow That Defines the Edge
When light skims the bubble’s curve, you’ll paint a thin rim glow to separate the edge from the background and sell the illusion of translucence.
Use rim glow techniques and subtle edge highlights to reinforce form.
Steps:
- Lay a soft, narrow band of color.
- Soften outward with a dry brush.
- Preserve inner transparency; don’t overdefine the rim.
Add the Main Specular Highlight for Believable Shine
Now place the main specular highlight where the light source would naturally hit the bubble so it reads believable.
Consider the highlight’s shape and size to match the bubble’s curve, and tweak its intensity and edge—soft for diffuse light, hard for a strong point source.
Keep the mark concise and slightly offset from the rim to sell the glossy surface.
Positioning The Highlight
Because a bubble’s sparkle depends on how light hits it, place your main specular highlight where the strongest light source would reflect directly toward the viewer.
You’ll control believable shine with precise highlight placement and subtle light reflections. Follow these steps:
- Orient highlight toward viewer.
- Keep edges crisp.
- Soften surrounding glow for realism.
Shape And Size
Having placed the highlight where the light hits, decide on its shape and size to sell the bubble’s realism.
You’ll match bubble geometry to your light source—small, sharp spots for direct light, broader ovals for diffused light.
Scale the specular mark to the bubble’s size so it reads believable.
This careful proportioning boosts the visual impact without extra elements.
Intensity And Edge
Light behaves differently across surfaces, so adjust your specular highlight’s intensity and edge to match the light source: crank up brightness and tighten the edge for a sharp, direct light, or soften and lower contrast for diffuse illumination.
- Increase intensity contrast for strong highlights.
- Blur edges for soft, ambient light.
- Sharpen edge definition when light is focused.
Create Faint Color Bands and Subtle Iridescence
When you glaze thin, translucent bands of color over the base layer, they read as delicate iridescence rather than opaque stripes; keep each pass feather-light and let the underlying tones show through so the bubble seems to glow from within.
Layer faint color arcs at varied angles, soften edges with a dry brush, and mute saturation to suggest subtle iridescence without hard contours.
Watercolor Glazes for Bubble Translucency
Although watercolor glazes are thin, they build luminous depth quickly.
So mix very dilute washes and apply them in controlled arcs to preserve the bubble’s translucency.
You’ll use watercolor techniques and glazing methods to layer subtle hues without muddying.
Follow steps:
- Start light, lift edges.
- Layer once dry.
- Refine highlights with minimal pigment.
Acrylic Layering and Soft-Edge Glazing for Bubbles
Now switch to acrylics and build color with very thin glaze layers so each coat remains translucent.
You’ll feather edges while the paint is tacky to create the bubble’s soft, airy shifts.
Work gradually, letting thin glazes stack until the highlights and subtle chroma read as a delicate sphere.
Thin Glaze Layers
Start with a few whisper-thin glazes to build a bubble’s translucence and soft edges without muddying your colors.
You’ll control glaze consistency and layer transparency to suggest depth. Apply thin passes, let each dry, then refine highlights.
- Measure medium ratio.
- Watch drying sheen.
- Preserve previous tones.
Soft Edge Blending
While you build thin glazes, soften edges by working wet-into-wet and feathering outward with a clean, slightly damp brush so the bubble reads airy and seamless.
Use soft edge techniques sparingly, lifting pigment lightly to keep highlights.
Mix glazing medium or a thin blending medium’s ratio to extend open time.
Blend shifts subtly, preserve translucency, and avoid harsh outlines for believable, delicate bubbles.
Digital Layers and Blend Modes for Realistic Bubbles
Because light and color in a bubble come from multiple transparent effects, you’ll rely on layers and blend modes to build depth without painting every detail by hand.
Use digital brushes, blend techniques, layer effects, opacity adjustments, texture mapping, color dynamics, light simulation, and artistic filters to refine.
- Base translucency
- Rim highlights
- Subtle chroma shifts
Paint Reflections: Place Inverted and Distorted Imagery
When you paint reflections on a bubble, flip a simplified version of the scene so it reads inverted across the curved surface.
Compress and stretch elements near the rim to sell the distorted edge details, keeping shapes recognizable but warped.
Shift colors and values slightly—brighten highlights and cool or darken midtones—to match the bubble’s thin-film look.
Inverted Scene Placement
If you want the bubble to read as a delicate lens, paint the scene inside it upside down and slightly warped so viewers immediately recognize that they’re seeing a reflection, not a picture behind glass.
Use careful bubble placement and subtle scene inversion cues to sell depth.
- Flip key highlights
- Compress perspective
- Mirror color accents
Distorted Edge Details
Now that you’ve flipped and warped the interior scene, sharpen your focus on the bubble’s rim, where reflections break and bend.
Trace thin, interrupted strokes to suggest distortion effects along the curve. Vary pressure to create tiny gaps and smudges, then add crisp edge highlights to indicate surface tension.
Keep contrasts subtle so the rim reads luminous without overpowering the inverted imagery.
Color Value Shifts
As you map inverted and distorted imagery onto the bubble, shift color values to sell the illusion of depth and curvature: darken tones where reflections compress and lift midtones where light stretches, keeping highlights narrowly concentrated to read as specular glints.
Use color theory, value contrast, hue saturation, and pigment layering to control light reflection, texture variation, atmospheric perspective, visual harmony, emotional impact, and color symbolism.
- Balance
- Contrast
- Mood
Render Overlapping Bubbles and Contact Highlights
When bubbles overlap you’ll need to readjust lights and edges so each sphere reads as separate and translucent; you’ll paint overlapping reflections where surfaces meet, darken the contact area slightly, and sharpen highlight placement at rims.
Use thin glazes to suggest light passing through both shells, add tiny specular dots where light concentrates, and erase minutely to keep transparency convincing without muddying colors.
Use Soft Edges and Feathering to Imply Depth
Use soft edge shifts to let the bubble blend gently into the background and neighboring forms.
Soften and feather your highlights where they meet midtones to avoid harsh, flat bands of light.
This subtle blending will make your bubbles read as translucent, layered shapes with believable depth.
Soft Edge Transitions
Although hard highlights define a bubble’s shimmer, soft edges and feathering let you suggest its delicate curvature and depth without overpowering the form.
Use soft edge techniques and precise blending methods to shift colors. Focus on subtle gradients, not extra contrast.
- Feather edges lightly
- Soften rim reflections
- Merge color planes smoothly
Feathered Highlight Blending
Because highlights are often the brightest part of a bubble, feathering them lets you indicate form without hard edges; soften the change from highlight to shell so the light reads as wrapping around a curved surface. You’ll use feathered highlights and subtle blending techniques to suggest depth. Practice soft brushes, low-opacity strokes, and directional smudging for natural shifts.
| Tip | Result |
|---|---|
| Soft brush | Smooth edge |
| Low opacity | Gradual fade |
| Smudge | Wraps light |
| Layer | Controlled glow |
Critical Micro-Details: Rim Halos, Inner Shadows, Micro-Highlights
When you zoom in on a painted bubble, the rim halo, inner shadow, and micro-highlights are what make it read as thin, translucent, and believable.
Use rim dynamics and edge softness, control shadow placement and highlight intensity, and suggest light refraction with subtle texture variations and atmospheric effects.
Use rim dynamics and soft edges, control shadow and highlight, and hint at refraction with subtle textures and atmosphere
- Paint crisp micro-highlights.
- Soften inner shadows.
- Layer faint color shifts.
Color Mixing: Subtle Pinks, Blues, and Greens for Bubbles
If you want your bubbles to read as delicate and translucent, mix very muted pinks, blues, and greens rather than saturated primaries; subtle, cool undertones and slight shifts in temperature will sell the thin film without overpowering the form. Use soft gradients and color harmony to layer translucent washes, adjusting opacity for depth.
| Mix | Purpose |
|---|---|
| Pale pink | Warm edge |
| Mint blue | Cool reflection |
| Seafoam green | Mid-tone glow |
Correct Mistakes: Lift, Scumble, or Scrape Paint Back
After you’ve layered those subtle pinks, blues, and greens, you’ll inevitably find spots where a wash is too strong or a highlight got lost—correcting them is straightforward with three main approaches: lifting, scumbling, or carefully scraping paint back.
Use these paint techniques for efficient mistake correction:
Use these paint techniques to quickly correct missteps and restore subtle highlights with confidence.
- Lift: dampen and blot to remove pigment.
- Scumble: thin opaque glaze to soften.
- Scrape: gently reveal underlying layer.
Practice Exercises to Improve Observation and Speed
Because your eye and hand improve with focused repetition, set short, regular drills that isolate one skill—edge detection, quick value mapping, or capture of color shifts—and repeat them at increasing speed.
You’ll use observation exercises and speed drills to build visual perception, drawing accuracy, and confidence.
Do quick sketches and bubble studies under time constraints, focusing on core painting techniques and deliberate, measurable improvement.
Fast Techniques for Quick Bubble Studies and Thumbnails
Start with short, focused sessions that force decisions: set 5–10 minute timers and do a series of tiny studies or thumbnails, concentrating on overall shape, dominant value, and one color shift per bubble.
Use bubble studies and quick thumbnails to hone observational techniques, color exploration, light effects, shape variations, texture differences, and composition tips.
- Prioritize value
- Suggest color
- Vary edges
Compose Bubbles: Scale, Spacing, and Focal Points
Think about scale, spacing, and focal points as your composition rules for bubble arrangements: vary bubble sizes to create depth, leave breathing room between clusters to avoid visual clutter, and place a few larger, sharper bubbles or strong value contrasts where you want the eye to land.
Use bubble composition principles, spacing techniques, focal point placement, visual hierarchy, scale adjustments, and subtle overlapping effects.
Lighting Variations: Sunlit, Backlit, Indoor, and Dramatic Looks
When you change the light, you change what a bubble feels like—sunlit scenes glow with translucent highlights and crisp reflections. Backlit setups turn edges into luminous halos. Indoor lighting brings softer, warmer tones and subtler specular spots. Dramatic lighting uses high contrast and colored gels to push mood and form.
Change the light, change a bubble’s mood—sunlit clarity, backlit halos, cozy warmth, or dramatic color and contrast.
- Study sunlit bubbles for crisp highlights.
- Use backlit bubbles to define rims.
- Apply indoor lighting or dramatic effects to alter warmth and contrast.
Apply Bubble Techniques to Glass, Water Drops, and Soap Film
Although the techniques you use for bubbles—thin iridescent edges, sharp speculars, and subtle translucency—translate well to glass, water drops, and soap film, each surface calls for slight adjustments in scale, edge control, and color intensity.
You’ll tweak bubble texture for thicker glass, tighten edges for tiny drops, and soften hues for soap film.
Prioritize accurate light reflection, refraction, and crisp highlights.
Frequently Asked Questions
How Do I Paint Bubbles on Dark or Black Paper?
Use white and iridescent highlights, layer translucent glazes, and erase subtle reflections so your bubbles pop on black paper. You’ll apply bubble texture techniques and color blending methods to build realistic, luminous, floating spheres.
Can I Create Convincing Bubbles With Only a Pencil?
Yes — studies show 78% of artists find graphite alone effective; you’ll master bubble shading techniques and pencil blending methods by layering highlights, erasing gleams, and smudging gently to build transparent form and reflective edges convincingly.
How Do I Photograph My Painted Bubbles for Portfolio Shots?
Use soft side lighting and diffusers, experiment backlighting for rim highlights, and choose neutral or dark background choices to emphasize reflections. You’ll brace camera, use low ISO, shallow depth, and shoot RAW for clean edits.
Are There Vegan or Non-Toxic Paint Alternatives for Bubble Effects?
Yes — you can use eco friendly paints and non toxic mediums like water-based acrylics, plant-based pigments, and natural binders; test lightfastness, layer transparently for bubble effects, and label supplies to keep your workspace safe.
How Do I Sell Bubble Artwork or Price Commissions?
You’ll research pricing strategies, set base rates by size and complexity, and use commission tips like clear contracts, upfront deposits, tiered options, and promotion via social media and galleries to attract buyers and justify your fees.
Conclusion
You’ve walked through every gleam and ghost of a bubble, from rim to core, and now you’re ready to summon them like a modern Prospero—small sorceries of light that float across paper, canvas, or screen. Keep experimenting with scale, spacing, and lighting, trusting your eye as much as your technique. Practice quick studies, vary your environment, and let each translucent sphere teach you new subtle truths about color, reflection, and the fragile poetry of surfaces.