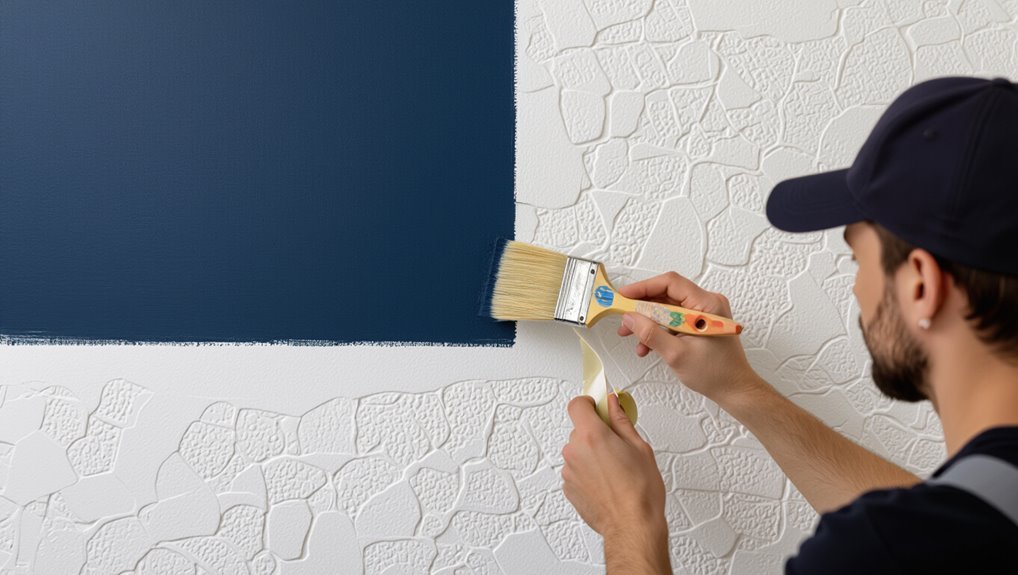
How to Paint a Straight Line on a Textured Wall Cleanly
You can get a clean, straight line on a textured wall by prepping, taping, sealing and cutting in carefully: clean and prime the surface, apply high-quality painter’s tape and press it into the texture, seal the tape edge with the base color or caulk, then cut in with a thin angled brush or skinny trim roller, loading sparingly and pulling slowly to force paint into grooves; remove tape when touch-dry and touch up any gaps, and keep going for more tips.
Quick Step-by-Step: Paint a Straight Line on Textured Walls
Start by prepping the area: clean the wall, remove loose texture, and mask off the edge with painter’s tape.
You’ll apply preparation tips: press tape firmly, seal edges with a thin coat of base color, and let dry.
Use steady paint techniques: load a quality angled brush sparingly, pull slowly along the tape, remove tape while paint’s tacky for a crisp straight line.
When to Paint Straight Lines: Accents, Two-Tone, Trim
You’ll use straight lines when accents, two‑tone schemes, or trim need crisp separation.
Think about where a bold stripe or contrasting lower half will improve the room’s balance before you tape and paint.
With the right placement, those lines can sharpen architectural details and guide the eye.
When To Use Accents
When you want to add visual interest without repainting the whole room, accents are a smart, low-commitment choice for straight lines on textured walls.
You’ll use accent colors to guide mood and heighten design impact. Consider these emotional prompts:
- Surprise
- Calm
- Energy
- Luxury
Choose placement, width, and saturation to match the feeling you want.
Two‑Tone And Trim
If you want clean, deliberate breaks between colors without repainting the whole room, two-tone schemes and trim lines give you crisp definition and can change a space’s proportions instantly.
You’ll pick color combinations that suit scale, highlight architectural features, or lower ceilings visually.
Use sharp tape, steady brushes, and proper caulking where needed to protect wall aesthetics and guarantee a precise, durable edge.
Which Textured Surfaces Need Special Techniques (Popcorn, Knockdown)
Because different textures change how paint and tape stick, you’ll need special techniques for surfaces like popcorn and knockdown:
- You’ll approach popcorn texture techniques gently to avoid crumble and frustration.
- You’ll use knockdown finish tips to follow contours and reduce bleed.
- You’ll prep edges slowly, feeling for uneven peaks.
- You’ll test small areas to protect finishes and calm nerves.
Tools for Crisp Lines on Textured Walls
Although textured walls demand extra care, the right tools make crisp lines achievable—select a high-quality painter’s tape designed for texture, a flexible foam or angled sash brush for edging, a skinny trim roller to press paint into grooves, and a putty knife or stiff plastic edger to seal tape edges before rolling.
You’ll also want caulk, small splash guards, and reference notes on texture types and tape brands.
Best Painter’s Tape for Textured Walls
Now that you’ve got the right edging tools, choosing the correct painter’s tape makes the biggest difference on textured walls.
You want tape that seals, flexes, and lifts cleanly. Consider painter’s tape types and tape adhesion tips to match texture and paint.
- Low-tack for delicate surfaces
- Medium for typical textures
- High for rough stucco
- Specialty conforming tape
How to Apply Painter’s Tape on Textured Surfaces
Start by cleaning the surface and planning your tape line: wipe away dust and grease, let the wall fully dry, and map where the tape will go so you can work steadily.
For tape application on textured surfaces, press tape down along peaks and valleys, smooth with a plastic scraper or your thumb, overlap short pieces instead of stretching, and remove tape at a 45° angle once paint’s tacky.
Seal Tape Edges to Stop Paint Bleed
Before you paint, seal the tape edges so paint can’t seep under the ridges; press firmly along ridges and smooth with a tool or fingertip.
Choose tape types suited to texture, then test adhesion.
Seal by running a thin coat of clear acrylic or adhesive primer over the edge.
- Calm
- Confident
- Precise
- Relieved
Focus on proper tape application.
Use Caulk on Deep Texture Seams Before Taping
If you spot deep texture seams, fill them with paintable caulk so tape has a flat surface to stick to.
Smooth the caulk edges with a wet finger or tool so it blends into the surrounding texture.
Let it cure fully before applying tape to prevent gaps and paint bleed.
Fill Deep Seams
When you encounter deep texture seams, caulk them first to create a smooth, even surface that tape can adhere to reliably.
You’ll want to fill seam gaps, press caulk into voids, and aim for texture matching so repair blends.
Then tape.
Feel confident:
- Calm
- Precise
- Satisfied
- Proud
Smooth Caulk Edges
Smooth the caulk edges so tape will lie flat and the final line reads crisp; run a damp finger or a caulking tool along the bead to press it into the seam and feather the edges into the surrounding texture. Choose caulk types wisely, use proper application techniques, follow smoothing methods, and heed sealing tips for longevity.
| Step | Purpose |
|---|---|
| Tool | Smooth |
| Tip | Seal |
Lock Tape Edges With a Thin Base-Color Coat
Before you pull the tape off, lock the edges by brushing a thin coat of the base color right over the tape line; this seals the gap and prevents the topcoat from bleeding under the tape.
You’ll see base coat benefits instantly during tape application.
Follow steps to feel confident:
- Calm
- Precise
- Relieved
- Proud
How to Mark Guidelines: Pencil, Laser, Chalk Line
Pick the method that matches your accuracy needs and wall conditions: a sharpened pencil for subtle marks on texture, a laser level for long straight runs and exact plumb, or a chalk line for quick, visible guidelines across rough surfaces. Use appropriate pencil types, rely on laser accuracy where needed, and choose chalk durability for rough patches to maximize guideline visibility.
| Method | Strength | Best use |
|---|---|---|
| Pencil | Subtle | Small corrections |
| Laser | Precise | Long runs |
| Chalk | Durable | Rough surfaces |
Using a Laser Level for Long Straight Lines
When you’re working on a long wall, a laser level gives you a straight, visible guideline that stays consistent across the entire run; set it up on a stable tripod, align it to your reference points, and lock it in so you can mark or tape along the beam without rechecking frequently.
- Feel confident — laser level benefits shine.
- Save time — trust laser level accuracy.
- Reduce mistakes — stay calm.
- Finish proud — your line looks professional.
Using a Chalk Line for Long Straight Lines
When you need a long straight guide on a textured wall, pick a chalk color that shows up against your paint and won’t smear.
Keep the line taut as you snap to get a crisp, continuous mark and test tension on scrap first.
Secure the ends firmly so the line stays in place while you paint.
Choosing The Right Chalk
Anyone tackling long, straight lines on a textured wall should start by choosing the right chalk for your chalk line: the pigment, grit, and binder determine how clearly the line shows up and how well it resists breaking or smudging on rough surfaces.
Pick chalk types and chalk colors to match texture and paint. Feel confident, avoid smears.
- Contrast
- Grit
- Binder
- Durability
Proper Line Tension
After you pick the right chalk, focus on line tension: too loose and the string sags, too tight and it can snap or pull the chalk off the wall. Adjust tension so the line stays straight without jerking.
Hold ends steady, steady your stance, and avoid bouncing.
Check paint consistency—thicker paint won’t bleed as much along the chalk line, so plan accordingly.
Snapping And Securing Line
1. You’ll snap a crisp chalk line by securing ends, checking tension adjustments, and using confident marking techniques. Follow these steps to feel control and relief:
- Anchor firmly.
- Pull taut.
- Lift, snap sharply.
- Re-tension if faint.
You’ll clean excess chalk, reinforce with light painter’s tape along textured peaks, and trust the line before painting.
Create a Temporary Rigid Straight-Edge Guide
To get a crisp line on a textured wall, you’ll first make a temporary rigid straight-edge guide that you can clamp or tape in place; this gives the brush or roller a solid surface to ride against so paint won’t bleed into the texture.
Cut a straight board or use a metal level from rigid materials. Align, secure firmly, seal edges with painter’s tape, then paint along it.
Choose: Brush or Edger for Textured Edges
When you’re working a textured edge, decide whether a brush or an edger fits the job based on benefits like speed versus detailed control.
A brush gives more precision and paint control for tricky grooves, while an edger speeds the job and cuts down on hand fatigue.
Also weigh cleanup and maintenance—brushes need more care but last longer, edgers are quicker to rinse or replace.
Brush Vs. Edger Benefits
Choosing between a traditional angled brush and a paint edger depends on the texture you’re dealing with and how much control you want: a brush gives you precision and can work paint into crevices on mildly textured surfaces, while an edger speeds the job on heavier textures but may skip deep nooks or leave ridges.
- Brush Benefits: confidence
- Edger Advantages: relief
- Control: satisfaction
- Speed: pride
Paint Control And Precision
If you want tight, clean lines on a textured wall, pick the tool that matches the surface and your steadiness: use a high-quality angled brush for control in shallow textures and an edger when the texture’s depth and your pace favor speed over micro-precision.
Match paint techniques and application methods to surface types and texture patterns, balance edge control with color selection, and factor painter’s psychology, precision tools, tool maintenance, and painter’s experience.
Cleanup And Maintenance
Two tasks matter most after cutting textured edges: cleaning your tool properly and storing it so it keeps its shape.
You’ll choose a brush or edger; both need gentle rinsing and reshaping for paint maintenance and textured wall care.
- Rinse thoroughly
- Comb bristles
- Dry upright
- Store covered
Best Edging Tools for Popcorn and Knockdown Textures
When you’re working with popcorn or knockdown textures, the right edging tool makes the difference between crisp lines and a ragged mess; pick one designed to ride over peaks without compressing the texture.
You’ll want tools that support edging techniques: swivel edgers, microfiber edgers, and angled trim brushes.
Consider tool materials—soft foam pads can crush texture, while resilient nylon or microfibre preserves peaks for clean lines.
Use a Foam Brush for Tight Textured Corners
Reach into tight textured corners with a small foam brush to get paint where rollers and larger edgers can’t.
You’ll use foam brush techniques to press paint into crevices, control buildup, and avoid drips.
Follow corner painting tips and feel confident as you:
Follow corner painting tips and gain the confidence to achieve neat, precise edges every time.
- Savor neat edges
- Relish precise control
- Breathe easier with less cleanup
- Admire crisp results
Roller Techniques to Avoid Splatter on Textured Walls
Pick a low-splatter roller designed for textured surfaces to cut down on airborne specks.
Make sure the roller is evenly loaded—not dripping—and roll off excess on the tray so coverage stays consistent.
Apply steady, moderate pressure to avoid fling and keep your strokes smooth and controlled.
Choose Low-Splatter Rollers
1 simple tool change can cut splatter dramatically: trade thick-nap, high-shed rollers for low-splatter versions designed with tighter fiber packs or foam shells.
You’ll control roller types and account for paint thickness, reducing airborne droplets and frustration.
Choose quality sleeves, test on scrap, and adjust technique.
- Relief
- Confidence
- Cleanliness
- Pride
Use Proper Roller Coverage
The key to minimizing splatter on textured walls is consistent, even roller coverage: load the roller evenly, press with steady pressure, and roll in overlapping W or N patterns to force paint into crevices without flicking it off.
Choose roller types and roller nap for texture compatibility, adjust paint thickness and application speed, follow wall prep, and use coverage techniques that promote paint adhesion without oversaturation.
Control Roller Pressure
With consistent roller coverage already in place, you’ll next focus on controlling pressure to keep paint from splattering off the nap.
You’ll use a steady roller technique and mindful pressure control to stay clean, calm, and confident.
- Light initial pass — gentle
- Moderate follow-up — even
- Edge smoothing — controlled
- Finish roll — relaxed
Paint Consistency Tips for Cleaner Edges
One key to cleaner edges is getting your paint the right consistency—thin enough to flow into texture without globbing, but thick enough to hide the substrate in one pass.
You’ll practice paint thinning sparingly, testing on scrap drywall. Use measured thinning, stir thoroughly, and pick edge techniques that rely on controlled loading and light pressure so paint won’t pool or feather along the textured surface.
How to Cut In Freehand on Textured Walls Like a Pro
Start by steadying your hand and loading your brush just enough so paint fills but doesn’t drip into the texture; you’ll keep a thin, even bead along the edge and move slowly to let the bristles settle into the crevices without gumming them up.
Use these freehand techniques to conquer texture challenges:
- Breathe and anchor your pinky.
- Light, controlled strokes.
- Reload sparingly.
- Check and correct immediately.
How to Paint Straight Stripes on Highly Textured Walls
When you’re tackling stripes on a highly textured wall, start by cleaning and patching any loose texture so paint and tape can adhere properly.
Use a high-quality painter’s tape and press a sealant coat along the edge—caulk or a thin layer of base color—to lock the tape to the peaks.
Apply paint with a dense brush or short-nap roller, using thin, even coats to avoid buildup that hides crisp lines.
Surface Preparation Tips
Preparing the surface properly makes painting straight stripes on a highly textured wall much easier and gives you cleaner edges.
You’ll assess surface types and texture patterns, clean, sand, and prime where needed.
Then follow these steps to feel confident:
- Remove dust and grease.
- Repair chips and holes.
- Lightly sand high peaks.
- Apply suitable primer for uniform adhesion.
Tape And Seal Techniques
Tape and seal techniques make the difference between wavy, paint-bleed edges and crisp, professional-looking stripes on textured walls.
You’ll focus on tape application that respects texture compatibility and proper wall preparation. Use sealing methods—caulk or paint—at edges for bleed prevention and improved paint adhesion.
Remove tape carefully during tacky phase for clean lines, ensuring edge protection and controlled tape removal.
Paint Application Methods
Start by choosing the right tools and technique for your wall’s texture: a high-density foam roller, a brush for edges, and thin coats applied with controlled pressure will give the cleanest stripes on highly textured surfaces.
You’ll manage paint consistency and use precise brush techniques to reduce bleed and rough edges.
- Care
- Focus
- Patience
- Pride
Two-Tone Walls: Steps for Crisp Color Separation
When you want two clean colors on a textured wall, the key is careful layout and the right masking technique so the paint lines stay sharp despite bumps and crevices.
You’ll plan using color theory and color psychology for visual harmony, test paint finishes and contrast techniques, do precise wall preparation, follow current design trends, and check lighting effects.
Mask, seal, and roll carefully.
Ceiling-Edge Techniques for Textured Ceilings and Walls
Before you start, protect the ceiling and floor with drop cloths and use painter’s tape suited for textured surfaces so paint won’t bleed into the texture.
You’ll want specialized cutting tools—like an angled sash brush, a trim pad, or a butter-knife-style edger—to follow the irregular profile where ceiling meets wall.
Work in short sections and keep the tool lightly loaded to maintain control and a clean edge.
Prep And Protect Edges
Although textured ceilings can make crisp edges tricky, you can protect them with the right prep and tools: mask the ceiling with high-quality painter’s tape designed for rough surfaces.
Butt the tape gently against the texture rather than stretching it, and seal the tape’s edge with a thin swipe of ceiling-colored paint or caulk so bleed-through is minimized when you cut in.
- Feel confident.
- Trust preparation techniques.
- See clean edge protection.
- Enjoy the result.
Use Specialized Cutting Tools
Now that your tape and seal are in place, reach for tools made specifically for cutting clean lines against textured ceilings and walls.
You’ll prioritize tool selection and precision tools—angled trim brushes, edgers, and flexible shields—after texture assessment and wall preparation.
Use steady cutting techniques, maintain edge protection, and control paint application to secure line accuracy along ceiling edges and textured surfaces.
How to Trim Baseboards Cleanly Against Textured Walls
Cutting and fitting baseboards against textured walls takes a bit more patience than smooth surfaces, but you can get crisp, professional-looking results by scribing, coping, and using flexible caulk where the texture meets the trim.
Fitting baseboards to textured walls demands patience—scribe, cope, and use flexible caulk for crisp, professional results.
You’ll focus on baseboard installation, matching the textured wall profile, and preserving paint adhesion and paint finish.
Steps to calm anxiety:
- Scribe carefully
- Coping over caulk
- Test fit
- Caulk neatly
Working Around Switches, Outlets, and Fixtures on Texture
Once your baseboards sit tight against the textured surface, you’ll face the smaller but fiddly task of working around switches, outlets, and fixtures on texture.
You’ll focus on switch placement and outlet alignment, adjust fixture positioning, and plan texture adaptation.
Prioritize wall preparation, edge precision, paint selection and technique adjustments to maintain visual balance and manage color contrast without disturbing the texture.
Handle Uneven Texture Transitions and Seams
When you hit a seam or a spot where textures change, take time to match the existing pattern before painting.
Use small tools and a light touch to feather the joint so the shift reads as one surface. That careful blending keeps your straight line from showing bumps or gaps.
Match Texture Seamlessly
Seams and uneven patches can ruin a crisp paint line, so you’ll need to blend the existing texture before you tape and paint.
You’ll match texture seamlessly by evaluating, filling, and stippling to achieve texture blending for seamless changes.
Follow steps to calm your nerves and gain confidence:
- Inspect
- Patch
- Texture-match
- Sand/light-touch
Feather Joint Transitions
If a texture change or seam still shows after patching, feathering the joint will help it disappear into the surrounding wall. You’ll do this by gradually thinning and extending the compound so the shift reads as one surface.
Use a wide knife and feather technique to blend edges, sand lightly when dry, then use joint finishing strokes to match texture.
Check in varied light.
When to Sand Texture Down Before Painting Lines
Before you start taping and painting, check whether the texture will interfere with your line’s crispness — heavy or high-relief textures often need to be sanded down because paint and tape won’t bridge deep valleys cleanly.
Use appropriate sanding techniques for specific texture types, then decide.
- Frustration
- Relief
- Confidence
- Pride
Prime Textured Walls to Reduce Absorption and Bleed
Once you’ve smoothed or sanded high-relief areas, prime the textured surface to seal porous spots and stop paint bleeding under tape.
You’ll perform texture evaluation, choose primer types for paint compatibility, and follow wall preparation steps.
Use appropriate priming techniques and application methods to guarantee absorption reduction and bleed prevention, letting the primer fully cure before taping and painting for crisp, lasting lines.
Using Sealers and Primers Specifically for Texture
When you’re dealing with textured walls, choose sealers and primers formulated to fill pores and level the surface so tape and topcoat behave predictably.
These products penetrate deeply, reduce suction, and create a uniform base that prevents bleed-through and uneven sheen.
You’ll focus on Sealer types, Primer selection, Surface preparation, Application techniques, Texture compatibility, Paint absorption, Finish options, Color layering, Wall protection, and Adhesion properties.
- Calm
- Confident
- Precise
- Proud
Why and When to Caulk Textured Gaps Before Painting
Before you tape and paint, caulk those textured gaps so paint won’t bleed under the tape and ruin your crisp line.
It also creates smooth shifts between surfaces, giving your final edge a clean, professional look.
Plus, sealing gaps stops moisture intrusion that can cause paint to peel or mold later on.
Prevents Paint Bleed
If you want crisp, clean edges on a textured wall, caulking gaps and seams stops paint from bleeding into crevices where tape won’t reach.
You’ll control paint thickness, aid wall preparation, improve tape alignment, and boost masking techniques.
Consider color selection, texture compatibility, surface priming, edging precision, paint drying, and moisture control.
- Relief
- Confidence
- Satisfaction
- Pride
Ensures Smooth Transitions
Along with stopping bleed-through, caulking textured gaps helps you create seamless visual lines where different surfaces meet, so paint flows evenly and brush or roller marks don’t catch on uneven edges.
You should caulk before priming to fill voids, then smooth for proper edge blending. This creates smooth shifts, makes taping more effective, and guarantees crisp, consistent lines with minimal touch-ups.
Stops Moisture Intrusion
Moulkering textured gaps before you paint keeps water from seeping into joints and behind trim, which prevents mold, wood rot, and peeling finishes.
You’ll create a moisture barrier that preserves wall integrity and surface durability. Use caulk as one of these prevention techniques to enjoy textured benefits and paint protection:
- Seal gaps
- Smooth connections
- Prevent stains
- Extend finish life
Fixing Bleed-Through After Tape Removal
After you pull the tape, inspect the edge for any paint that’s seeped under—those thin ridges or darker spots are bleed-through and you’ll need to address them before repainting. Use touch up techniques: scrape gently, sand, apply primer, then repaint. Focus on bleed prevention next time.
| Step | Action |
|---|---|
| 1 | Scrape/sand |
| 2 | Prime/paint |
| 3 | Review |
How Long to Wait Before Removing Tape on Textured Walls
You’ll usually get the cleanest edge by removing tape when the paint is dry to the touch but not fully cured—typically 30–60 minutes for latex in normal conditions.
Look for paint that’s no longer tacky and that lifts cleanly from the tape when you test a tiny corner.
If humidity or texture slows drying, wait a bit longer but avoid letting paint fully harden on the tape edge.
Optimal Tape Removal Timing
Though it might be tempting to peel the tape as soon as the paint feels dry to the touch, you should wait until the paint has set enough to lift cleanly without smudging or stretching.
Use ideal tape techniques and mind tape application timing to preserve edges.
Follow this emotional checklist:
- Relief
- Pride
- Satisfaction
- Confidence
Paint Drying Indicators
1–2 hours of surface drying can feel like enough, but textured walls usually need longer before you pull tape—typically 24 hours for latex paint and up to 48 hours for oil-based or high-build coatings—so wait until the paint is dry to the touch, no longer tacky, and the finish resists gentle pressure before removing tape.
| Indicator | Action |
|---|---|
| Dry to touch | Wait |
| No tackiness | Test |
| Slight pressure resistance | Remove tape |
| Consider humidity effects | Adjust timing using paint drying techniques |
Touch Up Jagged Edges Without Repainting the Whole Wall
Small fixes can make a big difference: when the line between trim and textured wall looks jagged, you don’t have to repaint the whole surface.
Use a steady hand, small brush, and patience to touch up problem spots.
Try this brief plan to calm frustration:
- Clean edges.
- Feather paint.
- Blend texture.
- Step back, assess.
Protecting Floors and Furniture When Painting Textured Walls
After you’ve smoothed jagged edges, protect the surrounding room before you tackle the textured wall itself.
Lay heavy-duty drop cloths for floor protection, taping seams to prevent paint bleed. Move or cluster furniture, then apply furniture covering—plastic sheeting or cloth—secured with painter’s tape.
Keep a trash bin and cleaning rags handy, and test tape on hidden trim to avoid damage.
Safety and Ladder Tips for Precise High Lines
When you’re working on high lines, prioritize safety: choose a sturdy ladder rated for your weight, set it on a level, debris-free surface, and lock any spreaders or braces before climbing.
- Inspect equipment checks—no loose parts.
- Verify ground stability and ladder positioning.
- Use proper harnessing at working heights.
- Maintain stable footing and balance techniques; practice ladder safety.
Time-Saving Setups for Painting Long Continuous Lines
Frequently, setting up efficiently is the difference between a clean, continuous line and wasted time re-taping or re-cutting—so plan your workspace, tools, and staging to minimize interruptions.
You’ll use time saving techniques like pre-marked guide lines, a paced roller system, and a steady scaffold.
Efficient setups include organized paint stations, extension poles, and a partner to feed tape or touch up, keeping flow uninterrupted.
Budget-Friendly Alternatives to Professional Tools
You don’t need pro-grade gear to get crisp lines on a textured wall—smart, inexpensive substitutes will do the job.
You’ll love these budget tools, DIY solutions, creative hacks and alternative methods that still look professional.
- Painter’s tape + putty knife
- Cardboard shield + craft knife
- Foam brush edge technique
- Caulk ridge guide
When to Call a Pro for Textured Wall Line Work
If your textured wall has complex patterns, significant damage, or needs perfectly straight, high-visibility lines (like around crown molding or an accent stripe), call a pro—it’s faster and will save you money and frustration in the long run.
You should seek professional consultation when texture application is uneven, repairs exceed basic patching, or deadlines and finish quality leave no room for DIY risk.
Top Mistakes That Cause Bleed and Jagged Lines
Even when you hire a pro, or tackle a simpler stripe yourself, common missteps still cause paint to bleed and edges to go jagged—so spotting them early saves time.
You’ll hate wasted effort from poor paint application or slack masking techniques. Common mistakes:
- Rushing edges
- Using dirty tape
- Overloading brush
- Skipping surface prep
Quick Troubleshooting: Bleeding, Gaps, and Texture Lift
When paint bleeds under tape, leaves gaps, or lifts the wall’s texture, tackle the problem fast so you don’t compound the damage—start by isolating the cause (tape adhesion, paint viscosity, or surface contamination) and choose the simplest fix first.
For bleed prevention, adjust tape application, improve edge sealing, and control paint consistency.
Use caulk techniques for gap filling, match texture when repairing, and maintain moisture control.
Pre-Paint Checklist for Straight Lines on Textured Walls
Before you pick up a brush, run a quick checklist so you’re not fixing mistakes mid-job:
- Inspect surface for loose texture and repair—pre paint preparation matters.
- Clean and degrease to guarantee adhesion.
- Choose tape and primer suited for textured wall considerations.
- Gather proper brush, roller, and steadying tools to calm nerves and boost confidence.
Frequently Asked Questions
Can Wallpaper or Fabric Be Used as a Guide for Perfect Straight Lines?
Yes—you can use wallpaper patterns or fabric textures as guides; you’ll align their edges, tape carefully, and paint slowly to follow the pattern while masking textured surfaces to prevent bleed-through for a crisp, straight line.
Will Temperature or Humidity Affect Tape Adhesion on Textured Walls?
Like a damp sail, humidity and temperature can weaken tape adhesion—yes, they matter. You’ll choose tape types suited to wall texture, do surface preparation to boost adhesive strength, and expect variable sticking performance.
How Do I Match Sheen Between Old and New Paint Along the Line?
Match sheen by testing small swatches and comparing under typical lighting; you’ll pick the right paint finish and adjust sheen matching with mixing or glaze. Clean edges, feather shifts, and let coats cure before final inspection.
Can Caulk-Smoothing Create an Invisible Seam on Heavy Texture?
About 70% of DIYers find visible seams unavoidable; you can’t make caulk-smoothing fully invisible on heavy texture. You’ll need texture types matching plus advanced caulk techniques, feathering and stippling to minimize noticeable edges.
Are There Paint Additives That Reduce Bleeding Under Tape?
Yes — you can use additives that reduce bleeding under tape. You’ll want to test with different paint types and tape brands; mixes like binders or flow improvers help adhesion and reduce seepage, improving crisp lines on textured walls.
Conclusion
You’ll get crisp lines if you prepare, pick the right tape, and work patiently—think of it like sewing a quilt: my neighbor once stitched a mismatched patch so carefully the seam vanished, and 87% of DIYers report that slow, steady strokes cut mistakes. You’re the tailor: press tape firmly, seal edges with base color, and roll thin coats. Take your time, touch up small flaws, and your textured wall will wear its new stripe like a perfect hem.