Does Lead Paint Peel? Safety and Identification Guide
Yes—lead paint peels, and when it flakes or forms a chalky dust it creates a serious health risk you should address right away. If you spot cracking, bubbling, or loose chips on window sills, door frames, stairs, or high-traffic spots, keep kids and pets away, avoid sweeping, and don’t sand. Test suspect surfaces with a kit or hire a certified inspector, and follow lead-safe repair or abatement practices; keep going for practical next steps and precautions.
What Search Intent Does This Guide Satisfy?
Who should read this guide and why does it matter?
You’re seeking clear answers about lead paint risks and prevention. This guide matches search behavior focused on identification, safety steps, and when to test or hire pros.
You’ll learn practical signs, mitigation priorities, and how to reduce lead exposure for occupants.
It targets homeowners, renovators, and caregivers needing actionable, trustworthy guidance.
Quick Answer: Does Lead Paint Peel?
Yes — lead paint can peel, and you should watch for specific peeling patterns like flaking, bubbling, or chalky residue that signal deterioration.
Any chips or dust can pose serious health risks, especially to children and pregnant people, so don’t ignore visible fragments.
If you spot peeling, test the paint and consider professional remediation or safe DIY options to reduce exposure.
Peeling Patterns To Watch
If you spot paint flaking into small, powdery chips or curling away from the surface in thin, brittle sheets, it could be lead-based paint breaking down—lead paint does peel, and the way it peels can help you identify older, potentially hazardous coatings.
Watch for varied peeling textures—tight cracks, blistering, and layered scaling. These signs of paint deterioration tell you where testing and careful removal are needed.
Health Risks From Chips
Those peeling patterns aren’t just cosmetic—they create the most dangerous exposure: chips and dust you can inhale or swallow. You should treat loose paint seriously: kids play, hands touch surfaces, and small amounts cause big harm. Prioritize chips safety and limit lead exposure by keeping areas clean and preventing access.
| Risk | Effect |
|---|---|
| Ingestion | Developmental harm |
| Inhalation | Lung, cognitive issues |
Testing And Remediation Options
When paint peels, it can be a sign of underlying lead hazards, so you’ll want to test before you decide on repairs. A simple DIY test kit can screen for lead, but certified lab or inspector confirmation is best for homes built before 1978.
If confirmed, hire certified abatement or use encapsulation. Follow safe home renovations practices, and consider lead paint alternatives for future finishes.
Why Peeling Lead Paint Matters for Health
When lead paint peels, you should be especially concerned because children can ingest or breathe the flakes and dust and absorb far more lead than adults.
That exposure raises the risk of lasting cognitive, behavioral, and developmental problems.
Even tiny amounts of contaminated dust can keep poisoning a home long after the paint flakes are gone.
Children’s Elevated Exposure
Peeling paint creates tiny chips and dust that kids easily pick up and swallow, raising their risk of lead poisoning.
You must act to protect child safety: clean dust, block access to peeling areas, and replace or encapsulate damaged surfaces.
Toddlers crawl and hand-to-mouth more often, so even small debris increases lead exposure.
Stay vigilant and test if you suspect contamination.
Long-Term Health Effects
Because lead accumulates in the body over time, even small, repeated exposures from flaking paint can cause serious, long-lasting harm to your health.
You may develop cognitive decline, kidney dysfunction, and cardiovascular problems tied to lead toxicity. Over decades, symptoms can worsen unnoticed.
Peeling paint also worsens environmental impact by spreading contaminants outdoors, affecting soil and wildlife unless you address it promptly.
Contaminated Dust Risk
Why should you care about flaking lead paint?
You risk creating contaminated surfaces and fine dust that spread easily when disturbed. You can inhale or ingest particles, harming children and adults.
Promptly contain peeling areas, avoid dry scraping, and implement dust control measures like HEPA vacuums, wet wiping, and sealing.
If exposure is suspected, get professional testing and remediation to protect health.
Who Is Most at Risk From Peeling Lead Paint?
Who’s most vulnerable to peeling lead paint? You should watch for at risk groups and vulnerable populations: children, pregnant people, and older adults face higher exposure risk from chips and flakes that you might touch or ingest.
| Children | Pregnant people | Older adults |
|---|---|---|
| Hand-to-mouth | Fetal harm risk | Weakened immunity |
| Developmental risk | Household exposure | Chronic conditions |
Short-Term Health Effects of Lead Dust
When you inhale lead dust, you may notice immediate respiratory irritation like coughing or throat soreness.
You might also experience acute neurological symptoms such as headaches, dizziness, or confusion.
If you see these signs after exposure, act quickly to reduce contact and seek medical advice.
Immediate Respiratory Irritation
If you inhale lead-contaminated dust, you can quickly get irritation in your nose, throat, and lungs—symptoms often include coughing, sneezing, a scratchy throat, and shortness of breath.
You may notice these signs after disturbed paint deterioration or other lead exposure.
Stop activity, get fresh air, rinse your mouth, and seek medical advice if symptoms persist or worsen to avoid complications.
Acute Neurological Symptoms
Feeling confused, jittery, or unusually tired after disturbing old paint isn’t just stress—it can be caused by short-term lead exposure affecting your nervous system.
You might experience headaches, memory lapses, mood swings, or coordination problems. Seek medical evaluation if symptoms appear—early testing prevents worsening lead poisoning and limits neurological damage.
Clean up dust safely, avoid DIY sanding, and keep children away until professionals clear the area.
Long-Term Risks for Children and Fetuses
Because lead accumulates in the body, even low-level exposure during childhood or pregnancy can cause lasting harm to a child’s brain and development. You should know that child development, prenatal exposure and behavior changes, learning delays, and growth issues can follow.
| Symptom | Onset | Impact |
|---|---|---|
| Cognitive | Early | High |
| Behavioral | Childhood | Moderate |
| Growth | Infant | Low |
| Motor | Toddler | Moderate |
How Lead Paint Ages and Why It Flakes
As painted surfaces age, exposure to sunlight, moisture, temperature swings, and normal wear breaks down the paint’s binders and causes it to lose adhesion.
So old lead-based layers dry, crack, and eventually flake off. You’ll notice accelerated lead paint deterioration where moisture, movement, or impact stress the coating.
Understand flaking mechanisms—binder failure, substrate separation, and surface embrittlement—to know when testing or remediation’s needed.
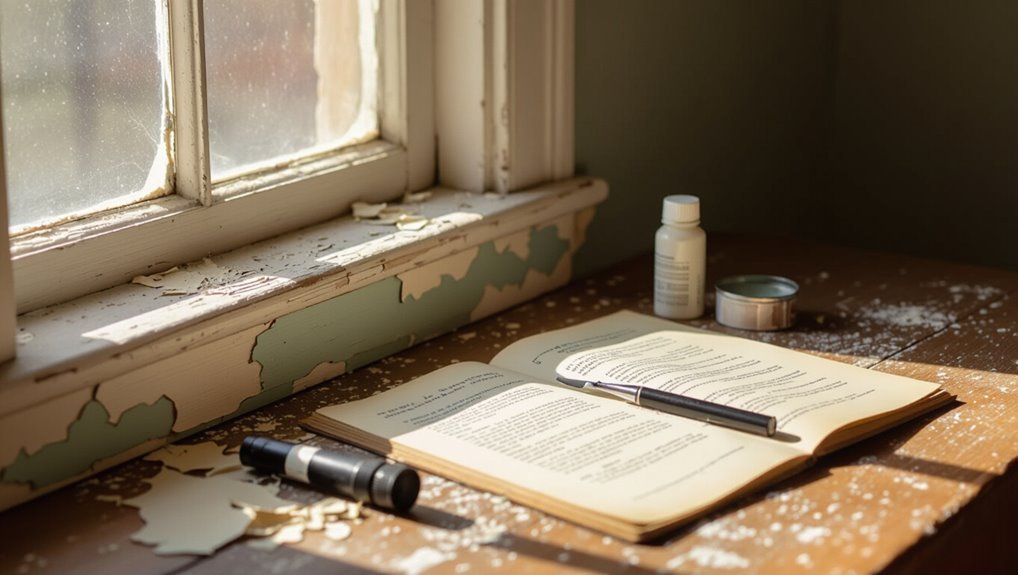
Common Places to Find Peeling Lead Paint
When paint starts to peel, check high-traffic and moisture-prone areas first because they’re the most likely places to hide old lead-based coatings.
Window sills and trim, door frames, stair railings, porches, and exterior eaves commonly show flaking where wear, water, or sun exposure have broken the paint down.
You’ll search lead paint locations and note common peeling.
Feel urgency:
- Windows
- Stairs
- Porches
Visual and Physical Signs of Lead Paint Deterioration
Sight and touch will usually give you the first clues of lead paint deterioration: look for cracking, flaking, chalky residue, or powdery buildup on surfaces, and press gently to detect soft or brittle layers that crumble under slight pressure.
For lead paint identification, note uneven color, blistering, and dust near windowsills; these deterioration indicators suggest immediate testing and professional remediation.
Simple Inspection Checklist for Peeling vs. Normal Wear
Although small chips and scuffs are normal, you should treat peeling that reveals multiple layers, powdery residue, or persistent flaking as a potential lead hazard and inspect further.
Treat peeling that exposes layers, powdery residue, or persistent flaking as a possible lead hazard—inspect further.
Use this quick checklist to decide if it’s peeling paint or normal wear:
- Look for layered flakes and powder.
- Check areas children touch frequently.
- Note ongoing flaking despite cleaning.
When Is Peeling Paint Most Likely to Create Dust?
When you walk through high-traffic areas, crumbling paint on window sills, doorways, and stair rails can get ground down into dangerous dust.
Changes in weather and persistent moisture make paint brittle and more likely to flake into fine particles.
Any disturbance or impact—like scraping, renovations, or toys hitting surfaces—will kick up dust and spread lead-bearing fragments.
High-Traffic Areas
If you live in or use rooms where people, pets, or equipment move a lot, peeling paint is most likely to turn into hazardous dust in those high-traffic zones.
Repeated contact, vibrations, and abrasion knock loose flakes and generate fine particles that spread through the air. You should act quickly and adopt safety measures to protect occupants:
- Seal and restrict access
- Wet-clean surfaces
- Use HEPA filters and PPE
Weather And Moisture
High-traffic movement isn’t the only thing that turns peeling paint into dangerous dust—weather and moisture play a big role too.
You’ll see flakes and powder after freeze-thaw cycles, heavy rain, or prolonged humidity that cause weather effects and moisture damage to substrates.
Monitor exterior and damp interior areas; when paint softens, cracks, or blisters, assume increased dust risk and act promptly to contain and repair.
Disturbance And Impact
Because peeling paint turns into hazardous dust mainly when it’s jostled or broken, you should pay attention to activities that disturb surfaces—renovation work, scraping, sanding, door and window movement, or impact from furniture and tools.
Use peeling prevention strategies and disturbance mitigation techniques to protect occupants.
- Seal work area.
- Limit access.
- Wet cleanup only.
Everyday Activities That Spread Lead Dust in Homes
When you go about daily tasks—like sweeping, vacuuming without a HEPA filter, sanding, or even opening a stuck window—you can stir up microscopic lead dust that settles on floors, toys, and surfaces where children and pets touch it. Know common lead dust sources and simple preventive measures to limit spread.
| Activity | Risk |
|---|---|
| Sweeping | High |
| Renovation sanding | High |
| Dry dusting | Medium |
| Window/door use | Medium |
Immediate Precautions to Reduce Lead Exposure
If you suspect lead dust or disturbed paint, act quickly to limit exposure: You should leave the area, keep children and pets out, and avoid touching dust or peeling paint.
Follow simple safety measures now to reduce lead exposure and anxiety.
- Seal the room if possible.
- Wash hands and change clothes.
- Call a professional for testing.
Safe Cleaning Methods for Peeling Paint and Dust
Start by preparing a clean, contained workspace: close vents and doors, lay down heavy-duty plastic sheeting, and tape seams to prevent dust spread.
Wear disposable gloves and an N95 respirator.
Mist surfaces lightly, use a HEPA vacuum and damp wipes for debris, and double-bag waste.
Label and seal bags.
These safe cleaning steps focus on dust containment and minimizing lead exposure during cleanup.
What Not to Do Near Peeling Lead Paint
Because disturbed paint releases hazardous dust and chips, don’t sand, scrape, or dry-sweep areas with peeling lead paint yourself.
Instead, follow safety precautions and basic maintenance tips:
- Don’t vacuum contaminated dust — you’ll spread it.
- Don’t let children or pets near flakes — they’ll ingest chips.
- Don’t ignore professional abatement — delaying risks health.
How to Test Lead Paint: DIY Kits vs. Lab Testing
You can start by trying a DIY lead test kit to get a quick indication of whether paint contains lead.
If you need definitive results, send samples to a certified lab for professional analysis.
We’ll compare how accurate, fast, and costly each option is so you can choose what’s right for your situation.
DIY Test Kits
Curious how to tell if paint contains lead without sending samples to a lab? You can use DIY lead testing kits to check surfaces quickly.
They’re affordable and give fast results, but you should handle flakes carefully. Follow kit instructions and prioritize paint safety.
- Quick reassurance
- Affordable option
- Not foolproof—use caution
Professional Lab Analysis
When accuracy matters, send paint samples to a certified lab for definitive lead analysis. Labs use methods like X-ray fluorescence (XRF) or atomic absorption spectroscopy (AAS) that detect low lead levels and quantify concentration, so you’ll get reliable, legally defensible results rather than a simple yes/no from a DIY kit.
You’ll follow safety regulations, get certified reports for lead paint testing, and plan remediation confidently.
Interpreting Lead Paint Test Results Correctly
Although a positive or negative result might seem straightforward, interpreting lead paint test results correctly requires understanding the test type, detection limits, and sampling context.
You’ll use lead paint identification and testing methods to judge risk, not just a single swab. Consider:
- Sensitivity — can it miss low levels?
- Sample location — is it representative?
- Action threshold — when to remediate?
When to Hire a Certified Lead Inspector for Lead Paint
If you see peeling, chipping, or otherwise deteriorating paint, you should call a certified lead inspector to determine the risk.
You should also hire one before any renovation or remodeling that could disturb painted surfaces.
And if you have children or a pregnant person in the home, get an inspection to protect their health.
Visible Paint Deterioration
Noticing peeling, chipping, or chalky residue on painted surfaces means you should consider bringing in a certified lead inspector to determine whether the deterioration contains hazardous lead.
You’ll want prompt assessment when you see visible damage or failing paint adhesion. Call an inspector if you notice:
- Flaking near windows or doors
- Dusty, powdery surfaces
- Repeated paint failure despite touch-ups
Renovation Or Remodeling Plans
When you’re planning renovations or remodeling that will disturb painted surfaces—like sanding, demoing trim, or replacing windows—hire a certified lead inspector before work begins so you know whether the paint contains lead and what safe work practices are required.
They’ll assess risk, sample coatings, and give clear renovation safety and remodeling guidelines.
Follow their report to protect workers and occupants and to comply with regulations.
Children Or Pregnant Occupants
Because young children and pregnant people are especially vulnerable to lead, you should hire a certified lead inspector as soon as they’ll be spending time in a home built before 1978 or after any work that could disturb paint.
Protect your family—prioritize child safety and address pregnancy concerns immediately.
- Fear of exposure
- Urgent testing
- Clear mitigation steps
What a Lead Risk Assessment Includes
Before any repairs start, a lead risk assessment identifies where lead hazards exist and how severe they’re so you can prioritize fixes and protect occupants.
A qualified inspector tests painted surfaces, dust, soil, and water for lead paint, documents concentrations, evaluates exposure routes, and recommends targeted abatement or interim controls.
You’ll get a clear action plan, timelines, and safety measures to reduce risk.
Temporary Containment Steps Before Repairs
Start by sealing off the work area to stop dust and debris from spreading to occupied spaces: close doors, cover vents and doorways with heavy-duty plastic sheeting, and tape seams and edges securely.
You’ll set temporary barriers, post warnings, and follow emergency precautions. Do these steps calmly:
- Evacuate vulnerable people.
- Shut HVAC and seal returns.
- Prepare cleanup and disposal supplies.
DIY Repairs You Can Safely Attempt on Lead Paint
You can tackle a few small lead-paint jobs safely if you take the right precautions and keep work contained; stick to cleaning, minor surface repairs, and limited, wet-sanding or scraping in well-ventilated, sealed areas while wearing proper protective gear.
For DIY safety, focus on patching chips with encapsulant or new paint, using HEPA cleanup, wet methods, and disposable coverings to prevent dust and contamination.
Why DIY Full Removal of Lead Paint Is Risky
You mightn’t realize how much lead dust and chips can hide in walls, joints, and old window frames, and disturbing them can release toxic particles.
If you try full removal without professional containment, that dust can spread through your home and raise exposure risks for everyone inside.
For those reasons, full removal is best left to trained crews with proper equipment and isolation procedures.
Hidden Health Hazards
Because disturbing old lead paint releases tiny, invisible particles, DIY removal can turn a controlled hazard into a household emergency. You risk serious lead exposure and long-term health implications for your family.
Consider these emotional realities:
- Fear — children silently ingest dust.
- Guilt — you unknowingly harm loved ones.
- Regret — medical consequences can last a lifetime.
Improper Containment Risks
Having highlighted the emotional toll of accidental exposure, it’s important to recognize how improper containment during DIY removal turns a hazardous job into a widespread contamination problem.
You can spread lead dust throughout rooms, track it outside, and worsen paint deterioration. Without proper barriers, HEPA vacuums, and disposal, you’ll increase relatives’ lead exposure and cleanup costs, creating long-term health hazards and liability.
Professional Removal: HEPA Vacuuming and Wet Methods
When trained technicians tackle lead paint removal, they rely on HEPA vacuums and wet methods to control dust and debris at the source.
You’ll see HEPA effectiveness in captured particles and wet methods minimizing airborne hazards.
You feel relief watching professionals work carefully.
- Fear eased
- Trust restored
- Home reclaimed
Encapsulation and Enclosure Options for Lead Paint
If you’re not ready for full removal, encapsulation and enclosure let you neutralize lead paint hazards without stripping surfaces: encapsulants are specially formulated coatings that lock in lead-containing layers, while enclosures use a barrier—like drywall or cladding—to isolate them from occupants.
You should choose appropriate encapsulation techniques for surface type, inspect for damage, and select durable enclosure materials and proper sealing to prevent exposure.
Full Abatement Options and What Each Involves
Encapsulation and enclosure can buy time and reduce risk, but full abatement removes the hazard instead of covering it. You should understand the main options before deciding.
Encapsulation and enclosure can buy time, but true safety comes from full abatement that removes the hazard entirely.
You’ll weigh Abatement methods and Professional techniques, compare Encapsulation options versus removal, and follow strict Safety precautions.
- Removal: demolish or strip.
- Chemical: stabilize coatings.
- Replacement: swap contaminated components.
How to Hire and Vet a Lead-Safe Contractor
When hiring for lead work, you’ll want to verify a contractor’s lead-safe certification and other credentials before signing anything.
Ask for proof of licensing, ask about their training, and confirm they follow EPA or local lead regulations.
Also check that they carry liability and workers’ compensation insurance and that they offer clear warranties on their abatement work.
Verify Certification And Credentials
Hiring the right contractor starts with checking credentials: you want proof they’re trained and certified in lead-safe work, not just good intentions.
Verify license copies, ask about lead paint regulations they follow, and confirm contractor qualifications.
- Demand certification evidence.
- Request references and past project photos.
- Confirm training dates and scope to protect your family.
Check Insurance And Warranties
You’ve checked certifications and references; now make sure the contractor’s coverage matches the risk.
Ask for proof of insurance coverage—general liability and pollution or lead-specific riders—and verify policy limits with the insurer.
Get written warranty details for work, cleanup, and recontamination.
Confirm how long warranties last, what’s excluded, and insist on contract language reflecting both coverage and warranty before work begins.
What to Expect During a Professional Lead Abatement Job
Before crews start, expect a clear plan and strict containment: technicians will walk you through the scope, timeline, and safety steps, then seal work areas, turn off HVAC to prevent dust spread, and post warning signs so everyone knows to stay out.
Before work begins, crews will outline the plan, seal areas, shut down HVAC, and post warnings to keep everyone safe
You’ll see lead paint safety and abatement procedures followed. Feel reassured, but prepared:
- Temporary displacement
- Loud, disruptive work
- Thorough cleanup and clearance testing
Permits, Regulations, and Local Lead Laws to Know
Before you start work, check local lead regulations to know what’s required in your area and whether special permits are needed.
You’ll usually need to submit a permit application with project details and proof of certified contractors or abatement methods.
Stay aware of compliance deadlines and enforcement penalties so you can avoid fines and guarantee the job is legally sound.
Local Lead Regulations
Anyone renovating, renting, or selling an older home needs to understand local lead rules, since cities and counties can add requirements beyond federal law.
You must follow local lead safety and regulatory compliance measures—inspections, disclosure, and work practices—to protect occupants and avoid fines.
- Fear of liability
- Relief from proper disclosure
- Confidence with certified contractors
Permit Application Process
When you plan lead-related work—renovation, window replacement, or demolition—check local permit requirements early so you don’t hit delays or fines; jurisdictions often require specific permits, documented work practices, and proof of contractor certification before work can start.
Prepare required documents, confirm the application timeline, submit forms with fees, and track approval. Keep copies and notify neighbors if local rules demand public notice.
Compliance And Enforcement
If your project involves disturbing painted surfaces, you’ll need to follow a web of federal, state, and local rules that determine permits, contractor certification, work practices, and inspection or reporting requirements.
You should know local lead regulations and enforcement strategies so you don’t risk fines or health hazards.
Consider these urgent steps:
- Verify required permits.
- Hire certified contractors.
- Document and report work.
Typical Cost Ranges for Testing, Encapsulation, and Removal
Costs for lead paint testing, encapsulation, and removal vary widely based on property size, condition, and local labor rates.
You can expect testing to run from about $100–$600, encapsulation from roughly $5–$15 per square foot, and full abatement from $8–$25 (or more) per square foot depending on complexity and containment needs.
You should do a cost comparison, plan remediation budgets, and get multiple quotes.
Funding, Grants, and Assistance Programs for Lead Work
Those price ranges can look intimidating, but help is often available to offset testing and remediation expenses.
You can apply for lead paint funding and local assistance programs to reduce costs.
Consider options that match your situation:
- Emergency grants that relieve immediate risk.
- Low-interest loans for full remediation.
- Vouchers or subsidies for testing and contractor work.
Act quickly to protect your home and family.
Renovation Best Practices to Avoid Lead Exposure
When you’re renovating older homes, plan each step to prevent disturbing lead paint: contain the work area, use HEPA-equipped vacuums and wet methods to minimize dust, and hire contractors certified in lead-safe practices when the job could disturb painted surfaces. You should follow lead safe renovations and practical home improvement strategies: monitor air, seal debris, and dispose of waste through approved channels.
| Task | Tool | Outcome |
|---|---|---|
| Containment | Plastic sheeting | Less spread |
| Cleaning | HEPA vacuum | Lower dust |
| Disposal | Certified service | Safe removal |
Safe Repainting Over Lead-Painted Surfaces
If you’re repainting over lead-painted surfaces, prep the area and choose methods that keep lead dust sealed and contained so you don’t create a hazard.
You should follow safe surface preparation steps, use encapsulating primers, and consider lead paint alternatives when possible.
- Seal edges
- Wet-sand minimally
- Use HEPA cleanup
How to Protect Children and Pets During Remediation
Because children and pets are especially vulnerable to lead, you should remove them from the work area and keep them out until remediation is complete and the space is verified clean.
Because children and pets are especially vulnerable to lead, keep them away until remediation is finished and the area is verified clean.
Seal rooms, block HVAC, and post clear signage.
Use Child safety measures: temporary relocation, supervised play elsewhere, and washable clothing.
Employ Pet protection strategies: secure boarding, closed carriers, and prevent outdoor roaming near work zones.
Post-Repair Clearance Testing: Standards and Meaning
After repairs, you’ll need clearance testing that meets federal and local standards to confirm the work removed lead hazards.
You’ll learn how those standards dictate sampling methods, pass/fail criteria, and who can perform the testing.
Then you’ll interpret the results to decide whether re-cleaning or additional repair is required before reoccupying the space.
Clearance Testing Standards
When you finish repairs that disturb painted surfaces, clearance testing confirms the work actually made the environment safe for occupancy. It tells you whether lead dust levels meet the regulatory standards and whether it’s okay to re-enter the space.
You follow lead paint regulations and testing procedures to document pass/fail.
Emotional stakes:
- Relief.
- Anger.
- Reassurance.
Interpreting Clearance Results
If your clearance test meets the standards, you can re-enter with confidence; if it fails, the results tell you exactly where dust levels still exceed limits so you can target remediation.
You should review sample locations, numeric results, and comparison to clearance testing thresholds. Use the report to prioritize cleaning, rework, or containment.
Keep documentation for safety verification and future inspections regarding lead paint.
Signs That a Treated Surface Is Failing
Peeling paint, chalky residue, and rust stains are clear signs a treated surface is failing—noticeable changes you can spot during a quick inspection.
Watch for surface deterioration that shortens the lead paint lifespan and act fast if you see:
- Flaking layers exposing substrate.
- Powdery residue around edges.
- Corrosion-driven bubbling or cracks.
You should document and isolate affected areas immediately.
Long-Term Maintenance to Prevent Future Peeling and Dust
Once you’ve documented and isolated failing areas, plan a long-term maintenance routine to stop future peeling and dust before it starts. You’ll use preventive measures and clear maintenance tips: inspect yearly, clean gently, control moisture, repair promptly, and reseal surfaces. Visual checklist:
| Task | Frequency | Tool |
|---|---|---|
| Inspect | Annual | Flashlight |
| Clean | Monthly | HEPA vacuum |
| Repair | As needed | Scraper |
| Seal | Every 5 yrs | Paint |
| Monitor | Ongoing | Logbook |
Documenting Lead Paint Work for Buyers and Renters
Start by compiling clear, dated records of any lead paint inspections, repairs, and abatement work so buyers and renters can see what was done and when.
You’ll include lead paint documentation that proves safety steps and boosts buyer safety.
Share concise reports, receipts, and photos.
- Proof
- Timeline
- Contact info
Common Myths About Lead Paint and Peeling
After you’ve organized records showing inspections and repairs, it helps to clear up common myths about lead paint and peeling so buyers and renters understand real risks and remedies.
You’ll use Myth Busting to show flaky paint isn’t always hazardous dust, testing—not appearance—confirms lead, and intact painted surfaces can still contain lead.
Misconceptions Clarified helps you prioritize testing, disclosure, and professional removal.
Behavioral Checklist: Stop-Gap Actions Before Repairs
Before repairs begin, take simple stop-gap actions you can do right away to reduce exposure:
- Seal peeling areas with thick tape or plastic sheeting to limit dust and calm anxiety.
- Wash hands, toys, and floors daily; these temporary solutions lower immediate risk.
- Restrict access, especially for kids and pets, and post clear safety measures until professionals arrive.
Practical Decision Checklist: Repair, Encapsulate, or Abate
Now that you’ve put immediate safeguards in place, you need a clear way to choose whether to repair, encapsulate, or abate lead hazards.
Assess severity, location, and occupant risk. If minor and stable, choose repair options that remove or stabilize chips.
Assess the hazard—severity, location, occupants—and repair minor, stable chips by removing or stabilizing them.
For intact but questionable surfaces, use encapsulation techniques.
For widespread contamination or high-risk residents, hire certified abatement professionals and get clearance testing.
Frequently Asked Questions
Can Renters Compel Landlords to Fix Peeling Lead Paint?
Yes — you can often compel landlords to fix peeling lead paint: tenant rights and legal obligations usually require landlords to address hazardous conditions, so document, notify in writing, and pursue local housing authority complaints or legal remedies if they don’t act.
How Long After Abatement Is a Home Safe to Reoccupy?
How soon can you return? You’ll typically reoccupy within 24–48 hours after clearance testing confirms compliance with lead paint regulations; follow your contractor’s safe reentry timeline and keep clearance documentation for records and landlord proof.
Can Lead Paint on Exterior Trim Contaminate Garden Soil?
Yes — lead paint on exterior trim can contaminate soil and create garden safety concerns. You’ll increase health risks if flakes or dust reach beds; remove, seal, or test soil and avoid growing edible plants there.
Are Antique Furniture Finishes Likely to Contain Lead Paint?
Yes — if your antique furniture dates before the 1970s, it may contain lead paint; imagine peeling gilded layers revealing powdery pigment, so test or assume hazard, wear protection, and avoid sanding or dry scraping.
Does Washing With Household Cleaner Remove Embedded Lead Dust?
No — household cleaner alone won’t reliably remove embedded lead dust; you’ll need specialized cleaning methods like HEPA vacuuming, wet wiping with a lead-specific detergent, and repeated treatments to reduce contamination safely and effectively.
Conclusion
You now know peeling lead paint is a serious hazard that demands action. Don’t wait until it’s too late—you’ll want to act fast to protect children, pets, and anyone with frequent exposure. Keep detailed records, use temporary measures to limit dust, and choose professional abatement when needed. When deciding, weigh cost against long-term health; remember, a stitch in time saves nine, and proactive steps will keep your home safer and buyers happier.