How to Paint Wood Ceiling for a Beautiful Natural Finish
You can get a beautiful, natural wood‑ceiling finish by prepping, repairing, and applying thin, even coats that enhance grain. Start by sanding with the grain, cleaning dust, and filling knots or cracks. Choose a clear or semi‑transparent stain or low‑sheen topcoat, apply 2–3 thin coats with a brush, roller, or sprayer, and control humidity for proper drying. Protect surroundings, work safely on a ladder, and follow curing times — keep going for detailed tips and troubleshooting.
Quick Plan: The One‑Paragraph Roadmap for Finishing a Wood Ceiling
Start by prepping the space: remove or cover furniture, lay drop cloths, and tape edges and fixtures.
Next, sand lightly, clean dust, and assess stain or damage.
Sand gently, remove dust, and check for stains or damage before proceeding.
Prime if needed, then apply paint in thin, even coats, following grain.
Allow drying between coats, inspect for drips, and finish to balance natural aesthetics with wood preservation.
Clean tools and ventilate well.
What “Natural Finish” Means for a Wood Ceiling
When you choose a natural finish for a wood ceiling, you’re aiming to preserve the wood grain so its character still shows through.
Pick a low‑sheen finish—like satin or matte—to avoid reflective glare while keeping the surface subtle.
You can also use a clear or lightly tinted product to enhance the wood’s natural tone without masking it.
Preserve Wood Grain
One key choice you’ll make for a wood ceiling is whether to keep the natural grain visible, because a natural finish highlights the wood’s texture, color variations, and knot patterns instead of hiding them under opaque paint.
You’ll use wood preservation techniques like sealing and UV-resistant oils, and apply grain enhancement methods—gentle sanding, stain glazing, or transparent varnish—to protect and accentuate the grain without masking it.
Choose Low-Sheen Finishes
If you want a natural finish that feels understated and timeless, choose a low-sheen topcoat—matte, satin, or eggshell—to keep the wood’s texture visible while reducing glare.
You’ll appreciate low sheen benefits: subtle reflection, fewer fingerprints, and easier touch-ups.
Apply thin, even coats and let each cure fully to maximize finish durability, so your painted wood ceiling stays resilient and authentic.
Enhance Natural Tone
Low-sheen finishes highlight the wood’s grain, but you can go further to enhance the natural tone so the ceiling feels warm and lived-in.
Use these tips to keep wood tone subtle and achieve color harmony with the room.
- Test stains on scrap wood first.
- Wipe stains for softer effect.
- Layer thin glazes sparingly.
- Match trim undertones to ceiling.
Who This Guide Is For and How to Use It
Who is this guide for, and how should you use it? You’re a DIYer or pro wanting wood ceiling benefits and clear maintenance tips. Follow stepwise advice, pick compatible products, and work safely. Use the quick-reference table below to match needs and outcomes.
| User Type | Best Focus |
|---|---|
| DIY homeowner | Simplicity, durability |
| Contractor | Efficiency, specs |
| Renter | Temporary options |
| Designer | Aesthetics, longevity |
Choose Stain vs. Semi‑Transparent vs. Clear Coat
When you pick a finish, decide whether you want color plus visible grain or just protection.
A stain adds pigment while still showing the wood’s texture, whereas a clear coat only seals and shields without changing the look.
Choose semi‑transparent if you want a bit of tint with grain still visible.
Stain: Color And Grain
Color and grain determine the look and feel of your ceiling more than any other finish, so pick a product that matches your aesthetic and maintenance needs.
You’ll choose stain for color selection and grain enhancement, balancing hue with transparency.
Consider these factors before staining:
- Wood species and undertone
- Desired translucency
- Sample-testing on scraps
- Maintenance frequency and touch-up ease
Clear Coat: Protection Only
After you’ve settled on a stain tone and how much grain you want to show, decide whether you need a product that adds color or one that only protects. Choose clear coat options when you want protection without tint. Test sheen and dry time. Use proper application techniques: thin coats, even strokes, light sanding between coats for durability and consistent appearance.
| Type | Effect |
|---|---|
| Waterborne | Clear, fast-dry |
| Oil-based | Deeper glow |
Picking the Right Sheen for a Wood Ceiling
Because sheen affects both appearance and durability, you’ll want to choose it deliberately for a wood ceiling.
Consider sheen types and finish longevity to balance look and maintenance.
Pick satin for subtle glow, eggshell for low reflection, semi-gloss where cleaning matters, or matte for natural feel.
- Satin: balanced sheen
- Eggshell: soft reflection
- Semi-gloss: easy cleaning
- Matte: minimal shine
Tools and Materials for Overhead Finishing
Usually, you’ll want to gather the right tools and materials before you even set up a ladder: a sturdy ladder or scaffold, an extension pole for rollers, quality brushes and a small angled brush for trim, drop cloths, painter’s tape, appropriate primers and ceiling paint in your chosen sheen, sandpaper or sanding blocks, a tack cloth, and safety gear like goggles and a dust mask.
Choose brush types for edges, rollers for flats, and select primers and paints that guarantee finish durability; keep replacement brushes, clean rags, and a lightweight vacuum handy.
Identify Your Ceiling’s Wood Type and Condition
Start by identifying the wood species—pine, oak, or a softwood will take paint differently than a hardwood.
Then inspect the surface for cracks, rot, mold, or loose boards so you know what repairs are needed.
Finally, check for previous finishes like varnish, stain, or oil, since they affect adhesion and prep methods.
Determine Wood Species
Grain, color, and knot patterns will tell you a lot about the wood on your ceiling, so take a close look before you pick a paint system.
Use wood characteristics to guide species identification—pine, cedar, oak, or maple have different tannins and grain that affect primer choice.
- Pine: resinous, knotty
- Cedar: aromatic, stable
- Oak: open grain
- Maple: tight grain
Assess Surface Condition
Now that you’ve identified the wood species, check the surface for damage and finish so you know how to prep it.
Inspect for cracks, warping, rot, insect holes, and loose boards. Note sanding needs and any bare spots requiring primer.
Record areas needing repair and plan surface preparation steps.
Include simple maintenance tips to preserve the finished ceiling long-term.
Check For Previous Finishes
Before you begin prepping, identify any previous finishes on the ceiling so you know what solvents, primers, or sanding methods you’ll need; older varnish, shellac, lacquer, or paint will each demand different approaches.
Check adhesion, discoloration, and wood type to plan wood ceiling maintenance for finish longevity.
- Test solvent on a hidden spot
- Sand adhesion points
- Use appropriate primer
- Replace damaged boards
When to Strip Old Finish Versus Coat Over It
If the old finish is mostly intact, smooth, and well-adhered, you can usually paint right over it; but if it’s flaking, discolored, or built up with many coats, you’ll need to strip it first to get a stable, attractive result.
Evaluate adhesion and texture, then choose stripping techniques or simpler sanding.
Pick coating methods compatible with the cleaned surface to guarantee long-lasting coverage.
Repair Cracks, Knots, and Nail Holes First
Before you paint, walk the ceiling and assess every crack, knot, and nail hole so you know what needs fixing.
Use a suitable wood filler or epoxy to fill knots and cracks, pressing it in firmly and wiping away excess.
Once cured, sand the repairs smooth so the surface is even and ready for primer.
Assess Damage Areas
Start by scanning the entire ceiling for cracks, loose knots, and nail holes so you know exactly what needs fixing before you paint.
Perform a quick damage assessment, note location and severity, and plan repair techniques. Prioritize structural issues, then cosmetic spots. Check lighting angles to reveal defects.
- Mark deep cracks
- Flag loose knots
- Count nail holes
- Photograph problem areas
Fill Knots And Cracks
Now that you’ve mapped the trouble spots, tackle cracks, loose knots, and nail holes so the finish lays down smooth.
Use a quality knot filler on oily or loose knots, pressing it in firmly.
For splits, apply an appropriate crack treatment, forcing compound deep into gaps.
Let fillers cure fully, then check adhesion before priming or painting to prevent bleed-through and failure.
Smooth And Sand Surface
Smooth the repaired areas and the rest of the ceiling with a medium-grit sandpaper, blending filler seams and feathering edges so the surface reads uniformly.
You’ll use proper sanding techniques to avoid gouges and guarantee consistent surface preparation before priming.
- Sand with the grain
- Use a sanding block for flatness
- Vacuum and tack cloth between passes
- Inspect under raking light
Proper Sanding Steps for an Even Surface
Before you apply any primer or paint, sand the ceiling methodically so the surface is uniform and free of mill glaze, old finish, and raised grain.
Use progressive grits—start with 80–100 to remove flaws, follow with 120–150 for leveling, finish with 180–220 for smoothness.
Employ proper sanding techniques and tack cloths as part of surface preparation to avoid swirl marks and guarantee even adhesion.
How to Clean and Degrease a Wood Ceiling Safely
Anyone tackling a wood ceiling should remove dust, grease, and residues thoroughly so paint or primer will stick evenly; you’ll use mild cleaning solutions, test finishes, and safe degreasing techniques to avoid damage.
Anyone prepping a wood ceiling should thoroughly remove dust, grease, and residues so paint or primer adheres evenly.
Follow simple steps and wear gloves.
- Vacuum loose dust first
- Wipe with diluted cleaner
- Apply degreasing technique sparingly
- Rinse and dry completely
How to Protect Walls, Fixtures, and Floors Below
Once the ceiling is clean and dry, you’ll want to shield the room below so dust, drips, and paint fumes don’t create a new mess.
Lay a durable floor covering, tape edges along baseboards for wall protection, and wrap lights, vents, and fans for fixture shielding.
Plan space preparation: remove fragile items, ventilate, and keep a clear pathway for ladders and tools.
Best Primers for Wood Ceilings and When to Use Them
When you’re ready to prime, pick a product that matches the wood type and the job: choose wood ceiling primers that control tannin bleed, seal knots, or enhance adhesion.
Match oil- or water-based primers to finish and location. Use proper application techniques for even coverage.
- Tannin-blocking oil primer
- Water-based stain-blocker
- Shellac knot sealer
- Adhesion-promoting bonding primer
Test Stain Color and Transparency On‑Site
After priming, you’ll want to test stain color and transparency on-site to see how the wood species, grain, and primer affect the final look.
Apply small stain samples in inconspicuous areas, varying coats and wipe‑back.
Use simple testing techniques: label each sample, photograph in natural and artificial light, and evaluate once dry to choose the right tone and translucency.
Apply Stain or Semi‑Transparent Finish: Step‑by‑Step
Start by laying out your tools, mixing any stain to the tested ratio, and planning your work by ceiling panels so you won’t miss spots or overload the brush.
Start by arranging tools, mix stain to tested ratio, and work panel-by-panel to avoid missed spots.
Then follow a clear stain application sequence and proven finish techniques:
- Wipe grain, remove dust
- Apply thin even coats
- Tip off streaks immediately
- Let recommended dry time between coats
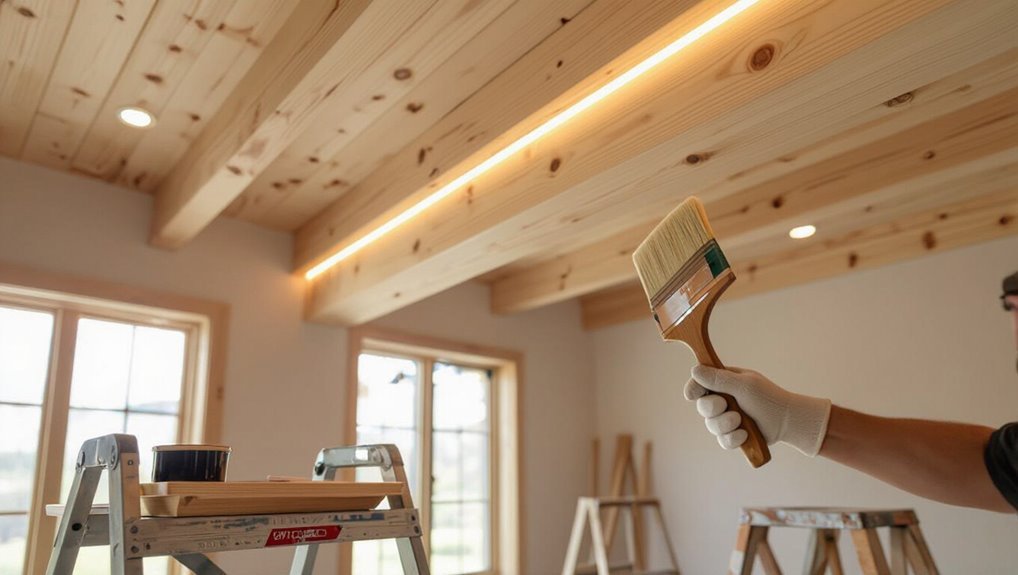
Brush, Roller, or Sprayer: Pick the Right Method
You’ll choose your tool based on the look and speed you want: a brush gives precise control for detailed trim and grooves.
A roller covers flat areas evenly with minimal streaks.
A sprayer blasts on paint fastest, ideal for large ceilings but needs masking and practice.
Brush For Detailed Work
One tightly angled brush gives you control where a roller or sprayer can’t—along beams, trim, and in tight corners—so you’ll reach nooks without glazing over texture or leaving drips.
Use detailed techniques and choose brush types for crisp edges, feathering, and small repairs.
- Cut in along beams
- Work with grain
- Tap excess paint
- Blend edges smoothly
Roller For Even Coverage
After cutting in with a brush, grab a roller to cover large flat areas quickly and evenly; it lays down paint faster than a brush and keeps the grain visible without brush marks.
Use a short-nap roller, work with the grain, and overlap passes to avoid lines.
Follow roller techniques and these coverage tips: maintain even pressure, reload frequently, and finish with light feathering for a uniform natural finish.
Sprayer For Speedy Application
A paint sprayer lets you cover a wood ceiling far faster than brush or roller, especially on large or textured surfaces—you’ll get an even, thin coat that settles into grooves and between boards without brush marks.
Use sprayer techniques to control overspray and maintain consistent application speed. Prep, practice, and thin paint for best results.
- Shield surrounding areas
- Maintain steady distance
- Overlap passes slightly
- Clean nozzle often
Working Overhead: Avoid Streaks and Drips
Start by positioning a sturdy ladder or scaffold so you can work comfortably with the brush held at chest level instead of over your head; this reduces fatigue and helps you keep even pressure, which prevents streaks and drips.
Use thin, even coats, feather edges, and keep a damp brush for blending.
Check and catch sagging spots immediately for streak prevention and drip control.
Drying Times, Recoat Windows, and Ideal Humidity
You’ll want to know typical drying times for your chosen paint so you don’t ruin the finish by recoating too soon.
Check the label for recommended recoat windows and wait the full minimum before applying another coat.
Also keep humidity around 40–60% so paint cures evenly and stays workable.
Drying Time Guidelines
Drying times for ceiling paint vary by product and conditions, so check the can and plan your schedule around the manufacturer’s recoat window; most latex paints need 2–4 hours before a light recoat and 24 hours for full curing, while oil-based paints typically require longer.
- Use proper drying techniques: good ventilation and airflow.
- Monitor humidity effects; keep 40–50% relative humidity.
- Avoid dust and contact until tack-free.
- Warm, steady temps speed curing.
Recoat Window Timing
When timing your next coat, follow the manufacturer’s recoat window and account for temperature and humidity so the paint bonds properly; latex often accepts a light recoat in 2–4 hours but may need up to 24 hours for full cure, while oil-based paints usually require longer between coats. You’ll check recoat timing to preserve finish consistency.
| Paint Type | Short Recoat | Full Cure |
|---|---|---|
| Latex | 2–4 hrs | 24 hrs |
| Oil-based | 8–24 hrs | 72 hrs |
| Conditions | Warm/dry | Cool/humid |
Ideal Humidity Range
Although paint will still dry outside ideal conditions, high humidity and low temperatures slow solvent evaporation and lengthen both drying times and recoat windows.
So aim for a stable environment. You should monitor humidity control and wait for ideal conditions before recoating.
Tips:
- Keep RH between 40–60%
- Use dehumidifiers if needed
- Heat gently to speed curing
- Avoid painting during rainy days
How Many Coats You Need for Durability and Look
You’ll usually need two to three coats on a wood ceiling to balance durability and appearance: one coat for base coverage, a second to even out color and build protection, and an optional third where high wear, knots, or uneven grain demand extra sealing.
Consider durability factors like primer quality and curing time, and aesthetic considerations such as sheen and color depth when deciding final coats.
Troubleshooting Lap Marks, Blotching, and Uneven Color
Spot problems quickly so you can correct lap marks, blotching, and uneven color before the finish fully cures.
You’ll act fast to blend wet edges, use consistent thinning, and control drying. For lap marks solutions and blotching prevention, try these steps:
- Work with a wet edge and steady stroke
- Thin coats for even flow
- Control humidity and temperature
- Use a quality brush or roller
Blending Patches and Touch‑Ups Without Seams
When you patch or touch up a wood ceiling, start by matching the wood grain and tone so the repair follows the surrounding pattern.
Feather the edges of your touch-up paint or stain gradually to avoid hard lines.
Finish by blending the area with the same finish coat to even out sheen and color.
Match Grain And Tone
Matching the grain and tone is what makes a patch disappear, so start by studying the surrounding wood to see its direction, contrast, and color variations.
You’ll use grain matching and subtle tone enhancement to blend repairs so they’re invisible.
- Align patch direction with adjacent fibers
- Thin stains for gradual color
- Use small brushes for detail
- Compare in natural light
Feather Edges Gradually
Start by lightly thinning your finish at the repair’s perimeter so you can work outward with a soft brush or lint-free cloth, blending each stroke into the surrounding surface; you want a barely noticeable shift rather than a hard line.
Use feathering techniques—short, overlapping strokes—to merge patches, gradually adjusting pressure and paint load.
Test blending colors nearby, wipe excess, and let thin layers dry before repeating.
Blend With Finish Coat
Apply the finish coat with deliberate, feathered strokes so the patched area melts into the surrounding wood without a visible seam.
You’ll use blending techniques and check finish compatibility before starting. Work swiftly, match sheen, and let thin layers dry fully. Use a light scuff between coats to level.
- Test on scrap wood
- Thin coats only
- Match brush direction
- Final sheen check
Maintenance to Keep a Natural Wood Ceiling Fresh
Longevity depends on regular care, and keeping a natural wood ceiling fresh is mostly about simple, consistent maintenance you can do yourself.
Use gentle cleaning techniques—soft cloths, mild detergent, and occasional vacuuming—to remove dust and grime.
Reapply protective measures like thin wax or clear sealer yearly where wear shows.
Inspect for stains, touch up promptly, and avoid abrasive cleaners or excess moisture.
Finish Choices for Bathrooms and High‑Moisture Ceilings
When a wood ceiling faces frequent steam and splashes—like in bathrooms or laundry rooms, you’ll need finishes that stand up to moisture and mildew while preserving the wood’s look.
Choose products prioritizing moisture resistance and finish longevity.
Consider:
- Waterproof clear sealers for visible grain
- Mildew‑resistant topcoats
- Satin sheens to hide wear
- Regularly renewed protective coats
Oil‑Based vs. Water‑Based: When to Choose Which
You’ll pick oil‑ or water‑based products based on the ceiling’s condition, your tolerance for odor and drying time, and the final look you want. Choose oil for durability and rich sheen; choose water for quick drying and easy cleanup. Consider maintenance and indoor air.
| Oil‑Based | Water‑Based |
|---|---|
| oil based advantages: durable | water based benefits: low odor |
| deeper sheen | faster drying |
| longer cure | easier cleanup |
Preventing UV Fading and Yellowing on Wood Ceilings
Because sunlight can steadily break down wood finishes, taking steps to block UV and choose the right coatings will keep your ceiling from fading or yellowing prematurely.
Use UV protection strategies and proven wood preservation techniques to extend color life. Consider:
- Low‑UV window films
- UV‑inhibiting varnishes
- Clear finishes with UV absorbers
- Regular inspection and touch‑ups
Budget Finishes and Smart Cost‑Saving Substitutions
Blocking UV and choosing the right coatings will protect your ceiling, but you don’t have to spend a fortune to get durable, attractive results.
Look for cost effective alternatives like water‑based polyurethane and acrylic primers, and choose budget friendly materials such as stripped pine or veneer panels.
Test finishes on scrap, buy mid‑grade brushes, and concentrate splurge on sealers for longevity.
Safety Tips for Ladders, Ventilation, and Solvents
When working overhead, take ladder safety, ventilation, and solvent handling seriously to prevent falls, fumes, and fires. You’ll secure the ladder, monitor solvent ventilation, and keep ignition sources away while painting.
Follow local rules and product labels, wear respirator and gloves, and ventilate continuously.
- Inspect and level ladder before climbing
- Use respirator for solvent ventilation
- Keep solvents sealed when not in use
- Store flammables away
How Long a Properly Finished Wood Ceiling Should Last
If you maintain the finish and control humidity, a properly finished wood ceiling can last decades—often 20 to 50 years or more—before needing a full refinish; touch-ups, occasional cleanings, and spot repairs will extend that life and keep the ceiling looking fresh.
You should monitor durability factors like finish type, wear, and UV exposure, and account for climate impact—drying, swelling, or mold—to plan maintenance.
Frequently Asked Questions
Can I Paint a Wood Ceiling White While Keeping the Grain Visible?
Yes—you can paint a wood ceiling white while keeping the grain visible. Use white paint options like diluted acrylic or whitewash, and employ grain highlighting techniques: thin coats, wiping excess, sanding, and glazing to reveal texture and contrast.
Will a Natural Finish Hide Old Smoke or Odor Stains?
No, a natural finish won’t fully hide smoke stains or handle odor removal; you’ll need to clean, seal with a stain-blocking primer, then apply the finish so the grain shows while preventing lingering smells and discoloration.
Can I Finish Tongue‑And‑Groove Ceilings Without Removing Trim?
Yes — you can finish tongue‑and‑groove ceilings without removing trim; use trim preservation techniques like masking, careful brush edging, and drop cloths. Follow ceiling maintenance tips for sealing seams, ventilating, and inspecting caulk to prevent future issues.
How Do I Refinish a Ceiling With Uneven Board Widths?
Like fitting puzzle pieces, you’ll stagger boards, scribe edges, and rip wider planks to match gaps. You’ll use wood ceiling maintenance techniques and board width solutions—caulk, filler, or trim—to achieve a smooth, unified surface.
Are There Color‑Matching Services for Replacement Ceiling Boards?
Yes — you can get color matching services; you’ll use color matching techniques like spectrophotometry and on-site samples, and compare replacement board options from suppliers, mills, or reclaimed-wood dealers to find the best match.
Conclusion
You’ve tended this ceiling like a quiet garden: each brushstroke seeds warmth, each coat protects the grain’s story. Now step back and let the room breathe—light will sift through the wood like wind through leaves, revealing the finish you chose. Maintain its heart with gentle care, and it’ll age into a steady companion, holding sunlight and memory. Your handiwork becomes shelter and ceremony, a ceiling that quietly keeps time with you.