How to Use Paint Sprayer for Walls and Ceilings Properly
You’ll get fast, professional walls and ceilings by prepping surfaces, masking trim tightly, and using the right sprayer for your job. Patch, sand, and prime where needed, then thin and strain paint per manufacturer instructions. Hold the gun 6–12 inches from the surface, use steady, overlapping passes (30–50%), and apply multiple light coats to avoid runs. Flush and clean the sprayer after use, wear a respirator, and follow disposal rules — keep going and you’ll pick up detailed tips and setups.
Quick Start: Spray a Room in 6 Steps
1. You’ll prep the room, mask trim, and lay drop cloths.
Mix paint per label and confirm paint selection suits your sprayer.
Test spray on cardboard, adjust pattern and pressure, then work in overlapping passes.
Keep the gun moving to avoid runs.
Keep the sprayer moving steadily—slow, continuous strokes prevent drips and ensure an even, professional finish.
Finish by flushing lines and doing sprayer maintenance to protect tips and seals for the next job.
Choose the Right Paint Sprayer for Walls & Ceilings
Now that you’ve got the basics of spraying and upkeep down, pick a sprayer that matches the size of the room and the job’s demands.
Consider sprayer types, paint viscosity and air pressure for consistent finish types.
Balance cost analysis with environmental concerns, follow safety tips and surface preparation, learn spray techniques, and schedule equipment maintenance so you’ll get efficient, durable results.
HVLP vs Airless vs Compressed‑Air: Which to Pick?
When you pick between HVLP, airless, and compressed-air sprayers, think about the spray pattern and the finish you want.
You’ll also weigh transfer efficiency—HVLP wastes less, airless covers fast, and compressed-air gives the finest atomization.
Finally, match the sprayer to the surface: ceilings and walls, trim, or furniture each call for different strengths.
Spray Pattern & Finish
Choosing between HVLP, airless, and compressed‑air sprayers comes down to the finish you want, the material you’re spraying, and how much control you need.
Balance spray technique, finish quality, nozzle adjustment, surface preparation, paint consistency, airflow control, drying time, and application speed.
- HVLP: smooth finish, slower application
- Airless: fast, thicker coats
- Compressed‑air: finest control
- Blend settings to suit surface
Transfer Efficiency Differences
Although each sprayer can lay down good coverage, their transfer efficiency—the percentage of paint that actually hits the target versus what becomes overspray—varies a lot.
So you should pick the type that matches your job, material cost concerns, and environmental rules.
HVLP gives higher transfer efficiency for thinner paints.
Airless suits fast paint application with more overspray, and compressed‑air offers fine finishes but wastes more material.
Surface Type Suitability
Pick the sprayer that matches the surface you’re coating, because texture, detail and location determine whether HVLP, airless or compressed‑air will give the best result.
- HVLP for fine detail and smooth surface texture compatibility.
- Airless for rough walls and fast coverage.
- Compressed‑air for factory finishes and thin coatings.
- Match substrate preparation techniques to sprayer choice for adhesion and uniformity.
How Sprayer Price and Power Change Your Results
When you shop for a paint sprayer, price usually reflects power, build quality, and the features you’ll actually use. So think about the jobs you plan to tackle before committing.
You should compare sprayer brands, power ratings, performance factors, and user reviews.
Balance cost efficiency, budget considerations, and maintenance costs to judge long-term investment: higher power helps coverage, but match it to your typical projects.
Match Sprayer Tip Size to Paint Type
Matching the sprayer tip size to the paint you’re using is one of the quickest ways to get smooth, even coverage without clogs or overspray.
You should match viscosity and finish, and keep tip selection and sprayer maintenance in mind.
Follow these steps:
- Thin lighter paints.
- Use larger tips for thicker coatings.
- Match tip to finish.
- Clean tips after use.
Rent or Buy: When Renting Makes Sense
Knowing the right tip and keeping your sprayer in good shape makes a big difference, but you also need to decide whether to rent or buy the equipment itself.
If you’ll spray just once or rarely, renting advantages include lower cost and trying models before committing.
For frequent work, weigh purchasing considerations like long-term savings, maintenance, and storage before you buy.
Measure Room Size, Ceiling Height, and Obstacles
Before you pull out the sprayer, measure the room’s square footage, ceiling height, and any obstacles so you can calculate paint volume, choose the right tip, and plan your work pattern.
Use measuring tools, record room dimensions, and note ceiling obstacles for height considerations and obstacle management.
Do a quick layout assessment for space planning and area calculation.
- Tape measure
- Sketch
- Photos
- Notes
Drywall, Plaster, Textured, and Popcorn Ceilings: What to Expect
Ceilings can be deceiving—drywall, plaster, textured, and popcorn surfaces each take paint differently, so you’ll want to adjust prep, tip size, and spray pressure accordingly. Expect varied drywall textures, fragile popcorn ceilings, and dense plaster finishes; prioritize surface preparation, appropriate spray techniques, and paint compatibility to avoid clogging or damage.
| Surface | Prep | Tip/Pressure |
|---|---|---|
| Drywall textures | Sand/prime | Medium/medium |
| Popcorn ceilings | Gentle clean | Fine/low |
| Plaster finishes | Patch/prime | Coarse/high |
Calculate Paint Quantity for Spraying Jobs
Estimate paint needs by calculating the total square footage you’ll cover and factoring in the sprayer’s transfer efficiency and number of coats.
Use paint coverage estimation and account for spray technique variations. Calculate gallons like this:
- Measure wall and ceiling area.
- Divide by product coverage per gallon.
- Adjust for sprayer transfer efficiency.
- Multiply by coats and add 10% waste buffer.
When and How Much to Thin Paint
Viscosity matters when spraying, so you’ll want to thin paint whenever the manufacturer’s specs or your sprayer’s manual indicate the material is too thick to atomize cleanly; thin just enough to achieve a steady, even spray pattern without causing runs or excessive overspray.
Check paint viscosity with a cup or meter, follow recommended thinning ratios, and adjust incrementally, testing on scrap until coverage and atomization are ideal.
Strain Paint to Prevent Clogs
If you want a smooth, uninterrupted spray, strain your paint before pouring it into the sprayer—this catches lumps, skin, and debris that clog nozzles and wreck finishes.
Use paint filtering for clog prevention and better finish.
Filter paint before spraying to prevent clogs and achieve a smoother, more professional finish.
Follow steps:
- Set up a clean strainer.
- Pour slowly.
- Scrape residue into trash.
- Repeat for each batch.
Prep the Room for Safe, Efficient Spraying
1 clear step before you load the sprayer: prepare the room so paint mist won’t damage surfaces, electronics, or nearby items.
Assess room layout, plan airflow management and lighting conditions, and choose paint selection suited for walls or ceilings.
Wear safety equipment, complete surface cleaning, organize tools and equipment organization, and schedule work to optimize time management for efficient, safe spraying.
Protect Floors, Furniture, and Fixtures From Overspray
Before you spray, cover floors and any exposed furniture or fixtures with durable, overlapping drop cloths or plastic sheeting secured with painter’s tape so overspray can’t sneak underneath or drift onto surfaces.
You’ll use smart overspray techniques and protective measures:
- Seal edges tightly.
- Layer cloths in traffic paths.
- Wrap furniture completely.
- Ventilate to direct spray away.
Mask Trim, Outlets, and Light Fixtures Correctly
Before you start spraying, mask trim edges tightly so paint won’t seep under the tape and ruin sharp lines.
Cover outlets, switches, and light fixtures with painter’s tape and plastic or paper to prevent overspray and electrical hazards.
Take a moment to press tape down and trim any excess so everything stays protected while you work.
Protecting Trim Edges
When you’re ready to spray, take the time to mask trim edges, outlets, and light fixtures so overspray won’t ruin your finishes or create extra cleanup.
Use the right materials—painter’s tape, plastic sheeting, and low-tack paper—to get clean lines without pulling paint off later.
- Use tape techniques for tight seams.
- Apply edge guards on corners.
- Press tape firmly.
- Remove tape at tacky stage.
Covering Fixtures And Outlets
After masking trim edges, shift your attention to outlets, switches, and light fixtures so they don’t get hit with overspray.
Remove plates where possible, label screws, and cover fixtures with plastic and painter’s tape for secure fixture protection.
Use foam outlet masking pads or folded tape for tight fits.
Double-check edges before spraying and leave covers off until paint fully cures to avoid sticking.
Ventilation and Respirators for Indoor Spraying
Because indoor spray mist and solvent fumes can build up quickly, you need effective ventilation and the right respirator to protect your lungs.
Use ventilation methods and plan project planning to maintain air quality and health safety. Keep equipment maintenance and workspace organization tight.
Follow protective gear and spray technique guidance:
- Open windows, run fans
- Use NIOSH-rated respirator
- Isolate area
- Monitor air levels
Pick the Right Primer for Walls and Ceilings
Before you start spraying, match your primer to the surface—drywall, plaster, and bare wood all need different formulations for proper adhesion.
Think about primer sheen and tint too: a tinted primer can improve coverage and a flatter sheen helps hide imperfections.
Picking the right combo saves coats and gives your topcoat a smoother finish.
Surface Material Compatibility
When you’re prepping walls and ceilings for a paint sprayer, matching the primer to the surface material prevents adhesion problems, blotchy coverage, and extra coats.
You’ll focus on texture compatibility, paint adhesion, surface preparation, and application techniques.
- Drywall: use high-penetration primers.
- Plaster: pick breathable primers.
- Wood: block stains, seal grain.
- Metal: use rust-inhibiting primers.
Primer Sheen And Tint
Although primers are often thought of only for adhesion, their sheen and tint play a big role in how many topcoat coats you’ll need and how even the finish looks, especially on walls and ceilings.
Choose low-sheen primer for ceilings to hide imperfections and match primer application to surface porosity.
Proper tint selection cuts topcoat layers and guarantees uniform color, saving time and material.
Prep Patched Drywall and Repaired Areas
Patch any loose compounds and sand the repaired areas smooth so the sprayer gives an even coat.
You’ll check repair materials and use proper patching techniques, drywall sanding, and texture matching before priming.
Do wall cleaning and moisture assessment, then edge sealing.
- Inspect and remove loose debris
- Apply repair materials
- Sand and texture match
- Surface priming and seal
Fix Common Surface Problems Before You Spray
Before you spray, patch any holes and cracks so the finish looks seamless.
Sand and fill uneven areas until the surface is smooth and level.
Taking these steps now prevents visible flaws after the paint dries.
Patch Holes And Cracks
When you’re working with a sprayer, filling holes and cracking seams is a must so the finish looks smooth and professional; you’ll choose patch materials by hole sizes and crack types, follow surface preparation, use repair techniques, respect drying times, and check paint compatibility for finishing touches.
- Clean edges
- Match filler
- Sand smooth
- Prime before spray
Smooth Uneven Surfaces
If your surface has bumps, waves, or texture inconsistencies, you’ll want to level them out so the sprayer lays down an even coat.
Inspect, sand high spots, and fill low areas with lightweight filler. Use proper smoothing techniques—skim coat where needed—then sand and prime.
Good surface preparation guarantees uniform spray coverage, reduces rework, and yields a professional, long-lasting finish.
Choose Spray Patterns and Fan Widths
Because the spray pattern determines coverage and finish, you’ll want to match pattern shape and fan width to the job before you start painting.
Because the spray pattern controls coverage and finish, match its shape and width to the job beforehand.
Use spray pattern selection and fan width adjustment to suit surfaces.
- Narrow for trim and corners
- Medium for walls
- Wide for ceilings and large areas
- Overlap passes 50% for even coverage
Adjust Fluid, Air, and Pattern Settings
Now that you’ve picked the right pattern and fan width, fine-tune the sprayer by adjusting fluid, air, and pattern settings to match the material and surface.
Start with manufacturer’s recommended ideal pressure, then tweak fluid flow for full coverage without runs.
Balance air to atomize properly.
Test on scrap, note settings for consistency, and include these checks in regular sprayer maintenance to prolong performance.
Keep Steady Distance and Angle for Even Coverage
Keep the nozzle 6–12 inches from the surface and hold it perpendicular or at a consistent angle to prevent uneven buildup and overspray.
You’ll control finish quality by steady posture and grip, watching for drips and texture changes.
Also practice sprayer maintenance and nozzle cleaning to keep patterns consistent.
Regular sprayer maintenance and nozzle cleaning preserve a consistent spray pattern and reliable finish every time.
- Stand square to surface
- Use a comfortable grip
- Watch spray fan
- Pause for touch-ups
Maintain Consistent Speed and Overlap When Spraying
Keep your arm movement steady and use smooth, even strokes so the spray pattern doesn’t blotch.
Overlap each pass by about 30–50% to blend edges and prevent striping.
Practice a consistent pace until your passes look uniform.
Steady Arm Movement
Hold the sprayer steady and move your arm at a consistent speed so each pass lays down an even coat; jerky motions or variable speed will create streaks and uneven buildup.
- Use a steady hand and relaxed wrist flexibility.
- Monitor muscle tension to avoid arm fatigue.
- Improve grip strength and posture awareness.
- Practice technique regularly to maintain consistent speed.
Proper Overlap Technique
Although you’ll want to move at a steady pace, overlapping each pass by about 30–50% guarantees an even coat without buildup at the edges; maintain the same speed and distance for every pass so the layers blend smoothly.
Adjust for paint viscosity and check sprayer maintenance before starting. Keep a consistent rhythm, control trigger bursts, and inspect for thin or heavy spots, correcting with uniform passes.
Vertical vs Horizontal Passes: When to Use Each
When should you use vertical passes and when are horizontal strokes better?
Use vertical spray techniques on tall walls for consistent runs and faster coverage.
Try horizontal spray advantages on wide surfaces to blend seams.
Consider surface texture, trim, and gravity.
- Vertical: tall walls
- Horizontal: wide walls
- Texture: pick direction
- Trim: avoid overspray
Cut In Edges: Spray vs Brush Techniques
If you’re tackling edges, decide whether to cut in with a brush or use your sprayer with masking—each method has trade-offs you’ll want to weigh.
You can save time by spraying masked edges, but you’ll need precise taping.
Brush comparison shows better control near trim and corners.
Combine techniques: brush for tight spots, sprayer for broad coverage, using edge techniques to blend finishes.
Avoid Runs, Sags, and Heavy Buildup
Start with thin, even passes and you’ll cut the chance of runs, sags, and heavy buildup dramatically—keep the gun moving, overlap each pass about 30–50%, and apply multiple light coats rather than one heavy one.
- Test spray pattern and pressure.
- Maintain consistent distance.
- Use run prevention techniques: thin coats.
- Employ sag reduction strategies: quicker passes, inspect and touch wet spots promptly.
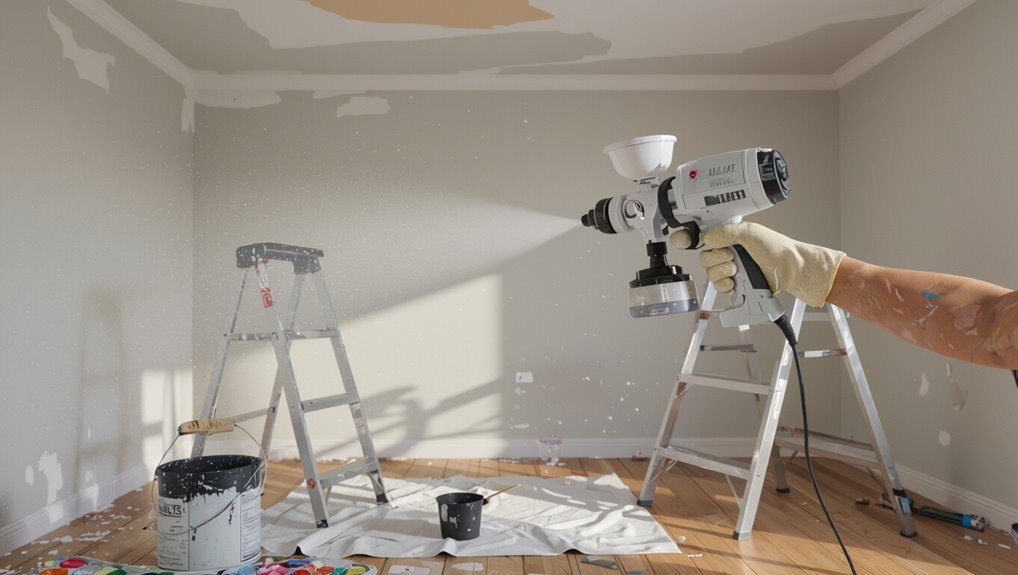
Use Extension Poles and Ladders Safely on Ceilings
One or two extension poles and a sturdy ladder will keep you balanced and in control when spraying ceilings.
Assess ceiling height, set ladder stability with level feet, and lock joints. Use an extension pole to maintain reach and reduce strain.
Wear personal protective gear and other safety equipment. Keep workspace organization clear of tripping hazards and have a spotter when possible.
How to Spray High Ceilings and Soffits Efficiently
Before you start spraying high ceilings or soffits, you’ll want to prep the area and mask off walls, fixtures, and floors to catch overspray.
Use sturdy scaffolding or a reliable extension pole so you can keep a consistent spray angle without overreaching.
Working from a stable platform and protecting surrounding surfaces will save time and give you a cleaner finish.
Prep And Masking
Spray high ceilings and soffits efficiently by planning access, containment, and safety up front: set up sturdy ladders or scaffolding, clear and cover nearby fixtures and floors with drop cloths, and mask trim and junctions with low-tack painter’s tape and plastic sheeting so overspray stays contained.
- Check paint types and thinning for sprayer.
- Do surface preparation: clean, sand, prime.
- Apply masking techniques around fixtures.
- Prioritize overspray control, spray safety, equipment setup.
Use Scaffolding Or Extensions
Two tools will save you time and reduce fatigue when painting high ceilings and soffits: scaffolding for broad, stable access and pole extensions for quick touch-ups and tight spots.
Set up scaffolding safety by leveling, locking wheels, and using guardrails. Practice extension pole techniques to maintain even distance and steady strokes.
Move the scaffold rather than overreaching, and inspect gear before each session.
Spraying Textured Surfaces and Touching Up
When you’re tackling textured surfaces or making touch-ups, adjust your technique and equipment so the finish blends smoothly with the surrounding area.
- Use lower pressure for textured surfaces to avoid over-saturation.
- Thin paint slightly for even coverage on bumps.
- Practice touch up techniques on scrap before working on walls.
- Feather edges with quick, light passes so repairs disappear into the texture.
Drying Times and Timing a Second Coat
After you’ve blended touch-ups into the texture, pay close attention to drying times before applying a second coat.
Check the paint label and monitor drying conditions—temperature, humidity, and ventilation—to confirm surface dryness.
Use timing strategies like spot checks and test patches rather than fixed clock times.
If tack-free, apply the next coat evenly; if not, wait and recheck periodically to avoid sagging or poor adhesion.
Blend Fresh Spray With Existing Paint
When you spray near previously painted areas, match the paint sheen so the finish looks uniform.
Feather your spray edges by easing pressure and overlapping lightly to avoid hard lines.
Blend wet into dry by working quickly along the seam so the new coat merges smoothly with the old.
Match Paint Sheen
Because sheen affects how light reflects off a surface, matching the new spray to the existing finish is essential for a seamless blend; you’ll need to identify the current sheen level, test spray on a hidden area, and adjust technique or product choice until the edges disappear.
- Inspect sheen types.
- Compare sheen effects under real light.
- Test spray in a closet.
- Adjust pressure or choose matching finish.
Feather Spray Edges
Feathering the spray edge helps the new coat dissolve into the old so you won’t see a hard line where they meet; you’ll achieve this by easing off the trigger as you approach the overlap, angling the gun slightly away, and making progressively lighter passes that thin the paint at the border. Use this feathering technique and edge blending for seamless changes.
| Tip | Action |
|---|---|
| Trigger | Ease off |
| Angle | Slightly away |
| Passes | Lighter |
| Test | Inspect overlap |
Blend Wet Into Dry
After feathering the edges, blend your fresh spray into the existing paint by working wet-over-dry in short, controlled passes so the new coat mingles without leaving ridges or noticeable overlap.
- Keep a consistent wet edge.
- Match spray speed and distance.
- Overlap passes lightly for smooth paint blending techniques.
- Stop before paint skins to avoid lap marks; inspect and touch up immediately.
Troubleshoot Common Spray Finish Problems
When your spray finish looks off, don’t panic—you can usually fix common issues by identifying the symptom and adjusting technique, equipment, or material accordingly.
Check spray technique, nozzle adjustments, and paint viscosity; improve surface preparation and address finish issues like runs or orange peel.
Consider overspray solutions, paint drying times, equipment maintenance, environmental factors, and follow safety precautions to prevent repeats.
Clean and Flush Your Sprayer After the Job
Flush the system immediately and don’t let paint dry inside the sprayer—cleaning now prevents clogs, preserves seals, and keeps performance consistent for your next job.
- Empty cup, run solvent through system.
- Disassemble nozzle and soak parts.
- Use recommended cleaning techniques and soft brushes.
- Reassemble, test spray, log sprayer maintenance tasks for next use.
Store Equipment and Leftover Paint Properly
Once you’ve cleaned your sprayer and parts, store them in a dry, dust-free place and seal leftover paint in airtight containers so it stays usable—label cans with color, date, and thinner ratio.
Keep small amounts in tightly closed jars for touch-ups. Coil cords loosely, protect nozzles with caps, and use clear bins for paint storage so you can find leftover paint quickly and prevent spills.
Maintenance Checklist for a Reliable Sprayer
To keep your sprayer dependable, you’ll follow a simple maintenance checklist covering regular cleaning, part inspection and replacement, and proper storage.
Clean the gun and filters after each use, check seals, hoses, and nozzles for wear, and swap anything that’s damaged.
Store the unit drained and protected from dust and freezing to extend its life.
Regular Cleaning Routine
Keep a short, consistent cleaning routine after every use so your sprayer stays reliable and ready.
Use proper paint maintenance and simple cleaning methods to prevent clogs and wear.
Do these steps each time:
- Flush with solvent recommended for the paint.
- Disassemble nozzle and brush parts.
- Wipe seals and body with a lint-free cloth.
- Reassemble and test briefly before storage.
Inspect And Replace Parts
Inspect your sprayer regularly and replace worn components before they cause failures — that includes checking the nozzle, needle, seals, hoses, and filters for wear, buildup, or cracking.
During part inspection, look for corrosion, uneven spray patterns, and loosened fittings.
Document findings, perform timely part replacement with manufacturer-approved items, and test the sprayer after repairs to confirm reliable, safe operation.
Proper Storage Procedures
1 clear routine will extend your sprayer’s life and prevent clogs, so store it clean, dry, and protected after every use.
- Follow sprayer manuals for nozzle care, flushing, and sprayer cleanliness.
- Use labeled storage containers and proper sealing to boost paint longevity.
- Maintain equipment organization and humidity control; monitor temperature effects.
- Log safety protocols, inspect seals, and keep accessories tidy for reliable performance.
Save Money: Reduce Waste and Overspray
If you want to save money with a paint sprayer, focus on cutting overspray and material waste from the start: adjust the nozzle and pressure to match the job, use the right tip size and distance, and mask or shield nearby surfaces so you only coat what needs painting.
Use cost effective techniques: test spray patterns, choose proper material selection, thin correctly, and clean filters to minimize rework.
When to Call a Pro for Big or Complex Jobs
If you’re facing large-scale surface prep—think scraping, patching, and extensive masking—you might want to call a pro to save time and guarantee a uniform finish.
The same goes for complex architectural features like ornate trim, high ceilings, or tight recesses that need precision and specialized equipment.
A pro can handle the logistics and deliver consistent results when the job is big or intricate.
Large-Scale Surface Prep
When a project covers hundreds of square feet, involves multiple surfaces, or needs detailed repairs before spraying, you should consider calling a pro—commercial painting contractors have the equipment, crew, and experience to handle large-scale prep efficiently and safely.
- Evaluate surface preparation techniques for large areas.
- Plan effective masking strategies and containment.
- Coordinate crew and timeline.
- Guarantee safety, permits, and cleanup.
Complex Architectural Features
Large-scale prep often overlaps with architectural complexity, and you’ll want to call a pro when ornate trim, multi-level facades, intricate moldings, or hard-to-reach features multiply risk and work time.
You should hire expertise if your project involves varied architectural styles, preservation needs, or structural constraints.
Professionals handle tricky masking, custom techniques, and critical design considerations, reducing damage risk and ensuring uniform finish across complex surfaces.
Environmental and Disposal Guidelines for Spraying
Although spray painting speeds up projects, it also increases the risk of fumes, overspray, and hazardous waste, so you should take steps to minimize environmental impact and dispose of materials properly.
- Wear respirator, seal work area to limit overspray.
- Use low-VOC paints to reduce environmental impact.
- Follow local disposal methods for solvent waste and empty containers.
- Clean equipment with designated solvent stations; never pour runoff down drains.
Paint Day Checklist for a Smooth Spray Job
Before you start spraying, make sure you’ve gathered all your supplies and materials—paint, thinner, filters, replacement nozzles, and the right PPE.
Lay out tarps and masking film, and tape off edges so overspray won’t reach floors, furniture, or landscaping.
With supplies organized and coverings in place, you’ll work faster and avoid costly cleanups.
Prep Supplies And Materials
1 checklist item you shouldn’t skip: gather every supply and material you’ll need the morning of the spray.
Inspect paint types, color selection, primer options, paint additives, and note drying times.
Confirm sprayer maintenance and equipment setup, plus safety gear.
Consider surface preparation and environmental conditions before starting.
- Paint & primer
- Tools & additives
- Safety kit
- Maintenance supplies
Protective Covering Setup
Now that you’ve gathered your paints, tools, and safety gear, set up protective coverings so overspray and drips don’t wreck floors, furniture, or landscaping. Use masking techniques, protective gear, and careful covering furniture and floor protection. Prioritize overspray management, safety precautions, surface preparation, and correct paint selection.
| Area | Material | Method |
|---|---|---|
| Floor | Drop cloth | Tape edges |
| Furniture | Plastic | Secure |
| Trim | Paper | Mask |
| Plants | Sheeting | Cover |
| Ceiling | Cloth | Drape and tape |
Frequently Asked Questions
Can a Paint Sprayer Be Used on Exterior Siding and Trim?
Yes—you can use a paint sprayer on exterior siding and trim. You’ll need thorough siding preparation, mask and sand trim protection, use appropriate tip/settings, and work in even passes to avoid runs and guarantee uniform coverage.
How Do You Paint Over Lead-Based or Very Old Paint Safely?
Wear respirators, seal the room, and wet the surface; don’t sand dry. You’ll follow lead paint safety rules, use HEPA vacuums, bag debris, and hire certified abatement for risky jobs—old paint removal done carefully prevents exposure.
Can Tinted Paint Be Mixed at Home to Match a Spray Job?
Yes — you can DIY tinting to color match a spray job, but you’ll need sample swatches, a calibrated tinting system, test sprays, and adjustments. You’ll want consistent sheen and dilution for an accurate match.
What Electrical Requirements or Generator Size Do High‑Power Sprayers Need?
About 70% of high‑power sprayers draw over 15 amps; you’ll need appropriate power requirements and generator capacity—typically a 2,000–3,500 watt generator—so you won’t trip breakers or lose consistent spray performance.
How Do You Prevent Spray Mist From Drifting to Neighboring Properties?
You’ll control spray mist by adjusting spray technique, using low pressure and fan width, working upwind, and monitoring wind conditions; set up containment (tarping, masking, screens) and use tack cloths or airless filters to minimize drift.
Conclusion
You’ve prepped, picked the right sprayer, matched tip size, and practiced your technique — now you’re ready to spray like a pro. Ready to glide across walls and ceilings with even, fast coverage, minimal overspray, and less cleanup? Keep pressure consistent, overlap strokes, and protect floors and fixtures; call a pro for large or tricky jobs. Follow disposal rules and breathe easy — you’ll finish faster and with a much cleaner result than brushing or rolling.