Can You Paint Pvc Molding? Best Methods and Tips
Yes — you can paint PVC molding successfully if you prep it right. Clean with mild detergent and isopropyl alcohol, lightly sand with 220–320 grit, and fill any gouges. Prime with a plastic-specific high-adhesion primer, then apply thin, even coats of quality acrylic or enamel paint, sanding lightly between coats. Allow full cure for durability and use low-VOC options if you prefer. Follow these steps and you’ll get a durable, professional-looking finish—and there’s more tips ahead.
Can You Paint PVC Molding?
Can you paint PVC molding? You can, but success hinges on surface preparation to guarantee paint adhesion.
You’ll clean, sand lightly, and apply a primer designed for plastics. Use high-quality acrylic or enamel paint, thin coats, and proper drying between layers.
Follow manufacturer instructions and test a small area first so your finish bonds well and looks professional.
Why Paint PVC Molding Instead of Replacing It
Because painting keeps cost and disruption low, it’s often the smarter choice than replacing PVC molding.
You’ll get a clear cost comparison: paint and prep vs. buying and installing new trim.
Painting saves time and waste, and delivers aesthetic benefits by matching trim to your decor.
It’s a practical, less invasive update that preserves existing profiles while improving room appearance.
Which PVC Molding Accepts Paint Best
Which PVC moldings take paint best depends on their surface texture and formulation.
You’ll find rigid, primed, or lightly textured PVC offers superior paint adhesion because manufacturers often design them for finishing.
Smooth, glossy or unprimed extrusions can resist coating unless you prep for surface compatibility with sanding and a suitable primer.
Choose profiles labeled “paintable” for easiest results.
Best Paint Types for PVC: Acrylic, Latex, Oil
When you’re choosing paint for PVC molding, weigh acrylic and latex for ease and flexibility versus oil-based for durability and adhesion.
Acrylic and latex are water-based, dry fast, and resist yellowing, while oil-based paints bond strongly and tolerate wear better.
Consider the molding’s location and finish needs to pick the best option.
Acrylic Vs. Latex
Curious which paint will give your PVC molding the best finish? You’ll find acrylic durability resists yellowing and holds color longer, ideal for trim that sees wear.
Latex flexibility follows PVC’s slight movement, reducing cracking and easing application.
Choose acrylic for longevity and latex for adaptability; both need proper cleaning and a compatible primer to bond well to PVC surfaces.
Oil-Based Benefits
If you’ve weighed acrylic and latex, it’s worth looking at oil-based paints for PVC molding, especially where hardness and stain resistance matter. You’ll get oil based advantages like smoother finish and superior oil based durability, which resists scuffs and stains. Use primer and thin coats; allow long cure time for best results.
| Feature | Benefit |
|---|---|
| Finish | Smooth |
| Durability | High |
| Stain resistance | Excellent |
| Cure time | Longer |
Why Primer Matters for PVC Trim
Because PVC is nonporous and slick, paint alone won’t bond reliably—primer gives the paint something to grab onto and helps prevent peeling, flaking, and uneven coverage.
You’ll improve adhesion importance by using a suitable primer, which creates a stable surface. Knowing primer types helps you pick one formulated for plastic.
Proper priming reduces prep time, boosts durability, and guarantees a smooth, long-lasting finish.
Choose the Right Primer for PVC
Now that you know why primer matters, pick one formulated for plastics to get the best results on PVC. You’ll want primer compatibility with PVC and strong primer durability to prevent peeling and guarantee adhesion. Apply thin, even coats and follow drying times.
| Type | Adhesion | Use |
|---|---|---|
| Plastic primer | High | PVC, vinyl |
| Multi-surface | Medium | Mixed materials |
| Bonding primer | Very high | Difficult plastics |
Tools and Materials You’ll Need
Gather the right tools and materials before you begin so the job goes smoothly and the finish lasts.
For a concise tools overview, you’ll need quality brushes or a sprayer, sandpaper, masking tape, drop cloths, and a paint tray.
Material selection matters: use PVC-compatible primer and paint, nitrile gloves, and tack cloths.
Choose durable, low-VOC products for best results.
Clean PVC Molding Before Painting
Before you paint, clean the PVC molding thoroughly to remove dirt, grease, and manufacturing residues that can prevent primer and paint from adhering.
Use mild detergent and water, then wipe with isopropyl alcohol for stubborn oils. Test a small area first.
Wash with mild detergent and water, then remove stubborn oils with isopropyl alcohol—always test a small area first.
These cleaning techniques and simple surface solutions guarantee paint bonds evenly.
Let the molding dry completely before priming or painting.
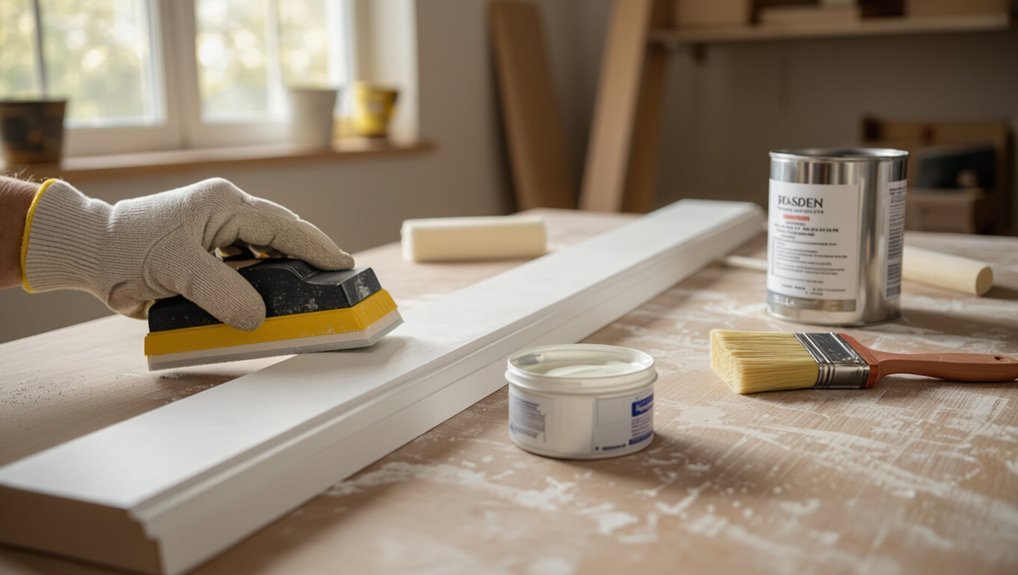
Sand PVC Molding for Better Adhesion
Before you sand PVC molding, make sure the surface is clean and dry so abrasion will be effective.
Use a fine-grit sandpaper (around 220–320) to scuff the surface without leaving deep scratches.
After sanding, remove all dust with a vacuum and tack cloth so paint can bond properly.
Prepare Surface First
Start by sanding the PVC molding to roughen its glossy surface so paint can grip.
After sanding, wipe thoroughly for surface cleaning to remove dust, oils, and residues. Use a tack cloth and mild solvent if needed.
Apply primer designed for plastics to enhance adhesion techniques, then let it cure fully before painting to guarantee a durable, even finish.
Choose Proper Grit
Now that the PVC is sanded and cleaned, pick the right sandpaper grit to create the best surface for paint to stick.
For smooth molding, start with 220–320 grit for light scuffing; for rougher profiles, use 120–180 grit then finish with 220.
Your grit selection depends on condition, and consistent sanding techniques guarantee even adhesion without over-sanding or gouging the PVC.
Remove Dust Thoroughly
Once you’ve sanded the PVC, remove all dust so paint can bond properly; even fine particles will block adhesion and create a rough, uneven finish.
Wipe with a microfiber cloth, vacuum crevices, then tack cloth for lingering grit. Use mild soapy water if oily, rinse and dry fully.
These dust removal techniques guarantee effective cleaning and a smooth, long-lasting painted surface.
Repair Dents and Gouges in PVC Trim
Repairing dents and gouges in PVC trim is usually straightforward and doesn’t require replacing the whole piece. You’ll clean, sand, apply filler, sand again, and use appropriate surface treatments before priming. Use these repair techniques for small and medium damage, then repaint.
| Step | Tool/Material |
|---|---|
| Clean | Mild detergent |
| Fill | PVC filler |
Mask and Protect Surrounding Surfaces
Before you start painting, take time to mask and protect nearby surfaces so paint never reaches areas you don’t want coated. Use proper masking techniques and surface protection to save cleanup time and avoid damage.
Before painting, thoroughly mask and protect nearby surfaces to prevent stray paint and simplify cleanup.
Consider:
- Painter’s tape for crisp edges
- Drop cloths for floors
- Plastic sheeting for furniture
- Masking paper for trim
- Clips or weights to secure coverings
Apply Primer to PVC Molding
Now that surrounding surfaces are protected, you can move on to priming the PVC molding to secure paint adhesion.
Inspect and sand lightly, then choose a primer based on primer selection guidance—use a plastic-bonding or adhesion-promoting primer.
Apply thin, even coats, allowing recommended dry times between layers.
For primer application, use a brush or short-nap roller to avoid runs and guarantee full coverage.
Apply Topcoat Paint to PVC Molding
Start by choosing the right topcoat—acrylic latex or water-based enamel works best for PVC.
You’ll use proper topcoat techniques and simple application tips to finish cleanly. Prepare the surface, use thin even passes, and dry between layers.
Follow these steps:
- Wipe surface with a tack cloth
- Use a quality brush or sprayer
- Apply thin coats
- Sand lightly between coats
- Inspect for defects
How Many Coats Does PVC Trim Need?
How many coats you’ll need depends on the paint type and the look you want: most projects require two to three thin topcoats for even coverage and durability on PVC trim.
You’ll apply consistent coating techniques, sanding lightly between coats if needed, and watch manufacturer-recommended drying times to avoid smudges.
Two coats often suffice; add a third for color depth or wear resistance.
Drying and Curing Times for PVC Primer and Paint
Drying and curing times for PVC primer and paint vary by product and conditions, but you can generally expect primers to dry to the touch within 30 minutes to an hour and paints to be touch-dry in 1–2 hours.
Full cure, when the coating reaches its maximum hardness and chemical resistance, typically takes 7–14 days.
- Check label for drying times
- Use thin coats to speed drying
- Control temperature and humidity
- Wait full curing times before stress
- Test adhesion after cure
Painting Outdoors vs Indoors: PVC Tips
Whether you’re working on trim inside or trim exposed to the elements, painting PVC outdoors vs indoors requires different prep and timing because weather, ventilation, and surface contaminants change how primer and paint perform.
You’ll clean and scuff both, but in outdoor conditions watch temp, humidity, and dust.
Indoors, guarantee good indoor ventilation, low dust, and adequate curing time before handling.
Best Paint Sheens for PVC Trim
When choosing a sheen for PVC trim, you’ll usually want a satin or semi-gloss for the best balance of appearance and cleanability.
Higher sheens resist scuffs and stains better and are more durable for high‑traffic areas, while lower sheens hide surface imperfections.
Think about where the trim is located and how much wear it’ll get when picking your finish.
Best Sheen For Trim
Although PVC trim accepts many finishes, choosing the right sheen matters more than you might think because it affects appearance, durability, and how easy the trim is to clean.
You’ll want to balance sheen selection with style and maintenance. Consider:
- Flat for hiding imperfections
- Satin for moderate sheen durability and wipeability
- Semi-gloss for easy cleaning
- Gloss for high shine
- Match surrounding trim sheen
Sheen Effects On Durability
Sheen choice doesn’t just change how your PVC trim looks—it affects how well it stands up to wear and cleaning.
You’ll see sheen impact in scuff resistance and ease of wiping: higher sheens resist abrasion and stain better.
For a clear durability comparison, choose semi-gloss or gloss for high-traffic areas and satin for a balance of wear resistance and softer appearance.
How Temperature and Humidity Affect PVC Paint
Because PVC’s surface and the drying chemistry of paint both react to air conditions, temperature and humidity strongly shape your paint job’s outcome.
You’ll monitor temperature effects and humidity impact to avoid runs, long tack times, or poor flow. Keep consistent conditions while painting.
- Aim for moderate temps (50–85°F)
- Avoid high humidity
- Ventilate well
- Allow longer cure in cool air
- Use fast-dry formulations
Prevent Adhesion Failures on PVC
To prevent adhesion failures on PVC, you’ll want to start by cleaning the surface thoroughly to remove grease and dust.
Next, apply a primer made for plastics so paint can bond properly.
Finally, avoid painting in humid conditions or on dusty surfaces to keep the finish from lifting.
Clean Surface Thoroughly
Before you prime or paint, make sure the PVC is spotless so the coating can actually stick. You’ll improve surface preparation by removing grease, dust, and mold with proper cleaning techniques.
Follow these steps:
- Wipe with mild detergent and warm water
- Rinse thoroughly and dry
- Use isopropyl alcohol for oily spots
- Lightly scuff with fine sandpaper
- Remove sanding dust before painting
Use Proper Primer
Once the PVC is clean and lightly scuffed, pick a primer made for plastics so your paint will bond rather than peel.
Check primer compatibility with your chosen paint—solvent or water-based—and test on a scrap.
Apply thin, even coats using recommended application techniques: brush for edges, foam roller for flats, or spray for smooth coverage.
Let each coat dry fully before painting.
Avoid Moisture And Dust
1 simple step you can’t skip is controlling moisture and dust—both will keep primer and paint from bonding to PVC.
You’ll guarantee adhesion with moisture control and dust prevention before painting. Follow these quick actions:
- Wipe surfaces with a lint-free cloth
- Use a dehumidifier in humid rooms
- Let PVC reach room temperature
- Vacuum corners and crevices
- Avoid painting during dusty work
How to Stop Peeling and Flaking Over Time
If you want painted PVC molding to stay intact for years, focus on proper surface prep, the right primers and paints, and correct application techniques to prevent peeling and flaking.
Clean, sand lightly, and degrease before priming. Use a bond-promoting primer and a flexible exterior acrylic or enamel.
Apply thin, even coats, allow full curing, and inspect periodically for peeling prevention and flaking solutions.
Get a Smooth, Brush-Free Finish on PVC
To get a smooth, brush-free finish on PVC, you’ll need to prep the surface by cleaning, sanding lightly, and wiping off dust.
Choose a paint formulated for plastics or a flexible acrylic with a primer made for PVC.
When spraying, keep the nozzle moving, apply thin even coats, and allow proper flash time between passes.
Surface Preparation Steps
Once you’ve cleaned the molding, prep becomes a quick, two-part process: scuff the surface to give primer something to bite, then wipe away dust so paint lays down smooth and brush-free.
- Use fine-grit sandpaper for light abrasion.
- Clean with mild detergent for surface cleaning.
- Remove residue with a tack cloth.
- Apply adhesion techniques like a bonding primer.
- Let everything fully dry before painting.
Best Paint Types
Choose paints formulated for plastic — they’ll give you the smooth, brush-free finish PVC needs without peeling or poor adhesion.
Use spray enamels or acrylic lacquers for fast, even coverage and superior paint durability.
For adhesion, pick products labeled for PVC or multi-surface plastics.
Consider primerless options to save steps, and make deliberate color selection to match trim and resist UV fading.
Spraying Technique Tips
When you want a truly smooth, brush-free finish on PVC, spray application beats brushing every time because it lays down thin, even coats that minimize texture and runs.
You’ll control finish by managing spray speed and overlap; mind spraying distance and perform proper nozzle adjustment.
- Thin coats
- Consistent overlap
- 8–12″ spraying distance
- Test spray patterns
- Keep nozzle adjustment steady
Spray vs Brush vs Roller for PVC Molding
Wondering whether to spray, brush, or roll PVC molding?
You’ll weigh spray advantages like fast application speed and smooth finish, against brush techniques for precise edges and reduced overspray.
Roller efficiency gives quick coverage differences on flat sections but may add texture effects.
For finish comparison, choose based on profile complexity.
Consider cleanup methods for each—solvent for spray, soap and water for brush or roller.
Match Painted PVC to Existing Trim Colors
Look closely at the existing trim’s sheen and texture so your painted PVC matches both color and finish.
Test small paint samples on scrap PVC and hold them next to the trim under the same lighting to confirm the match.
If needed, blend the new paint with a subtle glaze or tint to harmonize tones and hide slight differences.
Assess Existing Trim Finish
Before you start painting PVC molding, take a close look at the existing trim finish so you can match color, sheen, and texture accurately.
Check trim condition and perform a finish evaluation, then plan paint choice and prep.
Consider:
- Surface gloss level
- Color under natural light
- Texture and brush marks
- Wear or staining
- Adjacent wall color impact
Test Paint Samples
Now that you’ve evaluated the existing trim finish, you’re ready to test paint samples to confirm the PVC matches the rest of your trim.
Apply small sample applications on inconspicuous PVC sections, let them cure fully, and view under natural and artificial light.
Compare tones side-by-side, note undertones, and repeat test color variations until you achieve an exact match.
Blend With Glazing
One effective way to harmonize painted PVC with existing trim is to apply a thin glaze over the dried paint to tweak color, depth, and sheen without repainting the whole piece.
You’ll use glazing techniques and careful blending colors to match tones.
Try these steps:
- Mix glaze with paint tint
- Test on scrap
- Work thin layers
- Blend with a brush or rag
- Seal when matched
Paint Complex Profiles and Inside Corners
When you tackle complex PVC profiles and tight inside corners, take your time and work methodically so paint lays down smoothly without pooling.
Use small angled brushes and thin coats, employing complex techniques like feathering and stippling to reach grooves.
For corner solutions, mask adjacent surfaces, back-brush seams, and sand between coats for crisp shifts and even coverage on intricate molding.
Painting PVC Baseboards and Door Casings
When painting PVC baseboards and door casings, start by cleaning, sanding lightly, and wiping away dust so the primer bonds.
Choose a high-adhesion primer formulated for plastics or a universal bonding primer for best results.
Apply paint with thin, even coats—brush for edges and a small roller for flats—and allow full drying between coats.
Surface Preparation Steps
Before you grab paint, prep every PVC baseboard and door casing so the finish will stick and look professional.
You’ll use proper cleaning techniques and sanding methods before priming. Follow these steps:
- Remove dust and grime with detergent.
- Rinse and dry thoroughly.
- Lightly sand to scuff surface.
- Vacuum and tack cloth.
- Fill gaps and wipe clean.
Best Primer Choices
Now that your PVC is clean, sanded, and gap-filled, pick a primer that bonds to smooth, nonporous plastic so paint won’t peel. For primer application, choose a high-adhesion, solvent- or acrylic-based primer; it improves adhesion and durability. Primer benefits include sealing and uniform topcoat appearance.
| Type | Use |
|---|---|
| Acrylic | Water-based, easy cleanup |
| Solvent | Strong bond |
| Shellac | Quick dry |
| Epoxy | Heavy-duty |
Paint Application Techniques
Start by setting up a clean, dust-free workspace and lay down drop cloths to protect floors and nearby trim.
You’ll use brush techniques for corners and detail painting, spray methods for even coverage, and follow cleaning tips before starting.
Mind application timing and color matching; use light passes for texture effects and finish smoothing.
- Brush techniques
- Spray methods
- Cleaning tips
- Application timing
- Finish smoothing
Painting PVC Crown Molding and Chair Rail
Painting PVC crown molding and chair rail is straightforward if you prep properly and pick the right products.
You’ll want to clean the surfaces, scuff them lightly with fine sandpaper, and use a primer made for plastics before applying a high-quality latex or acrylic paint for a durable finish.
Use crown molding techniques to minimize brush marks, and match chair rail styles to room decor for a polished look.
Maintain and Clean Painted PVC Molding
Keep a simple dusting routine to prevent grit from scratching the paint, using a soft cloth or brush.
When it needs more than dusting, you’ll gently wash the molding with mild soap and water and rinse thoroughly.
For scuffs or chips, clean the area, sand lightly if needed, and apply a small touch-up of matching paint.
Surface Dusting Routine
While you won’t need heavy scrubbing, a simple weekly dusting routine will prevent buildup and keep painted PVC molding looking fresh.
You’ll focus on surface cleaning, dust removal, and quick surface inspection as part of a maintenance routine.
Prep essentials are a soft cloth and duster; cleanliness importance is regularity.
- Soft microfiber cloth
- Extendable duster
- Light brush for crevices
- Vacuum brush attachment
- Routine checklist
Gentle Washing Methods
After your weekly dusting, occasional gentle washing will remove grime that a duster can’t catch and help preserve the paint finish. Use a soft bristle brush, mild soap, and lukewarm water; rinse and pat dry. Avoid harsh scrubbing or solvents.
| Tool | Purpose |
|---|---|
| Soft bristle brush | Lift dirt |
| Microfiber cloth | Rinse & dry |
Touch-Up Paint Tips
If dinged spots or scuffs appear, you’ll want to address them quickly to prevent further chipping and keep the finish uniform.
Use these touch up techniques and focus on color matching:
- Clean area with mild soap, dry thoroughly
- Lightly sand rough edges
- Apply primer if needed
- Use small brush or marker for paint
- Blend edges and allow full cure
How Often Painted PVC Needs Touch-Ups
Generally, painted PVC needs touch-ups only occasionally, depending on exposure and traffic: interior trim in low-traffic rooms may go several years before showing wear, while exterior or high-contact areas can need attention every 1–2 years.
You should set a simple touch up frequency based on inspection and create a maintenance schedule to spot chips, scuffs, or fading and address them promptly.
Remove Old Paint From PVC Safely
When the old paint on your PVC molding starts to peel, crack, or simply won’t take new paint, you’ll want to remove it carefully to avoid damaging the plastic.
Use gentle paint removal techniques and approved safe solvents, and work patiently.
- Test solvent on a hidden spot
- Wear gloves and eye protection
- Use plastic scrapers, not metal
- Sand lightly with fine grit
- Clean residue with mild detergent
Paint PVC That Was Previously Stained or Coated
If your PVC molding was previously stained or coated, start by evaluating the surface for gloss, peeling, or contaminants so you know what you’re up against.
Strip or sand off any existing finishes until the surface is clean and matte.
Then apply a primer formulated for PVC to promote proper adhesion before painting.
Surface Assessment First
Start by inspecting the PVC closely to determine what kind of finish you’re dealing with—stain, factory coat, or a previous paint layer—and note any peeling, chalking, or glossy areas that could prevent new paint from adhering.
You’ll assess surface preparation needs to guarantee paint adhesion. Check:
- Gloss level
- Peeling spots
- Chalky residue
- Contaminants
- Texture for sanding
Remove Existing Coatings
Now that you’ve assessed the PVC surface, tackle any existing stains or coatings that could block adhesion.
Use gentle removal techniques: wipe with mild detergent, scuff with fine-grit sandpaper, or apply a plastic-safe stripper per instructions.
Remove residue, rinse, and dry thoroughly.
Proper removal techniques are essential for effective surface preparation and guarantee paint will later bond without peeling or flashing.
Prime For Adhesion
Once you’ve removed old coatings and let the surface dry, apply a primer formulated for plastics to help paint stick to previously stained or coated PVC.
Use adhesion techniques and choose primer options suited to PVC. Follow these steps:
- Clean with mild detergent
- Lightly sand for bite
- Wipe dust away
- Apply thin primer coat
- Let cure fully before painting
Cost: Paint PVC Vs Replace With Wood (Diy Vs Pro)
When you weigh painting PVC molding against replacing it with wood, cost often becomes the deciding factor — painting stays cheaper if you’re doing it yourself, while replacement costs climb quickly when you hire pros or choose higher-end wood.
For a clear cost comparison, tally materials, tools, and labor.
DIY painting usually wins; evaluate replacement options only if damage or style demands full swap.
Eco-Friendly Paint Options for PVC Molding
If you want a low-toxicity finish for PVC molding, choose paints labeled zero- or low-VOC, water-based acrylics, or plant-derived formulas that bond well to smooth plastic surfaces; these options cut fumes and environmental impact without sacrificing durability.
For a low-toxicity PVC finish, use zero/low-VOC, water-based, or plant-derived paints that bond to smooth plastic.
- Use eco friendly options like low-VOC primer
- Pick water-based acrylic topcoats
- Consider plant-derived paint blends
- Prefer recyclable packaging
- Choose sustainable materials for brushes and rollers
Troubleshooting: Peeling, Orange Peel, Blotches
Troubleshooting peeling, orange peel, and blotches starts with identifying surface prep and application problems so you can target the fix quickly:
Check for adhesion issues and poor paint compatibility, sand to correct surface texture, clean thoroughly for peeling prevention, and thin or adjust spray settings for orange peel solutions.
For blotch correction, feather edges, apply even coats, and use compatible primers to guarantee uniform coverage.
Pro Tips for a Professional-Looking PVC Finish
After you’ve corrected adhesion, texture, and coverage problems, focus on techniques that make PVC molding look factory-finished.
Use precise finishing techniques and smart color selection to match trim.
Use precise finishing and color-matching to blend PVC molding seamlessly with existing trim.
Try these steps:
- Sand lightly between coats
- Use quality primer made for PVC
- Apply thin, even topcoats
- Blend edges with a brush
- Cure fully before handling
Quick Checklist Before You Start Painting PVC
Before you touch brush or primer, run through a short checklist to prevent common mistakes and save time:
confirm surface is clean, dry, and free of oil or wax;
sand glossy areas lightly;
wipe dust;
repair gaps with appropriate filler;
choose a compatible primer and paint;
test adhesion on a scrap;
gather PPE and drop cloths.
These checklist essentials streamline Painting preparation and guarantee lasting results.
Frequently Asked Questions
Can You Paint PVC Molding With Spray Paint From a Hardware Store?
About 80% of paint failures stem from poor prep — yes, you can paint PVC molding with spray paint from a hardware store if you choose proper spray paint types and do thorough surface preparation, sanding and priming first.
Will Painted PVC Emit Odors or VOCS After Installation?
Yes — freshly painted PVC can emit odors and elevated VOC levels briefly; if you prime and use low-VOC paint, ventilate well, and let it cure fully, you’ll minimize odor emissions and long-term VOC exposure.
Can PVC Molding Be Painted While Already Installed With Electrical Wires Nearby?
Absolutely — you can paint it while installed, but don’t treat nearby wiring like it’s harmless as a sleeping tiger. Use safety precautions, turn power off, protect wires, and prep surfaces to guarantee paint adhesion.
Is It Safe to Paint PVC Trim in a Home With Infants or Pets?
Yes—you can safely paint PVC trim around infants and pets if you choose non toxic options like low‑VOC or water‑based primers and paints, keep areas ventilated, and avoid access until full drying time finishes to prevent exposure.
Can Painted PVC Molding Be Used in High-Temperature Areas Like Above Ranges?
Like a sunproof cloak, painted PVC can go above ranges, but you’ll need proven high temperature resistance and heat tolerance testing to be sure; you should choose high-temp paint, secure proper clearance, and monitor for warping.
Conclusion
You can definitely paint PVC molding—and doing it saves time, money, and a ton of waste compared to replacing it. Pick a high-quality acrylic or latex paint with a plastic-bonding primer, prep thoroughly by cleaning and sanding lightly, and use thin, even coats to avoid drips. If you follow the troubleshooting tips and pro tricks, your trim will look salon-fresh and last for years—seriously, it’ll look better than when it was brand-new!