How to Fix Peeling Exterior Paint Before It Becomes a Bigger Problem
You can stop peeling exterior paint from turning into rot and costly repairs by acting fast: scrape or pressure-wash loose paint, sand feathered edges, repair any soft or rotted wood, prime bare areas with a quality exterior primer, then repaint with suitable exterior paint. Fix gutters, flashing, and ventilation to remove moisture sources before finishing. Use proper PPE and follow cure times for best adhesion, and keep tools and materials ready — continue for detailed steps, tools, and prevention tips.
Quick Answer Can You Fix Peeling Exterior Paint Before It Gets Worse?
You can often stop minor peeling yourself by scraping loose paint, sanding, priming, and spot-painting when the underlying wood or siding is sound.
If peeling covers large areas, exposes rot, or keeps coming back, you’ll need a pro to address moisture, adhesion failure, or structural damage.
Acting quickly on small problems prevents bigger, more expensive repairs later.
Short summary of when quick fixes work and when professional help is needed
If the peeling’s limited to small patches and the wood underneath is dry and sound, you can usually stop it from getting worse with a quick repair—scrape loose paint, sand, prime, and repaint the area.
You’ll tackle how to fix peeling exterior paint yourself for minor spots. Seek pros when rot, widespread failure, moisture sources, or lead paint appear.
- small spots
- rot present
- moisture issues
- lead concern
Basic Understanding What Is Peeling Exterior Paint and Why It Happens
You’ll first want to inspect for clear signs like large sheets of paint pulling away, powdery chalk on the surface, small flakes, or raised blisters.
Knowing common causes—moisture intrusion, poor adhesion from bad prep, intense sun exposure, or problems with the underlying material—helps you target the fix.
I’ll also show how to tell peeling apart from flaking, chalking, and blistering so you can choose the right repair steps.
What peeling paint looks like (signs to inspect)
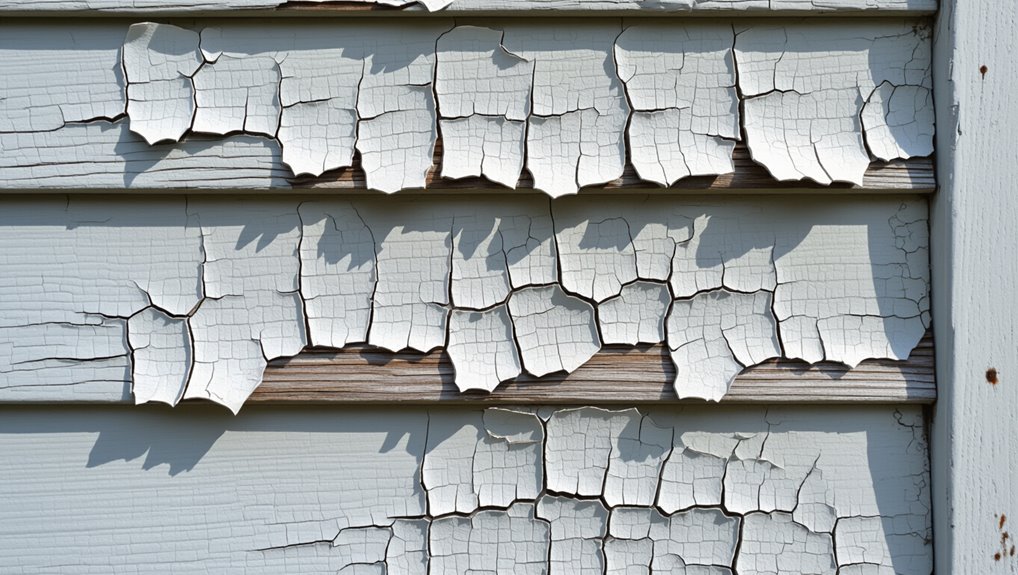
When paint starts to peel, you’ll notice sections lifting away from the surface in curls or flakes, bare substrate showing through, and uneven texture where the finish was once smooth.
Check edges for blistering, paint cracking into scales, and thin spots that reveal previous coats.
Look for raised seams, flaking around trim, and patchy color changes indicating failing adhesion you should address.
Common causes of exterior paint failure (moisture, adhesion, preparation, sun, substrate issues)
Noticing peeling paint is just the first step; to fix it you need to know why it happened.
You’ll check common causes so repairs last. Look for:
- Moisture intrusion from leaks or poor drainage
- Poor adhesion due to incompatible or old paint
- Inadequate surface prep like dirt or loose material
- Sun and substrate degradation breaking paint bonds
How to distinguish peeling vs. flaking vs. chalking vs. blistering
Because different paint failures look similar at a glance, you need to tell peeling, flaking, chalking, and blistering apart before you start repairs.
Peeling lifts in sheets from poor adhesion; flaking produces small, plate-like fragments; chalking leaves a powdery residue you can wipe away; blistering creates raised bubbles from trapped moisture or heat.
Identify the pattern to choose correct fixes.
Assessing the Damage How Serious Is the Problem?
Start by walking the exterior with a checklist—note problem areas, materials, paint layers, and any old coatings.
You’ll test adhesion (the thumb or tape test) and probe for soft wood or trapped moisture to spot rot.
If peeling is widespread, recurring, or the substrate is compromised, call a pro because it often signals structural or persistent moisture issues.
Step-by-step inspection checklist (areas, materials, layers, previous coatings)
Before you grab a scraper, walk the perimeter and inspect every surface systematically so you know exactly what you’re up against: look for all peeling patches, check trim, eaves, and window sills, probe suspicious areas to reveal underlying layers, note substrate materials (wood, metal, masonry), and record any signs of moisture, blisters, or incompatible previous coatings.
- Note all peeling areas and extent
- Identify substrate material per area
- Document paint layer count and types
- Flag spots with visible damage or prior incompatible coatings
How to test adhesion and identify underlying rot or moisture
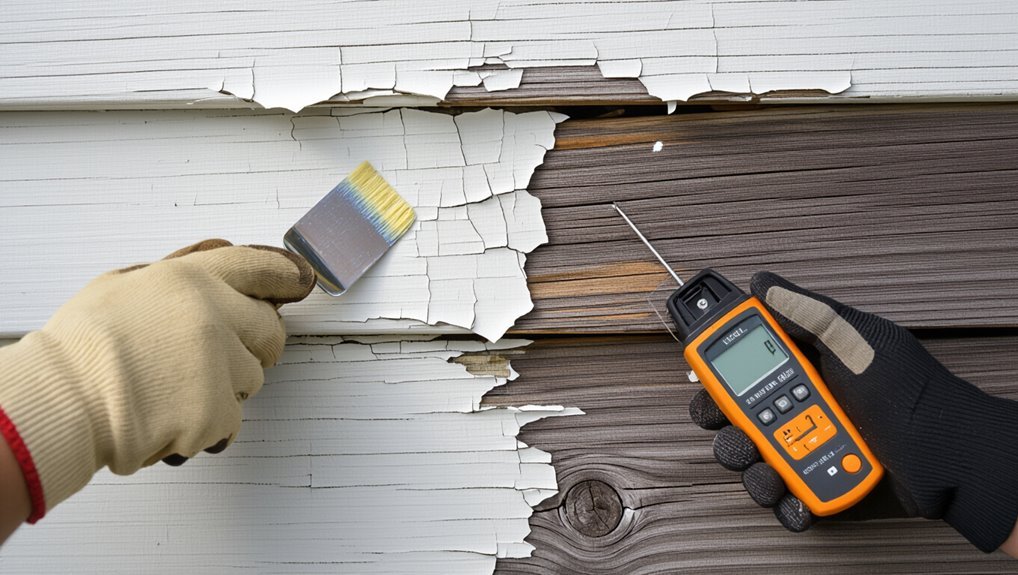
How well does that paint actually grip the surface beneath it? Test adhesion with a sharp blade: score a small X, press tape, and pull—flakes mean poor bond.
Probe suspect areas with a screwdriver; soft or crumbling wood indicates rot.
Look for blistering, damp stains, or mold that signal moisture.
Document findings, dry surfaces, and repair or replace compromised material before repainting.
When peeling indicates structural or moisture problems requiring a pro
When peeling paint exposes softened wood, recurring blistering, widespread stains, or active leaks, you’re likely facing more than a cosmetic issue and should call a pro; structural decay, hidden rot, or persistent moisture can compromise framing, sheathing, or siding and demand specialist assessment and repair before repainting.
You should document damage, avoid DIY patching, and hire a contractor who’ll diagnose moisture sources, repair affected structure, and recommend drying and ventilation fixes.
Materials, Tools, and Safety You’ll Need Before Starting
Before you start scraping and sanding, gather the right tools, materials, and safety gear so the job goes smoothly and safely.
Here’s a quick checklist to get you ready:
- Scrapers, sanders, brushes, rollers, pressure washer
- Primers, exterior paint, sealers, caulk
- Mask, gloves, eye protection, and ladder safety procedures
- Drop cloths, painter’s tape, and replacement fasteners
With these on hand, you’ll be prepared to proceed methodically and reduce surprises.
Basic tools (scrapers, sanders, brushes, rollers, pressure washer)
Tools make the job go faster and give you a cleaner result, so gather scrapers, a variable-speed sander, assorted brushes and rollers, and a pressure washer if the surface is heavily soiled or flaking.
Use sharp metal or plastic scrapers for loose paint, a medium-grit sanding pad to feather edges, stiff brushes for debris, and quality rollers for smooth coats.
Wear PPE.
Materials and products (primers, exterior paints, sealers, caulk)
Paint, primer, sealer, and caulk are the core materials you’ll choose to stop peeling and protect the repaired surface, so pick products designed for exterior use and your specific substrate (wood, metal, masonry).
Use a high-quality exterior primer, acrylic or oil-based paint suited to the substrate, elastomeric sealer for porous areas, and a paintable exterior caulk for joints and gaps.
Personal protective equipment and safe practices (mask, gloves, ladder safety)
One good rule: protect your lungs, skin, and eyes while you work—wear an N95 or better respirator for dust and fumes, chemical-resistant gloves, and safety goggles.
Use long sleeves and avoid open cuts.
Inspect ladders, set them on stable ground, maintain three points of contact, and don’t overreach.
Keep a partner nearby and follow product label safety instructions to minimize risk.
How to Fix Peeling Exterior Paint Step-by-Step Repair Guide
Start by preparing the area and protecting nearby plants, windows, and fixtures so you won’t spread debris or damage anything.
Next, remove loose paint with the appropriate method—scrape, pressure-wash, or use a chemical stripper—then repair or replace any rotten or damaged substrate and fill gaps as needed.
Finish by sanding smooth, making sure surfaces are clean and dry, and apply a suitable primer before repainting.
Prepare the area and protect surroundings
Before you touch the wall, clear a workspace and cover nearby plants, windows, trim, and walkways so dust and debris don’t create more work later.
Protect yourself and surroundings:
- Lay drop cloths and tape edges securely
- Shield plants with plastic or burlap
- Cover nearby hardware and fixtures
- Use goggles, a dust mask, and gloves for safety
Remove loose paint properly (manual scraping, power washing, chemical strippers)
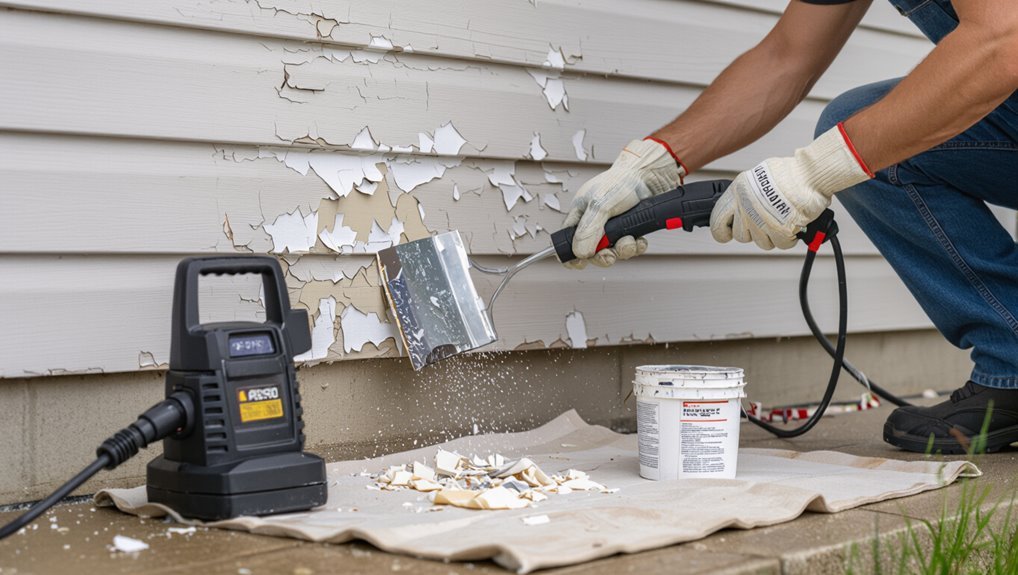
Remove all loose, flaking paint so new coatings can bond properly and the repair lasts.
Use a sturdy scraper and wire brush for small areas, sanding edges smooth. For larger surfaces, consider a pressure washer at moderate setting, keeping distance to avoid damage.
Chemical strippers work on stubborn layers—follow label safety, protect plants, and rinse thoroughly before priming and repainting.
Repair and replace damaged substrate (wood rot repair, siding replacement, filler)
Assess the damage carefully and cut out any soft, rotted, or severely warped material so the new repair has a solid base.
Replace damaged siding panels or rotten trim with matching materials, fasten securely, and seal joints.
For repairable spots, apply a wood hardener, then fill voids with an exterior-grade epoxy or filler.
Prime repaired areas before painting to guarantee durability.
Sanding and smoothing for proper adhesion
Start by sanding all edges of the peeled paint back to a firm, feathered junction so new coatings will bond evenly; use a coarse grit (60–80) to take off loose paint, then step to 120–150 grit for a smooth finish.
Sand flat areas lightly to remove gloss, blend connections, and eliminate ridges.
Vacuum dust, then wipe with a tack cloth before painting.
Clean, dry, and prime surfaces primer selection and application tips
Once the surface is clean and completely dry, you’ll choose and apply a primer that matches the substrate and the problem you fixed—stain-blocking for tannins, rust-inhibiting for metal, or a bonding primer for glossy or chalky surfaces.
Apply evenly with a brush, roller, or sprayer; follow manufacturer tack-free times; thin only if directed.
Seal bare wood and metal edges; allow full cure before repainting.
Repaint: choosing exterior paint, application techniques, and drying times
With your primer cured and the repaired areas sealed, pick an exterior paint formulated for the substrate and local climate—100% acrylic latex for wood and most siding offers flexibility and UV resistance, while elastomeric coatings work for heavily cracked stucco.
Apply thin, even coats; follow manufacturer recoat intervals; watch temperature and humidity for proper curing.
- Use high-quality brushes/rollers
- Maintain wet edges
- Avoid painting in direct sun
- Allow recommended dry times
Final inspection and touch-ups
After the paint has cured, walk the entire surface to inspect for missed spots, drips, thin coverage, or edging issues you can fix now.
Mark imperfections, feather edges, and lightly sand rough areas.
Apply thin touch-up coats where needed, blend into surrounding paint, and allow full drying.
Reinspect for uniformity, clean up tools, and note maintenance intervals to prevent future peeling.
Alternative Approaches and When to Use Them
You’ll weigh spot repairs against full repaints by considering cost, time, and how widespread the peeling is.
If large areas, multiple coats, or structural issues are involved, you’ll likely need a full repaint rather than patching.
Use a quick DIY checklist—skill level, tools, safety, and warranty—to decide whether to tackle it yourself or hire a pro.
Spot repairs vs. full repaints pros and cons
When deciding whether to patch peeling spots or strip and repaint the whole surface, weigh the scope of damage, longevity you want, and your budget; spot repairs can be quick and cheaper for small, isolated failures, but they’ll look uneven and often don’t last if underlying adhesion or moisture issues remain.
| Option | Pros | Cons |
|---|---|---|
| Spot | Fast, cheap | Uneven, short-lived |
| Partial | Targeted balance | Prep tricky |
| Full | Durable, uniform | Costly, time-consuming |
When to consider repainting the entire wall or siding
If peeling is widespread, the paint is more than a cosmetic problem — repainting the entire wall or siding is usually the smarter choice to restore protection and appearance.
Choose full repaint when multiple patches fail, underlying wood or trim shows damage, or color mismatch and texture prevent seamless spot repairs.
Repainting guarantees uniform adhesion, long-term weatherproofing, and a consistent finish across the surface.
DIY vs. hiring a professional contractor decision checklist
Deciding whether to tackle peeling exterior paint yourself or hire a pro comes down to scope, skill, time, and risk — so weigh each factor before you start.
You’ll save money on small areas but hire pros for large jobs or safety concerns.
Consider:
- Job size and access
- Your experience and tools
- Time and schedule constraints
- Warranty and workmanship needs
Common Mistakes to Avoid When Repairing Peeling Paint
When you tackle peeling exterior paint, don’t rush the basics—skipping prep or using the wrong products only makes the problem come back.
Check these common mistakes so you can fix the cause, not just the appearance:
- Skipping proper surface preparation
- Using the wrong primer or paint for the substrate
- Painting over trapped moisture or active leaks
- Relying on cosmetic fixes without addressing root causes
Skipping proper surface preparation
Because paint only bonds to a clean, stable surface, skipping proper preparation dooms repairs before you’ve started. You must remove loose paint, dirt, and mildew; sand glossy edges; and repair rot or unstable substrate.
If you rush or skip cleaning and stabilization, new coatings’ll lift quickly. Take time to prep—use appropriate cleaners, fillers, and sanding—to guarantee durable adhesion and a long-lasting finish.
Using wrong primer or paint for substrate
If you apply a primer or paint that’s incompatible with the underlying material, the new coating won’t adhere and the peeling will return.
Match primer type to substrate—wood, metal, masonry, or previously painted surfaces—and choose paint formulated for exterior use and UV resistance.
Test adhesion on a small area, follow manufacturer instructions, and don’t substitute cheaper products that lack proper bonding properties.
Painting over trapped moisture or active leaks
Although it might seem faster, painting over trapped moisture or an active leak only hides the problem and guarantees the new finish will fail sooner.
You need to locate and stop leaks, dry materials thoroughly, and repair damaged substrate before repainting.
Skipping these steps leads to bubbling, mold, and repeat peeling.
Take time now to fix underlying moisture so your paint lasts.
Over-reliance on cosmetic fixes without addressing root causes
Fixing leaks and drying out materials is only part of the job; you also can’t just slap on a new coat and call it done.
If you only mask symptoms, paint will fail again. Diagnose rot, poor adhesion, or structural issues first.
Repair or replace damaged substrates, improve ventilation and flashing, then prime and repaint. That way your work lasts.
Prevention and Best Practices to Stop Future Peeling
To keep paint from peeling again, you should set up a simple maintenance routine for cleaning, inspections, and re-caulking as needed.
Make sure gutters, flashing, and ventilation are sound to control moisture, and address any problems promptly.
Finally, pick a durable exterior paint system and apply it within the proper temperature and humidity windows for best adhesion.
Ongoing maintenance schedule (cleaning, inspections, caulking)
A simple, regular maintenance routine will keep small problems from turning into peeling paint disasters.
You should clean, inspect, and recaulk seasonally to prevent gaps and dirt buildup.
Follow this checklist:
- Wash siding annually and remove mildew.
- Inspect trim and joints each spring and fall.
- Recaulk cracked seams promptly.
- Touch up paint chips as soon as you find them.
Weatherproofing and moisture control strategies (gutters, flashing, ventilation)
Because water is the main culprit behind peeling paint, you should make moisture control a top priority by keeping gutters clear, flashing intact, and ventilation working properly so exterior surfaces stay dry and paint bonds lastingly.
Inspect and repair gutters and downspouts, reseal or replace damaged flashing, guarantee attic and crawlspace vents provide airflow, and direct splashback away from siding to prevent trapped moisture.
Choosing durable exterior paint systems and correct application windows
When you pick an exterior paint system, prioritize durable formulations and proper timing so coatings resist the elements and bond well.
Choose high-quality acrylic or elastomeric paints for flexibility and UV resistance, match primer to substrate, and confirm surface is dry and clean.
Apply within manufacturer temperature and humidity windows, avoid direct sun or impending rain, and follow recommended recoat intervals.
Cost Estimates and Timeframes for Typical Repairs
You’ll want a quick sense of cost and time before you start any repair, so here’s a simple breakdown of typical jobs and what they usually take.
| Repair type | Typical cost & timeframe |
|---|---|
| Small spot repair | $50–$300, a few hours to half a day |
| Partial wall or siding panel repair | $200–$1,200, half a day to 2 days |
| Full exterior repaint | $2,500–$10,000+, 3–7 days (or longer for large homes) |
Use these ranges to plan budgeting and scheduling, and adjust for material, access, and local labor rates.
Small spot repair
Plan for small spot repairs by matching scope, cost, and time to the damage severity.
For hairline peeling or tiny flakes, expect under an hour and minimal cost: sand, prime, and touch up with matching exterior paint.
Larger isolated areas may take a few hours, require patching compound, and cost more.
Always prep properly to prevent repeat peeling.
Partial wall or siding panel repair
Partial wall or single siding-panel repairs typically take from a couple of hours to a full day and cost anywhere from $50 to $400, depending on the damage, materials, and whether you hire a pro.
You’ll replace or patch panels, sand and prime edges, and match paint.
Expect higher labor costs for hard-to-reach areas and extra for specialty materials or weather delays.
Full exterior repaint
A full exterior repaint typically takes from several days to two weeks and can cost anywhere from $2,500 for a small, DIY job up to $15,000 or more for large homes or high-end finishes when you hire professionals.
You’ll need surface prep, repairs, priming, and two finish coats.
Expect higher costs for scaffolding, trim detail, or specialty paints; get multiple quotes and a clear timeline.
FAQ Peeling Exterior Paint (3 5 Common Questions)
You probably have a few quick questions before starting repairs, so let’s cover the basics you’re likely wondering about.
Can you paint over peeling paint, how long to wait after power washing, and whether primer will prevent future peeling are all important to answer.
I’ll also explain how to spot moisture-related peeling and offer a short-term fix until you can do a full repair.
Can I paint over peeling paint without scraping?
Wondering if you can skip scraping and just paint over peeling exterior paint? You shouldn’t.
Painting over loose or flaking paint traps moisture and leads to faster failure. Remove all loose material, sand edges smooth, prime bare spots with a suitable exterior primer, then repaint.
Proper surface prep guarantees adhesion and longevity, preventing more costly repairs later.
How long after power washing should I wait to repaint?
After scraping and priming, power washing can speed cleanup, but you’ll need to let the surface fully dry before repainting.
Wait at least 24–48 hours in warm, dry conditions; cooler or humid weather can require 72 hours or more.
Touch the substrate—no dampness—and verify all loose particles are gone.
Repaint only when moisture content is low and surfaces feel completely dry to the touch.
Will primer stop paint from peeling again?
How well a primer prevents peeling depends on choosing the right type and applying it correctly.
You’ll reduce future peeling if you remove loose paint, use a quality exterior primer matched to the surface (wood, metal, or previously painted surfaces), allow proper drying, and apply topcoat within recommended time.
Primer improves adhesion and seals surfaces but won’t fix underlying structural or moisture issues.
How do I know if peeling is caused by moisture inside the wall?
Primer helps with adhesion, but it won’t hide ongoing moisture problems — and that’s often why paint keeps peeling.
If you see bubbling, soft or discolored spots, or paint lifting near windows, rooflines, or flashing, suspect internal moisture.
Use a moisture meter, check for musty smells, stained insulation, or mold.
Persistent dampness after repairs means the source still leaks and needs fixing.
Is there a temporary quick fix until I can do a full repair?
If you need a short-term fix before a full repair, you can stabilize small peeling areas to slow further damage and make the surface look acceptable.
Clean loose paint, sand edges smooth, apply an exterior-grade patching compound to fill gaps, prime the patched spot, and topcoat with matching exterior paint.
These steps buy time, but plan a proper repair to prevent recurrence.
Conclusion Next Steps and Call to Action
Use this quick checklist to decide whether you can tackle the repairs now or need help: assess paint loss, check for rot or moisture, and note the area size.
If you see extensive peeling, underlying damage, or you’re unsure about the cause, you should schedule a professional inspection or get a quote.
When in doubt, call a pro to avoid costly mistakes down the road.
Quick checklist to decide immediate actions
1 quick checklist will help you decide what to do next: assess the extent of peeling (few small flakes vs. widespread), check for underlying moisture or rot, note the substrate (wood, metal, stucco), determine if paint failure is localized or systemic, and decide whether you can tackle repairs yourself or should call a pro.
Prioritize safety, immediate moisture control, and temporary sealing to prevent further damage.
When to schedule a professional inspection or quote
After you’ve run the quick checklist and stabilized any immediate moisture or safety issues, decide when to call a pro based on damage scope, substrate condition, and your comfort with repairs.
If you’re unsure, get an inspection or quote when damage is widespread, involves rot or stucco, requires scaffold or lead-safe practices, or you lack time.
- Widespread peeling
- Rot or structural issues
- Access/height concerns
- Time or skill limits