How to Paint Over Gel Stain Without Stripping Everything Off
You can paint over gel stain without stripping it all off if the finish is intact and you prep properly. Clean grease and grime, scuff the surface with 220–320 grit sandpaper, and test adhesion with a solvent or tape. Fill any holes, then apply a high‑bonding primer designed for glossy finishes. Paint with quality brushes or rollers, sanding lightly between coats and allowing full dry times. Follow these steps and you’ll get lasting results—keep going to learn the full process.
Quick Answer Can You Paint Over Gel Stain Without Stripping It All Off?
Yes — you can often paint over gel stain without stripping every bit off, but success depends on how glossy and well-bonded the finish is.
If you scuff, clean, and use a good bonding primer, you’ll get a smooth painted look, though durability and adhesion won’t match a full strip-and-repaint job.
Expect a solid cosmetic update that may need touch-ups sooner than a resurfaced piece.
Short summary of outcomes and when it’s possible
If the gel stain’s surface is intact and glossy, you can usually paint over it without fully stripping—just scuff it, clean it, and prime with a bonding primer;
but if the finish is flaking, peeling, or had multiple thick coats, you’ll need to remove or sand it back to guarantee paint adhesion and an even result.
You’ll get good results following how to paint over gel stain properly.
Recommended final look and durability expectations
Knowing whether you can skip stripping will shape what the finished project looks like and how long it lasts.
You can expect a smooth, painted surface with some grain or texture showing through if you stain lightly.
Durability depends on prep and topcoat: use bonding primer and two quality coats of paint plus a protective clear finish for daily use.
Minor touch-ups may be needed over time.
Basic Understanding What Is Gel Stain and Why It Matters for Painting
Gel stain is thicker than traditional stains and behaves more like a tinted varnish, so you’ll treat its surface differently than raw wood or paint.
Its heavier binders and common topcoats—like varnish or polyurethane—change how well primers and paints will stick.
Before you paint, you’ll want to assess the gel stain’s finish and any existing topcoat to determine sanding, deglossing, or priming needs.
How gel stain differs from traditional stains and paintable surfaces
Because it sits on the surface rather than soaking into wood, gel stain behaves very differently than traditional penetrating stains, and that affects how paint will adhere and what prep you’ll need.
You’ll notice thicker, more uniform color and a film-like finish that resists absorption. That means you’ll treat it like a finished surface—clean, scuff, and prime—rather than raw wood before painting.
Adhesion characteristics and common finish types
1 key thing to remember is that gel stain creates a surface film rather than penetrating wood, so paint will need a surface designed for adhesion rather than raw wood fibers.
You should sand lightly or scuff to promote mechanical bite.
Gel finishes often use oils, resins, or waxes; primers formulated for slick surfaces or bonding primers improve adhesion.
Test in an inconspicuous spot first.
How previous topcoats (varnish/polyurethane) affect painting
If a gel-stained piece already has varnish or polyurethane on it, you’ll need to treat that film differently than bare wood because those topcoats create a slick, sealed surface that resists paint adhesion.
You should scuff-sand or chemically degloss, clean thoroughly, and use a high-adhesion primer.
Otherwise paint may peel or flake; proper prep guarantees durable, even coverage without stripping the stain.
Assessing Your Project When You Can Paint Over Gel Stain vs. When to Strip
Check the surface first: if the gel stain finish is intact with only light wear, you can usually paint right over it after scuffing and cleaning.
Look for red flags like peeling, flaking, or a thick gummy buildup that won’t bond to new paint—those areas need full or partial stripping.
Use simple assessment tools like a solvent wipe and a tape-adhesion test to confirm whether the finish will accept paint or must be removed.
Surface conditions that allow painting (intact finish, light wear)
When the gel stain’s finish is intact and shows only light wear—minor scuffs, slight dulling, or small surface scratches—you can usually paint over it without stripping; just clean thoroughly and scuff-sand to promote adhesion.
Check for firm finish, no flaking, and consistent color.
Remove grease, wax, or dirt, sand lightly with fine grit, then apply a bonding primer before your topcoat.
Red flags requiring full or partial stripping (peeling, thick buildup)
Because some gel-stained surfaces hide problems that paint won’t fix, you need to spot red flags that demand stripping before you start.
If finish peels, flakes, or lifts, you can’t paint over it. Thick, gummy buildup, bubbling, or obvious multiple failed coatings will prevent adhesion.
Also strip areas with deep damage, soft wood, or heavy contamination to guarantee a stable base.
Tools and materials for assessment (solvent test, tape adhesion test)
If you want to know whether you can paint over gel stain or must strip it, use a couple of quick tests and a handful of basic tools to decide.
Gather supplies, then perform solvent and tape tests to check finish integrity.
- Denatured alcohol
- 3M painter’s tape
- Clean cloths
- Small scraper
Materials and Tools Needed
Before you start, gather safety gear and set up a well-ventilated, dust-free workspace so you can work comfortably and protect yourself.
You’ll need cleaners, deglossers or adhesion promoters, plus primers, paint, brushes or rollers, and an optional topcoat for durability.
If the surface needs more prep, have sanding supplies or power tools on hand to speed the job.
Safety gear and workspace setup
When you’re getting ready to paint over gel stain, equip yourself with proper safety gear and set up a well-ventilated, organized workspace to protect your health and make the job smoother.
Wear a respirator, goggles, and gloves; use drop cloths and good lighting. Prioritize ventilation and cleared surfaces.
- Respirator
- Eye protection
- Gloves
- Drop cloths
Cleaning agents, deglossers, and adhesion promoters
Although gel stain bonds tightly, you still need to remove surface oils, grime, and the glossy layer to guarantee paint adhesion.
So gather a good degreaser, a liquid deglosser or sandable primer, and a dedicated adhesion promoter. Clean thoroughly, follow product directions, and test a small area first.
- Citrus degreaser
- Liquid deglosser
- Sandable bonding primer
- Adhesion promoter
Primers, paints, brushes/rollers, and optional sealing topcoats
Gather primers, paints, and applicators that match the surface and finish you want so your work starts on the right foot.
You’ll need quality supplies to guarantee adhesion and durability. Choose a bonding primer, paint type, and applicator suited to gel stain. Seal if needed.
- Bonding primer
- Satin or semi-gloss paint
- Brushes and foam rollers
- Clear topcoat (optional)
Optional power tools and sanding supplies
You don’t have to buy a full shop of equipment to prep gel-stained surfaces, but a few power tools and sanding supplies will speed the job and improve results: a random-orbit sander with 120–220 grit discs, a detail or palm sander for edges and tight spots, sanding blocks, tack cloths, and a vacuum or shop vac to control dust.
- Random-orbit sander
- Detail/palm sander
- Sanding blocks
- Dust control tools
Step-by-Step Process to Paint Over Gel Stain Without Full Stripping
Start by thoroughly cleaning and degreasing the gel-stained surface so paint will adhere.
Next, test adhesion and finish compatibility with a solvent or tape test, then do light scuff sanding or use a deglosser to create a mechanical tooth.
Repair any cracks or dents, then apply an appropriate bonding primer following manufacturer recommendations for type and application.
Step 1 Clean and degrease the surface
Before you prime or paint, clean and degrease the surface thoroughly so paint will bond to the gel-stained wood.
Use a mild degreaser or TSP substitute with warm water, scrub with a soft brush or cloth, and rinse well.
Dry completely.
Remove wax, silicone, and grime — these block adhesion.
Proper cleaning prevents peeling and guarantees a smooth, long-lasting finish.
Step 2 Test adhesion and finish compatibility (solvent/tape test)
Someone should always test the gel stain’s finish and adhesion before priming or painting; this step prevents wasted time and failed results.
You’ll dab solvent (denatured alcohol or acetone) on a hidden spot to check finish solubility, then press tape firmly and pull to assess adhesion.
If finish softens or lifts, you’ll need more removal; if it holds, proceed with priming.
Step 3 Light scuff sanding or deglossing for mechanical tooth
If the solvent and tape tests showed the gel stain is stable, move on to creating a mechanical bond by lightly scuffing or deglossing the surface.
Use 220–320 grit sandpaper or a synthetic Scotch-Brite pad, sanding just enough to dull the sheen.
Wipe dust with a tack cloth or damp rag, let dry, and proceed only when the surface feels uniformly matte and clean.
Step 4 Repair and fill imperfections (cracks, dents)
Patch visible damage so your topcoat sits smooth and lasts longer.
Remove loose debris, then clean the area with a damp cloth.
Fill dents and cracks with a paintable wood filler or epoxy, pressing it in and smoothing with a putty knife.
Let it cure fully, sand flush with fine grit, and wipe away dust so paint bonds evenly.
Step 5 Apply bonding primer (types and application tips)
Step 5 is applying a bonding primer—your bridge between gel stain and paint—so choose a product formulated for glossy or previously finished wood (shellac-based, oil-based, or a high-quality bonding acrylic) and apply it evenly to guarantee adhesion.
Use a brush for edges, a short-nap roller for flat areas, sand lightly between coats with fine grit, and follow manufacturer dry times for best bonding.
Step 6 First paint coat application and recommended techniques
Start by laying down your first coat confidently and evenly, working from the least visible area toward the center so you can correct any issues as you go.
Use a high-quality brush for corners and a foam roller for flat surfaces, keeping thin, uniform passes.
Watch for drips, maintain a wet edge, and let the primer bond guide your coverage for a smooth, consistent finish.
Step 7 Sand between coats and apply subsequent coats
Lightly sand the first coat once it’s dry to the touch so the next layer will stick and the surface will stay smooth.
Use fine-grit sandpaper (220–320), wipe away dust, then apply another thin, even coat.
Repeat sanding between coats as needed until coverage is uniform and brush marks are gone.
Allow proper drying time before each pass.
Step 8 Finish with protective topcoat if needed
Now that your coats are smooth and even, seal the work with a protective topcoat to lock in durability and appearance.
Choose a clear polyurethane or water-based polycrylic suited to the paint and use—matte, satin, or gloss.
Apply thin, even coats with a high-quality brush or foam applicator, sand lightly between coats if directed, and allow full curing before regular use.
Alternative Methods When Full Stripping Isn’t Desired
If you don’t want to fully strip the gel stain, you can rely on high-bonding primers to adhere paint without sanding.
You can also choose gel-compatible paints or tintable gel stains that lay over the existing finish for a more forgiving application.
For stubborn spots, consider partial spot-stripping and careful blending to match surrounding areas before priming or topcoating.
Using high-bonding primers only (no sanding)
Skip sanding and rely on a high-bonding primer when you want a quicker fix over gel stain; these primers are formulated to stick to slick, stained surfaces and create a paint-ready layer without aggressive abrasion.
Clean the surface, remove grease, and apply thin, even coats per manufacturer instructions. Allow full cure time, inspect for adhesion, and spot-prime any missed glossy areas before topcoating.
Painting over with gel-compatible paints or stains
When you don’t want to strip gel stain, consider using gel-compatible paints or glazes designed to adhere to stained surfaces; they let you change the look without heavy prep.
Choose products labeled for gel stain adhesion, test a small hidden area, and clean the surface thoroughly.
Apply thin, even coats, allow proper drying time, and finish with a compatible clear topcoat for durability and uniform appearance.
Partial spot-stripping and blending technique
You can also avoid full stripping by spot-removing gel stain in targeted areas and blending new finishes into the surrounding surface.
You’ll work small, feather edges, and match tones for a seamless look.
- Identify damaged or high-wear spots
- Lightly sand to bare wood
- Apply matching stain/paint thinly
- Blend edges with fine abrasive and topcoat
Comparison Pros and Cons of Painting Over vs. Stripping First
You’ll weigh time, cost, and labor when deciding whether to paint over gel stain or strip it first.
Painting over saves time and money up front but can mean more maintenance and a shorter lifespan than a full strip and refinish.
Stripping gives a more authentic look and better durability, but it’s pricier and more labor‑intensive.
Time, cost, and labor comparison
Although stripping lets you start with bare wood, painting over gel stain usually saves time, money, and sweat—especially for small projects—because it cuts out the extensive chemical or mechanical work stripping requires. You’ll spend less on materials, finish faster, and avoid heavy labor, though prep still matters.
| Task | Relative cost/time |
|---|---|
| Paint over | Low/Short |
| Strip first | High/Long |
Durability and long-term maintenance tradeoffs
When long-term durability matters, painting over gel stain and stripping first each bring tradeoffs that affect maintenance and lifespan.
If you paint over, you save time but may need earlier touch-ups or recoat if adhesion or underlying tannins cause failure.
Stripping gives a truer base and longer-lasting finish, but costs more upfront and requires careful prep to avoid future maintenance headaches.
Visual outcome and authenticity considerations
1 clear choice you’ll face is whether to preserve the gel-stained character or start fresh with paint — and that decision shapes the visual outcome and sense of authenticity.
If you keep stain under paint or use translucent finishes, grain and warmth remain, lending original charm.
Stripping then painting gives a cleaner, consistent look but sacrifices vintage depth and patina that buyers or you might value.
Common Mistakes and How to Avoid Them
Don’t skip an adhesion test—it’s the quickest way to spot whether the old gel will bond to paint.
Make sure you scuff or degloss glossy gel finishes, choose a primer and paint formulated for slick or stained surfaces, and resist rushing between coats.
Let each coat cure fully before handling to avoid tacky, uneven results.
Skipping adhesion testing
Although it might seem like an unnecessary extra step, skipping an adhesion test can ruin hours of work and leave your finish peeling or flaking within weeks.
You should always test a small hidden area with your chosen primer and paint. If it chips or lifts, try a bonding primer or light sanding and retest.
That simple check saves time and prevents costly rework.
Not scuffing or deglossing glossy gel finishes
If you skip scuffing or deglossing a glossy gel finish, paint won’t key properly and is likely to peel or show uneven coverage.
You should sand lightly with fine-grit paper or use a liquid deglosser to dull the surface, wipe clean, and test adhesion.
Scuffing creates mechanical grip so your new coat bonds evenly and lasts longer—don’t skip this prep.
Using wrong primer or paint type
When you pick the wrong primer or paint, adhesion, durability, and finish all suffer—so choose products formulated for gel stain rather than assuming any primer will do.
Use a bonding primer or an oil-based/adhesion-promoting primer recommended for slick finishes.
Match paint type (acrylic or oil) to primer.
Test a small area first to confirm proper adhesion and cure before full application.
Rushing between coats or inadequate curing times
Because gel stain and topcoats need time to chemically bond and off-gas, rushing between coats or ignoring cure times is the fastest way to get tacky, uneven, or easily damaged finishes.
You should wait full cure windows and test readiness. Follow this checklist:
- Read label cure times.
- Touch-test discreet area.
- Sand lightly between coats.
- Allow extra drying in cool/humid conditions.
Best Practices and Professional Tips
You’ll get the best results when you match a high-adhesion primer to your chosen paint and control temperature and humidity during application.
Use the right tools and techniques—quality brushes, foam rollers, and thin, even coats—to achieve a smooth, long-lasting finish.
If the piece needs structural repair or you’re unsure about coatings, call a professional to avoid costly mistakes.
Primer-paint pairings that work best over gel stain
Choosing the right primer and paint combo is the single most important step after prepping gel-stained wood, because the wrong pairing can lead to poor adhesion, visible bleed-through, or uneven sheen.
Use a high-adhesion bonding primer (shellac- or Zinsser-based for tannin blocking) with a quality latex or acrylic enamel topcoat.
For oil-based finishes, match with an oil-based primer and enamel paint.
Temperature, humidity, and environmental controls
When you control temperature and humidity during prep and application, your paint will go on smoothly and cure predictably; aim for 50–75°F (10–24°C) and relative humidity between 40–60% for most primers and topcoats.
Work in a ventilated, dust-free space, avoiding extreme cold or damp. Use portable heaters or dehumidifiers to stabilize conditions, and wait longer to recoat if humidity spikes.
Tools and techniques for a smooth, long-lasting finish
After stabilizing temperature and humidity, focus on the right tools and techniques to get a smooth, long-lasting finish.
Use high-grit sanding pads to scuff, tack cloth to remove dust, and quality brushes or foam rollers for even laydown.
Apply a bonding primer, thin coats, and light sanding between layers.
Cure fully before light use, and follow manufacturers’ recoat and cure times.
When to call a professional
If a project involves structural repairs, extensive damage, intricate molding, or finishes you can’t confidently match, call a pro—you’ll save time and avoid costly mistakes.
Hire a professional when odor control, lead testing, or complex surface prep is needed. Pros have specialized tools, know safe products, and guarantee results.
Get quotes, check references, and confirm warranty terms before committing.
Maintenance and Long-Term Care After Painting
Give the paint proper cure time before you put heavy items or stress on the surface—follow the product label for exact hours or days.
Clean regularly with a mild, nonabrasive cleaner and soft cloth to protect the finish, and use felt pads or coasters to prevent wear.
If you get chips or scratches, touch them up promptly with matching paint and sand/prime fully when you plan a future refinish.
Cure times before heavy use
Curing isn’t just waiting — it’s the stage when your painted surface reaches full hardness and durability, so you’ll want to know how long to keep heavy use off it.
Light touch is fine after 24–48 hours, but avoid heavy items, sliding, or sitting for at least 7 days.
For best durability, wait 14–30 days depending on paint type and humidity.
Cleaning and upkeep recommendations
Once you’ve let the paint fully harden, care and cleaning will keep that finish looking good and lasting longer.
Wipe spills quickly with a damp, soft cloth and mild dish soap. Avoid harsh chemicals, abrasive pads, and excess water.
Use felt pads under decor and coasters for hot or wet items. Dust regularly and address stains gently to preserve the painted surface.
How to handle chips, scratches, or future refinishing
1 simple repair kit will save you time and frustration when chips or scratches appear: keep a small container of matching paint, a fine brush, and some 320–400 grit sandpaper or a sanding sponge on hand.
For minor damage, sand lightly, clean, and touch up. For larger wear, feather edges, prime exposed gel, repaint, then seal with a clear topcoat.
Regular inspections prevent costly refinishing.
FAQ
Got questions? You’ll want to know whether you can skip sanding, if paint will adhere over a polyurethane topcoat, which primer hides dark gel stain best, how many coats you’ll need, and whether spray, brush, or roll is preferable.
I’ll answer each so you can pick the quickest, most durable method for your project.
Can I paint directly over gel stain without sanding?
Can you paint directly over gel stain without sanding? You can in some cases if the stain is clean, dry, and has minimal sheen.
Scuffing with fine-grit sandpaper or using a liquid deglosser improves adhesion far more reliably.
Skip heavy sanding; aim for a keying surface, clean off dust, then prime with a bonding primer before painting for best, long-lasting results.
Will paint stick to gel stain that has polyurethane over it?
If you scuffed or deglossed gel stain before painting, the next question is whether paint will adhere when a polyurethane topcoat sits over that stain.
Yes—if you properly scuff with fine-grit sandpaper and remove dust, paint can bond to a dulled polyurethane surface.
Use a high-quality bonding primer and apply thin, even coats for best adhesion and durability.
What primer is best for covering dark gel stain colors?
Wondering which primer will block that dark gel stain best? Use a high-hide, stain-blocking primer—oil-based or shellac-based are top choices.
Shellac seals tannins and severe bleed-through quickly; oil-based offers strong adhesion and hiding power. Choose a product labeled “stain blocker” or “high-hide.”
Apply per instructions, allow full cure, then inspect for any remaining bleed before painting.
How many coats of paint are needed to fully hide gel stain?
How many coats will it take to fully hide gel stain?
Usually two to three coats of quality paint over a stain-blocking primer will cover most gel stains.
Start with one thin coat, let it dry, then assess light bleed-through.
Apply a second; if any color shows, add a third.
Sand lightly between coats for adhesion and smoothness.
Can I use spray paint or should I brush/roll over gel stain?
Want speed and a smooth finish or more control and build-up? You can use spray paint for even coverage and fewer brush marks, ideal for detailed pieces.
But you’ll need proper ventilation, thin coats, and masking.
Brushing or rolling gives better control, thicker build, and easier touch-ups.
Choose spray for speed; brush/roll for durability and precision over gel stain.
Visual Guide and Quick Reference Checklist
You’ll get a simple step-by-step checklist to plan your gel-stain paint project from prep to finish.
I’ll show before-and-after photo ideas to help you visualize results and pick the look you want.
You’ll also see common problem photos with quick fixes so you can spot and correct issues fast.
Step-by-step checklist for quick project planning
Start with a quick walk-through that lays out each task in order so you can move steadily from prep to finish without surprises.
You’ll plan time, tools, and steps to avoid delays. Follow this compact checklist:
- Assess surface and note repairs
- Gather supplies and masking
- Sand, clean, prime
- Paint, inspect, cure
Before-and-after photo suggestions and common problem photos
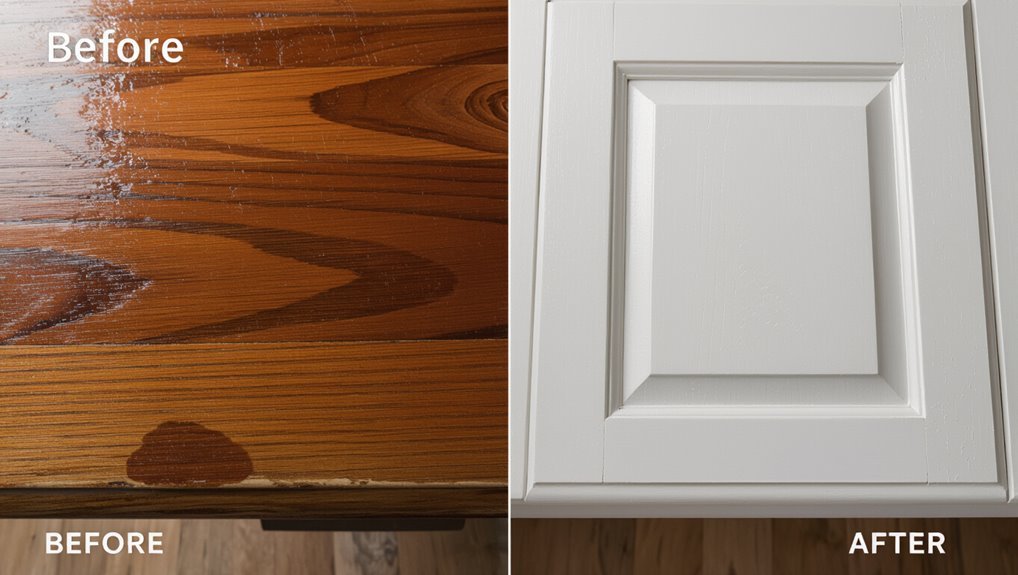
Need a visual roadmap? Photograph surfaces before you prep: overall, close-ups of grain, damaged spots, and hardware.
After priming and painting, shoot matching angles for clear comparison.
Also capture common problems—bleeding, brush marks, drips, and adhesion failures—with context and lighting.
Label photos with step, products used, and date so you can troubleshoot or reproduce successful results quickly.