How to Prep Exterior Wood Trim for Painting So It Lasts for Years
You’ll extend exterior trim life by years when you strip loose paint, repair rot, sand smooth, and clean thoroughly so primer and paint can bond. Fix damaged wood or replace it, fill gaps with paintable caulk, and use an oil- or acrylic-based primer on bare spots. Aim for moisture under 12–15%, prime and lightly sand between coats, then finish with 100% acrylic exterior paint. Keep going to learn specific tools, timing, and troubleshooting.
How to Prep Exterior Wood Trim for Painting So It Lasts for Years
When you take the time to prep exterior wood trim properly, your paint job will resist peeling, cracking, and moisture for years.
You’ll assess for rot, strip loose paint, sand smooth, and clean debris and mildew.
Fill gaps and prime bare wood to guarantee adhesion.
These steps show how to prep exterior wood trim for painting so coatings last and protect.
Quick Answer How Long Prep Should Take and Key Steps
You’ll want to clean, scrape or sand loose paint, fill and prime any bare or damaged wood, then topcoat for weather protection.
For a single door or window trim, expect about 1–3 hours of hands-on work and $20–$75 in materials depending on repairs and primer choice.
With good prep you’ll save time and repainting costs down the road.
One-sentence summary of the most important prep actions
Plan on 1–3 hours of prep for a single trim section (a full exterior job can take a day or two):
Clean, dry, and sand surfaces; remove loose paint and caulk gaps; repair rot or nail pops; prime bare wood and repairs; mask and protect adjacent areas; choose compatible paint and let primer cure—then you’re ready to apply finish coats for long-lasting exterior trim protection.
Typical time and cost estimates for a single door/window trim
For a single door or window trim expect about 1–3 hours of hands-on prep and roughly $10–$75 in materials depending on what needs doing: basic cleaning, sanding, and caulk/primer will sit at the low end, while patching rot, replacing small trim pieces, or buying specialty primers and high-quality caulk pushes you toward the high end.
Plan: assess damage, clean, sand, prime, fill, and caulk.
Basic Understanding Why Proper Prep Extends Paint Life
You’ll want to understand how moisture, UV exposure, and poor adhesion lead to peeling and rot so you can target the right fixes.
Different trim materials—solid wood, engineered boards, and PVC—need different cleaning, sanding, and priming to hold paint.
And knowing when damage is repairable versus when replacement is cheaper and more durable will save you time and money.
How moisture, UV, and surface adhesion cause paint failure
Because exterior paint is a thin barrier, moisture, UV light, and poor adhesion attack it in different but related ways that lead to failure.
You’ll see moisture push paint off as wood swells and contracts. UV breaks polymer chains causing chalking and fading, and poor adhesion lets layers lift or peel.
Proper prep stops these processes and keeps coatings bonded longer.
Types of exterior wood trim and how they affect prep needs
Different kinds of exterior trim—cypress, cedar, pine, engineered wood, and fiber cement—each demand specific prep steps because their porosity, grain, and decay resistance change how paint bonds and wears.
You’ll sand smooth high-porosity woods, use milder abrasion on cedar, clean and prime engineered products per manufacturer, and apply a bonding primer on fiber cement.
Tailor sealing and primer choice to material.
When to repair vs. replace trim
When deciding whether to repair or replace exterior trim, consider how damage, wood species, and installation quality affect how long paint will hold up.
If rot is shallow or confined, you can patch, epoxy, and prime.
Replace trim with deep rot, structural failure, or poor fastening.
Replace soft, porous species if decay recurs.
Proper replacement and sealing give paint a lasting substrate.
Materials, Tools, and Safety Checklist
You’ll need a concise list of essential tools—scrapers, sanders, wire brushes, and putty knives—plus recommended materials like caulk, primer, exterior filler, and paint.
Don’t forget safety gear (gloves, eye protection, masks) and site protection like drop cloths and ladders, and know when the job calls for a pro.
I’ll walk you through what to use, how to stay safe, and when hiring help is the smarter choice.
Essential tools (scrapers, sanders, wire brushes, putty knives)
Gather the right scrapers, sanders, wire brushes, and putty knives before you start—these basic tools do the heavy lifting in prepping exterior wood trim for paint.
Use sharp scrapers to remove loose paint, an orbital sander for smooth edges, wire brushes for crevices, and various putty knives to apply and feather filler.
Keep spare blades and grit handy for efficiency and clean results.
Recommended materials (caulk, primers, exterior fillers, paints)
After your tools are staged and blades are sharp, pick materials that match exterior conditions and the wood’s needs.
Use high-quality exterior caulk (paintable, flexible), solvent- or acrylic-based wood fillers for gaps, and an oil- or acrylic-based primer suited to new or bare wood.
Finish with 100% acrylic exterior paint for UV and moisture resistance. Match products to climate and substrate.
Safety gear and site protection ()
Wear the right personal protective equipment and shield the work area before you touch a single brush or blade. You’ll protect yourself and nearby surfaces from dust, paint, and solvents.
Prepare containment and safe access, and keep cleaners handy for spills.
- Safety goggles and NIOSH-rated respirator
- Work gloves and knee pads
- Drop cloths and plastic sheeting
- Tape, clamps, and barricades
When to hire a pro
If the job involves extensive rot repair, high scaffolding, lead paint, or complex trim profiles you’re unsure how to match, hire a pro—these situations need specialized tools, certifications, and experience to guarantee a safe, long-lasting result.
You should also call a pro if time, permits, insurance, or precise color and millwork matching exceed your skills.
Get written estimates and references.
Step-by-Step Prep Process
Start by thoroughly inspecting the trim and noting any damage so you know what needs attention.
Next you’ll strip loose paint, clean away dirt, mildew, and chalking with the appropriate cleaners, and let everything dry while checking moisture with a meter.
Finally, repair or replace rotted sections—using epoxy for minor repairs and full replacement when decay is extensive—before you prime and paint.
Step 1 Inspect and document damage ()
Walk the perimeter of the house and closely inspect every piece of exterior trim for cracks, rot, peeling paint, nail pops, and gaps where water can enter.
Take photos, note locations, measure affected lengths, and mark severity (minor, repairable, replace).
Check joints, sills, and trim-to-siding interfaces.
Create a prioritized repair list and estimate materials so you can plan the work efficiently.
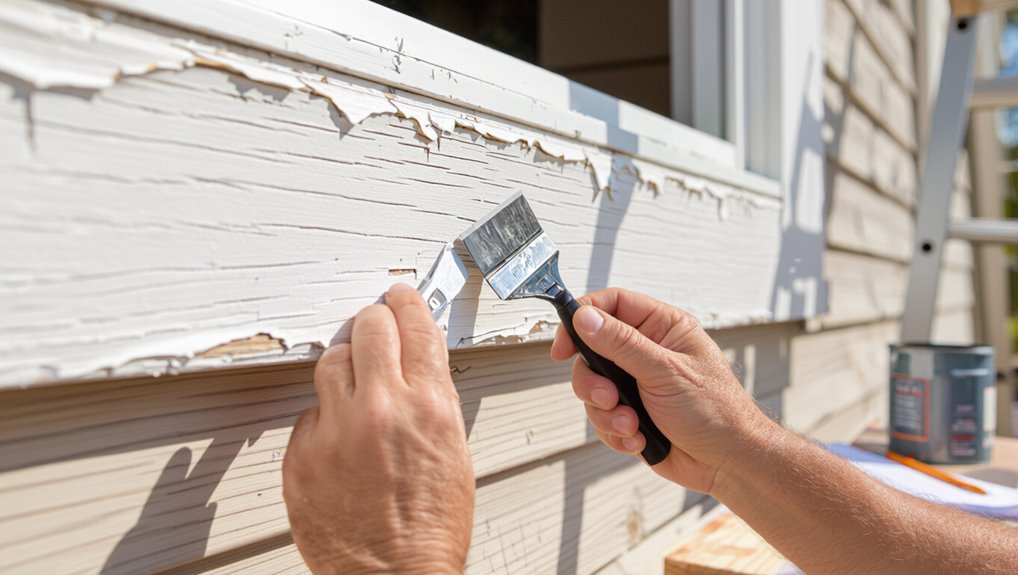
Step 2 Remove old loose paint and failing coatings
Scrape away loose paint and flaking coatings until you reach a sound surface—use a stiff putty knife, a paint scraper, or a multi-tool with a scraper blade for tight spots.
Work with the grain, apply steady pressure, and remove all brittle edges.
Sand feathered edges smooth, and chip out blisters or soft rot.
Dispose of paint debris properly and recheck for remaining loose areas.
Step 3 Clean surfaces (dirt, mildew, chalking) and recommended cleaners
Tackle dirt, mildew, and chalking next by washing the trim with the right cleaners so paint will adhere properly; use a mild detergent and water for general grime, a bleach-based mildew remover (or a 1:3 bleach-to-water solution) for black mold, and a trisodium phosphate (TSP) substitute for heavy chalking or grease—rinse thoroughly and let the wood dry completely before moving on.
Scrub with a stiff brush, rinse well, and repeat spots as needed.
Step 4 Drying and moisture checks (moisture meter guidance)
After washing, let the trim dry and then check its moisture before you prime or paint.
Use a pin or pinless moisture meter to test multiple spots: end grains, joints, and behind trim.
Aim for wood moisture content below 12–15% (manufacturer dependent).
If readings are higher, wait and recheck after drying in sun or shade; document readings before priming.
Step 5 Repair rotted or damaged wood (epoxy vs. replace) ()
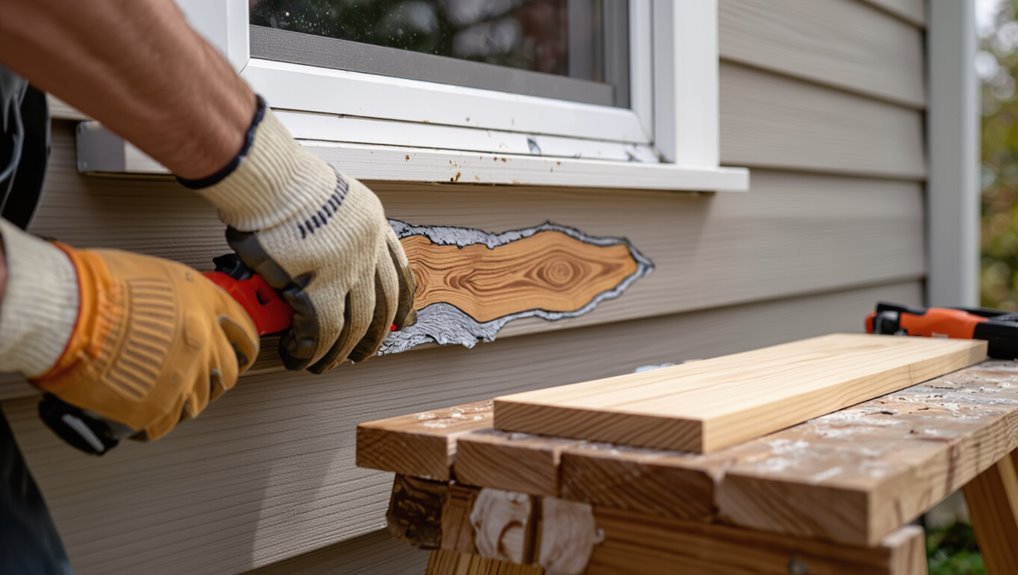
Now address any rot or damage before priming, because patching or replacing compromised wood is essential for a long-lasting finish.
Remove soft, decayed material until you reach solid wood. Small areas you can rebuild with a quality epoxy wood filler; follow cure times and shape to match trim.
For extensive rot or structural pieces, replace the board to guarantee durability and proper sealing.
Step 6 Fill gaps and cracks with appropriate exterior filler
Gather the right materials and seal every joint: fill gaps and cracks with an exterior-grade caulk or elastomeric filler to keep moisture out and secure a smooth paint surface.
Choose a paintable, UV-resistant product, cut the nozzle to match gap width, apply steadily, and tool the bead for full contact.
Allow manufacturer-recommended cure time before priming and painting to guarantee lasting adhesion.
Step 7 Sanding: grit progression and feathering edges
Start sanding with a clear plan: work through progressively finer grits to level repairs, knock down high spots, and feather edges so the primer and paint sit smoothly.
Begin with 80–100 grit for shaping, move to 120–150 grit for smoothing, and finish with 180–220 grit for a fine surface.
Sand along the grain, blend changes, and remove dust between passes.
Step 8 Caulking joints and seams: best practices and caulk selection
Once you’ve sanded and cleaned the trim, apply caulk to seal joints and seams so moisture can’t get behind the paint and cause peeling.
Choose a high-quality exterior-grade, paintable silicone or polyurethane caulk. Cut the tip for a consistent bead, tool it smooth within five minutes, and remove excess.
Allow full cure per manufacturer instructions before painting to guarantee lasting adhesion.
Step 9 Priming: primer types and application tips
Before you paint, prime the bare and repaired areas to guarantee uniform adhesion, seal porous wood, and block stains.
Choose a primer formulated for exterior use—oil/alkyd for knotty or tannin-rich wood, latex for easy cleanup and flexibility, or a shellac-based sealer for severe stain blocking—and apply it evenly at the manufacturer’s recommended spread rate, feathering into adjacent surfaces so your topcoat lays down smoothly and lasts.
Use proper drying times, sand lightly between coats, and clean tools immediately.
Step 10 Final inspection before painting
One last sweep through the trim will catch any missed imperfections: walk the job looking for exposed wood, pinholes, loose caulk, sanding scratches, or primer thin spots and mark them so you can touch them up before the topcoat.
Check joints, seams, and fasteners, sand glossy primer, re-caulk gaps, and confirm surfaces are clean and dry.
Only paint when everything’s correct.
Product Selection and Comparison
Now you’ll pick the right products for long-lasting trim: the best primers for exterior wood, when to choose acrylic versus oil/alkyd topcoats, and which caulks and fillers stand up to weather.
I’ll explain primer features (adhesion, stain-blocking, and compatibility), compare paint types and their ideal uses, and outline durable sealants for gaps and nail holes.
That way you can match materials to your wood condition and local climate before you paint.
Best primers for exterior wood trim ()
When you’re choosing a primer for exterior wood trim, focus on adhesion, stain-blocking, and flexible durability so paint sticks and stays put through weather changes. Pick an exterior-grade acrylic or oil-based primer matched to the wood condition: knot-sealing, mildew-resistant, or fast-dry for project pace. Test compatibility with your topcoat and sand between coats for best bond.
| Primer Type | Best For | Dry Time |
|---|---|---|
| Acrylic | Mildew resistance | 1–2 hrs |
| Oil-based | Knot/stain sealing | 6–8 hrs |
| Shellac | Severe staining | 30–60 min |
Top exterior paint types (acrylic vs. oil/alkyd) and when to use each
Pick between acrylic (water-based) and oil/alkyd paints based on the trim’s condition and your performance priorities:
Acrylics flex, resist UV, dry fast, and clean up with water—choose them for new or well-primed wood and hot climates.
Use oil/alkyd where you need leveling, stain-blocking, or longer open time for tricky details, but expect slower drying and solvent cleanup.
Comparison of caulks and fillers for exterior trim ()
Because gaps, nail holes, and weathered joints demand different solutions, choosing the right caulk or filler matters as much as your paint choice. You’ll pick silicone for flexibility, acrylic-latex for paintability, and epoxy for rotted repair. Match movement, adhesion, and sanding needs.
| Type | Best For |
|---|---|
| Silicone | Seals, high movement |
| Acrylic-latex | Paintable gaps |
Common Mistakes That Shorten Paint Life
Don’t paint over wet or dirty wood, because trapped moisture and grime will make even the best coatings fail quickly.
Use the right primer and sand just enough—too much or too little destroys adhesion—and get caulking and flashing correct to keep water out.
Also check that you can access trim for regular maintenance, since ignored access points shorten paint life.
Painting over wet or dirty wood
If you paint over wood that’s wet or covered in dirt, the finish won’t stick and the coating will fail quickly.
You should always wait for wood to fully dry and remove dust, pollen, mildew, and loose debris with a soft brush and mild detergent.
Wet or dirty surfaces cause peeling, blistering, and uneven coverage, shortening paint life and wasting effort.
Using wrong primer or skipping it
When you skip primer or use the wrong one, paint adhesion suffers and the finish won’t last. You’ll see peeling, blistering, and premature wear because primer seals wood, hides tannins, and creates a bond.
Use a quality exterior primer matched to your paint (oil vs. acrylic) and to the substrate. Don’t assume paint alone will protect or adhere properly.
Over-sanding or under-sanding
Although sanding is essential, too much or too little can both sabotage your paint job. You should sand enough to remove loose finish and rough spots, creating a slightly toothy surface for adhesion, but avoid stripping wood fibers or creating deep scratches.
Use the right grit progression, light pressure, and clean between passes so primer and paint bond evenly and last longer.
Improper caulking and flashing mistakes
Because water always finds weak spots, improper caulking and flashing are prime reasons exterior paint fails early.
You’ll let moisture seep behind trim if you use wrong caulk, skip joints, or apply gaps too thinly. Flashing that’s missing or poorly sealed directs water into assemblies.
Use compatible exterior-grade caulk, proper flashings, and inspect seals so paint bonds and trim stays dry.
Ignoring maintenance access points
Failing to provide access points for regular checks and minor repairs will undo careful caulking and flashing work.
If you don’t plan for discrete access—removable trim, small inspection panels, or routed gaps—you’ll skip upkeep or damage adjacent materials trying to reach problem spots.
Design for easy entry so you can re-caulk, touch up paint, and address rot quickly, preserving the trim and paint life.
Best Practices and Longevity Tips
To keep your trim looking sharp longer, paint only in mild, dry weather and follow temperature guidelines on the product label.
Set a simple maintenance schedule for annual inspections and quick spot repairs, and protect trim before winter or storms with temporary covers or sealants.
Use proper techniques—thin, even coats, brush out the edges, and don’t skip primer—to maximize durability.
Ideal weather and temperature conditions for painting
When you pick the right weather—steady temperatures, low humidity, and no rain—you’ll guarantee paint adheres properly and cures evenly on exterior trim.
Aim for daytime temps between 50°F and 85°F, dew point well below surface temp, and humidity under 70%.
Avoid painting late afternoon or before forecasted storms. Windy conditions can cause rapid drying and dust contamination, so choose calm days.
Maintenance schedule and spot-repair routine ()
Once your trim’s been painted under the right conditions, keep it looking good by setting a simple maintenance schedule and handling small repairs promptly.
- Inspect quarterly for cracks, peeling, and rot.
- Touch up chips with primer and matching paint within days.
- Recaulk seams annually or when gaps appear.
- Clean gently with mild soap twice yearly to remove dirt and mildew.
Seasonal considerations and protecting during harsh weather
Although paint holds up best in mild, dry weather, you should still plan for seasonal swings and protect trim during extremes so coatings last longer and wood stays sound.
In cold, delay painting until temperatures meet product specs and keep trim covered.
In wet or windy seasons, shield areas with tarps and temporary flashing, guarantee drainage, and inspect seals after storms to catch damage early.
Painting technique tips to improve durability
Start by planning each stroke and step to build a durable finish: use high-quality primer suited to the wood and climate, apply thin, even topcoat layers, and follow the manufacturer’s recommended dry times between coats.
Work with the grain, maintain a wet edge to avoid lap marks, sand between coats with fine grit, remove dust, and use corrosion-resistant fasteners and proper caulk to prevent moisture intrusion.
Cost, Time, and ROI Considerations
You’ll want to weigh a clear budget comparison between DIY supplies and hiring a pro, since labor can be the biggest cost.
Estimate hours based on project size and trim complexity—small houses might take a weekend, larger or ornate jobs can take several days.
Remember that thorough prep costs more up front but cuts repainting and repair bills over the long run.
Budget breakdown for DIY vs. professional prep
When weighing prep options, think regarding three numbers you can control: cash outlay, hours you’ll spend, and the value you’ll get back if you sell or whenever maintenance next comes up.
DIY saves labor costs and can cut materials if you shop smart, but expect more time and possible rework.
Pros cost more upfront, deliver faster, better warranty, and often higher resale ROI.
Time estimates by project size and complexity
Estimate time by breaking the job into clear chunks—prep, priming, and painting—and matching them to project size and surface condition so you can balance cost, time, and long-term value.
For small touchups expect a few hours; a whole-house trim refresh can take several days.
Allow extra time for sanding damaged areas, drying between coats, and unexpected repairs to keep your schedule realistic.
How proper prep increases long-term savings
Breaking the job into prep, priming, and painting helped set your schedule; now focus on how thorough prep saves money and time down the road.
Proper prep prevents rot, peeling, and frequent repainting, cutting material and labor costs. You’ll avoid emergency repairs, extend coating life, and improve resale appeal.
Invest time now to reduce recurring expenses and get better ROI over years.
Troubleshooting Guide Problems After Painting and Fixes
If you spot blistering, peeling, or bubbling, you’ll want to identify whether moisture, heat, or poor surface prep caused it and address the specific remedy for each.
For mildew and staining, you’ll need targeted cleaning and possibly a stain-blocking primer before repainting.
When paint is cracking or losing adhesion, you’ll strip or sand back to sound wood, correct the underlying issue, and recoat with proper primers and paint.
Blistering, peeling, and bubbling: causes and remedies
When paint on exterior trim starts blistering, peeling, or bubbling, it’s usually signaling a moisture, adhesion, or surface-prep problem you should address before repainting.
Identifying the cause quickly will save you time and prevent recurring damage. Check for trapped moisture, poor adhesion from glossy or contaminated surfaces, and incompatible coatings.
Remove damaged paint, dry and sand, prime with a suitable exterior primer, then repaint with compatible topcoat.
Mildew and staining after painting
Though you may expect a fresh coat to hide flaws, mildew and dark staining can appear on exterior trim after painting if spores were present or conditions stayed damp.
You’ll want to tackle these issues promptly to prevent spread and paint failure. Clean affected areas with a mildew remover or diluted bleach, rinse thoroughly, allow to dry completely, then spot-prime with a mold-resistant primer and repaint.
Cracking and adhesion failures: remediation steps
Mildew and stains can signal underlying moisture problems that also cause paint to crack or lose adhesion. You’ll want to address these failures promptly to protect the wood.
Scrape loose paint, sand to sound edges, and clean with a mild detergent. Repair rot, let wood fully dry, prime with a high-adhesion exterior primer, then repaint with quality acrylic exterior paint.
FAQ
You’ve probably got quick questions like whether you can skip primer, how long to wait after priming, or if interior fillers and caulks will hold up outside.
You’ll also want to know how often to repaint and the safest way to handle suspected lead on old trim.
Read on and you’ll get concise, practical answers.
Can I paint exterior trim without priming?
Can you skip priming when painting exterior trim? You generally shouldn’t.
Primer seals wood, blocks tannin bleed, and improves paint adhesion for weather resistance.
If trim is new, knot-free, and you use a high-quality exterior paint with built-in primer, you might get away without a separate primer.
For best longevity and fewer repairs, though, apply a proper exterior primer before topcoat.
How long should I wait after priming to paint?
If you decided to prime (or chose a paint with primer built in), you’ll want to know how long to wait before applying the topcoat so the finish bonds properly.
Generally wait until the primer is dry to the touch and recoatable—usually 1–4 hours for latex primers, 6–24 hours for oil-based.
Cooler or humid conditions lengthen cure time; follow label guidance and test a small area.
What’s the best way to handle lead paint on old trim?
Worried your old trim might contain lead paint? Test kits or a certified inspector can confirm it.
If positive, avoid sanding or scraping dry—wet-sanding, chemical strippers, or HEPA-equipped professionals reduce dust.
Wear proper PPE, contain and seal the area, and follow local disposal rules.
Consider hiring licensed abatement contractors for extensive work to protect you and your family.
How often should exterior wood trim be repainted?
How often you should repaint exterior wood trim depends on the paint type, exposure, and local climate, but most trims need fresh paint every 5–10 years.
High-sun, wet, or wind-driven areas may require touch-ups or repainting every 3–5 years.
Inspect annually for cracking, peeling, mildew, or bare wood.
Address issues promptly: clean, sand, prime, and repaint affected sections to prevent deterioration.
Can I use interior fillers and caulks on exterior trim?
After you spot and repair peeling or bare spots during annual inspections, you’ll also need the right fillers and caulks for exterior trim to keep repairs durable.
Don’t use interior products outdoors—they’re not formulated for UV, moisture, freeze/thaw cycles, or big movement.
Choose exterior-grade, paintable caulk and wood filler labeled for outdoor use. They bond, flex, and resist weathering so your paint job lasts.