Can You Paint Over Exterior Paint or Does It Need to Be Stripped?
You can usually paint over exterior paint if the existing coating is sound, clean, and well-adhered, but you’ll need to inspect for peeling, chalking, mildew, or moisture problems first. Prepare surfaces by washing, sanding glossy areas, repairing damage, and priming bare or repaired spots. Strip only when paint is delaminating, lead-based, severely failed, or incompatible—then follow proper safety rules. Keep going for guidance on tests, primers, and when to hire pros.
Quick Answer Can You Paint Over Exterior Paint or Does It Need to Be Stripped?
You can usually paint over existing exterior paint if it’s sound, clean, and well-adhered, but you’ll need to strip or remove paint when it’s peeling, chalking, or contaminated with lead.
Stripping is mandatory for unstable surfaces, severe damage, or when local regulations require lead-safe practices.
For everything else, proper prep—washing, sanding, and priming—makes painting over acceptable.
Short verdict with key conditions
Yes — in most cases you can paint over exterior paint, but only if the existing coating is sound, clean, and properly prepared.
You should inspect for peeling, chalking, mildew, or lifting; sand glossy surfaces, wash and prime as needed, and choose compatible paint.
When those conditions are met, you’ll save time and money by painting rather than stripping.
When stripping is mandatory vs. optional
Most of the time painting over exterior paint saves time and money, but there are clear situations where stripping becomes mandatory rather than optional.
You should strip when old paint is peeling, lead-based, severely failed, or when you need a different substrate preparation.
Consider stripping optional for minor adhesion issues, color changes, sound coatings, or when encapsulation is acceptable.
- Peeling
- Lead paint
- Severe failure
- Substrate change
Basic Understanding What Matters When Recoating Exterior Paint
Before you recoat, you’ll want to know what kind of paint and finish you’re working with—latex, oil-based, enamel, or powder-coated—and what substrate it’s on, like wood, metal, masonry, vinyl, or stucco.
Check the surface for common failure signs—peeling, chalking, blistering, cracking, or mildew—because each problem and substrate needs a different prep and primer.
That quick assessment will tell you whether you can paint over it or need stripping, sanding, or special treatment first.
Types of exterior paint and finishes (latex, oil-based, enamel, powder-coated)
Paint type matters because each finish bonds, flexes, and weathers differently, and those differences determine how you’ll prepare and what products will stick.
- Latex: flexible, breathable, easy to clean and recoats well if surface is clean and keyed.
- Oil-based: durable, slicker—requires deglossing or primer for adhesion.
- Enamel: hard, weather-resistant; sand/prime before repainting.
- Powder-coated: very tough—usually needs stripping or specialty primers.
Substrate types (wood, metal, masonry, vinyl, stucco)
Because each substrate behaves differently, you’ll need a tailored approach when recoating exterior paint.
Know adhesion, porosity, and movement for each surface so you choose primers, cleaners, and application methods properly.
- Wood: sand, clean, use oil or bonding primer.
- Metal: remove rust, use rust-inhibitor primer.
- Masonry/stucco: use masonry primer; fill cracks.
- Vinyl: clean, light-sand, use flexible exterior paint.
Paint failure modes and what they look like (peeling, chalking, blistering, cracking, mildew)
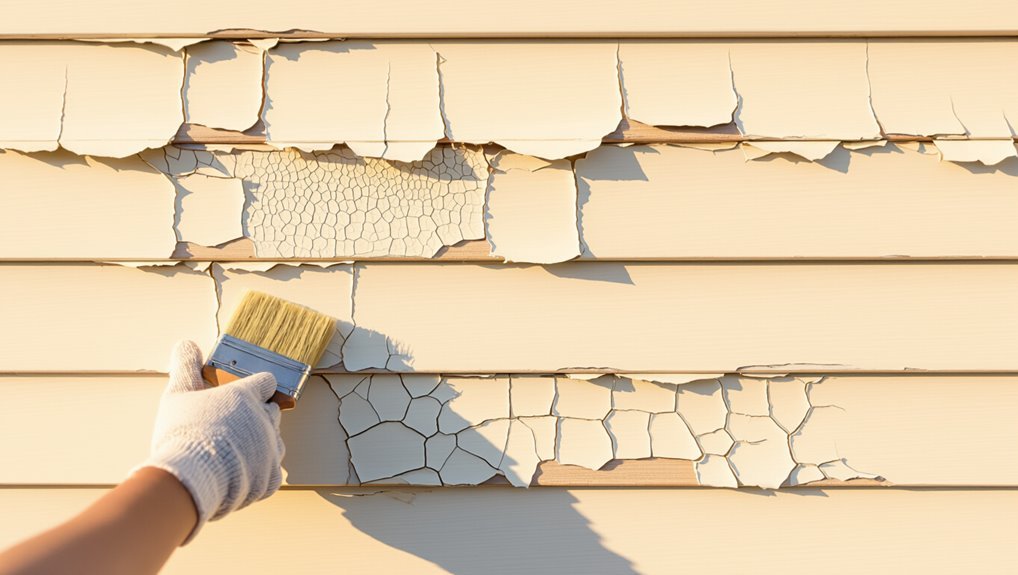
When you’re preparing to recoat exterior surfaces, recognizing common paint failures—peeling, chalking, blistering, cracking, and mildew—lets you diagnose causes and choose the right repairs and products.
Peeling reveals adhesion loss; chalking leaves powdery residue from UV breakdown; blistering shows trapped moisture or heat; cracking indicates substrate movement or old paint; mildew appears as black/green spots you clean before priming and repainting.
Assessment Checklist How to Decide Whether to Paint Over or Strip
Start by inspecting the surface with an adhesion test, moisture check, and look for structural damage to see if new paint will bond and last.
Bring a solvent, scraper, sandpaper, and a moisture meter to evaluate problem areas accurately.
Use a simple decision matrix—repaint, spot-strip, or full strip—based on your findings and the extent of deterioration.
Surface inspection steps (adhesion test, moisture check, structural damage)
Before you decide to paint over exterior surfaces, perform a focused inspection: check adhesion with a tape pull test, probe for trapped moisture with a moisture meter or by looking for staining and blistering, and scan for structural damage like rot, loose trim, or failing flashings that must be repaired first.
Record locations of failures, prioritize repairs, and determine if substrate replacement or targeted patching is needed before repainting.
Tools and materials for evaluation (solvent, scraper, sandpaper, moisture meter)
After you’ve documented adhesion failures, moisture hotspots, and any structural repairs needed, gather the evaluation tools you’ll use to decide whether to paint over or strip.
- Solvent (denatured alcohol or mineral spirits) to test finish type and spot adhesion.
- Metal scraper for loose paint removal and edge testing.
- Medium-grit sandpaper for feathering and adhesion checks.
- Moisture meter to verify substrate dryness before repainting.
Decision matrix: repaint, spot-strip, or full strip
When you combine your inspection notes with the tool tests, use a simple decision matrix to choose one of three paths: repaint, spot-strip, or full strip. Use this to weigh adhesion, damage, and lead risk, then act.
| Condition | Action | Rationale |
|---|---|---|
| Good adhesion | Repaint | Saves time |
| Local failure | Spot-strip | Targeted repair |
| Widespread/lead | Full strip | Safety first |
When You Can Paint Over Conditions and Preparations
If the existing exterior coat is sound and the new and old paints are compatible, you can usually paint over it without stripping.
Before you start, you’ll need to clean, sand, repair any loose areas, and prime as recommended for the substrate.
Choose primers and topcoats formulated for exterior use and follow manufacturer compatibility notes to prevent adhesion or finish problems.
Suitable scenarios for painting over (sound adhesion, compatible paint types)
Because the old paint is firmly bonded and the existing finish and materials are compatible, you can often paint over exterior surfaces without a full strip-down—provided you verify adhesion, match paint families (latex over latex, oil over oil or use a proper primer), and address any peeling, chalking, or severe weathering first.
- Sound, well-adhered paint
- Same paint family or primed connection
- Minimal surface degradation
- Stable underlying material
Surface preparation steps before painting over
Before you paint over exterior paint, you’ll need to clean surfaces and remove any mildew so the new coat can adhere properly.
Lightly sand or degloss shiny areas, repair cracks or holes, and fill gaps to create a smooth, stable surface.
Then choose a primer suited to the existing substrate and paint type—use stain-blocking or adhesion primers when needed.
Cleaning and mildew removal
Start by thoroughly cleaning the surface and removing any mildew—paint won’t properly adhere to dirt, chalk, or fungal growth.
Scrub siding, trim, and eaves with a mildew-killing cleaner or diluted bleach solution, rinse well, and let dry completely.
Treat stubborn patches again and inspect for rot or damage.
Only after a clean, dry surface should you proceed with priming and painting.
Light sanding and deglossing
Once the siding is clean and dry, rough up glossy or smooth surfaces so new paint will bite—light sanding and deglossing creates the mechanical tooth primers and topcoats need to stick.
Use fine-grit sandpaper or a liquid deglosser, work evenly, and remove dust.
Focus on gloss reduction rather than aggressive removal; you’re prepping for adhesion, not stripping down to bare substrate.
Repairing minor defects and filling gaps
Patch small flaws and seal gaps so your new coat looks smooth and lasts—minor defects like cracks, nail holes, and separated trim let moisture in and undermine adhesion if you paint over them.
Scrape loose material, backer any deep cracks, and use exterior-grade caulk for joints.
Fill holes with a compatible exterior filler, sand flush when dry, and clean dust before painting.
Priming: when and which primers to use
Priming creates a uniform, adhesive base that helps new exterior paint stick, hide stains, and resist moisture — so you’ll want to prime whenever the surface is bare wood, heavily repaired, stained, chalky, or when you’re switching between paint types (for example, oil to latex).
Choose a high-adhesion primer for glossy or chalky surfaces, an oil-based primer for stains and tannins, and a mildew-resistant exterior latex primer for general use.
Recommended products and compatibility tips
Choosing the right products makes repainting exterior surfaces straightforward and durable. You’ll pick compatible paint, primer, and caulk to prevent adhesion failures and peeling.
Check labels for substrate and previous-coat compatibility, and test a small area first.
- Use exterior acrylic latex over cured latex.
- Use oil-based primer for glossy oil surfaces.
- Match finish levels.
- Allow full cure times.
When You Must Strip Signs and Methods
If the existing finish has lead, shows severe failure, or is incompatible with new coatings, you’ll need to strip paint fully or partially before repainting.
Choose the right method — chemical strippers, heat, or mechanical removal — based on substrate and condition, and follow safe work practices.
Also test for lead, dispose of waste per local rules, and comply with environmental and safety regulations throughout the job.
Conditions requiring full or partial stripping (lead paint, severe failure, incompatible coatings)
When you inspect exterior surfaces before repainting, look for three situations that force you to strip paint rather than just repaint: known or suspected lead paint, coatings that are delaminating or chalking severely, and old finishes that are chemically incompatible with your new paint.
You’ll also strip where rusted metal, rotten wood, or multiple failing layers prevent adhesion, or where texture and buildup hide defects.
Stripping methods overview
When you’re deciding whether to strip old exterior paint, you’ll want a clear sense of the methods, their risks, and when stripping is actually required.
Below is a quick checklist of common approaches and what to watch for so you can pick the right one for your project.
Consider safety, the substrate, and local disposal rules before you start.
- Chemical strippers — effective on multiple layers but require PPE, proper ventilation, and careful waste handling.
- Heat guns / infrared — strip quickly without chemicals but can scorch wood, release fumes, and pose burn/fire hazards.
- Mechanical methods (sanding) — precise and simple but generate dust and can damage soft substrates or lead to lead exposure.
- Media blasting — fast for large areas and tough coatings but needs containment, correct media choice for the substrate, and trained operators.
Chemical strippers pros, cons, safety
Because chemical strippers dissolve old paint rather than sanding it away, they’re often the fastest option for exterior surfaces with multiple layers, intricate trim, or lead-based paint concerns.
You’ll remove coatings efficiently and reach crevices, but expect strong fumes, runoff disposal rules, and surface damage risk.
Wear PPE, use containment, follow label instructions, and test a small area to confirm effectiveness and substrate compatibility.
Heat guns and infrared pros, cons, hazards
If chemical strippers aren’t suitable—or you want a dry method that avoids solvents—you can use heat guns or infrared heaters to soften and lift old exterior paint.
You’ll work faster on small areas; infrared heats evenly and reduces blistering.
Risks: burns, ignition of flammable substrates, and toxic fumes from old lead or oil-based paints.
Use PPE, ventilation, and a temperature-controlled tool.
Mechanical methods (sanding, media blasting) pros, cons, substrate considerations
Although mechanical methods look straightforward, you’ll want to match the technique to the surface: sanding works well for sound wood and metal and for feathering edges, while media blasting (sand, soda, or plastic) removes heavy buildup and coatings from durable substrates like masonry or steel.
You should avoid thin or brittle materials, control dust and profile, and test small areas to prevent pitting or distortion.
Disposal, environmental, and safety compliance (lead testing and regulations)
When you’re preparing to repaint or strip exterior signs, you need to follow specific disposal, environmental, and safety rules—especially regarding lead testing and handling—so you don’t create legal or health hazards.
You must test for lead, use certified abatement if positive, contain and label waste, and follow local disposal laws.
- Test surfaces for lead.
- Use certified abatement.
- Contain and label waste.
- Follow local disposal rules.
Step-by-Step Guide Repaint Over vs. Full Strip Workflow
You’ll compare two clear workflows: Repaint Over (six steps) and Full Strip and Refinish (eight steps).
I’ll outline each step sequence and then show how time, cost, and labor differ between them.
That way you can choose the faster, cheaper repaint or the more thorough full strip based on your project constraints.
Workflow A: Repaint Over (Step 1 → Step 6)
Workflow A walks you through repainting over existing exterior paint in six clear steps, so you can refresh the surface without a full strip.
You’ll assess adhesion, clean, sand keyed areas, apply primer where needed, then topcoat for protection and cure per manufacturer instructions.
- Inspect and test adhesion
- Clean and degrease
- Patch and sand
- Prime selectively and topcoat
Workflow B: Full Strip and Refinish (Step 1 → Step 8)
Although it’s more labor-intensive, choosing a full strip and refinish gives you a fresh, durable base and lets you correct underlying problems that repainting would hide.
You’ll remove old coatings, repair substrate damage, prime, and apply new finish for long-term protection.
- Strip to bare substrate
- Repair and sand
- Prime thoroughly
- Apply finish coats
Time, cost, and labor comparisons between workflows
Now that you’ve seen what a full strip and refinish entails, it’s time to compare that path with repainting over the existing coat regarding time, cost, and labor. You’ll save time and money by repainting, but stripping gives longer life. Choose repaint for quick refreshes; pick stripping for severe damage or longevity.
| Workflow | Time | Cost |
|---|---|---|
| Repaint over | Short | Low |
| Full strip | Long | High |
Common Mistakes to Avoid
Don’t paint over flaky or failing coatings—you’ll just trap problems and shorten the new finish’s life.
Don’t skip primer or grab the wrong one, and don’t ignore moisture or substrate repairs that can cause peeling and mold.
Prep properly and use the right tools and techniques to avoid common surface- and application-related failures.
Painting over unsound coatings
If you paint over unsound coatings, the new finish won’t adhere and will fail quickly, leaving you with peeling, bubbling, or blistering paint.
You should inspect surfaces for flaking, chalking, or loose layers and remove all unstable material.
Sand, scrape, or strip to solid substrate, clean thoroughly, and repair damage.
Only then apply compatible topcoats for a durable exterior finish.
Skipping primer or using wrong primer
When you skip primer or pick the wrong one, the paint won’t bond properly and problems like peeling, uneven coverage, and premature wear show up fast; always match primer to the surface and the topcoat so adhesion, stain-blocking, and durability aren’t compromised.
You should choose oil- or latex-based primer for the substrate, use stain-blocking where needed, and follow manufacturer recommendations for compatibility and dry times.
Ignoring moisture and substrate repair
Because paint only covers problems—it won’t fix them, you need to address moisture and substrate damage before you ever open a can.
Don’t paint over rot, mold, blistering, or loose material. Replace or repair compromised boards, fix leaks, and let surfaces dry completely.
Otherwise paint will fail prematurely, wasting time and money—and forcing costly rework you could’ve prevented.
Improper surface preparation and tool mistakes
Although skipping proper prep might save time up front, it creates bigger problems down the line; you need to clean, sand, and prime surfaces correctly and use the right tools or the finish won’t adhere or look professional.
Follow these essential steps:
- Remove loose paint and dirt thoroughly.
- Sand glossy areas for adhesion.
- Use appropriate primer for the substrate.
- Choose quality brushes or rollers and keep them clean.
Best Practices and Professional Tips
To get lasting results, match your new paint to the existing paint system and prep surfaces properly.
Plan around weather and timing, use the right tools and techniques for smooth coverage, and know when a pro’s skills are worth the cost.
These tips will help you decide what you can tackle yourself and what’s better left to a contractor.
Matching paint systems for longevity
When you repaint an exterior, matching the new paint’s system—primer type, base (oil or latex), and finish—to the existing coating is the single best way to guarantee adhesion and long-term performance.
Check manufacturer specifications, test a small area, and use compatible primers or binders.
If you can’t match exactly, choose bridging primers designed to connect different bases to prevent peeling and failure.
Weather and timing considerations for exterior painting
Because exterior paint cures as much from temperature and humidity as from the chemistry of the coating, you should plan jobs around predictable, moderate weather windows so paint can dry and form a durable film;
avoid painting in direct sun that heats surfaces above the paint’s recommended temperature range, during high humidity or rain, or when freezing nights are forecast.
Time coats for warm, dry days with cool evenings, and monitor forecasts closely.
Tools and techniques for professional-looking results
Good timing and conditions set you up for success, but getting a professional finish comes down to using the right tools and techniques and applying them correctly.
- Use quality brushes/rollers and a pressure washer for prep.
- Sand and prime glossy or repaired areas.
- Caulk gaps, then back-roll sprayed sections for even coverage.
- Work wet-edge to avoid lap marks and follow manufacturer drying times.
When to hire a pro vs. DIY
Curious whether you should tackle the job yourself or call in a pro? Decide based on scope, skill, time, and safety.
Small patches and repainting? Do it. Extensive peeling, lead concerns, or complex trim? Hire a pro.
- Assess surface condition
- Consider lead or permit issues
- Estimate time and tools needed
- Prioritize safety and warranty
Cost, Time, and Longevity Considerations
You’ll want to compare typical costs and timeframes for a simple repaint versus a full strip-and-repaint so you can budget and schedule correctly.
Expect a repaint to be cheaper and quicker but often shorter-lived (years), while strip-and-repaint costs more and takes longer yet usually lasts longer.
Longevity will hinge on maintenance, local climate, and the substrate material, so factor those into your decision.
Typical cost ranges for repaint vs. strip-and-repaint
When weighing repainting against a full strip-and-repaint, expect a clear trade-off: simple repaint jobs typically cost much less up front but may need touch-ups or repeat work sooner, while strip-and-repaint runs higher labor and material costs now and delivers longer-lasting results. You’ll typically see:
| Approach | Typical range |
|---|---|
| Repaint (DIY) | $500–$2,500 |
| Repaint (pro) | $1,500–$6,000 |
| Strip-and-repaint | $3,500–$12,000 |
Expected lifespan after each approach
Although repainting costs less up front, expect a shorter useful life compared with a full strip-and-repaint: a properly done repaint typically lasts 5–10 years depending on surface prep, paint quality, and local climate.
In contrast, a strip-and-repaint—where old, failing coatings are removed and substrates are repaired—can extend service life to 15–25 years or more.
You’ll pay more and wait longer for stripping, but you’ll enjoy far greater durability.
Factors that affect long-term results (maintenance, climate, material)
Because maintenance habits, local climate, and the substrate you’re painting all interact, the same repaint can last wildly different lengths of time and cost very different amounts to keep up.
You’ll spend more where moisture, sun, or salt accelerate wear. Hard, stable materials hold coatings longer than soft, peeling surfaces.
Regular cleaning, timely touch-ups, and proper prep cut total cost and extend longevity.
FAQ Practical Questions About Painting Over Exterior Paint
You probably have specific practical questions—like whether latex will stick to old oil-based paint or how to tell if the existing paint contains lead.
You’ll also want to know if cleaning is enough for chalky surfaces, how much sanding is really necessary, and which primer suits your siding or trim.
Let’s answer these common concerns so you can plan the job safely and efficiently.
Can I paint latex over oil-based exterior paint?
Wondering if you can paint latex over oil-based exterior paint? Yes, but you’ll need proper prep: clean, sand glossy surfaces, and apply a high-quality bonding primer designed for latex over oil.
Skipping primer risks poor adhesion and peeling. Once primed, use exterior-latex paint for flexibility and UV resistance.
Test a small area first and follow manufacturer drying times for best results.
How do I test if the existing paint is lead-based?
How can you tell if the existing exterior paint contains lead? Use an EPA-approved DIY lead test kit—follow instructions, swab multiple layers and high-wear areas.
For certainty, hire a certified inspector who’ll take samples and lab-analyze them.
If you plan renovations that disturb paint, assume lead may be present and use proper containment, respirators, and disposal procedures until testing confirms otherwise.
Will painting over chalky paint work if I just clean it?
Can cleaning chalky exterior paint alone make a new coat stick? You can improve adhesion by thoroughly washing with a stiff brush and TSP substitute to remove powdery residue, but cleaning often isn’t enough.
After cleaning, test adhesion; if paint still powders, prime with a high-adhesion bonding primer or remove loose material. Proper prep prevents peeling and extends the new finish.
How much sanding is required before repainting?
If cleaning and priming didn’t stop the powdering or you’re covering glossy or peeling paint, you’ll need to sand to give the new coat something to bite into.
Sand enough to remove loose flakes and dull gloss—usually medium-grit (80–120) for problem areas, fine-grit (150–220) for feathering and smoothing.
Don’t over-sand; leave a keyed surface for primer and paint to adhere.
How do I choose the right primer for exterior surfaces?
When you’re preparing to repaint exterior surfaces, pick a primer that matches the substrate and the problem you’re solving.
Use oil/alkyd or bonding primers for slick surfaces, latex primers for porous siding, and stain-blocking primers for tannin or water stains.
Choose rust-inhibiting primer for metal and mildew-resistant formulas where moisture’s an issue.
Always confirm compatibility with your topcoat.