Can You Prime Over Peeling Paint or Should You Fix It First?
You should usually fix peeling paint before priming to guarantee a solid, lasting finish. Remove loose flakes, address moisture or rot, and smooth the surface so primer can bond properly. If the remaining paint is firmly adhered and only tiny edges lift, a quality bonding primer may work as a temporary fix, but it won’t help underlying problems. Proper prep prevents repeat failure and gives topcoats durability—keep going to learn the step-by-step repair and priming process.
Quick Answer Can You Prime Over Peeling Paint?
Yes — but only if you remove loose, peeling paint first and the surface is sound.
Use a bonding primer on any areas with slight adhesion issues and a high-quality topcoat once the primer cures.
If large sections are failing or you have moisture damage, repair those problems before priming.
Direct, short recommendation with conditions
If the old paint is firmly adhered and you’ve removed all loose flakes, you can prime over it—otherwise strip or sand first.
If you’re asking “can I prime over peeling paint,” inspect for moisture, chalking, or adhesion issues.
Prime only clean, dry, sound surfaces with a compatible primer.
If doubt remains, repair or remove failing paint to guarantee a durable finish.
Understanding Peeling Paint and Priming
You’ll want to know why paint peels—moisture, poor adhesion, or incompatible layers are the usual culprits—so you can address the root problem before priming.
A primer helps by sealing the surface, promoting adhesion, and blocking stains, but it only works if loose paint is removed and the substrate is sound.
Choose primers made for adhesion, stain-blocking, or bonding to glossy or chalky surfaces depending on the cause.
What causes paint to peel?
When paint peels, it’s usually because the bond between the coating and the surface has failed; moisture, poor surface preparation, incompatible coatings, and extreme temperatures are common culprits.
You’ll see flaking when adhesion’s weak. Identify cause before fixing so repairs last.
- Moisture intrusion (roof, walls, humidity)
- Poor prep (dirt, chalk, or loose paint)
- Wrong paint type or application conditions
What a primer does and when it helps
Because primer creates a stable bridge between the surface and your topcoat, it’s what helps paint stick and last — especially over tricky substrates or patched areas.
You should prime when you’ve exposed bare wood, patched drywall, or sealed stains.
Primer evens porosity, blocks tannins and stains, and improves adhesion, reducing peeling risk.
Don’t expect primer to fix loose, unprepared paint.
Types of primer relevant to peeling paint
If you’re tackling peeling paint, choosing the right primer matters: different formulations address adhesion, stain-blocking, and moisture resistance in distinct ways.
Use an adhesion or bonding primer for glossy or chalky surfaces, an oil-based or shellac primer for tannin or water stains, and a mildew-resistant, high-build acrylic for moist areas.
Match primer chemistry to substrate and damage for lasting results.
When You Can Prime Over Existing Paint
You can prime over existing paint only after checking adhesion, surface soundness, and whether the old finish is oil- or water-based.
For lightly compromised areas use a stain-blocking or bonding primer designed for that paint type, and pick products labeled for adhesion to glossy or chalky surfaces.
Have on hand a scraper, sandpaper, tack cloth, appropriate primer, brushes or rollers, and protective gear before you start.
Criteria for priming over existing paint (adhesive, surface condition, paint type)
When deciding whether to prime over existing paint, check three things: adhesion, surface condition, and paint type.
Test adhesion by scraping; loose or flaking paint must come off.
Inspect for chalking, contamination, or moisture damage—clean, dry, and repair as needed.
Identify oil versus latex; oil may need special prep or a compatible primer.
Make sure the substrate is sound before priming.
Suitable primers and products for lightly compromised surfaces
Primer choice matters: for lightly compromised painted surfaces—minor flaking, mild chalking, or slight stains—you can usually skip full-strip and use a high-adhesion primer designed to bond to sound paint.
Choose products that seal, promote adhesion, and block stains. Consider these options:
- Bonding primer (acrylic or latex)
- Stain-blocking primer (oil or shellac-based)
- Flexible exterior primer for mild chalking
Tools and materials checklist
Start with the right tools and materials so the job goes smoothly and the primer can do its job.
You’ll need safety gear, cleaners, and appropriate sandpaper to feather edges. Choose a compatible primer and quality brushes or rollers to guarantee proper adhesion and coverage.
- Sandpaper, scraper, tack cloth
- Cleaner/deglosser, primer, patching compound
- Brushes, roller, protective gear
When You Should Fix Peeling Paint First
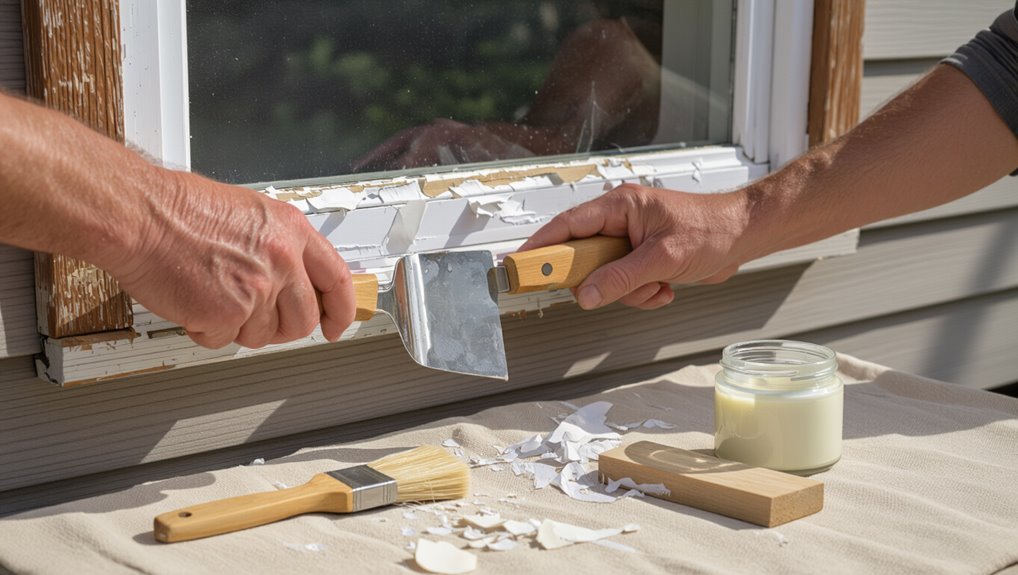
If paint flakes or peels when you scrape it, you’ll need to remove the loose material before priming to guarantee adhesion.
You should also fix any structural damage or active moisture problems first, because primer won’t stop rot or leaks.
And don’t try to prime over failing coatings—situations where paint is chalking, blistering, or separating are too risky for a simple prime-over.
Signs you must remove loose paint before priming
When you see paint flaking, bubbling, or cracking, you’ve got to remove the loose areas before priming—those failures will keep new primer and paint from adhering properly.
Check for large lifting patches, powdery or chalky surfaces, edges that peel away with a fingernail, and blisters.
If paint detaches easily, strip to a sound substrate, sand, clean, and then prime for lasting results.
Structural or moisture issues that require repair first
Because peeling paint is often a symptom, not the cause, you should address underlying structural or moisture problems before priming; repairing rot, leaks, or poor flashing guarantees new coatings won’t fail again.
You’ll want to inspect and fix issues so primer adheres and paint lasts.
- Replace rotten wood and trim.
- Repair roof, gutter, or flashing leaks.
- Fix rising damp or plumbing leaks.
Cases where priming over is ineffective or risky
Although priming can save time on minor surface chips, you should fix significant peeling before priming because loose or flaking paint prevents primer from bonding and can cause new coatings to fail quickly.
Don’t prime over blisters, widespread peeling, lead-contaminated layers, or moisture-damaged surfaces. Repair, remove, or stabilize the substrate first so primers and topcoats adhere and last.
Step-by-Step Repair and Priming Process (If Fixing First) Step 1 to Finish
Start by evaluating the surface to find what’s causing the peeling so you know which repairs are needed.
Then remove loose paint by scraping, sanding, or using a chemical stripper. Clean and degloss with detergent or mildew treatment, and repair cracks, rot, or rust.
Finish by letting everything dry fully, feathering and sanding edges, and preparing the substrate for primer.
Step 1: Assess the surface and identify root causes
Before you touch primer or paint, take a close look at the surface and figure out what’s causing the peeling so you don’t waste effort on a failing repair.
You should identify moisture, adhesion failure, or substrate damage, then plan targeted fixes before priming.
- Check for leaks and dampness.
- Test adhesion and previous coatings.
- Inspect for rot or crumbling substrate.
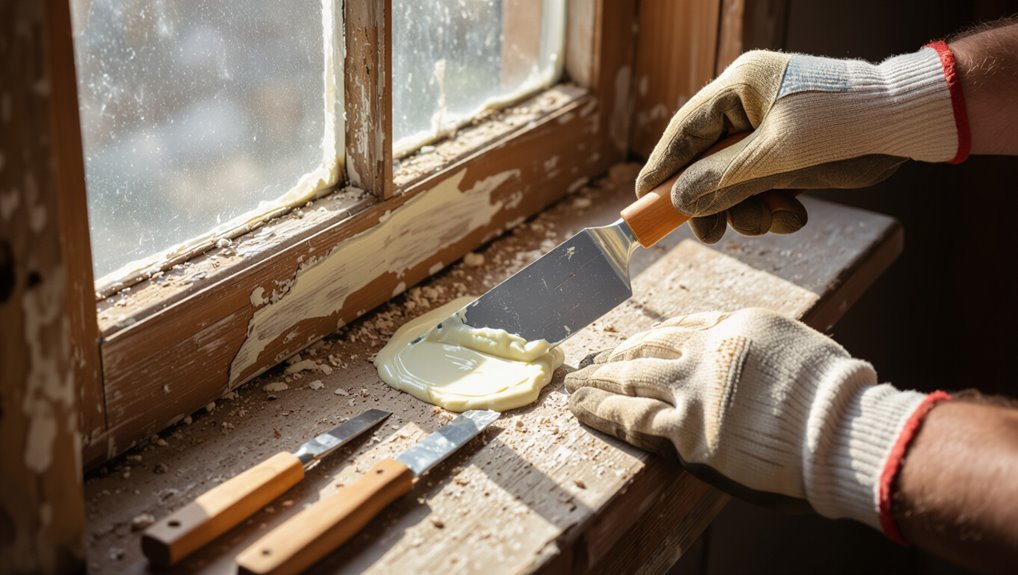
Step 2: Remove loose and peeling paint (methods: scraping, sanding, chemical)
Tackle all loose and flaking paint now so the new primer can bond to a sound surface.
You’ll remove failing coatings by scraping, sanding, or using a chemical stripper depending on substrate and paint type. Work to solid edges, avoid feathered changes, and follow safety for dust and vapors.
- Scraping (manual or powered)
- Sanding (coarse to fine)
- Chemical stripping
Step 3: Clean and degloss surface (washing, detergents, mildew treatment)
Clean and degloss the surface so the primer can adhere properly: wash with a mild detergent solution, rinse thoroughly, and treat any mildew with a bleach or commercial mildew remover following label directions.
Scrub with a stiff brush, remove soap residue, and let the area fully dry.
Use a deglosser or fine sanding to dull glossy paint so primer bonds evenly before you proceed.
Step 4: Repair substrate (fill cracks, patch, address rot or rust)
Repair the substrate by filling cracks, patching holes, and addressing any rot or rust so your primer and topcoat have a solid, stable base to bond to.
Remove soft wood, treat metal corrosion, and use appropriate fillers or epoxy for structural gaps.
Replace badly rotted sections.
Verify patched areas are flush and sound so coatings will adhere and perform as planned.
Step 5: Allow drying and perform surface prep (sanding, feathering edges)
Let surfaces dry completely—moisture trapped under primer will cause adhesion failures—then sand and feather the repair edges so paint has a smooth, continuous blend to the surrounding surface.
Use progressively finer grit to remove high spots and roughness, wipe away dust with a tack cloth, and inspect for hollows or ridges.
Repeat light sanding until changes are imperceptible and the substrate is clean.
Step 6: Apply appropriate primer (type, number of coats, application tips)
With your feathered edges smooth and dust-free, it’s time to choose and apply the right primer so your paint will bond and hide remaining imperfections.
Pick a bonding primer for glossy or patched areas, or a stain-blocking primer if discoloration exists.
Apply one full coat, inspect for coverage, then add a second thin coat where needed.
Use even brush or roller strokes.
Step 7: Paint finishing coats and cure time recommendations
Start by applying your finish coats only after the primer is fully dry and you’ve checked for smooth, even coverage—this prevents tackiness and lifts.
Use thin, even coats, sanding lightly between layers if needed.
Follow manufacturer recoat times, typically 2–4 hours for latex, 24 hours for oil.
Allow full cure before heavy use: 7 days for latex, 30 days for oil-based finishes.
Simplified Quick Method When You Can Skip Full Repair (If Conditions Met)
If the peeling is limited and the surface is sound, you can save time by doing a quick prep checklist: power wash, scrape any loose areas, and scuff-sand for better adhesion.
Then use a fast-apply primer followed by a topcoat designed for quick fixes in acceptable-risk scenarios.
Only use this shortcut when peeling is superficial and the substrate is stable—skip it if moisture, widespread failure, or lead paint are involved.
Quick prep checklist (power wash, scrape loose areas, scuff sand)
You can often skip a full repair and still get good results by following a quick prep checklist: power-wash the surface, scrape away loose paint, and scuff-sand the remaining area so primer can bond properly.
Wear eye and respiratory protection, let wood or drywall dry fully, remove all dust, and vacuum or tack-rag before priming.
Address blistering or flaking areas thoroughly.
Fast-apply primer and paint method for acceptable-risk scenarios
Once you’ve followed the quick prep checklist and confirmed the surface is dry and dust-free, you can move to a fast-apply primer-and-paint method suited for acceptable-risk situations where full repair isn’t necessary.
Use a high-adhesion, stain-blocking primer rolled or brushed on thinly, let it tack 30–60 minutes, then apply two thin coats of quality exterior paint, drying between coats per label instructions.
When this shortcut is acceptable vs when it’s not
When conditions are limited and the goal is a temporary or low-risk fix, you can skip full repairs and use the fast primer-and-paint shortcut—provided the peeling is localized, the substrate is sound, and the area won’t be exposed to heavy wear or moisture.
Use it for small, interior patches, testing samples, or staging.
Don’t use it on structural, exterior, or high-moisture surfaces; those need full repair.
Comparison of Approaches
When deciding between remove-and-repair and priming over, you’ll weigh durability against cost and time—full repair lasts longer but costs more and takes longer, while priming can be quicker and cheaper if the surface is stable.
You’ll also need to pick the right primer for problem surfaces: oil-based for old oil paint, latex for compatible surfaces, or a bonding primer when adhesion is doubtful.
Consider the condition and long-term goals to choose the best trade-off.
Remove-and-repair vs prime-over: durability, cost, time trade-offs
Because you’re weighing durability, cost, and time, the core trade-off between removing-and-repairing versus priming over peeling paint comes down to immediate savings versus long-term performance: priming over saves time and money up front but risks adhesion and faster failure on compromised surfaces, while removing and repairing costs more and takes longer yet usually yields a more durable, lower-maintenance finish.
| Option | When to choose |
|---|---|
| Prime-over | Quick, low-budget fixes on sound substrate |
| Remove/repair | Extensive peeling, moisture damage, long-term value |
| Hybrid | Local repairs then prime for balance |
Primer types comparison for problematic surfaces (oil-based, latex, bonding primers)
If you’re dealing with peeling or otherwise compromised paint, choosing the right primer matters more than the paint itself. You’ll weigh oil-based for stain blocking and adhesion, latex for flexibility and easy cleanup, and bonding primers for slick or chalky surfaces; pick based on substrate and future paint.
| Type | Best use |
|---|---|
| Oil-based | Stains, metal |
| Latex | Drywalls, wood |
| Bonding | Glossy, chalky |
Common Mistakes and How to Avoid Them
Don’t skip fixing the root causes like moisture or substrate damage before priming, because the peel will just come back.
Make sure you pick a compatible primer and topcoat and prepare the surface thoroughly so the paint can adhere.
Also pay attention to safety and ventilation while you work to protect yourself and get the best results.
Skipping root-cause repairs (moisture, substrate damage)
When you skip fixing the underlying problem—like a leaky roof, trapped moisture, or rotted substrate—you’re only masking symptoms and setting up the paint to fail again.
Don’t prime over wet or damaged surfaces. Repair leaks, dry and replace rotten material, and address ventilation or flashing issues first.
Otherwise primers and paint will blister, peel, or mold, wasting time and money.
Using wrong primer or incompatible paint
Fixing leaks and rotten substrate stops most failures, but choosing the wrong primer or pairing incompatible paint can sabotage a perfect repair.
You’ll ruin adhesion and finish if latex goes over oil-based primer or vice versa. Match primer type to both substrate and topcoat, follow manufacturer recommendations, and test a small area.
When in doubt, use a universal primer designed for mixed surfaces.
Inadequate surface prep and poor adhesion
Because paint only grips what you give it, skipping proper surface prep or leaving loose paint and contamination in place guarantees adhesion problems down the line.
You should scrape, sand, and remove chalk, grease, and mildew before priming. Feather edges, fill gaps, and wipe clean with a suitable solvent.
Proper prep prevents peeling, secures primer bonds, and extends finish life.
Overlooking safety and ventilation
You’ve prepped the surface, but don’t let that make you complacent about safety and ventilation—skipping them puts you and your home at risk.
Wear a respirator when sanding old paint, especially if lead’s possible. Open windows, run fans, and seal off areas to prevent dust spread.
Dispose of debris properly and follow label warnings on primers and cleaners to protect yourself and others.
Best Practices and Preventative Tips
To keep paint from peeling again, you should stay on top of routine maintenance like fixing leaks and touching up chips.
Pick primers and topcoats that are chemically compatible and rated for your surface.
Also pay attention to temperature and humidity when you prime and paint so the film can cure properly.
Routine maintenance to prevent peeling
When you spot early signs of paint failure—bubbling, cracking, or flaking—tackle them quickly with simple, regular checks and fixes to keep peeling from spreading.
Inspect surfaces seasonally, clean mildew and dirt, and repair small chips before they widen. Maintain gutters and seal joints to limit moisture.
- Check and clean quarterly
- Patch and sand promptly
- Control moisture sources
Choosing compatible paint systems and primers
After you’ve kept up with seasonal inspections and fixed small chips, pick paint and primer that work together so repairs last.
You should match solvent bases—oil with oil, acrylic with acrylic—or choose a universal primer rated for both.
Read manufacturer specs, confirm adhesion to your substrate, and use compatible topcoat sheens.
Proper pairing prevents peeling, staining, and premature failure.
Environmental and timing considerations (humidity, temperature)
Although paint and primer can look fine on the job site, humidity and temperature control make the difference between a durable repair and one that peels, bubbles, or traps moisture.
You should work when surfaces are dry, air is 40–70% relative humidity, and temperatures match product recommendations.
Avoid painting in extreme heat, cold, or high humidity; allow full cure times before exposing surfaces to moisture.
Tools, Materials, and Cost Estimates
You’ll want the right tools—scrapers, sandpaper, wire brush, putty knife, and quality brushes or a roller—to prep and prime effectively.
Choose primers and patching compounds suited to your surface (oil- or latex-based primer, rust-inhibitor for metal, exterior-grade for siding) and consider trusted brands like Zinsser or Kilz for problem areas.
For a small touch-up expect a few hours and $20–$75, medium rooms a day and $75–$250, and large exterior jobs a weekend or more costing $250–$1,000+ depending on materials and whether you hire help.
Recommended tools for repair and priming
Gather the right tools before you start—doing so saves time and prevents costly mistakes when repairing peeling paint and priming a surface.
You’ll need efficient, safe gear to strip, sand, and prep edges, then apply primer smoothly. Choose durable items so you can reuse them for future jobs.
- Putty knife, scraper, sanding block
- Hand sander or power sander
- Roller, brushes, drop cloth
Typical materials and product recommendations
Materials make the job predictable and affordable: for most peeling-paint repairs you’ll want a high-quality bonding primer, a latex or oil-based topcoat that matches the original finish, a stripper or paint remover for stubborn areas, 80–120 grit sandpaper, and appropriate fillers (spackling for small spots, exterior-grade patch for larger voids).
- Bonding primer, quality latex/oil topcoat
- Sandpaper, scrapers, stripper
- Fillers, caulk, safety gear
Rough cost and time estimates by project size (small, medium, large)
For a quick sense of scale, think in three tiers—small, medium, and large—so you can match tools, materials, and time to the job without overbuying. You’ll spend roughly: small $20–$100, half day; medium $100–$400, 1–2 days; large $400+, several days. Pick patching kits, primer, brushes/rollers accordingly.
| Size | Cost range | Time |
|---|---|---|
| Small | $20–$100 | 0.5 day |
| Medium | $100–$400 | 1–2 days |
| Large | $400+ | Several days |
FAQ Common Questions
You’ll want clear answers to common questions like whether latex primer will stick to old oil-based paint and how long fresh paint should cure before priming.
We’ll also cover whether priming fixes moisture-driven peeling, when bonding primers can replace sanding on glossy surfaces, and what kind of longevity or warranty you can realistically expect.
Read on for practical, concise guidance so you can decide the right next steps.
Can I prime over old oil-based paint with latex primer?
If the existing finish is oil-based, you can often prime over it with a latex (water-based) primer—but only after you prepare the surface properly.
You’ll need to clean, degrease, and sand glossy sections to promote adhesion. Scuff sanding plus a high-quality bonding primer prevents peeling and tannin bleed.
If the oil paint is failing or flaking, remove loose areas before priming.
How long should paint be allowed to cure before priming?
When the old finish is sound and you’ve cleaned and sanded appropriately, don’t rush into priming—paint needs time to cure so the primer can bond properly.
Generally wait at least 24–48 hours for latex and 72 hours for oil-based finishes; colder or humid conditions extend cure times.
Test by pressing a fingernail lightly—no tackiness means you’re ready to prime.
Will priming stop peeling caused by moisture?
Although priming can help, it won’t stop peeling that’s caused by ongoing moisture—you’ve got to fix the moisture source first.
Prime only after repairing leaks, improving ventilation, or replacing damaged materials. Otherwise moisture will undermine adhesion and cause recurring failure.
Use moisture-resistant products where appropriate, confirm surfaces are dry, then prime and repaint for a durable finish that won’t delaminate.
Can I use a bonding primer over glossy surfaces without sanding?
Fixing moisture issues first matters, but you’ll also face surface-prep questions like whether you can slap a bonding primer over glossy paint without sanding.
You usually can if the primer specifies adhesion to glossy surfaces, but testing a small area first is smart.
Clean thoroughly, degloss with a scuff pad or chemical deglosser if recommended, and follow manufacturer instructions for best results.
What warranty or longevity can I expect after priming over previously painted surfaces?
How long will a primer hold up over old paint?
You’ll get variable results: warranties rarely cover priming over peeling or failing paint.
If the underlying coating is sound, primer plus proper topcoat can last years—often 5–15 years depending on exposure and product.
If you prime over compromised paint, expect shorter life and voided manufacturer guarantees; repair first for best longevity.