How to Paint Acoustic Ceiling Tiles Without Ruining Their Function
You can paint acoustic ceiling tiles if you clean, test, and use light, breathable coatings so you don’t clog pores or reduce absorption. Identify the tile type, check for asbestos, patch damage, and try a small test tile first. Use low-VOC, water-based primer and thin latex or acrylic in one to two light coats, spray or roll evenly, and let each coat dry fully. Keep coats thin to preserve function—more tips follow if you want details.
How to Paint Acoustic Ceiling Tiles Without Ruining Their Function
Yes—you can paint some acoustic ceiling tiles safely, but you need to choose the right paint and technique so you don’t clog the pores that absorb sound.
I’ll explain when it’s okay to paint tiles (clean, stable, and non-fibrous types) and when you shouldn’t (damaged, heavily textured, or labeled non-paintable).
Follow the simple tests and product recommendations that preserve acoustic performance.
Quick Answer Can You Paint Acoustic Ceiling Tiles Safely?
Wondering if you can paint acoustic ceiling tiles without wrecking their sound-absorbing properties? Yes—if you follow proper steps.
Use light, water-based paints or specialized acoustic coatings, apply thin even coats with a sprayer or roller, and avoid clogging pores.
Test one tile first, monitor acoustic change, and replace rather than repaint if performance drops.
Learn how to paint acoustic ceiling tiles correctly.
When You Should and Shouldn’t Paint Acoustic Tiles
While you can paint many acoustic tiles to refresh a room, you shouldn’t do it blindly—know when painting will preserve appearance without hurting performance.
You should paint when tiles are clean, porous, and rated for paint.
Don’t paint damaged, water-stained, or insulated tiles. Consider testing one panel first.
- Clean
- Porous
- Rated for paint
- Damaged or stained? Don’t paint
Understanding Acoustic Ceiling Tiles
You’ll want to know what ceiling tiles are made of—fiberglass, mineral fiber, or cellulose—and how those materials affect painting.
Their ability to absorb sound depends on porosity and surface texture, so clogging pores with heavy paint can reduce performance.
Finally, different tile types accept paint differently, so choose products and techniques that preserve both appearance and acoustic function.
What Acoustic Ceiling Tiles Are Made Of
Acoustic ceiling tiles combine materials chosen for sound absorption, fire resistance, and durability, so knowing what they’re made of helps you pick the right type for your space.
You’ll find mineral fiber, fiberglass, cellulose, and wood wool options, plus vinyl-faced or metal-backed panels. Each has different weight, moisture tolerance, and finish compatibility, so choose based on environment and painting constraints.
How Tiles Absorb Sound and Why Porosity Matters
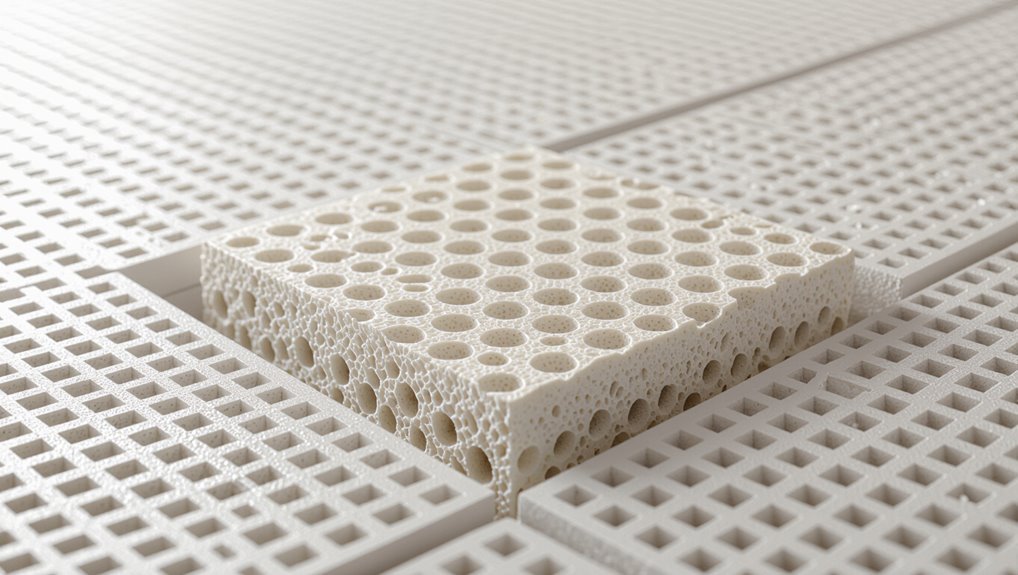
Knowing what tiles are made of helps you understand how they handle sound: their ability to absorb noise comes down to porosity and internal structure.
You’ll notice open pores let air move into the material, converting sound energy to heat. Denser, closed-cell areas reflect sound.
When you paint, clogging pores reduces absorption, so choose methods that preserve surface porosity and internal pathways.
Common Types of Tiles and Their Paint Compatibility
Tiles come in several common materials—mineral fiber, fiberglass, gypsum, and metal—and each takes paint differently, so you should match your paint choice and prep to the tile type. Know that porous mineral fiber soaks paint, fiberglass needs light sanding, gypsum tolerates thin coats, and metal requires primer.
| Material | Prep | Paint |
|---|---|---|
| Mineral fiber | Dust, primer | Thin latex |
| Fiberglass | Sand, clean | Acrylic |
| Gypsum | Seal edges | Low-VOC |
| Metal | Degrease, prime | Oil or enamel |
Risks of Painting Acoustic Tiles
Before you grab a brush, know that paint can clog the pores of acoustic tiles and reduce their sound‑absorbing performance.
You should also consider that coatings might alter fire ratings or add weight that leads to staining, sagging, or other damage.
We’ll cover how different paints affect acoustics, structural and fire concerns, and ways to avoid common problems.
How Paint Affects Sound Absorption
While a fresh coat can improve appearance, painting acoustic ceiling tiles can reduce their ability to absorb sound because paint fills and seals the tiny pores and surface texture that trap and dissipate noise.
You’ll notice higher reverberation and diminished speech clarity if you overcoat or use heavy, glossy paints.
Use thin, breathable coatings or specialized acoustic paints to preserve absorption performance.
Structural and Fire-Rating Concerns
Beyond acoustic changes, painting can also affect a tile’s structural integrity and fire rating, so you should weigh those risks before starting.
You should check manufacturer guidance and fire labels because coatings can add combustible material or block intumescent layers.
If tiles are part of a rated assembly, get approval from a professional or the manufacturer; improper modification can void certifications and compromise safety.
Potential for Staining, Sagging, or Damage
If you paint acoustic ceiling tiles, you risk staining, sagging, or other damage because many tiles are porous, water-sensitive, or finish-coated in ways that react poorly to paint and solvents.
You’ll see discoloration, uneven blotches, or surface hardening that reduces porosity. Moisture from latex or oil paints can warp fibers, cause sagging, delamination, or crumble brittle edges, ruining appearance and function.
Preparation Before Painting
Before you start, check what your tiles are made of and follow any manufacturer instructions so you don’t void warranties or damage the material.
Test a small, inconspicuous area with your chosen primer and paint, following a clear step-by-step so you can see adhesion and finish.
Wear proper PPE, guarantee good ventilation, and confirm tiles aren’t asbestos-containing before you proceed.
Assessing Tile Material and Manufacturer Guidelines
Though painting ceiling tiles can refresh a room, you first need to confirm what the tiles are made of and what the manufacturer recommends.
Check labels and paperwork, contact the maker, and confirm warranty impacts.
Consider these steps:
- Identify material (fiberglass, mineral fiber, etc.)
- Note porosity and finish
- Record manufacturer’s painting guidance
- Verify warranty and acoustic specs
Testing a Small Sample Area Step-by-Step
Start by selecting a discreet corner or a spare tile to test, and gather the materials you’ll need: the paint you’ll use, a small brush or foam roller, cleaner, primer (if recommended), painter’s tape, and a marker to note results.
Clean the area, tape edges, apply primer if needed, paint a small patch, let it dry fully, then inspect adhesion, texture, color match, and porosity.
Safety Precautions: PPE, Ventilation, and Asbestos Checks
Because ceiling tiles can contain dust, fibers, or old coatings that are unsafe to disturb, you should take clear safety steps before you paint:
Wear N95 or P100 respirators, safety goggles, and disposable coveralls; use gloves.
Guarantee cross-ventilation or an exhaust fan.
Don’t disturb suspect materials—stop and get a licensed asbestos test if tiles predate 1980 or show damage.
Step-by-Step Painting Process
Now you’ll follow a clear step-by-step painting process that starts with cleaning and repairing tiles to guarantee adhesion.
You’ll then pick the right primer and paint (considering type, sheen, and VOCs), thin appropriately, and choose spray, brush, or roller based on your tiles.
Finish by applying thin, even coats with proper drying/humidity control, then allow full curing before reinstallation and inspection.
Step 1 Cleaning and Repairing Tiles
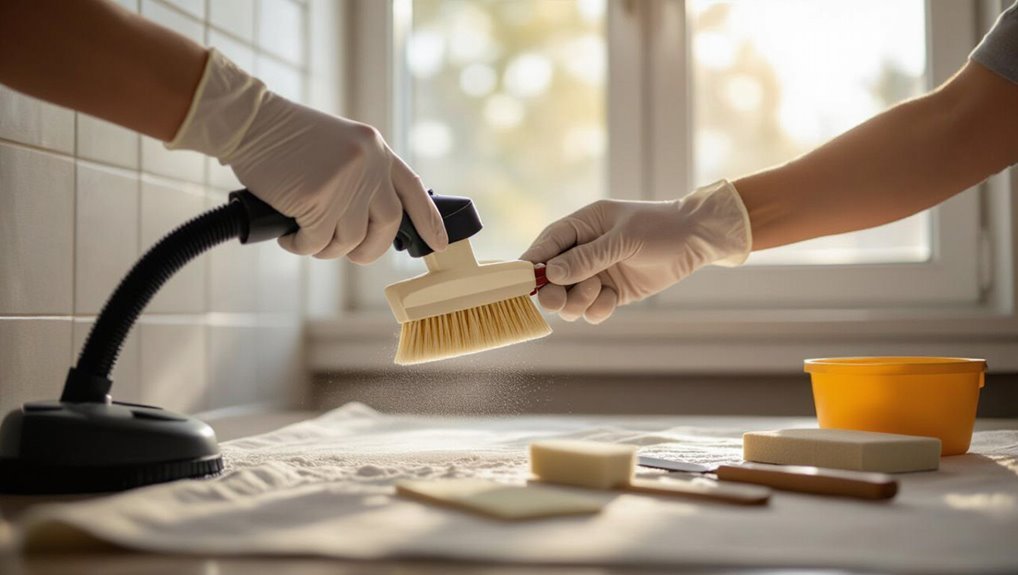
Begin by giving each tile a thorough inspection and clean; you’ll remove dust, stains, and any loose fibers so the paint will adhere evenly.
Then dry and repair damaged areas before painting.
- Vacuum with soft brush
- Spot-clean stains with mild detergent
- Let tiles dry completely
- Patch holes or replace crumbling tiles
Proceed only when surfaces are sound.
Step 2 Choosing the Right Paint and Primer (types, sheen, VOCs)
Step 2: Choose a water-based latex primer and paint formulated for ceilings or porous surfaces, since they’ll bond to acoustic tile without clogging the texture; pick a low- to zero-VOC formula for indoor air quality, and match the paint sheen—flat or matte for hiding imperfections, eggshell if you want slight washability—so the finish meets your durability and aesthetic needs.
Pick tintable primer, test color on a scrap tile, and avoid oil-based or high-gloss paints that seal pores and reduce acoustic performance.
Step 3 Thinning Paint and Using the Correct Application Method (spray vs brush vs roller)
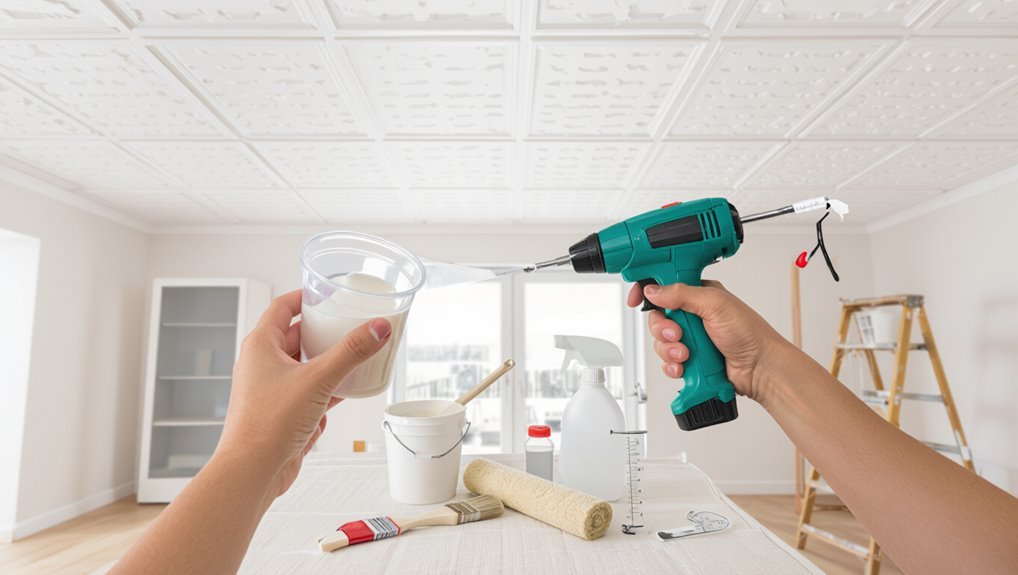
Decide whether to thin your paint and which application method to use based on tile porosity, texture, and the equipment you have.
You’ll want thin coats for spray, slightly thinned for low-nap rollers, and unthinned for careful brush touchups.
Consider:
- Spray: even, minimal texture fill
- Roller: controllable, good for rough tiles
- Brush: precise edges
- Viscosity: follow manufacturer thinning guidance
Step 4 Applying Paint in Thin, Even Coats (drying times and humidity)
With your thinning and application method set, apply paint in thin, even coats to avoid sagging and to preserve the tiles’ texture.
Work systematically, overlapping passes lightly. Allow each coat to dry fully before the next—check manufacturer drying times.
High humidity slows curing, so ventilate or use a dehumidifier.
Stop after uniform coverage; thin multiple coats beat one heavy one for acoustics.
Step 5 Post-paint Curing, Reinstallation, and Inspection
Let the paint cure fully before you handle the tiles—this guarantees the finish won’t mar and the acoustic surface won’t clog.
Wait manufacturer-recommended time, keep ventilation steady, and avoid touching.
Inspect each tile for uniform coverage, porosity changes, or blocked pores.
Reinstall carefully, aligning edges and support grid.
Test room acoustics and lighting; if performance changed, remove or lightly sand and retest.
Comparison: Spray Painting vs Roller/Brush for Acoustic Tiles
When you choose between spraying and using a roller or brush, weigh speed and finish against overspray and equipment needs.
Spray application gives fast, even coverage but can waste paint and require masking, while rollers and brushes control drips better and work well for touch-ups but take longer.
Think about your budget, workspace, and desired texture to pick the best method.
Pros and Cons of Spray Application
Spray painting and rolling/brush work each have clear trade-offs you should weigh before starting:
Spray gives even, fast coverage and fewer texture changes, but it risks overspray, needs ventilation, and can clog acoustics if applied too thickly.
| Advantage | Drawback |
|---|---|
| Fast, uniform finish | Overspray control needed |
| Less texture change | Requires masking/ventilation |
| Covers edges easily | Potential for clogging pores |
Pros and Cons of Roller/Brush Application
If you prefer tighter control and less overspray, rolling or brushing will feel more manageable than spraying. You’ll avoid clouding nearby surfaces and control paint buildup, but careful thin coats are needed to preserve acoustic pores. It’s slower and may leave texture.
| Method | Speed | Control |
|---|---|---|
| Spray | Fast | Low |
| Roller/Brush | Slow | High |
Mistakes to Avoid When Painting Acoustic Tiles
Before you start, don’t seal acoustic tiles with heavy coats or the wrong products — that can clog pores, ruin sound absorption, or affect fire ratings.
Follow the manufacturer’s instructions and never paint damaged tiles or anything that might contain asbestos; if in doubt, test or replace them.
I’ll also point out common DIY mistakes and simple fixes so you won’t make costly errors.
Overcoating or Using Thick Paints That Seal Pores
When you coat acoustic ceiling tiles with heavy, pore-sealing paints or keep layering without allowing proper drying, you’ll kill their sound-absorbing performance and risk cracking or flaking as the paint film stiffens.
Use only light, breathable acoustic-grade paint or very diluted latex; apply one thin, even coat, let it fully dry, and test a small tile before doing the whole ceiling.
Ignoring Manufacturer Instructions or Fire Ratings
Because acoustic tiles often carry specific installation and fire-safety labels, you should never ignore the manufacturer’s instructions or ratings when planning to paint them.
Check label limits on coatings, approved products, and coverage methods. Ignoring ratings can void warranties, reduce fire resistance, or violate codes.
If instructions limit paint type or forbid coating, follow them or consult the manufacturer for alternatives.
Painting Damaged or Asbestos-Containing Tiles
If a tile’s damaged or might contain asbestos, don’t try to paint it yourself—leave it alone and get a professional assessment.
You shouldn’t sand, scrape, or disturb suspect tiles; that can release hazardous fibers.
Hire licensed abatement or restoration pros to test and, if needed, remove or repair tiles.
Only replace compromised tiles with verified, safe acoustic replacements before repainting.
Common DIY Errors and How to Fix Them
Although painting acoustic ceiling tiles seems straightforward, DIYers often make predictable mistakes that ruin looks and performance. You can avoid them by prepping wisely, using proper paint, and fixing errors quickly.
- Skipping cleaning — wipe dust and stains.
- Using heavy coatings — choose light, breathable paint.
- Painting damp tiles — dry fully first.
- Ignoring edges — seal gaps carefully.
Best Practices and Maintenance After Painting
After painting, you’ll want to preserve the tiles’ acoustic performance by using light, acoustically friendly coatings and avoiding heavy buildup.
Clean painted tiles gently with a soft brush or low-moisture wipe and schedule occasional inspections to catch wear or staining early.
If tiles lose texture, show water damage, or the paint has sealed pores, you’ll need to replace them rather than repaint.
How to Preserve Acoustic Performance Post-Paint
When you finish painting acoustic ceiling tiles, take deliberate steps to keep their sound-absorbing qualities intact by using light, breathable coatings, avoiding clogged pores, and maintaining dust-free surfaces.
Inspect tiles periodically for paint buildup, repair chips with thin touch-ups, and keep ventilation balanced to prevent moisture.
Replace heavily sealed or damaged tiles to restore acoustic performance rather than overcoating compromised surfaces.
Cleaning and Long-Term Care of Painted Tiles
Maintaining painted acoustic tiles means balancing gentle cleaning with care to preserve both appearance and sound absorption.
You’ll dust regularly with a soft brush or microfiber, spot-clean stains with a damp cloth and mild detergent, and avoid saturating tiles.
Don’t use abrasive pads or strong solvents.
Inspect for peeling or mold annually, touch up paint sparingly, and control room humidity to extend tile life.
When to Replace Instead of Paint
If tiles show deep water stains, crumbling edges, persistent mold, or sagging despite repairs, you should replace them rather than paint, because those issues compromise both appearance and acoustic performance.
You should also replace tiles with disintegrated backing, heavy contamination, or warped panels that won’t sit flush.
Replace rather than paint when structural integrity, hygiene, or fire-resistance is uncertain.
Alternatives to Painting for Aesthetic Improvement
If painting isn’t right for you, consider swapping tiles entirely or choosing budget-friendly replacement options and weigh the costs.
You can also use suspended grid inserts, fabric covers, or wallpaper-style panels to change the look without repainting.
For smaller updates, add trim, update lighting, or paint the grid itself to create striking accents.
Tile Replacement Options and Cost Considerations
When painting won’t achieve the look or performance you want, replacing acoustic ceiling tiles gives you more durable, attractive, and customizable results; you can swap in new tiles that offer better sound absorption, mold resistance, or a completely different texture and color. Choose materials, factor labor and disposal, and compare costs per tile and per square foot before committing.
| Tile Type | Cost Range | Benefits |
|---|---|---|
| Fiberglass | $2–$6 | High absorption |
| Mineral fiber | $1–$4 | Affordable |
| PVC/Metal | $5–$12 | Moisture resistant |
Using Suspended Grid Inserts, Fabric Covers, or Wallpaper Alternatives
You can transform a tired drop ceiling without paint by swapping tiles for decorative grid inserts, stretching fabric covers, or applying ceiling-grade wallpaper alternatives that mimic texture and pattern.
You’ll preserve acoustics while upgrading appearance: choose breathable fabrics, adhesive-backed panels rated for ceilings, and lightweight inserts that clip into the grid.
Measure carefully, test materials for sag and fire rating, then install systematically.
Accent Treatments: Trim, Lighting, and Grid Painting
Beyond swapping tiles or applying fabric and wallpaper alternatives, small finish details can dramatically change a drop ceiling’s look without painting every tile.
Add decorative trim or coffering to define sections, swap grid T-bars for contrasting colors, and install low-profile LED strips or pendant fixtures to highlight patterns.
Use primer-safe grid paint for neat accents while keeping acoustic materials untouched and effective.
FAQ Common Questions About Painting Acoustic Ceiling Tiles
You probably have a few practical questions before you start painting, like whether paint will harm sound absorption, whether spray or aerosol paints are okay, and how many coats are safe.
You’ll also want to know if there are paints made specifically for acoustic tiles and what to do if your tiles might contain asbestos.
Let’s answer these clearly so you can make an informed, safe choice.
Will painting reduce sound absorption significantly?
Although painting will change a tile’s surface, it usually won’t cut sound absorption dramatically if you use the right products and techniques.
You should choose a thin, acoustically transparent paint or diluted latex, apply light, even coats, and avoid clogging pores.
Test one tile first and measure results in the room; small gains in reflectivity rarely harm overall performance.
Can I use spray paint or aerosol paint on tiles?
Wondering whether spray or aerosol paint will work on acoustic ceiling tiles? You can use low-pressure, water-based spray paints sparingly, keeping coats thin to avoid clogging pores.
Avoid solvent-based aerosols and heavy sprays that seal texture and harm absorption.
Test a scrap tile first, verify even, light passes, and allow full drying between passes to preserve acoustic performance.
How many coats are safe to apply without ruining function?
How many thin coats should you apply to keep tiles acoustic?
Apply no more than two light, even coats of low-VOC latex or acoustic-safe paint to preserve porosity.
Let each coat fully dry and test a corner for sound absorption.
If coverage’s insufficient, sand lightly and add a very thin third coat only.
Excess layers clog pores and reduce acoustic performance.
Are there paint brands formulated for acoustic tiles?
Yes — several manufacturers make paints or coatings specifically formulated for acoustic ceiling tiles, and you’ll want to choose those when preserving sound absorption is a priority.
Look for low-VOC, breathable, microporous formulas labeled for acoustics or porous ceilings. Brands often publish test data (NRC, airflow resistance).
Follow their prep and application instructions to avoid clogging pores and compromising performance.
What if my tiles contain asbestos can I paint them?
If your ceiling tiles might contain asbestos, don’t try to paint them yourself—disturbing the surface can release hazardous fibers and create a serious health risk.
Stop work, avoid sanding or drilling, and seal off the area.
Hire a certified asbestos professional to test and, if needed, abate or encapsulate the tiles.
Follow local regulations before any removal or modification.