How to Paint a Porch Ceiling the Right Way (Color, Finish, and Tips)
Pick a light, cool color like haint blue or crisp white and use an exterior acrylic-latex in a satin or low-sheen finish to hide imperfections and resist moisture. Prep thoroughly: clean, repair, and prime with a stain-blocking exterior primer, then apply two even coats with brushes for trim and rollers or a sprayer for flat areas. Paint in mild, dry conditions and choose low-VOC products for sustainability. Keep going to get step-by-step tips and troubleshooting help.
Quick Answer Best Color, Finish, and Overall Approach for Porch Ceilings
You’ll get the cleanest look by choosing a light, cool blue or crisp white in an exterior-grade latex paint.
Pick a satin or low-sheen finish to hide imperfections but still shed moisture, and use paint formulated for porches or trim to resist mildew and UV.
Start with proper prep—cleaning, patching, and priming—then apply two coats for durable, even coverage.
Direct recommendation summary (color, finish, paint type)
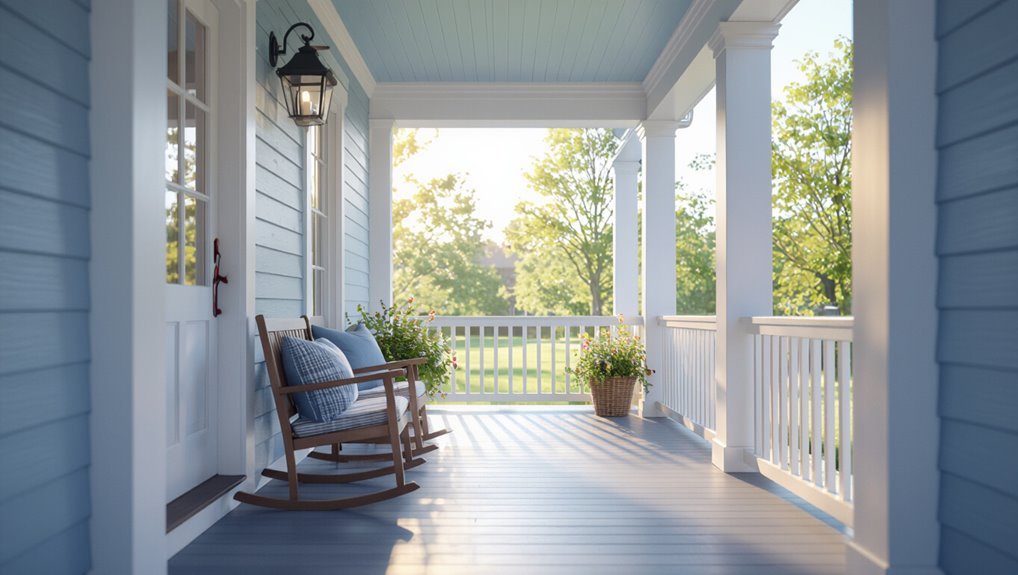
For most porch ceilings, pick a light, cool blue (think “haint blue”) in a semi-gloss exterior latex—this color deters insects, hides minor imperfections, and reflects light while the semi-gloss finish resists mildew and sheds moisture.
Choose exterior latex for durability, use mildew-resistant formulas, and apply with a roller after priming.
For guidance on how to paint a porch ceiling, follow simple prep and two coats.
Why Porch Ceiling Color and Finish Matter
Your porch ceiling color and finish do more than look nice — they affect light reflection, how well the surface stands up to weather and pests, and even how insects behave.
You’ll also shape the porch’s style by tying the ceiling to the house’s colors and by influencing perceived height.
And don’t forget regional and historical choices, like haint blue, which blend tradition with practical benefits.
Functional reasons (light reflection, weather, insects)
One essential reason to think beyond aesthetics is that ceiling color and finish affect how much light your porch gets, how well it stands up to weather, and whether it deters insects.
You’ll choose lighter tones and satin or semi-gloss for better light reflection and easier cleaning.
Opt for exterior-grade, mildew-resistant paint and smooth finishes to reduce standing water and discourage insect nesting.
Aesthetic reasons (continuity with house, perceived height)
Although it’s tempting to treat the porch ceiling as an afterthought, its color and finish play a big role in tying the porch to the rest of the house and shaping how tall the space feels.
Choosing a hue that echoes trim, siding, or accent colors creates visual continuity, while lighter tones and satin or semi-gloss finishes make the ceiling recede and feel higher.
Darker, matte choices can add coziness or a defined overhead plane. Use contrasts sparingly, pick complementary shades, and consider how finish reflects light so your porch feels intentional and proportioned.
Common regional and historical traditions (e.g., haint blue)
Beyond matching trim or manipulating perceived height, porch ceilings also carry cultural and regional meanings that can shape color choices.
You’ll encounter Southern haint blue meant to ward off spirits, New England’s classic whites that brighten gray skies, and midwestern barn reds or natural wood finishes reflecting local materials.
Respecting tradition can honor history and unify neighborhood character while still fitting your home’s style.
Basic Understanding Materials and Conditions
Start by noting what your porch ceiling is made of—wood, beadboard, plywood, vinyl, or fiber cement—because the substrate affects prep and paint choice.
Consider environmental factors like humidity, sun exposure, and temperature swings since they’ll influence adhesion and durability.
Then pick a suitable paint (exterior-rated latex, acrylic, or oil-based) and a sheen (flat, satin, semi-gloss, or high-gloss) based on the material and the finish you want.
Typical porch ceiling materials (wood, beadboard, plywood, vinyl, fiber cement)
Porch ceilings come in several common materials—solid wood, beadboard, plywood, vinyl, and fiber cement—each with different prep and painting needs, so you’ll want to know which you’re working with before you pick products or techniques.
Wood and beadboard need sealing and stain blocking. Plywood accepts primers. Vinyl requires cleaners and flexible paint, and fiber cement needs high-adhesion primers for long-lasting results.
Environmental factors to consider (humidity, sun exposure, temperature swings)
Because your porch ceiling sits between the house and the elements, you’ll need to factor in humidity, sun exposure, and temperature swings when choosing prep methods, primers, and paint.
High humidity slows drying and promotes mildew, so dry surfaces and use mildew-resistant primers.
Intense sun can fade and heat-expand materials; allow flexible coatings.
Large temperature swings demand paints and caulks that tolerate movement without cracking.
Paint types suitable for porch ceilings (exterior vs. interior, latex, oil-based, acrylic)
When you pick paint for a porch ceiling, choose a product designed for the conditions it faces: exterior paints resist moisture, mildew, and UV better than interior formulas, while latex and acrylic emulsions offer fast drying, easy cleanup, and good flexibility.
Oil-based paints give harder, smoother finishes but take longer to dry and can yellow over time.
Pick exterior-grade latex or acrylic for durability and easier maintenance.
Sheen options explained (flat/matte, satin, semi-gloss, high-gloss)
If you want a ceiling that hides imperfections, go with a flat or matte finish; if you need something easier to clean, choose a satin or semi-gloss, and reserve high-gloss for trim or areas where maximum durability and reflectivity matter. You’ll pick flat for texture, satin for balance, semi-gloss for washability, and high-gloss sparingly.
| Sheen | Look | Use |
|---|---|---|
| Flat/Matte | Low | Imperfect ceilings |
| Satin | Soft | Porches |
| Semi-gloss | Shiny | Cleanable |
| High-gloss | Very shiny | Trim/doors |
Step-by-Step How to Paint a Porch Ceiling
Before you pick up a brush, you’ll inspect the ceiling for damage, clean off mold or mildew, and fill nail holes or rot so the surface is sound.
Then you’ll decide if and which primer is needed, choose the right exterior paint and sheen, and select the best application method.
Finally, you’ll use the appropriate technique—brush, roller, or sprayer—to apply paint evenly and efficiently.
Step 1 Inspecting and preparing the surface
Start by giving the ceiling a careful inspection so you can spot loose paint, water stains, mildew, nail pops, or soft spots that need repair.
Check for flaking, uneven texture, peeling edges, and any gaps at trim or seams.
Note areas needing sanding, priming, or fastening.
Mark trouble spots so you’ll address them methodically before painting.
Step 2 Cleaning and repairing (mold, mildew, rot, nail holes)
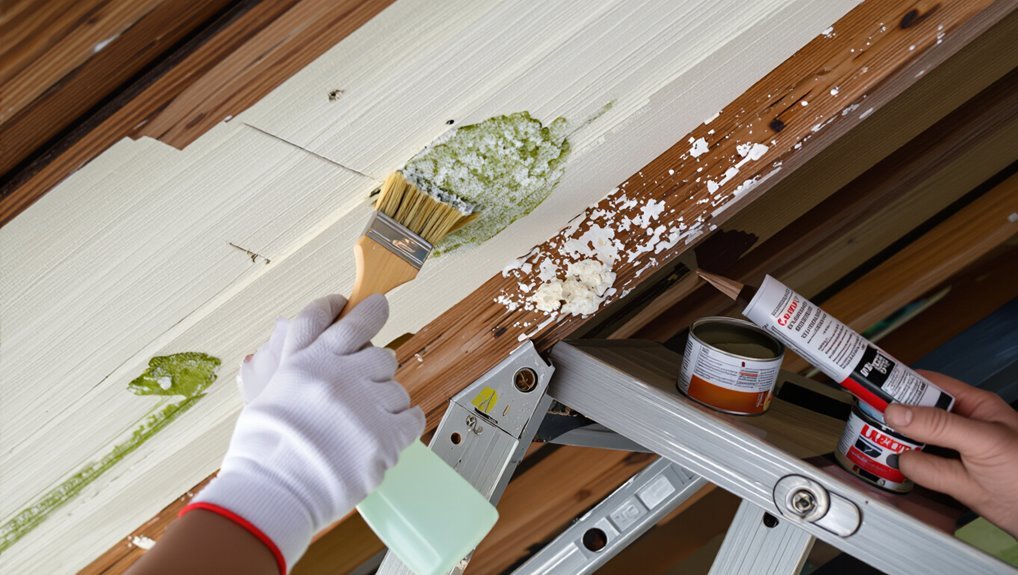
Scrub away grime and address damage so your paint will adhere and last: remove mildew with a bleach or oxygen-based cleaner, rinse thoroughly, and let the surface dry.
Sand flaking paint, scrape loose material, and cut out rotten wood. Fill nail holes and small cracks with exterior-grade wood filler, replace severely damaged boards, and wipe dust away before moving to priming.
Step 3 Priming: when and which primer to use
Once the surface is clean and dry, prime the porch ceiling to seal bare wood, block stains, and give paint a uniform surface to grab onto.
Use an exterior-grade, stain-blocking oil or acrylic primer for knots, tannin bleed, or patched areas. Choose a mildew-resistant primer for humid porches.
Apply one even coat, let it cure fully, then sand lightly before painting.
Step 4 Choosing the right paint and sheen
Now pick a paint formulated for exterior use that handles moisture, UV exposure, and temperature swings—latex (acrylic) exterior paints are generally the best balance of durability, breathability, and ease of cleanup, while oil-based paints can offer extra hide for problem spots.
Choose a low- to semi-gloss sheen for easy cleaning and mildew resistance, or flat/eggshell to hide imperfections if upkeep is minimal.
Step 5 Painting techniques (brush vs. roller vs. sprayer)
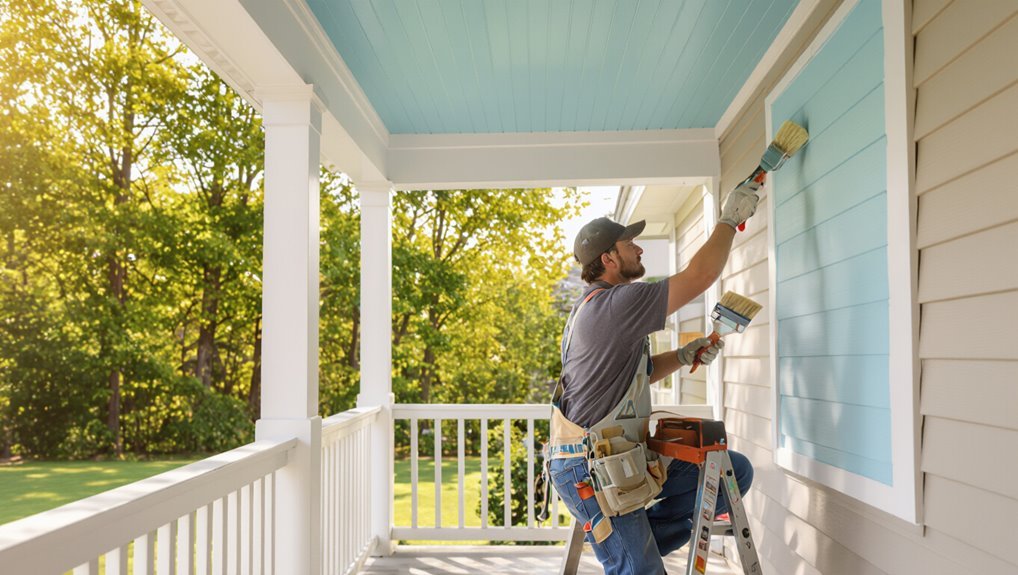
Pick the right application method for your porch ceiling based on its texture, height, and how fast you want the job done: a brush gives control for trim and tight spots, a roller covers smooth or lightly textured surfaces quickly, and a sprayer speeds work on high or heavily textured ceilings but needs more prep and masking.
Use an angled brush for edges, a short-nap roller for panels, and overlap passes evenly.
Step 6 Number of coats and drying times
Most porch ceilings need two coats of paint to get even coverage and proper durability, though you may apply a single coat if you’re using a high-hide paint on a uniformly primed surface.
Wait recommended dry times on the can—usually 2–4 hours between coats for latex, longer for oil-based.
Confirm surface temperature and humidity are within manufacturer specs before recoating.
Step 7 Cleanup and final inspection
Gather your tools and give the area a careful once-over: remove drop cloths, clean brushes and rollers according to paint type, and wipe any drips or smudges while the paint’s still workable.
Inspect for missed spots, thin coverage, or streaks. Touch up with a small brush, allow full curing, reinstall fixtures and ceiling fans, and dispose of or store materials per local regulations.
Color Selection Guide
Consider how much light and ceiling height you have, since brighter rooms and taller ceilings can handle darker or bolder hues while low, shaded porches benefit from light, airy tones.
Think about style—traditional porches often suit soft whites or pale blues, modern spaces can take crisp neutrals or charcoal, coastal favors sea-inspired blues and greens, and farmhouse looks good with muted creams or sage.
Finally, coordinate the ceiling with your trim, siding, and flooring so the color ties the porch to the house—reserve bold or dark ceilings for covered, well-lit porches or to create a deliberate focal point.
How light and ceiling height affect color choice
When natural light floods your porch, lighter ceiling colors will amplify the brightness and make the space feel more open; in dim or shaded porches, richer or warmer tones can add depth and coziness without feeling oppressive.
Low ceilings benefit from lighter, cool hues to lift the space, while high ceilings tolerate deeper shades that create intimacy—balance light levels with color intensity.
Color suggestions by style (traditional, modern, coastal, farmhouse)
If you want your porch ceiling to reinforce a specific décor, pick colors that echo each style’s core mood:
- Traditional: soft cream or muted blue for timeless warmth.
- Modern: crisp white or charcoal for clean lines.
- Coastal: pale aqua or seafoam to feel breezy.
- Farmhouse: warm white or chalky gray for rustic charm.
- Eclectic: pick a bold accent that ties the look together.
Coordinating porch ceiling color with house trim, siding, and flooring
Because the porch ceiling sits between your roofline and the living space, it should tie together trim, siding, and flooring so the whole entry feels intentional; pick a hue that echoes at least one element—match a cool trim white, soften with a siding undertone, or contrast subtly with flooring.
Test samples in different light and choose a durable, easy-to-clean finish that complements surrounding materials.
When to use bold or dark ceiling colors
Although a light, airy ceiling often feels safe, you should consider bold or dark porch ceilings when you want depth, drama, or a strong visual anchor that complements surrounding elements.
Use dark hues to highlight architectural details, create intimacy on large porches, or contrast light siding.
Pick colors tied to trim or furniture, test samples in different light, and balance with lighter flooring or accessories.
Finish and Sheen Recommendations by Situation
If your porch gets a lot of moisture or direct sun, you’ll want finishes that stand up to mildew and UV damage.
For covered porches you can use a lower-sheen, more matte finish for a classic look, while open or high-traffic areas benefit from satin or semi-gloss for durability and washability.
Choose paints labeled anti-mildew or UV-resistant when exposure is a concern.
High-moisture porches and covered vs. open porches
When your porch sees a lot of moisture—think frequent rain, high humidity, or splashback from sprinklers—you’ll want paints and sheens that resist mildew, blistering, and peeling.
Covered porches let you choose finishes with lower durability requirements than fully open porches, which need more robust, moisture-resistant coatings.
For high-moisture spots, prime with a mildew-resistant primer, use exterior-grade products, and guarantee proper ventilation to dry surfaces quickly.
Best sheens for durability and washability
Pick a finish based on how much wear and cleaning your porch will see: flat and matte hides imperfections but won’t stand up to scrubbing, satin offers the best balance of durability and washability for most porches, and semi-gloss provides the toughest, easiest-to-clean surface for high-traffic or splash-prone areas.
| Sheen | Best use |
|---|---|
| Flat/Matte | Low-traffic, cosmetic |
| Satin | Most porches, balanced |
| Semi-gloss | High-traffic, easy-clean |
| Eggshell | Subtle sheen, moderate use |
Anti-mildew and UV-resistant options
Beyond sheen and scrub resistance, you’ll also want paints formulated to resist mildew and UV damage so your porch ceiling stays clean and colorfast over time.
Choose acrylic latex paints with mildewcide additives for humid locations; they shed moisture and discourage growth.
For sun-exposed porches, pick UV-stable pigments and polymers to prevent fading and chalking.
Follow manufacturer prep and maintenance guidelines.
Tools, Materials, and Cost Estimates
Before you start, gather an essentials checklist—paint, primer, rollers, brushes, drop cloths, ladders, and safety gear—so you won’t stop mid-job.
If you want a more polished result, consider optional pro tools like a sprayer or scaffolding.
Finally, I’ll outline typical DIY costs versus hiring a pro so you can weigh time, effort, and budget.
Essential tools and materials checklist
A concise checklist will save you time and money: gather the right brushes, rollers, drop cloths, ladders, painter’s tape, primer and exterior ceiling paint, plus caulk, sandpaper, and safety gear so you can tackle the job without interruptions.
- Brushes and angled trim brush
- Roller frame and extension pole
- Quality drop cloths and painter’s tape
- Exterior primer and paint
- Caulk, sandpaper, respirator and goggles
Optional tools for professional finish (sprayer, scaffolding)
If you want a truly smooth, fast finish, consider renting a paint sprayer and scaffolding—both speed the job and improve consistency compared with brushes and rollers.
A HVLP or airless sprayer gives even coverage and fewer brush marks; practice on scrap first.
Scaffolding offers stable, full-ceiling access without overstretching.
Rent quality gear, follow safety rules, and clean equipment thoroughly after use.
Typical DIY vs. professional cost breakdown
One clear way to decide whether to DIY or hire a pro is to compare the real costs: tools you’ll need, materials consumed, and labor time (yours or theirs). You’ll save on labor but may buy tools; pros charge for speed and finish. Estimate both sides before choosing.
| Item | DIY | Professional |
|---|---|---|
| Tools | Buy/rent | Included |
| Materials | Cost-only | Cost-only |
| Labor | Your time | Hourly fee |
| Total | Lower/higher risk | Higher/guaranteed |
Common Problems and How to Fix Them
As you paint, you’ll likely run into issues like peeling or blistering, mildew and stains, uneven coverage or brush marks, and even hidden wood rot.
Learn the causes so you can strip, clean, or treat surfaces and choose the right primer and paint.
If you find structural decay, stop and repair or replace the damaged wood before proceeding.
Peeling or blistering paint causes and remedies
When paint peels or blisters on your porch ceiling, it’s usually a sign of moisture, poor surface prep, or incompatible products — and you can fix it by addressing the root cause.
Scrape loose paint, sand to sound edges, and dry the area thoroughly.
Prime with a compatible, high-quality exterior primer.
Repaint using breathable, exterior-grade paint and guarantee proper ventilation to prevent recurrence.
Mildew and staining prevention and treatment
Peeling paint often signals moisture that can also lead to mildew and unsightly stains on your porch ceiling.
So after you’ve repaired damaged areas, tackle mold growth and discoloration next. Clean affected spots with a dilute bleach solution or a commercial mildew remover, rinse thoroughly, dry completely, then prime with a stain-blocking primer.
Use mildew-resistant exterior paint and improve ventilation to prevent recurrence.
Uneven coverage or visible brush marks troubleshooting
If your porch ceiling shows uneven coverage or visible brush marks, don’t worry—you can fix most issues without redoing the whole job.
Lightly sand glossy or raised brush marks, vacuum dust, and apply a thin, even coat with a high-quality brush or roller designed for ceilings.
Use consistent strokes, work wet edge to wet edge, and consider a second thin coat for uniformity.
Wood rot or structural issues discovered during prep
While prepping your porch ceiling, you may uncover wood rot or hidden structural problems that need prompt attention; don’t paint over soft, crumbling wood or loose joists.
Remove rotten sections, treat surrounding lumber with a wood preservative, and reinforce or replace compromised joists.
Use epoxy wood filler for small areas, guarantee proper ventilation and flashing to prevent recurrence, then prime and repaint.
Best Practices and Pro Tips
Pick a clear, dry weather window in the mild season so paint can cure properly and you won’t rush.
Use sturdy ladder technique, good ventilation, and PPE to stay safe while you work.
Choose low‑VOC products for health and sustainability, and plan routine touch‑ups every few years to keep the ceiling looking fresh.
Timing the project (season, weather window)
Because paint cures best within a specific temperature and humidity range, plan your porch-ceiling project for a season when days stay between about 50–85°F and relative humidity is below roughly 70%.
Check forecasts for several dry days, starting prep and painting when overnight lows won’t drop below the lower limit.
Avoid windy, dusty days and allow full recommended dry times between coats for best results.
Safety tips (ladders, ventilation, PPE)
When you’re ready to start, put safety first: secure a stable ladder or scaffold, guarantee good ventilation to disperse fumes, and wear proper PPE—gloves, eye protection, and a respirator rated for paint vapors—so you can work confidently and avoid injury or exposure.
Check ladder footing, maintain three points of contact, keep tools in a belt, pause if dizzy, and follow product label warnings.
Long-term maintenance and repainting schedule
Although a fresh porch ceiling looks great, you’ll keep it that way longer by setting a simple maintenance routine and a realistic repainting schedule.
Inspect annually for peeling, mold, or water stains; clean gently with mild detergent and a soft brush. Touch up chips immediately.
Plan full repainting every 5–7 years or sooner in harsh climates, documenting dates and products used for consistency.
Sustainable and low-VOC options
If you want a healthier porch and a smaller environmental footprint, choose low-VOC or zero-VOC paints and sustainable materials that still deliver durable, weather-resistant finishes.
Pick acrylic-latex formulas labeled low-VOC, reclaimed or FSC-certified trim, and water-based primers.
Test small areas for adhesion and color.
Ventilate while painting, dispose of leftover paint properly, and favor maintenance over frequent repainting to conserve resources.
Comparison: Popular Paint Brands and Product Types
You’ll want to compare brands by their features—durability, sheen options, and weather resistance—to match the look and longevity you need.
Consider typical use cases: lightweight acrylic for covered porches, mildew-resistant formulas for humid climates, and oil-based or alkyd blends for older wood.
Also weigh primer-plus-paint systems versus paint-and-primer-in-one, since separate primers often give better adhesion and stain blocking on porch ceilings.
Brand features and typical use cases
1 clear way to choose the right porch ceiling paint is to match brand features to how you’ll use the space: some brands emphasize mildew-resistant formulas for humid climates, others focus on ultra-flat finishes to hide imperfections, and a few offer fast-drying, low-odor options for quick weekend projects or occupied homes. Pick what fits your routine.
| Feature | Feeling |
|---|---|
| Mildew-resistant | Relief |
| Ultra-flat | Calm |
| Fast-dry | Excitement |
| Low-odor | Comfort |
Primer + paint system comparisons
Matching brand features to your needs helps narrow choices, but you’ll also want to compare complete primer-plus-paint systems to see how products work together.
Look for systems matched for exterior wood or stucco, mildew resistance, and adhesion. Consider one-step exterior primers with stain-blocking, or two-coat systems for durability.
Match sheen recommendations—flat for ceilings—and choose compatible cleaners and touch-up products for best long-term results.
FAQ Common Questions About Painting Porch Ceilings
You’ll find answers to common porch-ceiling questions here, like whether interior paint works on a covered porch and whether to paint beams or just panels.
We’ll cover which colors make the ceiling appear higher, whether gloss or flat hides imperfections best, and how long to wait between primer and paint coats.
If you have other specific concerns, mention them and we’ll address those too.
Can I use interior paint on a covered porch ceiling?
Can you use interior paint on a covered porch ceiling? Yes—if the porch is well-sheltered, dry, and ventilated, interior paint can work temporarily.
Choose moisture-resistant, low-VOC latex and apply primer suited to the surface.
For long-term durability or exposure to humidity and temperature swings, exterior or porch-specific coatings are a better choice to prevent peeling and mildew.
What color makes a porch ceiling look higher?
If you want your porch ceiling to feel taller, paint it a light, cool shade—whites, pale blues, or soft grays—because lighter colors reflect more light and visually push the ceiling upward.
You’ll also create a cohesive look by coordinating ceiling color with trim and siding.
Avoid dark, warm tones that draw the eye inward; stick with airy hues to open the space.
Is gloss or flat better for hiding imperfections?
Since lighter colors help open up a porch, you might also wonder which finish hides flaws best: flat or gloss.
Flat hides dents, seams, and texture because it doesn’t reflect light, so imperfections stay less visible. Gloss highlights bumps and brush marks by shining on them.
If durability matters in a covered porch, choose an eggshell or satin compromise—less reflective yet easier to clean.
How long should I wait between primer and paint coats?
When you’re painting a porch ceiling, wait until the primer is fully dry to the touch and no longer tacky—usually 1 to 4 hours for water-based primers and 24 hours for oil-based ones—before applying the topcoat.
Check manufacturer instructions and local humidity; high humidity or low temperatures can extend drying.
If in doubt, lightly sand between coats and wipe dust away before painting.
Should I paint exposed beams or just the ceiling panels?
You’ve already waited the right amount of time between coats, so next decide whether to paint exposed beams or leave them natural to create contrast.
Paint beams the same color for a unified, modern look; stain or clear-coat them to showcase wood grain.
Consider scale, lighting, and maintenance—paint hides flaws but chips; stain shows character but needs periodic recoat.
Closing Checklist Before You Start Painting
Before you pick up a brush, run through a quick pre-paint inspection checklist to confirm surfaces are clean, dry, and any repairs are done.
On the day you paint, use a short day-of-painting checklist to verify weather, lighting, ladder safety, and that you have all supplies ready.
That final prep keeps the job efficient and helps you avoid costly mistakes.
Pre-paint inspection checklist
Although the prep work can feel tedious, run through a short closing checklist so nothing derails your paint job once you start:
- Check for loose boards, rot, or soft spots and note repairs.
- Remove peeling paint and sand glossy areas.
- Inspect for mold or mildew; clean as needed.
- Verify all nails are flush and gaps caulked.
- Confirm lighting and ceiling fixtures are protected.
Day-of-painting quick checklist
Start with a quick walk-around to confirm everything’s set so your workday stays smooth:
- Check lighting and power for tools
- Verify weather and ventilation
- Cover furniture and plants securely
- Make certain ladders and scaffolding are stable
- Mix paint and test spray/brush on scrap
You’ll be ready to start without interruptions, safer and more efficient.