Can You Paint Laminate Wall Panels for a Fresh Updated Look?
Yes — you can paint laminate wall panels to give your room a fresh, updated look if you prep them properly. Clean and degrease the surface, scuff it with fine sandpaper, repair any damage, then apply a bonding or shellac-based primer before painting in thin, even coats. This works best in low-humidity, low-traffic spaces and won’t fix warped panels. Keep going to get step-by-step prep, paint choices, and pro tips for lasting results.
Can You Paint Laminate Wall Panels for a Fresh Updated Look? Quick Answer
Yes — you can paint laminate wall panels in many cases if the surface is clean, scuffed, and primed with a bonding primer; if the laminate is heavily textured, damaged, or peeling, painting may not give durable or attractive results.
Painting can refresh the room quickly, hide dated patterns, and be cost-effective, but it requires proper prep and may need touch-ups or special primers.
We’ll cover exactly when it’s worth it and the trade-offs so you can decide confidently.
Short, direct verdict (when painting is feasible and when it’s not)
You can often paint laminate wall panels, but only when the surface is intact, clean, and properly prepped—sanded lightly, deglossed, and primed with a bonding primer.
If panels are delaminated, warped, or heavily damaged, don’t bother; replacement is better.
When sound, you’ll get durable results with proper prep and paint.
Assess adhesion and defects before you start; that decides success.
Summary of pros and cons
If the panels are sound and you prep them right, painting gives a fast, cost-effective way to modernize your space; it brightens rooms, expands style options, and can extend the life of otherwise-good laminate.
Pros: affordable, quick, customizable, less waste.
Cons: requires careful prep, may peel if skipped, doesn’t fix warped panels, limited longevity compared with replacing with new drywall.
Understanding Laminate Wall Panels: What They Are and Why It Matters
You’re looking at panels made of particleboard or MDF topped with a thin plastic, laminate, or veneer surface that resists moisture and wear.
Unlike porous drywall or solid wood, those smooth, nonporous finishes won’t absorb primer or paint the same way.
That surface makeup determines how well paint will stick and what prep steps you’ll need for a lasting result.
What laminate wall panels are (materials and common surface types)
Because they combine a rigid core with a decorative surface, laminate wall panels offer a durable, cost-effective alternative to painted drywall and real wood.
You’ll find cores of MDF, HDF, plywood, or composite, topped with printed paper, melamine, vinyl, or high-pressure laminate. Surfaces mimic wood grain, stone, tile, or solid colors and often include textured, glossy, or matte finishes.
Why laminate differs from drywall, wood, and other surfaces
While laminate panels look like wood or painted drywall at a glance, they behave differently in ways that affect preparation, painting, and long-term performance.
You’ll notice laminate’s smooth, nonporous finish, factory-applied sealers, and flexible substrate respond unlike absorbent drywall or solid wood.
That means you’ll need different cleaning, scuffing, priming, and expectations for durability and movement than with traditional surfaces.
How laminate composition affects paint adhesion
Although laminate panels often look solid, their layered construction and factory finish determine how well paint will stick, so you need to know what’s beneath the surface before you start.
Some laminates have slick melamine or PVC topcoats that repel paint; others are porous fiberboard with adhesive layers.
You’ll prep differently—cleaning, sanding, and using a compatible primer—to guarantee lasting adhesion.
When Painting Laminate Panels Is a Good Idea
If the panels are firmly attached, free of deep damage, and have a smooth, non-porous finish, you can reasonably paint them.
You’ll get the best results in low-moisture rooms like living areas or bedrooms and when you want a cost-effective refresh instead of a full remodel.
But if panels are warped, water-damaged, or badly delaminated, replacing them is usually the smarter choice.
Signs that panels are candidates for painting
Because laminate varies in quality and condition, you’ll want to spot a few clear signs before you decide to paint it.
Check for intact, smooth surfaces without deep scratches or peeling veneers, firmly adhered panels with no loose edges, minimal water damage or mold, and stable seams.
If the texture is manufacturer embossed or heavily glossy, painting may be harder or need extra prep.
Best scenarios and rooms for painted laminate
When you want a quick, budget-friendly room refresh, painting laminate panels works best in low-moisture, low-traffic spaces like bedrooms, home offices, and formal living rooms where wear and tear is limited; these areas let paint adhere longer and show off a smoother finish without constant scuffs.
You’ll also have good results in dining rooms, hallways with light use, and guest rooms.
Cases where replacement is better than painting
While painting laminate works well in low‑moisture, low‑traffic rooms, there are situations where swapping panels makes more sense.
If panels are warped, water‑damaged, moldy, or peeling, replace them.
In high‑traffic or humid areas—bathrooms, basements, kitchens—new panels or moisture‑resistant boards offer durability.
Also swap when you want a different texture, insulation, or electrical access you can’t achieve by painting.
Tools, Materials, and Paint Types You’ll Need
Before you start, gather the right surface prep tools—sanders, cleaners, and tack cloths—plus primers or adhesion promoters that work on laminate.
Choose durable paints and sheens made for slick surfaces, and pick the right application tools (brushes, rollers, or a sprayer) along with gloves, masks, and drop cloths.
Finally, use a simple checklist to confirm prep, primer, paint type, tools, and safety gear before you begin.
Surface preparation tools (sanders, cleaners, tack cloths)
You’ll need a small set of reliable tools to get laminate ready for paint: an orbital sander with 120–220 grit pads (or sanding blocks if you prefer hand work), a degreasing cleaner or trisodium phosphate alternative, fine-grit sanding sponges for edges, and tack cloths to remove dust before priming.
Work methodically: degrease, sand lightly to dull the surface, vacuum, wipe with tack cloths, and recheck for residue.
Recommended primers and adhesion promoters
Now that the surface is clean and scuffed, pick primers and adhesion promoters that’ll bond to slick laminate rather than relying on paint alone.
Use a high-bond bonding primer (shellac- or solvent-based) or a dedicated laminate adhesion primer.
Apply thin, even coats, follow manufacturer cure times, and sand lightly between coats.
Consider a liquid adhesion promoter for ultra-smooth finishes or problematic glossy panels.
Best paint types and sheens for laminate
When choosing paint for laminate, pick products formulated for low‑surface‑energy substrates so your finish lasts and resists peeling.
Use acrylic latex or water‑based enamel for durability and easy cleanup.
Opt for satin or semi‑gloss sheens to hide minor imperfections while providing scuff resistance; gloss is durable but highlights flaws.
Matte can look modern but may mark more easily.
Brushes, rollers, sprayers, and protective gear
Tools make the job faster and the finish last, so pick brushes, rollers, and sprayers that match your paint and panel surface.
Use a high-quality nylon/poly brush for water-based paint and a short-nap roller for smooth panels. An HVLP sprayer gives even coverage for large areas.
Wear nitrile gloves, eye protection, and a respirator for spraying; drop cloths protect floors and furniture.
Checklist for a painting job
Preparation is key, so gather everything before you start: the right brushes, rollers, or sprayer, plus sandpaper, deglosser, primer, and your chosen paint.
You’ll also need drop cloths, tape, and safety gear. Follow manufacturer instructions, test a small area, and work in thin coats for durable coverage.
- Deglosser
- Primer
- Semi-gloss paint
- Fine sandpaper
- Masking tape
Step-by-Step How to Paint Laminate Wall Panels
Start by inspecting the panels for cracks, loose seams, or mildew and make any necessary repairs.
Clean with a degreaser and treat mold, then sand with the appropriate grit to create tooth for paint.
Finish by applying a suitable primer, then your paint in even coats, allowing proper drying between each step.
Step 1 Inspect and repair: identifying and fixing damage
Before you apply primer or paint, closely inspect the laminate panels for chips, scratches, loose seams, or water damage so you can fix issues that will show through the finish.
Patch chips with wood filler or epoxy, sand smooth, tighten or re-glue loose seams, and replace badly warped or water-stained sections.
Allow repairs to cure fully before proceeding.
Step 2 Clean thoroughly: degreasers and mildew treatment
Once you’ve repaired any damage, clean the laminate thoroughly so primer and paint will bond properly; grease, dust, and mildew can all cause peeling or uneven coverage.
Use a degreasing cleaner or trisodium phosphate substitute to remove oils, then rinse.
Treat mildew with a bleach solution or commercial mildew remover, follow safety instructions, and let the surface dry completely before continuing.
Step 3 Sanding: grit choices and techniques for adhesion
3 key sanding steps will give your primer something to grip: scuff the laminate with fine-grit sandpaper (220–320) to dull the glossy surface.
Spot-sand any high-gloss or embossed areas with 120–150 grit if needed, and remove sanding dust with a tack cloth before priming.
Sand with even pressure, follow grain or pattern, and vacuum thoroughly to remove particles for best adhesion.
Step 4 Priming: types, application tips, and drying times
With the surface scuffed and dust-free, priming is the next step to guarantee paint will stick and look even.
Choose a bonding primer or shellac-based primer for slick laminate; oil-based works too.
Apply thin, even coats with a high-density foam roller or brush, avoid drips, and follow manufacturer drying times—usually 1–4 hours between coats and full cure in 24–48 hours.
Step 5 Painting: application methods, coats, and drying
After the primer cures, start painting by working in small sections and using thin, even coats so the finish stays smooth and avoids drips.
Use a high-quality nylon roller for flat panels and a brush for edges.
Apply two to three light coats, letting each coat dry per manufacturer instructions.
Sand lightly between coats if needed for a flawless, uniform surface.
Step 6 Sealing and finishing: when to use a clear coat
Because laminate can still chip or scratch even after several paint coats, you’ll usually want to seal the surface with a clear coat to protect the finish and make cleanup easier.
Choose water-based polycrylic for low yellowing and easy application, or oil-based polyurethane for tougher areas.
Apply thin, even coats, sand lightly between coats with fine grit, and avoid heavy build-up that causes drips.
Step 7 Cleanup and curing time before heavy use
Now that the clear coat’s down and sanding’s done, focus on cleanup and letting the finish cure before you put the panels back into heavy use.
Remove dust with a tack cloth, ventilate the room, and wait per product directions—usually 24–72 hours for light handling, up to 7 days for full durability.
Reinstall fixtures gently and avoid scrubbing until fully cured.
Visual guide to sanding, priming, and painting stages
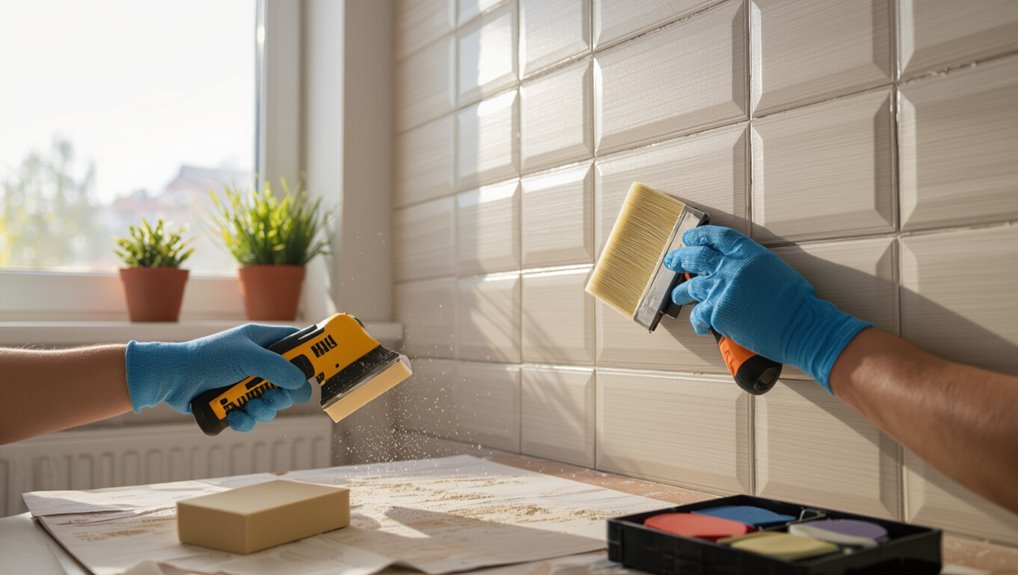
When you’re ready to transform laminate panels, follow a clear, visual sequence—sanding to dull the sheen, priming with a bonding primer, then applying your paint in even coats—so you can see progress and catch problems early.
Start with 120–220 grit sanding, wipe dust, roll or brush primer, sand light between coats, then apply two thin paint coats, drying fully before light use.
Alternatives and Comparative Options
Before you commit to painting, weigh painting against replacing panels by comparing upfront costs and how long each option will last.
Consider other finishes too—veneers, wallpaper, peel-and-stick, or overlay panels—each has its own cost, look, and durability trade-offs.
Also decide whether you’ll hire a pro for a guaranteed finish or tackle a DIY job to save money but accept more risk and prep work.
Painting vs. replacing panels: cost and longevity comparison
Though painting laminate panels costs less upfront, you’ll want to weigh that savings against how long the finish will last and how much prep and maintenance you’ll accept. Painting: lower cost, shorter lifespan, occasional touch-ups. Replacing: higher cost, durable, minimal upkeep. Consider budget, time, and room use.
| Option | Cost | Longevity |
|---|---|---|
| Paint | Low | Short |
| Replace | High | Long |
Other finish options: veneers, wallpaper, peel-and-stick, and panels overlays
If you want a different look without full replacement, several alternatives can refresh laminate wall panels: wood veneers give a real-grain appearance with relatively little thickness; wallpaper offers endless patterns and easy coverage; peel-and-stick films let you apply and remove quickly; and overlay panels clip or adhere over existing boards for instant texture and depth.
You can mix options, match durability needs, and swap styles later.
Pros and cons of professional painting vs. DIY
When weighing painting laminate wall panels, decide whether you’ll hire a pro or tackle it yourself based on budget, time, and desired quality: professionals bring speed, surface prep expertise, and durable finishes that reduce callbacks, while DIY saves money and gives you control but demands careful sanding, priming, and patience to avoid peeling or uneven coverage.
If you hire, expect higher cost but reliable results; DIY requires discipline.
Common Problems and How to Fix Them
You’ll likely run into issues like peeling or flaking paint, visible seams or bubbles, adhesion failures, and uneven color coverage when painting laminate panels.
Learn what causes each problem and the specific fixes—sanding and priming for adhesion, filling and feathering seams, and recoating or color-matching for patchy areas.
With the right prep and rework steps you can correct most flaws and get a smooth, durable finish.
Peeling or flaking paint: causes and remedies
Though laminate looks smooth, paint can still peel or flake if the surface wasn’t prepped, the wrong products were used, or moisture and adhesion issues are at play.
If you see peeling, scrape loose paint, sand edges, clean thoroughly, and apply a high-bond primer made for slick surfaces.
Use quality paint and control humidity.
Repaint small areas; replace panels if damage’s extensive.
Visible seams, bubbles, or texture mismatch: solutions
If seams, bubbles, or texture differences catch your eye after painting laminate panels, don’t panic—these issues usually mean the surface prep or application wasn’t even and can be fixed with targeted steps.
Lightly sand raised seams or bubbles, fill gaps with flexible caulk, smooth and feather edges, prime repaired areas, then repaint with thin, even coats.
Blend texture with stippling or matching roller.
Adhesion failure: rework process
Visible seams, bubbles, and texture issues often come from surface or application problems, but a paint that’s peeling, flaking, or blistering means the paint simply isn’t sticking—so you’ll need a more thorough rework.
Strip loose paint, sand to raw laminate or primer, clean with degreaser, etch if needed, then apply a bonding primer.
Repaint with compatible paint and allow full cure between coats.
Color inconsistency and patchy coverage: how to correct
Color inconsistency and patchy coverage are usually the result of uneven surface preparation, improper primer choice, or thin application—so you’ll want to diagnose the cause before repainting.
Sand glossy spots, clean dust and oils, and fill dents.
Apply a high-quality bonding primer designed for laminate, then use two thin, even coats of paint with a roller or sprayer. Allow full drying between coats.
Best Practices and Pro Tips for Durable, Professional Results
Before you start painting, get into good surface-prep habits—clean, sand, and prime—to lock in long-term adhesion.
Pick colors and finishes that minimize visible seams and imperfections, and choose low-VOC, eco-friendly products when possible.
After painting, follow simple maintenance tips like gentle cleaning and touch-ups to keep the finish looking professional for years.
Surface prep habits that ensure long-term adhesion
When you take the time to prep laminate wall panels correctly, paint will bond far better and last much longer.
Clean with TSP or mild detergent, rinse, and dry. Lightly scuff with fine-grit sandpaper, then degrease.
Fill gaps and caulk seams. Use a high-adhesion primer designed for slick surfaces.
Work in dust-free conditions and follow manufacturer drying times for durable results.
Choosing colors and finishes to hide seams and imperfections
If you want painted laminate walls to look seamless and polished, pick hues and sheens that minimize contrast and disguises flaws rather than spotlighting them.
Choose mid-tone, muted colors and eggshell or satin finishes to soften light and downplay seams.
Use slightly warmer or cooler undertones to blend panel joins, and test samples under room lighting before committing to a full coat.
Maintenance tips for painted laminate walls
Since painted laminate walls can show wear at edges and seams faster than drywall, you’ll want a simple maintenance routine that keeps them looking fresh without stripping the finish.
Dust weekly with a microfiber cloth, spot-clean with mild soap and water, and avoid abrasive pads.
Touch up chips promptly with matching paint, inspect seams for lifting, and reseal edges with clear caulk when needed to prevent moisture damage.
Eco-friendly products and low-VOC options
Although you might worry that low-VOC products compromise durability, today’s eco-friendly primers and paints deliver professional results while cutting fumes and toxins.
Choose a high-quality acrylic bonding primer labeled low-VOC, then pick a washable, low-VOC semi-gloss or satin for durability.
Ventilate, follow manufacturer cure times, and use eco-friendly brushes or rollers.
Proper prep guarantees long-lasting, healthier finishes on laminate panels.
Cost, Timeframe, and Project Planning
You’ll want to budget for primer, paint, sandpaper, brushes/rollers, and any special cleaners—plus tools or pro labor if you hire help.
Expect a weekend for a DIY room and a day or two for pros per room, depending on prep needs.
Use a simple checklist (measure, prep, prime, paint, dry) and note room specifics like ventilation, trim, and furniture removal.
Typical cost breakdown (materials, tools, labor if hiring)
A basic paint-over for laminate wall panels can cost anywhere from $50 to $300 in materials and tools if you do it yourself.
Expect primer, bonding paint, sandpaper, brushes/rollers, tape, and drop cloths. Materials run $40–$200; tools $10–$80.
If you hire pros, add labor: $200–$800+ depending on size and prep.
Always budget a 10–20% contingency.
Time estimate for DIY vs. professional jobs
When planning your laminate wall panel paint project, factor in both hands-on work and drying/curing times so your schedule stays realistic.
For a small room DIY, expect 8–12 hours over two days: prep, priming, two coats, touch-ups, plus 24–48 hours curing.
A professional crew can finish in one day plus curing, but scheduling and travel may add a day or two.
Project planning checklist and room-by-room considerations
Now that you’ve mapped out time and who’s doing the work, plan costs, timeline, and room-specific needs before you buy paint.
List supplies, primer, and labor; budget for repairs and ventilation.
Allocate days per room: kitchen needs moisture-resistant finishes, bathroom needs mildew protection, living areas need low-VOC options.
Schedule drying times and touch-ups, and confirm disposal rules for leftover products.
Frequently Asked Questions (FAQ)
You probably have a few quick questions about painting laminate panels, like whether high-gloss surfaces need sanding or if primer is always required.
You’ll also want to know how long the paint will last, whether moisture resistance is affected, and if you can change colors later without redoing the prep.
Below are clear answers to those common concerns.
Can I paint high-gloss laminate panels without sanding?
Want to skip sanding high-gloss laminate panels? You can sometimes skip heavy sanding if you thoroughly clean, degloss with a liquid abrasive, and apply a high-bond bonding primer designed for slick surfaces.
Expect slightly reduced adhesion compared with scuff-sanded surfaces, so test first. For best durability, light sanding is still recommended, but these steps let you avoid aggressive abrasion when needed.
How long will paint last on laminate walls?
Skipping heavy sanding can work, but how long that paint will hold up on laminate depends on prep, primer, paint type, and traffic.
With proper cleaning, a bonding primer, and quality acrylic or enamel, expect 5–10 years in low-traffic rooms.
In kitchens or hallways you might see wear in 1–3 years.
Touch-ups or a fresh coat extend lifespan.
Will painting laminate reduce its moisture resistance?
Although painting can change how laminate handles moisture, it doesn’t automatically make panels less water-resistant if you prep and seal them properly.
You should clean, sand lightly, and apply a bonding primer, then use a moisture-tolerant paint and finish with a clear sealer.
Done correctly, paint can maintain or even improve resistance; skip prep and you risk peeling and trapped moisture.
Can I change the paint color again later without redoing prep?
After you’ve prepped and painted laminate properly—cleaning, sanding, priming, and sealing—you won’t usually need to redo all that work to change colors later.
You can scuff lightly, clean, and apply a compatible primer or adhesion-promoting base coat, then paint your new color.
If the existing topcoat is intact and well-adhered, a light deglossing step often suffices before repainting.
Is priming always necessary before painting laminate?
Do you always need a primer before painting laminate? Not always, but it’s highly recommended.
Primer improves adhesion, blocks stains, and prevents peeling on slick laminate surfaces. If you use a specialty adhesion-promoting primer or a bonding primer, skip extensive sanding.
For best, longest-lasting results, apply a high-quality bonding primer, then paint with a durable latex or oil-based topcoat.