Can You Put Peel and Stick Tile on Textured Walls? The Real Answer
You can put peel-and-stick tile on mildly textured walls, but you’ll need to prep carefully for reliable adhesion and a neat finish. Clean the surface, sand or skim any high spots, and prime with a high-adhesion primer so the pressure-sensitive backing can grip. Heavy textures like popcorn or rough stucco usually need a full skim coat or a backer board first. With the right steps your tiles will stick and look professional—keep going to see how.
Can You Put Peel and Stick Tile on Textured Walls? Quick Answer
Yes — you can usually install peel-and-stick tile on mildly textured walls if you prep the surface and choose tiles with strong adhesive.
It’ll save time and looks good, but texture can reduce adhesion and make seams uneven, so you might need skim-coating or backing board for best results.
We’ll walk through when it works, what to try first, and when to opt for extra prep.
Direct short answer (Yes/No and when)
If your textured walls are relatively smooth and the surface can be cleaned and primed, you can use peel-and-stick tile; otherwise, it won’t stick well or last.
Yes — you can put peel and stick tile on textured walls when texture is light, adhesive can bond, and you prep properly.
No — avoid it on heavy popcorn or rough stucco without smoothing.
One-sentence summary of pros and cons
When your textured walls are lightly sanded, cleaned, and primed, peel-and-stick tile gives you a fast, affordable, and damage-free update.
However, it’ll struggle to bond on heavy popcorn or rough stucco and may peel or show uneven seams over time.
You’ll save time and money and avoid demolition, but expect limited durability, reduced adhesion on rough textures, and occasional cosmetic flaws.
Basic Understanding What Is Peel and Stick Tile and How It Adheres
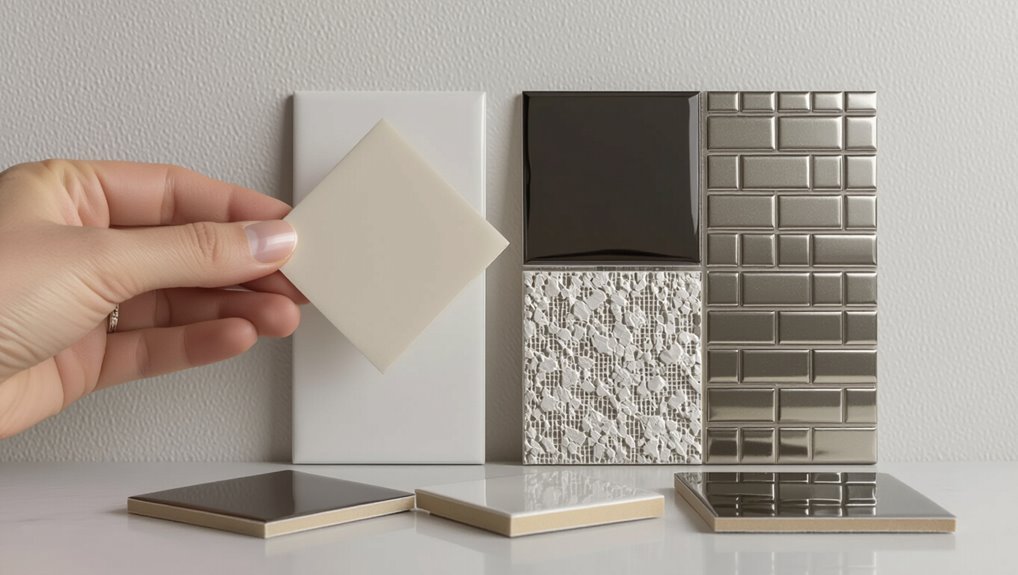
Peel-and-stick tiles are thin panels made from vinyl, PVC, or sometimes natural stone veneers with a pressure-sensitive adhesive backing and a protective peel-off liner.
You’ll stick them to smooth, clean surfaces—the adhesive needs close contact, consistent pressure, and a non-porous substrate to bond well.
Rough or heavily textured walls (orange peel, knockdown, popcorn) reduce contact area and can compromise the seal, so you’ll need to assess texture and prep accordingly.
What peel and stick tile is (materials, backing, common types)
Although simple to install, peel-and-stick tile is a manufactured sheet product made from vinyl or PVC, often with a printed surface that mimics ceramic, stone, or wood and a pressure-sensitive adhesive backing covered by a release liner.
You’ll find rigid vinyl planks, flexible peel-and-stick tiles, and foam-backed decals; surfaces vary in thickness, texture, and wear layer to suit walls, backsplashes, and light-traffic floors.
How adhesive backing works and adhesion requirements
How does that thin adhesive layer actually hold a tile to your wall? It’s a pressure-sensitive adhesive that forms bonds with smooth, clean surfaces.
You’ll need adequate contact area, firm pressure during installation, and temperatures within the manufacturer’s range. Surfaces must be free of dust, oils, and loose paint.
Long-term adhesion also depends on curing time and load—no heavy hanging items.
Common wall textures and how they affect adhesion
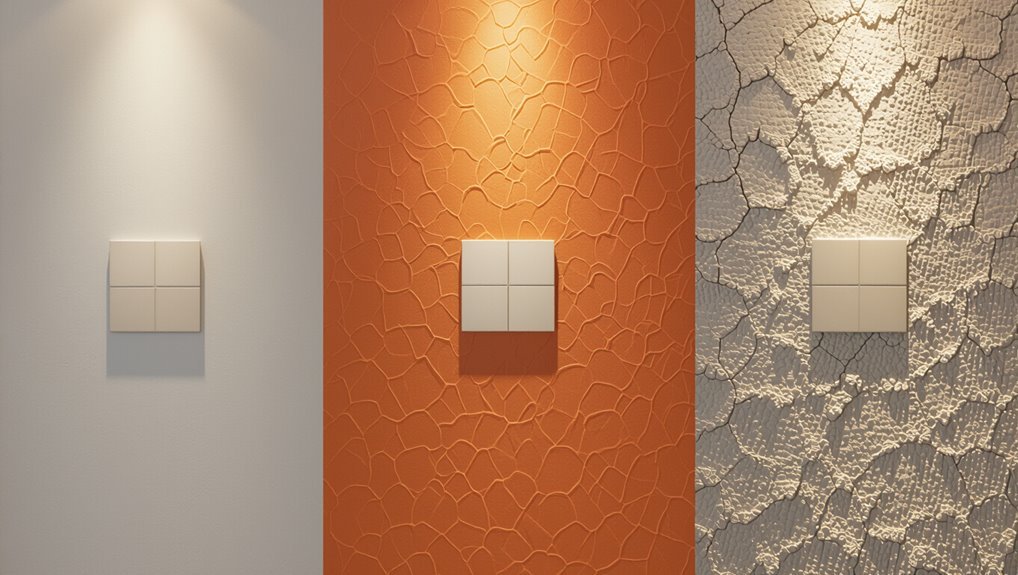
Textures like orange peel, knockdown, popcorn, and heavy splatter change how much of the tile’s adhesive actually contacts the wall, and that contact area directly affects the strength of the bond.
You’ll find smooth drywall gives the best adhesion. Light textures may work after cleaning and priming.
Deep textures leave gaps, reducing hold; you’ll need skim coating or backing boards for reliable results.
Condition Assessment Can Your Specific Textured Wall Work?
You’ll start by identifying your texture—orange peel, knockdown, popcorn, or heavy stucco—since each affects adhesion differently.
Do a simple peel test and follow a surface-prep checklist (cleaning, sanding high spots, and using primer) to see if tiles will stick.
If the texture is too rough—visible gaps under tile edges or surface peaks over about 1/8 inch—you’ll likely see lifting and should consider smoothing or backer board.
Inspecting texture type: orange peel, knockdown, popcorn, heavy stucco
Before you decide on peel-and-stick tile, identify which texture you’re working with—orange peel, knockdown, popcorn, or heavy stucco—because each affects adhesion differently.
Orange peel is mild and usually workable; knockdown has flattened peaks that may need smoothing.
Popcorn and heavy stucco are very rough and often unsuitable without major leveling.
Note visible gaps, flaking, or crumbly texture that signal problems.
Testing adhesion: simple peel test and surface prep checklist
If you’re not sure whether peel-and-stick tile will stick, start with a simple peel test on a small scrap of tile in an inconspicuous spot: press it firmly, wait 24 hours, then peel it straight off to check for lift, residue, or crumbling.
Then follow this surface prep checklist:
- Clean with mild detergent, rinse, dry
- Remove loose paint or flaking texture
- Sand glossy areas lightly
- Fill deep voids with compound
- Wipe with isopropyl alcohol before applying
When texture is too rough: measurable thresholds and signs of failure
When texture gets too rough, peel-and-stick tile often won’t bond reliably—so you need clear thresholds and failure signs to decide whether the wall is workable.
Measure peak-to-valley height: under 1/32″ (0.8 mm) is ideal; 1/32″–1/16″ may work with leveling; over 1/16″ risks failure.
Look for gaps, edge lifting, bubbling, or tiles falling within days to weeks as warning signs.
How-To: Preparing Textured Walls for Peel and Stick Tile
Before you slap on peel-and-stick tiles, you’ll want to clean the wall with a mild detergent or trisodium phosphate and remove dust or grease so adhesive can bond.
If the texture is too heavy, smooth it with sanding, a skim coat, or drywall compound, then prime and seal with a high-adhesion primer and allow proper drying time.
Finally, dry-fit a layout, then apply tiles with firm, even pressure using a roller and clean seams as you go.
Step 1 Clean the wall: recommended cleaners and methods
Start by stripping the wall of dust, grease, and loose particles so the adhesive can grip properly.
You’ll clean in sections, use mild cleaners, and rinse thoroughly. Focus on removing oils and film so peel-and-stick will bond.
- Vacuum or brush texture
- Wipe with TSP substitute
- Rinse with clean water
- Dry completely with cloth
- Degrease stubborn spots with isopropyl
Step 2 Smooth the surface options: skim coat vs. sanding vs. drywall compound
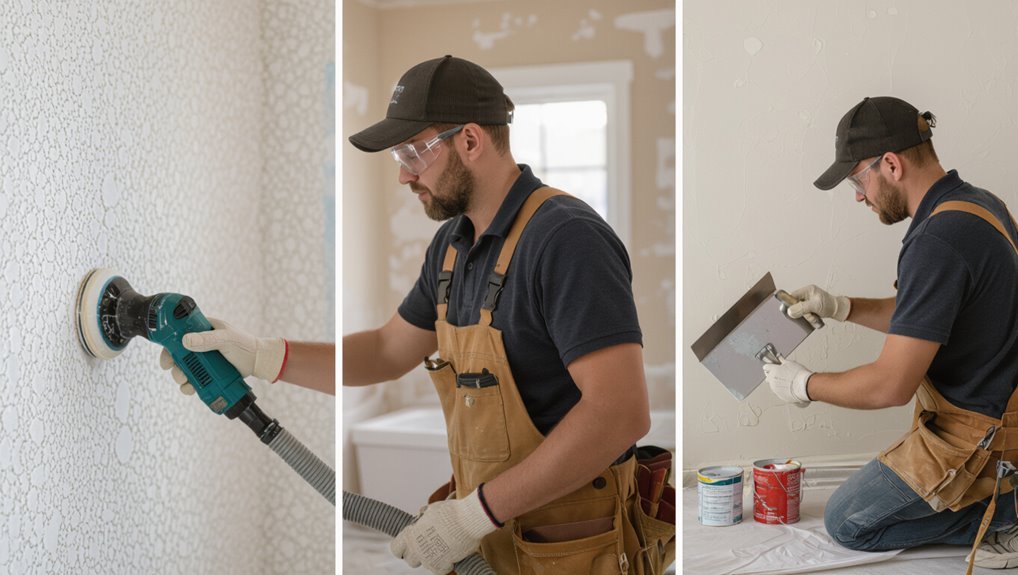
Because texture prevents peel-and-stick tiles from lying flat, you’ll need to level the surface using one of three main approaches: sanding, applying a skim coat, or using a drywall compound to fill deep ridges.
- Sand rough peaks for minor texture and dust carefully.
- Skim coat for a smooth, uniform finish.
- Use drywall compound to fill deep grooves.
- Feather edges to blend shifts.
- Allow full cure before proceeding.
Step 3 Prime and seal: best primers and drying times
Once your skim coat or repairs have fully cured, prime and seal the surface to guarantee peel-and-stick tiles bond and peel cleanly later on.
Use a high-quality acrylic latex primer or a bonding primer for slick surfaces.
Roll two thin coats, allow 1–4 hours between coats (follow label), and cure 24–48 hours before tiling for best adhesion and moisture protection.
Step 4 Layout and dry-fit tiles before sticking
Before you peel a single tile, lay out full sheets and cut pieces on the floor to plan seams, patterns, and focal points so you won’t be making awkward cuts on the wall.
Work outward from centerlines, mark layout lines on the wall lightly, and dry-fit each row to confirm spacing and edge fits.
Adjust cuts and pattern repeats before you commit.
Step 5 Applying tiles correctly: pressure, tools, and seam handling
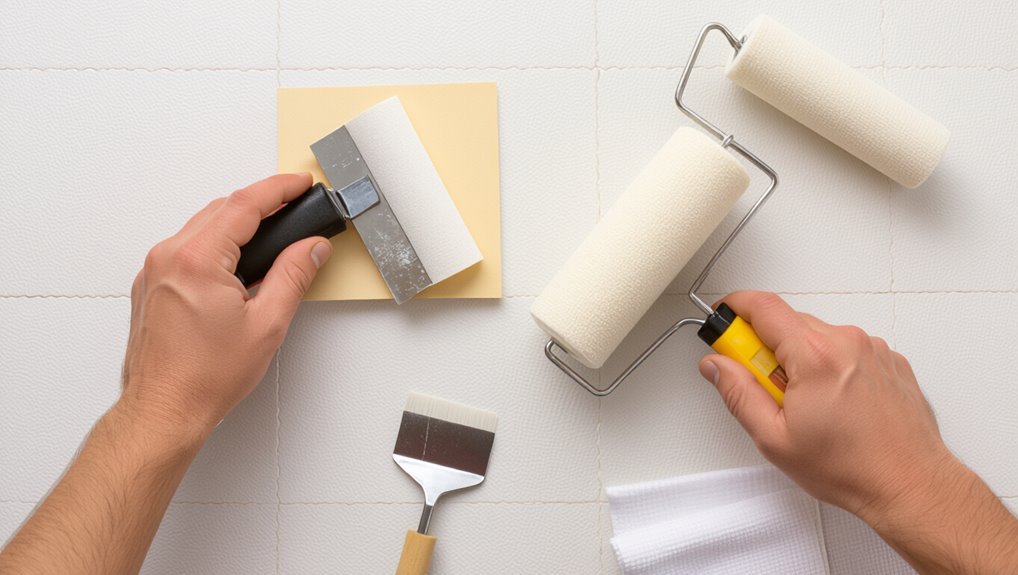
Press each tile firmly and evenly, using a soft rubber roller or a firm hand to guarantee full contact with the textured wall and squeeze out any trapped air.
- Start from the center or a straight guideline.
- Peel backing gradually to control placement.
- Overlap seams slightly, then press to lock.
- Use a utility knife for tight cuts.
- Wipe away adhesive squeeze-out immediately.
Step 6 Finishing touches: caulk, trim, and edge pieces
Step 6 wraps up the job by sealing gaps, hiding edges, and installing trim pieces so your peel-and-stick tile looks professional and stays put.
You’ll run a thin bead of paintable silicone caulk along seams and corners, smooth it with a wet finger or tool, and press edge trims or quarter-round into place.
Wipe excess, let cure, then touch up paint for a finished look.
Alternatives When Peel and Stick Tile Won’t Work
If peel-and-stick won’t bond to your textured walls, you can switch to adhesive-backed panels or install traditional tile with mortar for a more permanent fix.
You can also mount a backer board or underlayment over the texture to create a flat, stable surface for any tile type.
For temporary solutions, consider removable wallpaper or interlocking vinyl panels that hide texture without permanent changes.
Use of adhesive-backed panels or traditional tile with mortar
When peel-and-stick tiles won’t bond properly to heavy texture, consider adhesive-backed wall panels or installing traditional tile with mortar—both give you durable, professional results where stickers fail.
Panels adhere over uneven surfaces, cut easily, and speed installation.
For longevity, set ceramic or porcelain tile with proper mortar and grout; you’ll get a solid, moisture-resistant finish that handles wear and cleaning much better.
Installing a backer board or underlayment over textured walls
Because heavy texture can prevent peel-and-stick tiles from sticking reliably, you’ll often get a much better result by installing a backer board or underlayment over the existing wall before tiling.
You’ll fasten cement board or plywood to studs, tape and mud seams, then apply thinset and tile as usual. This creates a flat, stable surface and improves adhesion and longevity.
Temporary or removable options: wallpaper, vinyl panels
Looking for a short-term fix that still looks polished? You can use removable wallpaper or peel-and-stick vinyl panels to conceal texture without permanent work.
They adhere smoothly, come in many patterns, and remove cleanly if you prep properly. Choose high-quality, repositionable products, smooth surfaces during application, and test a small area to verify adhesion and easy removal without damaging drywall or paint.
Comparison: Peel and Stick on Smooth vs. Textured Walls
When you compare peel-and-stick tile on smooth versus textured walls, you’ll notice differences in adhesion longevity and overall durability that affect how long the job holds up.
You’ll also see contrasts in cost, labor, and time — smoothing a textured wall adds expense and work.
Finally, the visual finish and maintenance needs will differ, with smooth walls giving a cleaner look and textured walls often requiring more upkeep.
Adhesion longevity and durability
If you want peel-and-stick tile to last, adhesion depends heavily on the wall surface: smooth walls give full contact and a stronger bond, while textured walls reduce contact area and create stress points that shorten longevity. You’ll see more lifting on texture; prepping helps but won’t fully equalize longevity.
| Feel | Smooth | Textured |
|---|---|---|
| Hope | Secure | Worry |
| Care | Easy | Vigilant |
Cost, labor, and time differences
The extra prep textured walls demand directly affects your budget, labor, and timeline: smoothing, priming, or installing backerboard adds materials and skilled work that you won’t face on smooth surfaces.
You’ll spend more on patching compounds, primers, and possibly pro labor.
Expect longer project times for surface prep and curing.
Smooth walls let you finish faster and cheaper with minimal tools and effort.
Visual finish and maintenance differences
Although textured walls can give your peel-and-stick tiles a unique, dimensional look, they also make achieving a crisp, professional finish harder than on smooth surfaces.
You’ll see uneven edges, grout-line gaps, and raised seams that collect dust.
Smooth walls deliver cleaner lines, easier cleaning, and longer-lasting adhesion.
Expect more touch-ups and careful maintenance with texture to keep the installation looking sharp.
Common Problems and Mistakes to Avoid
Don’t skip proper surface prep, because dust, grease, or loose texture will keep tiles from sticking.
Avoid installing on overly textured walls, and don’t work in temperatures or humidity levels outside the manufacturer’s recommendations.
Also use the correct primer and cleaners—wrong products can prevent adhesion or damage the tile.
Mistake 1 Skipping surface prep
Before you stick anything, prep the wall—failing to remove dust, grease, or loose texture will keep tiles from bonding and cause edges to lift.
You should clean thoroughly with a degreaser, scrape loose material, and sand rough spots smooth.
Prime porous areas with a bonding primer, let it dry fully, then test a single tile.
Proper prep prevents bubbles, lifting, and early failure.
Mistake 2 Applying on excessively textured surfaces
When you stick peel-and-stick tile onto a heavily textured wall, the adhesive won’t make full contact and tiles will tend to lift, curve at the edges, or trap gaps that collect dirt and moisture.
You should avoid extremely rough surfaces; they compromise bond strength and appearance.
Sand, skim, or apply a thin drywall compound to smooth peaks before installing to guarantee lasting adhesion and clean seams.
Mistake 3 Incorrect temperature or humidity during install
If the room’s temperature or humidity is off, your peel-and-stick tiles won’t bond properly and can peel, bubble, or warp after installation.
You should install when temperature and humidity match manufacturer recommendations—usually moderate, stable conditions.
Don’t work in extreme cold, heat, or very damp environments.
Allow tiles and adhesive to acclimate in the space for at least 24 hours before sticking.
Mistake 4 Using wrong primer or incompatible cleaners
Choose your primer and cleaners carefully — the wrong products can prevent adhesive from bonding or leave residues that repel peel-and-stick tiles.
Test compatibility: use a primer the tile manufacturer recommends and clean with a mild, residue-free cleaner.
Avoid silicone, wax, or oil-based cleaners and strong solvents.
Rinse thoroughly and let surfaces fully dry before installing to guarantee lasting adhesion.
Best Practices and Tips for Long-Lasting Results
You’ll want the right tools and materials—like a level, sharp utility knife, roller, and quality primer—to make installation go smoothly.
Pay special attention to edges, corners, and irregular surfaces by trimming tiles precisely and using caulk or edge trim where needed.
Keep tiles clean and avoid excessive moisture or steam to help the adhesive last.
Recommended tools and materials
When preparing to install peel-and-stick tile on textured walls, gather the right tools and materials so the job goes smoothly and lasts.
You’ll need products that guarantee adhesion, accurate cuts, and clean surfaces. Consider these essentials:
- High-grit sandpaper or sanding block
- Primer or bonding agent
- Quality utility knife and straightedge
- Level and measuring tape
- Clean rags and isopropyl alcohol
Tips for edges, corners, and irregular surfaces
Edges, corners, and irregular surfaces demand a careful approach to guarantee peel-and-stick tiles stay put and look professional.
Trim tiles precisely with a utility knife, score multiple times for clean breaks, and use straightedges.
For inside corners, miter or butt joints; for uneven areas, apply thin-set-compatible caulk or flexible seam sealant.
Press firmly, roll edges, and allow full cure before light use.
Maintenance tips to extend adhesion life
Because peel-and-stick tiles rely on surface contact, regular care and simple checks will keep their bond strong and your installation looking sharp for years.
Wipe tiles with a mild, non-abrasive cleaner and soft cloth; avoid excessive water.
Re-press any lifting edges with a roller, clean adhesive residue, and use caulk at seams for moisture protection.
Inspect yearly and address problems promptly.
Cost, Time, and Durability Expectations
You’ll want a clear cost picture—materials usually run low per square foot while hiring pros adds labor costs.
Expect a few hours for a small accent wall and a day or two for larger areas, plus extra time for prep on heavily textured surfaces.
Plan for several years of wear from quality peel-and-stick tiles, check manufacturer warranties, and factor in replacement or touch-up costs.
Estimated cost breakdown: materials and labor
Budgeting a peel-and-stick tile project means looking beyond the sticker price of the tiles themselves; you’ll need to account for surface prep, adhesive or primer, trim pieces, and any tools you don’t already own.
Expect materials (tiles, primer, trim) to run $2–7 per sq ft; labor, if hired, adds $30–75 per hour.
Factor in small extras: caulk, cleaner, disposal.
Typical project timeline for small and large walls
When planning your peel-and-stick tile job, map out time by wall size and surface prep needs: a small backsplash or accent wall can take a weekend (4–8 hours) including prep and setting, while a full room or multiple textured walls can stretch over several days as you sand, prime, and let adhesives cure.
Expect added time for repairs, trimming, and pattern alignment; allow adhesive cure windows.
Expected lifespan and warranty considerations
While peel-and-stick tiles can look great and save time, their lifespan depends on material quality, installation, and surface prep — expect 5–15 years for vinyl tiles on well-prepared, low-traffic walls and shorter performance on heavily textured or humid surfaces.
Check manufacturer warranties for coverage, limitations, and required prep; register purchases, keep receipts, and document installation to support claims if adhesive failure or delamination occurs within warranty.
Real-World Scenarios and Case Examples
You’ll see three common outcomes when working on textured walls.
In Case A, a light texture that’s properly cleaned and sanded accepts peel-and-stick tiles with good results.
In Case B, a heavy texture needs a skim coat.
In Case C, the tiles may fail—forcing you to remove them and switch to a mortar-and-ceramic or a full resurfacing solution.
Case A Light texture successfully prepped and tiled
Because the wall had only a light orange-peel texture, the homeowner sanded the high spots, cleaned thoroughly, and applied a thin skim coat before installing peel-and-stick tiles.
The tiles adhered smoothly with no lippage or peeling after a month of normal use.
You can replicate this: sand, degrease, use a feathered skim, press tiles firmly, roll seams, and wait 24–48 hours before light use.
Case B Heavy texture requiring skim coat
If your wall has a heavy knockdown or popcorn texture, you’ll need to apply a full skim coat before laying peel-and-stick tile to create a smooth, stable surface; otherwise the tiles won’t bond properly and edges will show unevenness or lift.
You’ll sand, clean, and prime the skimmed surface, then press tiles firmly, allowing proper adhesive contact and curing time for long-lasting results.
Case C When peel-and-stick failed and replacement solution
Even after properly skim-coating a heavily textured wall, peel-and-stick tiles can still fail—especially when old adhesive residue, moisture issues, or improper rolling were overlooked.
If tiles peel, remove adhesive, dry and decontaminate the surface, then choose a true wall tile and mortar or a heavy-duty construction adhesive.
You’ll get a durable, long-lasting finish instead of repeated reapplications.
Frequently Asked Questions (FAQ)
You’re probably wondering whether peel-and-stick tile will stick to textured or painted surfaces, whether you need a primer, and how long to wait before grouting or caulking.
You may also want to know if the tiles can be removed without damaging the drywall.
Below we’ll answer those common questions clearly and quickly.
Will peel and stick tile fall off if walls are textured?
Wondering whether peel-and-stick tile will stay put on textured walls? You might see reduced adhesion on heavily textured or uneven surfaces, increasing the risk of tiles peeling at edges.
Lightly textured walls often work if you clean, dry, and press tiles firmly, using a roller.
For best results, address deep texture or loose paint before installation to avoid failures.
Can I install peel and stick tile over painted texture?
If your walls have a painted texture, you can often install peel-and-stick tile, but success depends on the paint type and how rough the texture is.
You should clean and dry the surface thoroughly, test adhesion with a small sample, and avoid deeply popcorned or crumbly textures.
Smooth, well-adhered paint gives the best results; rough peaks reduce contact and holding power.
Do I need a primer before applying peel and stick tile?
Do you need a primer before applying peel-and-stick tile? You usually don’t need primer on smooth, clean surfaces, but textured or porous walls often benefit.
Primer improves adhesion, seals porous paint, and prevents peeling. Use a high-quality bonding primer if texture is absorbent or paint is glossy.
Always follow tile and primer manufacturer instructions for best results.
How long before I can grout or caulk after installation?
You can grout or caulk as soon as the adhesive has fully cured, which typically takes 24 to 72 hours depending on the product, temperature, and humidity; check the adhesive manufacturer’s cure time and feel a few tiles to verify they’re firmly set before proceeding.
Use compatible grout or silicone caulk, apply in thin, even beads, and wipe excess quickly to avoid staining the tile surface.
Can peel and stick tile be removed without damaging drywall?
Once the adhesive has cured and you’ve finished grouting or caulking, you’ll likely wonder whether peel-and-stick tile can come off without harming the drywall beneath.
You can usually remove tiles cleanly by warming adhesive with a hair dryer or heat gun, peeling slowly, and using a plastic scraper.
Any remaining residue comes off with adhesive remover; repair minor paper tears with joint compound and light sanding.