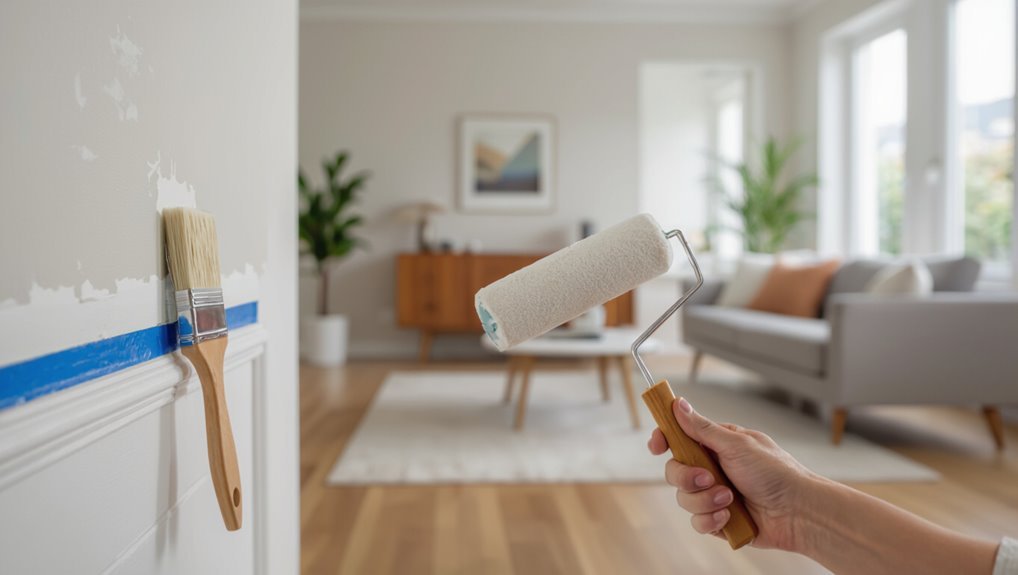
Do You Paint Skirting Before Walls? Proper Painting Order Explained
You can paint skirting first for the cleanest edges or do walls first for speed and forgiveness; both work if you prep well. Skirting-first gives crisp trim lines and cuts down on touch-ups but needs careful taping and protection. Walls-first lets you roll large areas fast and fix trim nicks afterward. Choose based on room layout, your patience, and skill level—keep surfaces clean, sanded, and primed—and keep going to learn which method fits you best.
How This Guide Helps You Choose Painting Order
This guide helps you pick the smartest painting order by focusing on efficiency, protection, and finish quality so you can avoid rework and accidental marks.
You’ll learn painting techniques that save time, protect skirting, and guarantee crisp edges.
It helps you plan prep, sequence tasks, and use color coordination to match trims and walls, reducing touch-ups and guaranteeing a professional result.
Quick Answer : Paint Skirting or Walls First?
Although you can paint either first, most pros recommend doing the skirting (baseboards) before the walls so you protect trim edges and get a cleaner finish with less taping and touch-up.
You’ll enjoy skirting benefits like crisp lines and easier touch-ups, while still gaining wall advantages such as faster roller coverage and color consistency.
Choose based on room complexity and your comfort level.
When Painting Skirting First Gives the Cleanest Result
When you paint skirting first, you lock in precise, sharp edges along the floor-line before rolling broad swaths of wall color that can blur or smudge those lines.
You’ll use careful skirting techniques — cutting in with angled brushes and steady tape — ensuring clean shifts.
That control improves overall painting aesthetics, reducing touch-ups and preserving crisp, professional-looking borders you’ll appreciate.
When Painting Walls First Is Faster and More Forgiving
If you want speed, paint the walls first — rollers cover large areas quickly so you’ll finish the bulk of the work fast.
You can then cut in around the skirting and touch up any stray marks without redoing whole sections.
That approach is more forgiving if you nick the trim, since skirting can be fixed after the walls are done.
Faster Coverage With Rollers
Grab a 9-inch roller and you’ll cover a room far faster than with a brush alone — rolling lays down paint evenly, hides brush marks, and lets you finish large wall areas before tackling trim.
Use proper roller techniques: load the nap, work in W motions, maintain a wet edge.
These coverage tips speed the job and tolerate minor overlap onto skirting without fuss.
Easier Touch-Up Around Trim
Because painting the walls first gives you broad, even coverage, touching up along the skirting becomes quicker and less stressful— you’ll spot drips or edges, then fix them cleanly without masking everything.
Use smart skirting techniques and coordinate with your trim colors.
- Feather edges with a small brush.
- Clean overlap lines promptly.
- Match sheen and trim colors precisely.
How the Room’s Condition Should Guide Your Choice
When you’re deciding whether to paint skirting boards and walls the same color or contrast them, let the room’s condition steer your choice: salvage worn skirting with a durable, darker trim to hide scuffs, or brighten tired walls with a fresh, light coat while keeping trim neutral.
Do a quick room assessment, prioritize surface preparation, fix damage, then choose colors that suit wear and lighting.
How Painter’s Tape Affects Your Decision
When you plan your taping, think about timing—apply tape to clean, dry surfaces and wait for the primer or base coat to cure as recommended.
Use simple adhesion tricks like pressing the edge down firmly or heating stubborn spots with a hair dryer to prevent bleed-through.
Remember that painting over tape can seal paint to the tape and cause peeling, so weigh the risk before deciding to leave it in place.
Tape Placement Timing
If you want crisp lines without wasted time, plan your tape placement around the sequence of cutting-in, rolling, and trim painting.
You’ll choose tape types based on paint and surface; schedule taping after primer but before rolling; remove tape at the right paint tack.
Follow this simple order:
- Tape along skirting before cutting-in.
- Tape windows/doors after trim prime.
- Remove tape during tacky stage.
Tape Adhesion Tricks
Because tape adhesion determines whether you get razor-sharp edges or ripped paint, pick and test your tape based on surface texture, paint type, and how long it’ll stay stuck.
You’ll compare tape types and adhesive strength, practice tape application for edge sealing, confirm surface compatibility, and plan tape removal to guarantee clean lines and effective paint prevention without damaging skirting or freshly painted walls.
Paint-Over Tape Risks
Pulling tape off later is as important as sticking it on, since paint-over tape can make or break your finish.
You’ll weigh risks: trapped paint worsens paint adhesion and quick removal prevents tape damage.
Consider timing and angle when peeling. Choose tape quality and test small areas to avoid lifting skirting or leaving residue.
- Peel at 45° immediately
- Replace cheap tape
- Test adhesion first
Tools You Need for Skirting or Wall‑First Approaches
You’ll need a handful of reliable tools to get clean, efficient results whether you paint skirting first or tackle the walls before the trim.
Pack angled brushes, small rollers, quality painter’s tape, drop cloths, and a trim edger.
Include a sanding block, caulk gun, and steady ladder.
Choose tools that support precise painting techniques and seamless color coordination.
Prep Skirting to Avoid Bleed and Drips
Before you start painting, mask and tape the floor and wall edges tightly so paint can’t wander where it shouldn’t.
Sand and clean the skirting to remove grime and give primer something to grip.
Finally, seal joints and gaps with caulk or primer to stop bleed and drips before you load the brush.
Masking And Taping Techniques
Want crisp lines and zero drips where skirting meets wall? Use proper masking techniques and precise tape applications to protect surfaces and guide your brush.
Follow these quick steps:
- Clean edge, apply high‑adhesion painter’s tape along the skirting.
- Press tape firmly, seal with a plastic card to prevent bleed.
- Remove tape while paint’s tacky for sharp, drip‑free edges.
Sanding And Cleaning Prep
1 step you can’t skip: sanding and cleaning the skirting so paint sticks and won’t bleed.
You should use gentle sanding techniques—120–150 grit—to dull gloss and smooth edges.
Wipe dust with a tack cloth, then apply mild cleaning solutions (soapy water or trisodium phosphate substitute) to remove grease.
Let fully dry before priming or painting to prevent drips and poor adhesion.
Sealing Edges To Prevent Bleed
When you’re prepping skirting to stop paint bleed and drips, sealing the joint between the skirting and wall is the key step that saves time and keeps edges crisp.
You’ll use caulk or painter’s tape for effective bleed prevention and edge sealing; work in short sections and smooth immediately.
- Caulk gaps
- Tape edges
- Inspect seams
Prep Walls to Protect Skirting and Save Time
Before you touch a brush, protect the skirting by masking and clearing the wall surface so you won’t waste time fixing drips or repainting baseboards later.
You’ll prep walls for wall protection and skirting maintenance, ensuring surface readiness and paint consistency.
Prioritize prep efficiency and job organization to get time savings, minimize errors, and simplify cleanup strategies for a smooth, professional result.
Step‑by‑Step: Paint Skirting Before Walls
Start by prepping the skirting with filler, sanding, and primer so you have a clean base.
Paint the skirting first to avoid drips and to make wall taping easier.
Once the skirting’s dry, you can confidently paint the walls without worrying about edges.
Prep Skirting First
Gather your tools and clear the area, because prepping skirting properly sets the foundation for a clean, professional finish when you paint skirting before walls.
You’ll inspect skirting materials, sand rough spots, and fill gaps for smooth paint adhesion. Choose compatible paint finishes and allow proper drying between steps.
- Clean and sand
- Fill and caulk
- Prime compatible surfaces
Paint Walls After
With the skirting dry and protected, move on to painting the walls using controlled, systematic strokes so you don’t damage the trim work you just finished.
Start by confirming wall preparation—clean, sand, and prime as needed.
Use an angled brush for edges, then roll in sections, blending into the trim.
Employ skirting techniques like feathered edges and tape removal while paint’s still tacky.
Step‑by‑Step: Paint Walls Before Skirting
Begin by protecting the floor and adjoining skirting with drop cloths and painter’s tape so you can work confidently up the wall without worrying about splashes or drips.
Protect floors and skirting with drop cloths and painter’s tape before painting to prevent splashes and drips.
Clean and prime surfaces, choose compatible wall finishes, and let each coat dry fully before moving on.
Apply skirting techniques after walls dry to avoid smudges.
- Prep
- Paint
- Finish
Cutting‑In vs Rolling: Which to Use Where
After the walls are dry and protected, you’ll choose between cutting‑in and rolling for different areas: cutting‑in with a brush gives crisp edges along skirting, corners, and around trim, while a roller covers large flat surfaces quickly and evenly.
Use cutting techniques for precision at junctions and tight spots; use rolling advantages for speed and uniform coverage on expanses. Match tools to task for clean results.
Best Paints and Sheens for Skirting and Walls
You’ll want to pick paints that balance looks with durability—washable acrylics or water-based enamels work well on both skirting and walls.
Choose sheens based on function: eggshell or low-sheen satin for walls, and semi-gloss for skirting to resist scuffs and make cleaning easier.
Also consider maintenance: higher-sheen trims hide marks from cleaning better, while lower sheens hide surface imperfections on walls.
Best Paint Types
Choosing the right paint and sheen makes a bigger difference than you might think: it affects durability, washability, and the final look of both skirting (baseboards) and walls.
You’ll prefer different types for function and style.
- Acrylic latex — durable, easy clean.
- Eggshell or satin sheen — forgiving on walls.
- Semi-gloss for skirting — tough, wipeable.
Recommended Sheen Levels
Now that you’ve picked paint types, match each surface with the right sheen to get the look and durability you want.
For skirting, choose a semi-gloss for easy cleaning and subtle sheen; for walls, opt for eggshell or low-sheen matte to hide imperfections.
Your sheen selection balances appearance and finish durability, so pick based on traffic, light, and desired maintenance.
Durability And Maintenance
Because skirting takes more knocks and scuffs than walls, you should pick paints and sheens that stand up to wear without demanding constant touch-ups.
Consider durability factors and maintenance tips when choosing:
- Semi-gloss for skirting — easy wipe-clean, high abrasion resistance.
- Eggshell for walls — hides imperfections, moderate durability.
- Durable acrylic primers — boost adhesion and reduce future maintenance.
Choosing Trim Contrast and Complementary Colors
Want your skirting to pop or subtly blend? You’ll use color theory to decide: high-contrast trim highlights architectural lines, while complementary tones create cohesion and calm.
Consider room scale, natural light, and furniture to maintain design balance. Test swatches near skirting and view at different times.
Pick satin or semi-gloss for durability without overpowering the wall finish.
Drying Times and Timing Between Coats
When planning coats, remember that drying time depends on paint type, temperature, humidity, and film thickness.
When planning coats, factor in paint type, temperature, humidity, and film thickness to predict drying time.
So you should always check the manufacturer’s recommended recoat window and test a small area before proceeding.
You’ll adjust coat intervals based on drying times to avoid tackiness and guarantee even coverage.
- Wait full recoat window.
- Use tack tests.
- Allow longer in cool/humid conditions.
How to Fix Paint Bleed on Skirting or Walls
If paint has bled under your tape or along a seam, act quickly to minimize staining and preserve crisp lines: assess the bleed, note paint bleed causes like improper tape adhesion or wet edges, then gently sand or scrape excess once dry.
Clean dust, apply appropriate primer, and repaint the affected area. For persistent issues consider caulk or repainting larger sections—this is fixing paintblems.
Quick Touch‑Ups for Crisp Edges
Although small chips and smudges can be annoying, you can restore crisp edges quickly with the right tools and a steady hand:
- Use a fine brush and minimal paint for targeted touch up techniques to avoid blobs.
- Feather paint outward from the defect for smooth blending and maintained edge precision.
- Wipe excess immediately and sand tiny ridges once dry to keep lines clean and consistent.
Use Edging Tools and Shields Effectively
Pick an edger that matches your trim profile and paint type so you get smooth, even coverage without extra passes.
Use a shield or tape guide to protect the wall or skirting while you run the edger along the joint.
With the right tools and steady technique, you’ll get precise, clean lines every time.
Choose The Right Edger
Tools matter: choosing the right edger or shield makes clean lines faster and keeps paint off trim, so consider blade type, size, and whether you want a manual edger, a rolling edger, or a magnetic/foam shield.
You’ll pick based on surface, control, and speed. Use proper edger types for precise paint application.
- Manual edger — control
- Rolling edger — speed
- Foam/magnetic — smooth edges
Use Shields For Precision
Once you’ve chosen the right edger, adding a shield lets you paint tight to skirting with confidence and speed.
Use shield techniques to block drips and steady your hand, aligning the tool against the trim. Move smoothly, reload sparingly, and inspect for gaps.
Tap off excess, feather strokes for precision edges, and clean the shield after each session to maintain crisp results.
When to Remove Painter’s Tape for the Cleanest Line
If you want razor‑sharp paint edges, the timing of tape removal matters more than you might think.
You’ll get clean edges by removing tape while paint is tacky but not wet, or after it’s fully cured for stubborn coats.
Don’t peel at a steep angle; pull slowly back on itself.
- After tacky set
- After full cure
- Slow, low angle pull
Painting Skirting Around Carpets, Sockets, and Trims
Now that you’ve mastered tape removal timing for clean edges, you’ll need a few different techniques when skirting meets carpets, sockets, and trims.
Use skirting techniques like angled brushes for tight joints, masking around sockets and removing plates before painting, and thin coats to avoid drips.
Lay down carpet protection tape or drop cloths, press edges firmly, and touch up seams after drying for neat results.
Save Time When Painting Several Rooms
When you’re tackling several rooms, plan the work so you group similar tasks—like cutting in, rolling, and trim work—so you repeat each action fewer times; that way you’ll move efficiently from room to room, keep tools and paint organized, and finish faster without sacrificing quality.
Use these time saving techniques during room preparation:
- Prep all rooms at once.
- Batch identical tasks.
- Stage tools and paint centrally.
Mistakes That Make Skirting Look Messy (And How to Avoid Them)
Because skirting sits at eye level and frames the room, small mistakes draw attention fast; you’ll want clean lines and smooth finishes to keep it looking sharp.
Avoid drips, uneven brush strokes, and poor prep. Choose skirting colors that hide scuffs, sand and prime before painting, and use steady painting techniques—sharp tape, small angled brushes, and thin coats—to prevent messy edges and blotches.
Cost and Effort: Skirting‑First vs Wall‑First Compared
If you paint skirting before walls, you’ll spend more time taping and protecting trim but save on touch-ups.
Painting walls first cuts prep work around the floorboard edges but risks more careful edging and potential scuff repairs to the skirting.
Balance cost comparison and effort analysis when choosing.
- Tape and prep: higher upfront effort.
- Touch-ups: lower material cost if skirting first.
- Edging: saves prep time but may raise repair effort.
Which Approach Suits Different Skill Levels
Although your experience level will shape the best order, choosing skirting-first suits beginners who want cleaner edges with fewer delicate brush skills.
In contrast, wall-first favors confident painters who move quickly and can cut crisp lines.
Match approach to your skill level: use beginner techniques like taping and small brushes to avoid mistakes.
Try advanced methods—edging tools, steady strokes—once you’ve overcome common challenges.
Final Inspection Checklist Before You Call It Done
Before you call the job done, walk the room with a checklist so you catch small issues that become big annoyances later.
You’ll perform a final inspection focused on touch-ups, edge crispness, and cleanup to guarantee quality assurance.
Follow this quick list:
- Check for missed spots and consistent coverage.
- Inspect skirting-to-wall edges for neat lines.
- Remove tape, clean drips, and tidy tools.
Frequently Asked Questions
Can I Use the Same Primer on Skirting and Walls?
Yes — you can often use the same skirting primer and wall primer if both surfaces are compatible; you’ll check substrate, stain-blocking needs, and manufacturer guidelines, and you’ll prep surfaces properly for consistent adhesion and finish.
How Do Pets Affect Paint Choice and Timing?
You’ll want pet-friendly paints to keep noses and paws safe, and plan timing considerations around pets’ routines; paint when they’re out or secluded, use low-VOC options, and allow thorough curing before reintroducing them.
Is Undercoating Necessary for MDF Skirting Boards?
Yes—you should undercoat MDF skirting; it seals the surface, highlights MDF benefits, prevents swelling, and guarantees paint adhesion. You’ll improve skirting durability and get a smoother, longer-lasting finish that resists chips and wear.
Can Heated Rooms Speed up Curing Safely?
Yes — you can speed curing time by warming the room, but don’t overdo it; heat effects can thin finishes, cause tackiness or cracking. You’ll shorten curing time safely by using moderate, consistent warmth and ventilation.
How to Repaint Without Removing Radiators?
You can repaint without removing radiators by using radiator cover options, masking and taping carefully, and employing paint application techniques like spray, small brushes, and rollers for tight spots; work when the radiator’s cool and ventilate the room.
Conclusion
You’ll often choose skirting-first for the cleanest crisp line, and walls-first when speed and forgiveness matter—so you’ll pick the method that matches the room and your patience. If the floor’s tidy you’ll lean skirting-first; if walls need patching you’ll grab rollers first. Coincidentally, the smarter prep you do, the easier the paintwork looks; the neater your tape, caulk, and sanding, the fewer touch-ups you’ll need. Then step back and inspect.