How to Get Acrylic Paint Off Clothes: Quick and Proven Techniques
You can remove acrylic paint quickly by scraping off excess, blotting fresh spills, then rinsing under cold water and working in dish soap; for dried paint, soak in warm water, gently scrub with detergent, and use isopropyl alcohol or acetone spot-tested first. Blot from the back to lift pigment, protect delicate fabrics, and air-dry until the stain’s gone. Follow these steps and you’ll often save the garment, and a few extra tips will help with tougher or delicate items.
Quick Steps to Remove Acrylic Paint Now
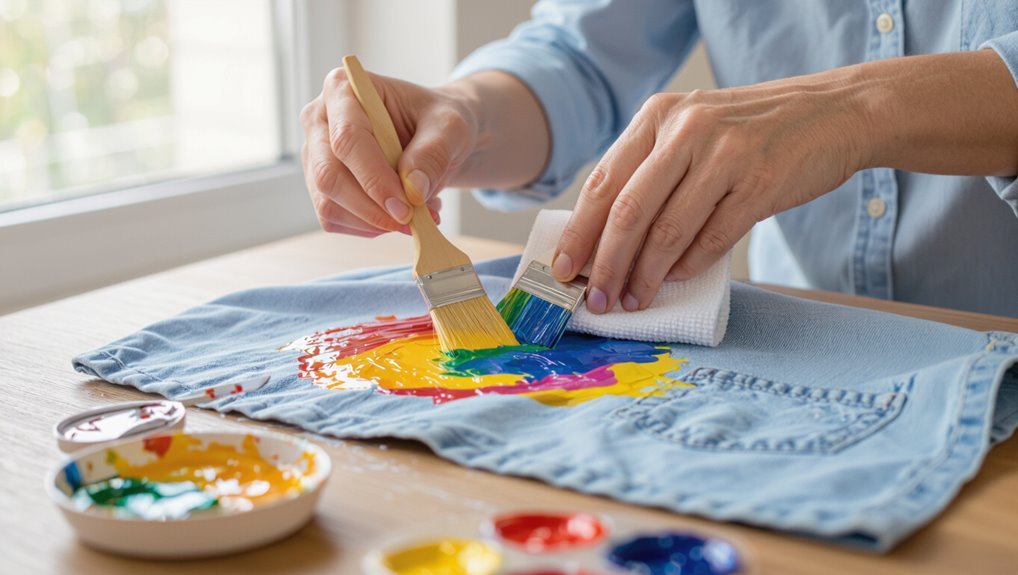
Act fast: scrape off excess wet paint with a blunt edge, blot fresh stains with a clean cloth, and rinse the area under cold running water to push pigment out of the fibers before it sets.
Then pretreat with liquid detergent, gently rub, and launder promptly.
You’ll follow paint removal tips that protect color and fabric care advice to avoid heat and rubbing that can set the stain.
How To Use This Guide: Fast vs. Deep-Clean Paths
Choose the path that matches your time and the stain’s stage: use the fast path for fresh spills when you can treat immediately, and switch to the deep-clean path for dried or stubborn stains that need soaking, solvents, or repeated treatments.
You’ll follow fast removal steps for quick action or a deep cleaning sequence when paint’s set. Pick one, follow steps, and check results before repeating.
Tools and Household Items to Have on Hand
You’ll want a few essential tools—like a soft brush, plastic scraper, clean cloths, and a small bowl—for effective spot treatment.
Keep common household solvents on hand too, such as rubbing alcohol, dish soap, and acetone (nail polish remover) for tougher spots.
I’ll explain when and how to use each so you can pick the safest option for your fabric.
Essential Cleaning Tools
A few key tools will make removing acrylic paint from clothes faster and less risky: a clean cloth or paper towels, a dull knife or spoon for scraping, rubbing alcohol or acetone, liquid dish soap, laundry detergent, a soft-bristled brush (like an old toothbrush), and a stain remover or oxygen bleach for follow-up.
| Tool | Purpose | Tip |
|---|---|---|
| Cloths | Blot | fabric care |
| Knife/Spoon | Scrape | tool selection |
| Soap/Detergent | Clean | stain prevention |
Common Household Solvents
Keep these five common household solvents on hand so you can tackle acrylic paint quick: rubbing alcohol (isopropyl), acetone or nail polish remover, hydrogen peroxide, white vinegar, and an enzyme-based laundry presoak.
You’ll test solvent effectiveness and compare household alternatives for spot treatment.
Carry:
- Isopropyl alcohol
- Acetone/nail polish remover
- White vinegar
- Enzyme laundry presoak
How To Test Fabric for Treatment Safety
Before applying any solvent or stain remover, test a hidden area of the garment to make sure the treatment won’t damage the fabric or color.
Dampen a cloth, apply your chosen cleaner, blot, then wait for full drying.
Check fabric compatibility and paint adhesion changes; if color bleeds, fibers weaken, or paint softens unpredictably, don’t proceed and try a gentler option or professional help.
Immediate Actions for Fresh Acrylic Paint Spills
If you catch acrylic paint on your clothes, act fast and blot the excess with a clean cloth to avoid spreading it.
Hold the stained area under cold running water to flush out as much pigment as you can.
Then gently work a drop of dish soap into the spot and rinse until the paint starts to lift.
Act Quickly And Blot
When acrylic paint lands on your clothes, act fast and blot — don’t rub — to lift as much wet paint as you can without pushing it deeper into the fabric.
You’ll improve stain prevention and protect fabric care routines.
Then follow these quick steps:
- Use a clean, absorbent cloth
- Blot from edges inward
- Replace soaked cloths promptly
- Avoid pressing paint deeper
Rinse Under Cold Water
Right after blotting, hold the stained area under a steady stream of cold water to flush out as much paint as possible; run the water from the back of the fabric so the paint pushes outward, not deeper into the fibers.
Use cold water benefits by preventing set-in stains and diluting pigment.
Employ focused rinse techniques—gentle pressure, short bursts—until excess paint thins and exits the fabric.
Apply Dish Soap Gently
Gently work a few drops of dish soap into the stained area with your fingers, massaging from the fabric’s back toward the front to lift diluted acrylic without pushing it deeper.
You’ll see dish soap effectiveness quickly as paint beads and loosens. Use this cleaning method, then rinse.
- Blot, don’t rub
- Use cool water
- Repeat if needed
- Air dry flat
Why You Should Act Before Paint Dries
Because acrylic binds to fabric as it dries, you need to treat stains while the paint is still wet—cleaning becomes much harder once the polymer film sets. You should act fast; paint drying demands a quick response to prevent permanent bonding. Prompt action preserves fibers and saves time.
| Tip | Benefit |
|---|---|
| Act immediately | Less penetration |
| Use cool water | Prevents setting |
| Avoid heat | Stops bonding |
| Gentle lift | Protects fabric |
| Repeat check | Ensures removal |
Blotting and Scraping Wet Paint: Step-By-Step
Start by removing as much wet paint as you can: use a clean cloth or paper towel to blot upward—never rub—lifting excess color from the fabric.
If paint has pooled, carefully scrape the surface with a dull knife or a plastic scraper to avoid pushing pigment deeper into the fibers.
- Use gentle blotting techniques for delicate fabric types
- Test scraping methods on seams
- Work outward from the stain edge
- Change cloths often for effective paint removal and fabric care
How To Rinse and Lift Fresh Paint With Cold Water
After you’ve blotted and scraped away the bulk of the paint, hold the stained area under cold running water with the fabric’s back facing the stream so water pushes the paint out of the fibers, not further in.
Gently rub fibers together while rinsing, letting cold water methods lift loosened paint.
Repeat rinsing and blotting; these fresh paint techniques minimize staining before you treat remaining residue.
Use Dish Soap to Break Down Fresh Acrylic Paint
Apply a few drops of a grease-cutting dish soap to the damp stain and gently work it into the fabric with your fingers or a soft brush; the surfactants in the soap will break up the acrylic binder and help lift pigment from the fibers.
Let sit, rinse, repeat. Consider dish soap effectiveness and paint removal alternatives.
- Agitate gently
- Blot, don’t rub
- Rinse cold
- Launder promptly
Use Rubbing Alcohol on Wet Stains
Grab some rubbing alcohol (isopropyl alcohol, 70% or higher) and dab it onto the fresh acrylic stain with a clean cloth or cotton ball; the solvent will dissolve the paint binder and loosen pigment so it lifts from the fibers.
Blot gently, work from edges inward, and repeat until transfer slows.
Rinse, launder promptly, and air-dry to confirm paint stains are gone.
Treating Partially Dried Acrylic Paint
Work on the stain as soon as you notice it starting to set: partially dried acrylic is firmer than fresh paint but still soft enough to soften with solvents and agitation.
You’ll counter common paint removal myths by respecting acrylic paint properties.
Try steps below, testing first on a hidden seam:
- Blot excess gently
- Apply isopropyl alcohol
- Agitate with soft brush
- Rinse and repeat until lifted
Soften Dried Paint With Warm Water and Soap
If the paint has already dried hard, don’t give up—warm water and soap can help rehydrate and loosen the film.
Soak the stained area in warm water, then apply a mild detergent and gently rub with a soft brush or cloth.
Repeat soaking and agitation until paint softens. These softening techniques reduce flaking and make subsequent removal or laundering more effective.
How To Use Isopropyl Alcohol on Dried Acrylic Stains
Start by placing the stained area face down on a clean towel and testing isopropyl alcohol on an inconspicuous spot to check colorfastness.
Apply a small amount of rubbing alcohol to the back of the stain and blot with a clean cloth until paint lifts, revitalizing the cloth as it picks up color.
Rinse the area with cold water and launder as usual once the stain has faded.
Preparing The Stain
1 simple solvent you’ll reach for on dried acrylic is isopropyl alcohol, which loosens the film so it can be lifted without excessive scrubbing.
Prep steps depend on stain prevention thinking and fabric types—test first.
- Check care label
- Blot excess paint gently
- Test alcohol on hidden seam
- Protect surrounding area
Applying Rubbing Alcohol
With the spot tested and excess paint blotted away, you’re ready to apply rubbing alcohol to lift dried acrylic.
Saturate a cotton pad, press briefly, then blot—don’t rub—to avoid spreading.
Rubbing alcohol benefits include breaking acrylic binders so acrylic paint effectiveness as a permanent coating is reduced.
Repeat until softened, rinse, then launder.
Test fabric colorfastness first and ventilate the area.
Applying Acetone or Nail Polish Remover Without Damage
Acetone (or acetone-based nail polish remover) can dissolve dried acrylic paint quickly, but you’ll need to use it carefully to avoid damaging fabric or finishes—test an inconspicuous spot first, work in a well-ventilated area, and protect surrounding skin and surfaces.
Follow precise acetone application steps and nail polish removal tips:
- Blot excess paint; don’t rub.
- Apply acetone sparingly with cotton.
- Rinse and launder promptly.
- Repeat if needed, testing fabric each time.
Use Vinegar and Baking Soda for Stubborn Acrylic Spots
If a spot won’t budge, heat some white vinegar until it’s warm and blot it onto the stain to loosen the paint.
Then make a paste from baking soda and a little water, rub it gently into the area, and let it sit for a few minutes.
Rinse and repeat as needed before laundering.
Heat White Vinegar
Heat plain white vinegar until it’s warm but not boiling, then apply it to the acrylic stain to help soften the paint.
You’ll use vinegar benefits and a careful heat application to loosen pigments before blotting. Work gently, repeat if needed, then launder.
- Warm, not hot
- Blot don’t rub
- Test fabric first
- Rinse thoroughly
Baking Soda Paste
Make a thick paste by mixing baking soda with a little warmed white vinegar until it forms spreadable cream; then apply it directly to stubborn acrylic spots to help lift softened pigment from the fibers.
Rub gently with a soft brush, let sit 10–15 minutes, then rinse.
Repeat as needed, laundering afterward. This baking soda method boosts paint removal on washable fabrics.
How To Use Commercial Paint Removers on Clothing
When commercial paint removers are your best option, pick a product formulated for fabric or labeled safe for clothing and test it on a hidden seam first to check colorfastness and fabric integrity.
Focus on commercial remover effectiveness and observe safety precautions.
Then:
- Ventilate the area and wear gloves
- Apply sparingly with a cloth
- Blot, don’t rub
- Rinse and launder promptly
Choosing the Right Stain Remover for Your Fabric Type
After trying a commercial remover, you’ll want to match the stain treatment to the fabric — not every product suits every material.
Check labels for fabric compatibility: delicate fibers need enzyme-free or gentle solvent options, while sturdy cotton tolerates stronger removers.
Check fabric labels — choose enzyme-free or gentle solvents for delicates; cotton can handle stronger removers.
Test an inconspicuous spot, follow product instructions, and prioritize colorfastness.
Choose a remover formulated for acrylic paint and your specific fabric.
How To Safely Use Laundry Pre-Treatments and Stain Sticks
Before you launder the item, apply a pre-treatment or stain stick directly to the acrylic spot and let it sit for the time specified on the product label so the solvent or enzymes can penetrate the dried film.
Use laundry pre treatments benefits smartly and follow stain stick application steps:
- Test fabric in an inconspicuous spot
- Blot, don’t rub
- Follow label timing
- Launder as directed
When Soaking Helps: Methods and Timings
You’ll want to soak when paint is still wet or has only just set, since older, cured acrylic is much harder to remove.
Compare soak solutions — cold water for fresh splatters, diluted dish soap or oxygen bleach for semi-set stains, and commercial paint removers only for stubborn, colorfast fabrics.
Timing matters: a quick 15–30 minute soak can lift recent stains, while tougher spots may need several hours or an overnight soak.
When To Soak
Soak when paint is still wet and hasn’t fully bonded to the fabric or when a thick, dried layer sits on the surface that you can loosen without rubbing harshly.
You’ll consider soaking duration and choose appropriate soaking solutions based on fabric care labels.
Try these quick checks:
- Test a hidden seam first
- Remove excess paint gently
- Start with short soaks
- Reassess before longer soaks
Soaking Solutions Compared
When the paint’s still tacky or you’ve loosened a dried patch, pick a soaking solution that matches the fabric and paint type: cold water and mild detergent work for fresh, water-based acrylic; rubbing alcohol or an alcohol-based hand sanitizer helps break up semi-dry acrylic on sturdy fabrics; and commercial paint removers or a diluted enzymatic cleaner suit stubborn, thick stains—always test a hidden seam first and limit soak times per the fabric’s care label.
Choose soaking methods based on fabric safety, then compare effectiveness comparison and rinse promptly.
Timing For Different Paints
Although timing varies by paint formulation and fabric, acting quickly gives you the best chance of removing acrylic without damaging the garment.
You’ll tailor soaking to wet vs. set stains; monitor acrylic paint drying to decide. For effective paint cleanup timing, try:
- Fresh drips: rinse immediately
- Partially set: 30–60 minute soak
- Dried spots: overnight with solvent
- Sensitive fabric: brief targeted soak
Use a Toothbrush to Lift Paint From Fibers
Gently scrub the stained area with a soft-bristled toothbrush to lift acrylic paint from the fabric fibers without damaging the cloth.
Gently scrub stains with a soft-bristled toothbrush to lift acrylic paint without harming fabric fibers.
Use a gentle toothbrush technique, working from edges toward the center, and blot loosened pigment with a clean cloth.
Rinse frequently, reapply mild detergent or rubbing alcohol as needed, and repeat until paint lifting slows.
Finish by laundering per garment care instructions.
Heat-Setting Mistakes to Avoid With Acrylic Paint Stains
If you try to fix an acrylic paint stain with heat too soon or in the wrong way, you’ll set the pigment and make removal much harder.
You should know heat setting pitfalls and clear acrylic paint misconceptions to avoid permanent damage.
- Don’t iron before paint is removed
- Avoid dryer heat on fresh stains
- Skip steam treatments
- Don’t assume heat fixes all stains
Machine Washing After Paint Removal: Best Practices
Once you’ve removed as much acrylic paint as possible by scraping, pre-treating, and rinsing, it’s time to use your washing machine—but do it carefully to avoid setting any remaining pigment. Use cold water, gentle cycle, and a heavy-duty detergent. Check pockets, separate stained items, and avoid heat until paint removal is confirmed.
| Step | Setting | Tip |
|---|---|---|
| 1 | Cold wash | Gentle cycle |
| 2 | Detergent | Pre-treat stain |
| 3 | Drying | Air dry |
How To Check If the Stain Is Gone Before Drying
Before you toss the garment in the dryer, inspect the stained area closely in good light and feel it for any raised texture that could mean paint remains.
Check stain visibility and do simple fabric testing:
- Hold fabric to light for translucence
- Press with a clean cloth for transfer
- Rub gently to detect texture
- Smell for chemical residue
What To Do If Paint Has Set After Multiple Washes
When paint has survived several washes and still clings to the fabric, don’t assume it’s hopeless—set paint can often be loosened with targeted treatments and some persistence. You’ll assess paint types, consider fabric sensitivity, and try stronger cleaning techniques noting drying time and removal effectiveness. Expect stain persistence after multiple washes; repeat treatments, scrape gently, and test solutions on hidden areas.
| Step | Action |
|---|---|
| 1 | Identify paint types |
| 2 | Test on hidden area |
| 3 | Apply targeted remover |
| 4 | Rinse and repeat |
| 5 | Evaluate drying time and results |
Handling Acrylic Paint on Delicate Fabrics (Silk, Wool, Linen)
Although acrylic bonds quickly to natural fibers, you can usually lift fresh or partially set stains from silk, wool, and linen with careful, fabric-safe methods.
Although acrylic sets fast on natural fibers, fresh or partially set stains on silk, wool, and linen can often be gently lifted.
Use gentle techniques and colorfastness testing before treatment. Consider these steps:
- Blot excess, avoid rubbing to protect fabric types
- Test cleaning solution for colorfastness
- Use mild detergent and spot-clean
- Air-dry with gentle drying methods, follow fabric care instructions
Removing Acrylic Paint From Denim and Canvas
Denim and canvas handle spot treatment better than delicate fabrics, but you still need to act fast and be precise to avoid setting the paint.
Start by scraping off excess with a dull knife or spoon, then blot—don’t rub—to lift wet paint.
For dried stains, soften with warm water and dish soap, use denim techniques like gentle scrubbing, and apply targeted canvas strategies before laundering.
Treating Paint on Synthetic Fibers (Polyester, Nylon)
Synthetic fibers like polyester and nylon react differently to acrylic paint than natural fabrics, so you’ll need to adjust your approach.
You should work quickly, test compatibility, and avoid heat.
Key steps:
- Blot excess paint gently.
- Pre-treat with rubbing alcohol or dish soap.
- Rinse cold, repeat until fade.
- Air-dry, then launder checking paint compatibility first.
Tackling Multi-Color or Large-Area Paint Stains
When you’re faced with multicolor splatters or paint smeared across a large area, prioritize separating wet from dry sections and tackling the freshest, most concentrated spots first; that way you limit spread and make subsequent cleaning steps more effective.
Use multi color techniques: blot layered hues, treat each pigment separately, and apply targeted solvent only where needed.
For large area strategies, work outward and rinse thoroughly.
Emergency Fixes When You’re Away From Home
If you’re out and about and notice a fresh acrylic smudge, act fast to keep it from setting—start by gently blotting excess paint with a clean cloth or paper towel so you don’t push pigment deeper.
Carry an emergency kit and use these travel tips:
- Blot, don’t rub
- Dab with rubbing alcohol sparingly
- Scrape dried bits gently
- Rinse under cold water when possible
How To Remove Paint From Pockets, Seams, and Linings
Start by inspecting pockets, seams, and linings closely so you know how deep the paint has penetrated and whether any fabric is fragile.
Use a targeted loosening method—like a cotton swab with solvent or a soft-bristled brush—to work the stain without spreading it.
Protect adjacent seams and linings with tape or a barrier cloth to prevent solvent damage and further staining.
Inspect And Prepare Area
Before you tackle visible stains, check pockets, seams, and linings for hidden paint so you don’t spread it during cleaning. You’ll save time and protect fabric care routines.
Inspect under bright light, turn seams outward, and empty pockets.
Then:
- Shake out debris
- Blot loose paint gently
- Isolate the garment
- Protect your workspace for stain prevention
Targeted Stain Loosening
Now that you’ve inspected pockets, seams, and linings, focus on loosening paint that’s tucked into those tight areas where scrubbing might spread the stain.
Use a blunt tool to lift dried paint, dampen with solvent-safe remover, and blot gently from the reverse.
Work in small sections, follow fabric care tips, and apply stain prevention techniques like immediate treatment to avoid permanent set-in marks.
Protect Seams And Linings
When paint hides in pockets, seams, or linings, you’ll need a careful, targeted approach to avoid spreading it or damaging delicate stitching. Protect seams and prioritize lining preservation by working from the fabric back to the stain.
Use small, gentle motions and test solvents first.
- Work inside-out for seam protection
- Blot, don’t scrub
- Use cotton swabs for precision
- Rinse and air-dry for lining preservation
Protecting Garment Trims, Buttons, and Hardware
If you want to keep trims, buttons, and hardware looking new while removing acrylic paint, take a few simple protective steps first: use gentle fabric care, targeted stain prevention, trim protection, button safety, and basic hardware maintenance to suit fabric types and prolong garment longevity.
| Trim | Button | Hardware |
|---|---|---|
| Tape | Cover | Wrap |
| Cloth | Cap | Polish |
| Seal | Remove | Secure |
Using Professional Dry Cleaning for Persistent Acrylic Stains
If the paint won’t budge, you should take the garment to a professional cleaner rather than risk damaging the fabric.
Ask the cleaner when acrylic stains are best handled professionally—especially for delicate fabrics, large spills, or old set-in paint.
They’ll assess the fabric, use appropriate solvents and techniques, and often pre-treat or spot-clean before full laundering.
When To Seek Professionals
Because some acrylic stains resist home treatments, you’ll want to bring stubborn or delicate garments to a professional dry cleaner rather than keep trying DIY fixes.
They’ll offer professional services and a careful stain assessment.
Consider seeking pros when:
- stains are old or set
- fabric is silk, wool, or labeled “dry clean only”
- you’ve tried solvents without success
- the item has high sentimental or monetary value
What Dry Cleaners Do
When you hand a stained garment to a dry cleaner, they’ll first inspect the fabric and test a small area to determine which solvent and process will remove the acrylic without damaging the material. You’ll benefit from professional dry cleaning techniques and stain removal expertise; they’ll pre-treat, select solvents, and monitor cycles to lift persistent acrylic without harming fibers.
| Step | Action | Purpose |
|---|---|---|
| 1 | Inspect | Identify fabric |
| 2 | Test | Check solvent |
| 3 | Pre-treat | Loosen paint |
| 4 | Clean | Remove stain |
| 5 | Finish | Restore texture |
When It’s Better To Accept the Stain or Repurpose the Item
Sometimes stains just won’t come clean, and it’s okay to move on.
You’ll weigh stain acceptance against time, cost, and attachment.
Consider item repurposing when repair isn’t worth it. Evaluate fabric, fit, and function, then choose one action:
- Keep for casual wear
- Use as painting/yard clothes
- Turn into rags
- Donate if wearable
Make a practical choice, not an emotional one.
How To Repaint or Restyle Stained Clothing Intentionally
If you’re ready to embrace the stain, repainting or restyling lets you turn a mishap into a deliberate design—start by deciding whether you want a bold new pattern, subtle touch-ups, or a complete makeover.
Choose colors that complement fabric, sketch layout, use fabric paints or dye, and test on a scrap.
For stained clothing transformation, plan placement, seal with heat, and enjoy a creative fabric redesign.
Preventing Acrylic Paint Stains During Projects
Because spills happen fast, take simple precautions before you start painting:
- Clear and protect surfaces for better workspace organization.
- Use palettes and secure lids to limit open paint.
- Keep damp cloths and solvents nearby for quick action.
- Assign a single, stable spot for brushes and cups to prevent tipping.
These paint prevention tips cut accidents and save clothing from stains.
Best Clothing to Wear for Messy Paint Work
Choose clothes you won’t mind ruining and that let you move freely: sturdy, older garments layered over a thin tee work best, plus a washable apron or smock for extra coverage.
For project preparation, focus on fabric selection—choose heavyweight cotton or denim—and use appropriate protective gear.
Consider apron types and paint smocks for mess management, color considerations, and easy cleanup strategies to minimize damage.
Quick Gear: Aprons, Drop Cloths, and Barriers That Work
A reliable apron, a heavy drop cloth, and a few well-placed barriers will save you time and stress when acrylic paint’s involved.
Choose apron materials and paint resistant fabrics for stain prevention, plan project preparation, and keep workspace organization tight.
Use drop cloths and barrier types suited to surfaces. Cleanup strategies matter.
- Waterproof apron
- Canvas drop cloth
- Portable barriers
- Surface tape
Clean Paint From Brushes and Tools So Clothes Stay Paint-Free
Rinse brushes and tools immediately after use to stop acrylic from hardening and transferring to your clothes.
If water won’t cut it, switch to the appropriate solvent—mild soap and water for water-based paints, or a brush cleaner/solvent for tougher residues.
Keep a dedicated sink or container for cleaning so paint stays off your garments.
Rinse Brushes Immediately
Wash your brushes as soon as you’re done painting so dried acrylic won’t ruin the bristles or flake onto your clothes later.
Rinse under warm water, gently combing bristles to remove paint. Good brush care prevents transfers and eases acrylic removal from fibers.
Quick steps:
- Flush with water
- Work out paint at the ferrule
- Repeat until clear
- Reshape and air dry
Use Appropriate Solvents
If you let them sit, brushes and tools can transfer sticky acrylic onto your clothes, so use the right solvents to fully clean them after each session.
Choose mild cleaners first, follow solvent safety guidelines, and work in a ventilated area.
For less toxic choices, try eco friendly options like biodegradable brush soap or plant-based cleaners, rinsing thoroughly to prevent transfer.
Eco-Friendly Stain Removal Options and Safety Tips
Because you’ll want to protect both your clothes and the planet, choose biodegradable, non-toxic cleaners and simple household items like white vinegar, baking soda, and castile soap to tackle acrylic paint stains. They break down residues without harsh chemicals, are safe to use on most fabrics, and minimize environmental impact when disposed of properly.
- Use eco friendly methods first
- Test fabric in a hidden spot
- Rinse thoroughly after treatment
- Wear gloves for skin safety
Common Mistakes That Make Acrylic Stains Worse
After trying gentle, eco-friendly remedies, watch out for actions that can actually set acrylic stains permanently.
Don’t rub vigorously, use hot water, or toss stained clothes into the dryer before treating—they lock paint in. Avoid mixing solvents without guidance and waiting too long to act.
Follow stain prevention tips, respect acrylic paint characteristics, and treat spills promptly to improve removal success.
How Fabric Type Affects Your Removal Strategy
Which fabric you’re working with changes what methods will work and how gentle you need to be.
Check the care label for fiber content and washing instructions before you start treating the stain. That info guides whether you can use solvents, vigorous scrubbing, or only mild detergent and cool water.
Fabric Fiber Matters
Different fibers react very differently to acrylic paint, so you’ll need to adjust your removal method based on the fabric.
You should consider fiber content and stain durability before treating a spot.
Check fiber behavior:
- Cotton: absorbent, easier when wet
- Polyester: resists stains, needs solvents
- Wool/silk: delicate, blot gently
- Fabric blends: vary, test first
Care Label Guidance
Because your garment’s care label spells out its fiber content and washing limits, you’ll want to read it before you start treating an acrylic paint stain.
Check fabric care instructions and label symbols to confirm water temperature, bleach allowance, and drying methods.
For delicate fibers (silk, wool) use gentle solvent-based spot removal or professional cleaning.
For sturdy cottons, pre-treat and launder as allowed.
Checklist: Step Sequence for the Fastest Acrylic Paint Removal
Start by evaluating the stain—identify whether the paint is wet or dried, how much fabric is affected, and what the garment’s care label allows—so you can choose the quickest, safest removal method.
Start by assessing the paint—wet or dry, coverage, and care label—then choose the safest removal method.
Use stain prevention and fabric care principles as you act. Then follow this checklist:
- Blot or scrape excess
- Pre-treat with appropriate solvent
- Rinse and launder promptly
- Inspect before drying
How Long To Wait Before Declaring a Stain Permanent
First check what kind of acrylic paint you’re dealing with—student, heavy-body, or permanent markers dry differently.
Then consider how long the stain’s been drying; fresh spills are far easier to lift than ones left for days.
Finally, test a hidden fabric area to see how the material reacts before you call the stain permanent.
Check Paint Type First
Before you decide a stain’s permanent, identify whether the acrylic on your clothes is water-based craft paint, fast-drying artist paint, or industrial acrylic—each behaves differently and needs a different wait-and-treat approach.
Consider paint characteristics to set treatment priority based on paint viscosity, paint formulation, color properties, fabric interaction, stain severity, and drying time.
- water-based craft
- artist/fast-dry
- industrial acrylic
- mixed/unknown
Evaluate Drying Time
When acrylic lands on fabric, how long you wait matters: assess drying factors like humidity, temperature, and airflow.
Thicker paint consistency dries slower; thin washes set fast.
Start treatment while still tacky for best removal; once fully cured—usually 24–72 hours depending on conditions—stain becomes much harder.
If unsure, test a small area quickly rather than assuming permanence.
Test Fabric Reaction
Although you can often tell by feel and sight, wait and observe the fabric’s reaction to initial treatments before calling a stain permanent:
- Check fabric types — cotton, synthetics, blends react differently.
- Note paint consistency — thin vs. thick affects absorption.
- Reapply solvent tests in an inconspicuous spot and wait 10–30 minutes.
- If color or texture changes after drying, consider the stain permanent and stop further treatment.
Resources and Product Recommendations for Tough Acrylic Stains
If you’re facing a stubborn acrylic stain that won’t budge, a few targeted products and reliable resources can save the garment — and your time.
Check fabric care labels, assess fabric compatibility and paint types, then use specialized removers or eco friendly products.
Consult colorfast testing guides, stain prevention tips, and trusted how‑to sites to debunk cleaning myths and choose the right treatment.
Frequently Asked Questions
Can Acrylic Paint Be Removed From Leather or Suede Garments?
Yes — you can often remove acrylic paint from leather or suede, but results vary. You’ll use paint removal techniques like gentle scraping, alcohol or leather cleaner, then follow leather care steps to condition and protect the material.
Will Hair Dryer Heat Help Lift Stubborn Paint Without Setting It?
Yes — you can use a hair dryer cautiously: moderate heat application can soften paint and aid paint lifting, but don’t overheat or hold too close, or you’ll set the paint and damage the fabric.
Can Acrylic Paint Transfer in the Dryer After Partial Removal?
Yes — if paint’s still damp or partly loosened, it can cause paint transfer in the dryer; you should avoid hot dryer settings, use cool air or air-dry, and re-treat stains before tumbling to prevent spreading.
Are There Safe Methods for Removing Paint From Upholstery and Carpets?
Yes — you can tackle paint like a gentle storm: dab fresh spills, blot with mild detergent or rubbing alcohol per fabric types, test first, use stain prevention sprays, and call pros for delicate upholstery and stubborn set stains.
Can Enzyme-Based Laundry Detergents Break Down Acrylic Paint?
You generally won’t see enzyme-based detergents break down dried acrylic paint; they’re aimed at organic stains. For wet paint, they’ll help during laundering, but for paint removal and proper fabric care, use solvents or specialized treatments first.
Conclusion
Act fast — you’ve learned clear, tested steps to rescue clothes from acrylic paint. Did you know about 85% of stains can be removed if treated within the first hour? Use the quick path for fresh spills and the deep-clean path for set stains, always testing fabric first. Keep recommended tools handy and follow the checklist sequence. If a stain persists after thorough treatment, consider professional cleaning or repurposing the garment.