How to Get Dried Paint Off Hardwood Floors: Easy Cleaning Guide
You can remove dried paint from hardwood by first identifying the paint type and testing a hidden spot, then softening the spot with warm soapy water, a hair dryer, or a mild solvent and gently lifting with a plastic scraper or putty knife; for latex try rubbing alcohol or vinegar solutions, for oil-based use mineral spirits sparingly, then clean and dry, touch up finish if needed — follow safe scraping and solvent tests to avoid damage, and keep going to learn detailed steps and tips.
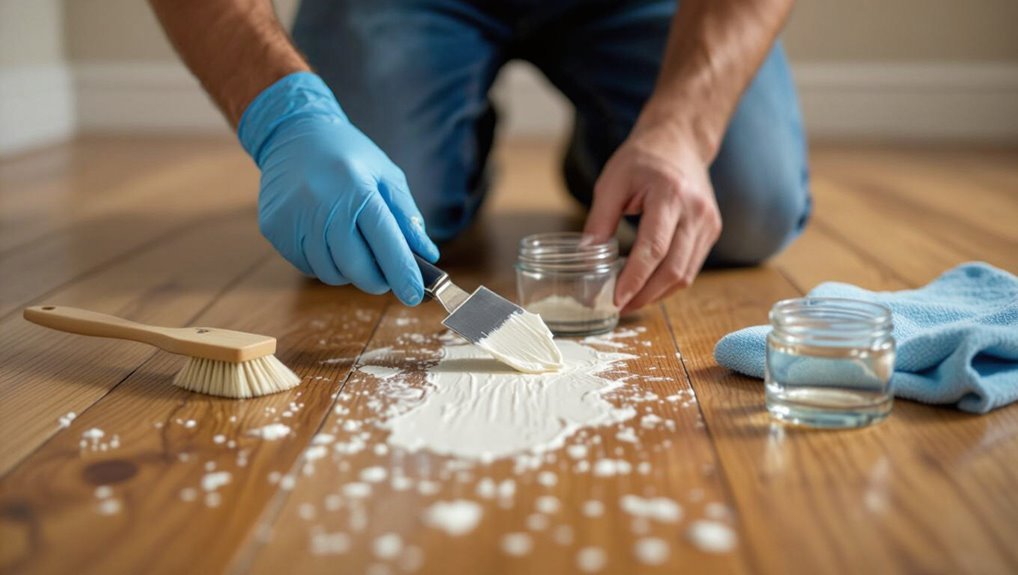
Quick Steps to Remove Dried Paint From Hardwood
Start by testing a small, hidden area to make sure your finish won’t strip or stain; then gather a plastic scraper, a soft cloth, mild solvent (like rubbing alcohol or a commercial paint remover rated for hardwood), warm water, and a gentle cleaner.
You’ll soften spots, gently scrape lifted paint, blot residue, rinse, and dry. Use paint removal techniques that prioritize hardwood care to avoid damage.
Tools and Supplies Checklist
Before you start scraping or spot-treating, gather the right tools and protective gear so you won’t interrupt the job to hunt for supplies.
You’ll need basic cleaning tools, gentle scrapers, and appropriate solvents plus rags and pads for testing and cleanup.
Wear gloves and eye protection, and make sure you have ventilation supplies or a respirator if you use strong solvents.
Essential Cleaning Tools
You’ll want a compact kit of reliable tools and supplies to remove dried paint without damaging hardwood: a plastic putty knife, soft-bristle brush, microfiber cloths, utility razor (used very carefully), rubbing alcohol or acetone (for small spots), a gentle commercial paint remover formulated for hardwood, fine steel wool (#0000) or fine-grit sanding sponge, gloves, safety glasses, and a bucket of warm, soapy water.
Include cleaning solutions and eco-friendly options, test small areas, and keep materials organized for efficient, careful work.
Protective Gear Needed
One simple kit of protective gear will keep you safe and protect the floor while you remove dried paint.
Wear protective gloves, safety goggles and a dust mask. Use knee pads and drop cloths to shield surfaces and your knees.
Position ventilation fans for airflow. Keep cleaning rags handy and a paint scraper nearby to lift stubborn spots safely and efficiently.
Solvent And Supplies
Gather a compact set of solvents and tools so you can tackle dried paint efficiently and safely. You’ll need several solvent types (mineral spirits, rubbing alcohol, paint thinner), soft cloths, plastic scrapers, and floor-safe cleaning supplies. Use gloves and ventilation. Choose the gentlest solvent first to protect finish.
| Item | Use | Notes |
|---|---|---|
| Mineral spirits | Loosen oil paint | Test first |
| Rubbing alcohol | Remove latex | Gentle |
| Plastic scraper | Lift paint | Nonmarring |
Identify the Paint: Latex vs. Oil
Wondering which paint you’re dealing with? Check paint characteristics: latex feels flexible, water-thins, and often peels; oil feels hard, glossy, and resists water.
For paint identification, scrape a tiny edge—if it softens with rubbing alcohol, it’s likely latex; if not, it’s probably oil.
Knowing this guides your solvent choice and removal approach without damaging the hardwood.
Test Your Floor Finish in a Hidden Spot
Now that you’ve identified the paint type, check your floor’s finish in a hidden spot before applying any solvent or scraper.
For effective floor testing, choose hidden areas like under a cabinet or closet corner.
Apply the cleaner or solvent sparingly, wait, then wipe.
Apply solvent sparingly, wait briefly, then wipe—checking for any finish change before proceeding.
Look for discoloration, softening, or finish removal.
If damage appears, stop and choose a gentler method.
Assess Paint Age and Adhesion Before You Start
Before you start removing paint, check whether it’s fully dry by touching an inconspicuous edge — tacky paint will need more time.
Gently test adhesion with your fingernail or a plastic scraper to see if the paint flakes off or stays put.
Try to identify the paint type (latex, oil, or enamel) since that affects which removers and methods will work best.
Check Paint Dryness
How long has the paint been sitting there, and how firmly is it stuck to the wood?
You’ll check paint drying visually: color change, sheen loss, and surface film.
Older, fully cured spots may need different removal than tacky areas.
Note drying time to protect finish and prioritize wood preservation—avoid aggressive methods on areas that still show flexibility or partial tackiness.
Test Adhesion Gently
If the paint comes away with light pressure, it’s likely still soft and needs gentler treatment; if it resists, you’ll need stronger, more cautious methods.
You should perform adhesion testing by pressing a fingernail or a piece of tape to a small corner.
Proceed with gentle techniques first—soft cloth, warm water, mild soap—and only escalate if the paint proves firmly bonded.
Identify Paint Type
Once you know whether the paint lifts with light pressure, identify what kind of paint you’re dealing with—oil-based, latex/water-based, or enamel—as removal methods differ and some solvents can damage finishes.
Check sheen, flexibility, and smell; fresh latex peels, oil feels rigid.
Match solvent and technique to those paint characteristics to avoid finish harm.
Plan paint removal accordingly.
Soften Dried Paint Without Harming the Wood
Start by softening the paint so you can remove it without gouging or discoloring the wood. You’ll dampen spots with warm, soapy water or a gentle solvent, test first, then lift softened flakes with a plastic scraper. Use careful paint removal techniques to protect finish and follow hardwood care steps:
| Tool | Result |
|---|---|
| Soap | Loosens |
| Solvent | Softens |
| Scraper | Lifts |
| Cloth | Cleans |
Use Heat Safely to Loosen Stubborn Paint
You can use a hair dryer on low to warm the paint until it softens, keeping the nozzle moving to avoid overheating the wood.
For smaller spots, wrap a warm (not hot) cloth around a putty knife or a plastic scraper and press gently to loosen the paint.
Always test a hidden area first and stop if the finish starts to discolor.
Use a Hair Dryer
Aim a hair dryer at stubborn paint to soften it so you can scrape it away more easily.
Use hair dryer techniques: hold it 6–8 inches away, sweep heat back and forth, and avoid lingering. Moderate heat application loosens paint without damaging finish.
Once paint softens, gently lift edges with a plastic scraper. Work slowly, reheat as needed, and ventilate the area.
Warm Cloth Wrap
A warm cloth wrap lets you apply gentle, even heat to loosen dried paint without risking the finish the way high heat can.
You’ll dampen a cloth with warm water, press it over the spot, then gently lift softened paint.
Use warm cloth techniques for safe paint removal benefits.
- Protect surrounding finish
- Time and patience matter
- Avoid scrapers initially
- Repeat as needed
Scrape Paint Flakes Safely (Hand Tools & Technique)
Start by gathering the right hand tools—putty knife, painter’s scraper, and a stiff-bladed chisel—and wear gloves and eye protection before you begin.
Work at a low angle, using gentle pressure to lift flakes without gouging finish. Use short strokes, keep blades sharp, and alternate tools for edges.
Prioritize scraping techniques and tool safety to protect floor and yourself.
Remove Latex (Water-Based) Paint From Hardwood
First check how thick the latex paint is and whether it’s just a thin film or built-up layers.
If it’s thin, you can usually soften and wipe it away with warm water and mild soap; for thicker spots you’ll need gentler scraping or a low-heat gun plus a solvent safe for finished wood.
Take care to test any method in an inconspicuous spot so you don’t damage the floor’s finish.
Assess Paint Thickness
Before you pick up a scraper or solvent, check how thick the latex paint layer is so you can choose the least aggressive removal method that won’t damage the hardwood.
Do a paint thickness assessment and paint adhesion evaluation by inspecting edges, tapping, and testing a tiny area.
Consider:
- Visible buildup
- Edge lifting
- Hard, well-bonded film
- Flaky, weak spots
Safe Removal Methods
Once you’ve judged the paint as latex and not firmly bonded, choose the gentlest method that will lift the film without harming the finish:
start with warm water and mild dish soap, using a soft cloth and plastic scraper.
Try eco-friendly solutions like vinegar-water or baking soda paste.
Test first; if needed, use rubbing alcohol or alternative methods such as citrus-based removers, rinsing and drying thoroughly.
Remove Oil-Based Paint From Hardwood
Tackle oil-based paint carefully, because it bonds to hardwood and can harm the finish if you use the wrong solvent or scrub too hard.
Use gentle paint removal techniques, test in an inconspicuous spot, and respect drying time between steps.
Use gentle paint removal methods, try a discreet test spot first, and allow proper drying time between steps.
Consider:
- Soft razor or plastic scraper
- Mineral spirits applied sparingly
- Clean with mild soap afterward
- Refinish damaged spots promptly
Use Rubbing Alcohol and Acetone Safely on Finishes
Because rubbing alcohol and acetone can dissolve finishes as well as paint, you should use them sparingly, spot-test first, and work from the gentlest option (rubbing alcohol) toward stronger solvents only if needed.
For paint solvent safety, wear gloves, ventilate, and blot—don’t rub.
Check finish compatibility on an inconspicuous spot, proceed slowly, and stop if sheen or color changes.
Use Mineral Spirits and Paint Thinner Without Damage
Pick a solvent that’s safe for your floor—mineral spirits for oil-based paint and a milder paint thinner for finished hardwood.
Test it first in an inconspicuous spot to make sure it won’t dull or strip the finish.
Apply the solvent sparingly with a soft cloth, work gently, and wipe away softened paint right away.
Choose Proper Solvent
Choose a solvent that dissolves the paint without harming your floor’s finish; mineral spirits and paint thinner are often safe for oil-based paints and sealed hardwood when used sparingly.
Focus on solvent selection and solvent effectiveness: pick mild, low-odor options, limit contact time, and ventilate.
- Check compatibility
- Use soft cloths
- Blot, don’t rub
- Dispose safely
Test Inconspicuous Area
Before you apply mineral spirits or paint thinner broadly, test them in an inconspicuous spot—like inside a closet or under a cabinet—to make sure the solvent won’t dull, discolor, or strip your finish.
Dampen a cotton swab, apply to the test surface, wait several minutes, then wipe.
Evaluate finish for sheen change, color shift, or softened varnish before proceeding.
Apply Gently And Wipe
Now that you’ve confirmed the solvent won’t harm the finish, moisten a clean, lint-free cloth or cotton ball with mineral spirits or paint thinner—don’t soak it—and gently rub the paint spot in the direction of the wood grain.
Use gentle pressure and a light circular motion; stop if finish dulls.
- Work small areas
- Wipe residue promptly
- Rinse with mild soap
- Dry thoroughly
When a Commercial Paint Remover Is Appropriate
If the paint won’t budge with gentle scraping, soapy water, or a heat gun, it’s time to contemplate a commercial paint remover.
You should weigh paint remover types—gel, solvent, or eco-friendly—against environmental considerations and your floor finish.
Test a small hidden spot, follow label instructions, ventilate well, wear gloves and eye protection, and remove residue promptly to avoid finish damage.
Protect Finish Edges and Nearby Trim During Cleanup
When you’re removing dried paint, shield the floor finish and trim edges so solvents, scrapers, or heat won’t cause chips, discoloration, or softened sealant.
Use edge protection and trim safeguarding to limit damage. Follow these steps:
- Apply painter’s tape along baseboards and seams
- Lay rosin paper or cardboard over nearby flooring
- Cover trim with plastic sheeting
- Work from center outward, checking seals
Removing Paint From Unfinished or Waxed Floors
Because unfinished and waxed floors lack a durable sealed surface, you’ll need to use gentler, oil-based methods and minimal abrasion to lift dried paint without harming the wood or wax coating. Use mineral spirits sparingly, test first, then reapply fresh wax application. Gently scrape with a plastic blade, buff, and re-wax as needed.
| Step | Tool | Note |
|---|---|---|
| 1 | Mineral spirits | Test |
| 2 | Plastic scraper | Gentle |
| 3 | Soft cloth | Re-wax |
Clean Paint From Gaps and Between Floorboards
Once you’ve lifted surface paint and cared for unfinished or waxed boards, you’ll likely find stubborn paint settled in gaps and along tongue-and-groove seams that won’t come off with a cloth or scraper.
Use precision tools and gentle solvents, following paint removal techniques and floorboard care to avoid damage.
- Nail or utility pick
- Soft-bristled brush
- Cotton swabs with solvent
- Vacuum debris
Fix Small Scratches and Minor Finish Loss
Start by evaluating how deep the scratches are so you know if you need a simple touch-up or light sanding.
Pick a finish that matches your floor’s sheen and color to keep the repair invisible.
Finally, blend the product into surrounding finish and buff gently until it looks seamless.
Assess Scratch Depth
Before you repair anything, check how deep the scratches go so you pick the right fix.
Do a quick scratch evaluation with good light and a fingernail test. Use a ruler for depth measurement if unsure.
Then decide whether touch-up, buffing, or light sanding is needed.
- Surface only: cosmetic
- Slight finish breach
- Through finish into wood
- Deep gouge: structural
Choose Matching Finish
Choose a finish that matches the existing sheen and color so your repair blends in rather than stands out.
You’ll inspect the area, test small swatches, and confirm color matching under natural light.
Pick a product with proven finish compatibility—waterbased to waterbased, oil to oil—to avoid adhesion or sheen problems.
Apply sparingly to rebuild lost finish without overcoating adjacent areas.
Blend And Buff Gently
Lightly buff the repaired spot with a soft cloth or a fine-grade synthetic pad to blend the new finish into the old without removing more finish than necessary.
Use careful paint blending techniques and gentle buffing methods to hide scratches.
Follow these steps for best results:
- Work small areas
- Use light pressure
- Check progress frequently
- Finish with compatible polish
Sand and Refinish a Spot After Paint Removal
Start by cleaning the area thoroughly so you can see the bare wood and any remaining imperfections; you’ll need a smooth, dust-free surface before sanding.
Choose appropriate sanding techniques—start with fine-grit, progress lightly, and feather edges to blend without gouging.
Vacuum and tack cloth, then pick refinishing options (polyurethane or oil-based) and apply thin, even coats, sanding lightly between layers.
Match Stain and Sheen for a Seamless Repair
Once the surface is clean and sanded, match both the stain color and the sheen to make the repair invisible; you’ll need to test stains on scrap wood or an inconspicuous spot to find the right tone and absorption.
Then focus on color matching and sheen blending so the patch disappears.
Consider these steps:
- Compare stains under natural light
- Thin coats for control
- Match finish level
- Blend edges carefully
Handle Large Splatters After Renovation Projects
Tackle large splatters by removing as much dried paint as you can mechanically before using solvents or abrasives; that reduces damage to the wood and cuts down on messy cleanup.
Use a plastic scraper, hairdryer to soften spots, then gentle sanding if needed.
For stubborn areas, apply minimal solvent and blot.
These splatters removal renovation tips help restore finish without overworking the floor.
Prevent Paint Spills on Hardwood During Projects
After you’ve removed large splatters, preventing future spills saves time and keeps your hardwood looking great.
Use paint prevention tips during project planning so you’ll avoid messes. Be deliberate and steady, and follow these quick rules:
- Clear traffic paths before you work
- Keep lids on cans between uses
- Use smaller containers for touchups
- Work from clean to dirty areas
Set Up Temporary Floor Protection for Painting
Before you start painting, lay down durable drop cloths that won’t tear or slip.
Tape the edges with painter’s tape to keep the cloths in place and seal gaps along baseboards.
Focus extra protection on high-traffic paths and around furniture to prevent tracked-on spills.
Choose Durable Drop Cloths
When you’re prepping to paint, choosing durable drop cloths is one of the smartest moves you can make to protect hardwood floors from spills, drips, and grit.
You want durable materials for long-term use and reliable paint prevention. Consider options:
- Canvas: reusable, heavy-duty
- Plastic: waterproof, disposable
- Felt: cushioned, slip-resistant
- Paper: cheap, single-use
Secure With Painter’s Tape
Now that you’ve chosen the right drop cloths, tape them down to keep edges from curling and paint from sneaking underneath.
Press painter’s tape application firmly along baseboards and seams, smoothing to prevent gaps. Overlap minimally and avoid wrapping onto finished flooring.
After paint dries, follow gentle tape removal tips: pull slowly at a 45° angle and heat stubborn adhesive slightly with a hairdryer.
Protect High-Traffic Areas
If you’re painting in rooms people still need to use, set up temporary floor protection along clear paths to keep traffic from tracking paint onto your hardwood.
You’ll limit cleanup and prevent stains by creating defined routes and barriers. Use durable, non-slip materials and visible traffic barriers so people comply.
- Heavy kraft paper
- Adhesive floor protection film
- Drop cloth runners
- Temporary traffic barriers
When to Call a Pro for Paint-Damage Repair
Because minor drips and smudges are often manageable with household tools, call a pro when the paint covers large areas, has soaked into the wood, or removal risks stripping the finish. You’ll want a professional assessment for significant paint damage or suspected finish compromise. Consider these triggers:
| Issue | Action |
|---|---|
| Large area coverage | Call pro |
| Soaked into wood | Call pro |
| Finish at risk | Call pro |
Typical Time and Cost Estimates for Cleanup and Repair
When paint is confined to small drips or smudges, you can usually clean it up in 30–90 minutes using household tools.
Larger jobs or those that require sanding, re-staining, or finish replacement can take several hours to a couple of days.
Plan cleanup duration and a quick cost analysis:
- DIY: low cost, short time
- Small pro job: moderate fee
- Extensive sanding: higher cost
- Finish replacement: longest, priciest
Common Mistakes That Damage Hardwood (And How to Avoid Them)
Don’t reach for the strongest solvent or start scraping with a metal blade — those quick fixes often do far more harm than good.
You’ll cause scratching floors, strip finishes, or create moisture damage by soaking with water-based cleaners.
Don’t sand aggressively or ignore manufacturer instructions.
Use gentle solvents, plastic scrapers, test spots, and blot rather than rub to protect finish and wood integrity.
Maintain Hardwood After Paint Removal for Lasting Results
After you’ve removed paint, keep your hardwood looking its best by following a simple maintenance routine that protects the finish and prevents future buildup.
Use these floor maintenance tips to extend life and appearance:
- Sweep daily to avoid grit scratching
- Mop with pH-neutral cleaner sparingly
- Reapply protective finishes as recommended
- Use felt pads and rugs in high-traffic zones
Frequently Asked Questions
Can I Use a Hairdryer Instead of a Heat Gun on Old Paint?
Yes—you can use a hairdryer instead of a heat gun for old paint, but hairdryer safety matters: it’s slower and less hot, so it’s a viable heat gun alternative for delicate surfaces though it requires more patience and caution.
Will Vinegar Remove Water-Based Paint Without Harming Finish?
Yes, you can try vinegar: vinegar effectiveness varies, vinegar effectiveness depends on paint age and finish. You’ll loosen water-based paint with mild vinegar, test a hidden spot first, and won’t typically harm a sealed hardwood finish.
How Long Should I Wait After Using Mineral Spirits Before Refinishing?
You should wait at least 24–48 hours after using mineral spirits before refinishing so solvents fully evaporate and you reduce finish adhesion issues; follow paint removal techniques and mineral spirits safety, and guarantee good ventilation and tack-free surface.
Can Pets or Children Safely Be in the Room During Paint Removal?
Yes — but you shouldn’t. You’ll keep pets and kids out during strong solvent use, guarantee ventilation, wear PPE, and only allow supervised reentry for short periods once fumes clear. Prioritize paint safety and child supervision.
Are Citrus-Based Cleaners Effective on Dried Paint Stuck to Wood?
Yes, they can work: citrus cleaner effectiveness varies by paint type, drying time, and finish; they’re a mild, natural paint remover option, but you’ll need patience, testing, and gentle scraping to avoid wood damage.
Conclusion
You’ve got this—remove dried paint carefully, step by step, and don’t rush. Test a hidden spot, match your approach to latex or oil, and use the gentlest effective tools so you don’t scuff the finish. If paint won’t budge or the floor’s damaged, call a pro. Think of your hardwood like a favorite book: treat it gently and it’ll keep telling its story. Maintain and clean regularly to protect your investment.