How to Paint a Border on a Wall for Clean Decorative Edges
You can get a sharp decorative border by measuring and marking your guide lines, prepping and priming the wall, and choosing a contrasting color and appropriate finish. Use high‑quality painter’s tape on textured surfaces or a small angled sash brush for freehand cuts on smooth walls, seal tape edges with base color, then apply thin coats and feather with a roller or small brush. Remove tape at a 45° angle for crisp lines, and keep going to learn pro tips and fixes.
Who Should Tackle a DIY Painted Wall Border
Who should tackle a DIY painted wall border? You, if DIY beginners appeal to your project motivation and you’ve reviewed design inspiration.
Match wall styles and border types to room themes, set clear aesthetic goals, and do an honest skill assessment before starting.
If you’re comfortable with patience and steady hands, this project fits—otherwise, consider help or practice first.
Quick Step‑By‑Step Overview and Project Time
Start by measuring and prepping the wall carefully so your border lines stay straight and the surface is clean.
Then apply paint in even coats, letting each layer dry before adding details or a second color.
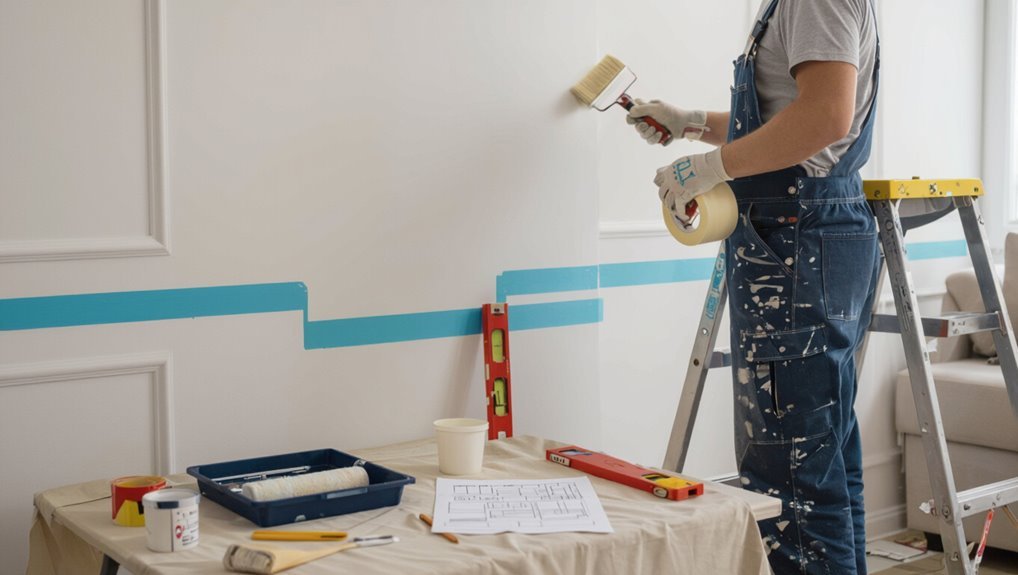
Prep And Measure
Before you pick up a brush, clear the wall area, remove outlet covers, and clean any dust or grease so tape and paint will adhere properly.
For proper wall preparation, patch holes, sand uneven spots, and prime if needed.
Use precise measuring techniques: mark level guide lines with a laser or chalk line, measure border width consistently, and double‑check before taping.
Paint And Finish
Once your tape’s down and the wall’s prepped, you’ll paint the border in a few straightforward passes: load a quality angled brush for crisp edges, cut in along the tape with smooth, even strokes, then fill the center with a roller for consistent coverage.
Let the first coat dry, assess color selection and apply a second coat if needed, then remove tape and choose a durable paint finish.
Tools & Supplies for Painted Borders
A few essential tools and the right supplies will make painting a clean, professional-looking border much easier. You’ll need quality brushes, masking tape, a level, and drop cloths suited to your chosen border styles and paint finishes. Gather angled sash brushes, a steadying edger, and sample cards to test sheen and contrast before you start.
| Tool | Purpose | Tip |
|---|---|---|
| Angled brush | Cutting edges | Use small sizes |
| Painter’s tape | Straight lines | Press edges firmly |
| Edger tool | Speed | Keep steady |
| Drop cloth | Protect floor | Use canvas |
| Samples | Match finish | Test sheen |
Choosing Paint Color and Finish for Borders
When you pick a border color and finish, think about contrast, room mood, and wear: choose a hue that either frames the space or subtly blends with the main wall.
Match the finish to the border’s function—eggshell or satin for low-sheen elegance in living areas, semi-gloss for trims that need cleaning, and matte for understated, low-reflective effects.
Use color psychology to set tone and prioritize finish durability.
Brushes, Rollers, and Edging Tools That Give Crisp Lines
You’ll want the right brush—angled sash or a high-quality synthetic—for clean, controlled strokes along the border.
Choose roller nap and width to match the wall texture and the border’s width so you don’t overload or miss spots.
Consider edging tools or trim guides to speed the job and keep lines straight without smudging.
Best Brush Types
Because crisp lines start with the right tools, choosing brushes, rollers, and edging gadgets matters more than technique alone.
For borders, pick angled sash brushes for control and synthetic filaments for latex. Use a small trim brush for tight corners.
Do a quick brush comparison before buying and follow brush maintenance—clean, reshape, and store bristles—to keep edges sharp and consistent.
Roller Sizes Matter
Pick the right roller diameter and nap length to control paint flow and edge definition—smaller rollers (2–4 inches) let you work close to trim and maintain a steady line, while wider rollers speed coverage but risk bleeding over borders.
Use appropriate roller types and roller fabric for surface texture.
- Short nap: smooth walls
- Medium nap: slight texture
- Long nap: rough surfaces
Edging Tool Options
Now that you’ve matched roller size and nap to your wall, it’s time to choose the edging tool that will give you the sharpest line.
Pick among edging tool types—angled sash brushes for control, trim rollers for speed, or foam edgers for crispness.
Test edging tool brands for comfort, durability, and paint pickup so you get straight, clean borders with minimal touch-ups.
When to Use Painter’s Tape vs. Freehand Cutting‑In
When you’re aiming for crisp, consistent edges on a border, decide whether tape or freehand cutting-in will give you the best control for the specific wall, paint type, and your skill level.
- Use tape when tape durability matters on textured or multiple coats.
- Choose freehand for smooth walls if your cutting techniques are steady.
- Blend methods for tricky corners.
Where to Place Your Border: Height and Proportion Tips
Place your border at eye level to create a natural focal band that draws attention without overwhelming the room.
Use simple proportional rules—like dividing the wall into thirds or aligning the band with chair-rail height—to keep the scale balanced.
If the ceiling’s low, position the band lower; for tall walls, raise it slightly so the proportions feel harmonious.
Eye-Level Focal Band
A midline band at eye level draws attention and keeps the room feeling balanced, so measure from the floor to the average eye height—about 57 to 60 inches—and use that as your starting guide.
Use eye level aesthetics and experiment with border variations to suit style.
- Pick width for visibility
- Align with furniture sightlines
- Test color contrast briefly
Proportional Height Rules
If you liked centering a band at eye level, use proportional height rules to make that band feel right in the room: measure wall thirds, lower for cozy spaces, higher for grandeur. Apply proportional heights to keep visual balance.
| Low | Mid | High |
|---|---|---|
| Cozy | Balanced | Airy |
| Intimate | Stable | Dramatic |
Planning Stripe Widths and Proportions
Decide how bold you want the border to read before you pick exact widths: wider stripes feel graphic and modern, while narrow stripes read delicate and traditional.
Use stripe design ideas and visual balance tips to guide choices. Consider:
Use stripe design ideas and balance tips to guide choices—consider proportion, contrast, and repeat rhythm for cohesion.
- Proportion to wall height.
- Contrast between colors.
- Repeat pattern rhythm for cohesion and scale.
Marking Straight Lines With a Laser or Chalk Line
When you’re ready to transfer your stripe layout to the wall, use a laser level or chalk line to establish crisp, consistent guides that keep every band true and parallel.
You’ll employ laser alignment techniques to project long, straight references and rely on chalk line accuracy for quick snapping across corners.
Mark lightly at eye level, double-check intersections, and snap or trace continuous lines before taping.
Fast Ways to Mark Level, Even Lines
After snapping your guides, move quickly to mark level, even lines so taping and painting go smoothly.
Use fast, reliable leveling techniques and clean line marking to save time and reduce errors.
Try these methods:
- Laser level sweep for continuous, precise reference.
- Chalk line snap for quick straight edges.
- Pencil and ruler touch-ups at corners and breaks.
Preparing the Wall: Cleaning, Sanding, and Repairs
Before you tape or prime, clean, sand, and repair the wall so paint adheres and the border looks sharp.
Inspect wall condition for dirt, grease, holes, and loose paint. Wash with mild detergent, fill dents with spackle, and sand patched areas flush.
Smooth rough surface texture lightly so tape sticks and edges stay crisp; remove dust before painting.
When to Prime the Border Area (And When to Skip)
Check the wall for stains, repairs, or uneven patches, because you’ll want to prime any area that won’t accept paint evenly.
Match your primer to the paint type—latex over latex is usually fine, but switch to a bonding primer for glossy or problem surfaces.
If you’re short on time or money and the surface is clean and similar to the existing finish, you can often skip priming for a narrow border.
Surface Condition Check
A quick inspection of the wall will tell you whether the border area needs primer: Check wall texture and surface moisture, then decide.
- Patch cracks or gouges; sand smooth.
- Guarantee dry surface; high surface moisture means wait or fix.
- Remove dirt, grease, and loose paint.
If the surface is uniform and clean, you can often skip primer; otherwise, prime first.
Paint Type Match
When your border will sit next to an existing coat, match the paint type—latex to latex, oil to oil—to prevent adhesion and finish issues; if you’re switching from oil to latex (or vice versa), plan to prime the border area to confirm proper bonding and consistent sheen.
Check paint sheen comparison and test a small patch. Priming verifies the border finish matches and lasts.
Time And Cost Tradeoff
If you’re on a tight schedule or budget, skip priming small, non-porous areas—latex over latex on smooth, previously painted walls usually bonds fine—but prime whenever you’re covering bare drywall, rough patches, stains, or switching paint types to guarantee adhesion and a consistent finish.
Do a Value analysis and simple Cost breakdown before deciding.
- Prime for bare or stained surfaces.
- Skip for smooth, matching paint.
- Factor time vs. longevity.
Masking Techniques for Flawless Straight Edges
Although precise cutting takes practice, masking is the single most effective way to get crisp, straight borders without endless touch-ups.
Use high-quality painter’s tape, press edges firmly, and mask edges beyond the border for protection.
Seal tape edges with a thin swipe of base color to prevent paint bleed, then apply your border color in thin coats.
Remove tape at a 45° angle.
Tape Tricks to Prevent Paint Bleed
Masking sets the stage, but preventing paint bleed comes down to a few smart tape tricks you can use before and during painting.
Use correct tape types and careful tape application to get crisp lines.
Choose the right tape and apply it carefully for consistently crisp paint lines every time.
- Press tape edges firmly with a plastic card.
- Seal with a thin coat of base color.
- Remove tape at 45° while paint’s tacky.
Cutting In by Hand: Steady‑Hand Brush Techniques
Before you start cutting in, prep your edges by cleaning dust, sanding rough spots, and sealing gaps so the brush can glide smoothly.
Pick a high‑quality angled sash brush that fits the border width and holds paint without dripping.
Keep your wrist steady and use slow, controlled strokes from the wall toward the tape line for a crisp edge.
Prep Your Edges
When you cut in by hand, steady‑hand brushwork is what keeps your border crisp and paint lines clean.
So take a breath, steady your wrist, and work deliberately in short, controlled strokes.
Prep edges by cleaning, sanding, and taping to honor color contrast and design inspiration.
- Clean surface
- Light sand
- Low‑tack tape
Choose The Right Brush
Brush choice matters: pick a sash or angular trim brush with a comfortable handle and high‑quality synthetic bristles so you can cut a clean line without fighting the tool.
Match brush sizes to border width—narrow for fine edges, wider for broader bands.
Consider bristle types: firmer synthetic for latex, softer for smooth finishes.
Change brushes when they fray to maintain crisp lines.
Steady Wrist Techniques
Steady your wrist and move deliberately along the edge to cut a clean line—keep your elbow anchored to your side and guide the brush with smooth, confident strokes rather than jerky motions.
- Rest your forearm for a steady hand.
- Use short strokes for precision control.
- Replenish paint sparingly to avoid drips.
Practice until your edges look intentional and crisp.
Using an Edger Tool or Guide Rail for Consistency
Because a steady hand can slip, use an edger tool or guide rail to keep your border straight and uniform from corner to corner. You’ll follow simple edger techniques, clamp a guide rail, and move steadily. Practice on scrap, adjust pressure, and inspect alignment frequently.
| Tool | Tip | Result |
|---|---|---|
| Edger | Light pressure | Clean line |
| Rail | Secure clamp | Even edge |
| Tape | Remove warm | Crisp finish |
Rolling, Feathering, and Avoiding Lap Marks
Now that your border’s straight, it’s time to work the main field with a roller and blend the edges so lap marks don’t show.
Use precise rolling techniques and gentle feathering methods to unify finish.
Employ precise rolling and gentle feathering to seamlessly unify the finish for a smooth, lap-free surface.
- Start with a loaded roller and work in W motions.
- Overlap wet edges by 50%.
- Lightly drag the roller outward to feather seams.
Painting Multi‑Color or Patterned Borders Step‑By‑Step
Start by planning your design so you know the colors, repeat pattern, and measurements you’ll need.
Prepare the surface by cleaning, repairing, and priming any areas that will get paint.
Mask carefully and paint each color in order, removing tape at the right time to keep crisp edges.
Plan Your Design
1 clear plan saves time and keeps your border looking sharp: decide the pattern, colors, and exact placement before you touch a brush.
Use design inspiration and color psychology to choose hues that fit the room.
Sketch full‑scale or tape mockups, then finalize measurements.
- pattern choice
- color palette
- placement & repeats
Prepare The Surface
Before you paint, make sure the wall is clean, smooth, and dry so your colors lay down evenly and the edges stay crisp.
Do a thorough wall inspection for bumps, cracks, or peeling. Sand rough spots, fill holes with spackle, then sand again.
Follow surface cleaning with a tack cloth to remove dust. Let everything fully dry before proceeding.
Mask And Paint Carefully
Tape the layout carefully and you’ll save time fixing bleed or uneven lines later.
Use proper masking techniques and a sharp blade for crisp edges.
For precision painting, follow these steps:
- Press tape edges firmly, seal with base color.
- Apply thin coats, let dry between layers.
- Remove tape slowly at a 45° angle for clean lines.
Timing: Drying Between Coats and Tape Removal
When you let each coat dry fully, you’ll get crisp edges and avoid tugging up paint when you remove the tape; drying times vary by paint type, humidity, and layer thickness, so always check the manufacturer’s recommended wait before applying another coat or peeling the tape.
You should remove tape at a slight angle while paint is just set, not wet, and follow proper tape techniques.
Touch‑Ups for Smears, Ragged Lines, and Imperfections
Fix smears and ragged lines by tackling them promptly with the right tools and a steady hand.
Use careful smear removal techniques and precise line correction methods to restore crisp edges.
Follow this quick routine:
- Lightly sand or dampen spots.
- Feather paint with a small brush.
- Repaint thinly, let cure, then inspect and touch again.
Common Border Mistakes: And How to Fix Them
Although you’ll probably get a clean line most of the time, some mistakes keep cropping up—bleeding, jagged edges, wavy lines, and uneven paint buildup are the usual culprits. You’ll identify common border mistakes, apply quick correction techniques, and salvage edges with light sanding, touch-up brushes, and fresh tape.
| Problem | Cause | Fix |
|---|---|---|
| Bleed | Poor tape seal | Seal, repaint |
| Jagged | Wrong brush | Switch, steady |
| Buildup | Excess paint | Feather, thin |
Adapting Methods for Textured, Plaster, or Drywall Walls
When you’re working with textured, plaster, or drywall surfaces, prepping those uneven areas is the first step—fill cracks, sand high spots, and prime where needed so paint adheres smoothly.
Pick tape designed for rough surfaces or use a flexible painter’s tape that seals against creases to keep crisp lines.
Test a small section first to confirm the tape sticks and the texture won’t bleed under the border.
Prepping Uneven Surfaces
If your wall is textured, plastered, or drywall with imperfections, you’ll want to tailor your prep so the border lays flat and looks sharp; that means cleaning, sanding high spots, filling gaps, and deciding whether to skim or prime based on the surface.
Use focused surface preparation for uneven textures, then:
- Clean and sand.
- Fill and smooth.
- Prime or skim coat.
Choosing Appropriate Tape
Now that the surface is clean, smooth, and primed or skim-coated, pick tape that’ll stick and conform to your wall type so the border stays sharp.
For textured plaster use a flexible, high-adhesion painter’s tape; for drywall choose medium-adhesion, low-residue tape.
Compare tape types and tape brands for edge fidelity, UV resistance, and removal window.
Test a small strip before committing.
Handling Corners, Trim, and Paint Near Outlets
Because corners, trim, and outlets demand careful attention, you’ll want to plan each step before you load the brush or roller.
Use precise corner techniques and follow outlet precautions to prevent smudges or damage.
- Score and tape corners for crisp lines.
- Paint trim with a sash brush, feathering edges.
- Remove outlet covers, mask sockets, and touch up carefully.
Maintaining and Refreshing Painted Borders Over Time
When you want your painted border to keep looking sharp, set a simple maintenance schedule and address wear as soon as you spot it.
Inspect quarterly for chips, scuffs, or dirt. Clean gently, touch up edges with matching paint, and feather new strokes into old for seamless color refresh.
Keep small tools handy for quick border maintenance between full repaints.
Budget‑Friendly Materials and Pro Shortcuts
Stretch your budget further by choosing smart materials and pro shortcuts that cut time without cutting quality.
You’ll get clean edges using budget friendly options and pro painting tips. Follow these essentials:
- Use quality tape and angled brush for control.
- Thin paints for smoother coats and fewer touch-ups.
- Reuse rollers and trays with proper cleaning to save money.
Project Checklist and Estimated Time for Each Step
Start by gathering everything you need so you won’t stop mid-task: tape, angled brush, roller, drop cloths, paint, primer, a level or laser, pencil, putty knife and caulk, sandpaper, rags, a tray, and gloves.
Then follow a concise project timeline with task prioritization: prep (1–2 hrs), priming (30–60 mins), taping/layout (30 mins), painting borders (1–2 hrs), touchups and cleanup (30–45 mins).
Frequently Asked Questions
Can I Use Wallpaper Instead of Painting a Border for the Same Look?
Yes — you can use wallpaper instead of painting a border for a similar effect. You’ll explore wallpaper options, match border designs to your room, and enjoy quicker application, but be mindful of seams and pattern alignment for best results.
How Do I Pick a Border Style That Matches Existing Decor or Furniture?
Measure twice, cut once: you’ll match a border by sampling color schemes and noting furniture styles, picking hues that echo upholstery or wood tones, balancing scale and pattern, and testing swatches in natural and artificial light.
Are There Eco‑Friendly or Low‑Voc Paint Brands That Work Well for Borders?
Yes — you can choose sustainable options like low‑VOC and zero‑VOC paints from reputable brands; you’ll get strong paint quality and durability while reducing toxins, so your borders look great and stay eco‑friendly long term.
Can I Paint a Border on Exterior Walls or in High‑Humidity Bathrooms?
Yes — you can paint a border on exterior walls and in high‑humidity bathrooms, but you’ll want paints rated for exterior durability and humidity resistance, use proper primers, sealants, and mold‑resistant coatings to guarantee lasting results.
What Are Legal or Building Code Concerns for Painted Borders in Rental Properties?
You should check lease agreements and tenant rights first, since landlords can restrict alterations; get written permission for painted borders, follow local building codes, avoid hazardous materials, and document approvals to prevent disputes.
Conclusion
You’ve learned the brushstrokes and patience that turn a plain wall into a frame for your life’s moments. Like tightening a picture’s mat, a crisp painted border refines the room and sharpens your eye for detail. Tackle it yourself, and each clean line will feel like a small victory—proof that careful hands and simple tools can shape comfort and beauty. Keep practicing; your walls will keep telling your story.